1
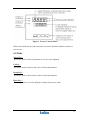
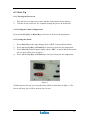
Ultra Low Temperature
Small Chest Freezer
User Manual
1
Note:
1. No part of this manual maybe reproduced in any form without the expressed
written permission of Kaltis.
2. The contents of this manual are subject to change without notice.
3. Please contact Kaltis if any point in this is unclear or if there are any inaccuracies.
2
1. Safety Precautions
It is imperative that users comply with this manual as it contains important
safety advice.
Items and procedures are described so that you can use this product correctly and
safely. If the precautions advised are followed, it will prevent possible injury to users
and other people.
Precautions are illustrated in the following way:
WARNING
Failure to observe WANRING signs could result in a hazard to personnel
possibly resulting in serious injury or death.
CAUTION
Failure to observe CAUTION signs could result in injury to personnel and
damage to this product and property.
Be sure to keep this manual in a place accessible to users of this product.
< Label on the unit >
The mark is labeled on the cover in which the electrical
components of high voltage are enclosed to prevent the
electric shock.
The cover should be removed by a qualified engineer or
a service personnel only.
3
WARNING
l
Use this product only in the way described in the product literature and
in its manual. Before using it, verify that this product is suitable for
intended use.
l
Do not modify system components. Before use, confirm that the product
has not been altered in any way.
l
Your unit must be properly grounded in conformity with national or
local electrical codes. Never connect the unit to overloaded power sources.
Do not use the unit outdoors. Current leakage or electric shock may result
if the unit is exposed to rain water.
l
l
Only qualified engineers or service personnel shall install the unit. The
installation by unqualified personnel may cause electric shock or fire.
l
Install the unit on a sturdy floor. If the floor is not strong enough or the
installation site is not adequate, this may result in injury from the unit
falling or tipping over.
l
Never install the unit in a humid place or a place where is likely to be
splashed by water. Deterioration of insulation may result which could
cause current leakage or electric shock.
l
Never install the unit in a flammable or volatile location. This may cause
explosion or fire.
l
Never install the unit where acid or corrosive gases are present as
current leakage or electric shock may result due to corrosion.
l
Never store volatile or flammable substances in this unit. This may cause
explosion or fire.
l
Never store corrosive substances in this unit. This may lead to damage to
the inner components or electric parts.
l
Disconnect the power source to the unit prior to any repair or
maintenances of the unit in order to prevent electric shock or injury.
Make sure not to inhale or consume medication or aerosols from around
the unit at the time of maintenance. This may harmful to your health.
l
l
Never slash water directly to the unit. This may cause electric shock or
short circuit.
l
Never disassemble, repair, or modify the unit yourself. Any such work
carried out by an unqualified personnel may cause fire or injury due to
malfunction.
4
CAUTION
l
Connect the unit to a power source as printed on the dataplate located
on the lower right side of the unit. Use of any other voltage or frequency
other than that on the rating label may cause fire or electric shock.
l
When removing the plug from the power supply outlet, grip the power
supply plug, not the cord. Pulling the cord may result in electric shock or
fire by short circuit.
l
Never damage or break the power supply plug or cord. Do not use the
power supply plug if its cord is loose. This may cause fire or electric shock.
l
Do not touch any electrical parts such as the power supply plug or any
switches with a wet hand. This may cause electric shock.
l
Put on dry gloves when you take out refrigerated articles from the
freezer. Handing frozen contents or the inside walls with naked hand may
cause frostbite.
l
Do not defrost inside walls with a knife or ice pick. There are pipelines
for cooling behind the walls. Be careful not to damage the lines as this
could cause breakdown. Also, do not make a hole in the wall for
installation of attachments.
Check the filter mentioned in this manual and clean it as necessary. A dusty
filter may cause temperature rise or failure.
l
l
Disconnect the power supply plug before moving the unit. Take care not
to damage the cord. A damaged cord may cause electric shock or fire.
l
Be careful net to tip over the unit during movement to prevent damage or
injury.
l
Disconnect the power plug when the unit is not used for a long time.
5
2. Caution For Usage
1.
2.
3.
4.
Do not defrost inside walls with a knife or ice pick. There are pipelines
for cooling behind the walls. Be careful not to damage the lines as this
could cause breakdown. Also, do not make a hole in the wall for
installation of attachments.
Frost will accumulate on the inside walls of the freezer during use.
Overfrosting may fix the inside doors shut. Then remove the frost with
the spatula or a similar tool. Or wipe off the frost with a dry and clean
cloth.
An access port to take out the measuring cable in the case is provided
on the back wall of the freezer. Be sure to replace the cap and heat
insulator after take out cable or, the inside temperature cannot
complete down, and frost may accumulate outside the port
surroundings.
In the case of high ambient temperature, the cabinet front may heat up
after the freezer starts to operate first. However, this does not denote a
malfunction. It is due to heater or hot gas piped around the unit frame
to prevent frost or ice sticking around the cabinet.
6
3. General Recommendations
The refrigeration system is designed to maintain ultra-low temperatures with safety in
a +32oC ambient environments, only when the freezer is used for storage.
CAUTION!
This unit is not a “rapid-freeze” device. Freezing large quantities or liquid, or
high-water content items, will temporarily increase the chamber temperature
and will cause the compressors to operate for a prolonged time period.
Attempting to utilize the freezer improperly may jeopardize safety or cause
undue stress or damage to the refrigeration compressors.
Avoid opening the door for extended time periods since chamber temperature air will
escape rapidly. Room air, which is higher in humidity, replacing chamber air may
cause frost to develop in the chamber rapidly.
3.1 Environmental Conditions
This equipment is designed to safe at least under the following conditions:
1. Indoor use;
2. Ambient temperature 15 to 32oC;
3.
Main supply voltage fluctuation not to exceed +10%, -10% of normal voltage.
3.2 Initial Loading
When loading the unit with “pre-frozen” materials, the operating temperature setpoint
of the freezer should be set no lower than the temperature of the “pre-frozen” material.
Allow the unit to operate the setpoint for eight hours. The setpoint may than be
lowered in increments no greater than 10oC. Allow a stabilizing period of eight hours
for each ten degree adjustment, until the desired setpoint is achieved.
CAUTION!
Failure to follow these procedures or overloading the unit may cause undue
stress on the compressors or jeopardize user product safety.
7
4. Pre-Installation
At delivery, examine the exterior for physical damage while the carrier’s
representative is present. If exterior damage is present, carefully unpack and inspect
the unit and all accessories for damage.
CAUTION!
Do not discard the sublids from chest-style units. The sublids are
necessary to maintain correct temperature, moisture control, and economy of
operation.
8
5. Installation
Do not exceed the electric and temperature ratings printed on the dataplate located on
the lower right back side of the unit.
CAUTION!
Improper operation of the equipment could result in dangerous conditions.
To preclude hazard and minimize risk, follow all instructions and operate
within the design limits noted on the dataplate.
5.1 Location
Install the unit in a level area free from vibration with a minimum of fifteen
centimeters of space on the sides, rear, and top. Refer to Section 5.3 for further
instructions on leveling cabinets. Allow enough clearance so that door or lid can
swing open at least 90 degrees.
Do not position the equipment in direct sunlight or near heating diffusers, radiators, or
other sources of heat. The ambient temperature range at the location must be 15 to
32oC.
WARNING!
Install the unit on a sturdy floor. If the floor is not strong enough or
the installation site is not adequate, this may result in injury from the
unit falling or tipping over.
WARNING!
Never install the unit in a flammable or volatile location. This may
cause fire or explosion.
Never install the unit where acid or corrosive gases are present as
current leakage or electric shock may result due to corrosion.
WARNING!
Do not use outdoor. Current leakage or electric shock may result if the
unit is exposed to rain water.
Never install the unit in a humid place or a place where is likely to be
splashed by water. Deterioration of the insulation may result which
9
could cause current leakage or electric shock.
CAUTION!
To allow for proper air flow, a minimum of fifteen centimeter of clearance
space is required behind the freezer.
5.2 Wiring
CAUTION!
Connect the equipment to the correct power source. Incorrect voltage can
result in severe damage to the equipment.
CAUTION!
For personal safety and trouble-free operation, the unit must be properly
grounded before it is used. Failure to ground the equipment may cause
personal injury or damage to the equipment. If the power supply outlet is not
grounded, it is necessary to install a ground from the ground screw located
on the lower right back side of the unit by qualified engineers.
Always connect the freezer to a dedicated (separate) circuit. Each freezer is equipped
with a service cord and plug designed to connect it to a power outlet which it delivers
the correct voltage. Supply voltage must within +10%, -10% of the freezer rated
voltage.
CAUTION!
Never cut the grounding prong from the service cord plug. If the prong is
removed, the freezer would not be properly grounded.
5.3 Leveling
The unit must be level both front to back and side to side.
To level chest models, leave the casters in place and shim the low wheel(s) with strips
of sheet metal cut wider than the caster.
Upright models have adjustable leveling feet which are located adjacent to the front
casters. Extend the leveling feet by rotating them counterclockwise to contact them to
the floor. Ensure the unit is level.
10
5.4 Door Operation (Upright Models)
5.4.1 Opening the Door
1.
2.
3.
Remove the padlock if you have one.
Grasp the latch handle (preferably with your left hand) and pull it toward to
yourself until the latch disengages from the track.
Keep pulling by the latch handle or the integrated handle to open the main door.
5.4.2 Closing the Door
Note that the latch does not self-engaged automatically when you close the door. You
must push the latch into the open position first.
1.
2.
Grasp the latch handle (preferably with your left hand) and pull it toward
yourself, rotating the latch into the open position.
Move the freezer door into the closing position and gently push the handle away
from you, making sure that the latch engages fully with the track.
CAUTION!
Closing the door without making sure the latch engages fully with the track
can result in substantial prying forces on the door.
11
6. Operation
6.1 freezer Control Panel Feature
Figure 1
Figure 2
Open the door in figure 1. you can find three pads in figure.
12
Figure 1. Freezer Control Panel
Before the initial start up, take some time to become familiar with the controls on
your freezer
6.2 Pads
Select Key :
This key is used to select a parameter to be viewed or adjusted.
Up Key :
This key is used to increase the value of selected parameter.
Down Key :
This key is used to decrease the value of selected parameter.
Reset Key :
This key is used to revert the display to display the process value.
13
6.3 Start Up
6.3.1 Turning the Power On
1.
2.
Plug the freezer to the power outlet, and the control panel screen displays.
Turn the Power switch on. It is complete turning the power on in this time .
6.3.2 Setting the Cabinet Temperature
Press and hold Up Key or Down Key to increase or decrease the temperature.
6.3.3 Setting the Alarm
1.
2.
3.
Press Select Key to the upper display shows “SP2”. It means Warm Alarm.
Press and hold Up Key or Down Key to increase or decrease the temperature.
Press Select Key unit the upper display shows “SP3”. It means Warm Alarm and
the two port will be close in figure 3.
4.
Press and hold Up Key or Down Key to increase or decrease the temperature
Figure 3
※When buzzer start up, you can push button which is alarm mute in figure 2. The
buzzer will stop, but it will be start up after 10 min.
14
7. Maintenance
WARNING!
Always disconnect the power supply to the unit prior to any repair or
maintenance of the unit in order to prevent electric shock or injury.
Ensure not to inhale or consume medication or aerosols from around the unit
at the time of maintenance. These may harmful to your health.
CAUTION!
Always put on dry gloves to protect the hands at the time of maintenance.
Without gloves may cause cut of the finger by the edge or corner.
Never touch the condenser when removing the condenser filter for cleaning.
Direct touching of the condenser may cause a bum on your hand.
7.1 Condenser Maintenance
Clean the condenser at least every six months, more often if the surroundings is
extremely dust prone.
To clean the condenser, complete the following steps:
1. Pull the grill open.
2. Remove the filter. Check the fans. If a fan is not operating, contact a Joho
Authorized Personnel immediately.
3. Vacuum the condenser.
4. Replace the filter and close the grill.
7.1.2 Clean the Condenser Filter
Clean the condenser filter every two or three months.
1.
2.
3.
4.
Pull the grill open.
Remove the filter.
Shake the filter to loose dust. Rinse the filter in clean water. Shake the excess
water from the filter, and replace the filter.
Close the grill.
15
7.2 Gasket Maintenance
Periodically check the gasket around or lid for punctures or tears. Leaks are indicated
by a streak of frost which forms at the point of gasket failure. Make sure the cabinet is
level (refer to Section5.3 for leveling information).
7.3 Defrost Procedures
To defrost the equipment, complete the following steps:
1. Remove all products and place in another cabinet.
2. Turn off the unit and allow the interior to warm to room temperature.
3. Dispose of ice and wipe out any water standing in the bottom of the cabinet.
If there is freezer odor, wash the interior with a solution of baking soda and warm
water. Clean the exterior with any common household cleaning wax.
16
8. Troubleshooting
CAUTION!
Troubleshooting should only be performed by trained personnel.
If the unit malfunctions, check out the following before calling for service.
The chamber is not cooled at all
1. The circuit breaker of power source is active.
2. The voltage is too low. (In this case, call an electrician.)
3. The power switch is not ON.
4. Large amount of articles (load) is stored in the chamber at one time.
The cooling is poor.
1. The ambient temperature is too high.
2. The latch of inner door is not closed completely. The outer door is not closed
firmly. (The frost or ice between the cabinet and door gasket possibly prevents
door seal.)
3. The air intake grill is blocked.
4. The condenser filter is clogged.
5. The operating temperature setpoint is not inputted properly.
6. The freezer is not away from the direct sunlight.
7. There is any heating source near the freezer.
8. A rubber cap and insulation for the access port are not set correctly.
9. Too many unfrozen articles is stored in the freezer compartment.
Noise
1. The freezer is not installed on a sturdy floor.
2. The freezer is not leveled with the leveling feet.
3. There is anything touching the frame.
4. The freezer is in the status immediately after start up.
The unit sometimes causes a noise when the chamber temperature is high due to a
large load. The noise gets less and less accompanying with the cooling of the
chamber.
17


![Cryogenic Freezer - User Manual [EN]](http://vs1.manualzilla.com/store/data/005841262_1-77d7cc3403393239d9b8135bfb24ee2c-150x150.png)