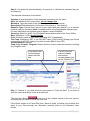
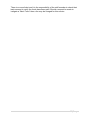
1
ProMaster User Guide
to
“Create Expense Claim”
This allows permanent staff the ability to create an Out
of Pocket (O.O.P) expense claim for goods and services
paid for using their own funds for CSU related business.
1|Page
Who Do I Contact With My Questions?
For any issues with the Create Expense Claims please, in the
first instance, email:
[email protected]
For further information on the ProMaster system please
contact:
34488 Chris Schiller
32273 Paul McLeod
Please note: The system is only available for permanent CSU
Staff.
For casual staff, guests and students please use the paper
travel authority/ order form and have this approved via the
appropriate Approver.
To check who the appropriate Approver is please use the link
below:
https://cms.csu.edu.au/division/finserv/staff/policies/p_autho_signatories
2|Page
What is an Expense Claim?
An expense claim is used when a staff member, for whatever
reason (didn’t take Visa Card, for example) has used their own
funds for expenses relating to CSU business.
When would I need to use an Expense Claim?
You use this link when you want to be reimbursed for an
expense that has been incurred that CSU should pay for.
This link is primarily for petty cash items.
If the claim is for other non related travel expenses, eg
materials for building traps this is how you make yur claim back
from the University to reimburse yourself.
*To make a claim that is travel related you are required to use
the “Create Quick Claim” button
located against
the linking and allocations area with the travel plans.
What information do I need before I make a claim?
Before making any claim you required a tax invoice that shows
an ABN Number and/or he GST component
3|Page
Create Expense Claim
Step 1; To make a claim for Out of Pocket expenses click on the “Create Expense
Claim” on your ProMaster Home page
You are presented with the “Expense Header” screen.
4|Page
Step 2; Complete the relevant details, as required, to validate the expense that you
are claiming.
The required information is as follows;
Purpose: A brief description of the expense and reason for the claim.
Date: Will default to the current date, do not change this.
Merchant: Type the name of the merchant (provider of the service).
Description: Brief description of the type of service (e.g. Taxi Sydney).
Expense Type: Choose from the list on the right hand side (ensure it is a relevant
expense type for the claim) Note: Food/Meals are not a Consumable expense type.
For any clarification on expense type(s) please contact Ph34488
Currency: Default to AUD. For Overseas Claims please refer to the Travel Office
Rate: Defaults to 1.000, do not change.
Price: Enter the value of your claim, including GST (if applicable)
Tax Code: Defaults to GST, if you DO NOT have a Tax Invoice/ Receipt you should
change this to NOGST unless your claim is under $82.50 (inc GST)
Invoice Number: optional
Fund, Org, Account, Program: Ensure that the correct codes are entered including
any Program code
If you have a tax
invoice/receipt
please tick this
box
If at any time you
make a mistake
and need to
re-start please click
on the “Delete” box
and “Add Item”
Step 3: “Submit” if you wish this to be processed or “Save as Draft” if you wish to
save the claim and return to this at a later time.
The Add Item Button
allows you to do multiple claims on the one screen,
ensuring that you have one item per line item.
If the Claim relates to a Travel Plan then “Save as Draft” will allow you to attach this
claim to your Plan through the ‘Allocation’ process (refer to the Allocation User
Guide)
5|Page
Step 4: After submission you are required to attach the tax invoice(s)/ receipt(s) for
substantiation of the claim and for CSU to correctly claim the GST tax Credits.
You also have the opportunity to check what you have entered and reverse the claim
for any adjustments, if necessary. If you click on the “Reverse Expense” Button it will
take you back to the previous screen.
Click
to attach the relevant tax invoice/receipts to the claim.
A: Click on Browse and select the pathway for the folder where the tax invoice(s)
have been scanned too. Select the correct tax invoice for the expense, double click
to attach.
B: Complete the Description Box – “Tax Invoice, Receipts for traps etc”
C: Click on “Update Changes”
D: Cancel (Exit)
The claim is now located in the “Waiting Approval” workflow. Once approved, the
claim will move to “Private Remittance” for Finance to check and then to“Waiting GL
Post” to process in to your EFT account.
Payments are posted on a daily basis. There is no association with salary and wages
payments.
This will be the same account that your normal CSU salary is paid to.
6|Page
There is no email alert and it is the responsibility of the staff member to check their
bank account to verify the funds have been paid. Should a request be made to
instigate a “Bank Trace” then a fee may be charged for this service.
7|Page