1
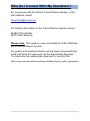
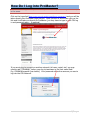
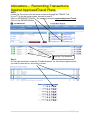
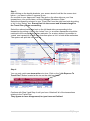
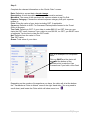
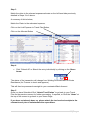
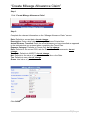
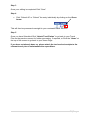
ProMaster User Guide For Travel Expense Allocations (Reconciliations) 1|Page Table of Contents Who do I contact with my questions? .........................................................................3 How do I log in to ProMaster? ....................................................................................4 What do all the Icons mean? ......................................................................................5 What is the “Home Page”? .........................................................................................6 All About Scanning…………………………………………………………………………..7 How to Reconcile Visa Transactions Against A Travel Plan? ………………………....9 How to “Create Quick Claim”? …………………………………………………………...12 How to “Create Mileage Allowance Claim”? ……………………………………………15 How to “Edit” Allocations/Transactions?.......……………………………………………18 2|Page Who Do I Contact With My Questions? For any issues with the Online Travel Planner please, in the first instance, email: [email protected] For further information on the Travel Planner please contact: 34488 Chris Schiller 32273 Paul McLeod Please note: The system is only accessible for CSU Staff who are in the HR Alesco System. For guests and students please use the paper travel authority/ order and have this approved via the appropriate Approver. To check who the appropriate Approver is, use this link: https://cms.csu.edu.au/division/finserv/staff/policies/p_autho_signatories 3|Page How Do I Log into ProMaster? Your ProMaster Log on and password is synchronised to your CSU Log on – that is, it is the same. Click on the hyperlink [http://www.csu.edu.au/division/finserv/promaster/] and you will be taken directly into ProMaster logon screen. Once you are on this screen click on the link and it will take you directly to ProMaster (you may have to type in your CSU log in and password again – if required) If you are trying to connect on another network {at home, motel, etc} you may need to add “CSUMAIN\” before your log in/username in the User name field E.g. CSUMAIN\xmsmith [see below]. Your password will be the same as you use to log into the CSU Network. 4|Page What Do All The Icons Mean In ProMaster? Identifier to advise a Visa card was used for this transaction. Either Purchase Card or Travel Card. Saved transaction waiting to be submitted. Verify or Reconcile a Transaction. View Transaction or Expense Details in full. Dispute Transaction. Edit Transaction details. Delete (a Visa Card transaction cannot be deleted) Waiting Accountholder (Transactions) – Number of Credit Card transactions that are waiting for the Cardholder to reconcile. Waiting Accountholder (Expenses) – Number of Credit Card transactions that have been “saved” and still need to be “submitted” Waiting Approval – Number of Transactions that have moved onto the Approver for their review and action. Waiting GL Post – Number of Transactions that have been Approved but have not been exported to the Banner General Ledger. Posted – Number of Transactions that have been Approved and have been Posted to Banner and the expense will appear in the appropriate Budget. Disputed – Number of Transactions that are being disputed with the Bank. Dispute Resolved – Number of Disputes that have now been resolved. Draft Travel – Number of Travel Plans that have been created and “saved” not “submitted” or sent back from an Approver for query. Compliance Review – Part of the workflow into Finance (if required) e.g. Approval for Private Vehicle. Review Travel – Allows the Travel Coordinator/ Administrator to be alerted that travel is now Approved and ready to be booked. Unapproved travel – Travel that is awaiting Approval from a Supervisor. Management Approval – Can accommodate an additional Approval for other Supervisors, if required. Executive Review – For the purposes of Approving International Travel at a higher level than normal e.g. Deans etc. Approved Travel – Travel Plan has been Approved. Completed Travel – Travel has been completed and the Plan has been reconciled. Cancelled Travel – Travel Plan has been cancelled prior to any financial transactions being attached. Archived Travel – Travel plan has been fully reconciled and has now been “finalised” Attach all relevant documentation e.g. Tax invoices, Receipts etc. Additional information is required as prompted. Log out 5|Page What Is The Home Page? After logging on to ProMaster, the Home Page appears. Information presented or functions available differ depending on your access rights as a user. Menu Tabs Displayed on the top of every page to allow single-click access to expenses, transactions, reports, authorities, profile details, the online help and logging off. Click To Open the Home Page. Open the Expense Search page. Visible only if the user has Accounts or is eligible to view expenses. Enterprise Controller only able to view expense details. Open the Transaction Search page. Account Holder able to administer transactions. Enterprise Controller only able to view transaction details. Open the Transactions by User report page. User able to generate several reports including exporting data to Excel. Open the User Authorities page. User able to change their authority or assign their authority to others. Open the Profile Detail page. Open the Document Control page. Account Holder able to manage expense documentation. (currently not in use) Open the help to provide even more detailed assistance. Log the user out of ProMaster. Provides quick access to any relevant forms e.g. Lost Receipt Declaration etc. Account Holder: Can be either an Account Holder/Traveller. You do not necessarily have to hold a Corporate Card to be an account holder or Traveller. Travel Coordinator: Can make Travel Plans & Bookings on behalf of other Staff. Travel Administrator: Can Make Travel Plans & Bookings on behalf of other staff, but can also Review/Submit to Supervisors as part of the workflow process. Supervisor: Will Approve Travel Plans and other transactions in accordance with the Delegations Authorities. Management Review: An additional Approver role within the workflow. Executive Review: An additional Approver role within the workflow. 6|Page Scanning in ProMaster Within the ProMaster system there are numerous ways to attach the invoices to the Trip Plans. It is recommended that you create a folder in the S Drive for you to store your scanned invoices and any relevant documentation, appropriately labeled. This allows for other personnel to undertake your reconciling should the need arise. This also makes it easy to pick up the scanned file as an attachment. (Please do not use Tif or Gif files) The file needs only to be attached to the Travel Plan (TP) once. There is no need to attach the file to each expense / transaction as required in the past. From the Home page, use the Travel Tab and search for your TP’s or if your plans are current they may be on your home screen. On this screen you will notice that that a paperclip is sitting there on the far right hand side with the other action icons . Click on the paper clip and it will display on screen called File Attachments 7|Page Click on the Browse button For the first time you will need to show the system the pathway where the scanned documentation has been stored. In the future it will automatically follow the pathway directly to the S drive. Locate the relevant documentation to the TP and click. This will bring the file across into ProMaster. Description Box will need to be completed eg, tax invoices, Requisitions, email. Repeat these steps if there is more than one file. Click on Update and the file(s) will appear like this. This completes the process for this particular trip. To exit this screen click on the Cancel Button and you are taken back to the previous screen. In ProMaster Cancel is Exit to the previous screen not exit out of the system. As mentioned previously, you can scan at the paperclips or look for the Attachments Button This will also take you to the same screens as outlined above. 8|Page Allocations – Reconciling Transactions Against ApprovedTravel Plans Step 1 Locate the Trip either from the home screen or through the TRAVEL Tab If your TP is on the home screen, proceed to step 2. Click on APPROVED TRAVEL. You can only reconcile against Approved Travel Click on the SEARCH Button Note the Trip Numbers Step 2 On the right hand side, locate the “Double Brackets” for the relevant approved trip you wish to reconcile to, and Click on these. 9|Page Step 3 After clicking on the double brackets, your screen should look like the screen shot below – you have in effect 2 screens in one. On one side is your Approved Travel Plan and on the other side are your Visa transactions, your quick claims, or Klms (Mileage) Allowance Claim. Select the transaction relevant to your Travel Plan from the right hand side by putting a ‘tick’ in the “Select” box. Ensure that it is the correct and relevant charge for the Travel Plan you are reconciling. Select the relevant estimated cost on the left hand side corresponding to the transaction by putting a ‘tick’ in the “select” box. ie. an airfare transaction should be matched to the corresponding airfare estimate. For a return airfare it is possible to ‘match’ one transaction to both legs, therefore place a ‘tick’ in both airfare estimates. The system will split this into each leg. Step 4 You can only match one transaction at a time. Click on the “Link Expense To Travel Plan” Button located at the top on the right hand side. Continue with Step 3 and Step 4 until you have “Attached” all of the transactions relating to the Travel Plan. They appear to have disappeared, but you have not finished. 10 | P a g e Step 5 Once you have completed the ‘Attaching’ process for all of the transactions relating to the Travel Plan, Click on the ALLOCATE Button. Step 6 This is your last opportunity to check that the transactions are correct and ready to be processed to the Banner Finance System. You are able to ‘Edit’ the information by Clicking the “Edit Pencil”. This is where you would update the transactions for the “Expense Type “Entertainment”, for example. If you are happy with the information then; Click on the SUBMIT ALL Button and the entries will be processed into the Banner Finance System. The status will change from Waiting Accountholder to Waiting GL Post OR Submit the entries individually by clicking on the Green Arrow. Step 7 Once you have Submitted Click “Attach Txns/Claims” to go back to the previous screen to do further actions if required, or Click the “Home” at the top of the screen to go back to your Home Page to process further transactions against other approved Travel Plans . If you have not already done so, please attach the tax invoices/receipts to the relevant travel plan to substantiate the expenditure. 11 | P a g e “Create Quick Claim” For any “Out of Pocket Expenses” associated with your Travel Plan you have the facility to “Create Quick Claim” at the same time that you are processing your transactions. NB: This applies to expenses paid for out of your own pocket NOT those that have been charged on your Corporate Visa Card. Step 1 Select the Button “Create Quick Claim” 12 | P a g e Step 2 Complete the relevant information on the “Quick Claim” screen. Date: Defaults to current date, do not change. Description: A brief description of the expense must be entered. Merchant: The name of the merchant the expense relates to eg City Rail. Expense Category: Choose the relevant expense category that your expense relates to. Price: Enter the value of your claim including GST, if applicable. Currency: Defaults to AUD. For Overseas Claims please forward to the Travel Office to process. Tax Code: Defaults to GST. If your claim is under $82.50, inc GST, then you can claim the GST credit, however if your claim is over $82.50, inc GST, you MUST have a legitimate Tax Invoice to claim the GST credit. Net: Defaults from the value in Price. Tax: GST value. Gross: Total value of your claim. This is an example of a completed claim. Click on SAVE and the claim will appear at the bottom of the allocations list (under the Visa Transactions if you hold a Visa Card Depending on the number of transactions you have, the claim will sit at the bottom the “Transactions/ Claim to Attach” area on the right hand side. (You may need to scroll down) and locate the Claim which will show as an icon 13 | P a g e Step 3 Match the claim to the relevant expense estimate on the left hand side previously detailed in Steps 3 to 6 above. A summary of this is below; Match the Claim to the estimated expense, Click on the Link Expense to Travel Plan Button, Click on the Allocate Button Step 4 Click “Submit All” or Submit the entry individually by clicking on the Green Arrow. The status of the transaction will change from Waiting Accountholder to Private Remittance (for Finance to check and approve). This will then be processed overnight to your nominated Bank Account. Step 5 Once you have Submitted Click “Attach Txns/Claims” to go back to your Travel Plan on the previous screen for further processing, if required, or Click the “Home” at the top of the screen to go back to your Home Page. If you have not already done so, please attach the tax invoices/receipts to the relevant travel plan to substantiate the expenditure. 14 | P a g e “Create Mileage Allowance Claim” Step 1 Click “Create Mileage Allowance Claim” Step 2 Complete the relevant information on the “Mileage Allowance Claim” screen. Date: Defaults to current date, do not change. Description: Enter a brief description e.g. Reimburse Private Kms Actual Distance Travelled: Enter the actual distance you have travelled as opposed to the estimate that you entered when completing the Travel Plan. Expense Category: Defaults to Private Car, do not change. Rate: Defaults to the current CSU rate for Private Km Reimbursements, do not change. Tax Code: Defaults to NOGST, do not change. Net: Defaults to the value of your claim from the Kms x the Rate. Tax: Defaults to zero, do not change. Gross: total value of your claim. Click SAVE 15 | P a g e Depending on the number of transactions you have, the claim will sit at the bottom the “Transactions/ Claim to Attach” area on the right hand side. (You may need to scroll down) and locate the Claim which will show as an icon Step 3 Match the claim to the relevant expense estimate on the left hand side previously detailed in Steps 3 to 6 above. A summary of this is below; Match the Claim to the estimated expense. With Private Klms claim you may need to select twice ie the forward leg and return leg in the Approved Travel Plan to cover the total klms claimed. Click on the Link Expense to Travel Plan Button, Click on the Allocate Button Step 4 Click “Submit All” or Submit the entry individually by clicking on the Green Arrow. The status of the transaction will change from Waiting Accountholder to Private Remittance (for Finance to check and approve). This will then be processed overnight to your nominated Bank Account. 16 | P a g e Step 5 Once you have Submitted Click “Attach Txns/Claims” to go back to your Travel Plan on the previous screen for further processing, if required, or Click the “Home” at the top of the screen to go back to your Home Page. If you have not already done so, please attach the tax invoices/receipts to the relevant travel plan to substantiate the expenditure. 17 | P a g e Allocations – Editing Transactions Prior to “Submitting All” transactions to the Banner Finance System it is possible to edit transactions, where further information is required e.g. Entertainment Step 1 Click on the “Edit Pencil”. Step 2 Edit the relevant details on this screen. This is where Entertainment is best managed as this requires further information to be added. Additionally you are able to edit the Account codes or any other information. 18 | P a g e Step 3 Once your editing is completed Click “Save” Step 4 Click “Submit All” or “Submit” the entry individually by clicking on the Green Arrow. This will then be processed overnight to your nominated Bank Account. Step 5 Once you have Submitted Click “Attach Txns/Claims” to go back to your Travel Plan on the previous screen for further processing, if required, or Click the “Home” at the top of the screen to go back to your Home Page. If you have not already done so, please attach the tax invoices/receipts to the relevant travel plan to substantiate the expenditure. 19 | P a g e