1
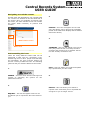
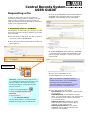
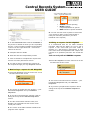
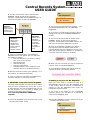
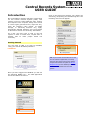
Central Records System
USER GUIDE
Introduction
Our organisation captures hardcopy information
via the Central Records System (CRS). This
system is used to create hardcopy files, capture
and respond to file requests, assign user access
to record types (personnel files, legal files etc),
track file locations (with people, at offsite
storage, in University Archives etc), apply
appropriate disposal authority and review dates
to files and to search for University Information.
Click on the CRS link to display your options for
Searching, Requesting and Transferring files. The
following menu list will appear
As a user you may have a need to use the
system in order to locate files, request files or
transfer files to other people within the
University.
Getting Started
You will need to LOG in to CRS via ANUBIS,
using your UNI ID & HORUS password.
LOGGING IN TIP – If you cannot see the CRS link or click on it to enter the application, it is likely that you don’t have access to the System and you will need to complete an Access Request Form (on the website) in order to access the information stored in the system Once you have logged into ANUBUS you will see
the following MENU tree – the CRS application
sits at the bottom of this list.
Central Records System
USER GUIDE
Navigating around the screens
As with most web applications you navigate CRS
via a menu tree located on the left hand side of
the screen. Once you highlight a function from
this menu, the main function screen will contain
the action fields necessary to perform that
function
3.
PROFILE – this icon will appear next to a file
entry and allows you to open up the metadata
profile of the FILE which displays the file details
& borrower history
Main function screen
Menu Tree Understanding the icons
There are many different actions that can be
performed in CRS such as: requesting a file,
transferring files to other people and searching
for information. For each of these actions you
will see a variety of different icons. The following
guide will tell you what the different icons mean.
1.
SEARCH – this icon when selected will begin the
process of searching the system for the
parameters entered
4.
TRANSFER – this icon will appear next to a file
entry only when the file is currently issued to
someone and will allow you to transfer the file
into the custody of someone else
5.
EDIT – this icon allows you to edit and update
any requests that you have made
6.
2.
DELETE – this icon allows you to delete a
request in the event that you’ve requested the
wrong file or you no longer need it.
REQUEST – this icon will appear next to a file
and allows you to request the file to be issued to
you.
Central Records System
USER GUIDE
Requesting a file
In order to have a file sent to you from the
University’s storage (onsite or offsite) you will
need to place a request for the file online via
CRS. This allows University Records to track and
report on all requests made.
3. Click on the REQUEST button underneath the
ACTIONS menu alongside the file you wish to
REQUEST. The following screen will appear:
1 Requesting a file for YOURSELF
The majority of files that you request via CRS
will be for yourself in order to perform your basic
work functions.
1 You will need to search for the file in order to
request it (refer to SEARCHING)
2. Once the file is listed in the search results you
can request it
Search results displayed
4. In the BORROWER field TYPE your SURNAME
– your full name & details should appear in the
list on the right hand side – select your name
from the list
REQUEST file
5. Fill in your LOCATION i.e. the
division/department you work for.
Time Saver – If you are able to request a file –
it is a good idea to check its location first, some files are located in Archives & you need to contact them directly, checking file location will save you time: 1. Click on the magnifying glass 2. Check the HOME LOCATION Field 3. If the location is: • N – University Archives do not request the file – contact University Archives to arrange a time to view the file TIP – Your location is usually the example underneath the field – you can HIGHLIGHT it and drag it into the LOCATION field. The field is left blank in the instance that you are on secondment to somewhere else 6. Fill in the remaining file details –
Part Number (you can select a specific part
or ALL parts)
DATE Required (it will default to today’s
date), you can change this if you wish for the
file to be delivered at a date in the future
(i.e. a weeks time)
Retrieval Priority (URGENT is usually
within an hour, routine is same day or
depends on the internal mail)
Delivery Instructions (if you select
INTERNAL mail it will be assumed your
request is not URGENT)
Central Records System
USER GUIDE
Building Number (this is so that we can
ensure the file makes it to the correct
location)
11. You will be able to monitor the progress of
this request through your MY REQUEST function
(2.3)
2 Requesting a file for SOMEONE ELSE
Occasionally you may have a need to request a
file on behalf of someone else either because
they don’t have access to their computer or they
are senior to you. CRS allows you to do so in
order to ensure accurate file location information
is maintained in the system and the right person
has responsibility for the file.
TIP – File details such as the TITLE & NUMBER will be automatically defaulted & cannot be changed. 7. Once you have completed the file details
fields, you will need to read the RESPONSIBILITY
statement which details your responsibilities as
the main file holder in relation to PRIVACY, File
access & File Maintenance.
1 You will need to search for the file in order to
request it (refer to SEARCHING)
2. Once the file is listed in the search results you
can request it
8. Place a tick in the box once you have read and
understand your responsibilities
TIP – You will not be able to request the file if you do not accept responsibility for it by placing a tick in the box. REQUEST file
3. Click on the REQUEST button underneath the
ACTIONS menu alongside the file you wish to
REQUEST. The following screen will appear
9. Click on SUBMIT to complete your request and
send it to University Records
10. If your request was successful you will see
the following message at the top of your screen
Central Records System
USER GUIDE
•
•
•
GREEN indicates pending
BLUE indicates
completed/fulfilled in system
RED indicates request cancelled
6. You can use this colour system to track when
your request is either in the Internal Mail or
ready for collection (whichever you have
indicated in the request)
4. In the BORROWER field TYPE the SURNAME of
the person on behalf of whom you are requesting
the file – Their full name & details should appear
in the list on the right hand side – select their
name from the list
5. Complete the File details
6. Read and tick the Responsibility Clause
7. Click on Submit to complete the request and
send to University Records for action.
8. You will be able to monitor the progress of
this request through your my REQUEST function
4 Editing a request via MY REQUEST
It is understood that we all make mistakes
therefore CRS has the ability for you to edit a
request in the event that you have made a
mistake (i.e. with delivery instructions) or that
there have been developments that require the
request to be updated (someone else needs the
file)
You can only edit a PENDING request.
1 Select MY REQUEST from the menu tree on the
left hand side of the screen
3 Monitoring a request via MY REQUEST
1 Select MY REQUEST from the menu tree on the
left hand side of the screen
2. The screen is divided into two sections – your
FULFILLED REQUESTS and your PENDING
REQUESTS.
2. The screen is divided into two sections – your
FULFILLED REQUESTS and your PENDING
REQUESTS.
3. If you have just placed the request it will be
sitting at the top of the PENDING REQUESTS
section.
4. The file will be listed with the TITLE, File
Number, the intended borrower and a colour
coded part number
5. The colour of the PART number indicates the
progress of the request
3. If you have just placed the request it will be
sitting at the top of the PENDING REQUESTS
section.
Central Records System
USER GUIDE
4. The file will be listed with its details (FILE
NUMBER, TITLE) as well as the intended
borrower. Underneath the ACTIONS column you
will have the option to edit the REQUEST
REQUEST
PROFILE –
Allows you to
see the request
profile but you
can’t change it.
EDIT
REQUEST –
Allows you to
change the
details of the
request, such
as the borrower,
location or
delivery method
2. The screen is divided into two sections – your
FULFILLED REQUESTS and your PENDING
REQUESTS.
DELETE
REQUEST
Allows you to
delete the
request if you
no longer
want the file
or it was
requested in
error
5. Click on the EDIT button – the standard
REQUEST screen will appear and you will have
the option to change:
•
Borrower details (if you wish to change
who is to receive the file
•
Date Required by
•
Retrieval Priority
•
Delivery Instructions
•
Building Number (if the location is now
different due to an updated borrower)
6. Edit the request to reflect your updates (i.e. in
the instance of a different borrower)
3. If you have just placed the request it will be
sitting at the top of the PENDING REQUESTS
section.
4. The file will be listed with its details (FILE
NUMBER, TITLE) as well as the intended
borrower. Underneath the ACTIONS column you
will have the option to DELETE the request
5. Click on the DELETE (garbage bin) button –
the Request Profile will appear with all the
request details and at the bottom of this screen
there will be the option to DELETE or go BACK (if
you have clicked on delete by accident)
6. When you are sure that you wish to delete the
request. Click on the DELETE Button
7. The following message will appear once the
request has been successfully deleted
7. Click on submit to complete the updates and
send the changes to University Records
6 Making a request via MY REQUEST
5 DELETING a request via MY REQUEST
You may need to delete a request in the instance
that you have requested the wrong file or part,
or that someone else has negotiated with you for
the file therefore you will need to delete your
request so that they can request it.
Once you have made a request via CRS it is
automatically moved into the MY REQUEST area
of the system. Once a request is FULFULLED it
remains in the MY REQUEST area under the
FULFILLED request section.
You can only DELETE a PENDING
request.
If you have a file sitting in your FULFILLED
requests section you are able to re-request it
from the MY REQUEST area
1 Select MY REQUEST from the menu tree on the
left hand side of the screen
1 Select MY REQUEST from the menu tree on the
left hand side of the screen
Central Records System
USER GUIDE
2. The screen is divided into two sections – your
FULFILLED REQUESTS and your PENDING
request
3. In the FULFILLED REQUESTS section select
the file you wish to request
4. Under the ACTIONS menu (if the file is not
currently located with a person) – select the
REQUEST BUTTON
REQUEST file
5. The Standard request form will appear and
you can complete as you normally would if
you’re requesting the file for yourself or for
someone else.
TIP – When Requesting a file either via the SEARCH
results view or the MY REQUEST function if there is
an arrow button it means that the file is currently located with a
PERSON and you will need to negotiate and arrange
the transfer of the file directly to you from that person.
If you request the file you will get the following
message: