1
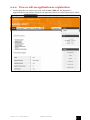
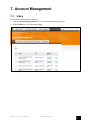
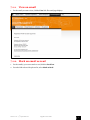
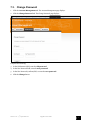
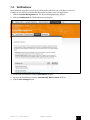
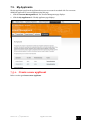
Registration Site Suppliers' User Guide Energy Rating Website www.energyrating.gov.au User Guide Contents 1. Document control ......................................................................................................... 4 1.1. Document revision history ..................................................................................... 4 1.2. Approvals ................................................................................................................ 4 1.3. Distribution list ...................................................................................................... 4 2. Legal Obligations for Registrants ................................................................................. 5 3. Getting Started.............................................................................................................. 6 3.1. Register for a new account ..................................................................................... 6 3.2. Initial log in – Create or join an applicant ............................................................ 7 3.3. Subsequent log in ................................................................................................... 9 3.3.1. 4. 5. Site Access................................................................................................................... 12 4.1. Login ..................................................................................................................... 12 4.2. Log out ................................................................................................................. 12 Applicant Management .............................................................................................. 13 5.1. 6. 7. Change to another applicant ........................................................................... 9 Create a new Applicant......................................................................................... 13 5.1.1. Add a contact to your applicant ......................................................................15 5.1.2. Add a brand to your applicant ....................................................................... 18 5.1.3. Add a test lab to your applicant ..................................................................... 19 5.2. Add another Authorised Representative to your account ................................... 24 5.3. Manage the applicant‟s owner ............................................................................. 27 Product Registration................................................................................................... 30 6.1. Create a product registration application ............................................................ 30 6.2. Manage your registrations / applications ........................................................... 32 6.2.1. Search for a registration ................................................................................ 32 6.2.2. View or edit an application or registration ................................................... 33 6.2.3. Edit an application ........................................................................................ 36 6.2.4. Delete a registration ...................................................................................... 36 Account Management ................................................................................................. 37 7.1. Inbox ..................................................................................................................... 37 7.1.1. View an email ................................................................................................. 38 7.1.2. Mark an email as read ................................................................................... 38 7.2. Personal Details ................................................................................................... 39 Version 0.10 – 13th September 2011 Suppliers' User Guide 2. 7.3. Change Password ................................................................................................. 41 7.4. Notifications ......................................................................................................... 42 7.5. My Applicants ...................................................................................................... 43 7.5.1. 8. Create a new applicant ................................................................................... 43 Appendix A: Example Letter of Authorisation .......................................................... 44 Version 0.10 – 13th September 2011 Suppliers' User Guide 3. 1. Document control 1.1. Document revision history Revision Date Author Version Summary of Changes 13 June 2011 Ruth Henry 0.1 Initial document 20 June 2011 Damien Wilmann 0.2 Revised 22 June 2011 Gavan Newell 0.3 Revised 22 June 2011 Gavan Newell 0.4 Revised 15 July 2011 Ryan Naylor, Damien Wilmann 0.5 Revised 14 August 2011 Ruth Henry 0.6 Updated screen shots and related instructions 18 August 2011 Ruth Henry 0.7 Document template changed. 8 September 2011 Damien Wilmann 0.8 Legal text added. 12 September 2011 Damien Wilmann 0.9 Further updates based on DCCEE review and revised legal text. 13 September 2011 Damien Wilmann 0.10 Final updates to guide as per Karen‟s review. 1.2. Approvals Name Title Karen Goldspink Project Manager 1.3. Signature Date of Approval Version 0.10 Distribution list Name Title Date of Issue Version Karen Goldspink Project Manager 13 Sep 2011 0.10 Mel Slade Director 13 Sep 2011 0.10 Version 0.10 – 13th September 2011 Suppliers' User Guide 4. 2. Legal Obligations for Registrants Please read the following information before proceeding. The registration process incorporates some changes. You will now be required to provide us with a declaration of acceptance of the terms and conditions of registration. Please read them carefully before proceeding with the registration. If you are registering in Australia you will also be asked to upload a letter signed by the Authorising Officer. For an example letter of authorisation, see section 8 (Appendix A). Please note the following definitions: Term Description Authorising Officer This is the person who is authorised by the entity submitting the application (the applicant) to make this application, to deal with all aspects of the subsequent registration process for the application and to bind the applicant accordingly. (AO) Authorised Representative (AR) Administrator (A) A third party or company representative who is authorised (in writing in the approved form) by the Authorising Officer to represent the Authorised Officer, to take responsibility for the application and the subsequent registration and to be available to provide assistance to the Administrator in relation to the application and registration. An example may be a compliance manager or an external consultant/agent. The person or entity appointed by E3 to ensure appropriate governance and undertake ongoing management of the Energy Rating website. If you are registering on behalf of the legal entity (in Australia), as an Authorised Representative, you will need to obtain a signed letter from them before you can process applications and deal with registrations on their behalf. You should also note that if the regulators are unable to contact the Authorised Officer the Authorised Representative will be required to answer questions on their behalf. If the Authorised Representative does respond to regulator enquires they run the risk of being prevented from being an AR for future applications. In New Zealand, there is no legal difference between the Authorising Officer and the Authorising Representative. All persons nominated by an applicant to submit applications on behalf of an applicant, should ensure that they are authorised by the applicant to act in this capacity. The „applicant‟ is the person or entity manufacturing or importing a product to New Zealand that is covered by the Energy Efficiency (Energy Using Products) Regulations. If you are unclear about your legal responsibilities in New Zealand please email [email protected] or call the Standards and Compliance Team at EECA on +64 4 470 2200. Version 0.10 – 13th September 2011 Suppliers' User Guide 5. 3. Getting Started Once you have registered to become a user of the site and you first login, you will need to create an applicant for all your applications and subsequent registrations to be associated to. Usually this will be the company you work with or a company you are submitting applications on behalf of. 3.1. Register for a new account When you first visit the website, you will need to register an account. You will be sent an email with instructions on how to activate your account and log in to the site. 1. In the browser, enter https://reg.energyrating.gov.au. The login page displays. 2. In the First Name field, enter your first name. 3. In the Last Name field, enter your last name. 4. In the Email Address field, enter your email address. 5. In the Phone field, enter the phone number including the country code as well as the area code if applicable. 6. In the Fax field, enter the fax number including the country code as well as the area code if applicable. 7. In the Organization field, enter the organisation. 8. In the Job Title field, enter the job title of the person registering the account. 9. In the Street Address field, enter the street number and name. 10. In the Suburb/Town field, enter the suburb within a city or town, whichever is applicable. Version 0.10 – 13th September 2011 Suppliers' User Guide 6. 11. In the Postal Code field, enter the postal code. 12. In the State/Region field, enter the state, county or region, whichever is applicable. 13. From the Country drop-down list, select the country. 14. Select the check box if the postal address is the same as the street address. 15. If the postal address is different complete the address fields. 16. Click the Submit button. 3.2. Initial log in – Create or join an applicant When you initially login to the website the Choose an Application page displays on the dashboard. Initially you will need to join an existing Applicant or create a new Applicant (for more information, see Authorising Officer in section 2 Legal Obligations for Registrants). To join an existing applicant, refer to section 7.5 Version 0.10 – 13th September 2011 Suppliers' User Guide 7. My Applicants. To create a new applicant, refer to section 5.1 Create a new Applicant. When you create a new Applicant, you will be required to enter at least one contact and brand associated with that Applicant, as well as at least one test lab that this Applicant uses to test its products. Once this initial Applicant setup is complete, you may then submit applications for a registration for or on behalf of that Applicant. Note that an applicant refers to a company (or similar legal entity, which may be an individual) and not an Authorised Representative. Any given Applicant may have any number of Authorised Representatives that may submit applications for registration on its behalf. Version 0.10 – 13th September 2011 Suppliers' User Guide 8. 3.3. Subsequent log in After you have created an applicant and logged into the website, the Dashboard displays. You can do the following: Create a new product registration application; refer to section 6.1 Create a product registration application. Manage my existing and draft registration; refer to section 6.2 Manage your registrations. Manage my account; refer to section 7 Account Management. 3.3.1. Change to another applicant If you are associated with more than one applicants then the Dashboard page will contain a change applicant link in the top right-hand corner. Version 0.10 – 13th September 2011 Suppliers' User Guide 9. 1. Select the Change link. The Choose an Applicant page displays. Note that this page will also appear when you log in, if you are associated to multiple applicants. 2. Click on the company details to change the applicant. The Dashboard displays. Version 0.10 – 13th September 2011 Suppliers' User Guide 10. You can do the following: Create a new product registration application; refer to section 6.1 Create a product registration application. Manage my existing and draft registration; refer to section 6.2 Manage your registrations. Manage my account; refer to section 7 Account Management. Version 0.10 – 13th September 2011 Suppliers' User Guide 11. 4. Site Access 4.1. 1. Login In the browser, enter https://reg.energyrating.gov.au. The login page displays. 2. In the Email/Username field, enter either your email or username. 3. In the Password field, enter your password. 4. Click the Log in button (this page will display differently depending on first or subsequent entry status). 4.2. 1. Log out In the top right-hand corner click the Log out link. Note that if you do not log out explicitly (as above) you will be automatically logged out of the system after 15 minutes‟ inactivity. Version 0.10 – 13th September 2011 Suppliers' User Guide 12. 5. Applicant Management 5.1. Create a new Applicant When you first log into the website, the Create an Applicant page displays on the dashboard. Initially, you will need to create a new Applicant to use when submitting applications. An Applicant is the company or organisation that submits product registration applications to regulatory authorities. The Applicant is accountable for the applications and subsequent registrations they submit, and may be held legally liable for those submissions by regulatory authorities. Applicants must be companies that are registered in Australia, New Zealand or Fiji unless they choose to register in Queensland where off shore applicants are permitted. Applicants that have companies registered in Australia or New Zealand may also choose to register in Queensland. 1. In the Company Name field, enter the company’s name. 2. In the ABN or Company Number field, enter the company’s Australian Business Number or Company Number. Listing an ABN or Company Number is MANDATORY if your company is registered in Australia. Version 0.10 – 13th September 2011 Suppliers' User Guide 13. If you are in Australia and fail to list your ABN or Company Number your application will be returned. 3. In the Company Phone field, enter the company’s phone number including the country code as well as the area code if applicable. 4. In the Company Fax field, enter the company’s fax number including the country code as well as the area code if applicable. 5. In the Company Email field, enter the company’s email address. 6. In the Company Website field, enter the URL of the company’s website. 7. In the Street Address field, enter the company’s street number and name. 8. In the Suburb/Town field, enter the company’s suburb within a city or town, whichever is applicable. 9. In the Postal Code field, enter the company’s postal code. 10. In the State/Region field, enter the company’s state, county or region, whichever is applicable. 11. From the Country drop-down list, select the company’s country or select other if not in Australia, New Zealand or Fiji. The applicant will need to reside in Australia, New Zealand or Fiji unless they register in Queensland. Applicants that have companies registered in Australia, New Zealand or Fiji may also choose to register in Queensland. 12. Select the check box if postal address is the same as street address, otherwise enter the postal address. 13. Click the Create Applicant button. The applicant is created and submitted to the regulators for approval. The Account Management page displays. Version 0.10 – 13th September 2011 Suppliers' User Guide 14. 5.1.1. Add a contact to your applicant Each Applicant may be associated with a number of Authorised Representatives and Contacts. Authorised Representatives are able to login to the website and submit registration applications on behalf of the Applicant. Applicant Contacts represent the administrative and technical contact people this Applicant has nominated. It is the Applicants responsibility to amend Authorised Representative and Contact details if they change. You need to have at least one Contact set up on your Applicant in order to submit a registration application. 1. From the top menu, click the Applicant Management tab. The Applicant Management page displays. 2. From the Applicant Management menu, click the Users & Contacts tab. The Users & Contacts page displays. Version 0.10 – 13th September 2011 Suppliers' User Guide 15. Version 0.10 – 13th September 2011 Suppliers' User Guide 16. 3. Click Add a contact link. The Create Contact page displays. Note you can add another Authorised Representative. The Authorised Representative can also be the nominated contact. 4. From the Does this contact have a user account? select either: Yes No If you selected Yes then complete the following: From the User drop-down list, select a user account. Click the Save button. The contact is added as a user. If you selected No then complete the following: In the Full Name field, enter the full name. In the Organisation field, enter the organisation. In the Job Title field, enter the job title. In the Phone field, enter the phone number including the country code as well as the area code if applicable. In the Fax field, enter the fax number including the country code as well as the area code if applicable. In the Street Address field, enter the street number and name. In the Suburb/Town field, enter the suburb within a city or town, whichever is applicable. In the Postal Code field, enter the postal code. Version 0.10 – 13th September 2011 Suppliers' User Guide 17. In the State/Region field, enter the state, county or region, whichever is applicable. From the Country drop-down list, select the country. Select the check box if postal address is the same as the street address. If the postal address is different complete the address fields. 5. De-select the check box if you do not want this contact to be selectable in drop-down lists. 6. Click the Save button. The contact is added. 5.1.2. Add a brand to your applicant Each Applicant has a list of brands that their registration applications refer to. This list of brands is maintained at the Applicant level so that you can update brand information (such as websites) at a later date. You need to have at least one Brand setup on your Applicant in order to submit a registration application. 1. From the Applicant Management menu, click the Brand List tab. The Brand List page displays. Version 0.10 – 13th September 2011 Suppliers' User Guide 18. 2. Click the Add a new brand link. The Create Brand page displays. 3. In the Brand Name field, enter the brand name. 4. In the URL of Brand Website, enter the brand’s website URL using the following example format: http://www.mysite.com This will be added as a hyperlink wherever this brand appears on the public site (i.e. on the product comparison tool). 5. Click the Save button. The brand is created. 5.1.3. Add a test lab to your applicant Each Applicant has a list of test laboratories that their registration applications can refer to. This list is maintained at the applicant level to reduce the repetitive data entry required when you use the same test lab in multiple registration applications. There are two types of test lab: your Own Lab representing your organisation‟s private internal lab, and Independent Labs representing publicly available labs. When adding an Independent Lab you can choose from a global list of labs that is available to all suppliers. You need to have at least one test lab setup on your Applicant in order to submit a registration application. Version 0.10 – 13th September 2011 Suppliers' User Guide 19. 1. From the Applicant Management menu, click the Test Lab tab. The Test Labs page displays. 2. Click the Create my own test laboratory link. Version 0.10 – 13th September 2011 Suppliers' User Guide 20. 3. In the Laboratory Name field, enter the laboratory name. 4. From the Laboratory Type drop-down list, select the laboratory type either: Independent Lab Own Lab 5. In the Street Address field, enter the street number and name. 6. In the Suburb/Town field, enter the suburb within a city or town, whichever is applicable. 7. In the Postal Code field, enter the postal code. 8. In the State/Region field, enter the state, county or region, whichever is applicable. 9. From the Country drop-down list, select the country. 10. Select the check box if postal address is the same as street address. 11. If the postal address is different complete the address fields. 12. Select the check box if you want this laboratory to be available to all other applicants. 13. Click the Save button. The lab added to your applicant. 5.1.3.1. Add an existing laboratory There is a “global” list of laboratories that is maintained for all users to access. This list contains laboratories that are used by multiple suppliers. Notes If your lab is exclusive, internal to your organisation or does not appear in this list, then add a test lab to your applicant, refer to section 5.1.3 Add a test lab to your applicant. If you know this laboratory is used by other suppliers then select the check box to make the lab available to other applicants, refer to step 13 in the above section. To add a test lab from the global directory complete the following: 1. Click the Add a test lab from the global directory link. Version 0.10 – 13th September 2011 Suppliers' User Guide 21. 2. In the Search Query field, enter the search text. 3. From the Country drop-down list, select the country. 4. Click the Search button. The search results display. 5. For the required laboratory, click the Select link. The Add Laboratory page displays. Version 0.10 – 13th September 2011 Suppliers' User Guide 22. 6. Click the Add laboratory button. The laboratory is added to your applicant. Version 0.10 – 13th September 2011 Suppliers' User Guide 23. 5.2. Add another Authorised Representative to your account You can have multiple Authorised Representatives associated with each Applicant. This allows the Authorising Officer to easily manage the people in their organisation and ensure they have the appropriate access. From the dashboard, complete the following: 1. From the menu, click the Application Management tab. Version 0.10 – 13th September 2011 Suppliers' User Guide 24. 2. From the sub-menu, click the Users & Contacts tab. From the User Accounts section complete the following: 3. Click the Add another user link. The Add a User page displays. Version 0.10 – 13th September 2011 Suppliers' User Guide 25. 4. In the First Name field, enter the user’s first name. 5. In the Last Name field, enter the user’s last name. 6. In the Email Address field, enter the user’s email address. 7. Click the Send Invitation Email button. The user will be emailed with the instructions on how to accept the invitation to register and join the account. When the user registration is completed there will be an extra user on the account.. Version 0.10 – 13th September 2011 Suppliers' User Guide 26. 5.3. Manage the applicant’s owner Every Applicant has a single user account that is owned by the Applicant. The owner can add other users to the Applicant and assign permissions to them. From the dashboard, complete the following: 1. From the menu, click the Application Management tab. 2. From the sub-menu, click the Users & Contacts tab. Version 0.10 – 13th September 2011 Suppliers' User Guide 27. From the Users section complete the following: 3. For the relevant user, click the Manage User link. The Manage Membership page displays. Version 0.10 – 13th September 2011 Suppliers' User Guide 28. 4. From the Role dropdown, select the appropriate role: User Admin - note that an „Admin‟ is considered the owner of the applicant account. 5. Click the Save Changes button and the user‟s membership change will be saved. Version 0.10 – 13th September 2011 Suppliers' User Guide 29. 6. Product Registration 6.1. Create a product registration application From the Dashboard page complete the following: 1. Click the Register a Product link. The Registration Wizard - Registration Type page displays. 2. From the What type of product do you want to register? drop-down list, select the product. 3. From the Under which regulatory standard? drop-down list, select the regulatory standard. 4. If applicable, the Single model or family of models? drop-down list will display. Select either: Family Single 5. If applicable, the What is this application for? drop-down list will display. Select either: Labelling and MEPS MEPS only 6. Click the Save and Continue > button. The Registration Wizard pages display. Depending on the product registration different pages will display. Complete the pages in order 1. Fill in the page information. 2. Click the Save and Continue button. A green tick displays at the right-hand side of the menu item. Complete some of the pages 1. Fill in the page information. 2. Click the Save and Continue button. A green tick displays at the right-hand side of the menu item. Version 0.10 – 13th September 2011 Suppliers' User Guide 30. 3. Select any page heading from the side menu. Note that you can navigate away from these pages at any time (essentially exiting the application) and return at a later time to complete the application. If prompted, please click “Save and Continue” when you navigate away to ensure the changes on the current page are saved (changes to previous pages will already be saved). Note also that a page that contains errors (marked in red) cannot be saved. You will be redirected back to the page if you try to save and continue when there are errors present. Version 0.10 – 13th September 2011 Suppliers' User Guide 31. 6.2. Manage your registrations / applications From the Dashboard page complete the following: 1. Click the Applications / Registrations link. The Manage Applications / Registrations page displays. 6.2.1. Search for a registration You can search for applications and registrations. 1. Click the Add Search Criterion button. The search criterion line displays. 2. From the [search criteria] drop-down list, select either: Status Registration ID Appliance Type Registration Date Regulatory Standard Model Number Registration Number Brand Name 3. Complete the search criteria. Note you can remove a search criteria line, click the Remove button. 4. Click the Search button. The search results display. Version 0.10 – 13th September 2011 Suppliers' User Guide 32. 6.2.2. View or edit an application or registration 1. For the application you want to view or edit, click the View / Edit link. The Registration / Application Home page displays. Note that only applications in draft or returned mode may be edited. Version 0.10 – 13th September 2011 Suppliers' User Guide 33. 6.2.2.1. Action the registration Depending on the status of the application different actions can be completed. Status Action Draft Edit Registration Submit Discard Create Copy Export to PDF Update Contacts 6.2.2.2. Notes & Change History To view the Change History and Notes area, click the „notebook‟ tab. The Notes & Change History page displays. 6.2.2.3. Add a note or file to the change history 1. In the [note] field, enter the note. Note: You can expand the note area by dragging and dropping the right-hand corner. 2. Optional – Click Attach a File link. Click the Choose File button. Navigate to the file. Select the file. Click the Open button. The file is added to the comment. Note: You can include additional files. 3. Optional – Select the Confidential check box to hide the comment from the applicant. 4. Click the Submit button. The comment is added to the Change History list. Version 0.10 – 13th September 2011 Suppliers' User Guide 34. 6.2.2.4. Filter the change history You can filter the Change History. Select the required filter: Select the green dot icon check box to display all status changes e.g. submitted, approved. Select the comment icon check box to display only manually entered comments. Select the confidential comment icon check box to display only confidential comments entered by members of your regulatory authority. Select the person icon check box to display changes of assignee e.g. assigned to yourself, then assigned to Sam, then assigned to Jeremy. Select the pen icon check box to display only notifications relating to edits made to the application for registration. The change history list is then filtered by the selection. 6.2.2.5. Add a note or file to the change history 1. In the [note] field, enter the note. Note: You can expand the note area by dragging and dropping the Version 0.10 – 13th September 2011 Suppliers' User Guide 35. right-hand corner. 2. Optional – Click Attach a File link. Click the Choose File button. Navigate to the file. Select the file. Click the Open button. The file is added to the comment. Note: If you wish to include additional files, click “Attach a File again” and repeat the above steps. 3. Optional – Select the Confidential check box to hide the comment from the applicant. 4. Click the Submit button. The comment is added to the Change History list. 6.2.3. Edit an application 1. For the application you want to edit, click the Edit Application link. The Registration Application Wizard displays. Depending on the product registration, different pages display. 2. For the page you want to edit, click the page heading from the side menu. 3. Fill in the page information. 4. Click the Save and Continue > button. A green tick displays at the right-hand side of the menu item. 6.2.4. Delete a registration 1. For the registration you want to delete, click the Delete link. The registration is deleted. Version 0.10 – 13th September 2011 Suppliers' User Guide 36. 7. Account Management 7.1. Inbox You can read email that has been sent out. 1. Click the Account Management tab. The Account Management page displays. 2. Click the Inbox tab. The Inbox page displays. Version 0.10 – 13th September 2011 Suppliers' User Guide 37. 7.1.1. 1. View an email For the email you want to view, click the View link. The email page displays. 7.1.2. Mark an email as read 1. For the email(s) you want to mark as read, click the check box. 2. From the With selected drop-down list, select Mark as Read. Version 0.10 – 13th September 2011 Suppliers' User Guide 38. 7.2. Personal Details On the Personal Details page you can update your name and email address information. 1. Click the Account Management tab. The Account Management page displays. 2. Click the Personal Details tab. The Personal Details page displays. You can edit the following: 3. In the First Name, enter your first name. 4. In the Last Name, enter your last name. 5. In the Email Address, enter your email address. 6. In the Phone field, enter your phone number including the country code as well as the area code if applicable. 7. In the Fax field, enter your fax number including the country code as well as the area code if applicable. 8. In the Organization field, enter your organization’s name. 9. In the Job Title field, enter your job title. 10. In the Street Address field, enter your street number and name. 11. In the Suburb/Town field, enter your suburb within a city or town, whichever is applicable. 12. In the Postal Code field, enter your postal code. 13. In the State/Region field, enter your state, county or region, whichever is applicable. 14. From the Country drop-down list, select your country. 15. Select the check box if your postal address is the same as your street address. Version 0.10 – 13th September 2011 Suppliers' User Guide 39. 16. If your postal address is different complete the address fields. 17. Click the Submit Changes button. Version 0.10 – 13th September 2011 Suppliers' User Guide 40. 7.3. 1. Change Password Click the Account Management tab. The Account Management page displays. 2. Click the Change Password tab. The Change Password page displays. Complete the following: 3. In the Old Password field, enter the old password. 4. In the New Password field, enter the new password. 5. In the New Password (confirm) field, re-enter the new password. 6. Click the Change button. Version 0.10 – 13th September 2011 Suppliers' User Guide 41. 7.4. Notifications The Notifications page allows you to specify which email notifications you would like to receive. For example you can stop being emailed when the regulator updates one of your applications. 1. Click the Account Management tab. The Account Management page displays. 2. Click the Notifications tab. The Notifications page displays. 3. For the required notification click the Send Email check box. 4. For the required notification click the Automatically Mark as Read check box. 5. Click the Save Changes button. Version 0.10 – 13th September 2011 Suppliers' User Guide 42. 7.5. My Applicants The My Applicants page lists the Applicants that your user account is associated with. You can create additional Applicants or leave an Applicant using this page. 1. Click the Account Management tab. The Account Management page displays. 2. Click the My Applicants tab. The My Applicants page displays. 7.5.1. Create a new applicant Refer to section 5.1 Create a new Applicant. Version 0.10 – 13th September 2011 Suppliers' User Guide 43. 8. Appendix A: Example Letter of Authorisation Letter of Authorisation To the Administrator, I am the Authorised Officer for purposes of making an application on the Energy Rating website [www.energyrating.gov.au] for regulated appliances that are produced and manufactured by [insert Authorised Officer‟s legal entity e.g. [name of company, ACN, company type] and sold in Australia and New Zealand. I authorise [insert the name of the Authorised Representative] as my Authorised Representative for the purposes of registering regulated appliances on the Energy Rating website [www.energyrating.gov.au] that are produced and/or manufactured by [insert details] and sold in Australia and New Zealand I understand that by making this authorisation that I retain legal responsibility for the accuracy and completeness of the material that my Authorised Representative uses as part of the application process. I also retain legal responsibility for application that is submitted by my Authorised Representative. The contact details for the Authorised Representative are: [insert contact details for Authorised Representative] Name: Address: Email address: Contact phone numbers: I also understand that it is my responsibility as the Authorised Officer to notify the Administrator if this authorisation is withdrawn and to immediately provide the Administrator with another Authorised Representative in relation to all applications submitted by previous Authorised Representative. Should the Administrator wish to contact the Authorised Officer my contact details are: [insert contact details for Authorised Officer] Name: Address: Email address: Contact phone numbers: Include signature and official title of Authorised Officer here. Version 0.10 – 13th September 2011 Suppliers' User Guide 44.