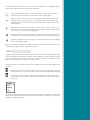
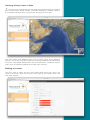
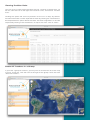
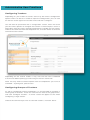
1
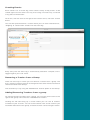
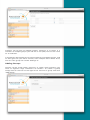
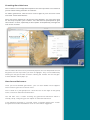
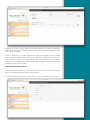
User Guide for The ‘Core’
Version 3.0
www.rock7mobile.com
General Overview
The Back-Office system is designed to provide a single-point of control
for Iridium-based tracking devices. The system can support a multitude of
different device types, allowing monitoring of all through a single console.
The back-office is a purely web-based system, and can be accessed with
any web browser from any internet connection.
Note: if you have your own corporate installation of the back-office system,
you will be given a separate URL to gain access.
Logging In
You will first be presented with a login screen. Entering your username and
password will log you into the back-office system and you will be presented
with the back-office interface screen.
If you have not been provided a username and password, please contact
your System Administrator.
The Interface
Immediately after login you will see the standard interface screen. The
screen is split into two main sections - on the left is the control area, where
you can see your Accounts, Groups and Trackers (see next section). On the
right is the map area, to display tracker locations and graphical information.
Clicking on a Group or Account on the left-hand side will expand that item
- for instance, clicking on a Group (e.g. ‘Europe’) will reveal the trackers
inside that group
To the right of each Account, Group and Tracker you can see a small cog
icon. Clicking on these icons will provide a menu giving options for each
item.
At the top-left of the Interface you can see a number of small green icons.
From left to right, these icons do the following:
Hide the left-hand panel, so the map takes up the entire screen. Clicking again will revert to showing the left-hand panel.
Turn on ‘ruler-mode’ so you can measure a distance on the map.
Clicking on the map once this is on will provide a draggable ruler.
Double-clicking on the ruler ends will remove the ruler and turn off
‘ruler-mode’
Reload the Interface, if you get in a mess with screens, menus, or
trackers you can click this button to reload the Interface and present
the screen as if you had just logged in
Show the Event Log for the whole account. This event log shows all
activity for any account, group or tracker within your entire system
Logout, clicking this icon will log you out of the Interface and return
you to the login screen
There is a search function, to help you find a particular tracker if you are
managing a large number within the system:
Typing in the name (or part of the name) of a tracker in this box and pressing
‘enter’ will filter the Accounts, Groups and Trackers in the left panel to show
items which match the name. To revert to show all entries, simply clear the
text in the search box, and press ‘enter’ again.
Lastly there are a number of other icons which you may see throughout the
system:
Refresh, if you are viewing a list or history then clicking this icon will
reload the list, to show any new entries since you opened the page
Close Page, if you have a view or edit page open, this button will
close the screen without saving any changes, and return you to the
map area.
Clicking on the above icons will change the map style. The default is ‘Satellite’
which shows both satellite imagery and also map data. ‘Map’ is typically the
quickest mapping to load.
Line Rental and Credits
In order to make things more efficient and cost-effective for our customers,
we have a billing scheme whereby customers only need to pay for line
rental when required, rather than on an annual basis.
We also provide a way of paying for position reports, using a credit-based
system. 1 credit = 1 position report. Better still, credits are shared amongst
all of the devices on your account and do not expire. This means that rather
than committing to a certain number of position reports each month, you
actually only pay for what you use.
Credits vary in cost, depending how many you buy at once – allowing you
flexibility to choose the right package for your needs.
Paying for line rental and credits is carried out online, through your existing
login to our back-office system.
Should an account run out of credit, or a device run out of line rental, it will
be temporarily deactivated. The devices can be automatically reactivated
simply by topping up your account.
Your billing contact will get an automatic notification by email when you
need to top-up.
Setting Up Your Billing Details
The first time you log in, you will need to tell us about yourself.
Click ‘Billing Settings’ and complete the form. This information is important
for future billing transactions. Ensure you complete the ‘Area of Use’ field
correctly. If you are based in the EU, please choose ‘European Union’ and if
you have a TAX/IVA number enter it in the box provided.
After saving these details, then go to the dropdown menu again, and choose
‘Contract Status’.
Here you can see the current line rental status of all your devices, whether
they are active or expired, and how many credits you have left. You can
then add extra months line rental to each of your devices, and purchase
more credits as needed.
Accounts, Groups and Trackers
The system is arranged in a hierachy, with accounts being the top level.
Inside your account you can have one or more groups, and inside each
group you can have one or more trackers.
When you log into the system you are presented with the Groups and
Trackers under your account.
You can have as many groups under your account as you wish, and inside
each group you can have as many of your trackers as you wish. Groups are
a convenient way to keep your trackers organised, and you can customise
the name of each group to suit your needs.
Viewing the location of a tracker
The first thing you are likely to want to do is see the location of your trackers.
To do this, expand the group with the required tracker in, and then click on
the tracker name.
A marker pin will be shown on the map. The tracker name will then be
highlighted in bold to show it is on the map.
Clicking on the marker pin will provide a pop-up balloon, giving details of
the last transmission received from the tracker. Depending on your options,
this will show:
•
•
•
•
•
•
•
•
Last Transmission Date/Time
Latitude
Longitude
OS Grid Reference
MGRS
Speed
Altitude
Battery Voltage
At the bottom of the balloon, you are also provided with a number of icons
to perform actions.
Options in the pop-up balloon
At the bottom of the pop-up balloon there are a number of icons, each of
which perform useful actions:
Hide tracker, clicking this will remove the tracker pin from the map
screen.
Zoom to street level, clicking this will zoom the map to the precise
location, centred on the tracker.
Show 10 historic points, clicking this icon will show the previous 10
historic transmissions, as well as the latest point. Clicking again will show a
further 10 points, and again a further 10 etc.
Hide 10 historic points, clicking this icon will remove 10 historic points
from the map each time it is clicked, assuming 10 historic points have already
been shown using the icon above.
Show the event log, clicking this icon will show the event log for this
tracker. The event log shows key history for the tracker, including geo-fence
activity, alerts, configuration changes and other useful information.
Historic trace, clicking this icon will show the location history of a tracker
from a certain date. When clicked, a calendar will pop-up. Clicking a date
in the calendar will then show a trace of the history from the date you have
chosen.
Remove historic trace, clicking this icon will remove the location history
from the map.
Previous locations
Show 10 historic points, clicking this icon will show the previous 10 historic
transmissions, as well as the latest point. Clicking again will show a further
10 points, and again a further 10 etc.
Viewing history from a date
Historic trace, clicking this icon will show the location history of a tracker
from a certain date. When clicked, a calendar will pop-up. Clicking a date in
the calendar will then show a trace of the history from that date
You may notice that different parts of the history trace are in different
colours. This is because the tracker was moving at different speeds during
the trace. Thresholds decide when the trace becomes a different colour,
and can be changed by editing the tracker (next section).
Editing a tracker
You may wish to adjust the way the tracker looks when you view it on
screen. To do this, click on the icon to the right of the tracker name and
click ‘Edit Tracker’.
In this page you can edit the following things:
Basic Details
• Tracker Name - the tracker name is shown in the menu and on the map
• Marker Number - the number shown in the ‘marker’ on the map
• Marker Colour - the colour of the marker on the map
• Late Marker Colour - The colour of the marker on the map if a position has
been received later than expected
• Custom Marker - A selection of different markers (other than the normal
‘droplet’) can be chosen to represent this tracker
Advanced Details
• Track Colours - colour of the historic trace dependent on speed
• Track Alpha - for each colour, how ‘transparent’ the historic trace is
• Trail Nodes - how each history point should be represented
• Moving Thresholds - to define what is ‘fast’ and ‘slow’ for this particular
tracker
Viewing the Tracker Event Log
Show the event log, clicking this icon will show the event log for this
tracker. The event log shows key history for the tracker, including geo-fence
activity, alerts, configuration changes and other useful information.
You can access the event log for a tracker either by clicking on the
icon
inside the balloon on the map, or alternatively by clicking the icon to the
right of the tracker name, and clicking ‘View Event Log’
Viewing Position Data
You may wish to view historic position data for a tracker in tabular form. To
do this, click the icon to the right of the tracker name, and choose ‘Position
Data’.
Clicking this option will show all positions for the last 30 days by default.
Position information can be exported to Excel by clicking the ‘Download as
Excel Spreadsheet’ option above the table. The date range filter can also be
adjusted by clicking in the date boxes, to adjust the ‘from’ and ‘to’ dates.
Show All Trackers in a Group
If you have a group of trackers, you may wish to show them all on the map
at once. To do this, click the icon to the right of the group name and click
‘Show All Trackers’.
All of the trackers in that group will then be displayed on the map, and the
map will be zoomed to the appropriate scale to see all of the markers.
In order to hide all of the trackers within a group, simply click the icon to the
right of the group name and click ‘Hide All Trackers’
Viewing the Group Event Log
The Event Log for an entire group of trackers can be displayed - this log will
combine all of the entries from all trackers within that group.
To view the group event log simply click the icon to the right of the group
name, and click ‘View Event Log’
You will then see all events regarding all trackers within that group, and any
events specific to the group itself.
Showing and Hiding Geo-Objects
Geo-objects include geo-markers and geo-fences, and can be setup by
Administrators within the system.
Geo-fences are defined geographic areas which can be used to create
alerts when one of the tracking devices either goes into or out of these
areas. Geo-markers are simply ‘marked points’ on the map which are of
interest to the operator.
To view these items simply click the icon to the right of your account name,
and click ‘Show Geo Objects’
You will then see appear on the map any geo-fences or geo-markers which
have been added by your account Administrators.
To remove these geo-objects from the map, click the icon to the right of
your account name, and click ‘Hide Geo-Objects’
Viewing the Account Event Log
The Event Log for the entire account can be displayed - this log will combine
all of the entries from all trackers within your groups, and all groups within
your account.
To view the account event log simply click the icon to the right of your
account name, and click ‘View Event Log’.
You will then see all events regarding all trackers and all groups within your
account, and any events specific to the account itself (such as logins and
logouts etc).
Administrative User Functions
Configuring Trackers
Depending on your model of tracker, there may be various configuration
options which can be set. In order to adjust the configuration, you can click
on the icon to the right of the tracker name and click ‘Configure’.
You will then be presented with a configuration screen, which will show
you the various options to configure the tracker. In the example, it shows a
drop-down with the various reporting frequencies available for the tracker.
Choose the command from the drop-down list, and click ‘Send’ to send the
command to the tracker.
Depending on the tracker model, it may wait until the next scheduled
transmission before picking up and acting on the new command.
Note: You only need to choose options from the dropdowns you want to
CHANGE – anything else, please leave.
Configuring Groups of Trackers
As well as configuring trackers individually, it is also possible to configure a
whole group of trackers. To do this click the icon next to the group name,
and click ‘Configure Trackers’. A similar screen will appear to that when
configuring a single tracker.
Choose the command you wish to send the trackers, and click ‘Send’.
Creating Events
Each tracker has an event log, which allows history of key events to be
stored against each tracker. You may wish to log a manual entry, to record
a key piece of information.
To do this, click the icon to the right of the tracker name, and click ‘Create
Event’.
You are then presented with a screen where you can enter ‘Maintenance’,
‘Shipping’ or ‘Observation’ entries into the event log.
Every entry into the event log is automatically date/time stamped, and is
logged against your user name.
Removing a Tracker from a Group
There are two ways in which you can remove a tracker from a group. The
first is simply to click on the icon to the right of the tracker name and choose
‘Remove Tracker from Group’.
The second way is by using the Add/Remove Tracker option on the Group
Adding/Removing Trackers from a group
To add and remove trackers from a group, you can click on the icon to the
right of the group name and click ‘Add/Remove Trackers’
Clicking this will then bring up a screen where you can see all trackers
available to your account. You can tick the boxes next to the trackers you
would like allocated to this group, and then click the ‘Save Changes’ button.
Trackers can be part of multiple groups. However, if a tracker is a
member of multiple groups you will see a red (MG) next to the name
as an indicator.
It should also be noted that if a tracker belongs to multiple groups, and
an alert goes off (see Alerts section) then multiple alerts will be fired,
one for each group the tracker belongs to.
Adding Groups
Groups can be made within accounts, or within other groups if you
wish, to organise large collections of trackers. To create a group
simply click on the icon to the right of the account or group and click
‘Add Group’.
The ‘Add Group’ screen will then appear, and will ask you to complete the
name of the group and the click ‘Save’.
Note: Under most circumstances you will only see the ‘group name’
field. If you are presented with the other boxes then you have been
given a special type of account and you will be given separate
instructions for these sections.
Editing Groups
You can change a group’s details, such as its name, by clicking on the
icon to the right of the group name, and clicking ‘Edit Group’
A screen will then appear where you can adjust the group name and
click ‘Save’.
Deleting Groups
You can delete a group by clicking on the icon to the right of the group
name, and clicking ‘Delete Group’.
You will be asked to confirm the deletion, and then the group will be
removed.
Contact Book and Logins
Each account has a contact book which holds details of people related
to the account. Each person in the contact book could be someone
who should be notified in the event of an alert (called ‘responders’), a
person who has a login to the back-office system, or both.
To view the current people in the contact book, click the icon to the right
of your account name and click ‘Contact Book’. A list of responders/
users will be shown.
Clicking ‘Edit’ next to a contact will take you to a screen where you can
view and edit the details. Similarly, clicking ‘Create Contact’ will take
you to a blank screen where you can add details for a new contact.
If you just wish to create a contact for alerts, simply complete the top
options:
• Name - the name of the person
• E-Mail - the email address (if you wish to alert by e-mail)
• Mobile - the mobile/cell number (if you wish to alert by SMS, in international
format)
• Alert By - preference for how to alert the user in the event of an alert being
triggered
If you wish to create a back-office login for the user, then complete the
lower set of options as well:
• Login - the username entered at login
• New Password - the password (may need to confirm to corporate
requirements)
• Confirm New Password - confirmation of above
• Administrator - tick this if you wish them to have Admin rights
Edit First Responders
Once people have been added to the ‘Contact Book’, you can then setup
‘First Responders’. First responders are the people who receive alert
notifications if:
• Button alerts are pressed
• Geo-fence alerts are triggered
• Other (tracker model specific) alerts are triggered
In order to adjust the first responder setup for a group of trackers, click the
icon to the right of the group name and click ‘Edit First Responders’.
A screen will appear showing you the list of first responders for that group
(if any are defined) and allowing you to add any people from your contact
list to the first responder list for the group.
In the example above, there are two first responders. The person called
‘Tim Smith’ will get an alert notification 0 minutes after the alert is triggered.
If that user has not acknowledged the alert within 5 minutes, then ‘Mark
Watts’ will get the alert.
There is no limit to the number of people you can have as first responders,
so the escalation can continue as far as you wish. Also, if you set the number
of minutes to the same for several people, they will all receive the alert at
the same time. For example, if you simply want 5 people to receive the alert
immediately it is triggered, add all 5 people to the list and set them all to 0
minutes.
Alerts
Alerts can be triggered for a number of reasons, special alert buttons
pressed on trackers, geo-fence triggers etc. If any alerts are triggered
in the system, they are shown at the bottom of the main map screen.
These alerts will vary in colour depending on what they indicate. Red
typically indicates a button alert being pressed, blue indicates a geofence alert.
Alerts will also fire an audible siren if the screen is open.
In addition to this, alerts will also be sent to first responders (in the
escalation pattern setup in the previous section) by e-mail, SMS or
both. Dependent on the installation of your back-office software, you
may also be able to reply to those e-mails and SMS messages to
acknowledge alerts remotely.
E-Mail and SMS alert notifications will contain the name of the
tracker, the latitude and longitude (or OS Grid / MGRS dependent on
preferences) co-ordinates and the date/time stamp of the alert.
Clicking on the tracker name in the alert will show the tracker in
question on the map and centre the map on its location.
To acknowledge (and therefore cancel) the alert, you can click the
‘Acknowledge’ and then ‘Force Ack’ buttons to the right of the alert
bars. Acknowledgement of alerts is logged in the event log for the
trackers involved.
Creating Geo-Fences
Geo-fences are defined geographic areas, and can be as large or
small as you wish. The system also allows you to define any shape of
area. They can be used for alerting, for instance if a tracker ‘goes into’
a certain area, or perhaps if a tracker ‘leaves’ a defined geo-fenced
area.
To create a geo-fence, click the icon to the right of your account name,
and click ‘Draw new Geo Fence’.
After clicking ‘Draw new Geo Fence’ you can then draw your fenced
area on the map by clicking at each vertex.
Double-click on the last vertex to finish the geo-fence, and you will be
prompted to give it a name, optionally a description, and optionally change
the colour of the fence.
Geo-fences can be edited once created simply by ‘grabbing’ one of the
vertex points with the mouse and dragging into the required position. Geofences can be deleted by clicking on the geo-fence, and clicking the ‘Delete’
link on the geo-fence balloon which pops up.
Creating Geo-Markers
Geo-markers are simply defined points on the map which are useful to
you for determining location of trackers.
To add a geo-fence, click the icon to the right of your account name
and click ‘Draw Geo Marker’
Once you have clicked on ‘Draw new Geo Marker’ you can then click
on the map to place your marker. You will then be prompted to give
the marker a name, optionally a description and optionally change the
icon of the marker.
Geo-markers do not have any functional purpose, but can be placed to mark
key points on the map which you wish to highlight. They can be deleted by
clicking on the geo-marker and then clicking the ‘Delete’ link on the geomarker balloon which pops up.
Geo-fence Behavour
Once you have defined geo-fences, you can then define what happens
when trackers go in/out of those areas.
This is done on a per-group basis. Click the icon to the right of the group
name, and click ‘Geo-Fence Behaviour’.
You will then see a screen showing any geo-fence behaviour which is
already setup, and giving you the option to add new behaviour.
In the following example, if a tracker sends a position report from ‘inside’
the geo-fence called ‘NoGoZone’ then an alert will be triggered.
A group can have as many geo-fence alerts setup as you wish. To remove
a behaviour, click the ‘Remove’ button next to the particular behaviour then
click ‘Save Changes’.
Note: In order for an ‘inside’ geo-fence alert to be triggered, the tracker
must first have transmitted at least once ‘outside’ the geo-fence, and viceversa. So for it to go off in the example, the tracker must first have been
‘outside’ of the NoGoZone zone, before transmitting inside the zone and
therefore setting off the alert.
Account Preferences
It is possible to customise various elements of the system to match your
local measurement preferences and timezone.
To do this, click the icon next to your account name, and click ‘Preferences’.