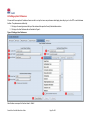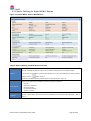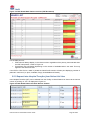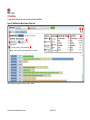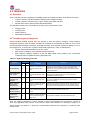
1
Patient Flow Portal Bed Board User Guide Version 4.3 July 2015 Revision History Version Issue date Description/Change Author V0.1 01/11/10 Initial draft Steph Wood V0.2 22/11/10 Draft – updated following review Steph Wood V0.3 23/11/10 Layout and edits Paula Cowan V0.4 09/12/10 Updated Steph Wood V0.5 01/03/11 Updated Steph Wood V0.6 02/05/11 Updated Steph Wood V.07 06/05/11 Updated following review by implementation team Steph Wood V1.0 06/05/11 Final Steph Wood V1.1 19/05/11 Bed definitions updated Steph Wood V1.2 20/06/11 Auto generated EDD’s calculation updated & added how to search for private facilities Steph Wood Updated following new release: Enhanced colours Ability to define “Boarder”, “Leave” and “Well Baby” beds Ability to sort transfers list V1.3 02/08/11 Highlighting of ED admission times that have Steph Wood exceeded KPI’s Ability to enter “Waiting for What” Changes to the detailed Patient Summary window Ability to tick all statuses for manually transferred patients V1.4 24/08/11 V1.5 14/05/12 V1.6 10/09/12 V1.7 03/12/12 V2.0 16/04/13 Review by implementation team Updated following release of the Admission risk filters Update Closed bed information in Bed Management Module Updated following release of PFP Management Grouping of Wards – Stream 1 enhancements Steph Wood Steph Wood Melinda Pascoe Steph Wood Document updated and restructured for PFP Steph Wood and Pedram Technical Version 2.0 Bidhendi Updates for release of PFP Release 3 – Stream 3: V3.0 6/12/13 New Sections: 2.4, 3.4.2, 4.3.1, 4.4.1, 4.5.1, 4.6.1 Steph Wood and Pedram Modified Sections: 1, 2.1, 3.1.1, 3.1.5, 3.2.1, 3.2.3, Bidhendi 3.2.4, 3.4.4, 4.3, 4.5, 5.2 V3.0.1 4/2/2014 Updated Outgoing IHT 4.3.1 Melinda Pascoe V4.0 May 2014 Updated User Preferences Steph Wood V4.1 January 2015 Updated Waiting for What Screen shots Damian Miners V4.2 June 2015 Updated Waiting for What Screen shots Melinda Pascoe V4.3 July 2015 Updated Admission Risk function Pedram Bidhendi Patient Flow Portal Bed Board User Guide Page 2 of 82 Contents 1.0 Overview of the Bed Board ................................................................................................... 6 1.1 Overview........................................................................................................................... 6 1.2 Bed Board Modules ........................................................................................................... 6 1.3 Definitions ........................................................................................................................ 7 1.3.1 Bed Availability ........................................................................................................................ 7 1.3.2 Changing a Bed Status ............................................................................................................. 8 2.0 Logging into PFP ................................................................................................................... 9 2.1 Accessing the Patient Flow Portal for the first time – Request Access ............................... 9 2.2 Accessing Bed Board ....................................................................................................... 13 2.3 Bed Board Home Page .................................................................................................... 14 2.4 Setting up User Preferences ............................................................................................ 15 3.0 Bed Board ........................................................................................................................... 18 3.1 Patient Mode .................................................................................................................. 18 3.1.1 Viewing a Patient................................................................................................................... 21 3.1.2 Add a “Waiting for What (WFW)” Reason .............................................................................. 23 3.1.3 Edit a “Waiting for What (WFW)” Reason .............................................................................. 24 3.1.4 Delete a “Waiting for What (WFW)” Reason .......................................................................... 26 3.1.5 Primary Views ....................................................................................................................... 27 3.1.6 Identifying “Well Babies”, “Leave” patients and “Boarders” ................................................... 31 3.2 Patient List view .............................................................................................................. 32 3.2.1 Customising columns ............................................................................................................. 36 3.2.2 Printing the Patient List view ................................................................................................. 38 3.2.3 Request Inter Hospital Transfers from Patient List View ......................................................... 39 3.2.3.1 Add Facility and Receiving Doctor to an IHT Request ...................................................... 42 3.2.3.2 Remove Facility from IHT Request.................................................................................. 44 3.2.4 Request Inter Ward Transfer ................................................................................................. 45 3.3 Bed Mode ....................................................................................................................... 47 3.3.1 Primary Views ....................................................................................................................... 50 3.4 Other Bed Board Functions ............................................................................................. 52 3.4.1 Filters .................................................................................................................................... 52 3.4.1.1 Adding a Filter ............................................................................................................... 52 3.4.1.2 Doctor and Specialty Filters ........................................................................................... 53 3.4.1.3 Ward Filters ................................................................................................................... 54 3.4.1.4 Clearing Filters ............................................................................................................... 55 3.4.2 Searching for a Patient .......................................................................................................... 56 Patient Flow Portal Bed Board User Guide Page 3 of 82 3.4.3 Graphing LOS and Potential Discharges ................................................................................. 57 3.4.4 General Functions ................................................................................................................. 58 4.0 Transfers ............................................................................................................................ 59 4.1 Overview......................................................................................................................... 59 4.2 Transfer Urgency Categories ........................................................................................... 59 4.3 Outgoing Inter Hospital Transfers (IHT’s)......................................................................... 60 4.3.1 Customising columns ............................................................................................................. 62 4.3.2 Edit Outgoing IHT Request ..................................................................................................... 64 4.3.3 Cancelling Outgoing IHT Request ........................................................................................... 65 4.4 Incoming Inter Hospital Transfers (IHT’s)......................................................................... 66 4.4.1 Customising columns ............................................................................................................. 67 4.4.2 Receive IHT from non-PFP sites ............................................................................................. 67 4.5 Ward Transfers ............................................................................................................... 70 4.5.1 Customising columns ............................................................................................................. 72 4.5.2 Edit IWT Request ................................................................................................................... 74 4.5.3 Cancelling an IWT .................................................................................................................. 74 4.6 Direct Ward Admissions .................................................................................................. 75 4.6.1 Customising columns ............................................................................................................. 77 4.6.2 Request New or Edit Direct Ward Admissions ........................................................................ 78 4.6.3 Cancel Direct Ward Admissions ............................................................................................. 78 5.0 Bed Management module .................................................................................................. 80 5.1 Ward Profile Window ...................................................................................................... 81 5.2 Schedule Window ........................................................................................................... 82 Patient Flow Portal Bed Board User Guide Page 4 of 82 Commonly Used Terms Acronym Description AMO Admitting Medical Officer DON Director of Nursing DWA Direct Ward Admission EDD Estimated Date of Discharge IHT Inter Hospital Transfer IWT Inter Ward Transfer LHD Local Health District LOS Length of Stay PAS Patient Administration System PFP Patient Flow Portal W4W Waiting for What Patient Flow Portal Bed Board User Guide Page 5 of 82 1.0 OVERVIEW OF THE BED BOARD 1.1 Overview The Bed Board within the Patient Flow Portal (PFP) has three modules that provide the following functions: Real time patient information – messages updated immediately. View beds and occupancy across a LHD, hospital or ward. Facilitate inter ward transfers, direct ward admissions and inter-hospital transfers across an LHD and between LHD’s. Ability to record patient’s delays via the ‘Waiting for What’ functionality. Quick and easy to use filters for: o Estimated Date of Discharge (EDD) monitoring. o Length of Stay (LOS) review. o Admission Risks. o Financial Status including patients in single rooms. o Identifying patients with delay reasons via “Waiting for What” o AMO, Specialty, Ward Type, Ward Group or ED Accessible Wards. Clinical specialty lists for hospital specialty profiles. Snapshot statistics for: o Clinician defined EDD. o Average length of stay. o Bed days to date. o Occupancy. o ED accessible bed Occupancy Access Reports for Transfers, Waiting for What Delay Reasons and Occupancy. Benefits: The benefits the Bed Board provides include: Access to real time information for a LHD, hospital, ward or patient. All patient information which populates the Bed Board is received from the Patient Administration System (PAS) in real time and therefore there is no delay in the retrieval of information. Ability to access granular (patient level) and rolled up (LHD level) views. Flexible filters and viewing options. Simplified requesting, monitoring and tracking of Inter Hospital Transfers, Inter Ward Transfers and Direct Ward Admissions. Access to real time Key Performance Indicators (KPIs) related to patient flow. Access to view bed availability via a visual display of capacity. Options to view EDDs and LOS across a LHD or facility. Ability to view and modify the status of a bed. Visible flow measures that can inform local demand and escalation plans. Information to predict potential capacity issues in advance based on known constraints. 1.2 Bed Board Modules Bed Board has three modules which are described in this document: 1. Bed Board 2. Transfers 3. Bed Management Patient Flow Portal Bed Board User Guide Page 6 of 82 1.3 Definitions 1.3.1 Bed Availability The definitions used for determining the status of a bed within the Bed Board are identified in Table 1. Table 1: Bed Board: Bed Status Definitions Bed Status Definition Physical Bed Capacity The total number of physical beds within a facility - this includes all open and closed beds. Open Beds that have been opened and can be used by Patient Flow Managers - this includes available, surge and unavailable beds. Beds that are available for a patient to be admitted into – these can be occupied or empty: Available Occupied: Open beds that have a patient currently in them. Empty: Open beds that do not a have a patient currently in them. Beds that can be made operational if required for short periods of time to manage capacity and demand issues or for specific initiatives e.g. winter funding, surgical wait list management. Surge Open beds that are temporarily not available. They could be reserved or unavailable due to clinical, staffing or maintenance issues. Unavailable Closed Reserved: Open beds that are pre-allocated for specific patients and are time limited. Clinical issue: Open beds that are temporarily unavailable due to clinical issues. Staffing issue: Open beds that are temporarily unavailable due to staffing issues. Maintenance issue: Open beds that are temporarily unavailable due to maintenance issues. Physically available beds that are closed. Figure 1: Conceptual Overview of Bed Capacity Physical Bed Capacity = 30 Closed = 10 Open = 20 Available = 14 Occupied =11 Empty = 3 Unavailable = 5 Reserved = 1 Clinical Issue = 1 Maintenance Issue = 0 Surge = 1 Patient Flow Portal Bed Board User Guide Staffing Issue = 3 Page 7 of 82 1.3.2 Changing a Bed Status Before the status of a bed can be changed the following points should be considered: Opening beds beyond funded capacity (number of open beds) requires approval from the facility General Manager/ After Hour’s delegate as per local delegation. When changing the status of a bed, a bed status hierarchy applies (shown in the available field options) e.g. making a bed unavailable will require the user to change the status to unavailable and then select a ‘reason’ from a list. Beds can only be reserved if they are Open and Available i.e. are empty and not occupied by a patient. Requests for reserving beds must go to the Patient Flow Administrator. If approved then the bed can be reserved and the user will be prompted to enter an expiry date/time for the reserve action. This time can be up to 4 days in the future from the current date. Patient Flow Portal Bed Board User Guide Page 8 of 82 2.0 LOGGING INTO PFP 2.1 Accessing the Patient Flow Portal for the first time – Request Access Before a user can start using PFP they must request access. To complete this user should go to: http://pfp.healthtech.nswhealth.net/pfp/ The log in user name and password will be the user’s network logon Active Directory (or Novell) details. Remember if this password changes, it will change for the Patient Flow Portal also. 1. 2. Request access to the facility/facilities they need to view the Bed Board Data for. Obtain approval from a relevant PFP user to access those facilities. The first time a user logs onto the PFP the following window will be displayed: Figure 2 – Security Administration, Request Access window From this window the user must select the Access Level that they require using the drop down list at the side of the field entitled “Access Level”. The access levels available and examples of the types of roles for the different Access Levels are detailed in the table below. The user must ensure they select the correct level of access or else the request will not be approved. Patient Flow Portal Bed Board User Guide Page 9 of 82 Access Level Example of user EPJB Ward User Nurses Allied Health staff Ward Clerk Ability to view / update patient information Clinical Manager Nurse Unit Manager Nurse in Charge Nurse Manager Ability to view / update patient information Patient Flow Manager Bed Manager After Hours Nurse Manager Patient Flow Administrator Patient Flow Manager Facility Manager General Manager DON, DCS, DDON, Group / Service Manager Ability to view / update patient information Ability to view / update patient information Ability to view / update patient information EPJB Admin Bed Management Waiting for What Inter Hospital Transfer Direct Admissions & Inter Ward Transfer Nil Access Ability to enter for all Wards Ability to enter for approved ward/s only Ability to enter for approved ward/s only Nil Access View only for approved Hospital/s Download reports Nil Nil Access Ability to enter for all Wards Ability to enter for approved ward/s only Ability to enter for approved ward/s only View only View only for approved Hospital/s Download reports Clinical Manager Ward User Download reports Connecting Care User Patient Flow Manager Clinical Manager Ward User Download & Schedule reports Connecting Care User Patient Flow Manager Clinical Manager Ward User Download reports Facility Manager Connecting Care User Patient Flow Manager Clinical Manager Ward User Bed Management Admin Predictive Tool Hospital Dashboard Reporting Ability to Approve / Deactivate Access View only Nil Access Ward Schedule all wards View only Update Bed Setup only Ward Schedule all wards View only Update Bed Setup only Nil restrictions Nil Access Patient Flow Portal Bed Board User Guide Ward Schedule all wards Access and modify Ward Schedules and Ward Profiles for approved Hospital/s View only Ward Schedule all wards for approved Hospital/s Nil Access Access and modify for approved Hospital/s Nil Access Ability to enter for all Wards for approved Hospital/s Ability to enter for all Wards for approved Hospital/s Ability to enter for all Wards for approved Hospital/s Ability to enter for all Wards for approved Hospital/s Ability to enter for all Wards for approved Hospital/s View only for approved Hospital/s Ability to enter for all Wards for approved Hospital/s Ability to enter for all Wards for approved Hospital/s View only for approved Hospital/s Page 10 of 82 Access and modify for approved Hospital/s Access and modify for approved Hospital/s View only for approved Hospital/s View only for approved Hospital/s View only for approved Hospital/s View only for approved Hospital/s Access Level Example of user LHD User LHD Patient Flow / Access Manager LHD Executive Connecting Care User EPJB Ability to view / update patient information Nil Access EPJB Admin Bed Management Bed Management Admin Waiting for What Inter Hospital Transfer Direct Admissions & Inter Ward Transfer Predictive Tool Hospital Dashboard Reporting Ability to Approve / Deactivate Access Nil Access Ability to enter for all Wards for approved Hospital/s Ability to enter for all Wards for approved Hospital/s View only for approved Hospital/s View only for approved Hospital/s View only for approved Hospital/s Download & Schedule reports Connecting Care User LHD User Facility Manager Patient Flow Manager Clinical Manager Ward User Ambulance User Nil Access View only Ward Schedule all wards for approved Hospital/s Nil Access View only for approved Hospital/s View only for approved Hospital/s View only for approved Hospital/s View only for approved Hospital/s View only for approved Hospital/s Download reports Connecting Care User Nil Access View only for approved Hospital/s View only for approved Hospital/s View only for approved Hospital/s View only for approved Hospital/s View only for approved Hospital/s Download & Schedule reports Nil Nil Access View only Ward Schedule all wards for approved Hospital/s MOH User Director Senior Managers Project Officers Nil Access Nil Access View only Ward Schedule all wards for approved Hospital/s Ambulance User Ambulance Liaison Officers Nil Access Nil Access Nil Access Nil Access Nil Access Nil Access Nil Access Predictions – Summary tab Nil Access Nil Access Nil System Administrator MoH PFP Support Team & Project Officers Ability to view / update patient information Nil restrictions Nil restrictions Nil restrictions Nil restrictions Nil restrictions Nil restrictions Nil restrictions View only for all Hospitals Download & Schedule reports Can approve all users No ability to access Patient Flow Portal Bed Board User Guide View only access Limited ability to access Page 11 of 82 Unrestricted access Once a level of access has been selected from the drop down list the user must select the LHD’s or Facilities that they require access to. Depending on the access level selected a user can request access to: Multiple LHD’s (and all the facilities within the LHD’s). Single LHD (and all the facilities within that LHD). Multiple facilities. Single facility. Single or multiple wards within a Facility. To request access to all the facilities within an LHD, the user must highlight the LHD in the list on the right hand side of the window, then drag and drop the LHD into the list in the middle of the window. Each facility will then be displayed in the list. To request access to specific facilities the user must first highlight and then double click the LHD that the facility is in, which in turn will display a list of all the facilities within that LHD. The users can then drag and drop the individual facilities into the list. If single or multiple wards are required the user can then drag and drop and the ward/wards into the list. Note: Ctrl click allows the user to select multiple LHD’s or multiple facilities at the same time and Ctrl Shift allows the user to select a block of adjacent facilities. Once the user has selected all the facilities they require access to, clicking on the “Save” button will display a message advising that the approval requests have been submitted. The request will now appear on the “Approve Access” list of the relevant approver and once the request has been approved the user will be able to login and access the PFP for the approved facilities. Patient Flow Portal Bed Board User Guide Page 12 of 82 2.2 Accessing Bed Board 1. Go to http://pfp.healthtech.nswhealth.net/ and the login page will be displayed: Figure 3: Patient Flow Portal Login Page 2. Login page allows the user to logon to the full version of the Patient Flow Portal, the Dashboard or the module Electronic Patient Journey Board for a selected hospital / ward. 3. To access Bed Board the user needs to logon to the “Patient Flow Portal” – the blue login section on the login page. 4. Enter your Network Log-in Name and Password. 5. Select the Organisation from the drop down list. 6. Click the Submit button. By logging onto the Patient Flow Portal the user is acknowledging that they are abiding by the principles as set out in the NSW Health Privacy Manual 2005 (PD2005_593) and the Electronic Information Security Policy 2008 (PD2008_052). NOTE: If the above page does not display or a message appears advising you need to install Adobe Flash Player 11 then please contact the State-wide Service Desk on 1300 28 55 33. Patient Flow Portal Bed Board User Guide Page 13 of 82 2.3 Bed Board Home Page Once a user has successfully logged onto PFP the Bed Board Home Page will be displayed. Figure 4: Bed Board Home Page The Bed Board allows the user to: Evaluate how beds within a given ward are being used. Understand current work practices by being able to identify which beds are open across an organisation to assist with demand and capacity planning. Identify an organisation’s “tipping points” for demand escalation. Patient Flow Portal Bed Board User Guide Page 14 of 82 2.4 Setting up User Preferences All users with the exception of Ambulance Users are able to set up their own user preferences which apply when they log on to the PFP or switch between facilities. The preferences are defined by: 1. Clicking on the user login name at the top of the window which opens the Security Administration window. 2. Clicking on the User Preference tab as illustrated in Figure 5. Figure 5: Setting up User Preferences Note: Numbers correspond to Functions listed in Table 2. Patient Flow Portal Bed Board User Guide Page 15 of 82 Table 2: User Preferences Purpose Allows the user to set up their own default user preferences for logging on to PFP, the primary view on the Bed Board and default filters on the Bed Board for each facility they have access to. The screen is broken down into three sections, each section associated with a different user preference default setting: Screen Layout Logon LHD, Facility and Logon Module – Only users with approved access to > 1 LHD and / or facility will be able to default their Login LHD and / or Facility. Bed Board primary view and associated primary filter – This filter applies when viewing any facility the user has approved access to. Bed Board Ward Type, Ward Group, AMO and Specialty filters which are unique to each facility the user has approved access to. To set up the User Preferences the user selects the required settings from the drop down lists and filters defined in the Function list below and clicks on the “Save” button. For the preferences to take effect, the user must log out and log back into PFP. Refer to Figure 5: Setting up User Preferences 1. Login LHD: Allows the user to select the default LHD when logging onto the PFP. LHD’s displayed depends on the user’s access rights. 2. Login Facility: Allows the user to select the default facility when logging onto PFP. Facilities displayed are based on the user’s access rights and the default Login LHD selected. I.e. it is not possible for a user to have a Login Facility which is not located in the Login LHD. “All” is an option which allows the user to display patients in All facilities they have access to for the selected LHD by default when they first logon to the PFP. 3. Login Module: Allows the user to select the default login module when logging onto the PFP. Options available are dependent on the user’s access level but may include one or more of the following: Bed Board Dashboard EPJB Predictive Tool Reporting Note: If user selects “All” as the Login Facility they will only be able to access the Bed Board module on login. Note: If user selects “All” as the Login Facility they will only be able to access the Bed Board tab on login. Functions 4. Bed Board Primary View: Allows the user to select 1 of the following Primary Views as their default whenever they view the Bed Board for any facility: LOS LOS > EDD Gender Age Waiting for What Financial Status Admission Risk 5. Bed Board Primary View Filter: Allows the user to select the Primary View filter as their default whenever they go to the Bed Board for any facility they have access to. The filters change based on the Primary View selected. 6. Display Ward Description: Allows the user to select if the Ward Description or the Ward Code displays by default on the Patient Mode, Bed Mode and Patient List view of the Bed Board. Ticking the checkbox will display the Ward Description by default. 7. Bed Board Default Filter LHD: Allows the user to select the LHD to set up default filters for. LHD’s Patient Flow Portal Bed Board User Guide Page 16 of 82 displayed depends on the user’s access rights. 8. Bed Board Default Filter Facility: Allows the user to select the facility to set up default filters for. Facilities displayed based on the user’s access rights and the Bed Board Default LHD selected. “All” is an option and allows the user to set up default filters when viewing “All” facilities in the given LHD. 9. Bed Board Default Filter: Allows the user to set up different filters for each facility the user has access to and the filters will be applied when the user selects to view the Bed Board for the given facility. When using the Bed Board, the default filters can be removed at any time by clicking on the “Clear all Filters” icon on Patient Mode and Bed Mode. The filters will be re-applied whenever the user switches back to the given facility. To add one of the following filters in the table below, the user must highlight the value to filter by in the list on the left (multiple selections can be made by using the ‘Ctrl’ key or using the ‘Shift’ key to select a block of values) and then either drag and drop the value into the list on the right or click on the right arrow button. Filter Ward Type Filter Ward Group Filter AMO Filter Specialty Filter Display Displays the list of Ward Types and Sub Ward Types available for the user to default by when viewing the selected facility. Options available are based on the state-wide defined Ward Type – Sub Ward Type list. If Ward Group filters have been selected then Ward Type Filter tab will be disabled (Ward Type filters and Ward Group filters cannot be applied at the same time). Displays the list of Ward Groups available for the user to default filter by when viewing the selected facility. Options displayed will be specific to the facility selected. Ward Group filter tab will be disabled if “All” is selected as the facility. If Ward Group filters have been selected then Ward Type Filter tab will be disabled (Ward Type filters and Ward Group filters cannot be applied at the same time). Displays the list of AMO’s to filter by when viewing the selected facility. AMO’s displayed will be specific to the facility selected depending on whether the AMO has ever admitted a patient into the selected facility. If “All” is selected a consolidated list of ALL AMO’s across ALL facilities the user has access to for the given LHD will display i.e. if an AMO works across multiple facilities they will display in the list multiple times. Displays the list of Specialties available for the user to filter by when viewing the selected facility. Specialities displayed will be specific to the facility selected. If “All” is selected a consolidated list of ALL Specialties across ALL facilities the user has access to for the given LHD will display. 10. Bed Board ED Accessible Filter: Allows the user to filter only ED Accessible wards by default for the selected facility when viewing wards in Patient Mode, Patient List View and Bed Mode. 11. Clear Filters: Allows the user to clear any filters they have setup as a Bed Board default. 12. Reset Defaults: Resets to PFP default settings, which will result in the following: Login LHD and Facility will be defaulted to the first LHD and Facility the user has approved access to based on the name in alphabetical order. E.g. If user has access to Far West LHD, Central Coast LHD, Gosford Hospital and Wyong Hospital and they Reset Defaults the Login LHD and Facility will be Central Coast and Gosford Hospital respectively. Login Module will be defaulted to Bed Board. Primary View will be defaulted to EDD and Clear. Display Ward Description will not be selected. Ward Type, Ward Group, AMO or Specialty filters will be cleared for all facilities. Patient Flow Portal Bed Board User Guide Page 17 of 82 3.0 BED BOARD The Bed Board module is the default view as detailed in Figure 4 with three key screens: Patient Mode Patient List View Bed Mode 3.1 Patient Mode The default view when the user clicks on the Bed Board tab is the Patient Mode view – see Figure 6. This view Figure 6: Bed Board Patient Mode View 1 14 2 12 3 9 4 6 5 11 8 7 15 10 16 Note: Numbers correspond to Functions listed in Table 3. . Patient Flow Portal Bed Board User Guide Page 18 of 82 13 Table 3: Bed Board: Patient Mode View Overview Allows the user to view bed occupancy information, including information regarding the patients occupying a Purpose bed, for a given LHD, hospital and ward. This is dependent on the organisation selected when logging on and approved level of access the user has. LHD/facility that the user is currently logged onto is displayed on the drop down list located underneath the PFP logo on the top left of the window details. Heading will display as “LHD Profile” or “Hospital Profile” depending on whether the user is viewing the Patient Mode for a LHD or a specific hospital. This provides the user with a summary of the following indicators: Indicator Screen Layout Definition ED accessible beds occupancy* This is the % occupancy of ED accessible beds in the hospital/LHD. Occupancy This is the total % occupancy of the hospital/LHD. Number of patients Number of patients currently admitted to the hospital/LHD (excludes patients in beds and wards flagged as Inactive and in beds flagged as “On Leave”, “Well Baby” and “Boarder). Bed days to date Total numbers of day’s patients have been occupying beds. Average LOS Average LOS of patients (excludes patients whose LOS = 0 days) Clinician Defined EDD* The % of patients who’s EDD that has been manually updated in the PAS. This excludes patients in wards flagged as “Day Only” and “Designated ED” and patients in any ward with LOS < 24 hours. Note *: Refer to the PFP Administrator Guide for information on how to flag a ward as ED accessible, 11 Day Only and Designated ED. 22 33 44 7 7 Next to the “LHD/Hospital Profile” summary is the “Filtered Profile” which displays a summary of the patients displayed on the screen when a filter has been applied, a filter being either: o Primary view - EDD, LOS, LOS >, Gender, Age, Waiting for What or Admission Risk. o AMO o Speciality o Ward Group o Ward Type o ED accessible wards o OR a combination of one or many of the above. 55 66 8 9 9 11 11 8 The first two columns on the main window, display the name of the Hospital and the ward. The coloured tile to the right of the ward represents a patient who is currently admitted to that ward. 10 Refer to Figure 6: Bed Board Patient Mode View 10 1. LHD and/or Facility from the drop down lists can be changed depending on a user’s access rights, by selecting another LHD and / or Facility and clicking on “Select Hospital”. Functions 2. Access the Bed Board, Transfers or Bed Management functions. 3. Access Patient Mode or Bed Mode views within Bed Board. 4. Primary view filters for patients, which include: EDD, LOS, LOS >, Gender, Age, Waiting for What and Patient Flow Portal Bed Board User Guide Page 19 of 82 Admission Risk. The coloured radio buttons update based on the primary view selected. 5. Filter patients using AMO Filter for Doctors and Specialty. 6. Filter patients using Ward Filter for Ward Types, Ward Groups and ED Accessible Wards. 7. Hide wards with no patients. 8. Display the PFP defined Ward Description instead of the PAS defined Ward Code on the ward tiles. 9. Display a LOS / Potential Discharges Graph. 10. View patient information and access Waiting for What functionality. 11. General functions such as Refresh and Clear All Filters – Refer to Section 3.4. 12. View LHD / Hospital Profile or Filtered Profile information. The Filtered Profile information is updated when an AMO, Ward or Primary View filter is applied. 13. Access the Bed Management Admin module, which is accessible to Patient Flow Administrators only. 14. Patient Search button, which allows users to find any patient in the facility. 15. A Facility or LHD Patient List View can be accessed by clicking on the Facility name in the blue tiles on the right hand side of the screen. 16. A Ward Patient List View can be accessed by clicking on the Ward Code in the light blue tiles next to the patient tiles. Patient Flow Portal Bed Board User Guide Page 20 of 82 3.1.1 Viewing a Patient Each bed that is occupied by a patient within a given ward is displayed as a coloured ‘tile’ on the main screen of the Patient Mode: The colour of the tile and value displayed on it is dependent on the primary view filter selected. Placing the cursor over a patient tile will display a hover over window detailing information about the patient who is occupying that bed in the given ward as displayed in Figure 7 – this information includes: Patient name. Admitting Medical Officer (AMO). Bed number. Room number. EDD, LOS, LOS >, Gender, Age, Waiting for What, Financial Status, Admission Risk Depending on which primary view has been selected. For example in Figure 7 the EDD primary view has been selected. Figure 7: Bed Board Patient Mode, Patient Hover Over Single clicking on a patient’s bed tile will display more detailed demographic information for the selected patient at the top of the screen as illustrated in Figure 8. The additional information includes the: Patient ID. Admission Date. Date of Birth. Age. Financial Status. Address. Language. Medical Officer. Specialty. Patient Flow Portal Bed Board User Guide Page 21 of 82 Figure 8: Bed Board Patient Mode, Detailed Demographic View Double clicking on a bed tile will display the patient’s detailed profile as displayed in Figure 9, which is a read only view and details the patient’s: Demographics and information about the current visit. EDD History. Admission History – within the LHD. Ward Transfers for Current Visit. Summary of Waiting for What reasons. Figure 9: Patient Mode, Detailed Patient Profile, WFW Summary Window Clicking on the ‘X’ at the top right of this patient profile window will return the user to the main Patient Mode window detailed in Figure 6. For further information about the purpose, screen layout and functions of the Detailed Patient Profile window refer to Table 5. Patient Flow Portal Bed Board User Guide Page 22 of 82 3.1.2 Add a “Waiting for What (WFW)” Reason Figure 10: Patient Mode, Select a WFW Reason Table 4: Select a Waiting for What Reason Overview The Waiting for What (WFW) functionality allows the user to add details about delay reasons, which could be potentially extending the patient’s length of stay in hospital or delaying them from being discharged. Purpose A WFW reason can be added to a patient’s PFP admission record from the Detailed Patient Profile window by clicking on the icon Refer to figure 7. This will open the Select a Waiting for What Reason window, displayed in Figure 10. Displays all the WFW reasons available for selection grouped by categories: Screen Layout Functions Consults Diagnostics / Treatment Discharge Process Out of Hospital Referral Transfer / Transport Selecting a WFW reason, which will result in the “Edit Waiting for What” window being displayed – Refer to Figure 11. Patient Flow Portal Bed Board User Guide Page 23 of 82 3.1.3 Edit a “Waiting for What (WFW)” Reason Figure 11: Patient Mode, Edit WFW Reason 1 3 4 2 6 5 Note: Numbers refer to the Screen Layout section in Table 5. Table 5: Edit a Waiting for What Reason Overview The Edit WFW functionality allows the user to modify details about delay reasons, which could be potentially extending the patient’s length of stay in hospital or delaying them from being discharged. Purpose A WFW reason can be edited by clicking on the icon from the Detailed Patient Profile window. 1. Header displays the Patient name, ID and Medical Officer. 2. Patient Details box displays non editable information for Bed, EDD, Admit Date, Specialty, DOB, Age, Language and Address. This box is highlighted in pink for females and blue for males. A dark border indicates that the EDD was auto-generated. 3. EDD History displays in top left hand quadrant of the screen next to the Patient Details box. 4. Admission History for the LHD displays in the top right hand quadrant of the screen. This information is Screen Layout non editable and updates with admission history for the patient at all facilities within the LHD. 5. Ward Transfers for Current Visit displays in bottom right hand quadrant of the screen. This details the ward transfers the patient has had within the specific facility for their current admission. 6. Waiting for What displays in bottom left hand quadrant of the screen for viewing and editing WFW reasons. When a user is not editing a WFW reason, all WFW reasons are displayed in the WFW quadrant on the screen – See Figure 12. User can: Functions Add free text notes to the selected “Waiting for What” reason. Enter a “Start Date” either today or a date in past, but not before the admission date. This is a mandatory field. Patient Flow Portal Bed Board User Guide Page 24 of 82 Add a “Close Date” which cannot be before the “Start Date”. Save the WFW reason by clicking on the “Save” button. Cancel changes by clicking on the “Cancel” button/ After clicking Save, the Detailed Patient Profile will display and the WFW reason will be detailed in the WFW Summary Section of the Detailed Patient Profile window – See Figure 12. Figure 12: Patient Mode, Detailed Patient Profile, WFW Summary Window A WFW reason can also be closed from the Detailed Patient Summary window as displayed in Figure 12 by: Clicking in the “Close Date” calendar icon. Selecting a date Clicking on the “Save” button. Once a Close Date has been entered for a WFW reason, the reason will still display in the list on the WFW Summary window, but will be greyed out and non-editable. . Patient Flow Portal Bed Board User Guide Page 25 of 82 Figure 13: Patient Mode, Detailed Patient Profile, WFW Summary window, Closed WFW Reason 3.1.4 Delete a “Waiting for What (WFW)” Reason If an Open WFW reason has been entered in error it can be deleted from the WFW summary window by clicking on the delete icon at the side of the reason. A message will appear confirming the deletion of the WFW reason asking the user to select: “Yes” - Remove the reason from the patient’s list. “No” - Leave the reason on the patient’s list. Once a WFW reason has been closed it cannot be deleted from the patient’s profile. Patient Flow Portal Bed Board User Guide Page 26 of 82 3.1.5 Primary Views Users are able to select what patient information to display on the tiles on the Patient Mode view by selecting a Primary View from the drop down list at the top left of the screen. Figure 14: Bed Board: Patient Mode, Primary View drop down list The Primary View selected will determine the: Colour of the patient tiles and the information detailed on the tile. Radio buttons underneath the Display Views/Filters which will correspond to the colour coding on the patient tiles. Clicking on a coloured radio button further filters the patients according to the text against the radio button. To clear this filter click on the radio button entitled ‘Clear’. The primary views that can be selected are detailed in Table 6. Table 6: Bed Board Patient Mode Primary Views Primary Views LOS Function Displays the LOS for the given patient in the hospital. The second filter using the coloured radio buttons allows the user to filter beds by LOS between a given number of days: o 0 – 4 days o 5 – 9 days o 10 – 14 days o 15 – 19 days o 20 – 49 days o 50 – 99 days o 99+ days Patient Flow Portal Bed Board User Guide Page 27 of 82 Primary Views Function Displays the LOS for the given patient in the hospital. The second filter using the coloured radio buttons allows the user to filter beds by LOS greater than a given number of days: LOS > o > 4 days o > 9 days o > 14 days o > 28 days o > 49 days o > 99 days By regularly reviewing the LOS of patients staff can: Identify patients who are staying longer than the average LOS. Identify delays in care and ensure they are effectively managed. This is useful in capacity planning and coordinating care to avoid unnecessary delays in discharging patients. By knowing the average LOS by speciality, standardised practices can be put in place across wards, to improve patient outcomes. Reviewing the LOS during daily bed meetings may assist in care coordination for patients who have exceeded the average LOS. Displays the number of days until the patient’s EDD The number will be negative if a patient’s EDD has expired i.e. it is a date in the past. The second filter using the coloured radio buttons allows the user to filter by EDDs: EDD o Expired (i.e. date in the past) o Today o Tomorrow o 2-3 days o 4-5 days o > 5 days o Auto Generated - If a patient is admitted and does not have a Clinician Defined EDD, PFP will automatically generate their EDD by calculating the median length of stay for the patient’s AMO for the given ward using the last 13 weeks of data for discharged patients. If the AMO has never had an admission to the given ward then PFP will calculate the median length of stay for the patient’s speciality for the given facility using the last 13 weeks of data for discharged patients. If an EDD has been system generated then the tile will have a bold highlight around it. The user can filter on these patients by clicking on the radio button entitled “Auto generated”. EDD’s predict the likely date that a patient will be discharged from hospital back into the community and should be reviewed frequently (in bed management daily meetings) and used as a planning tool to coordinate a patient’s care. This information can assist with demand and capacity planning. Displays the gender of the patient: either female or male. The second filter using the coloured radio buttons allows the user to filter on beds occupied by just Male or Female patients: Gender Age o Female = pink colour o Male = blue colour Displays the age of the patient. The second filter using the coloured buttons allows the user to filter the display based on age ranges: o 0 – 17 o 18 – 35 o 36 – 64 o 65 – 74 Patient Flow Portal Bed Board User Guide Page 28 of 82 Primary Views Function o 75 – 84 o 85+ o < 16 o > 75 Displays a reference to the Category of the Waiting for What (WFW) reason a patient has entered against them. The second filter using the coloured buttons allows the user to filter by the different “Waiting for What” Categories: Waiting for What o C = Consults o D = Diagnostics/Treatment o DP = Discharge Process o OHR = Out of Hospital Referral o T = Transfer/Transport o M = Multiple Waiting for What reasons o N = No Waiting for What Reasons Displays the patient’s Financial Status which is based on their financial class code which is sent by the Patient Administration System to PFP. The second filter using the coloured buttons allows the user to filter by the different “Financial Status”: Financial Status o Pub = Public. o Cha = Chargeable. o DVA = DVA. o Com = Compensable. o I = Ineligible. o DC = Deferred. o O = Other. o Single Room = selecting this radio button will display only patients in beds flagged as being in a Single room*. The patient’s Financial Status will still display on the tile. Note *: Refer to the PFP Administrator Guide for information on how to flag a bed as being in a Single room Only displays patients who have been previously admitted to a facility within the LHD and have met specific criteria related to these previous admission(s) and their current admission. This applies to all Admission Risks with exception of > 5 Ward Moves, ATSI and Remoteness. The second filter using the coloured buttons allows the user to filter by a specific admission risk with the criteria for each risk defined as: Risk:1 Multiple admissions: The patient is > 15 years of age AND This is the patient’s THIRD or more planned or unplanned admission in the last 12 months Admission Risk AND At least two of the previous admissions were UNPLANNED i.e. first ward they were admitted under was Emergency Note: If a patient meets the criteria for Risk #2 (Multiple admissions - specific specialty) then they will not be flagged as meeting this criteria. Risk 2: Multiple admissions – specific specialty: The patient is > 15 years of age AND This is the patient’s THIRD or more, planned or unplanned, admission in the last 12 months Patient Flow Portal Bed Board User Guide Page 29 of 82 Primary Views Function AND Any specialty recorded against the patient whilst admitted under this third or more admission is one of Endocrinology or Cardiology or Respiratory AND At least two of the previous admissions were UNPLANNED i.e. first ward they were admitted under was Emergency AND Any specialty recorded against the patient of at least two of their previous admissions was one of Endocrinology or Cardiology or Respiratory Risk 3: Multiple Admissions - Same specialty: The patient has a current, unplanned or planned, admission that has any specialty that is equal to any specialty recorded against any other planned or unplanned admission in the last 12 months. Risk 4: 28 day re-admit + ED: The patient has a current admission that is unplanned i.e. they have been admitted via ED, within 28 days of their last unplanned or planned admission, regardless of specialty. Risk 5: 28 day re-admit: The patient has a current admission that is planned i.e. they have not been admitted via ED, within 28 days of their last unplanned or planned admission, regardless of specialty. Risk 6:> 5 ward moves: The patient has been moved to more than 5 wards during their current admission, this includes the ED ward. Risk 7: ATSI: Patient’s current ATSI status is equal to Aboriginal and/or Torres Strait Islanders status. Risk 8: Remoteness: Patients whose current postcode is identified as being “Remote” or “Very Remote”: 2551 2873 2825 2824 2877 2839 2396 2648 2715 2387 2832 2878 2672 2405 2829 2406 2831 2835 2388 2356 2711 2834 2879 2836 2400 2386 2675 2833 2880 2840 2898 > 1 risk: Patients who have met more than one admission risk Note: An “unplanned” admission is an admission that was via the Emergency Department or into the Emergency Department. Exclusion criteria: For all of the above selection criteria if the patient is in a ward assigned to one of the following ward type / sub ward types they will not display with an admission risk: Medical / Dialysis OR Paediatric / Dialysis OR Ambulatory Care / No Subtype. Patient Flow Portal Bed Board User Guide Page 30 of 82 3.1.6 Identifying “Well Babies”, “Leave” patients and “Boarders” Beds can be flagged by Patient Flow Administrators in the PFP Bed Management Admin module as: Well Baby. On Leave. Boarder. Figure 15: Bed Board: Patient Mode, “Well Baby”, “Leave” and “Boarder” beds Table 7: Identifying “Well Babies”, “Leave” patients and “Boarders” Overview Identifying beds for Well Babies, Leave patients and Boarders will: Purpose Exclude the patients in these bed types from all counts and occupancy calculations in the LHD / Hospital Profile and Filtered Profile data. Exclude the patients in these bed types from occupying a bed tile on the Bed Mode view. Display patients in these bed types on the Patient List View identified by the # symbol which will appear at the side of the bed number. Once a bed has been flagged as Well Baby, On Leave or Boarder, if a patient is admitted into, or transferred to, one of these beds they will be displayed on the Patient Mode view with a white tile and black text. – Refer to Figure 15. Screen Layout The patient tile will display at the end of the row of patients, so they can easily be distinguished from actual admitted patients. Note: Differentiating between bed types i.e. “Well Baby”, “On Leave” or “Boarder” from the Patient Mode view is not possible. However the ward that the bed is associated with should be an indication as to what type of bed it is. Functions Text on the bed tile will be as per the Primary View selected i.e. EDD, LOS etc. When a secondary filter is applied using the coloured radio buttons or the AMO / Specialty filters, the patients in these bed types do not display on Patient Mode. Patient Flow Portal Bed Board User Guide Page 31 of 82 3.2 Patient List view PFP Bed Board has three Patient List Views: 1. Ward View – Lists all patients currently admitted to a ward. 2. Facility View – Lists all patients currently admitted to a facility. 3. LHD View – List all patients currently admitted to all facilities within a LHD. To access the Facility or LHD Patient List View, dependent upon the level of access the user has approval for, the user needs to single click on the Hospital tile from the Patient Mode as illustrated in Figure 16. To access the Ward List View, a user needs to single click on the Ward tile from the Patient Mode. Figure 16: Bed Board Access Patient List View Whether the Facility or LHD view opens is dependent on whether the user is viewing Patient Mode for a single facility or ALL facilities in that LHD. Patient Flow Portal Bed Board User Guide Page 32 of 82 Figure 17: Bed Board Ward Patient List View 1 12 11 2 7 3 8 6 4 5 13 9 10 14 Note: Numbers correspond to Functions listed in Table 8 Patient Flow Portal Bed Board User Guide Page 33 of 82 Table 8: Bed Board Patient List View The Patient List View allows users to view detailed information about the patients in their Ward, Facility or Purpose LHD depending on their level of access. This information can also be printed to a PDF or CSV file for users to take to meetings. LHD/facility that the user is currently logged onto is displayed on the drop down list located underneath the PFP logo on the top left of the window details. Heading will display as “LHD Profile” or “Hospital Profile” depending on whether the user is viewing the Patient Mode for a LHD or a specific hospital. This provides the user with a summary of the following indicators: Indicator Definition ED accessible beds occupancy* This is the % occupancy of ED accessible beds in the hospital/LHD. Occupancy This is the total % occupancy of the hospital/LHD. Number of patients Number of patients currently admitted to the hospital/LHD. Bed days to date Total numbers of day’s patients have been occupying beds. Average LOS Average LOS of patients (excludes patients whose LOS = 0 days) Clinician Defined EDD* The % of patients who’s EDD that has been manually updated in the PAS. This excludes patients in wards flagged as “Day Only” and “Designated ED” and patients in any ward with LOS < 24 hours. Note *: Refer to the PFP Administrator Guide for information on how to flag a ward as ED accessible, Day Only and Designated ED. Next to the “LHD/Hospital Profile” summary is the “Filtered Profile” which displays a summary of the patients displayed on the screen when a filter has been applied, a filter being either: o Primary view - EDD, LOS, LOS >, Gender, Age, Waiting for What, Financial Status or Admission Risk. Screen Layout o AMO o Speciality o Ward Group o Ward Type o ED accessible wards o OR a combination of one or many of the above. If the Ward List View is being viewed a Ward Profile will also display, identifying the number of patients in red and number of beds in black by bed status, as displayed below. Note: The Ward Profile does not display if the user is viewing a Facility or LHD View. If the primary view selected is “EDD”, then the value in the EDD column will display as per the applicable colour for EDD on the Patient Mode. This only applies for the EDD primary view, if any other primary view is selected the EDD cells will be the default blue colour. Patient Flow Portal Bed Board User Guide Page 34 of 82 Secondary filter radio buttons will update based on primary view selected from Patient Mode. Note: primary view is not editable on the Patient List View so the user is required to return to Patient Mode to change the primary view. Patients are listed in tabular format with columns that can be customised by the user. The default sort is alphabetical by Ward and then Bed Number, however the data can be custom sorted by clicking on any of the column headers to sort in ascending order by the given column type i.e. numeric fields e.g. Age, will sort from lowest (youngest) to highest (oldest) or for text fields, the sort will be alphabetically. Clicking on the column again will reverse sort the column. Refer to Section 3.2.1 for details about the columns that can be applied to Ward, Facility and LHD Views respectively. Refer to Figure 17: Bed Board Ward Patient List View 1. LHD and/or Facility from the drop down lists can be changed depending on a user’s access rights, by selecting another LHD and / or Facility and clicking on “Select Hospital”. 2. Access the Bed Board, Transfers or Bed Management functions. 3. Access Patient Mode or Bed Mode views within Bed Board. 4. Filter patients using AMO Filter for Doctors and Specialty. 5. Filter patients using Ward Filter for Ward Types, Ward Groups and ED Accessible Wards. This only applies to Facility and LHD Patient List View. 6. General functions such as Refresh and Clear All Filters – Refer to Section 3.4.1.4. 7. View Ward Profile information. This only applies to Ward Patient List View. Functions 8. View LHD / Hospital Profile or Filtered Profile information. The Filtered Profile information is updated when an AMO, Ward or Primary View filter is applied. 9. Customise columns to be displayed on the Patient List View. When a user exits the Patient List View, the columns selected, order of columns and width of columns are saved. Thus the layout of the Patient List View as created by the user will still be retained for next time the user logs on. 10. Reset columns to the default system generated view. 11. Access the Bed Management Admin module for Patient Flow Administrators only. 12. Patient Search button 13. Print the Patient List View in PDF or CSV format. 14. Exit the Patient List View and return to the Patient Mode by clicking on Patient Flow Portal Bed Board User Guide . Page 35 of 82 3.2.1 Customising columns Additional columns can be added to the Patient List view by ticking the relevant checkbox(s) from the drop down list displayed when clicking on the arrow at the side of the button entitled “Click to Customise Columns” as displayed below: The columns that are available for each Patient List View are listed in Table 9. Table 9: Bed Board Patient List View Columns Column Ward Facility LHD Actions X X X Address X X X Notes Allows user to initiate an Inter Hospital or Inter Ward Transfer for the patient. Displays the patient’s address. Will only display if the user has access to the ward the patient is admitted to. Patients who have exceeded the defined KPI’s for LOS in the Emergency ward/department will have their Admission date/time highlighted in the relevant colour on the Patient List View – Refer to Figure 18. Admission Date/Time X X If hospital LOS < 3 hours then Admission Date/time will be displayed in black. If hospital LOS > = 3hours and < 4 hours then the Admission Date/time will be displayed in orange. If hospital LOS >= 4 hours then the Admission Date/time will be displayed in red. X Note: Patient Flow Portal Bed Board User Guide The Emergency ward must be flagged Page 36 of 82 as Column Ward Facility LHD Notes “Designated ED” in the Bed Management Admin module to ensure that the following colouring displays specific patients, refer to the PFP Administrator Guide for further information. Data only displays for selected facilities that send admission reasons via the HL7 messaging interface. As of December 2013 this includes all LHD’s using Cerner and Admission Reason X X X the following LHD’s using iPM: South Eastern Sydney, Illawarra Shoalhaven, Western NSW and Far West. The iPM LHD’s send the “Presenting Problem from Referral” data which only provides admission reason for those patients admitted from the waiting list. Admission Risks X X X Displays the admission risks the patient meets. Age X X X Bed X X X Bed patient is occupying. DOB X X X Date of birth. Displays with colour background if user has selected EDD X X X primary view = EDD. Colours are based on EDD colour on the Patient Mode. Facility X The Financial Description displayed is based on the Financial Description X X X financial class code sent by the PAS to PFP. E.g. Medicare D/O Hospital Doctor. The Financial Status can be one of the following: 1. Public. 2. Chargeable - patients with private health insurance or other cover that NSW Health can recover the cost of the service from. 3. DVA – patients with Department of Veteran Affairs cover. Financial Status X X X 4. Compensable – patients with a compensable status such as MAA or Workers Compensation. 5. Ineligible – patients who are ineligible for Medicare cover. 6. Deferred – patients with a deferred financial classification. 7. Other – patients who are a Boarder, admitted with an outpatient financial class or admitted with a financial class code that has not been sent to PFP previously. Gender X X X HLOS X X X MO Specialty X X X Medical Officer X X X Name X X X Patient Flow Portal Bed Board User Guide Length of stay of the patient’s current admission. Page 37 of 82 Column Ward Facility LHD Patient ID X X X Service Category X X X Notes Displays the patient’s UID, however if no UID has been sent to PFP the MRN will display. As of December 2013, PFP only receives the patients Service Category from Sydney, South Western Sydney, Northern NSW and Mid North Coast LHD’s. Displays whether the patient is occupying a bed in a Single Room. Note: Patient Flow Administrators can change the setup of Single Room X X X Single Rooms in their facility via the Bed Profile tab in the Bed Management Admin module. Refer to the PFP Administrator Guide for further information regarding this setup. Displays for all patients regardless of whether the user has Suburb X X X or has not got approved access to the ward they are viewing. Displays the WFW Category with codes: WFW WLOS X X Ward X X X X X X Ward Group X X X Ward Type X X X C = Consults D = Diagnostics/Treatment DP = Discharge Process OHR = Out of Hospital Referral T = Transfer / Transport Length of stay of the patient in the current ward. Figure 18: Bed Board Patient List View, Highlighting Emergency Patients 3.2.2 Printing the Patient List view The Patient List View can be printed as a PDF or CSV file for the given LHD, Facility or Ward by clicking on the PDF or CSV buttons, located just above the far right column. Patient Flow Portal Bed Board User Guide Page 38 of 82 Figure 19: Bed Board Ward Patient List View (PDF Document) For the PDF print out: EDD cells will always display in the relevant colour regardless of the primary view selected when the PDF was printed – Refer to Figure 19. Extra blank rows will display depending on the number of available beds in the ward. This only applies to the Ward List View. If the PDF or CSV file for a ward is printed the Ward Profile section will also print displaying number of patients in each bed (i.e. Open, Available, Surge, Unavailable and Closed). 3.2.3 Request Inter Hospital Transfers from Patient List View Inter Hospital Transfers (IHT) can be initiated from the Facility or Ward Patient List Views via the Actions column by clicking on “IHT” as displayed in Figure 20. Figure 20: Bed Board Patient List View Actions Column Patient Flow Portal Bed Board User Guide Page 39 of 82 When IHT is clicked, the IHT Patient Transfer Request window will display – Refer to Figure 21. The patient’s details will be automatically defaulted and the user will be required to complete the fields that have not been auto completed by PFP. Fields with an * at the side of them are mandatory and must be completed before the transfer request can be submitted. Table 10 provides an overview of the data elements displayed on IHT Patient Transfer Request window and whether the fields are auto populated or require manual updates by the user. Figure 21: Bed Board: IHT Request initiated from Patient List View Table 10: Bed Board IHT Request initiated from Patient List View Data Elements Field Auto or Manual Comment Update Patient First Name Auto Patient first name. Patient Last Name Auto Patient last name. Patient ID Auto Patient’s ID (UID or MRN if UID is not sent to PFP from the PAS). Patient D.O.B Auto Patient’s date of birth displayed as DD/MM/YYYY. Patient Address Auto Gender Auto Current Ward Auto Financial Status Auto Patient Flow Portal Bed Board User Guide Patient’s Address and Suburb. The address will only display if the user has access to the ward the patient is currently admitted to. Patient’s gender. Current ward patient is in, which is automatically updated each time a patient is transferred. Patient’s Financial Status. Page 40 of 82 Field Auto or Manual Comment Update Detailed description in regards to the patient’s financial status. For Financial Description Auto example a patient with Financial Status = Public may have a Financial Description = Medicare D/O Hospital Doctor. Isolation Requirement Manual Indicates if the patient needs to be isolated. Urgency of the transfer options: Urgency Manual Bed Type Required Manual Speciality Manual Life threatening Urgent specialist care < 24hrs Inpatient specialist care 24-72hrs Return Transfer of Care Post Specialist Care Inpatient specialist care 24-72hrs (Future) Return Transfer of Care Post Specialist Care (Future) The type of bed the patient needs when transferred e.g. Monitored The speciality the patient is to be admitted to the new hospital under – selected from a pre-defined list The date the patient is due to be transferred. Disabled and defaults to the “Now” date and time if the Urgency is one of the following: Estimated Transfer Date Manual Life threatening Urgent specialist care < 24hrs Inpatient specialist care 24-72hrs Return Transfer of Care Post Specialist Care Enabled, blank and is mandatory if Urgency is one of the following: Inpatient specialist care 24-72hrs (Future) Return Transfer of Care Post Specialist Care (Future) Transfer Notes Manual Free text notes regarding the transfer of the patient Requesting Doctor Manual Name of the Doctor requesting for the patient to be transferred Contact Name Manual Name of the person to be contacted in relation to the transfer Contact Phone Manual Contact number of the person to be contacted Facility where the patient is being requested to be transferred to. Patient being transferred to^ Multiple facilities can be entered to request for the patient to be Manual transferred to. Once one of the facilities has confirmed they will accept the patient the transfers to the other facilities are closed. Note ^: To add the facility (or multiple facilities) the patient is being requested to be transferred to the user must click on the ‘Add Facility” button which will open a new window. Once all mandatory information has been entered, clicking on the ‘Save’ button will submit the transfer request and return the user to the Patient List View. By clicking on the ‘Cancel’ button, the transfer request will be cancelled and the user will be returned to the Patient List View. If the IHT has been saved it will appear on the Transfers module under the: Outgoing IHTs tab for the facility initiating the transfer. Incoming IHTs tab for the selected facility. Patient Flow Portal Bed Board User Guide Page 41 of 82 3.2.3.1 Add Facility and Receiving Doctor to an IHT Request The user can select the facility the patient is to be transferred to from a: Drop down list (Refer to Figure 22) OR Search function if the facility is not in the drop down list. For example the patient needs to be transferred to a Private facility or a non-PFP – Refer to Figure 23. Figure 22: Bed Board IHT, Select facility from drop down list Figure 23: Bed Board IHT, Search for a facility From the search window the user can enter a keyword to search for the facility they want to transfer the patient to e.g. if the user types in the letters “ash”, then the system will return all facilities that include the letters “ash” in their name e.g. Ashford Private Hospital, BUPA at Ashbury, Goodwin Village – Monash. Highlighting and single clicking on a facility in the list will close the Search Facility window and return the user to the “Add a Facility” window where information on the receiving doctor can be added. Patient Flow Portal Bed Board User Guide Page 42 of 82 The user can select the Receiving Doctor who will be accepting care for the patient at the incoming facility the patient is being transferred to, either through: Search function for those facilities which are active on PFP and have patients admitted. The Search function allows user to select an AMO who has admitted a patient to the hospital in the last 6 months. “ED Staff Specialist / Consultant” may be used only if the patient requires urgent transfer to the Emergency Department. Free text a Receiving Doctor for those facilities that are not active on PFP. For example private hospitals. Figure 24: Bed Board IHT, Select Receiving Doctor Search Figure 25: Bed Board IHT, Select Receiving Doctor free text Once a Facility and Receiving Doctor have been selected, the user needs to click “Add” to be returned to the IHT Request window where the facility (or facilities) the patient is being requested to be transferred to will be displayed. Patient Flow Portal Bed Board User Guide Page 43 of 82 3.2.3.2 Remove Facility from IHT Request The user can remove a selected facility for the patient to be transferred to by clicking on the “Remove” button – Refer to Figure 26. Figure 26: Bed Board: Inter Hospital Transfer, Removing a Facility Once an IHT Request has been accepted by the Incoming Facility (i.e. Transfer has status = Confirmed), the facility can no longer be removed as displayed in Figure 27. Figure 27: Bed Board: Inter Hospital Transfer, Removing a Facility Not Possible Patient Flow Portal Bed Board User Guide Page 44 of 82 3.2.4 Request Inter Ward Transfer Inter Ward Transfers (IWT) can be initiated from the Facility or Ward Patient List Views via the Actions column by clicking on “IWT” as displayed in Figure 28. Figure 28: Bed Board Patient List View Actions Column When IWT is clicked, the IWT Patient Transfer Request window will display – Refer to Figure 29. The patient’s details will be automatically defaulted and the user will be required to complete the fields that have not been auto completed by PFP. Fields with an * at the side of them are mandatory and must be completed before the transfer request can be submitted. Table 11 provides an overview of the data elements displayed on IWT Patient Transfer Request window and whether the fields are auto populated or require manual updates by the user. Figure 29: Bed Board IWT from Patient List View Patient Flow Portal Bed Board User Guide Page 45 of 82 Table 11: Bed Board IWT Request initiated from Patient List View Data Elements Field Auto or Manual Description Update Patient First Name Auto Patient first name Patient Last Name Auto Patient last name Patient ID Auto Patient’s ID (UID or MRN if UID is not sent to PFP from the PAS) Gender Auto Patient’s gender Patient D.O.B Auto Patient’s date of birth displayed as DD/MM/YYYY Current Ward Auto Ward the patient is currently admitted to Financial Status Auto Patient’s Financial Status. Financial Description Auto Detailed description in regards to the patient’s financial status. For example a patient with Financial Status = Public may have a Financial Description = Medicare D/O Hospital Doctor. Isolation Requirement Manual Indicates if the patient needs to be isolated. Urgency of the transfer options: Urgency Manual Life threatening Urgent specialist care < 24hrs Inpatient specialist care 24-72hrs Bed Type Required Manual The type of bed the patient needs when transferred e.g. Monitored Speciality Manual Estimated Transfer Date Manual The date the patient is ready to be transferred Transfer Notes Manual Free text notes regarding the transfer of the patient Requesting Doctor Manual Name of the Doctor requesting for the patient to be transferred Contact Name Manual Name of the person to be contacted in relation to the transfer Contact Phone Manual Contact number of the person to be contacted To Ward Manual Receiving Doctor Manual Name of the Doctor who has accepted the patient Contact Manual Name of the person to be contacted in relation to the ward transfer The speciality the patient is to be admitted to the new hospital under – selected from a pre-defined drop down list Ward the patient is being requested to be transferred to – selected from a drop down list Once all the mandatory information to request the ward transfer for the patient has been entered, clicking on the ‘Save’ button will submit the transfer request and return the user to the Patient List View. Clicking on the ‘Cancel’ button will allow the user to cancel the transfer request and return the user to the Patient List view. If the IWT request is saved it will appear on the Transfers module under the Ward Transfers tab for the selected facility. Patient Flow Portal Bed Board User Guide Page 46 of 82 3.3 Bed Mode To open the Bed Mode the user must click on the tab entitled ‘Bed Mode’. Figure 30: Bed Board Bed Mode, Patients & Beds View 1 11 2 3 4 8 5 13 7 6 14 Note: Numbers correspond to Functions listed in Table 12. Patient Flow Portal Bed Board User Guide Page 47 of 82 9 10 12 Table 12: Bed Board Bed Mode Purpose The Bed Mode allows the user to view information about the status / availability of beds in a ward for the selected LHD or hospital. Hovering over the Ward will display Ward Profile information. The information displayed in red is the number of patients and black is the number of beds. Screen Layout Clicking on a Ward tile will take the user to the Schedule View for that ward. The first two columns on the main window display the name of the Hospital and the ward. The colour of the tiles on the bed mode indicates the status of the bed. The coloured lines overlaying the bed tiles provide an indication of the current occupancy of the beds. Refer to Figure 30: Bed Board Bed Mode, Patients & Beds View 1. LHD and/or Facility from the drop down lists can be changed depending on a user’s access rights, by selecting another LHD and / or Facility and clicking on “Select Hospital”. 2. Access the Bed Board, Transfers or Bed Management functions. 3. Access Patient Mode or Bed Mode views within Bed Board. 4. Filter beds using the primary view filter to view patients and beds, beds or vacant beds – Refer to Section 3.3.1 for further information. 5. Filter beds using Ward Filter for Ward Types, Ward Groups and ED Accessible Wards. 6. General functions such as Refresh and Clear All Filters – Refer to Section 0. 7. View Ward / Unit Status: Ward Status Bed Colour Description This indicates there are X number of beds occupied in the ward and Functions Used Available that patients are only occupying available beds and the ward is not over capacity. This indicates there are X number of beds occupied in the ward and whilst some of the beds that are occupied have a status of ‘Surge’ the Used Surge ward is still not classified as over capacity. Used This indicates there are X number of beds occupied in the ward and Closed/Over the ward has now exceeded its capacity of available beds (includes Capacity patients in Surge beds but excludes patients in closed beds). 8. Bed Status: Bed Status Bed Colour Available beds Patient Flow Portal Bed Board User Guide Description Physical beds which are either empty or occupied. Page 48 of 82 Unavailable beds Physical beds which are temporarily not available due to: clinical, staffing or maintenance issues. Physical beds that can be operational if required for short periods of time to manage capacity and demand issues i.e. flex beds. Surge beds Note: If the bed is classed as ‘Surge’, this is only as defined by the hospital and is not classed as such by the Ministry of Health. Closed beds Over Capacity beds Physically available beds which are unfunded and closed. Beds which are over the defined physical capacity of the hospital. 9. Ward Filtered Profile displays bed information in terms of number of patients in red and number of beds in black based on bed status: Physical Capacity; Open; Available; Unavailable; Surge and Closed. The filters that impact the Ward Filtered Profile are: Ward Group Ward Type ED Accessible Ward 10. Bed Profile displays the total hospital bed information in terms of number of patients in red and number of beds in black based on bed status: Physical Capacity; Open; Available; Unavailable; Surge and Closed. 11. Access the Bed Management Admin module for Patient Flow Administrators only. 12. Patient Search button. 13. Hide wards with no beds. 14. Display the PFP defined Ward Description instead of the PAS defined Ward Code on the ward tiles. Patient Flow Portal Bed Board User Guide Page 49 of 82 3.3.1 Primary Views Users are able to select what bed information they want displayed on the Bed Mode view by selecting a primary view from the drop down list at the top left of the screen: Figure 31: Bed Board Bed Mode, Primary View drop down list The coloured radio buttons will change according to the primary view selected and correspond to the colour coding on the bed tiles. Clicking on a coloured button will filter the beds displayed accordingly. The following table details the primary views that are available in Bed Mode. Table 13: Bed Board Bed Mode Primary Views Primary View Description Provides an overview of the status of every bed in a given ward and the current occupancy. It does not provide any information about the actual patients who are occupying the beds. The second filter using the coloured radio buttons allows the user to filter by the different Bed Status: Patients & Beds Open Available Surge Closed Unavailable Over Capacity Patient Flow Portal Bed Board User Guide Page 50 of 82 Primary View Description Provides an overview of the status of every bed in each ward, regardless of whether it is currently occupied or not by a patient. The second filter using the coloured radio buttons allows the user to filter by the different Bed Status: Beds Available Surge Unavailable Provides an overview of the beds that are not currently occupied by a patient in each ward. The second filter using the coloured radio buttons allows the user to filter by the different Bed Status: Vacant Beds view Available Surge Unavailable Note: If a bed is classed as ‘Surge’, this is only as defined by the hospital and is not classed as such by the Ministry of Health when bed utilisation is being reported. Patient Flow Portal Bed Board User Guide Page 51 of 82 3.4 Other Bed Board Functions 3.4.1 Filters Users are able to filter the data displayed on the Patient Mode, Patient List view and Bed Mode by selecting a secondary filter as identified in the table below. Table 14: Bed Board Filters Module Filter Patient Mode Patient List View Bed Mode Ward Type X X X Ward Group X X X ED accessible wards X X X Doctor X X Specialty X X 3.4.1.1 Adding a Filter To add a filter the user clicks on the relevant filter button: AMO Filter for Doctor or Specialty. Ward Filter for Ward Type, Ward Group or ED Accessible Wards. Figure 32 – Bed Board: Patient Mode, AMO Filter window Figure 33: Bed Board Patient Mode, Ward Filter window Patient Flow Portal Bed Board User Guide Page 52 of 82 From the filter windows the user can select which values they want to filter by: Highlighting the value to filter by in the list on the left (multiple selections can be made by using the ‘Ctrl’ key or using the ‘Shift’ key to select a block of values). Either dragging and dropping the value into the list on the right or clicking on the right arrow button. Once all the values have been selected click on the Filter Data button. Once the Filter Data button has been click the following occurs: 1. Filter window will close, the data will refresh and only patients who meet the criteria selected will display on the Patient Mode, Patient List view or Bed Mode. 2. Text of the “AMO Filter” or “Ward Filter” button will display in red to indicate a filter has been applied. 3. Values selected will display next to the label entitled “Filters used”. 4. “Filtered Profile” section on the Patient Mode and Patient List view will update accordingly to reflect the filtered view OR “Ward Filtered Profile” section on the Bed Mode will update accordingly to reflect the filtered view. 3.4.1.2 Doctor and Specialty Filters When using the AMO Filter button patients can be filtered by: Doctor OR Speciality. Doctor AND Specialty. Doctor, Specialty and Ward Filters. Patient Flow Portal Bed Board User Guide Page 53 of 82 3.4.1.3 Ward Filters The Ward Filter allows patients to be filtered by: Ward Type OR Ward Group. Ward Type AND ED Accessible Wards*. Ward Group AND ED Accessible Wards*. Ward Filter in addition to Doctor and/or Specialty filters. The definition of each of these filters is defined in the table below. Table 15: Bed Board Ward Filter Definitions Filter Ward Type Ward Group Function State-defined Ward Type. Applies to a facility and all facilities within a LHD. I.e. user can view wards of the same type either within a single facility or across multiple facilities/LHD. User can filter by the primary Ward Type or by one or many Sub ward types associated to the primary Ward Type. Adding the primary Ward Type will automatically add all the associated Sub ward types. Alternatively user can select to filter by one or many Sub Ward Types. Specific to a facility. Do not apply across an LHD. Allow users to filter by Wards that are assigned to a defined group within a given facility e.g. Mental Health wards. Filtering by Ward Group (i.e. click on Ward Group radio button) will disabled the Ward Type list. User to filter and display only wards that have been flagged as ED accessible. Users can filter on “ED accessible wards only” or can filter by Ward Type or Ward Group AND ED ED accessible wards only accessible wards. To apply the “ED accessible wards only” filter the user must tick the checkbox entitled “ED accessible wards only” at the bottom of the ‘Ward Filter’ window and then click on the “Filter data” button. * Refer to the PFP Administrator Guide for information on how to allocate a Ward Type and Ward Group to a ward and how to flag a ward as “ED accessible”. Patient Flow Portal Bed Board User Guide Page 54 of 82 3.4.1.4 Clearing Filters The user can: Clear ALL filters that have been applied by clicking on the icon located next to the ‘Ward Filter’ button. Clicking on this icon will remove ALL filters applied i.e. Ward Filters, AMO filters and Primary view filters. Clear AMO/Specialty filters or Ward filters by opening the relevant “AMO Filter” or “Ward Filter” window and clicking on the “Clear Filters” button at the bottom of the window. Figure 34: Bed Board Clear Filter Button for AMO Filter When the filters are cleared the following occurs: 1. Filters are removed and data refreshed. 2. Text of the relevant filter button will display in black to indicate that filters are no longer applied. Patient Flow Portal Bed Board User Guide Page 55 of 82 3.4.2 Searching for a Patient A user can search for a patient on any screen in the Bed Board module by clicking on the “Patient Search” button located in the top right corner of all screens. Clicking on the button opens the Search Patient window as illustrated in Figure 35. Figure 35: Search Patient A list of ALL patients currently admitted in the facility displays, including the patient’s ID (MRN or UID depending on the LHD) and ward they are currently admitted to. To find a specific patient the user needs to start typing the first few letters of the patient’s surname, first name or ID (MRN or UID depending on the LHD) in the field at the top of the window. As the user enters the information the list of patients displayed will start to filter based on a full or partial match. When the patient has been found in the Search Patient window, double clicking on the patient will open the Detailed Patient Profile for the selected patient as detailed in Figure 9. Clicking on the X in the top corner of the Detailed Patient Profile will close the window and return the user to the Bed Board window they were on before they clicked on the Search Patient button. Clicking the “Cancel” button on the “Search Patient” window will close the window and return the user to the Bed Board window they were on before they clicked on the Search Patient button. Patient Flow Portal Bed Board User Guide Page 56 of 82 3.4.3 Graphing LOS and Potential Discharges When using Patient Mode, the user can display a graphical representation of number of patients grouped by: LOS – This is the default graph. Potential discharges based on EDD = Expired (i.e. date in the past), today, tomorrow or in 2-3 days’ time. By clicking on the graph icon located to the side of the ‘Filter’ button a graph will be displayed at the top of the window. The graph updates when any of the following filters are applied: Primary view. AMO filter – Doctor and / or Specialty. Ward filter – Ward Type, Ward Group or ED Accessible Wards. Figure 36: Bed Board Patient Mode, Graph View Figure 37: Bed Board Patient Mode, Potential Discharges Graph To close the graphing view, the user can either click on the: located at the top right above the graph OR the Graph icon . Patient Flow Portal Bed Board User Guide Page 57 of 82 3.4.4 General Functions General functions the user can perform across Patient Mode, Patient List View and Bed Mode are listed in the table below: Table 16: Bed Board General Functions Function Description Applies To Hide wards with no patients Hides all wards that have no patients admitted to them. Patient Mode Hide wards with no beds Hides all wards that have no beds. Bed Mode Displays the PFP defined ward description as opposed to the PAS defined Display the Ward Description ward code on the ward tiles. If this is checked, the wards are sorted in Patient Mode alphabetical order based on the PFP defined ward description. Hovering over the ward tile will display a pop up text box detailing both the ward code and the ward description. Bed Mode Patient Mode Refresh Refreshes data on the screen. Patient List View Bed Mode The Data Feed Indicator is displayed at the top of the PFP window next to the “Select Hospital” button. This button indicates the status of the data feed from the selected facility’s PAS. If the indicator displays in green this indicates messages are being received in real time. By hovering over the button the following message is displayed: “Messages are being sent and received in real time”. If the indicator displays in red this indicates messages are not being received in real time. By hovering over the button one of the following messages displays: “Delays are currently being experienced with PFP being updated with messages from your PAS”. Please contact State-wide Service Desk on 1300 285 533” OR “Delays are currently being experienced with PFP being updated with messages from your PAS”. This problem is in the process of being resolved by Health Share” Data Feed Indicator If the first message displays then the user should contact the Statewide Service desk as Health Share NSW and / or the impacted LHD PAS Team are not aware of the problem. All modules of the PFP If the second message displays then the user does not need to do anything as Health Share NSW and /or the impacted LHD PAS Team are aware of the problem. While the Date Feed Indicator is red then the PFP will not be up to date with patient admissions, discharges and ward transfers. If the indicator displays in orange this indicates the problem has been resolved and messages are now being received in real time. However, messages that were sent while the Data Feed Indicator was red have been queued up and are now starting to update PFP. Whilst the messages are being processed in chronological order until they are up to date, hovering over the button will display the following message: “Messages are being sent and received in real time; however there is historical data that is in the process of being loaded to update PFP” Once the messages are up to date the indicator will turn to green, indicating that the PFP is receiving messages in real time from the impacted PAS. Patient Flow Portal Bed Board User Guide Page 58 of 82 4.0 TRANSFERS 4.1 Overview Once a transfer has been requested it will display within the Transfers module, which allows the user to: Track the status of transfers between facilities (Inter Hospital Transfer). Track the status of transfers within a given facility (Inter Ward Transfer). Record and track the status of Direct Ward Admissions. The Transfers module can be accessed by clicking on the Transfer tab to view: Outgoing IHTs. Incoming IHTs. Ward Transfers. Direct Ward Admissions. 4.2 Transfer Urgency Categories Patient transfers initiated through PFP are required to have an Urgency Category. These Urgency Categories determine when a transfer request has exceeded its recommend timeframe to occur. Once this recommended timeframe has been exceeded the status of the transfer request will display in red on the Outgoing IHT, Incoming IHT or Ward Transfers tab respectively. Table 17 identifies the: Urgency Categories selectable for an IHT or IWT. Each Urgency Category recommended transfer timeframe. Each Urgency Category definition as per the NSW Health Policy PD2011_031, Inter-facility Transfer process for Adults Requiring Specialist Care. Table 17: Urgency Category Overview Applies To Urgency IHT IWT Recommended Transfer Timeframe Definition Critically ill/injured patients at risk of critical deterioration if not transferred. This is for patients who are both time urgent critically ill, non-time urgent critically ill and patients at risk of critical deterioration. Life threatening X X Within 4 hours based on the Transfer Request date / time. Urgent specialist care < 24hrs X X Within 24 hours based on the Transfer Request date / time. Patients who require specialist intervention to prevent or manage further deterioration within a short time frame (immediate to within 24 hours). Inpatient specialist care 24-72hrs X X Within 72 hours based on the Transfer Request date / time. Patients who require specialist investigations or management of care not available at originating site (requires transfer within 24 to 72hrs). Return Transfer of Care Post Specialist Care X Within 1 business day based on the Transfer Request date / time. Patients who must be transferred with the understanding that when the specialty services are no longer required, care of the patient will be transferred back to the originating hospital. Inpatient specialist care 24-72hrs (Future) X Within 72 hours based on the Estimated Request date / time. As per Inpatient specialist care 24-72hrs. Return Transfer of Care Post Specialist Care (Future) X Within 1 business day based on the Estimated Request date / time. As per Return Transfer of Care Post Specialist Care. Note: For Urgency Categories = Return Transfer of Care Post Specialist Care and Return Transfer of Care Post Specialist Care (Future), if the transfer request was initiated on a Saturday, Sunday or a Public Holiday the duration in which the recommended timeframe will commence is 8AM the next business day. Patient Flow Portal Bed Board User Guide Page 59 of 82 4.3 Outgoing Inter Hospital Transfers (IHT’s) The default view when the user clicks on the Transfers tab is the Outgoing IHT tab, which details patients who are waiting to be transferred to another facility from the facility the user is currently logged onto. At the top of the window there are four Summary tables for Outgoing IHT’s, Incoming IHT’s, Ward Transfers and Direct Ward Admissions, which displays the: Total number of open transfers or direct ward admissions by their current status (i.e. Estimated, Requested, Confirmed or In Progress for IHT’s and Requested for Ward Transfers and Direct Ward Admissions). Number of open transfers that have expired by status (i.e. number of transfers that have exceeded the recommended timeframe for the patient transfer or direct ward admission to be completed). These summary tables display at the top of the Transfers module regardless of which tab is selected. Figure 38: Transfers Outgoing IHT’s 12 1 13 2 4 5 7 6 3 10 11 9 Note: Numbers correspond to Functions listed in Table 18. Patient Flow Portal Bed Board User Guide Page 60 of 82 8 Table 18: Outgoing IHT’s Overview Purpose The Outgoing IHT’s tab displays the patients that are to be transferred from the selected facility to other facilities. This information can also be printed to a PDF or CSV file for users to take to meetings. The header is similar to the Bed Board Patient Mode and Patient List View whereby the user can: Select LHD and Facility depending on their access level. Select to access Bed Board, Transfers or Bed Management modules. Access the Search Patient window and Bed Management Admin module the latter for Patient Flow Administrators only. Patients are listed in tabular format with columns that can be customised by the user. The default sort order is: st Screen Layout 1 Sort: Urgency in following order: o Life Threatening o Urgent Specialist Care < 24 hours o Inpatient Specialist Care 24 – 72 hours o Return Transfer of Care Post Specialist Care o Inpatient Specialist Care 24 – 72 hours (Future) o Return Transfer of Care Post Specialist Care (Future) nd 2 Sort: Status in following order: o Requested o Confirmed o In Progress The data can be custom sorted by clicking on any of the column headers to sort in ascending order by the given column type i.e. numeric fields e.g. Age, will sort from lowest (youngest) to highest (oldest) or for text fields, the sort will be alphabetically. Clicking on the column again will reverse sort the column. Refer to Section 3.2.1 for details about the columns that can be displayed on the Outgoing IHT’s tab. Refer to Figure 38: Transfers Outgoing IHT’s 1. Access the Bed Board, Transfers or Bed Management functions. 2. Access Outgoing IHT’s, Incoming IHT’s, Ward Transfers and Direct Ward Admissions tabs within the Transfers module. Displays a summary of Open transfers for each view. 3. Tabular display of patient transfers with default columns: To Facility, Name, Patient ID, Current Ward, Urgency, Receiving Dr, Specialty, Isolation, Status, Open Transfer Time (Clock), Actions and Transfer Notes. 4. Print the IHT’s in PDF or CSV format. 5. New Transfer Requests can be initiated from the Outgoing IHT tab by clicking on the New Transfer Request button. These transfer requests open the IHT Patient Transfer Request window similar to the one that can be accessed from the Patient List View. When requesting a transfer from the Outgoing Functions IHT’s tab, the patient information is not auto populated. Note: All IHT’s should be initiated from the Patient List View. However, there are some instances where this is not possible due to the patient not appearing on the Patient Summary e.g. for out of Emergency patients where there is no clerical staff on duty. If this applies to your facility please contact MoH Patient Flow Portal Principal Policy Analysts for further advice regarding how to process transfers using the “New Transfer Request” button on the Outgoing IHT’s tab. 6. Customise columns to be displayed on the Outgoing IHT’s tab. When a user exits the Outgoing IHT’s tab, the columns selected, order of columns and width of columns are saved. 7. Last refreshed displays the date/time the Outgoing IHT’s tab was last refreshed. The screen automatically refreshes every 5 mins but the user can manually update the window by clicking on the refresh icon. 8. Reset columns to the default system generated view. 9. Checkboxes that allow the user to update the status to Confirmed, In Progress and Completed. Patient Flow Portal Bed Board User Guide Page 61 of 82 10. Click on to edit an IHT request. 11. Click on to cancel an IHT request. 12. Access the Bed Management Admin module for Patient Flow Administrators only. 13. Patient Search button. 4.3.1 Customising columns Additional columns can be added to the Outgoing IHT’s tab by ticking the relevant checkbox(s) from the drop down list displayed when clicking on the arrow at the side of the button entitled “Click to Customise Columns” as illustrated in Figure 39. These columns are detailed in Table 19. Figure 39: Outgoing IHT, Click to Customise Columns Table 19: Outgoing IHT’s Columns Column Notes Displays two icons to allow the user to Edit an Outgoing IHT and Cancel an IHT. Actions Address This is a mandatory column that cannot be removed from the Outgoing IHT’s tab. Displays the patient’s address, which only display if the user has approved access to the ward the patient is admitted to. Age Displays the patient’s age. Bed Type Displays the type of bed required for the patient. Current Ward Displays the ward the patient is currently admitted to. DOB Displays the patient’s Date of Birth. Financial Description Financial Status Displays the patient’s detailed financial status based on the financial class code sent by the PAS to PFP. E.g. Medicare D/O Hospital Doctor. Displays the patient’s Financial Status based on the financial class code sent by the PAS. E.g. Public, Chargeable, DVA, Compensable, Ineligible, Deferred or Other. Gender Displays the patient’s gender. HLOS Displays the patient’s length of stay for their current admission. Isolation Displays whether the patient requires isolation. Patient Flow Portal Bed Board User Guide Page 62 of 82 Column Notes Displays the patient’s name. Name This is a mandatory column that cannot be removed from the Outgoing IHT’s tab. Open Transfer Time Displays how long the transfer has been open. (Clock) This is a mandatory column that cannot be removed from the Outgoing IHT’s tab. Patient ID Displays the patient’s UID or MRN depending on the LHD. Receiving Contact Displays contact details of the person who has accepted the patient at the receiving facility. Receiving Dr. Displays the name of the person who has accepted the patient at the receiving facility. Requesting Contact Displays contact details of the person who has requested the transfer at the sending facility. Requesting Dr. Displays the name of the person who has requested the transfer at the sending facility. Service Category Displays the Service Category of the patient. Specialty Displays the specialty the patient is being transferred under. Displays the current status of the transfer with the following colour formatting: Status Red – If the transfer has expired (i.e. not been completed in the recommended timeframe). Black – If the transfer has not expired but needs to be actioned. Green – If the transfer is not scheduled to occur yet (i.e. Transfers initiated with a future urgency category and estimated transfer date/time that is in the future from the now date/time. This is a mandatory column that cannot be removed from the Outgoing IHT’s tab. Facility the patient is being requested to be transferred to. If the patient has been requested to be transferred to more than one facility, all the facilities will display until the patient is accepted at one of To Facility them. This is a mandatory column that cannot be removed from the Outgoing IHT’s tab. Transfer Notes Displays any free text notes entered for the IHT. Displays the Urgency of the transfer. Urgency This is a mandatory column that cannot be removed from the Outgoing IHT’s tab. Patient Flow Portal Bed Board User Guide Page 63 of 82 4.3.2 Edit Outgoing IHT Request The Transfer request can be edited by clicking on the Edit icon Outgoing IHT’s window – Refer to Figure 38. in the Actions column on the Figure 40: Transfers Edit IHT Request From this window the user can update any of the transfer information including adding a request for a transfer to another or different facility by clicking on the “Add Facility” button (only applicable if the transfer still has a status of “Requested”). Clicking on the “Save” button will save the changes and close the Edit window. Note: Once a transfer has been “Confirmed” the facility table becomes non-editable and the user must cancel the transfer if it is no longer required or if the transfer is to a different facility. For further information about adding a Facility and Receiving Doctor refer to Section 3.2.3.1 within this document. Patient Flow Portal Bed Board User Guide Page 64 of 82 4.3.3 Cancelling Outgoing IHT Request A transfer can only be cancelled by the requesting facility i.e. from the Outgoing IHT’s window by clicking on the cancel icon in the Actions column - Refer to Figure 38. The user must select a reason from the drop down list as to why the transfer is being cancelled and some additional free text which is optional. Reasons include: Patient deceased Patient discharged Patient transferred to another facility Treatment provided / completed at admitting facility Request for transfer not appropriate Cancelled by receiving hospital Other Figure 41: Cancel IHT Window Once the user has entered a reason for the cancellation and optional notes, clicking on the ‘Cancel Transfer’ button will cancel the transfer and the patient will be removed from the transfer lists at both the requesting and receiving facilities. By clicking on the ‘Cancel’ button, the user will exit from this window without cancelling the transfer. If the user selects “Cancelled by receiving hospital” as the Reason for Cancellation the “Notes” free text field is mandatory and must be completed before the transfer can be cancelled. Patient Flow Portal Bed Board User Guide Page 65 of 82 4.4 Incoming Inter Hospital Transfers (IHT’s) The ‘Incoming IHT’s’ tab allows the user to view outstanding requests from other facilities for patient transfers into their facility. Figure 42: Transfers, Incoming IHT 1 12 13 2 4 7 5 6 3 8 10 11 9 The information displayed and functionality on the Incoming IHT’s tab, including the default sort and updating of a transfer is the same as the Outgoing IHT’s tab – Refer to Table 18, with the following exceptions: First default column is the name of the facility requesting the transfer. Transfer request cannot be cancelled by the receiving facility unless it was initiated from the “Receive IHT from non PFP site” button. Transfer request can only be edited to add Transfer Notes, the To Ward and bed at the receiving facility. This information can then be viewed by the requesting facility via the Outgoing IHT tab. Transfer requests can be initiated from facilities that are not active on PFP Patient Flow Portal Bed Board User Guide Page 66 of 82 4.4.1 Customising columns For information about customising columns for the Incoming IHT’s tab refer to the Outgoing IHT’s tab Section 4.3.1. All columns that can be customised are the same with the exception of the columns identified in Table 20. Table 20: Incoming IHT’s Columns Column Notes Facility the patient is being requested to be transferred from. From Facility To Ward This column cannot be removed from the Incoming IHT’s tab. Ward the receiving facility is admitting the patient into. 4.4.2 Receive IHT from non-PFP sites All IHT’s should be initiated from the Patient List View by the requesting facility. However, there are some instances where a facility does not use the PFP or does not have access to PFP e.g. Private Hospitals. By clicking on the button “Receive IHT from non PFP Site”, the user can record a transfer from a facility that does not use or have access to PFP. Figure 43: Transfers, Receive Inter Hospital Transfer (IHT) from Non PFP Site Patient Flow Portal Bed Board User Guide Page 67 of 82 The user must complete the mandatory fields that have an * before an incoming transfer request can be submitted. Once all mandatory information to complete the transfer request has been entered, clicking on ‘Save’ will submit the transfer request, return the user to the Incoming IHT’s tab. The IHT request from a non-PFP site will now display on the Incoming IHT’s tab. Table 21 provides details about the data elements on the Receive IHT from Non PFP Site window. Table 21: Receive IHT from Non PFP Site Data Elements Field Mandatory From LHD Yes From Facility Yes Description LHD the facility is in that the patient is being transferred from. Facility the patient is being transferred from. Note: To enter an incoming transfer from a facility that is not in the drop down list, the user can click on the Search button at the side of the LHD field to open the “Search Facility” window. Requesting Doctor Yes Name of the Doctor requesting for the patient to be transferred. Contact Name Yes Name of the person to be contacted in relation to the transfer. Contact Phone No Contact number of the person to be contacted. Patient First Name Yes Patient’s First name. Patient Last Name Yes Patient’s Surname. Patient ID Yes Patient’s UID or MRN. Gender No Patient’s gender. Patient D.O.B Yes Patient’s Date of Birth. Isolation Yes Does the patient need to be isolated. Current Ward No Ward the patient is currently admitted to (free text field which does not get automatically updated as the patient is transferred between wards). Urgency of the transfer: Urgency Yes Bed Type Required Yes Speciality No Life Threatening Urgent Specialist Care < 24 hours Inpatient Specialist Care 24 – 72 hours Return Transfer of Care Post Specialist Care Inpatient Specialist Care 24 – 72 hours (Future) Return Transfer of Care Post Specialist Care (Future) Type of bed the patient needs when transferred e.g. Monitored. Speciality the patient is to be admitted under as selected from a pre-defined list. The date the patient is due to be transferred. Disabled and defaults to the “Now” date and time if Urgency is one of: Estimated Transfer Date Yes Life threatening Urgent specialist care < 24hrs Inpatient specialist care 24-72hrs Return Transfer of Care Post Specialist Care Enabled, blank and mandatory if Urgency is one of: Patient Flow Portal Bed Board User Guide Inpatient specialist care 24-72hrs (Future) Return Transfer of Care Post Specialist Care (Future) Page 68 of 82 Field Mandatory Description To Ward No Ward the patient is to be admitted to when received from the sending facility. Bed No Bed the patient will be admitted into. Receiving Doctor No Name of the Doctor accepting the patient. No Contact number of the Doctor accepting the patient. No Free text notes regarding the transfer of the patient. Receiving Doctor Contact Transfer Notes Patient Flow Portal Bed Board User Guide Page 69 of 82 4.5 Ward Transfers Figure 44: Transfers, Ward Transfers 12 11 1 2 6 4 5 3 9 8 Note: Numbers correspond to Functions listed in Table 22. . Patient Flow Portal Bed Board User Guide Page 70 of 82 10 7 Table 22: Ward Transfers Overview The Ward Transfers tab, allows the user to view all inter ward transfer requests within their facility, as Purpose requested from the Patient List View. i.e. Ward Transfers cannot be requested from the Ward Transfers tab. The header is similar to the Bed Board Patient Mode and Patient List View where by the user can: Screen Layout Select LHD and Facility depending on their access level. Select to access Bed Board, Transfers or Bed Management modules. Access the Search Patient window and Bed Management Admin module the latter for Patient Flow Administrators only. Patients are listed in tabular format with columns that can be customised by the user. The default sort order is: st 1 Sort: Urgency in following order: o Life Threatening o Urgent Specialist Care < 24 hours o Inpatient Specialist Care 24 – 72 hours nd 2 Sort: Status of Requested in reverse chronological order. The data can be custom sorted by clicking on any of the column headers to sort in ascending order by the given column type i.e. numeric fields e.g. Age, will sort from lowest (youngest) to highest (oldes t) or for text fields, the sort will be alphabetically. Clicking on the column again will reverse sort the column. Refer to Figure 44: Transfers, Ward Transfers 1. Access the Bed Board, Transfers or Bed Management functions. 2. Access Outgoing IHT’s, Incoming IHT’s, Ward Transfers and Direct Ward Admissions tabs within the Transfers module. Displays a summary of Open transfers for each view. 3. Tabular display of patient transfers with default columns: Current Ward, To Ward, Name, Patient ID, Urgency, Specialty, Isolation, Bed Type, Status, Open Transfer Time (Clock), Actions and Transfer Notes. 4. Print the Ward Transfer in PDF or CSV format. 5. Customise columns to be displayed on the Ward Transfers tab. When a user exits the Ward Transfer tab, the columns selected, order of columns and width of columns are saved. Functions 6. Last refreshed displays the date/time the Ward Transfers tab was last refreshed. The screen automatically refreshes every 5 mins but the user can manually update the window by clicking on the refresh icon. 7. Reset columns to the default system generated view. 8. Checkboxes that allow the user to update the status to Completed. 9. Click on to edit an IWT request. 10. Click on to cancel an IWT request. 11. Access the Bed Management Admin module for Patient Flow Administrators only. 12. Patient Search button. Patient Flow Portal Bed Board User Guide Page 71 of 82 4.5.1 Customising columns Additional columns can be added to the Ward Transfers tab by ticking the relevant checkbox(s) from the drop down list displayed when clicking on the arrow at the side of the button entitled “Click to Customise Columns”. The columns that are available for Ward Transfers tab are listed in Table 23. Table 23: Ward Transfers Columns Column Notes Displays two icons to allow the user to Edit an Outgoing IHT and Cancel an IHT. Actions This is a mandatory column that cannot be removed from the Ward Transfers tab. Address Displays the patient’s address, which will only display if the user has access to the ward the patient is admitted to. Age Displays the patient’s age. Bed Type Displays the type of bed required for the patient. Displays the ward the patient is currently admitted to. Current Ward This is a mandatory column that cannot be removed from the Ward Transfers tab. DOB Financial Description Financial Status Displays the patient’s Date of Birth. Displays the patient’s detailed financial status based on the financial class code sent by the PAS to PFP. E.g. Medicare D/O Hospital Doctor. Displays the patient’s Financial Status based on the financial class code sent by the PAS. E.g. Public, Chargeable, DVA, Compensable, Ineligible, Deferred or Other. Gender Displays the patient’s gender. HLOS Displays the patient’s length of stay for their current admission. Isolation Displays whether the patient requires isolation. Displays the patient’s name. Name This is a mandatory column that cannot be removed from the Ward Transfers tab. Open Transfer Time Displays how long the transfer has been open. (Clock) This is a mandatory column that cannot be removed from the Ward Transfers tab. Patient ID Displays the patient’s UID or MRN depending on the LHD. Receiving Contact Displays contact details of the person who has accepted the patient at the receiving ward. Receiving Dr. Displays the name of the person who has accepted the patient at the receiving ward. Requesting Contact Displays contact details of the person who has requested the transfer at the sending ward. Requesting Dr. Displays the name of the person who has requested the transfer at the sending ward. Service Category Displays the Service Category of the patient. Specialty Displays the specialty the patient is being transferred under. Displays the current status of the transfer, which displays in red if the Transfer has exceeded the Status duration for the given urgency. When the To Ward = From Ward the IWT status is set to Completed and the transfer no longer appears on the Ward Transfers tab. This is a mandatory column that cannot be removed from the Ward Transfers tab. Patient Flow Portal Bed Board User Guide Page 72 of 82 Column Notes To Ward Ward the patient is requested to be transferred to. Transfer Notes Displays any free text notes entered for the IWT. Displays the Urgency of the transfer. Urgency This is a mandatory column that cannot be removed from the Ward Transfers tab. WLOS Displays the patient’s length of stay in their current ward. Patient Flow Portal Bed Board User Guide Page 73 of 82 4.5.2 Edit IWT Request The Ward Transfer request can be edited by clicking on the Edit icon Ward Transfer’s tab – Refer to Figure 44. in the Actions column on the Figure 45: Ward Transfers, Edit IWT Request 4.5.3 Cancelling an IWT An IWT can be cancelled by clicking on the icon in the Actions column on the Ward transfers tab – Refer to Figure 44. The user must enter a reason from the drop down list as to why the transfer is being cancelled and optional additional free text. Figure 46: Transfers Cancel IWT Once the user has completed the ‘Cancel Transfer’ window, clicking on the ‘Cancel Transfer’ button will cancel the transfer and the patient will be removed from the Ward Transfers tab. By clicking on the ‘Cancel’ button, the user will exit from the window without cancelling the ward transfer. Patient Flow Portal Bed Board User Guide Page 74 of 82 4.6 Direct Ward Admissions Figure 47: Transfers, Direct Ward Admissions 1 12 4 7 5 6 3 10 11 9 Note: Numbers correspond to Functions listed in Table 24 Patient Flow Portal Bed Board User Guide 13 2 Page 75 of 82 8 Table 24: Direct Ward Admissions Overview Purpose Direct Ward Admissions (DWA) tab allows the user to enter and track the progress of direct admissions into specific wards within a facility. Screen Layout The header is similar to the Bed Board Patient Mode and Patient List View where by the user can: Select LHD and Facility depending on their access level. Select to access Bed Board, Transfers or Bed Management modules. Access the Search Patient window and Bed Management Admin module the latter for Patient Flow Administrators only. Patients are listed in tabular format with columns that can be customised by the user. The default sort order is by the date/time the DWA was requested. The data can be custom sorted by clicking on any of the column headers to sort in ascending order by the given column type i.e. numeric fields e.g. Age, will sort from lowest (youngest) to highest (oldest) or for text fields, the sort will be alphabetically. Clicking on the column again will reverse sort the column. Refer to Figure 47: Transfers, Direct Ward Admissions 1. Access the Bed Board, Transfers or Bed Management functions. 2. Access Outgoing IHT’s, Incoming IHT’s, Ward Transfers and Direct Ward Admissions tabs within the Transfers module. Displays a summary of Open transfers for each view. 3. Tabular display of direct ward admissions with default columns: From Location, To Ward, Name, Receive by & Phone, Specialty, Isolation, Clinical Notes, Bed Type, Est Admit Date, Est LOS, Status, Open Transfer Time (Clock) and Actions. 4. Print the direct ward admissions in PDF or CSV format. 5. New Request – Direct Ward Admissions can only be initiated from the Direct Ward Admissions tab by clicking on the New Request button. When clicking on this button the Request Direct Ward Admission window displays. Functions 6. Customise columns to be displayed on the Direct Ward Admissions tab. When a user exits the Direct Ward Admissions tab, the columns selected, order of columns and width of columns are saved. 7. Last refreshed displays the date/time the Direct Ward Admissions tab was last refreshed. The screen automatically refreshes every 5 mins but the user can manually update the window by clicking on the refresh icon. 8. Reset columns to the default system generated view. 9. Checkboxes that allow the user to update the status to Completed. 10. Click on to edit a DWA request. 11. Click on to cancel a DWA request. 12. Access the Bed Management Admin module for Patient Flow Administrators only. 13. Patient Search button. Patient Flow Portal Bed Board User Guide Page 76 of 82 4.6.1 Customising columns Columns can be customised on the Direct Ward Admissions tab by ticking the relevant checkbox(s) from the drop down list displayed when clicking on the arrow at the side of the button entitled “Click to Customise Columns”. The columns that are available for the Direct Ward Admissions tab are listed in Table 25. Table 25: Direct Ward Admissions Columns Column Notes Displays two icons to allow the user to Edit an Outgoing IHT and Cancel an IHT. Actions This is a mandatory column that cannot be removed from the Direct Ward Admissions tab. Bed Type Displays the type of bed required for the patient. Clinical Notes Displays any free text notes entered for the DWA. DOB Displays the patient’s Date of Birth. Est. Admit Date Displays the date the patient is estimated to be admitted. Est. LOS Displays the patient’s estimated length of stay once admitted. From Location Location the patient is being admitted from. Gender Displays the patient’s gender. Isolation Displays whether the patient requires isolation. Displays the patient’s name. Name This is a mandatory column that cannot be removed from the Direct Ward Admissions tab. Displays how long the transfer has been open. Open Transfer Time (Clock) This is a mandatory column that cannot be removed from the Direct Ward Admissions tab. Patient ID Displays the patient’s ID as entered manually by the user. Receiving By & Phone Displays the name and contact details of the person who has accepted the patient. Specialty Displays the specialty the patient is to be admitted under. Displays the current status of the direct ward admissions, which will be in red if it has exceeded Status 24 hours before the patient has been admitted. This is a mandatory column that cannot be removed from the Direct Ward Admissions tab. To Ward Ward the patient is to be admitted into to. Patient Flow Portal Bed Board User Guide Page 77 of 82 4.6.2 Request New or Edit Direct Ward Admissions To request a Direct Ward Admission, the user must click on the button entitled “New Request” located at the top right of the Direct Ward Admissions tab. Figure 48: Transfers, Direct Admissions, New Direct Ward Admission The user must complete the mandatory fields that have an * before a direct ward admission can be submitted. Once the mandatory information has been entered, clicking on ‘Save’ will submit the request, return the user to the Direct Ward Admissions tab and display the request on the Direct Ward Admissions tab. By clicking on ‘Cancel’, the direct ward admission request is cancelled and the user is returned to the Direct Ward Admissions tab. To edit a direct ward admission, the user needs to click on the icon in the Actions column on the Direct Ward Admissions tab. This will open the same window as the request New Direct Ward Admission window with all the fields pre-populated based on the initial request. 4.6.3 Cancel Direct Ward Admissions A Direct Ward Admission can be cancelled by clicking on the Cancel icon in the Actions column on the Direct Ward Admissions tab. The user must enter a free text reason as to why the admission is being cancelled. Patient Flow Portal Bed Board User Guide Page 78 of 82 Figure 49: Ward Transfer, Cancel Direct Ward Admission Once the user has completed the ‘Cancel Direct Ward Admission’ window, clicking on the ‘Cancel Admission’ button will cancel the request and the patient will be removed from the Direct Ward Admission tab. By clicking on the ‘Cancel’ button, the user will exit out of this window without cancelling the direct ward admission. Patient Flow Portal Bed Board User Guide Page 79 of 82 5.0 BED MANAGEMENT MODULE Clicking on the Bed Management tab will open the default Bed Management window, which has two views: Schedule or Ward Profile. Only Patient Flow Administrators can toggle between the Schedule and Ward Profile tabs by clicking on the relevant button underneath the module tabs. All other users only have access to the Schedule tab. Figure 50: Bed Management: Schedule View The Bed Management module allows any user with access rights as a Patient Flow Administrator to: Create profiles (templates) for bed availability in the future. Change bed availability on an ad hoc/as-needed basis. Note: The Bed Board User Guide provides a simple overview of the Bed Management functionality. For further information about how to use the Bed Management functionality refer to the Patient Flow Portal Bed Board Administrator Guide. Patient Flow Portal Bed Board User Guide Page 80 of 82 5.1 Ward Profile Window Only users with an access level of Patient Flow Administrator can access the Ward Profile window to create a ward profile/template for their hospital in regards to: Capacity Open beds Available beds Surge beds Closed beds The Ward Profile can be defined for an extended period e.g. next year. Any changes required to the bed numbers for the next two weeks cannot be implemented through the Ward Profile window. The Patient Flow Administrator will be required to make these changes to the 14 day bed availability via the Schedule window. Note: Patient Flow Administrators should refer to the PFP Administrator Guide for further details on creating Ward Profiles. Figure 51: Bed Management Ward Profile Window Patient Flow Portal Bed Board User Guide Page 81 of 82 5.2 Schedule Window The Schedule functionality is accessible: With administrator functions for the Patient Flow Administrator i.e. ability to update the availability of beds in a ward for the next 14 days based on the rules for updating ward profiles defined in Section 1.3.2. As a read only module for all other users. For all users to view the different status of beds in a selected ward on an hour by hour basis by clicking on the relevant button at the top right of the matrix. The Schedule assists with: Capacity and demand planning by monitoring the occupancy of a ward. Monitoring bed utilisation. Factoring in bed availability into demand escalation plans by knowing tipping points. A ward Schedule can be modified by the Patient Flow Administrator by: 1. Clicking on the button entitled Schedule. 2. Selecting the ward the user wants to modify the bed availability for from the drop down list at the side of the field entitled ‘Ward’. This will display a matrix detailing the bed availability on an hour by hour basis for each day in the next two weeks, commencing with today. The default view is the number of beds that are currently ‘Open’ but the user can change the view to display the different status of beds by clicking on the relevant button at the top left of the matrix. 3. From any these views the user can update the status of the beds within the selected ward, for one or more selected hours by clicking on the button entitled Edit Bed Numbers – Refer to Figure 52. 4. Beds can also be made temporarily unavailable by clicking on the button entitled “Set Unavailable Beds”. The value displayed in the hour(s) cell when there are unavailable beds displays in red, regardless of the bed status being viewed. By hovering over these specific cells, the user will notified about the number of unavailable beds. Figure 52: Bed Management Schedule Window Patient Flow Portal Bed Board User Guide Page 82 of 82