1
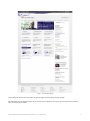
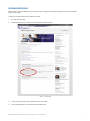
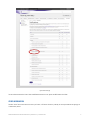
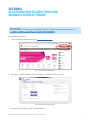
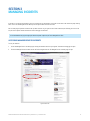
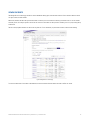
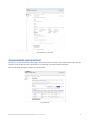
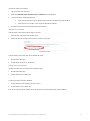
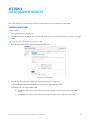
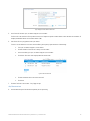
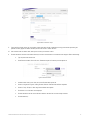
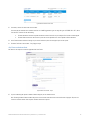
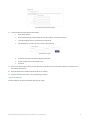
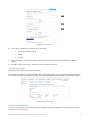
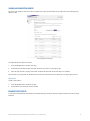
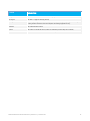
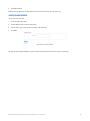
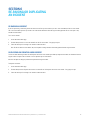
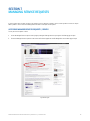
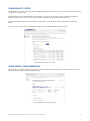
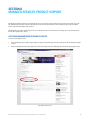
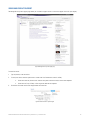
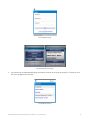
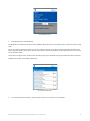
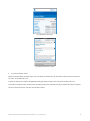
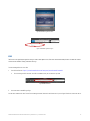
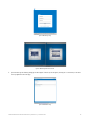
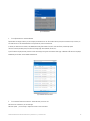
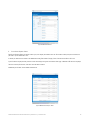
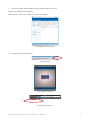
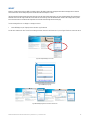
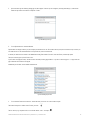
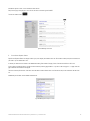
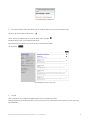
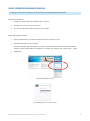
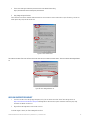
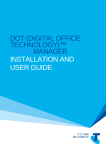
MANAGED SERVICES ONLINE USER GUIDE OCTOBER 2013 VERSION 3.0 Managed Services Online, User Guide, Version 4.0 © Telstra Corporation Limited (ABN 33 051 775 556) 2012. All rights reserved. This work is copyright. Apart from any use as permitted under the Copyright Act 1968, information contained within this manual cannot be used for any other purpose other than the purpose for which it was released. No part of this publication may be reproduced, stored in a retrieval system, or transmitted in any form or by any means, electronic, mechanical, photocopying, recording or otherwise, without the written permission of Telstra Corporation Limited. TRADEMARKS ACKNOWLEDGEMENT Words mentioned in this book that are known to be trademarks, whether registered or unregistered, have been capitalised or use initial capitals. Terms identified as trademarks include Cisco®, Microsoft®, Microsoft Windows®, Apple®, AirPort®, Mac®, Linksys®. MANAGED SERVICES ONLINE USER GUIDE | VERSION 3.0 | JANUARY 2013 2 WELCOME TO MANAGED SERVICES ONLINE! Managed Service Online (MSO) is the fast, easy way to manage your Telstra Managed Products and Services. MSO allows you to interact with your Telstra Managed Service Desk online across your contracted products and services for Incidents, Service Requests and How To Support. This guide will help you navigate and complete critical tasks to benefit your business and provide tips to better utilise the application. NEED MORE SUPPORT? Additional information, such as the MSO user guide and Frequently Asks Questions (FAQs) are available online at Your Telstra Tools under the Help and Resources tab. You may wish to contact your Telstra Managed Service Desk via phone and consultants can assist you in using the application. The consultants have access to view the same screen as to which you are having difficulty, and can either assist you in completing the task, and/or identify a fault and manage that on your behalf. You can also contact us via Online Chat or email. CONVENTIONS USED IN THIS GUIDE The following typographical conventions are used in this guide for simplicity and readability: Web addresses, e-mail addresses and hyperlinks are shown in bold italics , for example www.telstra.com.au/business-enterprise . Button names and titles/features on your computer screen are shown in italics. User input is shown in typewriter font. MANAGED SERVICES ONLINE USER GUIDE | VERSION 3.0 | JANUARY 2013 3 WHAT’S INSIDE WELCOME TO MANAGED SERVICES ONLINE! 3 SECTION 1 MANAGED SERVICES ONLINE OVERVIEW 5 SECTION 2 ACCESSING YOUR TELSTRA TOOLS AND MANAGED SERVICES ONLINE 9 SECTION 3 MANAGING INCIDENTS 10 SECTION 4 CREATING A NEW INCIDENT 14 SECTION 5 UPDATING OR REQUESTING AN INCIDENT BE CANCELLED 22 SECTION 6 RE-RAISING OR DUPLICATING AN INCIDENT 24 SECTION 7 MANAGING SERVICE REQUESTS 25 SECTION 8 MANAGED SERVICES PRODUCT SUPPORT 29 SECTION 9 ACCESS OPTIONS TO MSO 32 MANAGED SERVICES ONLINE USER GUIDE | VERSION 3.0 | JANUARY 2013 4 SECTION 1 MANAGED SERVICES ONLINE OVERVIEW Managed Services Online (MSO) is the fast, easy way to manage your Telstra Managed Products and Services. MSO allows you to interact with your Telstra Managed Service Desk online across your contracted products and services for Incidents, Service Requests and How To Support. You may use MSO in addition to communicating with the Service Desk by phone, SMS, fax or email. Note: The phone remains the best way to report high impact and critical issues to Telstra. Please call your Telstra Managed Service Desk with urgent issues WHY USE MSO? Managed Services Online offers: • Convenience: You have online access ticket, and knowledge articles as you need • Accessibility: MSO gives you around the clock access to your Telstra Managed Services Desk • Productivity: Save time with unrestricted access to online services • Self Help: Reduce the time and need to call the service desk for routine and common enquiries Features include: • Create and track active incidents • View closed incidents and re-raise or duplicate tickets • Track and view service requests • Dashboard of tickets including ability to create your own watchlist • Precise search function to locate raised tickets • Ability to search, view, print and share Knowledge Articles for How To Support • Individual log-in directly mapped to services and authorisation level assigned • Pre-population of personal and service details to help lodge incidents quickly and accurately • Access optimised for iPhone, iPad use whilst on the go • Intranet (Widget) access option to meet specific Company IT specifications and policies OVERVIEW OF YOUR TELSTRA TOOLS MSO is an application within the Your Telstra Tools (YTT) section of the Telstra Enterprise website ( www.telstra.com.au/business-enterprise ). Your Telstra Tools (YTT) is a secure online portal that will help you manage your Telstra accounts and services in one place for greater ease and simplicity. You can place and track orders, manage accounts, view and pay invoices, manager your network service, analyse usage and trends – all with less time and effort. MANAGED SERVICES ONLINE USER GUIDE | VERSION 3.0 | JANUARY 2013 5 Figure 1: Your Telstra Tools home page Help and Resources contains to Your Telstra Tools and application support content including user guides and FAQs. Your Profile allows users to manage their profile and user settings across all applications. You can elect to receive notifications by channel of choice for different types of changes. MANAGED SERVICES ONLINE USER GUIDE | VERSION 3.0 | JANUARY 2013 6 RECEIVING NOTIFICATIONS MSO notifications via email and SMS provide status updates to users as tickets progress through to completion. You can always track ticket progress online via MSO. To change your notification preferences for updates on incidents: 1. Access the Your Profile page. 2. Click the Notification & alert set up link in the Select Notifications and Alerts section. Figure 2: Your Profile page 3. To receive email notifications, click the check box under the Email column. 4. To receive SMS notifications, click the check box under the SMS column. MANAGED SERVICES ONLINE USER GUIDE | VERSION 3.0 | JANUARY 2013 7 Figure 3: Notifications page For more information about Your Telstra Tools and MSO enrolment and user roles, please see MSO Enrolment User Guide. OTHER INFORMATION Each Your Telstra Tools session remains active for up to 2 hours, or 20 minutes of inactivity, whereby you will be presented with the login page to re-authenticate yourself. MANAGED SERVICES ONLINE USER GUIDE | VERSION 3.0 | JANUARY 2013 8 SECTION 2 ACCESSING YOUR TELSTRA TOOLS AND MANAGED SERVICES ONLINE Important information You need to be registered to use Your Telstra Tools to use Managed Services Online. For information on registration to Your Telstra Tools, visit: www.telstra.com.au/business-enterprise/account-services/your-telstra-tools/index.htm To log into Managed Services Online: 1. Visit the Telstra Business & Enterprise home page at www.telstraenterprise.com.au. Figure 4: Telstra Business & Enterprise home page 2. In the Log in to Self Service dropdown on the right side of the page, select Your Telstra Tools for Enterprise. Figure 5: Telstra Business & Enterprise home page 3. In the Your Telstra Tools Login, select Login via username/password. MANAGED SERVICES ONLINE USER GUIDE | VERSION 3.0 | JANUARY 2013 9 4. Type your Username, Business ID and Password, and then click Login or alternatively via digital certificate At enrolment you can choose to use either : Username, Business id and Password - Telstra currently uses industry standard encryption technology to protect the security of your private information, including your account details and your password. You can reset your password at any time whilst logged in to Your Telstra Tools. Otherwise, your managing user can reset your password at anytime for you and can reset their own passwords. Digital Certificate - A digital certificate provides added security as it confirms the identity of both your computer and your Telstra account details. Furthermore, it has a set expiry schedule to provide an additional level of security and to ensure that Telstra's online services details remain up-todate. Telstra digital certificates have a 3-year lifetime from the date of download. When your digital certificate is about to expire, you will be alerted through Your Telstra Tools to obtain another digital certificate and maintain your online access. Telstra will provide the Digital Certifcate as part of Enrollment. MANAGED SERVICES ONLINE USER GUIDE | VERSION 3.0 | JANUARY 2013 10 SECTION 3 MANAGING INCIDENTS An incident is an event that has disrupted a service or impacted service performance, so that the service needs to be restored to proper working order. You can use the Managed Services Online portal to report incidents to the Service Desk. You can track progress updates on incidents that you have created or to get a general view of what incidents may be affecting your service. You may also want to update incident information to reflect changing circumstances. It is recommended that any urgent or high impact faults be reported via phone to your Telstra Managed Service Desk. ACCESSING MANAGED SERVICES INCIDENTS To view your incidents: 1. Access the Managed Services incidents page by clicking the Incidents tab in the top navigation. The Incidents landing page will open. 2. Click on the Managed Services incidents link on the Preferred applications tab. The Managed Services incidents page will open. Figure 6: Incidents tab MANAGED SERVICES ONLINE USER GUIDE | VERSION 3.0 | JANUARY 2013 11 VIEWING INCIDENTS The Managed Services incidents page includes an incident dashboard showing open, closed and draft incidents. Click on the tabs above the table to view open, closed, and draft incidents. When the All incidents link above the open and closed tables is selected, you will see incidents created by you and other users as well as incidents created by Telstra, for example a proactive alarm. You can filter the list of incidents to show just those created by you or for you by clicking the My incidents link. The most recently updated incidents are shown at the top of the list. To sort the table by any of the other columns, click the column heading. Figure 7: Managed Services incidents page To view the incident detail of an incident in the dashboard, click on the incident reference number link listed in the Ref. No. column. MANAGED SERVICES ONLINE USER GUIDE | VERSION 3.0 | JANUARY 2013 12 Figure 8: Managed Services iincident detail TRACKING INCIDENTS USING THE WATCHLIST The watchlist is a listing of incidents that you have flagged to monitor closely and need easy access to. You can add and remove incidents from your watchlist at any time. Incidents will remain in the watchlist until you remove them, even when the incident has been closed. You can view the incident detail pages by clicking on the reference number. Figure 9: Watchlist page MANAGED SERVICES ONLINE USER GUIDE | VERSION 3.0 | JANUARY 2013 13 To search for incidents in the watchlist: 1. Type a keyword(s) in the search field. 2. Select either Reference number, Service ID, Issue or Created by from the dropdown list. 3. To refine your search, click the More Options link. 4. • Select either All, Assigned, In-Progress, Pending, Resolved, Closed or Cancelled from the Status dropdown. • Select either All, 7 days, 30 days, or Date range from the Within last dropdown. Click Search. The search results will be displayed below the search field. Adding Incidents to the Watchlist To add an incident to your watchlist when creating a new incident: 1. Follow the steps in the Creating a New Incident section. 2. Click the check box Add to watchlist on the Create a new incident – Step 3 page. Figure 10: Notifictions details To add an incident to your watchlist after you’ve submitted the incident: 1. Open the Incident detail page. 2. Click the Add this incident to your watchlist link. Removing Incidents from the Watchlist To remove an incident from your watchlist vie the Incident detail page: 1. Open the Incident detail page. 2. Click the Remove from my watchlist link. To remove an incident from watchlist dashboard: 1. Click the check box next the incident(s) you want to remove. 2. Click the Remove from my watchlist link. If you remove an incident from the watchlist you can still open and view the details page from the incidents dashboard. MANAGED SERVICES ONLINE USER GUIDE | VERSION 3.0 | JANUARY 2013 14 SECTION 4 CREATING A NEW INCIDENT You can report issues that you are experiencing to the Service Desk by using the Create a new incident form available on MSO. CREATING A NEW INCIDENT To create an incident: 1. Access the Managed Services incidents page. 2. From the links on the left of the Managed Services incidents page, click the Create a new incident link. The Create a new incident – Step 1 page will open. Step 1: Identify the Product or Service that is Experiencing the Incident 3. Select the relevant product category from the Product offering dropdown list. Figure 11: Create a new incident – Step 1 4. Select the issue that best describes the problem you are experiencing from the Issue dropdown list. A list of relevant support articles may be displayed to help you resolve your issue without logging a fault. To troubleshoot your issue using the support articles: • Click the article link to open or click the View more articles link to display more articles. The article will be open in a new window. • If the article doesn’t resolve your issue, close the window and proceed with the following steps to create an incident. MANAGED SERVICES ONLINE USER GUIDE | VERSION 3.0 | JANUARY 2013 15 Figure 11: Support articles related to incident issue 5. In the Service ID field enter your (or another employee’s) service number. The Service ID is the identifier for Telstra products and services. Examples are phone or mobile numbers, router/hardware serial numbers, IP telephony handset MAC address or full national numbers (FNN). 6. If the Service ID list is pre-populated, select your number. To enter a service number that is not listed, select the Other (please specify) option then do one of the following: • Enter your (or another employee’s) service number. • Click the Search for Service ID link to look up a service number. • In the search field type in your (or another employee’s) service number. • Click Search. The results will be displayed below the search fields. Figure 12: Search for Service ID 7. • Click the radio button next to the relevant service ID. • Click Select. Click Next. The Create a new incident – Step 2 page will open. Step 2: Describe the Issue 8. In the Incident description field describe the problem you are experiencing. MANAGED SERVICES ONLINE USER GUIDE | VERSION 3.0 | JANUARY 2013 16 Figure 13: Create a new incident – Step 2 9. To help the Service Desk resolve your issue quickly include a description of what is happening, how long you have been experiencing the problem, how many people are affected, and what you have done to test or isolate the issue. 10. If the incident relates to another ticket (either open or closed) you can attach a ticket. 11. Click the check box I would like to add related incident(s) to attach a related incident. A search field will be displayed. Then do the following: • Type a keyword in the search field • Select Reference number, Service ID, Issue, Problem description or Created by in the dropdown list. Figure 14: Add related incidents • Advanced search allows you to refine your search. Click the More options link. • Select All, Assigned, In-Progress, Pending, Resolved, Closed or Cancelled from the Status dropdown. • Select All, 7 days, 30 days, or Date range from the Within last dropdown. • Click Search. A list of incidents will be displayed. • Click the check box to the left to the reference number in the table. You can select multiple incidents. • Click Add incident(s). MANAGED SERVICES ONLINE USER GUIDE | VERSION 3.0 | JANUARY 2013 17 . Figure 15: Related incidents search results 12. If necessary, attach a file that relates to the incident. You can attach one document with a maximum total file size of 4MB. Suggested file types are image file types (JPEG, BMP, GIF or TIFF), Word, Excel and PDF. To attach a file do the following: • Click the check box I would like to upload a document to browse for the file on your computer. The file name will be displayed. • Click the Remove link next to the file name if you do not wish to upload the file or want to upload a different document. 13. In the Personal incident reference field type in your internal reference system to track against your internal system. 14. Click Next. The Create a new incident – Step 3 page will open. Step 3: Contact and Notification Details Your details as the requestor will be auto populated from Your Profile. Figure 16: Create a new incident – Step 3 15. If you are submitting the request on behalf of another employee you can add their details. Note: Providing on behalf of details enables that person to also track the ticket online and receive notifications of progress. They are also listed as an alternate contact if the requestor cannot be contacted if required. MANAGED SERVICES ONLINE USER GUIDE | VERSION 3.0 | JANUARY 2013 18 Figure 17: Submitting on behalf of another employee 16. To submit on behalf of another employee do the following: • Select the Yes check box. • In the contact details fields enter the employee’s name, phone numbers, email address and user ID. • To look up an employee’s details, click the Search for employee link. • Enter the employee’s first name, last name or user ID in the search fields. Figure 18: Search for employee • Click Search. The results will be displayed below the search fields. • Click the radio button next to the employee’s name. • Click Select. 17. In the Email an incident copy to field enter the email addresses for individuals to receive notifications on updates to the incident. You can enter multiple email addresses. 18. Select the check box Add to watchlist to add the incident to your watchlist. 19. Click Next. The Create a new incident – Step 4 and the final page will open. Step 4: Review and Confirm Review the information you have provided before submitting your incident. MANAGED SERVICES ONLINE USER GUIDE | VERSION 3.0 | JANUARY 2013 19 Figure 19: Create a new incident – Step 4 20. To make changes to the information you provided, do one of the following: 21. • Click the steps at the top of the page. • Click Edit. • Click Back. Click the check box I have read and accept the Managed Services Terms & Conditions. Click the Terms & Conditions link to read before accepting. 22. Click Submit. The Create a new incident – Complete page will open confirming your submission. Create a New Incident – Complete The confirmation page is displayed once you submit your incident. Note: The incident ticket number will not be displayed immediately, but the incident has been submitted. There is a slight delay retrieving the reference number from the system. To view the reference number, refresh the page or return to the incident dashboard. The reference number will automatically be displayed. Figure 20: Create a new incident – Complete Cancelling an Incident without Submitting You can cancel or exit the Create a new incident form at any time. Click the Cancel and return to Managed Services incidents link at the bottom of each of the Create a new incident pages. MANAGED SERVICES ONLINE USER GUIDE | VERSION 3.0 | JANUARY 2013 20 SAVING AND COMPLETING DRAFTS You can save your incident as a draft at any time by clicking the Save as draft link on the bottom of any of the Create a new incident pages and submitting it later. Figure 21: Managed Services drafts page To complete the draft and submit as an incident: 1. Access the Managed Services incidents drafts page. 2. Click the Edit link in the Actions column in the table. The Create a new incident – Step 1 page will open. 3. Follow the steps in Section 4: Creating a new incident to complete the information required from steps 1 to 4 and submit. The information in your original draft will be updated and an active ticket created. Once a draft is submitted it will no longer appear in the list. Deleting Drafts To delete a draft incident: 1. Access the Managed Services incidents drafts page. 2. Click the Remove link in the Actions column in the table. INCIDENT TICKET STATUS A ticket status will be displayed for each Incident on the Incident detail page, providing an indication of progress and the current activities being performed. MANAGED SERVICES ONLINE USER GUIDE | VERSION 3.0 | JANUARY 2013 21 STATUS DESCRIPTION Assigned The incident ticket has been created and is awaiting diagnosis. In Progress The ticket is in progress and being actioned. Pending The ticket is pending further information. (There are a number of examples for pending status including Awaiting customer information, Site Access Required, and Pending Equipment Delivery). Resolved The incident has been resolved. Closed The incident is resolved and closed. (Tickets are automatically closed 14 days after resolution). Cancelled The ticket has been cancelled and no further action is required. MANAGED SERVICES ONLINE USER GUIDE | VERSION 3.0 | JANUARY 2013 22 SECTION 5 UPDATING OR REQUESTING AN INCIDENT BE CANCELLED You can provide further information or an update about the incident to the Service Desk on the incident detail page. Figure 22: Incident detail page UPDATING AN INCIDENT To update an incident: 1. Access the Incident detail page. 2. Type your comments in the Comments field under the Activity log. Figure 23: Add comments to the activity log 3. Click the check box I would like to upload a document box to browse for the file on your computer. MANAGED SERVICES ONLINE USER GUIDE | VERSION 3.0 | JANUARY 2013 23 4. Click Submit Comment. Comments you have submitted or communications from your Service Desk will be visible in the Activity log. CANCELLING AN INCIDENT To request to cancel an incident: 1. Access the Incident detail page. 2. Click the Would you like to cancel this incident? link. 3. Enter the reason why you want to cancel the incident in the Reason field. 4. Click Submit. Figure 24: Reason for incident cancellation The ticket will not be cancelled immediately. The Service Desk will action the request and cancel or advise any implications. MANAGED SERVICES ONLINE USER GUIDE | VERSION 3.0 | JANUARY 2013 24 SECTION 6 RE-RAISING OR DUPLICATING AN INCIDENT RE-RAISING AN INCIDENT If you are experiencing a reoccurring fault on the same service ID of a previous incident, you can re-raise and submit the fault as a new incident. The re-raise an incident option lets you create a new ticket with the information from the original incident populated. The re-raise option is only available on closed tickets. To re-raise an incident: 1. Access the Incident detail page. 2. Click the Would you like to re-raise this incident? link. The Re-raise incident – Step 1 page will open. 3. Follow the same steps for creating a new incident to submit the ticket. Note: The Service details are not editable, but you can update or change the other information populated from the original incident. DUPLICATING AND CREATING A NEW INCIDENT To save time when submitting incidents use the Duplicate and create a new incident option. When you duplicate an incident, the information from the original incident is copied to the new incident. You can duplicate open or closed tickets. Note: You can update or change any information copied from the original incident. To duplicate an incident: 1. Access the Incident detail page. 2. Click the Would you like to Duplicate and create a new incident? link. The Duplicate and create a new incident – Step 1 page will open. 3. Follow the same steps for creating a new incident to submit the ticket. MANAGED SERVICES ONLINE USER GUIDE | VERSION 3.0 | JANUARY 2013 25 SECTION 7 MANAGING SERVICE REQUESTS A service request can be a request to: order a new product or service, change to a product or service, cancel a product or service, or enquire about a product or service. You can use Managed Services Online to track your service requests. ACCESSING MANAGED SERVICES REQUESTS / ORDERS To view your service requests / orders: 4. Access the Managed Services requests/ orders page by clicking the Ordering tab in the top navigation. The Ordering page will open. 5. Click on the Managed Services requests/ orders link on the Preferred applications tab. The Managed Services incidents page will open. Figure 25: Ordering tab MANAGED SERVICES ONLINE USER GUIDE | VERSION 3.0 | JANUARY 2013 26 VIEWING REQUESTS / ORDERS The Managed Services requests / orders page includes a dashboard showing open and closed requests/ orders. Click on the tabs above the table to view open, closed, requests/orders. When the All requests / orders link above the open and closed tables is selected, you will see requests/ orders created by you and others as defined by your User Role. You can filter the list to show just those created by you or for you by clicking the My incidents link. The most recently updated requests / orders are shown at the top of the list. To sort the table by any of the other columns, click the column heading. To view the detail of a request / order in the dashboard, click on the reference number link listed in the Ref. No. column. Figure 26: Managed Services requests / orders page VIEWING SERVICE / REQUEST ORDER DETAIL The Managed Services requests / orders detail page provides a summary of ticket detail including ticket status, summary of what the ticket is for and service level, plus communication history in the Activity Log. Figure 27: Managed Services requests/orders detail page MANAGED SERVICES ONLINE USER GUIDE | VERSION 3.0 | JANUARY 2013 27 SERVICE REQUEST / ORDER STATUS A ticket status will be displayed for each Service Request / Order detail page, providing an indication or progress and the current activities being performed. STATUS DESCRIPTION Planning / Assigned The request/order ticket has been created and is awaiting action. Pend i ng The ticket is pending further action. (There are a number of examples for pending status including awaiting customer information, site access required, and pending equipment deliver.). In Progress The ticket is in progress and being actioned Completed / Closed The request / order is complete. Cancelled The ticket has been cancelled and no further action is required. MANAGED SERVICES ONLINE USER GUIDE | VERSION 3.0 | JANUARY 2013 28 SECTION 8 MANAGED SERVICES PRODUCT SUPPORT Managed Services Online provides access to knowledge articles as part of Telstra’s product support. These self help articles contain user guides and troubleshooting procedures to maximise the benefit from your Telstra business productivity tools including messaging, setup of telephony features (call forwarding, handset setup) and more. The Managed Services product support page provides a list of the most popular articles used within your company. This is a quick link of articles that may be of appropriate for viewing. ACCESSING MANAGED SERVICES PRODUCT SUPPORT To access Product support articles: 1. Access the Managed Services product support page by clicking the Help and Resources tab in the top navigation. The Help and Resources page will open. 2. Click on the Managed Services product support link on the Preferred applications tab. The Managed Services product support page will open. Figure 28: Help and Resources Tab MANAGED SERVICES ONLINE USER GUIDE | VERSION 3.0 | JANUARY 2013 29 SEARCHING PRODUCT SUPPORT The Managed Services product support page enables you to search for support articles or view the most popular articles for your company. Figure 29: Managed Services product support page To search for articles: 1. Type a keyword(s) in the search field. 2. To refine your search, click more options allow to search within Title, Product Name, Article ID, or Body. 3. • Select either within any of these words, with this exact phrase, without the word(s), created within dropdown. • Select either All, 7 days, 30 days, or Date range from the Within last dropdown. Click Search. The search results will be displayed below the search field. Figure 30: Advanced search for product support MANAGED SERVICES ONLINE USER GUIDE | VERSION 3.0 | JANUARY 2013 30 EMAILING ARTICLES To email an article: 1. Click the Email link in the upper right corner. A new window will open. 2. Enter email address/s separated by a semi colon in the Recipient’s email field. 3. Enter a subject in the Subject field. 4. To remove attachments, click the Remove link after the file name. 5. To send a copy of the email to your email address, click the Send me a copy check box. 6. Click Send. A confirmation message will be presented. 7. Close the window to return to the article. Figure 31: Email an article PROVIDING FEEDBACK ON ARTICLES To improve the quality of articles and service from Telstra, you can rate the quality of articles and provide additional comments. To send feedback, you must select a rating, but further comments are optional. To provide a rating and feedback: 1. Select a radio button for a rating from 1 to 5 (1 being poor and 5 being excellent). 2. Type your feedback in the Further comments field. 3. Click Send Feedback. Figure 32: Rating and providing feedback MANAGED SERVICES ONLINE USER GUIDE | VERSION 3.0 | JANUARY 2013 31 SECTION 9 ACCESS OPTIONS TO MSO Device specific access to Managed Services Online provides a relevant user experience considering mobility, purpose and company IT&T policies. Managed Services Online can be accessed via any mobile browser. However a specific design has been created for iPhone and iPad to provide the best mobile experience. In addition, the iPhone, iPad and Widget are to track ticket progress and status only, if you need other MSO functionality, access to those features are via the standard Internet site. MSO can be accessed via : Internet via http://www.telstra.com.au/business-enterprise/ and log into Your Telstra Tools IPhone at https://yourtelstratools.telstra.com/enterprise/yourtelstratools/msomda/ IPad at https://yourtelstratools.telstra.com/enterprise/yourtelstratools/msomda/ Company Intranet Application – Widget Managed Services Online is an unmetered site for Telstra pre-paid and post paid customers. Access to this site will not incur data charges for Telstra customers. IPHONE The iPhone view is specifically designed for viewing on a small screen. This is useful if you are not at your desk, but you need to track or urgently see the status of a ticket whilst on the move. To access Managed Services on an iPhone: 1. Enter URL into Browser. https://yourtelstratools.telstra.com/enterprise/yourtelstratools/msomda/ • To save entering the URL each time, save URL as a bookmark, and you can rename as you wish Figure 33: iPhone Browser Address Field 2. You will be taken to the MSO Login Page Use the same credentials for Your Telstra Tools including User Name, Business ID and Password or if you use a Digital Certificate, select from the list. MANAGED SERVICES ONLINE USER GUIDE | VERSION 3.0 | JANUARY 2013 32 Figure 34: MSO iPhone Login Page Figure 34: iPhone Digital Certificate selection 3. Upon successful login the following MSO landing page will be displayed. From here you can navigate by selecting the > or alternatively vie the menu at the top righthand corner of the page. Figure 35: MSO iPhone Home Page MANAGED SERVICES ONLINE USER GUIDE | VERSION 3.0 | JANUARY 2013 33 Figure 36: MSO iPhone Menu List 4. To view Open Incidents or Incidents Watchlist The Managed Services incidents page includes an incident dashboard showing open tickets or the incident watchlist a personal list you have created online. You will see incidents created by you and other users as well as incidents created by Telstra. Tickets are sorted by Incident priority Red (Critical), Orange (High) Yellow (Medium), Green (Low). A summary of ticket details are shown on the dashboard including Ticket number, Service ID, Issue and Priority indicated by symbol. Up to 5 tickets are displayed initially, and more can be selected by pressing more at the bottom of the page. A Maximum of 50 tickets are displayed, Attachments part of a ticket, are not viewable on these devices. Figure 37: MSO iPhone Open Incidents 5. To view Incident Ticket details select the > beside the ticket you wish to view, and scroll to see all information. MANAGED SERVICES ONLINE USER GUIDE | VERSION 3.0 | JANUARY 2013 34 Figure 38: MSO iPhone Incident Detail View Figure 39: MSO iPhone Incident Detail – Expanded 6. To view Service Request / Orders Open Service Requests/Orders will display tickets as per your company and individual user role. This includes tickets you may have created, have you listed or you are authorised to view. A summary of ticket details are shown on the dashboard including Ticket number, Category, Status, SLA due date and Service ID if valid. Up to 5 tickets are displayed initially, and more can be selected by pressing more at the bottom of the page. A Maximum of 50 tickets are displayed, Tickets are sorted by SLA due date, from most recent due date to farthest. MANAGED SERVICES ONLINE USER GUIDE | VERSION 3.0 | JANUARY 2013 35 Figure 40: MSO iPhone Open Request / Order 7. To view Service Request / Order Ticket details select the > beside the ticket you wish to view. More details are accessible as you scroll through. Where the symbol - you can collapse / expand this section to view more details. Attachments part of a ticket, are not viewable on these devices. Figure 41: MSO iPhone Request / Order Detail view 8. To Log Out of MSO, select Log Out and confirm Figure 42: MSO iPhone Footer MANAGED SERVICES ONLINE USER GUIDE | VERSION 3.0 | JANUARY 2013 36 Figure 43: MSO iPhone Log Out Confirmation Figure 44: MSO iPhone Log Out in Progress IPAD The iPad view is also specifically designed for viewing on a tablet. Like the Iphone service, Telstra has considered the usability features of a tablet and created a cut down version of MSO for Tracking Tickets whilst on the go. To access Managed Services on an iPad: 1. Enter URL into Browser. https://yourtelstratools.telstra.com/enterprise/yourtelstratools/msomda/ • To save entering the URL each time, save URL as a bookmark, and you can rename as you wish Figure 45: MSO iPad Browser 2. You will be taken to the MSO Login Page Use the same credentials for Your Telstra Tools including User Name, Business ID and Password or if you use Digital Certificate, select from the list. MANAGED SERVICES ONLINE USER GUIDE | VERSION 3.0 | JANUARY 2013 37 Figure 46: MSO iPad Login Page Figure 46: MSO iPad Digital Certificate selection 3. Upon successful login the following landing page will be displayed. From here you can navigate by selecting the > or alternatively vie the menu at the top righthand corner of the page. Figure 47: MSO IPad Home Page MANAGED SERVICES ONLINE USER GUIDE | VERSION 3.0 | JANUARY 2013 38 Figure 48: MSO IPad Menu 4. To view Open Incidents or Incidents Watchlist Open Incidents will display tickets as per your company and individual user role. This includes tickets you may have created, have you listed or you are authorised to view. The Incident Watchlist is the personal list you have created online. A summary of ticket details are shown on the dashboard including Ticket number, Service ID, Issue and Priority indicated by symbol. Tickets are sorted by Incident priority Red (Critical), Orange (High) Yellow (Medium), Green (Low). Up to 10 tickets are displayed initially, and more can be selected by pressing more at the bottom of the page. A Maximum of 50 tickets are displayed, Attachments part of a ticket, are not viewable on these devices. Figure 49: MSO IPad Incidents Dashbaord 5. To view Incident Ticket details select the > beside the ticket you wish to view. More details are accessible as you scroll through. Where the symbol - you can collapse / expand this section to view more details. MANAGED SERVICES ONLINE USER GUIDE | VERSION 3.0 | JANUARY 2013 39 Figure 50: MSO IPad Incident Detail 6. To view Service Request / Orders Open Service Requests/Orders will display tickets as per your company and individual user role. This includes tickets you may have created, have you listed or you are authorised to view. A summary of ticket details are shown on the dashboard including Ticket number, Category, Status, SLA due date and Service ID if valid. Up to 10 tickets are displayed initially, and more can be selected by pressing more at the bottom of the page. A Maximum of 50 tickets are displayed, Tickets are sorted by SLA due date, from most recent due date to farthest. Attachments part of a ticket, are not viewable on these devices. Figure 51: MSO iPad Service Request / Orders MANAGED SERVICES ONLINE USER GUIDE | VERSION 3.0 | JANUARY 2013 40 7. To view Service Request / Order Ticket details select the > beside the ticket you wish to view. More details are accessible as you scroll through. Where the symbol - you can collapse / expand this section to view more details. Figure 52: MSO IPad Request / Orders Detail View 8. To Log Out, select Log Out and then confirm. Figure 53: MSO IPad Footer Figure 54 : MSO iPad Log Out Confirmation Figure 55: MSO iPad Log Out In Progress MANAGED SERVICES ONLINE USER GUIDE | VERSION 3.0 | JANUARY 2013 41 WIDGET A Widget is a graphical user interface to MSO, on a company’s Intranet. The Widget, resides on the company Intranet where the company wishes to load, and users can then access on their desktop computer to track Incidents and Service Requests / Orders. The Users company IT department determines wether they wish to use the widget, and they then install as per Telstra provided guidelines. Once installed all or nominated users will see the widget, and be able to utilise. Each User will need to Login to see the MSO information relevant to their company and user profile. A short instruction manual is available for the IT department to create and access the Widget on their Intranet page. To access Managed Services as a Widget on a company’s Intranet: 1. Locate MSO Widget on your Company Intranet and enter Login Credentials Use the same credentials for Your Telstra Tools including User Name, Business ID and Password or if you use Digital Certificate, select from the list Figure 56: Example MSO Widget on an Intranet Figure 57: MSO Widget Login Page Figure 58: MSO Widget Digital Certificate Selection and Password MANAGED SERVICES ONLINE USER GUIDE | VERSION 3.0 | JANUARY 2013 42 2. Upon successful login the following landing page will be displayed. From here you can navigate by selecting the headings. (x) indicates the number of open tickets for Incidents or Requests / Orders. Figure 59: MSO Widget Home Page 3. To view Open Incidents or Incidents Watchlist Open Incidents will display tickets as per your company and individual user role. This includes tickets you may have created, have you listed or you are authorised to view. The Incident Watchlist is the personal list you have created online. A summary of ticket details are shown on the dashboard including Ticket number, Service ID, Issue and Priority indicated by symbol. Tickets are sorted by priority from Critical to Low. Up to 5 tickets are displayed initially, and more can be selected by selecting page number or > top move to the next page or >> to jump to the last page. A Maximum of 50 tickets are displayed, Attachments part of a ticket, are not viewable on these devices. Figure 60: MSO Widget Open Incidents 4. To view Incident Ticket details select the > beside the ticket you wish to view. A new window will open. The Incident Description is default closed. To show, press the The first Activity Log is expanded in full, to view further details, select > to collapse MANAGED SERVICES ONLINE USER GUIDE | VERSION 3.0 | JANUARY 2013 43 Attachments part of a ticket, are not viewable on these devices. Only 5 Activity Logs are displayed, to view a full list, the user will need to log into full MSO To close this window select Figure 61: MSO Widget Incident Detail 5. To view Service Request / Orders Open Service Requests/Orders will display tickets as per your company and individual user role. This includes tickets you may have created, have you listed or you are authorised to view. A summary of ticket details are shown on the dashboard including Ticket number, Category, Status, SLA due date and Service ID if valid. Up to 4 tickets are displayed initially, and more can be selected by selecting page number or > top move to the next page or >> to jump to the last page. A Maximum of 50 tickets are displayed, Tickets are sorted by SLA due date, from most recent due date to farthest. Where there is no SLA due date, they will be ordered at the end of the list. Attachments part of a ticket, are not viewable on these devices. Figure 62: MSO Widget Service Requests / Orders MANAGED SERVICES ONLINE USER GUIDE | VERSION 3.0 | JANUARY 2013 44 Figure 63: MSO Widget Example No Open Tickets 6. To view Service Request / Order Ticket details select the > beside the ticket you wish to view. A new window will open. The Activity Log, and Description are default closed. The first Activity Log is expanded in full, to view further details, select > to collapse Attachments part of a ticket, are not viewable on these devices. Only 5 Activity Logs are displayed, to view a full list, the user will need to log into full MSO view more details. Figure 64: MSO Widget Service Request / Order Detail 9. To Log Out There is no option for a user to logout for the Widget,automatic time out will end the users session. Automatic Logout ocurs after 20 minutes of inactivity, and/or after 2 hours of use, re-authentication will be required. It will return to the Log In page automatically. MANAGED SERVICES ONLINE USER GUIDE | VERSION 3.0 | JANUARY 2013 45 WIDGET INTEGRATION REQUIREMENTS (CREATION) The following instructions are for the Company IT or Intranet administrator in creating the MSO Widget within their Intranet. Specifications for the Widget are : 1. The Widget will consume 246px (width) and 345px (height) on the portal. 2. The widget needs users to have access to the internet 3. Users will need to be enrolled to MSO to successfully log into the Widget Steps to include a Widget on the Intranet 1. Identify a placeholder Identify a placeholder (minimum 246 px*345 px) for MDA on your portal. 2. Copy the html below & paste into the placeholder <iframe name='mdaWidget' width="246" height="345" src="https://yourtelstratools.telstra.com/enterprise/yourtelstratools/msomda" scrolling="no" onload="javascript:LoadIFrame()" frameborder="0" id="iframeid" style="margin-left: -8px; margin-top: -12px;" ></iframe> 3. Publish the page Figure 65: Example MSO Widget on an Intranet Figure 66: MSO Widget where there is no Internet Connection MANAGED SERVICES ONLINE USER GUIDE | VERSION 3.0 | JANUARY 2013 46 4. To test, enter a valid login or alternatively test direct access via the Internet Browser Using https://yourtelstratools.telstra.com/enterprise/yourtelstratools 5. Using a Widget and Digital Certificate Telstra.com and Telstra.com.au should be added to allowed sites to use cookies. In order to achieve this, on your IE browser, go to tools intenet options privacy tab and click on sites. Figure 67: Create Allowed Sites Enter addresses of website Telstra.com and Telstra.com.au and select allow (to use cookies) and select cookies. These will be added to the Managed Websites list. Figure 67: Enter Managed Website List HELP AND SUPPORT FOR WIDGET 1. If a user is not able to view the login page then please verify if you are able to access Your Telstra Tools and login access via http://www.telstra.com.au/business-enterprise/ MSO regardless of how accessed, requires an Internet connection, proxy setup, certificates or addition to trusted list. 2. Copy and Paste the Widget html, to ensure code is correct. For further support, contact your Telstra Managed Service Desk. MANAGED SERVICES ONLINE USER GUIDE | VERSION 3.0 | JANUARY 2013 47