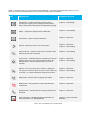
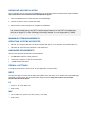
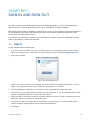
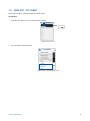
1
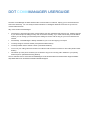
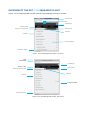
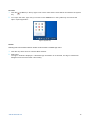
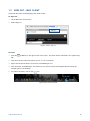
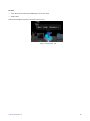
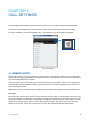
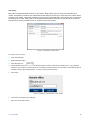
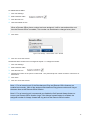
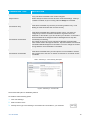
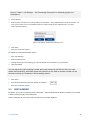
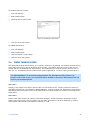
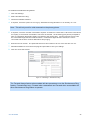
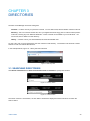
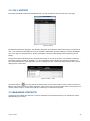
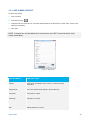
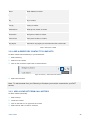
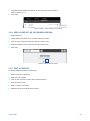
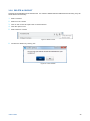
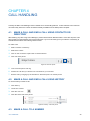
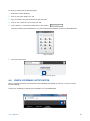
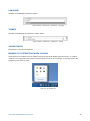
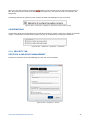
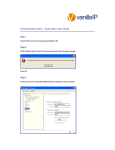
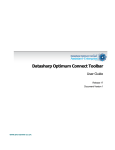
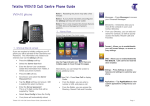
DOT (DIGITAL OFFICE TECHNOLOGY)™ COMMMANAGER INSTALLATION AND USER GUIDE WELCOME TO DOTCOMMMANAGER DOT CommManager enables the use of your DOT phones even when not at the office. If you travel regularly for work or sometimes like to work from home this tool enables the freedom to support you to do that, helping you to communicate and work more effectively. You can easily find team members or colleagues details and choose how you want to communicate with them or make phone calls from your business phones even when not at the premises. This guide describes the features of the DOT CommManager client and explains how to use them in an effective way. NEED MORE SUPPORT? If you have questions beyond this guide, we want to help. To learn more about your DOT tools and features, visit the DOT Online Support page at http://www.telstra.com.au/small-business/bundles/dot/support/ CONVENTIONS USED IN THIS GUIDE The following typographical conventions are used in this guide for simplicity and readability: Web addresses, e-mail addresses and hyperlinks are shown in bold italics, for example www.telstraenterprise.com.au. Button names and titles/features on your computer screen are shown in italics. User input is shown in typewriter font. DOT CommManager, User Guide, Version 1.0 © Telstra Corporation Limited (ABN 33 051 775 556) 2013. All rights reserved. This work is copyright. Apart from any use as permitted under the Copyright Act 1968, information contained within this manual cannot be used for any other purpose other than the purpose for which it was released. No part of this publication may be reproduced, stored in a retrieval system, or transmitted in any form or by any means, electronic, mechanical, photocopying, recording or otherwise, without the written permission of Telstra Corporation Limited. Words mentioned in this book that are known to be trademarks, whether registered or unregistered, have been capitalised or use initial capitals. Terms identified as trademarks include Cisco®, Microsoft®, Microsoft PC®, Apple®, AirPort®, Mac®, Linksys®. DOT COMMMANAGER USERGUIDE 2 WHAT’S INSIDE DOT COMMMANAGER USERGUIDE 4 SIGN IN AND SIGN OUT 9 CALL SETTINGS 15 DIRECTORIES 23 CALL HANDLING 29 SETTINGS, PREFERENCES AND SECURITY 32 DOT COMMMANAGER USERGUIDE 3 DOT COMMMANAGER USERGUIDE The DOT CommManager enables effective office communication in real time, helping you to communicate and work more effectively. You can easily find team members or colleagues details and choose how you want to communicate with them. Why use the DOT CommManager? Convenience: Directories and other communication tools are centralised and simple to use. Making changes to your business phone settings is easy and can be done remotely; if you need to work away from the Office location you can change your business phone settings to receive calls as long as you are connected to the internet. Accessibility: CommManager is always available for you to use and signing in is simple To easily configure a remote answer point (Remote Office feature) To easily forward calls to another number (Call forward feature) To turn off your calling name and number for outbound calls to external contacts or other sites (Hide number feature) Can define up to ten phone numbers you would like to ring for an incoming call in addition to your primary business phone. (Simultaneous Ring feature) The PC and Mac version of the DOT CommManager can be downloaded from Telstra’s DOT Support website: http://www.telstra.com.au/small-business/bundles/dot/support/ DOT COMMMANAGER USERGUIDE 4 OVERVIEW OF THE DOT COMMMANAGER CLIENT Figures 1 and 2 displays the Main window of the DOT CommManager for both PC and Mac. Client Resize Menu Call Settings Directory Tabs Add contacts Search or communicate Dial pad Contacts Communicate bar Connection Status Figure 1: DOT CommManager Main window - PC version Menu Client Resize Call Settings Directory Tabs Add contacts Search or communicate Dial pad Contacts Communicate Bar Connection Status Figure 2: DOT CommManager Main window - Mac version DOT COMMMANAGER USERGUIDE 5 Table 1 is a listing of the icons used in the DOT CommManager. It provides a brief description of the icon and refers the user to the relevant sections in the manual for further detail on the feature. ICON DESCRIPTION REFERENCE SECTION Call Settings – modify the features used to manage incoming and outgoing calls. Settings include; Remote Office, Call Forward, Hide Number and Simultaneous Ring Chapter 2 – Call Settings Dialler - displays the dialpad used to initiate calls Add Contact – opens the Add Contact form Expand –expands an area to view more options Chapter 4 – Call Handling Chapter 3 – Directories Chapter 3 – Directories Chapter 4 – Call Handling Call from phone – initiate a call from your Contacts screen, Directory screen and from Dialler Chapter 4 – Call Handling Actions menu – available within the Call History screen and displays options for a user to either initiate a call for the selected entry or add the selected entry to your list of Contacts Chapter 3 – Directories Options – this icon is found near a contact. Clicking this icon opens a menu from which an action for the contact can be chosen. Ie. Contact information and Remove contact. Chapter 3 – Directories Dialled Calls – lists the last 20 outgoing calls dialled Chapter 3 – Directories Missed Calls – lists the last 20 incoming calls that were unanswered Chapter 3 – Directories Received Calls – lists the last 20 incoming calls that were answered Chapter 3 – Directories Check Voicemail – indicates at least one message has been deposited to your MessageBank® Chapter 4 – Check Voicemail Notification Chapter 4 – Call Handling Chapter 4 – Call Handling Table 1: DOT CommManager icons and descriptions DOT COMMMANAGER USERGUIDE 6 DOWNLOAD AND INSTALLATION The PC and Mac version of the DOT CommManager can be downloaded from Telstra’s DOT Support website: http://www.telstra.com.au/small-business/bundles/dot/support/ 1. Click to download the PC or MAC versions of CommManager 2. Choose the option ‘Open’ to initiate the install 3. Follow the On-screen instructions to complete the installation. It is recommended that you do NOT install multiple instances of the DOT CommManager client on a single PC or Mac. Although technically feasible, it is not supported by Telstra. MINIMUM SYSTEM REQUIREMENTS OPERATING SYSTEMS SUPPORTED Mac OS 10.5 Leopard, Mac OS 10.6 Snow Leopard, Mac OS 10.7 Lion and Mac OS 10.8 Mountain Lion Windows XP, Windows Vista, Windows 7 and Windows 8 HARDWARE REQUIREMENTS The minimum hardware specification recommended is: 512 MB RAM, however 1 GB is preferred 1 GHz CPU, however 1.5 GHz is recommended ~100MB of hard disk space FIREWALL SETTINGS If prompted, please select “Allow access” for the application: “Communicator” HELP The Help link (Sign-in screen) and the Help option (Main menu) will direct you to Telstra’s DOT CommManager Userguide. For more help, refer to Telstra’s DOT Support web site: http://www.telstra.com.au/smallbusiness/bundles/dot/support/ PC 1. Press F1, Or Click Menu icon 2. Select Help MAC 1. On the Menu bar (at the top of the screen), click Help 2. Select Help DOT COMMMANAGER USERGUIDE 7 ABOUT Displays the version number and copyright details of the client installed on the PC or MAC. To view these details: PC 1. Click Menu 2. Select About MAC 1. On the Menu bar (at the top of the screen), click DOT CommManager 2. Select About DOT CommManager DOT COMMMANAGER USERGUIDE 8 CHAPTER 1 SIGN IN AND SIGN OUT The “Sign in” window will be displayed when the DOT CommManager starts up. Once a password has been entered, options to “remember the password” and “sign-in automatically” will become available. Before signing into the DOT CommManager, please ensure you have your “Commpilot” Username and Password for your business phone ready as they are the same. Note: Your Username and password will be for a User account and not an administrator account. If do not know your username or password for your business phone, please contact your Administrator, account holder or call Telstra Ph 13 2000 and state ‘DOT’. 1.1. SIGN IN To sign in please use the following steps: 1. If signing in for the first time, enter your username. However, on subsequent logins you may need to select your Username from a drop down list. The username format is 03xxxxxxxx@digitalbusiness 2. Enter your Password Figure 3: DOT CommManager Sign in 3. When a new version of the client is available, a prompt will appear to upgrade at this stage. For more details on the upgrade process refer to section 6.3 Upgrading to a new version 4. For CommManager to remember your password, check the checkbox to enable this option. 5. This option can be changed within the Preferences menu after sign in. For more details refer to section Chapter 5 Settings/Preferences and Security/Confirmations 6. When the option to Remember password has been selected, the option to Sign in automatically will be displayed. Check the checkbox to enable this option. 7. This option can also be changed within the Preference menu after sign in. For more details refer to section Chapter 5 Settings/Preferences and Security/Confirmations 8. Click Sign in SIGN IN AND SIGN OUT 9 Remember: Your username and password for CommManager is the same as for Commpilot and located within the configuration summary provided with your service. If you have not logged into Commpilot before, recommend you do so as you will be prompted to reset your password. Once a new password has been set, use your existing username and new password to sign into CommManager. If you are still unable to login to Commpilot or CommManager, contact your administrator, account holder or call Telstra Ph 13 2000 SIGN IN AND SIGN OUT 10 1.2. SIGN OUT - PC CLIENT A user has the option of selecting Sign Out, Close or Exit. To Sign Out: 1. Click the drop down arrow to view the Menu selector Figure 4: Menu on a PC 2. From the Menu select Sign Out Figure 5: Menu – Select Sign out or Exit SIGN IN AND SIGN OUT 11 To Close: 1. Click the (X-Button) in the top right corner of the client and the client will be minimised to the system tray 2. To re-open the client, right click your mouse on the Telstra icon in the system tray and choose the option “Open Application”. Figure 6: System Tray To Exit: Selecting Exit from the Menu selector will also close the DOT CommManager client. 1. Click the drop down arrow to view the Menu selector 2. Select Exit. The sign in window is displayed. If alternate login information is not entered , the Sign in window will disappear from the screen after a short delay. SIGN IN AND SIGN OUT 12 1.3. SIGN OUT – MAC CLIENT A User has the option of selecting Sign Out, Close or Quit. To Sign Out: 1. On the Menu bar click Actions 2. Select Sign out Figure 7: Actions - Sign out To Close: 1. Click the (X-Button) in the right corner of the client. The client will be minimised in the system tray, OR 2. Click and hold the left mouse button on the “T” icon in the dock. 3. Right click the mouse button on the DOT CommManager icon 4. Click Quit DOT CommManager; This allows you to receive calls and messages without having the window open on the desktop. 5. To restore the client, click on the icon. Figure 8: Dock with icon selected SIGN IN AND SIGN OUT 13 To Quit: 1. Click and hold the DOT CommManager icon on the dock 2. Select Quit Calls and messages will not be received via the client. Figure 9: Click and Hold - Quit SIGN IN AND SIGN OUT 14 CHAPTER 2 CALL SETTINGS The Call Settings button located on the Main window is where you can manage Incoming and Outgoing Calls. The features currently available are: Remote Office, Forward Calls, Hide Number and Simultaneous Ring. To access call settings, click the Call Settings button. Call settings can also be accessed via the Menu. Figure 4: Call Settings 2.1. REMOTE OFFICE Remote Office allows you (a User) to assign any other landline or mobile phone number as your business phone number and have outgoing calls billed to your business number. Incoming calls to your business are redirected to ring on the Remote Office phone number. A User who works away from the office (or from home) will benefit from this feature. When a call is initiated from CommManager with Remote Office enabled, your business phone number will be displayed to the caller and not your Remote Office number. Note: When a call is not initiated using Comm Manager the call will be not be charged back to your DOT service. Use Case 1: Ben works from home two days a week and has a landline at his home office. On the days Ben works from home, he signs into the DOT CommManager and enables the Remote Office feature to his home landline phone number. All the calls he makes using the DOT CommManager will display as his business phone number with the call cost charged to his business phone. When someone calls his business phone, the calls are received on his home landline phone number. When he is finished work for the day, Ben disables the Remote Office feature. CALL SETTINGS 15 Use Case 2: Molly will be travelling interstate to follow up with clients. Molly always gives her clients her business phone number. While Molly is interstate, she enables the Remote Office so all calls to her business phone number will be received on her mobile. When Molly initiates a call from the DOT CommManager, her business phone number will be displayed to the caller. Molly likes to use the Remote Office feature since she only has to give her clients her business phone number and still not miss a call when away from the office. Figure 5: Call Settings – Remote Office To enable Remote Office: 1. Click Call Settings 2. Select Remote Office 3. Click the Edit icon 4. Check Enable service and enter the Remote Office number in the phone number field. The preferred format for this number is 03xxxxxxxx (for a landline) and 04xxxxxxxxx (for a mobile). International phone number format is also supported (ie +<country code><phonenumber) 5. Click Save Figure 6: Call Settings – Remote Office – Edit - Enable 6. The screen will display the changes 7. Click X to close the window CALL SETTINGS 16 To disable Remote Office: 1. Click Call Settings 2. Select Remote Office 3. Click the Edit icon 4. Uncheck Enable service When a Remote Office phone number has been assigned, it will be remembered the next time the Remote Office is enabled; This number can be deleted or changed at any time. 5. Click Save Figure 7: Call Settings – Remote Office – Edit – Disable 6. Click X to close the window The Remote Office number can be changed at anytime. To change the number: 1. Click Call Settings 2. Select Remote Office 3. Click the Edit icon 4. Change the number in the phone number field. The preferred phone number format is: 03xxxxxxxx or 04xxxxxxxx. 5. Click Save 6. Click X to close the window Note 1: For an incoming call, if the Simultaneous Ring and Remote Office features are enabled concurrently, each of the assigned Simultaneous Ring phone numbers will ring at the same time as the Remote Office location. Note 2: For an incoming call, recommend you disable the Call forward Always feature to ensure your Remote Office location rings. If the Always forward feature is enabled, the assigned number for Always forward will ring and not the Remote Office location. CALL SETTINGS 17 To make a call when Remote Office is enabled: 1. Use the DOT CommManager to make the call Refer to Chapter 4: Call Handling for details on how to make a call using the DOT CommManager 2. The assigned Remote Office phone will ring 3. Answer the Remote Office phone 4. The call will be connected to the destination number 5. When you have completed the call, hang up the phone to disconnect the call 2.2. FORWARD CALLS The Forward Calls feature automatically forwards incoming calls (from your business phone) to an alternate phone number that is configured. The preferred phone number format is: 03xxxxxxxx or 04xxxxxxxx. International phone number format is also supported (ie +<country code><phonenumber) Use Case 1: Gloria will be on leave for two weeks. Gloria’s manager, Brian has agreed that he take her calls while she is away. On her last day of work, Gloria signs in to DOT CommManager and enables the Always Forward feature and assigns Brian’s number in the phone number field. All of Gloria’s calls are automatically forwarded to Brian. When Gloria returns from her leave she disables the Always Forward feature, so she can again receive calls on her business phone. Use Case 2: Jess and Aaron work together on the same project. The calls they receive could be answered and followed up by either of them. To help improve their response times and share the work load, Jess has enabled the Forward when Busy feature and assigns Aaron’s phone number. Aaron has also enabled the Forward when Busy feature and assigns Jess’s phone number. If Jess was already on a call and a second incoming call was received (and Call Waiting was not enabled), the call would be forwarded to Aaron’s phone number to assist with caller enquiry. Note: Call Waiting is a feature that can easily be managed using a Feature Access Code (FAC). To enable Call Waiting dial *43#; To disable Call Waiting dial #43#. Use Case 3: William is often not at his desk and misses a lot of calls that come through to his business phone. To ensure William can be contacted while away from his business phone, he enables Forward when unanswered to his mobile phone number. This way, if William is at his desk he is able to answer the call on his business phone. If he is not at his desk and there is a call to his business phone it will be forwarded to his mobile phone number. Use Case 4: Glen’s business is in an area where there are frequent disturbances to the electricity network. To prevent his business being unable to continue when these disturbances occur Glen has enabled Forward when unreachable and entered the number as his mobile phone into the relevant field. If there are any outages, all of his business calls will automatically be forwarded to his mobile phone. CALL SETTINGS 18 FORWARDING TYPE DESCRIPTION Every call will be forwarded to the number assigned. Always forward Forward when busy Forward when unanswered NOTE: Always Forward over rides all other call forward settings. If Always Forward is enabled, all your incoming calls will always be forwarded. Calls will be forwarded only when the phone being called is busy. If call Waiting is active this feature will not work correctly Calls will be forwarded after a defined number of rings. We have preconfigured your service to forward calls after 3 rings if the call is not answered. In other words, if you don’t answer your call after ~18 seconds it will be forwarded to the assigned number. Messagebank can stop this functionality from working. The number of rings can only be changed via the DOT Commpilot web portal. Please refer to the support web site http://www.telstra.com.au/smallbusiness/bundles/dot/support/ for information on how to change the number of rings before a call is forwarded in CommPilot Forward when unreachable Calls will be forwarded when your DOT phone is not accessible or inactive due to power loss to the site, no network connectivity or no internet access is available Table 2: Call Settings – Call Forwarding Description Figure 8: Call Settings – Forward Calls The Forward Call option is disabled by default. To enable a Call Forwarding option: 1. Click Call Settings 2. Select Forward Calls 3. Identify which type of forwarding to be enabled and click Edit for your selection CALL SETTINGS 19 Refer to Table 2: Call Settings – Call Forwarding Description for forwarding types and descriptions. 4. Check Enable 5. Enter a phone number for incoming calls to be forwarded. The preferred phone number format is: 03 xxxx xxxx or 04xx xxx xxx. International phone number format is also supported (ie +<country code><phonenumber>) Figure 9: Call Settings – Enable Call Forwarding service 6. Click Save 7. Click X to close the window To disable any of the Forward Calls options: 1. Click Call Settings 2. Select Forward Calls 3. Identify which type of forwarding you need to disable and click Edit for your selection 4. Uncheck Enable You can leave the Call forwarding number previously entered in the field for when you next enable Call forwarding, otherwise delete the number from the field so another number can be entered next time you enable the Call forwarding feature. 5. Click Save 6. The selected forwarding will now display as disabled 7. Click X to close the window 2.3. HIDE NUMBER By default, your number is displayed to the called party. When the Hide Number feature is enabled, your number is hidden from the display of the called party. Calls to colleagues at your business site will still see your number displayed. CALL SETTINGS 20 To enable to hide your number: 1. Click Call Settings 2. Select Hide Number 3. Check Enable to hide number Figure 10: Call Settings – Hide number 4. Click X to close the window To disable Hide Number: 1. Click Call Settings 2. Select Hide Number 3. Uncheck Enable to hide number 4. Click X to close the window 2.4. SIMULTANEOUS RING The Simultaneous Ring feature allows up to 10 phone numbers to be defined. All numbers defined will ring at the same time as your primary business phone number. This feature ensures incoming calls are not missed and can be answered from other phones. The preferred phone number format is: 03 xxxx xxxx or 04xx xxx xxx. International phone number format is also supported (ie +<country code><phonenumber >) The MessageBank® of the phones assigned within the Simultaneous Ring feature can answer a call. If this occurs, your Voicemail will be located on the phone that answers the call and not your business phone Use Case 1: Anthony is not always at his desk to answer calls on his business phone. Anthony prefers all calls to be answered promptly and not forwarded to MessageBank® . Anthony enables the Simultaneous Ring feature and assigns his mobile phone as one of the other numbers to allow Anthony to answer an incoming call on either phone. Use Case 2: Sarah’s sales team requires all calls to be answered promptly. Sarah enables the Simultaneous Ring feature and assigns all ten phone numbers from her team. This allows a call to be answered by another team member when Sarah is unavailable or already on a call. CALL SETTINGS 21 To enable the Simultaneous Ring feature 1. Click Call Settings 2. Select Simultaneous Ring 3. Check the Enabled checkbox 4. If required, check the option Do not ring my Simultaneous Ring Numbers if I am already on a call Note: This will only work for calls answered on the primary phone. 5. If required, check the “Answer confirmation required” checkbox to ensure that a call will be connected to a live party. If the Answer Confirmation check box is selected, the answering party will be prompted to enter a confirmation digit before getting connected to the calling party. All other phones will ring until the confirmation digit has been entered. When a confirmation digit has been entered, the call is connected and the other number destinations stop ringing. 6. Enter the Phone number. The preferred format for this number is 03 xxxx xxxx and 04xx xxx xxx. 7. DO NOT FORGET to scroll down the page and press OK to save your settings. 8. Click X to close the window Figure 11: Call Settings – Simultaneous Ring The Forward Always feature when enabled will take precedence over the Simultaneous Ring feature. Forward when busy, Forward when unanswered and Forward when unreachable will allow Simultaneous Ring feature to operate. CALL SETTINGS 22 CHAPTER 3 DIRECTORIES The DOT CommManager has three Calling lists: Contacts – contains a list of your personal contacts. You are able to add, edit and delete contacts in this list Directory – this is an internal contacts list, all of your digital office technology phone numbers will be present in this list, including any from different addresses. These contacts can be added to your Contacts list. You cannot add, edit or delete from this directory History – contains a list of your last 20 Missed, Received and Dialled calls To view a list, click on the required tab to view the contacts in that directory. The selected tab will have a raised white line under it to indicate the selection. In the example below, Figure 18 - History has been selected. Figure 12: Directory Tabs 3.1. SEARCHING DIRECTORIES Use Search in Directories and Search and Communicate in Contacts to quickly find contacts Figure 13: Directory Search Figure 14: Contacts Search The search function is incremental; as each letter is entered the displayed contacts will narrow to match the search criteria. DIRECTORIES 23 3.2. CALL HISTORY Call History lists Dialled, Received and Missed calls. The time and date of each call is shown on the right. Figure 15: History By default all calls will be displayed. Use the Filter drop down arrow button to select which calls you would like to view. The check boxes will display and can be selected or deselected. The Filter settings you select will remain even if you Sign out and Sign back in. Please remember to check the Filter settings before inspecting the Call History. Please note that the Call History does not display the leading “0” of a phone number. The Contacts or Directory will display a phone number as “03 8666 1111”. The Call History will only display this number as “3 8666 1111”. This is normal behaviour of the application. This is not always the case, I have seen many example where it does display with a 0 at the start. Figure 16: History – Filter The actions button on the right side of the date and time can be used to dial a Contact. Refer to section 4.2 Make a Call and End a Call for further information. Right click to view a menu and select either Call from phone to call the contact or Add to Contact list to add the contact to your contacts list if required. 3.3. MANAGING CONTACTS Contacts can be created as a new entry or can be obtained from the business directory. All contacts are sorted alphabetically by first name. DIRECTORIES 24 3.3.1. ADD A NEW CONTACT To add a new contact. 1. Click Contacts 2. Click Add Contact 3. Complete the Add Contact form. The table below details a full description of each field. None of the fields are mandatory. 4. Click Add NOTE: Contacts can only be added when connected to your DOT service otherwise it will remain be disabled. Figure 17: Add Contact FIELD LABEL DESCRIPTION Address Requires the sip address of the contact. If unknown please leave blank Display Name This is the name that will display in the Contacts list First Name First Name of contact Last Name Last Name of contact Email Email address of contact Web Website address of contact DIRECTORIES 25 Street Street address of contact Post Code Post Code of contact City City of contact Country Country of contact Mobile Phone Mobile phone number of contact Work Phone Work phone number of contact Home Phone Home phone number of contact Ring Signal Select which ring signal you would like when this contact calls Table 3: Add Contact - Details 3.3.2. ADD A DIRECTORY CONTACT TO CONTACTS To add a contact from the Directory to your Contacts list: 1. Select Directory 2. Search for the contact 3. Click on the contact to expand the Communicate bar Figure 18: Directory - Add Contact from Directory 4. Select Add Contacts Note: To add contacts from your Directory to Contacts you must be connected to your DOT service. 3.3.3. ADD A CONTACT FROM CALL HISTORY To add a contact from History 1. Select History 2. Locate the contact 3. Click on the Dial Icon or right click the contact 4. Select Add to add a contact to Contacts DIRECTORIES 26 5. The Add Contact details will display, enter in the required information. Refer to section 3.3.1 6. Click Add Figure 19: History – Add to Contact list from History 3.3.4. ADD A CONTACT AS YOU SEARCH OR DIAL 1. Select Directory 2. In the Search field enter in the contacts name or number 3. Click on the contact and select the Add to Contacts Icon 4. Enter the details of the contact to the Add Contact form 5. Click Add Figure 20: Add Contact from Search 3.3.5. EDIT A CONTACT To edit the details of Contacts and Directory. 1. Select Contacts or Directory 2. Search for the contact 3. Click on the contact to expand the Communicate bar 4. Click the Options icon 5. Select Contact Information 6. Make the required changes and click OK DIRECTORIES 27 3.3.6. DELETE A CONTACT Contacts can be deleted from the Contacts list. If a contact is deleted that was added from the Directory, they will still be listed in the Directory. 1. Select Contacts 2. Search for the contact 3. Click on the contact to expand the Communicate bar 4. Click the Options icon 5. Select Remove Contact Figure 21: Delete Contact 6. Confirm the deletion by clicking Yes Figure 22: Confirm Deletion DIRECTORIES 28 CHAPTER 4 CALL HANDLING Currently the DOT CommManager offers a limited set of call handling features. Future releases of the client will more than likely add to the number of features already available from the Web portal Commpilot. 4.1. MAKE A CALL AND END A CALL USING CONTACTS OR DIRECTORY When Making any calls using Comm Manager, please note that when Remote Office is not active all phone calls will be made from the Business phone at the premises. If you are not working from your Office it is necessary to activate Remote Office when making outbound calls. To make a call: 1. Select Contact or Directory 2. Select the contact 3. Click on the contact to expand the Communicate bar 4. Click Call from phone Figure 23: Call from phone 5. Your business phone will ring 6. Answer the call and you will then be connected to your Contact 7. End the call by hanging up the handset on business phone or remote phone 4.2. MAKE A CALL AND END A CALL USING HISTORY To use the History to make a call: 1. Click History 2. Locate the contact 3. Click the Call icon 4. Click the select Call from phone Figure 24: History – Call from phone 4.3. MAKE A CALL TO A NUMBER CALL HANDLING 29 To dial any numbers use the following steps: 1. Select the Contact Directory 2. Click on the Open Dialler icon and 3. Type a number from your keyboard into the field, OR 4. Click on the numbers in the number pad, OR 5. In the Search or Communicate field enter in the number. Copy the number from the field Search or communicate field and paste the number into the Dialler field. Figure 25: Dialler 6. Click Call from Phone Figure 26: Call from phone 4.4. CHECK VOICEMAIL NOTIFICATION When a message has been received the DOT CommManager will display an alert icon. This icon is a fully functional display. Access your messages by selecting the ‘messages’ icon in CommManager CALL HANDLING 30 Figure 27: MessageBank® ® Notification When a new message has been accessed the icon will no longer display. CALL HANDLING 31 YOU CAN ALSO ACCESS YOUR MESSAGES BY DIALLING ‘101’ OR BY PRESS THE ‘MESSAGES’ BUTTON ON YOUR HANDSETCHAPTER 5 SETTINGS, PREFERENCES AND SECURITY 5.1. PREFERENCES Preferences are used to maintain your own User profile. Preferences can be accessed through the main menu of the client. To access Preferences from your PC: 1. Click Menu 2. Click Preferences To access Preferences on Mac: 1. On the Menu bar click the DOT CommManager 2. Click Preferences 5.1.1. APPEARANCES The Appearance tab will display first by default. Options for this tab cannot be changed. SETTINGS, PREFERENCES AND SECURITY 32 Figure 28: Menu – Preferences - Appearance SETTINGS, PREFERENCES AND SECURITY 33 LANGUAGE The DOT CommManager is preset to English. Figure 29: Menu – Preferences – Appearance – Language THEMES The DOT CommManager is preset to the Telstra Theme. Figure 30: Menu – Preferences – Appearance – Themes SOUND EVENTS This feature is currently not supported. MINIMISE TO SYSTEM TRAY WHEN CLOSING The System Tray is located on the PC taskbar next to the clock at the bottom right of the screen. It contains miniature icons of programs and system functions that are running on your computer. To view the icons in the system tray click on the up arrow. Figure 317: PC System Tray SETTINGS, PREFERENCES AND SECURITY 34 When you close the program by clicking the (X-button) in the top right corner for PC and top left corner for Mac, the program does not exit but is minimised in the system tray. The client will continue to operate in the background. Unchecking “Minimise to system tray when closing” will allow CommManager to sign out and exit. Figure 32: Menu – Preferences – Appearance – Minimise to system tray when closing CONFIRMATIONS Confirmations allow pop-up notifications to be presented each time a contact is removed, or before an automatic re-login. Confirmations for these events (shown in fig 39) can be disabled by checking the relevant box Figure 39: Menu – Preferences – Appearance – Confirmation 5.1.2. SECURITY TAB PROTOCOLS AND DEVICE MANAGEMENT Contains the Username of the CommManager account and cannot be altered. Figure 33: Menu – Preferences – Security SETTINGS, PREFERENCES AND SECURITY 35 LOG IN There are two options that can be set to change your Log in preferences 1. Sign in automatically means you will be signed in immediately when the client starts. 2. Run this program when the system starts will automatically run the client when your computer starts. Click OK to save changes and exit or click Cancel to close. Figure 34: Menu – Preferences – Security – Log in SETTINGS, PREFERENCES AND SECURITY 36 CHAPTER 6 DEFINITIONS Definitions of terms used throughout this guide are listed in Table TERM DEFINITION DOT CommManager The name of the software described in this guide. Also referred to as the client. Client The software used and described in this guide. Also referred to as the DOT CommManager. CommPilot A web based graphical user interface that allows users to configure and customise DOT phone features. Remote Office The Remote Office feature allows you to define any landline or mobile phone number as your business phone. You can make phone calls from this phone number and have them billed to your business. Incoming calls to your business are also redirected to ring the Remote Office phone number. Forward Calls The Forward Calls feature automatically forwards incoming calls (from your business phone) to an alternate phone number that is configured Simultaneous Ring The Simultaneous Ring feature allows you to define up to 10 phone numbers that will ring at the same time as your primary business phone number. This feature helps to ensure incoming calls are not missed and can be answered from other phones. Table 4: Definitions of Terms Used SETTINGS, PREFERENCES AND SECURITY 37