1
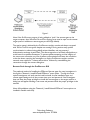
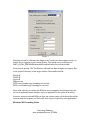
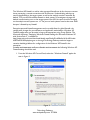
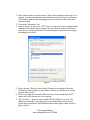
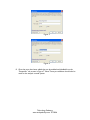
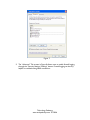
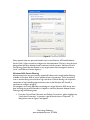
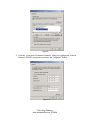
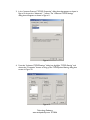
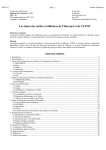
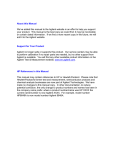
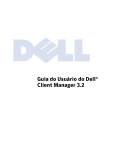
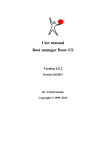
Remote Agent Use & Troubleshooting
Guide
Introduction
ProDiscover® IR and Investigator editions offer users great power by allowing remote
preview and imaging of suspect systems. Remote imaging and analysis capabilities are
enabled by the use of client/server technology where the ProDiscover Console
(investigators machine) is the client and the PDServer™ Remote Agent (running on the
target machine) is the server. An understanding of basic TCP/IP networking is essential to
successful use of ProDiscover in a network environment. Additional understanding of
ProDiscover remote communications protocol can be very beneficial in streamlining
connection troubleshooting. This article is intended to provide investigators a greater
understanding of ProDiscover’s remote connection and basic troubleshooting techniques.
Remote Agent Options
There are several options for running the remote agent designed to provide investigators
with the greatest flexibility for a given situation. Options include:
1. Have the PDServer Remote Agent pre-installed as a standard application on the
system. This option allows the agent to run in stealth mode.
2. Run the PDServer Remote Agent from CD-ROM or Thumb-drive. This option is
least intrusive, displacing only a small amount of physical memory and possibly
making one or two registry changes annotating the recently run command or
added thumb-drive. This option causes the remote agent to run in the foreground
and visible to users and the investigator.
3. Installing the PDServer Remote Agent using the ProDiscover console’s Network
Menu Option for installing PDServer. This GUI “Push” can be the simplest method
for installation and removal of the remote agent and support files. When using the
menu option a small number of files are written to the system32 directory of the
remote system. This option allows the agent to run in stealth mode.
4. Using an end-point systems management system such as Microsoft® SMS. This
approach also writes files to the target disk and is best performed by experienced
system administrators. This option allows the agent to run in stealth mode.
5. Booting the target system to the PDServer LINUX Boot Disk. In situations where
a target system is not running and imaging/preview is desired, using the PDServer
LINUX Boot Disk is the least intrusive method and provides a traditional bitstream image that is consistent across time.
Basic Connectivity Tests (Ping and Traceroute)
Ping is a simple utility that is used to check if a server is active and responding, and if it
is, how long it is taking packets of information to travel from your computer to the
destination server. Each packet is a small block of data by default (often 32 bytes), that
is checked for integrity to ensure that all data is transferred accurately. In addition to
time statistics provided, most implementations will also provide IP address and or
domain name information for the destination. This can be useful in tracking domain
name issues by ensuring that the domain is pointing to the correct IP address.
Technology Pathways
www.techpathways.com 2/7/2006
Traceroute is a utility that helps diagnose network congestion between your computer
and the destination server. Traceroute works by sending packets of information from
your location to the destination and timing how long it takes to receive a response. In
addition to tracking the time it takes to reach the final destination, you are provided
with the times to each 'Hop' between your terminal and the destination. Each Hop is a
separate 'router' that your information must pass through. By providing the times for
each hop, we can often find the source of problems accessing a server.
Note: While Ping and Traceroute are helpful in finding problem areas when access to
the PDServer remote agent may be slow or unavailable, it does not always isolate the
source of the problem. The commands themselves may not be available or may be
filtered.
Using Ping in DOS (Command Prompt)
For Windows 95 and 98 users, ping is already set up to run in the DOS window, also
known as the Command Prompt. To use Ping to test the connection to 192.168.0.1,
open a DOS window (Start Æ Programs Æ Command Prompt), and type the following
command:
ping 192.168.0.1
and press [ENTER]. You should see something that looks similar to the following:
Pinging rtr.techpathways.com [192.168.0.1] with 32 bytes of data:
Reply
Reply
Reply
Reply
from
from
from
from
192.168.0.1:
192.168.0.1:
192.168.0.1:
192.168.0.1:
bytes=32
bytes=32
bytes=32
bytes=32
time=70ms
time=70ms
time=60ms
time=60ms
TTL=114
TTL=114
TTL=114
TTL=114
Ping statistics for 192.168.0.1:
Packets: Sent = 4, Received = 4, Lost = 0 (0% loss),
Approximate round trip times in milli-seconds:
Minimum = 60ms, Maximum = 70ms, Average = 65ms
This tells you that the application server is up and running, and that the average time it
took 32 bytes of data to travel from your computer to the address 192.168.0.1 and back
is 65ms. Anything less than 200ms should be adequate enough for PDServer™ to
function properly. However, the ideal time for the best results is less than 100ms. A
connection with results in this range should provide a fast connection.
Using Traceroute in DOS (Command Prompt)
For Windows 95x/NT/XP/200x users, traceroute is already setup to run in a DOS
window. To use traceroute, open a DOS window (Start Æ Programs Æ Command
Prompt), and type the following command:
tracert rtr.techpathways.com (or the IP address) and press [ENTER]. You should
see something that looks similar to the following:
Technology Pathways
www.techpathways.com 2/7/2006
Tracing route to rtr.techpathways.com.com [192.168.0.1] over a maximum of 30
hops:
1
2
3
4
5
6
7
8
9
10
11
12
13
14
15
30
30
41
40
60
50
50
60
40
50
40
40
70
60
70
ms
ms
ms
ms
ms
ms
ms
ms
ms
ms
ms
ms
ms
ms
ms
40
30
60
30
50
71
40
50
40
70
40
30
50
70
80
ms
ms
ms
ms
ms
ms
ms
ms
ms
ms
ms
ms
ms
ms
ms
31
30
90
40
40
50
60
120
40
70
50
41
60
70
60
ms
ms
ms
ms
ms
ms
ms
ms
ms
ms
ms
ms
ms
ms
ms
hr1-cf9a4b01.dsl.impulse.net [207.154.75.1]
hr4-cf9a4105.iis.impulse.net [207.154.65.5]
q1-gateway1.impulse.net [205.171.37.69]
bur-cntr-01.inet.qwest.net [205.171.13.169]
bur-core-01.inet.qwest.net [205.171.13.134]
lax-core-01.inet.qwest.net [205.171.8.41]
lax-brdr-01.inet.qwest.net [205.171.19.38]
4.24.118.17
p1-0.lsanca2-br1.bbnplanet.net [4.24.5.130]
p15-0.lsanca2-br2.bbnplanet.net [4.24.5.46]
p7-0.lsanca1-ba2.bbnplanet.net [4.24.4.37]
p0-0-0.lsanca1-cr4.bbnplanet.net [4.24.4.42]
bvi1.core0.sba1.netlojix.net [207.71.192.58]
netx-rtr-e0.techpathways.com [207.71.224.129]
192.168.0.1
Trace complete.
As you can see, it took 15 'hops' to get from the originating computer to the remote
system. If you experience hops with asterisks * this denotes possible congestion (packet
loss) and can affect the performance of your application, or prevent you from
connecting at all. When this occurs and you are having trouble accessing your server,
send in a support request with the above information.
To copy this information from the Command Prompt, right-click the title bar of the
Command Prompt windows, select “Edit Æ Mark”, click and drag the mouse until you
select the data area that you want to copy. Press [ENTER] when you've finished
selecting. Switch to the Windows program that you want to import the just copied data
to, and select its paste function.
ProDiscover Setup and Communications Flow
Understanding the ProDiscover Session setup and communications flow can streamline
investigator troubleshooting. To provide the best possible performance in preview mode,
ProDiscover's network communications is such that many small packets are sent to the
target on port 6518 (by default) and many small packets are sent to the analysis console
on port 6518 (by default). This approach is somewhat like the implementation of VoIP to
avoid voice jitter. A simple diagram of the remote connection communications flow is
seen in Figure 1.
Technology Pathways
www.techpathways.com 2/7/2006
Figure 1.
Note: If the ProDiscover program is being utilized to “push” the remote agent to the
target computer, then Windows File and Print Sharing ports must be open on the remote
target system in addition to remote agent port 6518 (by default).
The session setup is initiated by the ProDiscover analysis console and always encrypted
with 256 bit TwoFish encryption despite user settings. During session setup, packet
synchronization is achieved using globally unique identifiers and any password
authentication exchange is performed. The remote agent has a hard back-off algorithm to
avoid brute force password attempts. To prevent packet tampering and the integrity of
the one-to-one connection, any loss of packet synchronization will cause the connection
to be shut down, requiring the investigator to use the ProDiscover analysis consoles
network menu option for “release remote client” followed by reestablishing the
connection through the connect dialog box.
Remote Push through the ProDiscover GUI
The preferred method of installing the PDServer Remote agent for many investigators is
through the "Network | Install/Uninstall PDServer" menu option. Through this menu
option investigators can easily set the install, uninstall, choose installation type, and
remote agent settings such as the process name, port and password. If the investigator
does not have the proper privileges to install the remote agent on the target machine, a
dialog box will appear allowing a user name and password with the proper privileges to be
entered.
Note: All installations using the "Network | Install/Uninstall PDServer" menu option are
installed in Stealth mode only.
Technology Pathways
www.techpathways.com 2/7/2006
Figure 2.
Choosing to install in "Windows Run Registry Key" causes the remote agent to only run
while a user is logged on to the remote system. The specific entry can be found in
HKEY_LOCAL_MACHINE\Software\Microsoft\Windows\CurrentVersion\Run
Once the user presses "OK" ProDiscover will install the Remote Agent and support files
in the system32 directory of the target machine. Files installed include:
Disk16.dll
Disk32.dll
msvcrt.dll
PDServer.exe
DFTSrv.exe (Installed only if installing as a service)
DFTSrv.ini (Installed only if installing as a service)
Note: when choosing to rename the PDServer.exe, investigators should ensure they do
not use an application name already in use by an application in the system32 directory.
If the user selects to uninstall PDServer from the remote system, all the above files will be
removed with the exception of "msvcrt.dll" which may be required by other applications.
Windows XP Firewalling Guide
Technology Pathways
www.techpathways.com 2/7/2006
The Windows XP firewall, as well as other personal firewalls are by far the most common
issues preventing a remote connection with ProDiscover. Understanding which ports
need to be allowed on the target system as well as the analysis console is essential. By
default, TCP port 6518 should be allowed on both systems. If investigators change the
default communication port on the target system from 6518, the port should be changed
on the analysis console system too. i.e. The port on both systems must be the same AND
be open / allowed by any firewall.
Enterprise personal firewall management tools normally allow for global firewall rule
configuration changes for port allowance and application authorization. Windows XP
Firewall configuration can be made in large scale enterprises using Group Policies. The
Microsoft document “Deploying Windows Firewall Settings for Microsoft Windows XP
with Service Pack 2” is available at
http://www.microsoft.com/downloads/details.aspx?FamilyID=4454e0e1-61fa-447a-bdcd499f73a637d1&DisplayLang=en or through Technology Pathways technical support
contains detailed guidelines for configuration of the Windows XP Firewall in the
enterprise.
In tests environments and non-domain environments the following Windows XP
Firewall settings should be used.
1. From the Windows XP Control Panel, select the “Windows Firewall” applet. As
seen in Figure 3
Figure 3.
Technology Pathways
www.techpathways.com 2/7/2006
2. Ensure the firewall is turned on and the “Don’t allow exceptions check box is not
checked. It is recommended that the firewall be turned on because the Windows
XP Firewall as well as other firewalling products are known to filter traffic even
when turned off.
3. Choose the “Exceptions” tab.
4. Note in Figure 4 the entry for “DFT” This is a program entry that is automatically
created on the analysis console system if the user chooses to allow ProDiscover
when first run and the Windows XP Firewall attempts to block it from binding to
the default port of 6518.
Figure 4
5. Ensure that the “File and Printer Sharing” Dialog box is enabled to allow the
ProDiscover Remote Agent to be “Pushed” out from the ProDiscover console
network menu option.
6. If this is the target system and ProDiscover had not been installed the “DFT”
option will not be present and is not required.
7. The “Add Port…” button is used to allow TCP and UDP ports to pass. The
default port of 6518 or other desired ports should be added on any remote
system with the Windows XP Firewall intended to be a target system as seen in
Figures 5 and 6.
Technology Pathways
www.techpathways.com 2/7/2006
Figure 5.
Figure 6.
8. Once the ports have been added they can be enabled and disabled from the
“Exceptions” tab as seen in Figure 7. Note: These port additions should also be
made on the analysis console system.
Technology Pathways
www.techpathways.com 2/7/2006
Figure 7.
9. The “Advanced” Tab as seen in Figure 8 allows users to enable firewall logging
through the “Security Settings | Settings” button. Firewall logging can be very
helpful in troubleshooting failed connections.
Technology Pathways
www.techpathways.com 2/7/2006
Figure 8.
Many systems today use personal firewalls such as the Windows XP Firewall added in
Service Pack 2. Most can also be configured as described above. The key is that the ports
being utilized (6518 by default) should be allowed on both systems. Windows File and
Print Sharing should also be allowed on any target system that investigators desire to
“push” the PDServer Remote Agent to.
Windows 2000 Packet Filtering
Administrators who are very security minded will often use the simple packet filtering
available in Windows 2000 to add an additional layer of protection. This is particularly
true on internet facing host and other high-risk servers. Packet filtering is an important
component of any firewalling approach and as seen in the Windows XP Firewall, is
important to configure properly.
If investigators are having difficulties connecting to a target Windows 2000 server even
after checking any personal firewalls it is helpful to check for Network Adapter Packet
Filtering using the following steps.
1. From the Control Panel “Network and Dial-up Connections” applet, highlight the
“Local Area Connection” in question, right-click and choose “Properties”. A
dialog box as seen in Figure 9 will appear.
Technology Pathways
www.techpathways.com 2/7/2006
Figure 9.
2. From the “Local Area Connection Properties” dialog box, highlight the “Internet
Protocol (TCP/IP)” component and choose the “Properties” button.
Figure 10.
Technology Pathways
www.techpathways.com 2/7/2006
3. In the “Internet Protocol “TCP/IP) Properties” dialog box that appears as shown in
Figure 10 choose the “Advanced…” button. The “Advanced TCP/IP Settings”
dialog box will appear as shown in Figure 11.
Figure 11.
4. From the “Advanced TCP/IP Settings” dialog box highlight “TCP/IP filtering” and
choose the “Properties” button to bring up the TCP/IP packet filtering dialog box
as seen in Figure 12.
Figure 12.
Technology Pathways
www.techpathways.com 2/7/2006
5. If the “Enable TCP/IP Filtering” check box is enabled and the “Permit Only” radio
button for TCP Ports is selected, investigators have the option of disabling the
“TCP/IP Filtering” check box or adding the PDServer Remote Agent port to TCP
Ports. Note after the change is made and the investigator chooses OK, a system
reboot is required for the changes to take effect.
This type of packet filtering in only normally found on Internet facing and high-risk servers
however, it is often overlooked and can be difficult to troubleshoot.
Troubleshooting Timeouts & Performance
Obsessive timeouts during protracted functions such as imaging, or more in-depth analysis
can be caused by many things. Some troubleshooting and planning can often limit these
difficulties.
One of the first things to look at is the end-to-end network utilization and performance
between the analysis console and the target system. The better the performance the less
likely timeouts will occur. Because of the amount of data being transferred, good network
performance is critical.
The next consideration is related to ProDiscover's design. We are designed to provide
minimal impact on the target system so as to allow background monitoring. All
ProDiscover Remote Agent processes run at a low thread priority. If the target system
becomes busy for protracted periods of time, this could preempt our process and thus
cause excessive timeouts. Investigators can increase the PDServer.exe thread priority on
the remote system to overcome this effect if desired. Process thread priority can be
changed through the Windows Task Manager’s Process tab by highlighting the desired
process, right-clicking and choosing “Set Priority”.
Another consideration is also related to ProDiscover's design. To provide the best
possible performance in preview mode, ProDiscover's network communications is such
that many small packets are sent to the target on port (6518 by default) and many small
packets are sent to the analysis console on port (6518 by default). Somewhat like VoIP
does to avoid voice jitter. This design can overload the TCP/IP buffers on the console
and/or target systems. To prevent timeout issues along these lines we make some TCP/IP
stack performance enhancements on the registry of the analysis console machine during
ProDiscover installation. In some cases making these registry changes on the target
system can eliminate any timeout issues. The default installation directory of ProDiscover
contains a .reg file called "ProDiscoverRegistryTweak_2k_XP.reg" that will make these
changes to any Windows 2000, 2003, or XP system. Note a system reboot is required
after making these adjustments and system performance is increased by making the
change.
In summary, ProDiscover performance is directly affected by the performance of the
systems and network that it is being used in, more so than many applications due to the
volumes of data that may be accessed. That said, Technology Pathways is continually
Technology Pathways
www.techpathways.com 2/7/2006
researching ways to increase performance and improve the application through the
utilization of user feedback.
Push Checklist
If the push fails to authenticate with the remote system, are you providing account
credentials with local administrative rights on the target system?
If the answer to #1 above is yes, but the authentication still fails, then check the
default Windows XP (non domain environment) settings on the target system.
Ensure that the security options policy for “Network access: Sharing and security
model for local accounts” is set for “Classic – local users authenticate as
themselves” (The default setting is “Guest only – local users authenticate as
Guest”). This is documented in detail on the ProDiscover Community forums at
http://toorcon.techpathways.com/CS/forums/98/ShowPost.aspx
If the answer to #1 is still yes, but authentication fails, check to ensure the
administrator account is enabled on the target system and ensure that the security
options policy for “Accounts: Limit local account use of blank passwords to
console logon only” is set for “Disabled” (The default setting is “Enabled”). These
settings are normally only required on non-domain (workgroup) computers. This
is documented in detail on the ProDiscover Community forums at
http://toorcon.techpathways.com/CS/forums/99/ShowPost.aspx
If attempts to “Push” the agent timeout and fail with no authentication request
from the remote system, check the Windows XP Firewall settings and ensure that
“File and Print Sharing” is allowed under “Exceptions”. Note this setting is only
present in non-domain (workgroup) installations.
Connection Checklist
Can you ping the target system? Remember that Ping blocking could be on the
client, server, or the network and failure does not definitively indicate a problem.
If you changed ports on the remote agent, did you change the User preferences on
the ProDiscover Console to match?
Does the remote system have a firewall? If so, is it set to allow the
ProDiscover/PDServer port through (6518 by default)?
Does the local system have a firewall? If so, is it set to allow the
ProDiscover/PDServer port through (6518 by default)?
If Windows XP Firewall is installed it is recommended to be turned ON at both
analysis console and remote target systems with exceptions made for the
ProDiscover Port in use (6518 by default). Note Windows XP and other personal
firewalls have been known to enforce port blocking when turned OFF.
Is there a hardware firewall or are access lists being enforced on a switch inbetween the analysis console and target system? If so the port in use (6518 by
default) should be allowed in both directions.
Technology Pathways
www.techpathways.com 2/7/2006