1
Installation and User Manual
Help Line No: 61-2-8878 3236
© 2005 MobileIT Solutions Data Pty Ltd
All rights reserved
www.mobileit.com.au
Contents
Contents .............................................................................................2
1. Introduction .....................................................................................5
1.1 Software Licence Agreement ...............................................................................5
1.2 Product Overview...............................................................................................7
2. Installation ......................................................................................9
2.1 Pack Contents ...................................................................................................9
2.2 Minimum System Requirements...........................................................................9
2.3 Installing the GSM Modem ................................................................................ 11
2.4 Installing the WorkGroup.SMS Software.............................................................. 12
2.4.1 Installing the WorkGroup SMS Engine..............................................................12
2.4.2 Installing the WorkGroup SMS Admin .............................................................. 16
2.4.3 Installing the WorkGroup SMS Client ...............................................................22
2.5 Setting up WorkGroup.SMS Engine parameters.................................................... 28
2.6 Evaluation Mode and Registering WorkGroup.SMS................................................ 30
3. Using WorkGroup SMS Admin........................................................... 34
3.1 Events Log ...................................................................................................... 34
3.2 Users Log........................................................................................................ 35
3.3 Sent Messages ................................................................................................ 38
3.4 Received Messages .......................................................................................... 39
3.5 Unsent Messages ............................................................................................. 40
3.6 Phone Book..................................................................................................... 41
3.6.1 Creating a New PhoneBook Entry .................................................................... 41
3.6.2 Editing a Phone Book Entry ............................................................................ 43
3.6.3 Deleting a Phone Book Entry ..........................................................................44
3.6.4 Deleting All of the Phone Book Entries .............................................................44
3.6.5 Sorting the Phone Book Entries....................................................................... 45
3.6.6 Exporting Phone Book Entries ......................................................................... 47
3.6.7 Importing Phone Book Entries (Outlook) ......................................................... 48
3.6.8 Importing Phone Book Entries (.CSV) .............................................................. 51
3.6.9 Printing the Phone Book Entries ...................................................................... 54
3.7 Unrouted Messages .......................................................................................... 55
3.8 Count IN/OUT SMS Messages ............................................................................ 56
3.9 Import from .CSV file ....................................................................................... 56
2/115
In s t a l la t io n a n d U s e r M a n u a l
Ver 1.0
3.10 Housekeeping ................................................................................................ 57
4. Using WorkGroup.SMS Client............................................................ 58
4.1 New Message Controls...................................................................................... 59
4.2 Sending a New text message............................................................................. 60
4.3 Viewing the List of Sent Text Messages............................................................... 63
4.4 Receiving Text Messages .................................................................................. 65
4.5 Viewing the List of Received Text Messages.........................................................66
4.6 Exporting Received and Sent Message Records .................................................... 68
4.6.1 Exporting Received Message Records............................................................... 68
4.6.2 Exporting Sent Message Records.....................................................................70
4.7 Scheduled SMS(s)............................................................................................ 72
4.8 The Phone Book............................................................................................... 75
4.8.1 Creating a New Phone Book Entry ................................................................... 77
4.8.2 Editing a Phone Book Entry ............................................................................ 78
4.8.3 Deleting a Phone Book Entry ..........................................................................79
4.8.4 Deleting All of the Phone Book Entries .............................................................80
4.8.5 Sorting the Phone Book Entries....................................................................... 81
4.8.6 Exporting Phone Book Entries ......................................................................... 82
4.8.7 Printing the Phone Book Entries ...................................................................... 83
4.9 Using the Phone Book Entries ............................................................................ 84
4.10 The File Menu ................................................................................................ 87
4.10.1 Phone Book ..............................................................................................87
4.10.2 Quick SMS.................................................................................................. 88
4.10.3 Work Station ID… ........................................................................................ 91
4.10.4 Export Sent Log to XLS ..............................................................................92
4.10.5 Export Received Log to XLS ........................................................................ 93
4.10.6 Unrouted SMS messages ............................................................................93
4.10.7 Events Log… ............................................................................................... 94
4.10.8 Exit
......................................................................................................... 95
4.11 The WorkGroup.SMS Client Help Menu.............................................................. 96
4.11.1 Licensing ..................................................................................................96
4.11.2 About WorkGroup.SMS Client
..................................................................... 97
5. Using WorkGroup.SMS Engine .......................................................... 98
5.1 Changing the COM Port… .................................................................................. 99
5.2 Changing the Baud Rate… ............................................................................... 100
3/115
In s t a l la t io n a n d U s e r M a n u a l
Ver 1.0
5.3 Changing the SMSC Number… ......................................................................... 101
5.4 Changing the Startup Delay and Response Time… .............................................. 101
5.5 Sending a Test SMS Text Message… ................................................................. 102
5.6 Running WorkGroup.SMS Engine in Test Mode… ................................................ 102
5.7 WorkGroup.SMS Engine About GSM… .............................................................. 104
5.8 WorkGroup.SMS Engine Registration… .............................................................. 105
6. Housekeeping............................................................................... 106
7. Common Error Messages ............................................................... 108
7.1 COM Port Doesn t Exist ................................................................................. 108
7.2 GSM Number Has to Have 10 Digits Minimum!
7.3 Invalid Activation Key
................................................ 108
.................................................................................. 109
7.4 Invalid Date/Time ........................................................................................ 109
7.5 Modem is Disconnected
................................................................................ 109
7.6 Not a Valid GSM Number! ............................................................................. 110
7.7 Nothing to Delete
........................................................................................ 110
7.8 Nothing to Export
........................................................................................ 110
7.9 Phone Number Must be Unique ...................................................................... 110
7.10 Please Put Phone No. in International
7.11 Range: 0 to 60
........................................................... 111
.......................................................................................... 111
7.12 SMS Message(s) NOT Sent .......................................................................... 111
7.13 Type GSM Number ..................................................................................... 111
7.14 Type Your Message
.................................................................................... 113
8. Appendices .................................................................................. 114
8.1 International Dialling Codes ............................................................................ 114
9. Contacting MobileIT ...................................................................... 115
4/115
In s t a l la t io n a n d U s e r M a n u a l
Ver 1.0
1. Introduction
1.1 Software Licence Agreement
Important. Please read carefully.
This MobileIT End-User Licence Agreement (hereafter known as "EULA") is a legal agreement between you (the
"User") and MobileIT Solutions Data Pty Ltd ("MobileIT"), for WorkGroup.SMS software including computer
software, associated media, licence key or file, printed materials and "on-line" or electronic documentation
("Software").
The terms of this EULA incorporate the entire MobileIT WorkGroup.SMS Software product, including individual
variations, configurations and options installed as part of the original installation or within subsequent add-ons,
enhancements or upgrades. Installing, copying, or otherwise using the Software indicates your acceptance of this
agreement, and indicates your decision to be bound by the terms of this licence. After reading this EULA carefully, if
you do not agree to all of its terms, you must not install, use or transfer the Software.
LICENCE: Pursuant to this EULA, you acquire the right to use the Software strictly in accordance with the
provisions of this agreement and make one copy only for backup, archival or security purposes. The Software may
only be used pursuant to this EULA by the User. You must not copy, alter, modify, reproduce or reverse-engineer
the Software except to the extent otherwise authorized by this licence.
COPYING: You must ensure any copy of the Software made pursuant to this EULA bears notice of the MobileIT
ownership of copyright and a notice stipulating that the Software contains information confidential to MobileIT.
MODIFICATIONS: You must not modify or alter the Software or merge all or any part of the Software with any
other software without written permission from MobileIT. Software as modified or altered remains the property of
MobileIT in all respects, whether modified by you, MobileIT or a third party and whether or not authorized
pursuant to this EULA. Specifically, you must assign MobileIT all intellectual property rights arising out of any
modifications to the Software. This EULA will apply to the Software as modified or altered.
COPYRIGHT/PROPRIETARY PROTECTION: The Software is owned by MobileIT and is protected by international
copyright laws and treaties, as well as other intellectual property laws and treaties. You must treat the Software like
any other copyrighted material. Any violation of this licence will automatically terminate your right to use the
Software and you must immediately return all copies of the software and associated materials to MobileIT.
LICENCE PROHIBITIONS: The Software is licenced, not sold. You acknowledge that you are not obtaining title to
the Software, any modifications, updates or any copyrights. You may not sub-licence, rent, lease, convey, modify,
translate, convert to another programming language, disassemble, de-compile, reverse-engineer or attempt to
discover the source code of the Software for any purpose. You may not copy, duplicate, publish or otherwise
disseminate any documentation and printed materials supplied with the Software.
SOFTWARE TRANSFER PROVISIONS: Where this licence has initially been granted to a MobileIT Value Added
Reseller (VAR), MobileIT hereby grants the VAR, the right to transfer this licence to you (the end-user customer).
VAR APPOINTED AS AGENT: Where this licence has not initially been granted to a VAR and MobileIT is not
contracting directly with you, despite clause 3.1 of the MobileIT Reseller Distribution Agreement, MobileIT
appoints the VAR as its agent solely for the purpose of entering into this licence with you on MobileIT’s behalf.
DISTRIBUTION: If this Software is used by a VAR or its agents, employees or contractors for the purpose of
supporting or marketing MobileIT equipment or software, the VAR or its agents, employees or contractors is
deemed to be the end-user and the VAR is therefore bound by the terms of this EULA to ensure that its agents,
employees or contractor comply with the terms of this licence.
USE OF THE SOFTWARE: You may use one copy of the Software on one server or client computer. If this is a multicomputer or network licence, you may install and use additional copies of the software on client workstations up to
the number of copies authorized by MobileIT.
A copy of the Software is considered to be in use when loaded into temporary memory (e.g. RAM) and/or installed
on a permanent storage device (e.g. HDD, CD-ROM etc.)
5/115
In s t a l la t io n a n d U s e r M a n u a l
Ver 1.0
TERMINATION: Without prejudice to any other rights, MobileIT may terminate this agreement if you fail to comply
with the terms of this EULA or the MobileIT Reseller Distribution Agreement is terminated (if the end-user of this
Software is a MobileIT VAR). In such event, you must destroy or return to MobileIT all copies of the Software
and all of its associated component parts.
If MobileIT terminates this licence, in addition to terminating the licence, MobileIT may:
(a) repossess any copies of the Software in your possession, custody or control;
(b) retain any money paid;
(c) charge a reasonable sum for work performed in respect of which work no sum has been previously charged;
(d) be regarded as discharged from any further obligations under this licence; and
(e) pursue any additional or alternative remedies provided by law.
LIMITED WARRANTY: MobileIT warrants any physical media to be free from defects in materials and workmanship
for a period of ninety (90) days from date of sale. Subject to the terms of the MobileIT Reseller Distribution
Agreement and to the extent permitted by law, any condition or warranty, which would otherwise be implied in this
EULA, is excluded. Where legislation implies into this licence any condition or warranty which is not capable of
exclusion or moderation, which condition or warranty will be deemed included in this licence. However, MobileIT’s
liability for breach of any such condition or warranty will be limited, at MobileIT’s option, to one or more of the
following:
(a) if the breach relates to goods
(i) the replacement of the goods or the supply of equivalent goods;
(ii) the repair of such goods;
(iii) the payment of the cost of replacing the goods or of acquiring equivalent goods; or
(iv) payment of the cost of having the goods repaired; and
(b) if the breach relates to services
(i) the supplying of the services again; or
(ii) the payment of the cost of having the services supplied again.
Any written or oral information or advice given by MobileIT employees or VARs will in no way increase or change
the scope of this warranty.
LIMITATION ON CONSEQUENTIAL DAMAGES: Neither MobileIT nor anyone involved in the creation, production, or
delivery of the Software shall be liable for any indirect, consequential, or incidental damages arising out of the use
or inability to use the Software even if MobileIT has been advised of the possibility of such damages or claims. In
no event will MobileIT’s liability for any damages exceed the price paid for the licence to use the software,
regardless of the form of claim. Users of this Software agree to indemnify, hold harmless, and defend MobileIT
from and against any claims or lawsuits, including legal fees that arise from the use or related to the use of the
Software.
JURISTICTION: This EULA is governed by the laws of the State of New South Wales, Australia. The United Nations
Convention for the International Sale of Goods shall not apply. This EULA is the entire agreement between us and
supersedes any other communications or advertising with respect to the Software product; this EULA may be
modified only by written agreement signed by authorized representatives of you and MobileIT.
Please contact MobileIT should you have any questions regarding this EULA:
Address:
MobileIT Solutions Data Pty Ltd
Level 2, 55 Blaxland Rd,
Ryde.
New South Wales 2112
Australia
Phone:
Fax:
+61 (0)2 8878 3223
+61 (0)2 9809 0555
Web:
E-Mail:
www.mobileit.com.au
[email protected]
6/115
In s t a l la t io n a n d U s e r M a n u a l
Ver 1.0
1.2 Product Overvi ew
WorkgroupSMS is a simple, cost-effective solution that allows PC users on a LAN (Local Area
Network) to send and receive SMS text messages directly to any GSM/CDMA mobile phone.
The solution consists of three modules:
1) Workgroup.SMS Engine - This module is installed on a Network Server and coordinates
the sending and receiving of SMS messages queued in a central database. Please note the
supplied as part of Workgroup.SMS needs to be connected to an allocated serial
communications port on the Network Server.
2) WorkGroup.SMS Admin – This module is installed on any PC on the network and is
used for administration and monitoring of various log files e.g. Sent messages, Received
messages, Unsent messages (messages in the queue), Unrouted messages etc...
The WorkGroup.SMS Admin module registers and maintains the list of network users
(WorkGroup.SMS Clients) as well as the public PhoneBook(accessible to all Workgroup.SMS
Clients). Records in the Phonebook can be directly imported from the company’s Public
Contact folder ( Outlook® ) or from a CSV (comma delimited) file.
3) WorkGroup.SMS Client – The Workgroup.SMS client module is installed on each PC and
allows users to generate outgoing SMS messages and receive routed incoming text
messages. This module is linked via an ODBC connection to the central database.
The database is also accessed by the WorkGroup.SMS Engine module.
WorkGroup.SMS provides 2-way text messaging between network users and any GSM mobile
user.
Key features of WorkGroup.SMS include:
Send text messages from your PC to any GSM/CDMA mobile phone
Send a text message to an individual, selected individuals or broadcast a
message to a group
Receive text messages directly to your PC
Customisable private phoneBook or access global public phonebook.
Schedule messages for dispatch at a later time
Regularly used messages can be stored and retrieved using the QuickSMS
feature
Logs are kept of all messages sent and received
Export sent and received messages to Microsoft Excel
View unrouted messages held on server (dependant on authorisation)
Customised message footer which appends to each outgoing SMS.
Automatic time-clock synchronisation between client and server
7/115
In s t a l la t io n a n d U s e r M a n u a l
Ver 1.0
An example application of WorkGroup.SMS is as follows:
The Sales Director wants to co-ordinate an urgent sales meeting for the day after tomorrow
and all twenty sales executives must attend. Just imagine how long it would take to call each
individual sales executive, and at what cost?
With WorkGroup.SMS the Sales Director would
simply type:
"Attn: Sales Team. URGENT sales meeting at 9
AM,
9 MAY, SYD. office. Attendance mandatory,
please confirm by return. Rgds Mel".
The Sales Director then selects "Sales Team"
from the Phone Book and presses Send.
This broadcast text message will be sent to all
individuals in the sales group and be delivered
within seconds. Not only that, when the sales
people reply confirming their attendance, the
routing functionality of Workgroup.SMS will
channel all replies back to the Sales Directors’ PC.
8/115
In s t a l la t io n a n d U s e r M a n u a l
Ver 1.0
2. Installation
To start using WorkGroup.SMS you must install :
A compatible GSM modem device.
WGSMS Engine module This software module delivers the SMS text messages to
the and poles the modem for incoming SMS Messages. (It is recommended that the
PC runs on NT4 or Windows 2000 o/s).
WGSMS Admin module Software that allows WorkGroup.SMS administrator to
maintain Users, global PhoneBook and monitor various logs ( Monitor events,
Incoming SMS messages, Outgoing SMS messages, Unsent messages, Unrouted
messages etc.
WGSMS Client module Software that needs to be installed on each WGSMS Client
i.e. network user and is used for creating and receiving SMS messages.
The following section is designed to guide you through the installation process.
2.1 Pack Contents
Before you begin, please verify all contents of the WorkGroup.SMS sales package are present
as follows:
CD-ROM containing a copy of the WorkGroup.SMS software with 3 setup files:
SETUP WGSMS Admin.exe
SETUP WGSMS Engine.exe
SETUP WGSMS Client.exe and
User manual
Document containing your personal WorkGroup.SMS registration key number.
If you are missing any of the above items, please contact MobileIT for assistance.
2.2 Minimum Syst em Requi rements
To successfully install WorkGroup.SMS your PC must conform to the following minimum
system requirements:
WorkGroup.SMS Admin & Engine (database server)
Intel Pentium® (or equivalent) CPU running at 233MHz (or faster)
32Mb RAM (or greater)
20Mb minimum free hard disk drive space
CD-ROM drive (4x minimum) for installation purposes
One free 9-pin RS232 serial communications port (e.g. COM1)
Supported 32-bit operating system ( Microsoft Windows NT 4 or 2000
Professional minimum)
VGA monitor (or better), 800x600 resolution, 256 colours (or greater)
Internet Explorer 4.0 or later
9/115
In s t a l la t io n a n d U s e r M a n u a l
Ver 1.0
NOTE: You don’t need to install the WGSMS_Engine.exe on to a network
Server. A 32 bit o/s Workstation PC is sufficient as long as proper security
permissions and sharing files and folders are applied.
WorkGroup.SMS Client (workstation)
Intel Pentium® (or equivalent) CPU running at 233MHz (or faster)
32Mb RAM (or greater)
20Mb minimum free hard disk drive space
Supported 32-bit operating system ( i.e. Microsoft Windows 95, 98, Me, NT,
2000 and XP)
VGA monitor (or better), 800x600 resolution, 256 colours (or greater)
Network connection
Once you have confirmed the minimum system requirements, please proceed to the
installation of the GSM modem.
10/115
In s t a l la t io n a n d U s e r M a n u a l
Ver 1.0
2.3 Installing the GSM Modem
The GSM modem enables connections to be made to the GSM 900/1800 (1900) mobile radio
network via your PC.
WorkGroup.SMS uses any of the
compatible GSM Modems to send and
receive SMS text messages.
The GSM modem must be installed
before the WorkGroup.SMS software.
Consult the GSM modem manufacturer’s manual for the correct installation instructions for
their specific devices.
Install the GSM modem device on the same PC that you intend to install the WGSMS_Engine
applications.
Important. The SIM card must be inserted before connecting the modem to the
power supply and must not be removed until the power has been switched off.
Insertion or removal of the SIM card with the modem power supply on may cause
irreparable damage.
Important. Please ensure that the SIM card does not require a PIN code to be
entered for it to connect to the network. If you are unsure, temporarily install the
SIM card into any GSM phone and switch on. If the phone requires a PIN code,
please refer to the phone manual to disable the PIN code requirement.
You can verify that the GSM modem has been correctly installed by using a thirdparty communications program (such as HyperTerminal on Microsoft Windows)
to talk to the modem via the allocated COM port. If the modem has been installed
correctly, you will be able to issue AT commands.
11/115
In s t a l la t io n a n d U s e r M a n u a l
Ver 1.0
2.4 Installing the WorkGroup.SMS Software
The WorkGroup.SMS software uses the GSM modem to send and receive text messages
across a mobile phone network. Please verify that you have installed the GSM modem on the
PC that you intend to install WorkGroup.SMS Engine before you continue.
To install the WorkGroup.SMS application you need to install 3 distinct modules and in
following order:
1) WorkGroup.SMS Engine
2) WorkGroup.SMS Admin
3) WorkGroup.SMS Client
NOTE: All 3 modules can be installed on the same PC or they can be installed on
different PC’s on the network.
NOTE: If WGSMS Client is running on a Win9x o/s PC, it needs to be running in
order to receive New message arrival notification.
NOTE: In order to receive SMS messages WGSMS Engine application needs to be
running all the time. If WGSMS Engine is not running and the SMS message has
been sent via GSM network to GSM modem it will NOT be captured and processed
until the WGSMS Engine application is restarted..
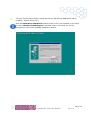
2.4.1 Installing the WorkGroup SMS Engine
Remove the WorkGroup.SMS CD-ROM from the sales package and insert into the
CD-ROM drive of your PC.
Using your Windows Explorer locate on the WorkGroupSMS Setup CD the name of file
called Setup WGSMS Engine.exe and double-click to run it.
12/115
In s t a l la t io n a n d U s e r M a n u a l
Ver 1.0
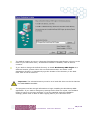
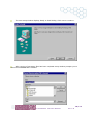
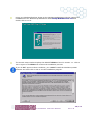
The second setup window displays the MobileIT EULA as found in section 1.1. Click on
Yes to agree to the EULA and continue the installation process.
If you do NOT agree to these conditions, you CANNOT install the WorkGroup.SMS
software and must click on No to exit the installation program.
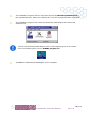
If you click on Yes to agree follow the instructions on the screen and select the folder
where database files will be installed.
13/115
In s t a l la t io n a n d U s e r M a n u a l
Ver 1.0
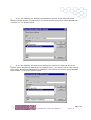
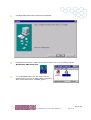
The default location is set to C:\Program Files\WorkGroup SMS Engine (where C is the
letter of your hard disk drive). If the default location is suitable, click on Next to
continue.
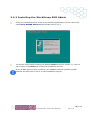
If you wish to change the default directory to install WorkGroup.SMS Engine at a
different location, please either click on the Browse button and select a new
destination directory or alternatively type the location of the directory in the Path
field. Click on OK to continue.
Important. The selected directory must be on a hard disk drive on the PC that has
the GSM MODEM installed.
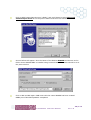
The program now has enough information to begin installing the WorkGroup.SMS
application. If you wish to change any settings before files are copied, use the Back
button to return to previous windows. If you are satisfied with the installation
settings, please click on Next to start copying files to your hard disk drive.
14/115
In s t a l la t io n a n d U s e r M a n u a l
Ver 1.0
The installation program will now copy files required by WorkGroup.SMS Engine to
the selected directory. When the progress bar is full, file copying has been completed.
The installation program will create the WorkGroup.SMS Engine Start menu and
Desktop icons.
Look for the WorkGroup SMS Engine icons in the Programs group on the Start
menu and desktop short-cut icon WGSMS_Engine.exe
Installation of WorkGroup.SMS Engine is now complete.
15/115
In s t a l la t io n a n d U s e r M a n u a l
Ver 1.0
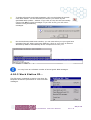
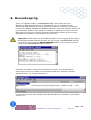
2.4.2 Installing the WorkGroup SMS Admin
Using your Windows Explorer locate on the WorkGroupSMS Setup CD the name of file
called Setup WGSMS Admin.exe and double-click to run it.
The second setup window displays the MobileIT EULA as found in section 1.1. Click on
Yes to agree to the EULA and continue the installation process.
If you do NOT agree to these conditions, you CANNOT install the WorkGroup.SMS
software and must click on No to exit the installation program.
16/115
In s t a l la t io n a n d U s e r M a n u a l
Ver 1.0
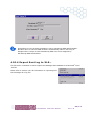
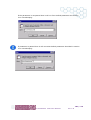
The next setup window displays where the files for WorkGroup SMS Admin will be
installed ( wgsms_admin.exe ).
Note that WorkGroup SMS Admin module doesn’t have to be installed on the same
PC where WorkGroup SMS Engine is installed. Later in the setup you will be
prompted to select where WGSMS database is located.
17/115
In s t a l la t io n a n d U s e r M a n u a l
Ver 1.0
The next setup window displays prompts you ti select Program Folder.
18/115
In s t a l la t io n a n d U s e r M a n u a l
Ver 1.0
The next setup window displays Ready to Install dialog. Click next to continue.
After copying of necessary files has been completed setup window prompts you to
select where WGSMS DB is located.
19/115
In s t a l la t io n a n d U s e r M a n u a l
Ver 1.0
If you are installing the WorkGroup SMS Admin module on the same PC where
WorkGroup SMS Engine is installed then you would choose the location where WGSMS DB
is located i.e. see picture bellow
If you are installing the WorkGroup SMS Admin module on a different PC on the
network where WorkGroup SMS Engine is installed then 1) you would need to map network
drive where WorkGroup SMS Engine is installed 2) then choose the location where WGSMS
DB is located i.e. as on the picture bellow
20/115
In s t a l la t io n a n d U s e r M a n u a l
Ver 1.0
After you selected the location of the WGSMS DB next setup dialog displays that the
setup has completed successfully.
Short cut has been created on a desktop with the name WGSMS_Admin.exe
You can start the WorkGroup SMS Admin by clicking on this Desktop short-cut icon
or by selecting Start, Programs, WorkGroupSMS_Admin, WGSMS_admin.
If you didn’t select the correct path to the WGSMS database following message will
be displayed when you try to start WGSMS Admin
21/115
In s t a l la t io n a n d U s e r M a n u a l
Ver 1.0
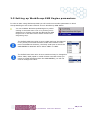
2.4.3 Installing the WorkGroup SMS Client
In order to install WorkGroup SMS Client module you will FIRST need to create a System
DSN ( Data Source Name) using ODBC Data sources applet from Control Panel, then install
the client application.
The name of the DSN is WGSMS.
Click on Control Panel Data Sources ( ODBC ) and then click on System DSN.
22/115
In s t a l la t io n a n d U s e r M a n u a l
Ver 1.0
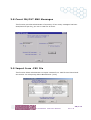
Click on Add button Data Sources ( ODBC ) and scroll down to select Microsoft
Visual Foxpro driver as on the picture bellow and then click Finish button.
Screen bellow will appear. Give the Name of the DSN as WGSMS and browse to the
folder where WGSMS.DBC is installed using browse button. The result should be as in
the picture below.
Click on OK and OK again. DSN name with the name WGSMS has been created.
ODBC part of WorkGroupSMS is completed.
23/115
In s t a l la t io n a n d U s e r M a n u a l
Ver 1.0
Using your Windows Explorer locate on the WorkGroupSMS Setup CD the name of the
installation file for WorkGroup SMS Admin called Setup WGSMS Client.exe and
double-click to run it.
The second setup window displays the MobileIT EULA as found in section 1.1. Click on
Yes to agree to the EULA and continue the installation process.
If you do NOT agree to these conditions, you CANNOT install the WorkGroup.SMS
software and must click on No to exit the installation program.
24/115
In s t a l la t io n a n d U s e r M a n u a l
Ver 1.0
Choose the location of the target folder. By default WorkGroup SMS Client will install
all files in the folder below. Click Next to proceed.
Select Program folder. Default is show on the picture bellow and then click next to
proceed.
25/115
In s t a l la t io n a n d U s e r M a n u a l
Ver 1.0
Ready to Install window show. Click next to proceed
Ready to Install window show. Click next to proceed. You will see progress bar while
Setup is been copying the files as on the picture bellow
26/115
In s t a l la t io n a n d U s e r M a n u a l
Ver 1.0
Finished dialog after Setup has been completed.
Program Items will be created as well as the short-cut on your desktop named
WorkGroup SMS Client.exe
To run WGSMS Client you can either click on
desktop short-cut icon or select Start, Programs,
Work Group SMS Client, WGSMS_Client
27/115
In s t a l la t io n a n d U s e r M a n u a l
Ver 1.0
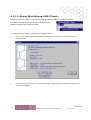
2.5 Setting up WorkGroup.SMS Engine parameters
In order to start using WorkGroup SMS you will need to set modem parameters in Work
Group SMS Engine and create network users in WorkGroup SMS Admin.
You can initialise WorkGroup.SMS Engine by either
clicking on its Start menu icon or by clicking on its
Desktop icon. Please note that the WorkGroup.SMS
Engine icon in the Start menu will be found in the
Programs group.
The default COM port value is set to COM1 and may be changed
to any serial port number between COM1 and COM10. Under
most circumstances however, the likely serial port to which the
GSM MODEM is attached will be either COM1 or COM2.
The default baud rate value is set to 9600 and may be changed to
either 2400, 4800, 9600 or 19200. Please note that unless you
intend to install a different than the GSM MODEM, you will not
need to change this value.
28/115
In s t a l la t io n a n d U s e r M a n u a l
Ver 1.0
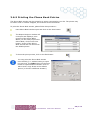
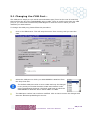
The way to change these parameters in WorkGroup SMS Engine is by clicking on to
Edit button
In most cases you will need to change only COM port and the SMSC No. Note that
when in Edit mode WGSMS Engine service is not running. Once the data is changed
you need to save it by pressing on Save button.
29/115
In s t a l la t io n a n d U s e r M a n u a l
Ver 1.0
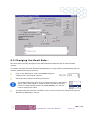
When first installed, WorkGroup.SMS Engine will be in Evaluation mode. Please
refer to the following section regarding the limitations of the un-licenced Evaluation
mode and how to register your product.
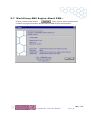
2.6 Evaluation Mode and Registering WorkGroup.SMS
When the WorkGroup.SMS software is first installed, it is set to Evaluation mode. This unlicenced mode of WorkGroup.SMS is designed to allow you to evaluate the features of the
program.
When in the Evaluation mode, the Registration window (with the MobileIT logo) appears
every 60 seconds.
This window serves to remind you that you have an un-licenced copy of WorkGroup.SMS and
allows you to register your product.
30/115
In s t a l la t io n a n d U s e r M a n u a l
Ver 1.0
Important. The Evaluation mode of WorkGroup.SMS has limited functionality.
Without registering the application, you can only send or receive up to 100 text
messages and will NOT be able to delete any messages from the Sent Messages and
Received Messages lists. All other functions are available.
If you wish to continue evaluating the WorkGroup.SMS application
without registering, please click on the Close button
This screen doesn’t prevent you of Sending or Receiving SMS
messages while in evaluation mode.
To register your copy of WorkGroup.SMS, please follow this procedure:
If you wish to register your copy of WorkGroup.SMS and have a valid registration
code (found in the WorkGroup.SMS sales package), do so as follows: click on the
Register button of the main form as shown on the picture bellow
31/115
In s t a l la t io n a n d U s e r M a n u a l
Ver 1.0
If you do not have a valid registration code please contact MobileIT for assistance
on 1902 224 551 (Australia only). Alternatively, click on the Print Registration
Form button and fax or e-mail your registration request to MobileIT.
The WorkGroup.SMS application is licenced
by entering a valid registration code
(activation key) on the Registration form
window. Please enter the name of the
vendor (i.e. from where you bought
WorkGroup.SMS), the name, address and
phone number of your company and
registration code (activation key) into the
fields provided.
Important. Please enter your
registration code (activation key)
precisely as found on your registration document.
Important. The registration code is linked to the serial/IMEI number of the
attached GSM modem. WorkGroup.SMS Engine must be able to access the modem
to validate your registration code. Please note that if you change your GSM device
at any point, you will require a new registration code and must contact MobileIT for
a re-issue. You may install copies of WorkGroup.SMS on multiple computers but
they will only fully operate when connected to the specific for which the
registration code has been issued.
Once you have entered all of the required information, please
click on the Validate Key button to verify your registration code.
If your registration code is valid, WorkGroup.SMS will report
Validation
successful and
will display the
licence information
in the main
window.
If however your registration code was not validated,
WorkGroup.SMS will report that you have entered an Invalid
32/115
In s t a l la t io n a n d U s e r M a n u a l
Ver 1.0
Activation key. You will need a valid registration code in order to register your copy of
WorkGroup.SMS.
When your copy of WorkGroup.SMS has been successfully registered, all limitations
will be deactivated and you will be able to send unlimited text messages and be
able to delete messages from the Sent Messages and Received Messages lists.
Thank you for registering your copy of WorkGroup.SMS.
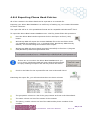
We suggest that you keep a copy
of your registration details by
clicking on the Print Registration
form button. On the following
window, please ensure all
information is present and correct
and click on the Print button. To
close the print preview, click on
the Exit button.
Once you have registered your WorkGroup.SMS application (or decided to continue
un-registered for evaluation purposes), you will need to become familiar with the
main window. The following section describes how to use WorkGroup.SMS to send,
receive and organise text messages.
33/115
In s t a l la t io n a n d U s e r M a n u a l
Ver 1.0
3. Using WorkGroup SMS Admin
Beside other functions WorkGroupSMS Admin module is used to register all users of
WorkGroup.SMS. If WorkGroup.SMS Client is run and user is not in a database
following message will be displayed
WorkGroupSMS Admin module provides following functions :
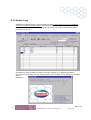
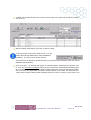
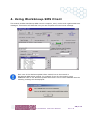
3.1 Events Log
Monitor Events Log ( Administrator can view and delete the records from the log ).
Events log function records all transactions for all WorkGroup.SMS users. For every
SMS sent out 2 records are written in Events log. First one is Processed and the
second one is Sent OK.
34/115
In s t a l la t io n a n d U s e r M a n u a l
Ver 1.0
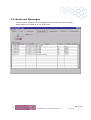
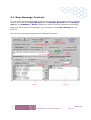
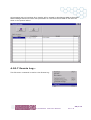
3.2 Users Log
Add/Edit and Delete Users of the WorkGroup.SMS. Users who are not in a database
cannot run WorkGroup.SMS Client. Maximum number of users are allowed to be
entered in a database in accordance to the licensing. By default WorkGroup.SMS is
licensed to 5 users.
If attempt is made to add user above licensing number e.g. WorkGroup.SMS is
licensed to 5 users only and the newly added user would be 6th the following message
will be
displayed
35/115
In s t a l la t io n a n d U s e r M a n u a l
Ver 1.0
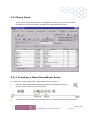
Users can be added by clicking on Add button
Unique values has to be entered for both Recipient ID and Netbios name.
“Netbios name “ is the netbios name of the corresponding PC name where there is an
installation of a WorkGroup.SMS Client application.
Every “user” i.e. WorkGroup.SMS Client needs to be entered in User’s form with it’s proper
Computer name
To facilitate the input of WorkGroup.SMS Netbios name you can use the list of users
from your local LAN network. Just type the domain name in the textbox above and
click on Domain name button and list of all Computer names will appear in Netbios
name combo box. From there on you can just select the proper one.
To Save the data just click on the Save button.
36/115
In s t a l la t io n a n d U s e r M a n u a l
Ver 1.0
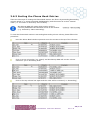
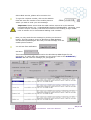
To Edit User details double-click on the record which you want edit. Fields for editing
will open up.
When finished with editing just click on Save button.
To Synchronize Clients time with Server ( i.e. PC
where WorkGroup.SMS Engine with database is
installed ) you will need to check the box.
This will force all WorkGroup.SMS Clients to synhronise time and date with the Server
database automatically.
View unrouted - by ticking this option, the administrator is allowing the specific user
to view any unrouted messages that may be received by the WorkGroup.SMS engine.
An unrouted message is where a SMS message has been received and that message
does not have the required 4 character routing header in the SMS. The absence of a
valid header means that the SMS message cannot be sent (routed) to any client’ s PC.
37/115
In s t a l la t io n a n d U s e r M a n u a l
Ver 1.0
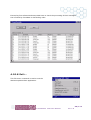
3.3 Sent Messages
This function monitors Sent messages from all users of WorkGroup.SMS.
Administrator can delete all or one at the time.
38/115
In s t a l la t io n a n d U s e r M a n u a l
Ver 1.0
3.4 Received Messages
This function monitors Received messages from all users of WorkGroup.SMS.
Administrator can delete all or one at the time.
39/115
In s t a l la t io n a n d U s e r M a n u a l
Ver 1.0
3.5 Unsent Messages
This function monitors Unsent/Scheduled messages from all users of WorkGroup.SMS.
Administrator can delete all or one at the time. Records appear here only temporarily
until they are not picked up by WorkGroup.SMS Engine. It gives an indication to the
user that the SMS message(s) are in the queue and are waiting to be processed.
40/115
In s t a l la t io n a n d U s e r M a n u a l
Ver 1.0
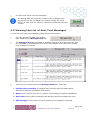
3.6 Phone Book
This function allows Administrator to Add/Edit or Delete records from the Global
Phonebook as well as Importing Contacts from Microsoft® Outlook®.
3.6.1 Creati ng a New PhoneBook Entry
To create a new Phone Book entry, please follow this procedure:
Have the Phone Book page selected and click on the Add New Record
button. This will open up the entry fields.
In the Name field, please enter the name of the contact (maximum 40 characters).
41/115
In s t a l la t io n a n d U s e r M a n u a l
Ver 1.0
In the Phone No field, please enter the GSM mobile phone number of the contact
(maximum 15 numbers).
Important. Please ensure that the GSM number entered is in the standard
international format (e.g. +61404818783 instead of 0404818783). Generally, most
numbers require a country code and the omission of the leading 0 digit. Please
refer to section 8.1 for international dialling code numbers.
In the Group field, please enter the name of the group in which you want the new
contact to be placed (maximum 30 characters). To create a group, directly enter the
name in the Group field. To select an existing group, click on the Group box arrow
and select a group name.
To clear all of the fields to re-enter information, click on the Clear Values
button.
Once all of the required contact information has been entered, you may save
the entry by clicking on the Save/Update Changes button. This action will
update the Phone Book contact list and display your new entry.
To exit the Add New Record function without saving any changes, click on the
Cancel changes button.
Each individual Phone Book entry must have a unique GSM mobile phone number.
You may have two entries with the same name but you may not have two entries
with the same GSM number. If you try to save an entry with a duplicate GSM
number, WorkGroup.SMS will report Phone Number must be unique! and you must
enter a new number.
42/115
In s t a l la t io n a n d U s e r M a n u a l
Ver 1.0
3.6.2 Editing a Phone Book Entry
To edit a Phone Book entry, please follow this procedure:
Have the Phone Book window open and simply double-click on the entry you wish to
edit.
This will open up the entry fields.
You may now directly edit the entry fields and make changes.
Once all of the editing has been completed, you may save the entry by
clicking on the Save/Update Changes button. This action will update the
Phone Book contact list.
43/115
In s t a l la t io n a n d U s e r M a n u a l
Ver 1.0
3.6.3 Deleting a Phone Book Entr y
To delete a Phone Book entry, please follow this procedure:
Have the Phone Book window open and click on the entry you
wish to delete.
Click on the Delete current record button. You will be asked to confirm
your action by the PhoneBook table update window. If you click on Yes,
this will irreversibly remove the current entry from the Phone Book. If
you click on No, you will return to the Phone Book without having deleted
the entry.
If you try to delete without having
selected a record, WorkGroup.SMS
will report that there is Nothing to
delete!. Please select a record before
you click on the Delete current record
button.
Important. Deleted entries CANNOT be restored. Please ensure you have a
sufficient backup copy of your contacts before you delete them.
3.6.4 Deleting All of the Phone Book Entries
To delete a Phone Book entry, please follow this procedure:
Have the Phone Book window open and click on the Delete all records
from the PhoneBook button. You will be asked to confirm your action by
the PhoneBook table update window. If you click on Yes, this will
irreversibly remove all entries from the Phone Book. If you click on No,
you will return to the
Phone Book without
having deleted any
entries.
Important. Deleted entries CANNOT be restored. Please ensure you have a
sufficient backup copy of your contacts before you delete them.
44/115
In s t a l la t io n a n d U s e r M a n u a l
Ver 1.0
3.6.5 Sorting the Phone Book Entries
There are two ways of viewing the Phone Book entries: the first is by ascending/descending
column values (e.g. names organised alphabetically) and the second is in their "natural
order" (i.e. the order in which they were created).
WorkGroup.SMS will report which sorting order is
currently enabled at the left-hand corner of the window
(e.g. Ordered by Name ascending).
To view the Phone Book entries in ascending/descending column values, please follow this
procedure:
Have the Phone Book window open and move the mouse to the top of the columns.
Click on a top column bar (e.g. Name) and WorkGroup.SMS will sort the column
entries for you in ascending order.
Click on the top column bar again and the order will be reversed (i.e. descending).
45/115
In s t a l la t io n a n d U s e r M a n u a l
Ver 1.0
Try sorting the Phone No, Groupname and No in group columns in the same
fashion.
To view the Phone Book entries in the order in which they were created (i.e. to return them
to their "natural state"), please follow this procedure:
Have the Phone Book window open and click on the
button.
z No order
This action will cause the Phone Book to sort the contact entries into the order in
which they were created.
The entries created first will be at the top of the table, while the latest will be
found at the bottom. This sorting function is ideal for manually checking newly
imported contact details (for information on importing contact details, please refer
to section 3.6.6 and 3.6.7).
Please note that it is not possible to change the row height or column width in the
Phone Book table.
46/115
In s t a l la t io n a n d U s e r M a n u a l
Ver 1.0
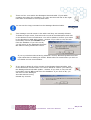
3.6.6 Exporting Phone Book Entries
All of the contacts in the Phone Book can be exported to an external file.
Exporting your Phone Book database is a useful way of backing-up your contact information
for future reference.
The export file will be in .XLS spreadsheet format and is compatible with Microsoft Excel.
To export the Phone Book contact database to an .XLS file, please follow this procedure:
Have the Phone Book window open and click on the Export to Excel (.XLS)
button.
WorkGroup.SMS will export the contact database file to the root folder where
you installed the application (e.g. K:\Program Files\ Workgroup SMS Engine by
default). You cannot change the location of the export.
WorkGroup.SMS will report Result exported successfully to Excel as K:\Program
Files\Workgroup SMS Engine\WGSMS_users.XLS.
If there are no records in the Phone Book database and you
try to export, WorkGroup.SMS will report that the Phone Book
is empty. Nothing to Export! and will not perform the action.
Check in the folder for the exported file and view in Microsoft Excel.
Examining the export file, you will notice that there are three columns:
47/115
In s t a l la t io n a n d U s e r M a n u a l
Ver 1.0
The groupname column is a list of the group names as found in the Phone Book.
The name column is a list of the names of the contacts.
The phone_number column is a list of the GSM mobile phone numbers of the
contacts.
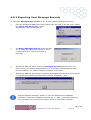
3.6.7 Importing Phone Boo k Entries (Outlook )
Importing existing contacts is an economical way of generating WorkGroup.SMS Phone Book
entries.
To import entries from your Microsoft Outlook Contacts folder(s), please follow this
procedure:
When the PhoneBook page is selected, look at
the right-hand side of the window for the
import controls. Click on the Check Outlook®
button to instruct WorkGroup.SMS to find your
Contacts folder.
WorkGroup.SMS can only import contacts from Microsoft Outlook and not from
other e-mail clients such as Microsoft Outlook Express or Eudora.
WorkGroup.SMS will now display Searching for
Outlook Contacts folders .
If you have an empty Microsoft Outlook Contacts folder and
instruct WorkGroup.SMS to check for entries, it will report that
there is Nothing to import!. You must have contact entries in the
Contacts folder to be able to import into the Phone Book.
If you do not have a copy of Microsoft Outlook
installed and yet instruct WorkGroup.SMS to
check for Contacts folder entries, it will report
that there is Nothing to Import! and will disable
the import controls.
48/115
In s t a l la t io n a n d U s e r M a n u a l
Ver 1.0
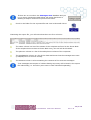
Once WorkGroup.SMS has found the Contacts
folder, it will display Drop down list updated. Ready
for import.
You may now select the folder containing the contacts
you wish to import from the List in Public Folders drop
down box.
If you have more than one sub-folder in your Microsoft®
Outlook® Contacts file, you may select either the entire
folder or alternatively, select a single sub-folder using
the drop down box.
If you have a large number of different Contact
folders and/or your Personal Folder File (.PST)
resides on a network share, it is recommended that
you create a new Contacts sub-folder locally on your
PC and copy all of the entries into it that you wish to
import into WorkGroup.SMS. You may then select the
sub-folder when importing to WorkGroup.SMS and be
precise as to which contact entries you will import.
Now you must click on the Import Contacts from
Outlook® button to proceed with the import process.
WorkGroup.SMS will now count the number of entries in
the Contacts folder. It will inform you that it has Found
X contacts in Contacts folder.
WorkGroup.SMS will now check these
contacts for their GSM mobile phone
numbers and will report Total contracts with
Mobile No.s X in Contracts folder.
WorkGroup.SMS will only import contacts that have a corresponding mobile phone
number. If for example, you try to import 100 contacts but none of these has a
mobile phone number, WorkGroup.SMS will not
create any new Phone Book entries.
49/115
In s t a l la t io n a n d U s e r M a n u a l
Ver 1.0
The GSM phone number imported from Outlook® does not have to be in international format
in Outlook® .
During the import process, all GSM numbers are converted to the standard international
format if they are not already in that format.
The import process adds the country code and replaces any number prefixes acording to the
previously entered values in the phonebook configuration for Country Code, International
Dialing Codes 1, 2 and 3.
Try assigning entries in your Microsoft Outlook
Contacts folder with categories. WorkGroup.SMS will
recognise these categories during an import and
create the appropriate Phone Book Groupnames for
you. Please note that WorkGroup.SMS will only
import one entry per GSM mobile phone number and
that multiple entries with identical numbers are not
allowed.
WorkGroup.SMS will now copy these contacts across to the
Phone Book and will report Phone Book refreshed .
Click on the Exit the form button to leave the Administration
window.
Back on the WorkGroup.SMS main window, click on the Phone Book
button.
The Phone Book window will now
open and display your newly
imported contacts.
You may now assign groups to
the newly imported contacts by double-clicking on the individual entries and
directly editing them.
You can now use the imported Phone Book entries to send SMS text messages.
50/115
In s t a l la t io n a n d U s e r M a n u a l
Ver 1.0
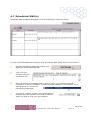
3.6.8 Importing Phone Boo k Entries (.CSV)
Importing existing contacts is an economical way of generating WorkGroup.SMS Phone Book
entries.
To import entries from a comma-separated (.CSV) file, please follow this procedure:
Have the WorkGroup.SMS main window open and
click on the File menu. Select the Import from CSV
File option.
This will open the Import
contacts from CSV file window.
Click on the Import into temporary table button to
enable the Open window. Using this window,
select the .CSV file from which you wish to import
your contacts.
51/115
In s t a l la t io n a n d U s e r M a n u a l
Ver 1.0
Important. To correctly import .CSV files into the WorkGroup.SMS Phone Book,
they must contain 3 fields separated by commas. The first field must be the Name
of the contact, the second must be the PhoneNo and the third the Groupname.
I.e.
"Name", "PhoneNo", "Groupname"
For example,
"Jocic, Dejan","+61414457256","MOBILEIT (DEVELOPMENT)"
"Chris Hall","+447976364025","COMMS XL LIMITED"
Please note that WorkGroup.SMS will always ignore the contents of the first line of
a .CSV file (i.e. the line usually occupied by the field descriptions).
The GSM phone number imported from Outlook® does not have to be in
international format in Outlook® .
During the import process, all GSM numbers are converted to the standard
international format if they are not already in that format.
The import process adds the country code and replaces any number prefixes
acording to the previously entered values in the phonebook configuration for
Country Code, International Dialing Codes 1, 2 and 3.
If you try to import a file that contains no records,
WorkGroup.SMS will report that the Selected .CSV is
empty. Nothing to import. Please select a file that
contains some entries and try again.
Once you have selected your .CSV file, click on the Import button.
WorkGroup.SMS will now scan the file for contact entries and will report X records
imported successfully from CSV file into
temporary table!.
The Temporary table is used to
illustrate how imported contact
entries would look when you
import them into the Phone
Book.
52/115
In s t a l la t io n a n d U s e r M a n u a l
Ver 1.0
If the imported .CSV file does not fill the columns as was expected, or if the
information is in the wrong place, please exit the window and modify the .CSV file
(to mimic format shown above). Now try to load the file again.
Please note that during checking if two (or more) entries in the .CSV file have
identical GSM phone numbers, the preceding entry will be overwritten by the
following and treated as one record only. Also note that any entries in the checked
.CSV file that have the same GSM number as an existing Phone Book contact, will
overwrite their Phone Book counterparts.
Once you are satisfied with the layout of the imported contacts on
the Temporary table and you wish to import them into the Phone
Book, click on the Import into Phone Book button.
WorkGroup.SMS will now copy the
checked records in the Temporary table
to Phone Book entries and will report
that X records imported successfully
from CSV file into PhoneBook!.
The Import contacts from CSV
file window will now display all of
the contacts that were imported
into the Phone Book.
Please note that WorkGroup.SMS will only import entries into the Phone Book if
they have a GSM mobile phone number entered in the Phoneno field.
The import function has now been completed. Click on the Close
button to exit and return to the WorkGroup.SMS main window.
You can now use the imported Phone Book entries to send SMS
text messages.
53/115
In s t a l la t io n a n d U s e r M a n u a l
Ver 1.0
3.6.9 Printing the Phone Book Entries
The Phone Book entries may be printed to a printer connected to your PC. The printer may
be either local or network mapped, but must be set as the default.
To print the Phone Book entries, please follow this procedure:
Have Phone Book window open and click on the Print button.
The Report Designer window will
now open and display a print
preview of the Phone Book.
When you are ready to print the
Phone Book, click on the Print
button. A copy of the Phone
Book entries will now be sent to
the default printer.
To close the print preview, click on the Exit button.
You may print the Phone Book entries
more directly (i.e. without having to open
the preview), by right clicking on the Print
button to open the Print window. Click on
OK to send a copy direct to the default
printer (or choose a different location).
54/115
In s t a l la t io n a n d U s e r M a n u a l
Ver 1.0
3.7 Unrouted Messages
This function monitors Received but unrouted messages from all users of
WorkGroup.SMS. Administrator can delete all or one at the time. This log is for all
received SMS messages which doesn’t have recipient ID in its header so it is treated
as unrouted message.
Users can be given permission by Administrator to view unrouted messages on
individual bases.
55/115
In s t a l la t io n a n d U s e r M a n u a l
Ver 1.0
3.8 Count IN/OUT SMS Messages
This function provides Administrator of summary of how many messages has been
Sent/Received per day, per user or total for all users.
3.9 Import from .CSV file
This function allows administrator to import contacts from .CSV file into Phone Book.
See section 3.6.8 Importing Phone Book Entries (.CSV)
56/115
In s t a l la t io n a n d U s e r M a n u a l
Ver 1.0
3.10 Housekeepi ng
This function is to specify criteria for permanently removing records from the
WorkGroup.SMS database as well as reindexing all tables. As shown on the picture
bellow all records from INSMS, OUTSMS and EVENTS LOG table will be deleted if they
are older then 7 days. Other tables will be just reindexed.
This function is required on a periodic basis as table indexes can get out of synch.
Example is abnormal shutdown of the PC while application was reading or writing data
to the hard disk.
57/115
In s t a l la t io n a n d U s e r M a n u a l
Ver 1.0
4. Using WorkGroup.SMS Client
This module enables WorkGroup.SMS users to compose, send, receive and organise SMS text
messages. This section will describe how you can compose and send a text message.
Each user of the WorkGroup.SMS Client module has to be entered in
WorkGroup.SMS Admin module. For example if user by the network name
MOBILEIT tried to use WorkGroup.SMS Client and is not in Users database then the
following message will be displayed.
58/115
In s t a l la t io n a n d U s e r M a n u a l
Ver 1.0
4.1 New Message Controls
You will notice that WorkGroup.SMS Client has 4 tab sections on the main window. These tab
sections are known as the New Message tab, the Messages Received tab, the Messages
Sent tab, the Scheduled / Unsent tab and are used to send and organise text messages.
When you wish to send a text message, you must make sure the New Message tab is to
the front.
The controls on the New Message tab are illustrated as follows:
59/115
In s t a l la t io n a n d U s e r M a n u a l
Ver 1.0
4.2 Sending a New text message
To send a new text message using WorkGroup.SMS, please follow this procedure:
Have the WorkGroup.SMS main window open
displaying the New Message tab.
Type your text message using
the Composure box. Please
note that SMS text messages
allow a maximum of 160
characters per message and
do not allow "Enter"/carriage-returns. WorkGroup.SMS displays the number of
characters you have typed above the Composure box.
You can use the Cut, Copy and Paste commands in the
Composure box and in the GSM No. field.
Try using acknowledged abbreviations to shorten your text message (e.g. ATT =
attention, ASAP = as soon as possible, MGMT = management, MSG = message,
RGDS = regards, TEL = telephone, THX = thanks etc…).
Footer ( Signature ) will be appended to your SMS so you can notify recipient i.e.
mobile user of how to reply directly to the you. Since every User in WorkGroupSMS
has a unique recipient ID, messages sent back with proper heading e.g. *01* will be
re-routed properly through corporate network and reach the User who initiated SMS.
With WorkGroup.SMS, you can store pre-typed text messages for convenience. These
can be accessed from the Select quick type SMS box. Select the pre-typed text
message you want and WorkGroup.SMS will fill the Composure box for you. For more
information on creating pre-typed Quick SMS text messages, refer to section 4.10.2
Once you have a text message that is ready
to send, you must now select the recipients of
the text message. You may send the message
to an individual, a pre-defined group or a
mixture of individual/group entries. For
information regarding the creation and use of
60/115
In s t a l la t io n a n d U s e r M a n u a l
Ver 1.0
Phone Book entries, please refer to section 3.6.
To type the recipient number, click on the GSM No.
field and enter the number of the mobile phone to
whom you wish to send your text message.
Important. Please ensure that the GSM number entered is in the standard
international format (e.g. +61404818783 instead of 0404818783). Generally, most
numbers require a country code and the omission of the leading 0 digit. Please
refer to section 8.1 for international dialling code numbers.
Now you may send the text message by clicking on the Send
button. This will create a record in WorkGroup.SMS database
and WorkGroupSMS Engine will send your text message over the
mobile phone network.
You will see first notification
and then.
This means that message is delivered to the WorkGroup.SMS Engine for the
processing. To verify that the message is in the queue click on the Scheduled /
Unsent tab and note the message you just typed in.
61/115
In s t a l la t io n a n d U s e r M a n u a l
Ver 1.0
In our case since we selected
to sent our message to group
by the name Customers (3)
and to individual Curran Pat
WorkGroupSMS will create 4
records for the Engine to processes.
Once the WorkGroup.SMS Engine has been delivered to GSM network our records will
disappear from the list Unsent / Scheduled and will appear in list Messages Sent
62/115
In s t a l la t io n a n d U s e r M a n u a l
Ver 1.0
You have now sent 4 new text messages!
WorkGroup.SMS will record the number of text messages sent
throughout the day and display the amount beneath the Send
button. As each new day rolls over, WorkGroup.SMS will reset this
counter.
4.3 Viewing the List of Sent Text Messages
To view the list of sent text messages, please follow this procedure:
Have the WorkGroup.SMS main window
open displaying the Messages Sent tab.
The Messages Sent tab will display a database records of all of the previously sent
text messages in a spreadsheet form and in chronological order with most recently
sent messages on the top.
There are four columns within the Messages Sent table. These are:
1) Column with no heading (if message didn’t went through the GSM network
WorkGroup.SMS will write ERR in this column),
2) Name column (where the name or number of the message recipient is displayed),
3) Date/Time column (that records the date and time that the message was sent)
4) SMS message column (where the text content of the message is recorded).
63/115
In s t a l la t io n a n d U s e r M a n u a l
Ver 1.0
If you used a Phone Book entry when sending your text message, the
corresponding name will appear in the Name column. If you entered a GSM
number manually however, then only the number will be shown in the Name
column.
The Messages Sent table will record sent text messages in chronological order. The
most recently sent message will be displayed on the top row and the oldest message
will be displayed at the bottom.
There are four rows within the Messages Sent table. If your table contains
more than four messages, you may use the scroll bar on the right-hand side
of the table to scroll up and down.
You can use the Copy command on the Messages Sent table.
Text message records remain in the table until they are manually deleted.
To delete a single record, first select the record as described above and click
on the Delete current record button. You will be asked to confirm your action
by the WorkGroup.SMS table update window. If you click on Yes, this will
irreversibly remove the current record
from the database. If you click on No,
you will return to the Messages Sent tab
without having deleted the record.
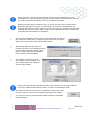
If you try to delete without having selected a record, WorkGroup.SMS will report
that there is Nothing to delete!. Please select a record before you click on the
Delete current record button.
If you wish to delete all of the records in the Message Sent table, click on the
Delete all records button. You will be asked to confirm your action by the
Messages Sent table update window. If you click on Yes, this will
irreversibly remove all records from the database. If you click on No, you
will return to the Messages Sent
tab without having deleted any
records.
Important. Deleted records CANNOT be restored. Please ensure you have a
sufficient backup copy of the records before you delete them. For information on
backing up your records, please refer to section 12.2.
64/115
In s t a l la t io n a n d U s e r M a n u a l
Ver 1.0
4.4 Receiving Text Messages
WorkGroup.SMS will receive SMS text messages automatically.
At predefined intervals, WorkGroup.SMS Engine checks the SIM card in your GSM MODEM for
new messages. If it finds a new text message and if reads the recipientID in the header of
the SMS message, it will re-route to appropriate WorkGroup.SMS user and report using net
SEND command that a Message from <server name> to <net user name> on current
date/time. SMS message received You can read it now or late! (see picture bellow)
Clicking on the OK button will open the newly arrived text message in the Messages Received
tab.
Important. For WorkGroup.SMS to be able to receive new SMS text messages,
you must have the GSM MODEM on and have the WorkGroup.SMS Engine
application running.
WorkGroup.SMS Client need not be running but user will be notified as
WorkGroup.SMS Engine will send notify the appropriate network WorkGroup.SMS
user.
If the user wishes to read the received SMS message and the WorkGroup.SMS
Client application is not running at the time, they will need to start the
WorkGroup.SMS Client application before the message can be viewed.
65/115
In s t a l la t io n a n d U s e r M a n u a l
Ver 1.0
4.5 Viewing the List of Received Text Messages
To view the list of received text messages, please follow this procedure:
Have the WorkGroup.SMS main
window open displaying the Messages
Received tab.
The Messages Received tab will display a database record of all of the received text
messages as a table.
There are three columns within the Messages Received table. These are: the Name
column (where the name or number of the message sender is displayed), the
Date/Time column (that records the date and time that the message was sent) and
the SMS message column (where the text content of the message is recorded).
If the GSM number of the sender corresponds to Phone Book
entry, their name will appear in the Name column. If not, then
only the GSM number will be shown.
The Messages Received table will record received text messages in chronological
order. The most recently received message will be displayed on the top row and the
oldest message will be displayed at the bottom.
66/115
In s t a l la t io n a n d U s e r M a n u a l
Ver 1.0
There are four rows within the Messages Received table. If your table
contains more than four messages, you may use the scroll bar on the righthand side of the table to scroll up and down.
You can use the Copy command on the Messages Received table.
Text message records remain in the table until they are manually deleted.
To delete a single record, first select the record as described above and click
on the Delete current record button. You will be asked to confirm your action
by the WorkGroup.SMS table update window. If you click on Yes, this will
irreversibly remove the current record
from the database. If you click on No,
you will return to the Messages Received
tab without having deleted the record.
If you try to delete without having selected a record, WorkGroup.SMS Client will
report that there is Nothing to delete!. Please select a record before you click on
the Delete current record button.
If you wish to delete all of the records in the Message Received table, click
on the Delete all records button. You will be asked to confirm your action by
the Messages Received table update window. If you click on Yes, this will
irreversibly remove all records from the database. If you click on No, you
will return to the Messages
Sent tab without having
deleted any records.
67/115
In s t a l la t io n a n d U s e r M a n u a l
Ver 1.0
4.6 Exporting Received and Sent Message Records
All of the text messages in the Messages Received and Messages Sent tables can be
exported to an external file.
Exporting your message database is a useful way of backing-up your text message
correspondence for future reference.
All files are exported in .XLS spreadsheet format to be compatible with Microsoft Excel.
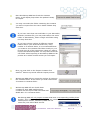
4.6.1 Exporting Received Message Records
To export the Messages Received database to an .XLS file, please follow this procedure:
Have the WorkGroup.SMS Client main window
open and click on the File menu. Select the Export
Received Log to XLS option. Alternatively, simply
press CTRL-R.
The Export Messages Received log screen will ask
you to verify the export action. Click on OK to
continue or click on Close to exit without
exporting.
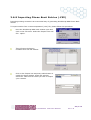
WorkGroup.SMS Client will always export the Messages Received database file to the
root folder where you installed the application (e.g. C:\Program Files\WorkGroup SMS
Client by default). You cannot change the location of the export.
WorkGroup.SMS will report Export completed successfully and stored as Excel XLS file
C:\Program Files\\WorkGroup SMS Client\InSMS_29042002_1.XLS.
68/115
In s t a l la t io n a n d U s e r M a n u a l
Ver 1.0
Exported filename definition: InSMS = from the Messages Received database,
25102002 = the date in DDMMYYYY format and 1 = part 1 (note that 2 parts are
only generated when an extremely large number of records are exported - greater
than 16,384 records).
If there are no records in the Messages Received database and
you try to export, WorkGroup.SMS will report that there is
Nothing to Export! and will not perform the action.
Check in the folder for the exported file and view in Microsoft Excel.
Examining the export file, you will notice that there are four columns:
The name column is a list of the names of the senders as found in the Phone Book. If
the sender does not have a Phone Book entry, this cell will be left blank.
The phoneno column is a list of the GSM phone numbers of the senders.
The smsdatetime column is a list of the dates and times that the messages were
received (in MM/DD/YYYY hh:mm:ss format).
The smstext column is a list containing the contents of the received text messages.
69/115
In s t a l la t io n a n d U s e r M a n u a l
Ver 1.0
4.6.2 Exporting Sent Message Records
To export the Messages Sent database to an .XLS file, please follow this procedure:
Have the WorkGroup.SMS Client main window open and click on the File menu. Select
the Export Sent Log to XLS option.
Alternatively, simply press CTRL-S.
The Export Messages Sent log screen will ask
you to verify the export action. Click on OK to
continue or click on Close to exit without
exporting.
WorkGroup.SMS will always export the Messages Sent database file to the root
folder where you installed the application (e.g. C:\Program Files\WorkGroup SMS
Client by default). You cannot change the location of the export.
WorkGroup.SMS will report Export completed successfully and stored as Excel XLS file
C:\Program Files\ WorkGroup SMS Client \Outsms_25102002_1.XLS.
Exported filename definition: Outsms = from the Messages Sent database,
25102002 = the date in DDMMYYYY format and 1 = part 1 (note that 2 parts are
only generated when an extremely large number of records are exported).
70/115
In s t a l la t io n a n d U s e r M a n u a l
Ver 1.0
If there are no records in the Messages Sent database and you
try to export, WorkGroup.SMS Client will report that there is
Nothing to Export! and will not perform the action.
Check in the folder for the exported file and view in Microsoft Excel.
Examining the export file, you will notice that there are four columns:
The name column is a list of the names of the recipients as found in the Phone Book.
If the recipient does not have a Phone Book entry, this cell will be left blank.
The phoneno column is a list of the GSM phone numbers of the recipients.
The smsdatetime column is a list of the dates and times that the messages were sent
(in MM/DD/YYYY hh:mm:ss format).
The smstext column is a list containing the contents of the sent text messages.
Text messages sent as part of a Phone Book group entry will be listed in the export
file individually (i.e. since they were sent to each individual separately).
71/115
In s t a l la t io n a n d U s e r M a n u a l
Ver 1.0
4.7 Scheduled SMS(s)
Scheduled SMS messages will appear in the list Scheduled / Unsent see below
To send a scheduled SMS text message using WorkGroup.SMS, please follow this procedure:
Have the WorkGroup.SMS main window open
displaying the New Message tab.
Type your text
message using the
Composure box.
Once you have a text message that is ready to send, you must now select the
recipient(s) of the text message. You may send the message to an individual, a predefined group or a mixture of
individual/group entries.
To type the recipient number, click on the GSM No.
field and enter the number of the mobile phone to
whom you wish to send your text message.
72/115
In s t a l la t io n a n d U s e r M a n u a l
Ver 1.0
Now you must inform WorkGroup.SMS that you wish to
schedule the text message by clicking on the Schedule option
on the main window.
This will activate the date/time field on the top right-hand
side of the New Message tab. In this field enter the date
and time you wish to send the new text message.
You must enter valid digits in the date/time field (in DD-MM-YYYY hh:mm:ss
format). For example, if today's date and time is the 26th April 2002 9:45am (2604-2002 09:45:00) and you wish to schedule a text message to be sent this
afternoon at 2pm, you must enter 26-04-2002 14:00:00.
You may now send the text message by clicking on the Send
button.
If WorkGroup.SMS reports Invalid Date/Time when you click on Send, you have
entered an incorrect date and/or time for scheduling. The date
and time must be in DD:MM:YYYY hh:mm:ss and contain valid
digits (e.g. 32:01:2002 is not a valid date).
If WorkGroup.SMS reports Scheduled send date/timemust be greater than current
date/time! Please try again , then you have entered a time that is equal to the
current or has already passed (e.g. if the current date and time is 26th April 2002
9:45am and you try to enter 26 th April 2002 8:15am).
If the text message was scheduled
successfully, WorkGroup.SMS Client
will present the summary window and
report SMS scheduled to send on:
DD-MM-YYYY hh:mm:ss to X users.
73/115
In s t a l la t io n a n d U s e r M a n u a l
Ver 1.0
To view your new scheduled message, click on the tab Scheduled / Unsent.
WorkGroup.SMS Client will present you with the list as pictured below
There are 3 columns within the list. These are: the Name and/or GSM number column
(where the name and/or number of the message recipient is displayed), the
Schdatetime column (that records the date and time that the message will be sent)
and the SMS message column (where the text content of the message is recorded).
The Scheduled SMS(s) window displays the total
number of text messages that you have scheduled in
the top-right hand corner.
To delete a scheduled message, click on the Delete current record
button. You will be asked to confirm your action by the Scheduled SMS
table update window. If you click on Yes, this will irreversibly remove
the current scheduled message. If you click on No, you will return
without having deleted the
message.
74/115
In s t a l la t io n a n d U s e r M a n u a l
Ver 1.0
To delete all scheduled messages, click on the Delete all records from
table button. You will be asked to confirm your action. If you click on Yes,
this will irreversibly remove the all scheduled messages. If you click on
No, you will return without having deleted any messages.
4.8 The Phone Book
The WorkGroup.SMS Phone Book is used to store the names and numbers of your contacts.
To access the Phone Book, please follow this procedure:
Have the WorkGroup.SMS main window open and click on the File menu. Select the
Phone Book option (or simply press CTRL-N).
You may also open the Phone Book by clicking on the Phone Book
button on the main window.
The Phone Book window is illustrated as follows:
75/115
In s t a l la t io n a n d U s e r M a n u a l
Ver 1.0
By using the Phone Book window, you may create, edit, delete, sort, import, export and print
entries from the list of your phonebook. There are 2 lists of contacts in this example:
1) List of the Public contacts - only for viewing. They are created by Administrator of
WorkGroup.SMS by importing from Outlook, .CSV file or simply by adding using the
Admin module.
2) List Own contacts – editable by user. You may create, delete or update only your
own contacts. If you try to edit Public contact WorkGroup.SMS will notify you as
below
or if you try to delete Public contact WorkGroup.SMS will display
76/115
In s t a l la t io n a n d U s e r M a n u a l
Ver 1.0
4.8.1 Creati ng a New Phone Book Entry
To create a new Phone Book entry, please follow this procedure:
Have the Phone Book window open and click on the Add New Record
button. This will open up the entry fields.
In the Name field, please enter the name of the contact (maximum 40 characters).
In the Phone No field, please enter the GSM mobile phone number of the contact
(maximum 15 numbers).
Important. Please ensure that the GSM number entered is in the standard
international format (e.g. +61404818783 instead of 0404818783). Generally, most
numbers require a country code and the omission of the leading 0 digit. Please
refer to section 8.1 for international dialling code numbers.
In the Group field, please enter the name of the group in which you want the new
contact to be placed (maximum 30 characters). To create a group, directly enter the
name in the Group field. To select an existing group, click on the Group box arrow
and select a group name.
To clear all of the fields to re-enter information, click on the Clear Values
button.
Once all of the required contact information has been entered, you may save
the entry by clicking on the Save/Update Changes button. This action will
update the Phone Book contact list and display your new entry.
77/115
In s t a l la t io n a n d U s e r M a n u a l
Ver 1.0
To exit the Add New Record function without saving any changes, click on the
Cancel changes button.
Each individual Phone Book entry must have a unique GSM mobile phone number.
You may have two entries with the same name but you may not have two entries
with the same GSM number. If you try to save an entry with a duplicate GSM
number, WorkGroup.SMS will report Phone Number must be unique! and you must
enter a new number.
4.8.2 Editing a Phone Book Entry
To edit a Phone Book entry, please follow this procedure:
Have the Phone Book window open and simply double-click on the entry you wish to
edit. If you double-click on Public contact WorkGroup.SMS will notify you that you can
edit it as on the picture below
…otherwise
This will open up the entry fields.
You may now directly edit the entry fields and make changes.
Once all of the editing has been completed, you may save the entry by
clicking on the Save/Update Changes button. This action will update the
Phone Book contact list.
78/115
In s t a l la t io n a n d U s e r M a n u a l
Ver 1.0
To exit from the editing function without saving any changes, click on the
Cancel changes button.
4.8.3 Deleting a Phone Book Entr y
To delete a Phone Book entry, please follow this procedure:
Have the Phone Book window open and click on the entry you
wish to delete.
Click on the Delete current record button. You will be asked to confirm your action by
the PhoneBook table update window. If you click on Yes, this will irreversibly
remove the current entry from the Phone Book. If you click on No, you will
return to the Phone Book without having deleted the entry.
If you try to delete Public contact
WorkGroup.SMS will notify you you
are not allowed.
If you try to delete without having
selected a record, WorkGroup.SMS will
report that there is Nothing to delete!.
Please select a record before you click
on the Delete current record button.
Important. Deleted entries CANNOT be restored. Please ensure you have a
sufficient backup copy of your contacts before you delete them.
79/115
In s t a l la t io n a n d U s e r M a n u a l
Ver 1.0
4.8.4 Deleting All of the Phone Book Entries
To delete a Phone Book entry, please follow this procedure:
Have the Phone Book window open and click on the Delete all records
from the PhoneBook button. You will be asked to confirm your action by
the PhoneBook table update window. If you click on Yes, this will
irreversibly remove all your contacts from the Phone Book. If you click
on No, you will return to the Phone Book without having deleted any entries.
Important. Deleted entries CANNOT be restored. Please ensure you have a
sufficient backup copy of your contacts before you delete them.
80/115
In s t a l la t io n a n d U s e r M a n u a l
Ver 1.0
4.8.5 Sorting the Phone Book Entries
There are two different ways of viewing the Phone Book entries
Ordered by Last name or
Ordered by Group
By default when you open the Phone Book records are ordered by Last Name.
By clicking the
name.
button, records in the PhoneBook will be sorted by Group
81/115
In s t a l la t io n a n d U s e r M a n u a l
Ver 1.0
4.8.6 Exporting Phone Book Entries
All of the contacts in the Phone Book can be exported to an external file.
Exporting your Phone Book database is a useful way of backing-up your contact information
for future reference.
The export file will be in .XLS spreadsheet format and is compatible with Microsoft Excel.
To export the Phone Book contact database to an .XLS file, please follow this procedure:
Have the Phone Book window open and click on the Export to Excel (.XLS)
button.
WorkGroup.SMS will export the contact database file to the root folder where
you installed the application (e.g. C:\Program Files\ WorkGroup SMS Client by
default). You cannot change the location of the export.
WorkGroup.SMS will report Result exported successfully to Excel as C:\Program
Files\WorkGroup SMS Client\phonebook.XLS.
If there are no records in the Phone Book database and you
try to export, WorkGroup.SMS will report that the Phone Book
is empty. Nothing to Export! and will not perform the action.
Check in the folder for the exported file and view in Microsoft Excel.
Examining the export file, you will notice that there are three columns:
The groupname column is a list of the group names as found in the Phone Book.
The name column is a list of the names of the contacts.
The phone_number column is a list of the GSM mobile phone numbers of the
contacts.
82/115
In s t a l la t io n a n d U s e r M a n u a l
Ver 1.0
4.8.7 Printing the Phone Book Entries
The Phone Book entries may be printed to a printer connected to your PC. The printer may
be either local or network mapped, but must be set as the default.
To print the Phone Book entries, please follow this procedure:
Have Phone Book window open and click on the Print button.
The Report Designer window will
now open and display a print
preview of the Phone Book.
When you are ready to print the
Phone Book, click on the Print
button. A copy of the Phone
Book entries will now be sent to
the default printer.
To close the print preview, click on the Exit button.
You may print the Phone Book entries
more directly (i.e. without having to open
the preview), by right clicking on the Print
button to open the Print window. Click on
OK to send a copy direct to the default
printer (or choose a different location).
83/115
In s t a l la t io n a n d U s e r M a n u a l
Ver 1.0
4.9 Using the Phone Book Entries
All Phone Book entries are repeated in the Contact box on the bottom left-hand corner of the
WorkGroup.SMS main window.
Using the Individual/group contact selection buttons, you may switch views in the Contact
box as follows:
Click on the Individuals button, and WorkGroup.SMS
will arrange the Contact box such that only individual
contacts are shown.
Click on the Groups button, and WorkGroup.SMS will
arrange the Contact box so that all of the contacts
groups are shown.
84/115
In s t a l la t io n a n d U s e r M a n u a l
Ver 1.0
Click on the All button, and WorkGroup.SMS will
display both individual and group contact together in
the Contact box.
You can filter the Contact box by selecting to view either Global contacts or your Own
contacts
See example bellow for Own contacts
To use the Phone Book entries to send text messages, please follow this procedure:
Select the contact you wish to send the text message to by clicking on their
corresponding entry in the Contact box. You may do this by moving your mouse over
and clicking on the entry.
You may select more that one contact at once by using the mouse combined with
the CTRL or SHIFT keys.
85/115
In s t a l la t io n a n d U s e r M a n u a l
Ver 1.0
If you have a large number of contact entries in the Contact box, use the
scroll bar to scroll up and down.
Now you must move the entry from the Contact box over to the Recipient
Box. To do this you must either double-click (single contact only) or drag
the entry over. You may also use Add Selected Items button to transfer
your selection.
To remove any entries you have moved over to the Recipient box, you must
select them and click on the Remove Selected Items button.
To move all of the contacts from the Contact box to the Recipient box, you
must click on the Add All Contacts button.
To remove all of the contacts from the Recipient boxback to the Contact box,
you must click on the Remove All Contacts button.
You may use the Contact boxto
create a combination of groups and
individuals to whom you wish to
send your message.
86/115
In s t a l la t io n a n d U s e r M a n u a l
Ver 1.0
You must now compose your message and click on the Send
button. WorkGroup.SMS will send a copy of the text message to
each of the recipients in the Recipient box.
Important. When sending text messages to a number of contacts (or as a group),
your mobile phone network will charge you for each delivery.
For example, if you send a text message to a group containing 20 contacts,
WorkGroup.SMS will send out 20 individual messages
and you will be charged by your operator for each of
those sent.
4.10 The Fil e Menu
The File menu contains a series of commands used to
perform functions in WorkGroup.SMS Client.
Some commands have a corresponding button on the
WorkGroup.SMS Client main window, whilst some are
only to be found on this menu.
The File menu options are described as follows:
4.10.1 Phone Book
This File menu command is used to activate the
WorkGroup.SMS Phone Book.
Please refer to section 4.7 for information on using the
Phone Book.
87/115
In s t a l la t io n a n d U s e r M a n u a l
Ver 1.0
4.10.2 Quick SMS
This File menu command is used to create Quick SMS messages.
Quick SMS messages are pre-typed and stored to save you
having to type them out manually every time you send a text
message.
To create a Quick SMS message, please follow this procedure:
Click on the Quick SMS option on the File menu. This will open the Pre-typed SMS
messages window.
88/115
In s t a l la t io n a n d U s e r M a n u a l
Ver 1.0
Click on the Add new record button. This will activate the Composure box in
which you may type the contents of your Quick SMS message.
You can use the Cut, Copy and Paste commands in the Composure
box. Enter a maximum of 124 digits. SMS text messages do not
allow "Enter"/carriage-returns. Maximum number of characters to
type per SMS is determined by number of characters typed in
Signature/footer see below
To exit the from the Add New Record function without saving any changes,
click on the Cancel changes button at the top of the window.
Once you have finished typing out your message, click on the Save/Update
changes button.
89/115
In s t a l la t io n a n d U s e r M a n u a l
Ver 1.0
Your Quick SMS message will now be stored. Click on the Exit button to close the Pretyped SMS messages window.
To delete a stored Quick SMS message, click on the Delete current record
button. You will be asked to confirm your action by the QuickSMS table
update window. If you click on Yes, this will irreversibly remove the
current pre-typed message. If you click on No, you will return without
having deleted the message.
90/115
In s t a l la t io n a n d U s e r M a n u a l
Ver 1.0
To delete all stored Quick SMS messages, click on the Delete all records
from table button. You will be asked to confirm your action by the
QuickSMS table update window. If you click on Yes, this will irreversibly
remove the all pre-typed messages. If you click on No, you will return
without having deleted any
messages.
On the WorkGroup.SMS main window, you can now select your pre-typed text
message from the Select quick type SMS box. Click on your entry to instruct
WorkGroup.SMS to automatically fill the Composure box for you.
You may have an unlimited number of stored Quick SMS messages.
4.10.3 Work Station ID…
This File menu command is used to view User ID,
Recipient ID and the permission to view Unrouted
messages.
91/115
In s t a l la t io n a n d U s e r M a n u a l
Ver 1.0
Permission to view Unrouted messages is set by WorkGroup.SMS Administrator.
Net bios name is network USER ID and is automatically read on users log in.
Recipient ID is unique for each WorkGroup.SMS user and is assigned by
WorkGroup.SMS Administrator.
4.10.4 Export Sent Log to XLS
This File menu command is used to export the Messages Sent database to a Microsoft Excel
.XLS file.
Please refer to section 4.6.2 for information on exporting sent
text messages as a log file.
92/115
In s t a l la t io n a n d U s e r M a n u a l
Ver 1.0
4.10.5 Export Recei ved Log to XLS
This File menu command is used to export the Messages Received database to a Microsoft
Excel .XLS file.
Please refer to section 4.6.1 for information on exporting
received text messages as a log file.
4.10.6 Unrouted SMS messages
This File menu command is used to view Unrouted SMS messages.
If WorkGroup.SMS User is given permission to view Unrouted messages then this
menu option will be enabled otherwise it will be disabled.
93/115
In s t a l la t io n a n d U s e r M a n u a l
Ver 1.0
All messages with no Recipient ID in header will be treated by WorkGroup.SMS as Unrouted
SMS messages and those Users with permission to view them will be able to see them as
show on the picture bellow.
4.10.7 Events Log…
This File menu command is used to view Events Log.
94/115
In s t a l la t io n a n d U s e r M a n u a l
Ver 1.0
Events/Log form allows WorkGroup.SMS user to check the processing of their messages.
List is sorted by Eventdate in descending order.
4.10.8 Exit
This File menu command is used to exit the
WorkGroup.SMS Client application.
95/115
In s t a l la t io n a n d U s e r M a n u a l
Ver 1.0
4.11 The Work Gr oup.SMS Cl ient Help Menu
4.11.1 Licensing
This Help menu command is used to display the WorkGroup.SMS Licensing file.
96/115
In s t a l la t io n a n d U s e r M a n u a l
Ver 1.0
4.11.2 About WorkGroup.SMS Client
This Help menu command is used to open the WorkGroup.SMS Client About window.
The About window contains copyright information and
WorkGroup.SMS Client technical data.
To view the About window, please follow this procedure:
Click on the About WorkGroup.SMS
About window.
option on the Help menu. This will open the
The Technical Data section is used by MobileIT to identify and troubleshoot your copy
of WorkGroup.SMS.
97/115
In s t a l la t io n a n d U s e r M a n u a l
Ver 1.0
5. Using WorkGroup.SMS Engine
WorkGroup.SMS Engine is used to send and receive SMS messages created by
WorkGroup.SMS Client users.
98/115
In s t a l la t io n a n d U s e r M a n u a l
Ver 1.0
5.1 Changing the COM Port…
The COM port is simply a 9-pin serial communications port (found on the rear of most PCs)
that connects the PC to the GSM MODEM using a cable. There is usually more than one COM
port, so you must instruct WorkGroup.SMS Engine to chose the one on which you have
installed your GSM modem.
To change the COM port, please follow this procedure:
Click on the Edit button. This will stop the service from running until you save the
data.
Select the COM port on which your GSM MODEM is attached from
the drop down box.
The default COM port value is set to COM1 and may be changed
to any serial port number between COM1 and COM10. Under
most circumstances however, the likely serial port to which the
GSM MODEM is attached will be either COM1 or COM2.
The COM port number has now been modified. Click on Save to store the changes and
start the WorkGroup.SMS Engine service.
99/115
In s t a l la t io n a n d U s e r M a n u a l
Ver 1.0
5.2 Changing the Baud Rate…
The baud rate is simply the speed of the data transferral between the PC and the GSM
modem.
To change the baud rate that WorkGroup.SMS Engine is using whilst communicating with the
modem, please follow this procedure:
Click on the Edit button. This puts WGSMS Engine in
editing mode. Select Baud rate box
Select the baud rate from the drop down box.
The default baud rate value is set to 9600 and may be changed to
either 2400, 4800, 9600 or 19200. Please note that unless you
intend to install a different than the GSM MODEM, you will not
need to change this value.
The baud rate has now been modified. Click on Save to store the change and start the
WorkGroup.SMS Engine service
1 0 0 / 1 15
In s t a l la t io n a n d U s e r M a n u a l
Ver 1.0
5.3 Changing the SMSC Number…
The SMSC (Short Message Service Centre) number is the number of the message centre of
the mobile phone network operator. The message centre is where all SMS text messages are
relayed. You must ensure you have the correct SMSC number for your network provider or
you will not be able to send or receive text messages.
To change the SMSC number, please follow this procedure:
Click on the Edit button. This puts WGSMS Engine
in editing mode. Click on the SMSC No
Select the appropriate SMSC number from
the drop down box or manually enter the
number in the activated field. Manually
entering the number should only be required
if the the system is being installed outside of
Australia or you are not using the Falcom GSM MODEM supplied .
WorkGroup.SMS Engine will automatically read the SMSC number from the SIM
card (found in the GSM modem) and will present the SMS Provider Name. Under
most circumstances, you should not have to modify this SMSC number.
The SMSC number has now been modified. Click on Save to store the change and
start the WorkGroup.SMS Engine.
5.4 Changing the St art up Delay and Response Ti me…
Important. The Startup Delay and Response Time settings are used to modify the
performance of WorkGroup.SMS Engine and should only be changed under
instruction from MobileIT. By default, the Startup Delay is set to 1.0 and the
Response Time is set to 1000.
1 0 1 / 1 15
In s t a l la t io n a n d U s e r M a n u a l
Ver 1.0
5.5 Sending a Test SMS Text Message…
You may use the WorkGroup.SMS Engine to send a test SMS text message and monitor it
using the Output commands box.
To send a test text message, please follow this procedure:
Once WorkGroup.SMS Engine window is open, enter the GSM mobile phone number of
the message recipient in the Destination No. field.
Important. Please ensure that the number entered is in the standard international
format (e.g. +61404818783 instead of 0404818783). Generally, most numbers
require a country code and the omission of the leading 0 digit. Please refer to
section 8.1 for international dialling code numbers.
Now you may send the text message by clicking on the Send button. This instructs
WorkGroup.SMS Engine to initialise the and send your text message over the mobile
phone network. By default it sends text Test SMS message .
You can monitor the sending process by watching the AT commands issued by
WorkGroup.SMS Engine to the GSM MODEM in the Output commands box.
5.6 Running WorkGroup.SMS Engine in Test Mode…
WorkGroup.SMS Engine has a Test Mode function that when enabled, allows you to monitor
the output commands to the GSM modem.
The Test Mode function is useful for troubleshooting and administration purposes. By default
WorkGroup.SMS Engine is set in test mode. You can observe operation of the
WorkGroup.SMS Engine by checking the AT commands in Output window
A typical series of AT commands issued by WorkGroup.SMS Engine when sending
a text message is as follows:
Ø
Actual message is Test SMS message
AT+CMGF=0
translated into PDU mode ( octets ) as bellow
SMS message format.
OK
AT+CMGS=28
Ø
Number of octets
0011000B911614549282F60000AA10D4F29C0E9A36A7A076793E0F9FCB
Message content
+CMGS: 48
OK
If you don’t want to run WorkGroup.SMS Engine to display output AT commands uncheck the
Display Output commands mode check box.
1 0 2 / 1 15
In s t a l la t io n a n d U s e r M a n u a l
Ver 1.0
The AT commands viewed in the Modem output commands window are part of a
line-orientated command language used on communications devices. Each
command contains three elements: the prefix, the body and the termination
character. The prefix is simply AT, the body is made of varying characters that
define the command (e.g. +CMGF=0) and the termination character identifies the
end of the command (usually hidden).
Commands are acknowledged with an OK (to signal that the command was a
success) or with an ERROR (to signal that the command was a failure).
1 0 3 / 1 15
In s t a l la t io n a n d U s e r M a n u a l
Ver 1.0
5.7 WorkGroup.SMS Engine About GSM…
Clicking on About GSM button
opens up The About window which
contains copyright information and WorkGroup.SMS Engine technical data.
1 0 4 / 1 15
In s t a l la t io n a n d U s e r M a n u a l
Ver 1.0
5.8 WorkGroup.SMS Engine Registration…
Clicking on Registration button
opens up The Registration window
which allows the user to register WorkGroup.SMS Engine. Please refer to section 2.6
on How to register WorkGroup.SMS.
1 0 5 / 1 15
In s t a l la t io n a n d U s e r M a n u a l
Ver 1.0
6. Housekeeping
There is a separate module ( HOUSEKEEPING.EXE ) that comes as part of
WorkGroup.SMS which allows user to permanently remove records from the
WorkGroup.SMS database as well as reindexing all tables. In addition, all historical
records from INSMS, OUTSMS and EVENTS LOG table, older then specified criteria will
be permanently deleted. This function is necessary to perform from time to time as
table indexes can get out of synch. Example is abnormal shutdown of the PC while
application was reading or writing data to the hard disk.
Important. Please make sure all WorkGroup.SMS users are logged off the system
and WorkGroup.SMS Engine and Admin are not running. HOUSEKEEPING.LOG file
can be found upon executing HOUSEKEEPING module. It is located in the same
folder where HOUSEKEEPING.EXE is located.
Parameter for Deletion can be set as described in section 3.10 Housekeeping.
This module can be run outside of the WorkGroup.SMS as a separate routine at
scheduled time ( e.g. using NT Scheduler ).
or it can be run at any time manually from Windows NT Run command or just doubleclicking on it.
1 0 6 / 1 15
In s t a l la t io n a n d U s e r M a n u a l
Ver 1.0
If the parameter is not passed then it will run from default parameter see section
3.10 Housekeeping.
If parameter is passed then it will overwrite default parameter described in section
3.10 Housekeeping.
1 0 7 / 1 15
In s t a l la t io n a n d U s e r M a n u a l
Ver 1.0
7. Common Error Messages
This section is design to guide you through resolving application errors.
If you have an application error not listed here or if you require any further
assistance, please call the MobileIT Help Line on 1902 224 551 (Australia only).
Common error messages and their suggested solutions are as follows:
7.1 CO M Port Doesn t Exi st
WorkGroup.SMS Engine will report COM port doesn't exist
or modem is not properly connected! Please check
connections and try again. when it cannot access the GSM
modem.
We suggest that you verify the connections between the GSM MODEM and the PC and
between the modem and electrical wall socket. Ensure that the modem is switched on.
Check which COM port you have plugged the GSM modem. Change the COM port number as
appropriate and click on Save and Exit.
Re-open the WorkGroup.SMS Engine window. If you still observe the COM port doesn't
exist message, then change the COM port number to a different value and try again.
The WorkGroup.SMS Engine can successfully communicate with the GSM MODEM when you
can observe that it is sending AT commands to the modem in the Output commands box
(lower side of the WorkGroup.SMS Engine window) when it is running in Test mode.
7.2 GSM Number Has to Ha ve 10 Di gits Minimum!
WorkGroup.SMS will report GSM number has to have 10 digits
minimum! when you are trying to add a new contact to the Phone
Book that is in the correct format but does not have the required
minimum number of digits.
We suggest that you confirm that the number you are entering is a valid one and ensure that
you have entered it correctly on the Phone Book window.
A valid GSM number must have minimum of 10 digits and have a leading plus (+) symbol
followed by a country code (e.g. +61404818783).
1 0 8 / 1 15
In s t a l la t io n a n d U s e r M a n u a l
Ver 1.0
7.3 Invalid Activation Key
WorkGroup.SMS will report Invalid Activation key when you have entered
an invalid registration code on the Registration form window and have clicked
on the Validate Key button.
We suggest that you ensure that you have entered your registration code exactly as was
supplied by MobileIT.
If you do not have a registration code please refer to section 2.6 and contact MobileIT for
assistance.
Please note that since the registration code is directly linked to the IMEI number of the GSM
device, your registration code will be invalid if you have changed the device from the one to
which the original registration code was issued. Please contact MobileIT for a replacement.
7.4 Invali d Date/Time
WorkGroup.SMS will report Invalid Date/Time when you are trying to send a
scheduled text message and have activated the date/time field on the
New
Message tab but have not entered a correct date and time.
We suggest that you ensure the date and time you have entered is valid.
You must enter valid digits in the date/time field (in DD-MM-YYYY hh:mm:ss format). For
example, if today's date and time is the 26th April 2002 9:45am (26-04-2002 09:45:00)
and you wish to schedule a text message to be sent this afternoon at 2pm, you must enter
26-04-2002 14:00:00.
Also, ensure that you have entered a date and time that is not in the present or in the past.
Scheduled SMS text messages must be set for a future date and time.
7.5 Modem is Disconnected
WorkGroup.SMS will report Modem is disconnected! Check
modem cable and connection settings. when it cannot access
the GSM modem.
We suggest that you verify the connections between the GSM MODEM and the PC and
between the modem and electrical wall socket. Ensure that the modem is switched on.
Check which COM port you have plugged the GSM MODEM on and open the WorkGroup.SMS
Engine window. Change the COM port number as appropriate and click on Save and then restart WorkGroup.SMS Engine.
If you still observe the COM port doesn't exist
to a different value and try again.
message, then change the COM port number
The WorkGroup.SMS Engine can successfully communicate with the GSM MODEM when you
can observe that it is sending AT commands to the modem in the Output commands box
(lower side of the WorkGroup.SMS Engine window) when it is running in Test mode.
1 0 9 / 1 15
In s t a l la t io n a n d U s e r M a n u a l
Ver 1.0
7.6 Not a Vali d GSM Number!
WorkGroup.SMS will report Not a valid GSM number! when you have
entered a mobile phone number into a GSM No. field that is not a valid
number.
We suggest that you confirm that the number you are entering is valid and ensure that you
have entered it correctly.
A valid GSM number must have minimum of 10 digits and have a leading plus (+) symbol
followed by a country code (e.g. +61404818783).
7.7 Nothing to Delete
WorkGroup.SMS will report Nothing to delete! when you are trying to
delete a record from a table (e.g. the Messages Received table) and none
exist.
We suggest that you make sure you have a record in the table before trying to delete any.
7.8 Nothing to Export
WorkGroup.SMS will report Phone Book is empty. Nothing to Export! when
you have tried to export contacts from an empty Phone Book.
We suggest that you add a few new contact entries to the Phone Book before trying to
export any.
7.9 Phone Number Must be Unique
WorkGroup.SMS will report Phone Number must be unique! when you
have tried to save a new contact with a mobile phone number that is
identical to an existing Phone Book entry (even though it may have a
different name).
We suggest that you either give the contact a different number or cancel adding the contact
to the Phone Book altogether.
All contacts stored in the Phone Book must have unique GSM numbers.
1 1 0 / 1 15
In s t a l la t io n a n d U s e r M a n u a l
Ver 1.0
7.10 Please Put Phone No. in International
WorkGroup.SMS will report Please put Phone No. in
international format! when you have entered a GSM mobile
phone number that is not in the standard international
format.
We suggest that you confirm the number you are entering is valid and ensure you have
entered it correctly.
A valid GSM number must have minimum of 10 digits and have a leading plus (+) symbol
followed by a country code (e.g. +61404818783).
It is most likely that you are trying to enter a number that does not include the country code
(e.g. 0404818783). You must omit the leading 0 digit and add the code for the country in
which the GSM mobile phone is registered.
Please refer to section 8.1 for international dialling code numbers.
7.11 Range: 0 to 60
WorkGroup.SMS Engine will report Range:0 to 60 when you have tried to change
the Refresh time to a value that is outside this range (e.g. 120).
We suggest that you change the refresh time to a value between 0 and 60. WorkGroup.SMS
Engine sets the Refresh time to 10 by default.
7.12 SMS Message(s) NOT Sent
WorkGroup.SMS will report SMS message(s) NOT sent. Check
modem settings! when you have tried to send a text message
but WorkGroup.SMS cannot do so.
We suggest that you check your modem setup in the WorkGroup.SMS Engine and ensure
that the SMSC No. is correct.
Also, check that you have entered a valid GSM mobile phone number.
A valid GSM number must have minimum of 10 digits and have a leading plus (+) symbol
followed by a country code (e.g. +61404818783).
Try sending a test SMS text message and observe at what point in the AT command
sequence that an ERROR appears.
7.13 Type GSM Number
WorkGroup.SMS Client will report Type GSM Number! when you have tried
to send a text message but have not entered any digits in the GSM No. field.
1 1 1 / 1 15
In s t a l la t io n a n d U s e r M a n u a l
Ver 1.0
We suggest that you enter a valid GSM mobile phone number and try sending the text
message again.
A valid GSM number must have minimum of 10 digits and have a leading plus (+) symbol
followed by a country code (e.g. +61404818783).
1 1 2 / 1 15
In s t a l la t io n a n d U s e r M a n u a l
Ver 1.0
7.14 Type Your Message
WorkGroup.SMS Client will report Type your message when you have tried
to send a text message but have not entered any text in the Composure
box.
We suggest that you enter some text and try sending the text message again.
Please note that SMS text messages allow a maximum of 160 characters per message and
do not allow "Enter"/carriage-returns.
1 1 3 / 1 15
In s t a l la t io n a n d U s e r M a n u a l
Ver 1.0
8. Appendices
8.1 International Di alling Codes
Country
IDC
Algeria
Andorra
Angola
Anguilla
Antigua and Barbuda
Antilles (Netherlands)
Argentina
Aruba
Ascension Island
Australia
Austria
Azores
Bahamas
Bahrain
Bangladesh
Barbados
Belgium
Belize
Bermuda
Bolivia
Bosnia-Herzegovina
Botswana
Brazil
Brunei
Bulgaria
Burundi
Cambodia
Cameroon
Canada
Canary Islands
Cayman Islands
Chile
China
CIS
Colombia
Congo
Congo, Democratic Republic
Cook Islands
Costa Rica
Cote d'Ivoire
Croatia
Cuba
Cyprus
Czech Republic
Denmark
Djibouti
Dominica
Dominican Republic
Ecuador
Egypt
El Salvador
Ethiopia
Falkland Islands
Faroe Islands
Fiji
Finland
France
French Guiana
French Polynesia
Gabon
Gambia
Germany
Gibraltar
Greece
213
376
244
1264
1268
599
54
297
247
61
43
351
1242
973
880
1246
32
501
1441
591
387
267
55
673
359
257
855
237
1
34
1345
56
86
7
57
242
243
682
506
225
385
53
357
42
45
253
1809
1809
593
20
503
251
500
298
679
358
33
594
689
241
220
49
350
30
Country
IDC
Country
Greenland
Grenada
Guadeloupe
Guam
Guatemala
Guinea
Guyana
Haiti
Honduras
Hong Kong
Hungary
Ibiza
Iceland
India
Indonesia
Iran
Iraq
Irish Republic
Israel
Italy
Jamaica
Japan
Jordan
Kenya
Kiribati
Korea, Republic of (South)
Kuwait
Lesotho
Libya
Liechtenstein
Luxembourg
Macau
Macedonia
Madagascar
Madeira
Majorca
Malawi
Malaysia
Maldives
Mali
Malta
Mariana Island
Martinique
Mauritania
Mauritius
Mexico
Micronesia
Minorca
Monaco
Montserrat
Morocco
Namibia
Nauru
Nepal
Netherlands
Nevis
New Caledonia
New Zealand
Nicaragua
Niger
Nigeria
Nive Island
Norfolk Island
Norway
299
1809
590
671
502
224
592
509
504
852
36
34
354
91
62
98
964
353
972
39
1876
81
962
254
686
82
965
266
218
4175
352
853
389
261
35191
34
265
60
980
223
356
670
596
222
230
52
691
34
377
1664
212
264
674
977
31
1869
687
64
505
227
234
683
672
47
Oman
Pakistan
Panama
Papua New Guinea
Paraguay
Peru
Philippines
Poland
Portugal
Puerto Rico
Qatar
Reunion
Rodriguez Islands
Romania
Rwanda
St. Christopher
St. Lucia
St. Pierre & Miquelon
St. Vincent
Samoa (US)
Samoa (Western)
San Marino
Saudi Arabia
Senegal
Serbia
Seychelles
Sierra Leone
Singapore
Solomon Islands
Somalia
South Africa
Spain
Sri Lanka
Sudan
Surinam
Swaziland
Sweden
Switzerland
Syria
Taiwan
Tanzania
Thailand
Togo
Tonga
Trinidad & Tobago
Tunisia
Turkey
Turks & Caicos Islands
Uganda
Union of Myanmar
United Arab Emirates
United Kingdom
Uruguay
USA
Vanuatu
Vatican City
Venezuela
Vietnam
Virgin Isles (UK)
Virgin Isles (US)
Yemen Arab Republic
Zambia
Zimbabwe
IDC
968
92
507
675
595
51
63
48
351
1787
974
262
230
40
250
1809
1758
508
1809
684
685
378
966
221
381
248
232
65
677
252
27
34
94
249
597
268
46
41
963
886
255
66
228
676
1868
216
90
1649
256
95
971
44
598
1
678
39
58
84
1809
1340
967
260
263
Important. When using International Dialling Codes you must remove the leading
0 digit from your GSM mobile phone number and add a plus (+) symbol followed
by the country code (e.g. to convert the Australian mobile phone number
0404818783, remove the leading 0 and add +61 to leave +61404818783).
1 1 4 / 1 15
In s t a l la t io n a n d U s e r M a n u a l
Ver 1.0
9. Contacting MobileIT
To contact MobileIT regarding a WorkGroup.SMS technical issue, please call the Help Line on
61 2 8878 3236 (Australia only) or fax the help line on 61 2 9809 0555 or email
[email protected]
If you have a general or sales enquiry, you may contact MobileIT at this address:
Address:
MobileIT Solutions Data Pty Ltd
Level 2, 55 Blaxland Rd,
Ryde
New South Wales 2112
Australia
Phone:
Fax:
+61 (0)2 8878 3223
+61 (0)2 9809 0555
Web:
E-Mail:
www.mobileit.com.au
[email protected]
© 2005 MobileIT Solutions Data Pty Ltd. All rights reserved.
WorkGroup.SMS is a registered trademark of MobileIT Solutions Data Pty Ltd.
Microsoft, Windows, Outlook and Excel are either trademarks or registered trademarks of Microsoft Corporation in
the United States and/or other countries. Intel Pentium is a registered trademark of Intel Corporation.
HyperTerminal is a registered trademark of Hilgraeve Incorporated. Eudora is a registered trademark of Qualcomm
Incorporated. HP and LaserJet are either trademarks or registered trademarks of Hewlett-Packard Company.
1 1 5 / 1 15
In s t a l la t io n a n d U s e r M a n u a l
Ver 1.0