1
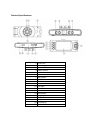
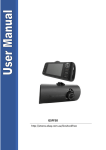
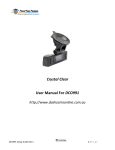
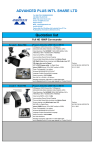
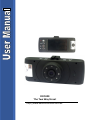
DCO420 The Two Way Street http://www.dashcamsonline.com.au Thanks for purchasing this product. Please read the instructions carefully before using this product. • FCC Compliance Statement: This device complies with Part 15 of the FCC Rules. Operation is subjected to the following two conditions: (1) this device may not cause harmful interference, and (2) this device must accept any interference received, including interference that may cause undesired operation. This equipment has been tested and found to comply with limits for a Class B digital device, pursuant to Part 15 of the FCC rules. These limits are designed to provide reasonable protection against harmful interference in residential installations. This equipment generates, uses, and can radiate radio frequency energy, and if not installed and used in accordance with the instructions, may cause harmful interference to radio communications. However, there is no guarantee that interference will not occur in a particular installation. If this equipment does cause interference to radio or television equipment reception, which can be determined by turning the equipment off and on, the user is encouraged to try to correct the interference by one or more of the following measures: - Reorient or relocate the receiving antenna. - Move the equipment away from the receiver. - Plug the equipment into an outlet on a circuit different from that to which the receiver is connected. - Consult the dealer or an experienced radio/television technician for additional suggestions. You are cautioned that any change or modifications to the equipment not expressly approved by the party responsible for compliance could void your authority to operate such equipment. The symbol of the crossed out wheeled bin indicates this product should not be placed in municipal waste. Instead, you need to dispose of the waste equipment by handing it over to a designated collection point for the recycling of waste electrical and electronic equipment. Caution 1. Do not drop, puncture or disassemble the device; otherwise the warranty will be voided. 2. Avoid all contact with water, and dry hands before using. 3. Use the device with care. Avoid pressing hard on the device body. 4. Use only the accessories supplied by the manufacturer. 5. Keep the device out of the reach of children. 6. For your own safety, don’t operate the device while driving. 7. Do not block your drivers view when mounting this device on the windscreen, we (the seller) do not take responsibility of improperly positioned units. 8. Please follow the instructions in this manual and use only the supplied accessories to avoid unpredicted damages to the device. Failure to follow the instructions will invalidate the warranty and may also endanger personnel safety, for which the seller assumes no responsibility. If your cigarette lighter draws power while the car is off, please disconnect this device to avoid draining the car battery. This device will turn off if the max/min temp is reached. Page 1 Product Description This DVR (Digital Video Recorder) is a dual-channel simultaneous video recording product dedicated for the evolving need of recording devices for automobiles. It features superior compact digital audio/video recording and high quality photo taking capability, high speed USB2.0 interface, and parallel battery charging and filming operation. Features Dual channel simultaneous recording and displaying on screen 2.7” HD display without distortion, Front lens can have180°rotation H.264 image compression technique Day/Night filming mode switch 30fps Recording Plug-‘n-Play HD PC CAMERA 16 IR LED for aided night vision Cyclic recording mode Motion detection Automatic recording when the vehicle starts, charging while recording. HDMI Output 3 minute LCD shut off (Australian road compliance necessity) Specifications Image sensor OV9712 CMOS WXGA HD sensor Video resolution 480P/720P/1080P Language Traditional & simplified Chinese, English, Russian, Japanese, Korean LCD display 2.7” TFT Memory TF card up to 32GB Focus range 12cm~∞ Photo format JPEG Video format MOV Audio Built in microphone and speaker USB USB2.0 Battery Built-in 3.7V/600mAh lithium battery Working 0-65℃ temperature Dimension 124×46×24mm (L×W×H) Weight 125g Accessories USB cable, charger(for car), mounting frame, manual, HDMI cable(optional) Included Accesories USB Cable Charger Window Mount HDMI cable AV cable Technical Specifications: 1 2 3 4 5 6 7 8 9 10 11 12 13 14 15 16 17 18 19 Front lens Mounting position Speaker Power button MENU button MODE button REC button RESET button TF slot MIC LED light HDMI port USB port SOS button Day/Night mode button UP button DOWN button LCD display Back lens Button Functions On and Off MENU Option menu of each operation mode MODE Switch operation mode and corresponding menu REC Start/Pause/OK ▼ Press it next turn to switch between day/night mode when stand by or operating. Press it shortly to turn on/off night vision IR LED. The status will display on LCD when the button released. ▲ Button Switch the camera to display SOS Lock the current video so cyclic recording cannot delete Day and night mode toggle, automatic debugging to best effect Installation & Operation: Mount the device preferably behind the rear view mirror or anywhere which does not restrict the driver’s vision of the road. When the adapter is plugged into the car’s charger, the device will start to work automatically when the car starts and will switch off when the car is turned off. Battery: The device includes an in built a 600mAh lithium battery. It will take about 90minutes to charge it completely in off state. The battery can be charged when DVR is in operation. The working current is about 380mA for normal and 580mA for night vision operation. On/Off and screen saver: 1. Press the POWER button for 3 seconds to turn on/off DVR. The display will show “Turning off…” when turned off. 2. Press the POWER button can turn on/off the LCD display for saving energy. Note: If the message “Turning off…” is not shown on the LCD display, just the LCD display is turned off, not the device. Date/Time Setup: Press the “MENU” button to enter setup mode, press the “MODE” button to bring up the setup menu. Pick “Date/Time” option, “Down”, “UP” buttons to adjust the right date and time. Press “OK” button to confirm and activate the settings. Video Recording Mode: 1. 1. Video is the default mode when powered up, the “ ” icon on the left upper corner will flash. 2. Press “REC” button to pause/resume the recording operation 3. Press the POWER button to switch the camera displayed 4. “720P” high resolution mode is preferred for the smooth filming during high speed motion. 5. Press “MENU” button enter set up mode, press “▲” button to set up resolutions , press “REC” button to select resolution Photo Mode: Press “MODE” button once switches to photo taking mode. The upper left corner of the display will show icon. There are three resolutions 1.3M, 3M, and 5M, for choice. Photo mode works only with the wide angle camera. Playback Mode: 1. Press “MODE” to enter the playback mode to check the video images taken. 2. Press “MODE” will stop the playback. 3. Press “MENU” for delete option can delete the selected file. Menu and Mode Menu Mode Resolution (Filming) 480P/720P/1080P Resolution (Photo) 1.3M/3M/5M Filming Interval 2min/5min/10/min/off Back Camera Off/On White Balance Auto/Sunny/Fluorescence/Cloudy/Incandescence The fill light Day mode/ Night mode Voice Recording Off/On Language Simplified Chinese/Traditional Chinese English /Russian /Japanese/Korean Frequency 50Hz/60Hz Date & Time / Reformat Confirm/Cancel Default Setup Confirm/Cancel Software version /