1
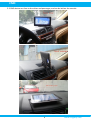
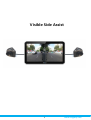
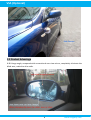
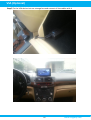
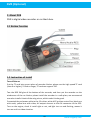
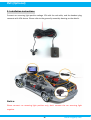
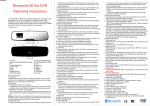
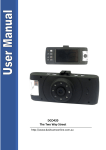
Car Multimedia System Visible Side Assist System User Manual Catalogue Catalogue CMD ...................................................................................................... 1 1. About CMD ........................................................................................ 1 1-1 Product Appearance ....................................................................... 1 1-2 Main Interface ................................................................................ 1 1-3 The Main Function of the CMD ....................................................... 2 2. The GPS Function of CMD ................................................................. 2 3. The CTP Function of CMD ................................................................. 2 4. The CMP Function of CMD ................................................................ 3 5. Installation Method .......................................................................... 4 VSA ...................................................................................................... 7 1. About VSA ........................................................................................ 8 1-1 Product Appearance ....................................................................... 8 1-2 Installation Location ....................................................................... 8 1-3 Product Advantage ......................................................................... 9 2. Installation Method ........................................................................ 13 3. Precautions for use ......................................................................... 18 DVR ................................................................................................... 19 1. About DVR ..................................................................................... 19 1-1 Button Function ............................................................................. 19 1-2 Instruction of Install ..................................................................... 19 2. Instruction of the KEY Functions ................................................... 21 3. Operation Instruction ..................................................................... 21 4. Responsible for the Declaration ...................................................... 22 5. Product Parameter ................................................................... 22 RVC .................................................................................................... 24 1. About RVC ...................................................................................... 24 1-1 Product Appearance ..................................................................... 24 1-2 Product Function .......................................................................... 24 2. Installation Instructions .................................................................. 25 3. Product Parameter ..................................................................... 26 General Assembly Drawing ................................................................ 27 Proper Car and Use the Device ....................................................... 29 www.itingway.com CMD 1. About CMD CMD is Car Multimedia Device. 1-1 Product Appearance 1 www.itingway.com CMD 1-2 Main Interfaces After power on, we can see the standard interface based on Android System. 1-3 The Main Function of the CMD 1-3-1 GPS: Car GPS Navigation 1-3-2 VSA: Visible Side Assist Camera (Optional) 1-3-3 DVR: Digital Video Recorder (Optional) 1-3-4 RVC: Rear Visible Camera (Optional) 1-3-5 CTP: Car Tablet PC 1-3-6 CMP: Car Music Player 2. GPS: Car GPS Navigation The user can install the local map based on Android OS 4.4.2 and above. The map software resolution is 800*480. 3. CTP: Car tablet PC Use standard Android 4.4.2 Operation System interface. 2 www.itingway.com CMD 4. CMP: Car Music Player Car music player plays the music in the CMD via Car Audio System, it can not only make the sound more loudly, but also let the sound quality much better. Let the user feel much better when navigation and play music. This function is used more frequently by the Car Navigation. By using the FM function of the CMD, you need to keep the receiving frequency of CMD FM and Car radio stay same. When set the frequency band, remember do not overlap with local radio spectrum, otherwise will be disturbed. Before using, please connect the car charger. Because the car charger is the antenna of FM transmit. Open the Car radio equipment, adjust the receiving frequency to the band without disturbed, and then click the CMD interface【FM Transmit】icon, open the FM transmit and adjust the frequency to stay same with car radio, check , that is the FM Transmit open, right now the CDM music plays via car radio. Notes: 1. Must connect to the car charger, otherwise cannot use FM Transmit function. 2. If not use FM Transmit function, please click again to close it, otherwise the CMD is in the mute state. 3 www.itingway.com CMD 3. According to the different car model, the Car FM Receiving antenna position is different. Some is in the back of the car which will influence the receiving result. Please use this function according to the actual condition. 5. Installation Method 5-1 First remove the sticker on the metal holder, fix the metal holder to the CMD device. Please stick according to the indication area. 5-2 Find the suitable position, fix the metal holder to the car console together with CMD. 4 www.itingway.com CMD 5-3 CMD device can face to the driver and passenger, and can be laid on the console. 5 www.itingway.com CMD 5-4 Metal holder level can rotate 360 degrees, vertical can rotate 90 degrees. Advantage: 1. Fixed position, stay the same level with driver, the driver does not need rise or low head, which make the driving more safety. 2. Fixed position, do not put in the windshield, will not block the driver's line of sight. Make the driving much more safety. 3. Product placement angle is adjustable, drivers and passengers can enjoy the best visual angle, can be folded up when not working. Notice: The device screen has been covered the protective film please don’t remove it 6 www.itingway.com Visible Side Assist 7 www.itingway.com VSA (Optional) 1. About VSA VSA is visible side assist camera system for vehicle traveling. As soon as you turn on the turn light during driving, the VSA can show the side image automatically. 1-1 Product Appearance 1-2 Installation Position 8 www.itingway.com VSA (Optional) 1-3 Product Advantage 1-3-1 Large angle, compared with conventional rear-view mirror, completely eliminate the blind area, make the drive safer. 9 www.itingway.com VSA (Optional) 10 www.itingway.com VSA (Optional) 1-3-2 In evening the VSA image is more brightness than car rear-view mirror. 1-3-3 On rainy day you can’t see anything on mirror but can see the rear image clearly by VSA. 1-3-4 On foggy day you can’t see anything on mirror but can see the rear image clearly by VSA. 11 www.itingway.com VSA (Optional) 12 www.itingway.com VSA (Optional) 2. Installation Method Step 1 Please removes the sticker of side camera and fixes the camera on the edge of car door. Please note let camera parallel to the ground. Put the cable of the camera into the gap between fender and door. Please fix the side camera with mark “L” onto car left and fix the right camera onto car right. 13 www.itingway.com VSA (Optional) Step 2 Make the cable through the fender. You can use one iron wire to guide Step 3 Find the front turns light cable and connects the white cable of camera together with it. (The left and right side camera use the same fix method) 14 www.itingway.com VSA (Optional) Step 4 Connect the side camera extended cable and put the two cables into the cab through cable channel. You can use one iron wire to guide 15 www.itingway.com VSA (Optional) 16 www.itingway.com VSA (Optional) Step 5 Fix the VSA device into car storage box and connect all the cables with it 17 www.itingway.com VSA (Optional) Notice: Make all the cables to keep away from engine and other heating element. Fix all the cables with Tingway plastic wires. Please reference the general assembly drawing 3. Precautions for USE When you enjoy using VSA system, sometimes you can use it combination with the car rear-view mirror together, for example in the bright light weather conditions. 18 www.itingway.com DVR (Optional) 1. About DVR DVR is digital video recorder or car black box. 1-1 Button Function 1-2 Instruction of install Turn off the car Put the TF card into correct place of recorder. Notice: please use the high speed TF card (class 6 or higher), 512mb or larger; TF card can support 32G. Tear the RED 3M glue of the bottom of the recorder, and then put the recorder on the windscreen of the car. Notice: please install the recorder in a safe place, we recommend user who installs it back of the wing mirror, which make it looks good. Connected the red power cable to the 12v driver, white ACC ignition control line, black one with earth, yellow one with video; AV output connect to the AVI connector of the GPS. Turn on the engine, check it install right or not, red light turn on and flashing, means it turn on and in a video situation. 19 www.itingway.com DVR (Optional) 20 www.itingway.com DVR (Optional) 2. Instruction of the KEY functions Turn on/off/OK key Under the standby mode, long press turn off, short press video; short press will stop to video when videoing; functions choosing, short press means OK MANU key Under the standby mode, short press the menu into main menu function setting, short press UP or DOWN, choose what you need to setting; press ON or OFF key to OK. After setting, short press MANU back to last till to exit the MANU. (Under the situation of the video, MANU does no working). Long press into the mode of re-play, press UP or DOWN to choose the file, press ON or OFF/ OK key to play or stop. Long press menu exit the mode of re-play. Reset If the recorder meet crash fault, short press can renew to the default factory setting, then it will restart. UP Under the video or standby mode, short press turn on tape; it means UP function under menu or re-play mode. DOWN Under standby mode, long press mean mode switch (APL/NTSC); under the MANU or RE-play mode mean DOWN function. Indicator Re-play mode, yellow light ON; standby mode, red light ON, video mode, red light flashing; turn on the tape function, blue light ON, no TF card, yellow, red and blue light all ON. 3. Operation instruction Use auto-record function Turn on the engine, recorder auto turn on the record function, red light flash. Turn off the engineer, recorder auto save the recording file and turn off. The video will save in the TF card by section; when TF full up, recorder will switch with newer video. Notice: recorder section can set in the MANU setting; range is 3, 5 or 10 minutes. Default setting is 3 mins. Use manual record function Under the standby mode, short press ON/OFF/ OK key, recorder start to video; press 3 minutes to turn off, recorder will auto save the recording and turn off. Use sport sense function Under standby mode, and set sport sense with ON. When the scene feeling to the move things around it, start to video; when the scene do not felling anything moving, 5 seconds later, stop to video. Enter into main menu turn off the sport sense. G-sensor function 21 www.itingway.com DVR (Optional) Inside with G-sensor, Under video mode, recorder shaking or swing, which will auto locked, lock the front seconds and behind 20 seconds video, and left screen show lock mark, locked video be saved with a special file, which will not be switched by new video. Date and Time setting Under standby mode, short press MANU enter into system setting menu, short press UP/DOWN and move cursor to the Time/date menu, short press turn on/off, press OK into TIME and DATE Modification interface, short press UP/DOWN to adjust the numbers; finished it, short press MANU key to exit. Quiet function key Under standby mode, long press MANU enter into re-play mode, short press UP/DOWN key to choose the file what you need; short press turn on/off, press OK key to play, short press again, paly pause. If you want to exit the re-play mode, long press MANU after paly pause or finish play. System convert APL/NTSC 2 systems, if need to switch the systems, under standby mode, long press DOWN key; or switch it in the MANU “TV mode”. The default mode is APL system. 4. Responsible for the declaration The information support by vehicle recording instruction only for reference, the right information please checks by your own recorder buy from us. We will not responsible for anything, if anything happen when using our products, like a fine or traffic accident. Traveling recorder video cycle recording, users please safe the important file in time. We cannot guarantee something happen in the using process; we do not responsible for it, if without record video file. At the same time, our company also advocates civilized driving, obey the traffic rules. Comply with this statement, when you buy this product. 5. Product Parameter Main chip: Taiwan Lian yong NT96220 Sensitization chip: OV9712 Built-in G-sensor accelerometer, start video when vehicle suffered mutations, records the 15 seconds video before and after mutations. Shooting angle: use 140 degree high-definition wide angle lens Screen: no screen, use car DVD navigation screen 22 www.itingway.com DVR (Optional) Image formats: JPG (resolution: 2560*1920/3264*2448) Video format: AVI (video resolution: 1280*720) Memory card format: TF memory card (1-32GB), recommend use the 6X or higher speed card No battery version, no explosion, long memory, more stable. Video output: input by car AVIN/AUX channel of car Microphone: support Video mode: automatic cycle cover motion Power supply: 12V Intelligent control: motion detecting, automatic startup video, turn it off. 23 www.itingway.com RVC (Optional) 1. About RVC RVC is rear visible camera for car 1-1. Product Appearance 1-2. Product Function When backing a car, you will see the back image from the CMD screen immediately. 24 www.itingway.com RVC (Optional) 2. Installation instructions Connect car reversing light positive voltage 12V with the red cable, and the headset plug connects with VSA device. Please refer to the generally assembly drawing on the details. Notice: Please connect car reversing light positive only, don't connect the car reversing light negative. 25 www.itingway.com RVC (Optional) 3. Product Parameter Product Model 602-C CMOS Image Sensor PC 1/4-inch Color CMOS Pixel 628*582 Resolution 420TV Line Mini illuminance 1.0LUX Camera Lens 1.8mm SYSTEM PAL/NTSC Working Temperature -20℃--50℃ Power Supply DC 5V Current 100mA Viewing Angle 170° Night Vision Range 0-3M 26 www.itingway.com General Assembly Drawing 27 www.itingway.com General Assembly Drawing 28 www.itingway.com Proper care and use the device Notice: All the pictures are for reference only. Please adhere to the original products in case of any mistake! You must buy and use Tingway produced Accessories. Use the original manufacturing accessories only. Unauthorized accessories may damage the device or shorten the using life; Keep the device dry and away from water to protect the device and accessories; Do not store your device near magnetic fields; Do not stored the device together with metal objects such as coins, keys, etc.; Avoid pressed by excess weight, fall from height, etc. Security Knowledge: Please carefully use the product in the following case: Airplane Prohibited in aircraft use, please turn off the device before boarding. When the aircraft is yet to take off or just landed, please also comply with the relevant airline regulations on the use of wireless electronic devices. Vehicle traffic safety Do not use the unit while driving. Place the unit in a safe place; do not place the unit on a passenger seat or other places easy to lose. Electronic Devices Most electronic devices use radio frequency signals; your device may interfere with other devices. Potentially Explosive Areas We recommend that you off the device in the might explosive area and comply with their environment slogans and instructions. In some special places, spark could cause an explosion or fire, which will lead to body injury or even death and other damage. Pacemakers and Other Medical Devices In order to avoid the possible adverse effects, pacemaker manufacturers recommend that 29 www.itingway.com mobile devices better to maintain at least 20 cm distance from the pacemaker. Operation of any radio transmitting equipment may interfere with the function of inadequately protected medical devices. Please refer to a doctor or medical device manufacturer if not clear about medical device whether shielded from external RF energy or not。Please shut down the device in any area or health care facilities which express provision to turn off your phone. Operating Environment When the unit is connected to other devices or accessories, please read the device's user manual or instructions for detailed safety instructions. Do not connect incompatible products. To avoiding hurting people then the airbag opened. Please do not place the equipment or install in the area an opened airbag can reach. Please be sure to shut down the device in the places where prohibit the use electronic products or it may cause interference or danger. Places Post Notices Please shut down the device when expressly provided requires you to turn off the device. 30 www.itingway.com