1
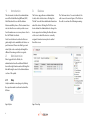
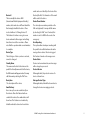
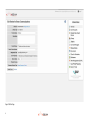
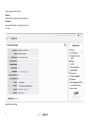
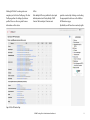
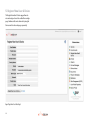
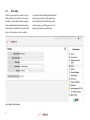
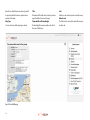
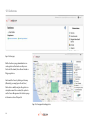
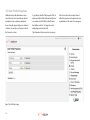
Tracking Portal
Administrators User Manual
2
CONTENTS
1. Introduction
X
2. Administration
X
2.1 Help
3. Devices
X
4. User Accounts
X
5. Register New User & Device
X
6. Groups
X
7. Tenants
X
8. Canned Messages
X
9. Release Notes
V
10. Documents
X
11. Check-In Schedules
X
12. Geofences
X
13. Alert Management (BETA)
X
14. User Profile Properties
X
15. Appendix 1: Iridium ExtremeTM
Messaging: Under the Hood
X
15.1 Mobile Origination Messages
15.2 Mobile Terminated Messages
BEAM Tracking Portal - Administrators User Manual
3
1.Introduction
3.Devices
This document describes the administration
area of the Global Alerting Platform (GAP)
Web Portal and its use with the Iridium
Extreme satellite phones. This document does
not describe the user-centric portal screens.
For information on user screen please refer to
the GAP Portal User Guide.
Note: Some features described in this user
guide might not be available to all devices or
portal versions. Please note that logos and
visual style used on actual portal might be
different from images in this user guide.
The Devices page allows an Administrator
to add, edit or delete devices. Clicking the
“Details” icon will show additional information
about the device. Clicking the “Edit” icon on a
device allows the Administrator to change the
device properties including the friendly name
or the user to which the device is currently
assigned. New devices may also be added
from this screen.
2.Administration
Once logged into the Portal, site
administrators have the additional “Admin”
item in the right hand menu bar. Clicking this
link will bring the user to the Administration
section of the portal.
2.1.Help
Help is available on most pages by clicking
the question mark icon shown below in the
title bar.
Figure 1 Help Icon
4
Figure 2 Devices Page
The “add new device” screen is similar to the
edit screen is shown in Figure 3. The fields on
the edit screen have the following meaning:
Device Id
This is normally the devices IMEI
(International Mobile Equipment Identity)
number, but can also be a different identifier
that uniquely identifies the device. There
is also a link here to “Change Device Id”.
This feature is for when a user gets a new
device and wants all messages and settings
transferred over to the new device. Please
note that the operation takes several minutes
to complete.
Device Type
This is the type of device, and once entered,
cannot be changed.
Friendly Name
The name used to refer to the device on the
portal. If no friendly name exists for the device,
the IMEI number will appear instead. You may
edit this name by selecting the “Edit” icon.
Description
The description of the device.
Email Delivery
Users can opt to receive email directly on
their device. Once this feature had been
enabled for a device the email address will
show here. This feature is not enabled by
default and must be turned on here before
email can be sent directly to the device. Note
that only the first 160 characters of the email
will be sent to the device.
Device Phone Number
The device phone number provided on the
SIM card (optional). You may edit this name
by selecting the “Edit” icon. If entered, this
number is sent to GEOS in the event of an
emergency.
Error Reporting
This option allows developers working with
the portal to be notified when we discard a
message from a device. We do not suggest
this feature is turned on for average users.
Device Status
Devices can be made inactive, and messages
will no longer be processed.
Protocol Version
When applicable, the protocol version of a
device is shown here.
Message Protocol Type
When applicable, a link will be shown here to
change the devices messaging protocol.
BEAM Tracking Portal - Administrators User Manual
5
Figure 3 Edit Device Page
6
4.
User Accounts
The User Accounts page allows you to add, edit
and delete a portal account for a user.
Figure 4 User Accounts Page
Clicking the “Edit” icon alongside a user
navigates you to the Edit User Account page.
The Edit User Account page allows for editing of
portal users. The fields on the edit screen have
the following meaning:
User Name
Email address of the user. Once created this
cannot be changed. You must delete the
account and create a new one.
Tenant
The tenant that the user is member of. This also
cannot be changed.
Friendly Name
This is shown on the User Accounts page, and
can be used to distinguish between similar
accounts.
Account Approved
If not checked the user cannot log in. New
accounts can be created with without being
approved and a user can be required to click
on a link provided in the registration email to
approve their account. Accounts can also be
created already approved, and administrators
can approve accounts manually here.
BEAM Tracking Portal - Administrators User Manual
Account Disabled
Used to disable an account. When checked, the
user cannot log in.
Portal Enabled
Indicates this user account is a portal user.
API Enabled
Indicates this user account is an API user.
Account Locked Out
If someone attempts to log into the portal
with the wrong password too many times, we
automatically lock the account. The account is
automatically unlocked after a period of time.
Alternately, an administrator can unlock an
account here. (When locked, an “Unlock” button
will display here.)
Last Lockout Date
Displays the last time the account was locked,
if any.
Groups
Here an administrator can add or remove the
user from any groups. See the Groups section
for more information on this feature.
Trial User
User accounts can be made to automatically
expire. Simply check the box, and enter the
account expiration date in the field that
appears. The user will be sent reminders about
the expiration of the account and once expired,
7
will no longer be able to log in.
Devices
A list of devices currently assigned to this user.
Password
Here an administrator can change a password
for a user.
Figure 5 Edit User Accounts Page
8
Clicking the “Profile” icon alongside a user
navigates you to the User Profile page. The User
Profile page allows for editing of portal user
profiles. Please see the user guide for more
information on this section.
API Users
When enabling the API for a user, you will have the option to grant
additional permissions to an API user by clicking the “Edit API
Permissions” link shown in Figure 5. Permissions can be
granted or revoked by checking or unchecking
the appropriate check boxes on the Edit User
API Permissions page.
By default, new API users have read-only rights.
Figure 6 Edit User API Permissions Page
BEAM Tracking Portal - Administrators User Manual
9
5. Register New User & Device
The Register New User & Device page allows devices and assigned users to be added from a single
page. Similar results can be achieved by using the
Devices and User Accounts pages separately.
Figure 7 Register New User & Device Page 6.
10
6.0 Groups
The Groups page allows groups (a.k.a. roles) to
be added and for devices to be associated with
those groups. Groups are used to allow users
to access a subset of devices which may not be
assigned to them. For example, a “Managers”
group could be added and several devices
added to that group. Then, portal users added
to the “Managers” group, as described in section
2.14.2, will have access to these devices from
the user’s pages in the main web site.
To add a new group click the “Add a group”
link at the top of the page. On the next page,
provide a name for the new Group and click
“Add Group”.
Devices may be added or removed from a group
by clicking the “Delete” link for that group.
Figure 8 Groups Page with two groups
BEAM Tracking Portal - Administrators User Manual
11
6.1.
Public Map
From the groups page it is possible to create a
public map that you can either send someone
the link to or embed within another webpage.
Please remember that any information shared
via the map here is public and everyone will be
able to see the location of devices included.
Figure 9 Change Public Map options page
12
To get started click the “Change Public Map” link
for the group you wish to create a public map
for. After clicking the “Use Public Map” option
on the next page, you will be given a series of
options to personalize your public map.
The fields on this page have the following
meanings:
To get started click the “Change Public Map” link
for the group you wish to create a public map
for. After clicking the “Use Public Map” checkbox
on the next page, you will be given a series of
options to personalize the public map.
Group Name
The name of the group the public map is being
created for
Use Public Map
If checked, indicates a public map should be
available for this group
Map Title
An optional title to be shown on your map
Time Zone
The time zone to be used for displaying
message times on the public map
History
Determines how many positions are shown
from each device in the group. The following
options are available
•
No History – The public map will display
the last position for each device
•
Last N Messages – The public map will
display the last “N” messages for each
device. You will be prompted to enter the
•
•
•
Number of Messages in an additional field.
(For example: You can use this option to
display the last 3 messages from each
device.)
Last N Days – The public map will display
all messages from the last “N” days for
each device. You will be prompted to enter
the number of Days in an additional field.
(For example: You can use this option to
display the last 3 days of messages from
each device.)
From Date - The public map will display
all messages from the date entered for
each device. You will be prompted to
enter the start date in an additional field.
(For example: You can use this option to
display all messages since Jan 1 2013 from
each device.)
From Date to Date – The public map will
display all messages between the two
dates entered for each device. You will be
prompted to enter the start date and end
dates in additional fields. (For example:
You can use this option to display all
message from Jan 1 2013 to Feb 1 2013.)
BEAM Tracking Portal - Administrators User Manual
13
Once those details have been entered you will
be presented with a few more options and a
preview of the map.
Map Type
You can select any of the map types shown.
Figure 10 Preview Public Map page
14
Title
Determines if the title entered on the previous
page should be shown on the map
Frame width and Frame Height
If embedding the map on another site, this is
the size of the iFrame.
Link
A link you can send to anyone to view the map
Embed code
The html code to be used to embed the map on
another site.
7. Tenants
8.
Canned Messages
The Tenants page allows for adding new
tenants. Tenants are a means of grouping users
and devices and work in a in a hierarchical
fashion. An administrator can view and
administrate all devices and users in their own
tenant and any sub-tenants (and any subtenants of sub-tenants, etc.). Tenants can only
be created as sub-tenants of the current tenant
(i.e. the tenant of the currently logged in user).
When adding a tenant you will need to provide
three pieces of information:
Tenant ID
This is a short code that is used internally and
must be unique.
Description
Longer text used for display purposes on the
portal.
Device Types
The types of devices this tenant will be using.
For example: A tenant might be created with
a Tenant ID of ‘GAP’ and a Description ‘Global
Alerting Platform’.
Normally, tenants are not be deleted; however
a tenant may be deleted if it has no users or
devices. (Most often the delete feature is used
when a typo is made creating a sub-tenant.)
The Canned Messages page allows for editing
of shared pre-set messages available to users.
Any messages defined here will be available
to the user in addition to their own canned
messages as described in section 2.8.
Clicking the “Edit” link at the bottom allows the
Administrator to change the message text and
choose whether location information should be
also included when the message is sent from
the device.
Figure 11 Canned Messages Administration Page
BEAM Tracking Portal - Administrators User Manual
15
9.
Release Notes
The Release Notes page contains change set
details relevant to GAP portal releases.
10.Documents
The Documents page contains portal guides
and user manuals that may be downloaded.
11.
Check-In Schedules
Check-in schedules can be used to specify times
when a device must check in. A device that hasn’t
reported according to its schedule will be marked
overdue, and an alert will be sent to all users in the
“Check In Schedule” address book list.
The Check-In Schedule page allows
administrators to manage the check in
schedules for all their devices.
Many options exist on this page. First
administrators can click the Edit these devices
link to edit the devices currently shown. Once on
the edit page, administrators can add, change
or remove a check in schedule for a device.
Additionally on the edit page, administrators
may disable (or enable) a schedule for a device
without removing the schedule.
16
Figure 12 Check In Schedule page
On the Check In Schedule page administrators
can perform a manual check in for a device by
clicking the Check In button on that device’s row.
Finally, administrative check in schedules may
be created by clicking the Manage schedules
link. Schedules can be created based on
“Selected Times” or “Intervals”. For selected
times, the user need only specify the times that
a device must check in. For intervals, the user
must specify the start and end time in addition
to the interval. The “Buffer Period” is the time
before or after the check in time that the user
may send a message to the portal.
Figure 13 Create Check In Schedule page
BEAM Tracking Portal - Administrators User Manual
17
12. Geofences
Figure 14 Geofences page
On the Geofences page, administrators can
create geofences that can be used by users.
First select the tenant, then either a Circular or
Polygon geofence.
Next create the fence by clicking on the map.
(Alternately, you may type in the Lat/Lon.)
Define a fence width, and give the geofence a
descriptive name. Once created, the option to
use the fence will appear on the Geofence page
in the main section of the portal.
Figure 15 Geofences page while creating a geofence
18
13. Alert Management (BETA)
On the BETA Alert Management page,
administrators can view a list of all devices that
are currently in an emergency state or have a
check in schedule assigned and are overdue.
Figure 16 Alert Management (BETA) page
BEAM Tracking Portal - Administrators User Manual
19
14. User Profile Properties
Additional user profile information can be
stored for each user. Form fields are defined
by tenant and can contain any number of
items. Currently supported types are text and
checkbox. You can also use headers to divide
the form into sections.
Figure 17 User Profile Properties page
20
To get started, click the “Edit properties” link. To
add a new field click the ‘Add new item’ button
or to remove a field click the button ‘Remove
item’ button next to it. To change the order,
simply drag and move the field.
The information that a user enters in response
to the items entered here may be shared
with first responders and search and rescue
organizations in the event of an emergency.
this page is intentionally left blank
BEAM Tracking Portal - Administrators User Manual
21
15. Appendix 1: Iridium
Extreme™ Messaging: Under
the Hood
This section describes how each type of message
is passed between the portal application servers
and an Iridium Extreme™ device.
15.1. Mobile Originated Messages
Among the messages that an Iridium Extreme™
device can send, some are automated and the
rest are sent as a result of user interaction with
the device. All messages from the device can be
viewed in the portal.
Mobile originated (MO) messages include GPS
information about the device. It is this information
that the portal uses for displaying the device track
and its current location on a map.
When a device sends a message, it is queued for
delivery at the Iridium Gateway SBD Subsystem.
The gateway then sends the message to the
application servers depending on its priority.
A description of the Iridium Gateway is out of
scope for this document. This section outlines
how each type of message, originating on a
device, is routed using the GAP infrastructure.
Note that all MO messages can be viewed on
the Inbox screen. Messages that include a valid
position may also be viewed on the Map page.
22
15.1.1. Emergency Alert
This type of message is sent from the device as
a result of the user depressing the Emergency
button on the device.
Each device has its own ECC (Emergency
Control Center) distribution list, configurable in
the portal on the Address Book page. Once the
message arrives at the server, it is forwarded to
all the ECC distribution list entries. The alert can
be viewed in the portal as well.
On receipt of the message from the device,
an emergency acknowledgement message is
automatically sent back to the device, so that
the device (internally) knows that the alarm
message that it sent has been routed to the
entries in the ECC distribution List.
15.1.2. Emergency Cancel Alert
This type of message is sent from the device to
cancel a previous emergency alert message.
Similarly to the Emergency Alert message,
the message is forwarded to all the ECC
distribution list entries.
15.1.3. Automatic Position Report
If the Iridium Extreme™ device is configured to
send automatic position reports, it periodically
wakes up from standby mode and sends its
position report to the server. The interval is preconfigured in the device.
15.1.4. Manual Position Report
A manual position report is similar to the
Automatic Position Report but manually sent by
the user of the device.
15.1.5. Response to Location (Ping) Response
A portal user may ‘ping’ the device requesting it
report its current location. This message is the
response to the ‘ping’ and includes the devices
current position.
15.1.6. Switch On
This message is automatically sent when the
device is switched on. It includes the current
location of the device as well as the Emergency
Destination, Emergency Call Recipient, and the
Reporting Frequency for Automated Position
Reports.
15.1.7. System Test Request (End to End)
This message is sent from the device requesting
an end to end test. When this message is received,
a Mobile Terminated System Test Response (End
to End) message is returned to the device.
15.1.8. Diagnostics Response
A portal user may request the diagnostic
information from a device. This message is the
response from the device and may include
Battery Voltage, Charger Status, Accumulator
Range, Visible Satellites and the Firmware/
Hardware version of the device.
15.1.9. Request Device Identifier Response
A portal user may request the device identifier
of a device. This message is the response from
the device identifier request and includes the
value stored first “My Number” slot on the
device’s SIM card (normally the devices phone
number, if this has been provisioned by the
service provider).
15.1.10. Free Text Message
A user may key in a free text message on the
device. The message recipient may either be an
email address or the name of a distribution list.
When the message is received, it is forwarded
to the recipients. If the recipient is a distribution
list, the message is forwarded to all the entries
in that list.
15.1.11. Geofence Crossed By Device
This message is sent when a geofence is activated
on the device. It is also sent whenever the device
crosses the geofence. The message includes the
current location of the device and indicates if the
device is currently in or out of the geofence.
15.2. Mobile Terminated Messages
Several messages may be sent to an Iridium
Extreme™ device. Some are automated, and some
sent as a result of a users’ action on the portal.
Example scenarios for each type of mobile
terminated messages are outlined below.
15.2.1. Emergency Alert Acknowledgement
This message is sent as an automatic response
to the Mobile Originated Emergency message.
It indicates that the message has been received
by the portal and the Emergency message has
been forwarded to the entries in the ECC group.
15.2.2. Location (Ping) Request
This message is sent from the portal to request
the devices current position.
15.2.3. System Test Response (End to End)
This message is automatically sent from the
portal when a Mobile Originated System Test
Request message is received.
15.2.4. Diagnostic Request
This message is sent when a portal user requests
the device’s current diagnostic information.
15.2.5. Request Device Identifier
This message is sent when a portal user
requests the device identifier.
15.2.6. Synchronize Data to the Device
This message is sent whenever information
entered on the portal needs to be synchronized
with the device. Currently, the following items
can be synchronized: Canned Messages,
Reporting Frequency Rate, Emergency
Destination, and Emergency Call Recipient.
15.2.7. Free Text
A portal user may send free text to the device
BEAM Tracking Portal - Administrators User Manual
from the “Compose Messages” screen.
15.2.8. Geofence Activate (Iridium Extreme™)
This message is sent to activate a geofence
configured on the portal. Note that only one
geofence may be active on a device at any time.
(If the device receives a second geofence, it will
overwrite the first.)
15.2.9. Geofence Cancel (Iridium Extreme™)
This message is sent to the device when a portal
user deletes a geofence.
15.2.10. Portal Status Message
This message is sent in response to the Mobile
Originated Switch On message and can be used
to indicate problems on the portal.
23
BEAM Communications Pty Ltd
8 Anzed Court, Mulgrave
Victoria, 3170, AUSTRALIA
Tel: +61 3 8588 4500 Fax: +61 3 9560 9055
www.beamcommunications.com
PART #: USRMAN007801A
Web: www.beamcommunications.com
Info: [email protected]
Support: [email protected]