1
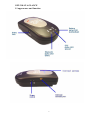
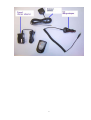
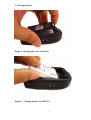
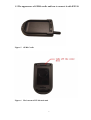
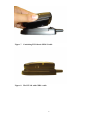
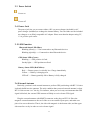
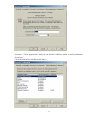
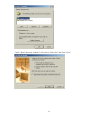
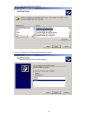
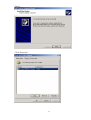
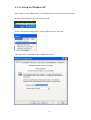
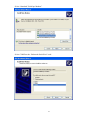
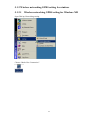
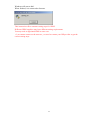
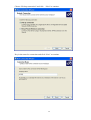
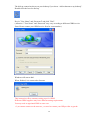
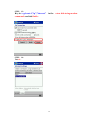
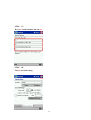
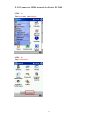
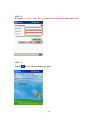
User Manual
Bluetooth GPS Receiver
BT-318
Version: 1.12
1
CONTENT
1 BT-318 AT A GLANCE
1.1 appearance and function
1.2 Change battery
1.3 The appearance of GPRS cradle and how to connect it with BT-318
1.4 How to insert SIM card into GPRS cradle
3
3
5
7
9
2 INTRODUCTION
2.1 Product Feature
2.2 Package
2.3 Power Switch
2.4 Power Jack
2.5 LED Function
2.6 External Antenna
10
10
10
11
11
11
11
3 Usage
3.1 For PDA which built-in Bluetooth (Example: iPAQ 3870/3970)
3.2 For PDA with Bluetooth Compact Flash card
3.3 For Notebook with Bluetooth device
3.4 How to test your Bluetooth GPS Receiver ?
13
13
13
13
14
4 BT-318 SPECIFICATION
4.1 System Specification
4.2 Bluetooth Specification
4.3 FCC Notices
16
16
16
17
5 How to get on internet by GPRS Cradle
5.1 Surfing on internet by using GPRS cradle with PC
5.1.1 setup Bluetooth for windows
5.1.1.1 Setup for Windows ME
5.1.1.2 Setup for Windows 2000
5.1.1.3 Setup for Windows XP
5.1.2 Wireless networking GPRS setting for windows
5.1.2.1 Wireless networking GPRS setting for Windows ME
5.1.2.2 Wireless networking GPRS setting for Windows 2000
5.1.2.3 Wireless networking GPRS setting for Windows XP
5.1.3 setup Bluetooth for Pocket PC
5.1.4 setup for Pocket PC 2002
5.1.5 Connect to GPRS network for Pocket PC 2002
5.1.6 Setup and connect to GPRS network for Pocket PC 2003
5.1.7 GPRS Connections Operators Information
18
18
18
18
27
36
45
45
50
55
61
68
77
80
85
2
1 BT-318 AT A GLANCE
1.1 appearance and function
3
4
1.2 Change battery
Figure 1 Opening the cover of battery
Figure 2
Putting battery into BT-318
5
Figure 3
Putting battery into BT-318
Figure 4
Closeing the cover of battery
6
1.3 The appearance of GPRS cradle and how to connect it with BT-318
Figure 5
GPRS Cradle
Figure 6
The bottom of BT-318 main unit
7
Figure 7 Combining BT-318 and GPRS Cradle
Figure 8
The BT-318 with GPRS cradle
8
1.4 How to insert SIM Card into GPRS cradle
Figure 9
Inserting SIM Card into GPRS Cradle
9
2 INTRODUCTION
The BT-318 is a GPS receiver with Bluetooth interface and built-in active antenna for
high sensitivity to tracking signal. Based on the SiRF star Ⅱe/LP low power chip set and
supports all functions(SingleSat updates in reduced visibility, Superior urban canyon
performance, FoliageLock for weak signal tracking, etc.). The BT-318 is well suited to
system integration and users who use PDA, Smart phone, Tablet PC and Notebook PC with
Bluetooth devices. It satisfies a wide variety of applications for car navigation, personal
navigation or touring devices, tracking and marine navigation purpose.
2.1 Product Feature
1.
2.
3.
4.
5.
6.
7.
8.
SiRF Star II/LP high performance and low power consumption chipset
Communicates with Host Platform via Bluetooth Serial Profile
Built-in high sensitivity active GPS antenna
Optional external GPS antenna
3 LED to show the status of GPS/Bluetooth/Battery
Replaceable and rechargeable 1650 mAh Li-ion battery
Continuously working for lasting 15 hours
Bluetooth operation range: 80M
9. Magnetic chassis for mounting conveniently
10. Can be provided with GPRS function by fitting on cradle
2.2 Package
Before you start up, make sure that your package includes the following
items. If any items are missing or damaged, contact your dealer immediately.
Bluetooth GPS Receiver
A CD with the User Manual and the Testing Program.
AC Power Charger
DC Car Power Charger
External Antenna
10
2.3 Power Switch
Power on
Power off
2.4 Power Jack
The power jack lets you to connect either a DC car power charger (included) or AC
power charger (included) to recharge the internal battery. You can either use the included
two chargers or an iPAQ-compatible AC adapter. Please note that the adapter rating 5V,
1.2 A, positive pole center.
2. 5 LED Function
Bluetooth Status LED (Blue):
Blinking (Slowly) ---- Not connected to any Bluetooth devices.
Blinking (Quickly) ---- Connected to other Bluetooth device.
GPS Status LED (Green):
Blinking ---- GPS position is fixed
Steady light ---- GPS position not fixed
Battery Status LED (Red/Yellow):
Red ---- Battery power is critically low. Charge immediately.
Yellow ---- Battery is charging now.
LED off ---- Battery partially full or Battery is fully charged.
2.6 External Antenna
Basically, you don’t need external antenna to perform GPS positioning with BT-318 since
it already build-in active antenna. The only condition that you need external antenna is when
BT-318 unit can not “see” the sky, For instance, when you are in any environments that GPS
signal is blocked, the external GPS antenna will help to receive better GPS signal.
Plug the external antenna with MMCX connector to the plug on BT-318. Place the
magnetic external antenna on the roof of the car or an outdoor open-space, and make sure
place it in correct direction. That is, the side with magnetic is the bottom side, and the upper
side must face to sky in order to receive better signal.
11
Notice:
Hold the antenna connector while you plug the external antenna into the BT-318 or
unplug the external antenna from the BT-318. Do not pull the cable line.
12
3 USAGE
3.1 For PDA which built-in Bluetooth (Example: iPAQ 3870/3970)
1.
Switch the BT-318 power on.
2. Please refer to the user manual of PDA to enable the Bluetooth of PDA
connecting to the BT-318. Some PDAs may need the Bluetooth passkey, the
passkey is “2003”.
3. Check the number of COM port used by Bluetooth.(Example the iPAQ 3970 is
the output port COM 8).
4. Running the suitable mapping/navigation software and select the correct COM
port(iPAQ 3970 is the output port COM 8)& baud rate : 38400
3.2 For PDA with Bluetooth Compact Flash card
1.
Switch the BT-318 power on.
2. Please refer to the user manual of Bluetooth Compact Flash card to enable it
connecting to the BT-318. Some Bluetooth devices may need the Bluetooth
passkey, the passkey is “2003”.
3. Check the number of COM port used by Bluetooth.(Example COM 6).
4. Running the suitable mapping/navigation software and select the correct COM
port & baud rate : 38400.
3.3 For Notebook with Bluetooth device
1.
Switch the BT-318 power on.
2. Please refer to the user manual of Bluetooth device to enable it connecting to the
BT-318. Some Bluetooth devices may need the Bluetooth passkey, the passkey is
“2003”.
3. Check the number of COM port used by Bluetooth.(Example COM 6).
13
4. Running the suitable mapping/navigation software and select the correct COM
port & baud rate : 38400.
Note: Most of the applications, the Bluetooth device have an “auto-detect” feature
that you do not need to select Baud Rate.
3.4 How to test your Bluetooth GPS Receiver ?
The testing program only supports the Microsoft Windows CE & Pocket PC based PDA
platform.
1. Run the “GPSinfo.exe” to execute the installation procedure of testing program (via
PC and ActiveSync).
2. Run the “GPS Information” program from “Start → Program files” of PDA.
Here is the description of “GPS Information” testing program as follows:
User must select COM port , Baud Rate (38400) and click the [Star GPS] button to start
receiving GPS data.
Note: Most of the applications, the Bluetooth device have an “auto-detect” feature
that you do not need to select Baud Rate.
14
15
4 BT-318 SPECIFICATION
4.1 System Specification
Electrical Characteristics (Receiver)
Frequency
C/A Code
Channels
Accuracy
Position Horizontal
Velocity
Time
L1, 1575.42 MHz
1.023 MHz chip rate
12 channel all-in-view tracking
10 meters, 2D RMS
7 meters 2D RMS, WAAS corrected
1-5 meters DGPS corrected
0.1m/sec
1 micro-second synchronized to GPS time
Datum
Datum
Default: WGS-84
Hot start
Warm start
Cold start
Reacquisition
8 sec., average
38 sec., average
45 sec., average
0.1 sec. average
Acquisition Rate
Protocol
GPS Protocol
GPS Output format
Dynamic Condition
Acceleration Limit
Altitude Limit
Velocity Limit
Jerk Limit
Temperature
Operating
Humidity
Power
Voltage
Operation Time
Default: NMEA 0183 (Secondary: SiRF binary)
GGA(1sec), GSA(1sec), GSV(5sec), RMC(1sec),
VTG(1sec)
Less than 4g
18,000 meters (60,000 feet) max.
515 meters/sec. (1,000 knots) max.
20 m/sec**3
-20°~ 60°C
5 to 95% non-condensing
Replaceable and rechargeable battery and 5V
DC input charging circuit
15 hours, after fully recharged, in continuous mode
>20 hours, in trickle power mode
Physical Characteristics
Dimension
89mm x 52mm x 30mm
4.2 Bluetooth Specification
Bluetooth V1.1 Compliant
Supply Voltage :
2.8V ~ 3.3V
Frequency Range :
2.402 ~ 2.480 GHz
Receiver Sensitivity : -80 dBm
Transmit Power :
Class 2
Transmitting Range :
80 m (Open Space)
Power Consumption : 45 mA (Typical)
16
4.3
FCC Notices
This device complies with part 15 of the FCC rules. Operation is subject to the following two
conditions:
(1)This device may not cause harmful interference, and
(2)This device must accept any interference received, including interference that may
cause undesired operation .
FCC RF Exposure requirements:
This device and its antenna(s) must not be co-located or operation in conjunction with any
other antenna or transmitter.
NOTE: THE MANUFACTURER IS NOT RESPONSIBLE FOR ANY RADIO OR TV
INTERFERENCE CAUSED BY UNAUTHORIZED MODIFICATIONS TO THIS
EQUIPMENT. SUCH MODIFICATIONS COULD VOID THE USER'S AUTHORITY TO
OPERATE THE EQUIPMENT.
17
5 How to get on internet by using GPRS Cradle
The GPRS Cradle is an extended device of BT-318; the main function of it is to make
BT-318 connect to GPRS via Bluetooth.
5.1 Surfing on internet by using GPRS cradle with PC
5.1.1 setup Bluetooth for windows
5.1.1.1 Setup for Windows ME
Double click the Bluetooth icon at bottom right
Select “Advanced Configuration” under the Bluetooth on tools bar
Then you may see the Bluetooth Configuration folder
18
Switch to ‘”Client Applications” then you can find the COM Port which is used by Bluetooth
Serial Port,
Click OK and back to My Bluetooth Places
19
Select “Find Bluetooth Devices”
Then the BT-GPRS device can be searched out (if no one can be found, please check the
bluetooth hardware)
Double click “BT-GPRS” device , SPP service support will show up
Right clickand select “Connect to Bluetooth Serial Port”
Then “Bluetooth PIN Code Required” will show up
Click the bluetooth icon at bottom right, then “Bluetooth PIN Code Request” will show up,
please enter “2003” for Bluetooth PIN code and click OK.
20
Finish Bluetooth Serial Port connecting
Open “Phone and Modem Options” from “Start”
Click “Add…”.
21
“Control Panel”.
Check “Don’t detect my modem; I will select it from a list” and click “Next”.
22
Select “Standard 28800 bps Modem”.
Select COM Port the “Bluetooth Serial Port” used.
23
Finish.
Click “Properties”
24
You could view the COM Port that modem uses in “Modem”
25
Choose “Advanced…” in “Connection” for advanced setting.
Key in “ +cgdcont=1,”IP”,”INTERNET” ” in “Extra settings” column and click “OK”.
(Attention! APN setting may vary according to different GPRS service firms. Please contact
your GPRS service firms for exact APN.)
26
5.1.1.2 Setup for Windows 2000
Double click the Bluetooth icon at bottom right
Select “Advanced Configuration” under the Bluetooth on tools bar
Then you may see the Bluetooth Configuration folder
Switch to ‘”Client Applications” then you can find the COM Port which is used by Bluetooth
27
Serial Port, Click OK and back to My Bluetooth Places
Select “Find Bluetooth Devices”
Then the BT-GPRS-XXXXX device can be searched out (if no one can be found, please
check the bluetooth hardware)
Double click “BT-GPRS-XXXXXX” device , SPP service support will show up
Right click and select “Connect to Bluetooth Serial Port”
28
Then “Bluetooth PIN Code Required” will show up
Click the bluetooth icon at bottom right, then “Bluetooth PIN Code Request” will show up,
please enter “2003” for Bluetooth PIN code and click OK.
Finish Bluetooth Serial Port connecting
29
Open “Phone and Modem Options” from “Start”
30
“Control Panel”.
Click “Add…”in “Modem”.
Check “Don’t detect my modem; I will select it from a list” and click “Next”.
31
Select “Standard 28800 bps Modem”.
Select COM Port the “Buletooth Serial Port” used.
32
Finish.
Click “Properties”
33
You could view the COM Port that modem uses in “Modem”.
Key in “ +cgdcont=1,”IP”,”INTERNET” ” in “Extra settings” of “Advanced” and click
“OK”.
(Attention! APN setting may vary according to different GPRS service firms. Please contact
your GPRS service firms for exact APN.)
34
35
5.1.1.3 Setup for Windows XP
Please make sure that Bluetooth CF card/Dongle has been fitted and work properly
Double click the Bluetooth icon at bottom right
Select “Advanced Configuration” under the Bluetooth on tools bar
Then you may see the Bluetooth Configuration folder
36
Switch to ‘”Client Applications” then you can find the COM Port which is used by Bluetooth
Serial Port
Select Search For Devices under Bluetooth
Then the BT-GPRS device can be searched out (if no one can be found, please check the
bluetooth hardware)
37
Double click “BT-GPRS” device , SPP service support will show up
Right click and select “Connect to Bluetooth Serial Port”
Then “Bluetooth PIN Code Required” will show up
Click the bluetooth icon at bottom right, “Bluetooth PIN Code Request” will show up, please
enter “2003” for Bluetooth PIN code and click OK.
Finish Bluetooth Serial Port connecting
38
Open “Phone and Modem Options” from “Start”
39
“Control Panel”.
Click “Add…”in “Modem”.
Check “Don’t detect my modem; I will select it from a list” and click “Next”.
40
Select “Standard 33600 bps Modem”.
Select COM Port the “Buletooth Serial Port” used.
41
Finish.
Click “Properties”
42
You could view the COM Port that modem uses in “Modem”.
Key in “ +cgdcont=1,”IP”,”INTERNET” ” in “Extra settings” of “Advanced” and click
“OK”.
(Attention! APN setting may vary according to different GPRS service firms. Please contact
your GPRS service firms for exact APN.)
43
44
5.1.2 Wireless networking GPRS setting for windows
5.1.2.1 Wireless networking GPRS setting for Windows ME
Open Dial-up Networking setting.
Choose “Make New Connection”.
45
Key in the name you want to establish.
Key in telephone number.
(Attention ! Telephone number may vary according to different GPRS service firms. Please
contact your GPRS service firm for exact number.)
46
Dial-up Networking connection is completed.
The dial-up connection you just established “My Connection” shows on your desktop.
Double-Click the Icon for dial-up.
Key in ”User Name” and “Password” and click ”Connect”.
(Attention ! ”User Name” and “Password” may vary accroding to different GPRS service
firms. Please contact your GPRS service firm for exact number.)
47
Windows will start to dial.
When finished, it is connected to Internet.
This instruction offers common setting steps for GPRS.
Different GPRS suppliers may have different setting requirements.
You may need an appointed DNS in some case.
I f you cannot connect to the network, you need to contact your ISP provider to get the
correct setting steps.
After that, you may just double-click the icon for reconnection dial-up.
IF BT-318cradle is not the only BT SPP device, you may need to connect Bluetooth Serial
Port manually.
Steps are as follow:
Double click the Bluetooth icon at bottom right
Select “Find Bluetooth Devices”
Then the BT-GPRS-XXXXX device can be searched out (if no one can be found, please
check the bluetooth hardware)
Double click “BT-GPRS-XXXXXX” device; SPP service support will show up
Right click and select “Connect to Bluetooth Serial Port”
48
49
5.1.2.2 Wireless networking GPRS setting for Windows 2000
Open “Network and Dial-up Connections” from “Start
Double-click ”Make New Connection”
Click “Next” to continue.
50
Setting”.
Key in telephone number.
(Attention ! Telephone number may vary accroding to different GPRS service firms. Please
contact your GPRS service firm for exact number.)
Click “Next” to continue.
Click “Next” to continue.
51
Key in the name.
(You can also click “Add a shortcut to my desktop”)
Click “Finish” to complete setting.
The dial-up connection you just established shows on your desktop. Double-click the Icon for
dial-up.
Key in ”User Name” and “Password” and click ”Dial”.
(Attention ! ”User Name” and “Password” may vary accroding to different GPRS service
firms. Please contact your GPRS service firm for exact number.)
52
Windows will start to dial.
When finished, it is connected to Internet.
This instruction offers common setting steps for GPRS.
Different GPRS suppliers may have different setting requirements.
You may need an appointed DNS in some case.
I f you cannot connect to the network, y ou need to contact your ISP provider to get the
correct setting steps.
53
After that, you may just double-click the icon for reconnection dial-up.
IF BT-318 CRADLE is not the only BT SPP device, you may need to connect Bluetooth
Serial Port manually.
Steps are as follow:
Double click the Bluetooth icon at bottom right
Select “Find Bluetooth Devices”
Then the BT-GPRS-XXXXX device can be searched out (if no one can be found, please
check the bluetooth hardware)
Double click “BT-GPRS-XXXXXX” device , SPP service support will show up
Right click and select “Connect to Bluetooth Serial Port”
54
5.1.2.3 Wireless networking GPRS setting for Windows XP
Open “Network and Internet Connections” from “Start Control Panel”.
Choose ”Create a connection to the network at your workplace”.
Please fill in the information if you have not done it and click “OK” to continue.
55
Choose “Dial-up connection” and click “Next” to continue.
Key in the name for connection and click “Next” to continue.
56
Key in telephone number.
(Attention ! Telephone number may vary according to different GPRS service firms. Please
contact your GPRS service firm for exact number.)
Click “Next” to continue.
Click “Finish” to complete setting.
(You can also click “Add a shortcut to this connection to my desktop”)
57
The dial-up connection shows on your desktop if you chose “Add a shortcut to my desktop”.
Double-click the Icon for dial-up.
Key in ”User Name” and “Password” and click ”Dial”.
(Attention ! ”User Name” and “Password” may vary accroding to different GPRS service
firms. Please contact your GPRS service firm for exact number.)
Windows will start to dial.
When finished, it is connected to Internet.
This instruction offers common setting steps for GPRS.
Different GPRS suppliers may have different setting requirements.
You may need an appointed DNS in some case.
I f you cannot connect to the network, y ou need to contact your ISP provider to get the
58
correct setting steps.
After that, you may just double-click the icon for reconnection dial-up.
IF BT-318 CRADLE is not the only BT SPP device, you may need to connect Bluetooth
Serial Port manually.
Steps are as follow:
Double click the Bluetooth icon at bottom right
Select “Find Bluetooth Devices”
Then the BT-GPRS-XXXXX device can be searched out (if no one can be found, please
check the bluetooth hardware)
Double click “BT-GPRS-XXXXXX” device , SPP service support will show up
Right click and select “Connect to Bluetooth Serial Port”
59
5.1.3 setup bluetooth for Pocket PC
STEP 1:
Tap Bluetooth Manager .
STEP 2:
Tap New,
Connect! .
60
STEP 3:
Select Explore a Bluetooth device . Tap Next .
STEP 4:
Tap Top here to choice a device .
61
STEP 5:
Select BT-GPRS -XXXXXX.
STEP 6:
Tap Next .
62
STEP 7:
To set the security settings to low (to connect this device no paired) ,tap Next .
STEP 8:
Select BT-GPRS COM Port. Tap Next .
63
STEP 9:
Tap Finish .
STEP 10:
Tap Start,
Settings .
64
STEP 11:
Tap Bluetooth .
STEP 12:
You may see the COM Port used by Bluetooth.
65
STEP 13:
Tap Start,
SppModem .
STEP 14:
Select the COM Port used by Bluetooth, Tap Create .
66
STEP 15:
Tap Yes .
67
5.1.4 setup for Pocket PC 2002
STEP 1:
Tap Start,
Settings .
STEP 2:
Tap Connections .
68
STEP 3:
Tap Connections icon.
STEP 4:
Select Internet Settings.
69
STEP 5:
Tap Modify… .
STEP 6:
In the Internet Settings window,
tap New… .
70
STEP 7:
Insert a name for connection and select a modem from the modem menu. Set the
Baud rate to 115200 and tab the Advanced… .
STEP 8:
Disable all checkbox on Terminal. And Data Bits
Bits set 1 , Flow Control Hardware and tab Ok.
71
set 8 , Parity set
None , Stop
STEP 9:
Make sure use server-assigned IP addresses is selected and then tab
STEP 10:
Make sure use server-assigned addresses is selected and tab ok.
72
Name Servers.
STEP 11:
Tab Next .
STEP 12:
Leave country code and Area code blank and
*99# in phone number . And tab Next .
73
enter the phone number
STEP 13:
Key in +cgdcont=1,”ip”,”internet”
commands and tab finish .
in the extra dial-string modem
STEP 14:
Tab ok .
74
STEP 15:
Tab Dialing Locations .
STEP 16:
Select Disable call waiting and tab Dialing Patterns…
75
STEP 17:
Key in G in all columns and tab ok.
STEP 18:
Tab ok to finish setting .
76
5.1.5 Connect to GPRS network for Pocket PC 2002
STEP 1:
Tab Start and tab settings.
STEP 2:
Tap Connections .
77
STEP 3:
Tab Connections button.
STEP 4:
Tab Connect
to connect GPRS system.
78
STEP 5:
Then you would see a window as below, select the device with “BT-GPRS-XXXXXX”
This instruction offers common setting steps for GPRS.
Different GPRS suppliers may have different setting requirements.
You may need an appointed DNS in some case.
I f you cannot connect to the network, y ou need to contact your ISP provider to get the
correct setting steps.
79
5.1.6 Setup and connect to GPRS network for Pocket PC 2003
STEP 1:
Tap Start, Settings to set up the dialing parameters.
STEP 2:
Select Add a new modem connection .
80
STEP 3:
Key in the name for connection
MODEM” .
and select a modem name which is “GPRS SPP
STEP 4:
Key in the phone number *99# and tab Next button.
81
STEP 5:
Key in the User name and Password but leave Domain blank and to tab Finish .
STEP 6:
Tab the
. Icon to start the dialing program.
82
STEP 7:
Tab the phone number *99#
icon to connect to GPRS system.
STEP 8:
Tab Hide button to close this window .
83
STEP 9:
Then you would see a window as below, select the device with “BT-GPRS-XXXXXX”
This instruction offers common setting steps for GPRS.
Different GPRS suppliers may have different setting requirements.
You may need an appointed DNS in some case.
I f you cannot connect to the network, y ou need to contact your ISP provider to get the
correct setting steps.
84
5.1.7 GPRS Connections Operators Information
Austria
[Connect Austria / One]
APN=web.one.at
DNS1=194.24.128.100
DNS2=194.24.128.102
[MobilKom]
[email protected]
APN=A1.net
DNS1=194.48.124.200
DNS2=194.48.139.254
[Singtel Optus]
APN=internet.optus.net.au
[Telering]
[email protected]
Password=web
APN=web
DNS1=212.95.31.11
DNS2=212.95.31.35
[Telstra]
APN=telstra.wap.mnc001.mcc505.gprs
[T-Mobile A - GPRS]
APN=gprsinternet
DNS1=213.162.64.1
DNS2=213.162.64.2
[T-Mobile A - Business GPRS]
APN=business.gprsinternet
DNS1=213.162.64.1
DNS2=213.162.64.2
85
Australia
[Vodafone AU]
APN=vfinternet.au
Belgium
[Mobistar]
Username=mobistar
Password=mobistar
APN=web.pro.be
DNS1=212.65.63.10
DNS2=212.65.63.145
[Proximus - Internet]
APN=INTERNET.PROXIMUS.BE
DNS1=195.238.2.21
DNS2=195.238.2.22
[Proximus - Intranet]
APN=INTRAPROX.BE
DNS1=195.238.2.21
DNS2=195.238.2.22
Canada
[Microcell]
Username=dummy
Password=dummy
APN=internet.fido.ca
China
[China Mobile]
APN=cmnet
Croatia
[VIPnet]
APN=gprs.vipnet.hr
86
Czech Republic
[Cesky Mobil - prepaid]
APN=ointernet
DNS1=212.67.64.2
[Eurotel]
APN=internet
DNS1=160.218.10.201
DNS2=194.228.2.1
[Paegas - GPRS Internet]
APN=internet.click.cz
DNS1=62.141.0.1
DNS1=62.141.0.2
[Paegas - GPRS Profil]
APN=profil.click.cz
DNS1=62.141.0.1
DNS1=62.141.0.2
Denmark
[Sonofon]
DNS1=212.88.64.14
DNS2=212.88.64.15
[TDC]
APN=internet
DNS1=193.162.146.9
DNS2=193.162.153.31
Finland
[Dna]
APN=internet
DNS1=217.78.192.78
DNS2=217.78.192.22
87
[Radiolinja]
APN=internet
DNS1=213.161.33.200
DNS2=193.185.210.10
[Sonera]
APN=internet
DNS1=192.89.123.230
DNS2=192.89.123.231
France
[Bouygues Telecom]
APN=ebouygtel.com
[Orange F]
Username=orange
Password=orange
APN=orange.fr
DNS1=194.51.3.56
DNS2=194.51.3.76
[SFR]
APN=websfr
DNS1=172.20.2.10
Germany
[D2 Vodafone]
APN=volume.d2gprs.de
DNS1=139.7.30.125
DNS2=139.7.30.126
[E-Plus]
Username=eplus
APN=internet.eplus.de
DNS1=212.23.97.2
DNS2=212.23.97.3
[Quam]
88
Username=quam
Password=quam
APN=quam.de
DNS1=193.189.244.192
DNS2=193.189.244.205
[T-D1]
APN=internet.t-d1.de
DNS1=193.254.160.1
[Viag Interkom]
APN=internet
DNS1=195.182.96.28
DNS2=195.182.96.61
[Viag Interkom (LOOP)]
APN=pinternet.interkom.de
DNS1=195.182.114.114
Greece
[Cosmote]
APN=internet
DNS1=195.167.65.194
[Telestet]
Password=24680
APN=gnet.b-online.gr
DNS1=212.152.79.19
DNS2=212.152.79.20
[Vodafone GR]
APN=internet.vodafone.gr
DNS1=213.249.17.10
DNS2=213.249.17.11
Hungary
[Pannon]
APN=Net
89
DNS1=193.225.155.254
DNS2=194.149.0.157
[Westel]
APN=internet
DNS1=194.176.224.3
DNS2=194.176.224.1
Hongkong
[CSL]
APN=internet
DNS1=202.84.255.1
DNS2=203.116.254.150
[New World]
APN=internet
; Hongkong
[Orange HK]
APN=web.orangehk.com
[Peoples]
APN=internet
[SmarTone]
APN=internet
DNS1=202.140.96.51
DNS2=202.140.96.52
[Sunday]
APN=internet
India
[BPL Mobile]
Username=bplmobile
APN=bplgprs.com
DNS1=202.169.145.34
DNS2=202.169.129.40
90
Indonesia
[IM-3]
Username=gprs
Password=im3
APN=www.indosat-m3.net
Italy
[Blu]
APN=INTERNET
DNS1=212.17.192.49
DNS2=212.17.192.209
[TIM]
APN=uni.tim.it
[Vodafone Omnitel]
APN=web.omnitel.it
[WIND]
APN=internet.wind
DNS1=212.245.255.2
1.1.1. Jordan
[Fastlink]
APN=internet
[MobileCom]
Username=internet
Password=internet
APN=internet.mobilecom.jo
Lebanon
[Cellis]
Username=plugged
Password=plugged
91
APN=internet.ftml.com.lb
DNS1=194.126.29.8
DNS2=194.126.29.12
[Libancell]
APN=isurf.libancell.com.lb
DNS1=212.98.130.34
DNS2=212.98.130.35
Lithuania
[Bite GSM]
APN=banga
DNS1=213.226.131.131
DNS2=193.219.32.13
[Omnitel Lithuania]
APN=gprs.omnitel.net
DNS1=194.176.32.129
DNS2=195.22.175.1
Malaysia
[DiGi]
APN=diginet
DNS1=203.92.128.131
DNS2=203.92.128.132
[Maxis]
APN=net
DNS1=202.75.129.101
DNS2=10.206.4.21
[TIMECel]
APN=timenett.com.my
DNS1=203.121.16.85
DNS2=203.121.16.120
[TMTouch]
APN=internet
92
DNS1=202.188.0.133
Netherlands
[Ben - GPRS intensief]
APN=internet-int
DNS1=193.79.251.39
DNS2=193.79.237.39
[Dutchtone]
APN=internet
DNS1=194.134.5.5
[Ben - GPRS actief]
APN=internet-act
DNS1=193.79.251.39
DNS2=193.79.237.39
[KPN]
APN=internet
DNS1=62.133.126.28
DNS2=62.133.126.29
[O2 NL]
Username=gprs
Password=password
APN=internet
[Vodafone NL]
APN=web.vodafone.nl
New zealand
[Vodafone NZ]
APN=www.vodafone.net.nz
DNS1=202.20.93.10
DNS2=203.97.191.189
93
Norway
[NetCom]
DNS1=212.45.188.43
DNS2=212.45.188.44
[Telenor Mobil]
APN=internet
Philippines
[Globe]
Username=globe
Password=globe
APN=www.globe.com.ph
DNS1=203.127.225.10
DNS2=203.127.225.11
[Smart]
APN=internet
DNS1=202.57.96.3
DNS2=202.57.96.4
Poland
[ERA]
Username=erainternet
Password=erainternet
[Idea]
Username=idea
Password=idea
APN=www.idea.pl
DNS1=194.204.159.1
DNS2=194.9.223.79
[Polkomtel - Plus]
APN=www.plusgsm.pl
94
Portugal
[Optimus]
APN=internet
DNS1=194.79.69.129
[TMN]
APN=internet
DNS1=194.65.3.20
DNS2=194.65.3.21
[Vodafone Telecel]
APN=internet.telecel.pt
DNS1=212.18.160.133
DNS2=212.18.160.134
Russia
[BeeLine]
Username=beeline
Password=beeline
APN=internet.beeline.ru
DNS1=194.190.195.66
DNS2=194.190.192.34
[Mobile Telesystems]
APN=internet.mts.ru
DNS1=213.87.0.1
DNS2=213.87.1.1
Singapore
[MobileOne]
APN=mobilenet
DNS1=202.79.64.21
DNS2=202.79.64.26
[Singtel]
APN=internet
[StarHub]
95
APN=shwap
Slovakia
[Orange SK]
APN=internet
DNS1=213.151.200.3
DNS2=195.12.140.130
Slovenia
[Mobitel - Internet]
APN=internet
[Mobitel - Internet Pro]
APN=internetpro
[Si.mobil]
DNS1=121.30.86.130
DNS2=193.189.160.11
Spain
[Amena]
Username=CLIENTE
Password=AMENA
APN=internet
DNS1=213.143.33.8
DNS2=213.143.32.20
[Telefonica Movistar]
Username=MOVISTAR
Password=MOVISTAR
APN=movistar.es
DNS1=194.179.1.100
DNS2=194.179.1.101
[Vodafone Espa]
APN=airtelnet.es
96
Sweden
[Telia]
Switzerland
[Orange CH]
APN=internet
DNS1=213.55.128.1
DNS2=213.55.128.2
[Sunrise]
Username=internet
Password=internet
APN=internet
DNS1=212.35.35.35
DNS2=212.35.35.5
[Swisscom]
Username=gprs
DNS1=164.128.36.34
DNS2=164.128.76.39
Taiwan
[Chunghwa]
APN=wappie
[Far EasTone]
[Hinet]
APN=internet
DNS1=168.95.192.1
DNS2=168.95.1.1
[KGT Online]
APN=internet
[MobiTai]
Username=gprs
97
Password=gprs
[TransAsia]
APN=internet
Thailand
[AIS]
APN=internet
DNS1=202.183.255.20
DNS2=202.183.255.21
[DTAC]
APN=www.dtac.co.th
DNS1=203.155.33.1
DNS2=203.44.144.33
Turkey
[Aria]
APN=internet
[Turkcell]
DNS1=212.252.168.240
DNS2=212.252.119.4
UK
[O2 UK]
APN=adf.btcellnet.net
DNS1=194.73.82.242
[Orange UK]
Username=Orange
DNS1=158.43.192.1
DNS2=158.43.128.1
APN=orangeinternet
[T-Mobile UK]
Username=user
98
Password=one2one
APN=general.t-mobile.uk
[Vodafone]
APN=Internet
United Arab Emirates
[Etisalat]
APN=mnet
US
[AT&T Wireless]
[Cingular]
[email protected]
Password= ZXY203DC9K0402
APN=ISP.CINGULAR
[Rogers AT&T]
APN=internet.com
Username=wapuser1
Password=wap
[Voicestream]
APN=internet2.voicestream.com
99