1
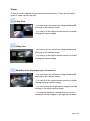
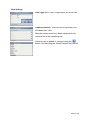
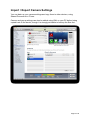
Q-Cam Professional V 1.1 User Manual Introduction QCam Professional is a remote monitoring application designed primarily for the remote monitoring and auxiliary control of IP video cameras. It allows the user live video and two-way voice communication with speaker equipped cameras, it has event playback, it supports multi view and is designed around the MXPEG protocol. Key Features: Professional High Quality IP Camera App suited to all applications including security. Live monitoring of video and audio across both 3G and wireless Speak to Camera function Frame rates as high as 25 frames per second can be achieved depending on the camera and network configuration PTZ controls Native IOS controls (multi-touch zoom, swipe, etc.) Single, and multi view of cameras, including a 16 camera view. Cameras can be assigned to groups for convenience No Limit on the number of Cameras or Views that can be monitored 3 Actions can be configured to open doors, switch lights etc. All Mobotix camera models are supported, including the T24, Q24 and M24. Contents Settings Menu .............................................................. 3 Event Notification Registration ......................................................3 Viewer Menu ................................................................ 4 Groups.......................................................................... 4 Cameras ....................................................................... 5 Snapshot ................................................................. 5 Mobotix Cameras Only ...................................................................5 Mute / Audio On........................................................ 5 Speak..................................................................... 5 Zoom (Camera PTZ) ................................................... 5 Actions ................................................................... 5 Events .................................................................... 6 Views ................................................................................................7 4 Way View ....................................................... 7 6 Way View ....................................................... 7 Multi Way View (Suppoprts up to 16 cameras) ........... 7 Camera / View Setup .......................................................................8 Camera Settings........................................................ 8 Camera Settings (Advanced) ........................................ 9 View Settings .......................................................... 12 Actions ....................................................................... 13 Import / Export Camera Settings .............................. 14 Page 2 of 14 Settings Menu This provides application wide settings. - Disable screen locking. This will prevent the IPhone from sleeping while you are viewing a camera. Please note this may impact battery life. - Disable frame rate warning. When live viewing cameras at a very high resolution, or on older devices such as the 3GS. You may see a warning message that the frame rate is too high. If the Frame rate is too high, the image may not display correctly. You can either lower the frame rate in the cameras settings, or disable the warning here. Event Notification Registration This feature allows QCamPro to receive a push notification when a camera event occurs. You will require a QCam Event Monitoring Account to use this feature. Details can be found on the QIMS support Website. Steps to Use are as Follows: 1) Register for a 'QCam Event Monitoring System' account and get a camera monitoring subscription; 2) Install QCamPro on one or more IOS device with push notifications enabled; 3) Register your IOS device with your QCam Event Monitoring System account (From this screen); 4) Register your Camera(s) with the QCam Event Monitoring System (From QCamPro Camera Setup Menu); 5) Setup the IP Notifications on your camera using the email sent by the QCam Event Monitoring System (After successful camera registration; Page 3 of 14 Viewer Menu The main viewer menu allows you to add / edit Groups, Cameras and Views. Groups The left hand menu allows you to group cameras and views into logical groups such as Sites or Clients. When you select a group the associated cameras and views will be displayed on the right hand side. New Groups can be added using the the button. Group Names can be edited using button on the Groups List. Page 4 of 14 Cameras A camera is considered any single camera that can output either an MXPEG or MJPEG video stream. - You can zoom any camera by using standard IOS pinching on the camera image. (This does a local zoom of the camera image only, it does not zoom the actual camera) Snapshot This button will save the current image to your photos folder on the IPhone / IPad. The image is saved at the full resolution being streamed by the camera. Mobotix Cameras Only All of the following features assume you have sufficient access privileges on the camera, and the connection is using MXPEG. Your installer may need to confirm this for you. Mute / Audio On This button is used to toggle sound on and off from Cameras with Audio Capability Speak Hold this button down and speak into the devices Microphone, this will then be played on the Cameras Speaker if it has one. (Note: This uses the same method to talk to the camera as MX Control Center. It does not use SIP) Zoom (Camera PTZ) The zoom button will zoom the actual image being sent from the camera. Double clicking on the camera Image will also zoom the actual camera. Single clicking on the camera Image will center the image coming from the camera on the point you clicked (assuming the camera Image has been zoomed) Actions This button provides access to actions configured in the camera settings Menu. It can be used to Open Doors, sound alarms etc. See the actions section for more information. Page 5 of 14 Events The Events Button can be used to playback any events previously recorded by the Camera. - Live will return to the current image. - While playing a clip, you can double click the image to pause and show the playback controls. - Latest will load the most recent event recorded by the camera. - << and >> move forward or back one event. Page 6 of 14 Views A View is used to display multiple cameras simultaneously. There are currently 3 types of views used by the App. 4 Way View - You can zoom any camera by using standard IOS pinching on the camera image. - You can go to the single camera screen by double clicking the camera image. 6 Way View - You can zoom any camera by using standard IOS pinching on the camera image. - You can go to the single camera screen by double clicking the camera image. Multi Way View (Suppoprts up to 16 cameras) - You can zoom any camera by using standard IOS pinching on the camera image. - You can go to the single camera screen by double clicking the large camera image. - You can change the large camera image by double clicking on the small camera Image - You see the additional cameras from the view by scrolling the small images on the right up and down. Page 7 of 14 Camera / View Setup Cameras can be sorted using the will change the list into edit mode. button which The Order can then be changed by dragging the cameras button to the desired location. Click when finished editing. New Cameras or Views can be added using the button. Group Names can be edited using the button on the Cameras List. Camera Settings Name Unique Name for this Camera /View Description (Optional) Type whether this setup is for a camera or a View Camera Type The app currently support either Mobotix or MJPEG Server The URL or IP address to access the Camera Port (Optional) The IP port for this camera User Name / Password (Optional) This is required if you have a username and password configured to access the camera Page 8 of 14 Camera Settings (Advanced) Access Mode Mobotix cameras have two different video streams that can be accessed depending on your access level. Use Live if you want to access PTZ, and image settings. Desired FrameRate This sets the max frame rate that will be sent to the camera, on older devices or slow networks this can be lowered to get more reliable connection. If your Audio keeps dropping out, lowering the frame rate can help. Adjust Camera Settings on Connect This is used to set optimal image and audio settings depending on the device you are using, and the speed of the network connection. The cameras live stream settings will be changed on connection to the camera, (the original settings will be restored once you stop viewing the camera) To effectively use the 2 way audio you need a frame rate of 10 FPS or better. NOTE If you use this setting it is advisable to have the recording stream set separately. By default this will impact what is recorded unless you set up an independent recording stream. Preview Mode In either guest mode or when “Adjust Camera Settings on Connect “ is off. This allows you to get a low quality stream from the camera at a specific size without impacting what is recorded. This stream will not include audio. Page 9 of 14 Image Size The desired image size to be sent from the camera, the smaller the image the less data is required. Also on older devices such as an Iphone 3GS, the processes struggles to display images larger than 320x240 at high frame rates, resulting in a jerky or pixelated display. Image Quality The resolution of the image to be sent from the camera, low will give a grainier picture but is needed to get frame rates above 16FPS. High has the best picture quality but a much lower max Frame rate. JPEG Quality The amount the image will be compressed. A lower setting will result in less data being sent, but will lose picture quality. If your Audio keeps dropping out, lowering size and quality settings can help. Actions 1, 2, 3 Actions provide the ability to control additional features within the camera such as opening doors and switching lights etc. You can set up to 3 custom actions which can be used from the main view screen Actions button. The buttons provide a number of pre-configured actions to simplify setup. Title allows you to name the action. The other input box requires you to enter the code for the action. This provides access to the various rcontrol features available on your camera. See the actions section for more information. Page 10 of 14 Diagnostics – Show Connection Stats This is used to help trouble shoot connection issues. It puts a small window at the top left of the image and shows - Actual Frame Rate. (Frames Per Second) - Actual Data Rate. (kb per second) The maximum consistently achievable data rate on a 3G network is around 60kb/s. If this is maxed out and the FPS is too low, you need to adjust the image size / settings to find your optimal connection parameters. - Dropped. This is the number of frames that could not be displayed on the screen. If the number is rapidly increasing or more than about 10, it means that the data is arriving faster than the device can process it. On an Iphone 3GS, with high quality image settings, max FPS and an Image size of 640x480, this will be very noticeable. - Size. This is the actual size of the image being received from the camera. When using the “Adjust camera settings on connect” this may show the normal settings size for a few seconds while the camera changes to the desired settings. Page 11 of 14 View Settings View Type which View Configuration you would like Camera Selection This is the list of cameras to be included in this View. Note the camera must have been setup previously, and must be in the selected group. Cameras can be added or changed using the button. And selecting the desired camera from the list. Page 12 of 14 Actions Actions provide the ability to control additional features within the camera such as opening doors and switching on lights etc. Actions work in a similar manner as soft buttons on the camera, and can be configured to us various rcontrol functions on the camera. To see what actions are supported on your camera, open the following link from a web browser to your camera. http://[yourcamip:port]/control/rcontrol?list Note: You may need your installer to assist you in setting this up for each camera, as there are many different ways cameras can be configured You only need to enter the actual command you want as QCamPro will do the rest. i.e. only enter the text after “http://...control/rcontrol?action=” Example commands Action Command Open Door (Output 1) for 10 seconds sigouthigh&outmask=0x1&time=10 Open Door on T24 customfunction&action=sigout&profile=~Door Switch on Lights (Output 2) sigouthigh&outmask=0x2 Switch off Lights (Output 2) sigoutlow&outmask=0x2 Switch on all LEDS for 5 seconds ledson&time=5 Play alarm sound sound&soundfile=Alarm Page 13 of 14 Import / Export Camera Settings You can back up your camera settings and copy them to other devices, using Shared Documents in ITunes. Camera and group settings can also be edited using XML on your PC before being copied back to the device, though it is strongly advisable to backup the files first. Page 14 of 14