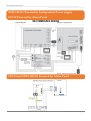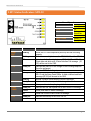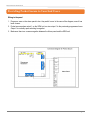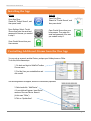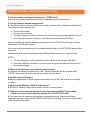
1
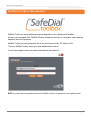
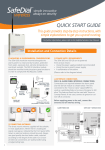
INSTALLATION AND USER MANUAL For more information and FAQ’s on any of our products or services please visit us online at www.globetelecom.com.au Level 8 - 499 St Kilda Road Melbourne VIC 3004 Phone 1300 737 314 Email [email protected] SafeDial Wireless SDW-100-3G Table of Content Contents Introduction Features of the SafeDial Wireless (SDW-100-3G) How to Activate the SDW-100-3G Installation and Commissioning Procedure Connecting the Alarm Panel Alarm Panel Programming Choosing GPRS or PSTN Primary Reporting Defaulting the SDW-100-3G Input and Output Battery Charging Wiring Diagram - SDW-100-3G Powered by Independent Power Supply SDI-10 powered by Alarm Panel Wiring Diagram - SDI-10 and SDW-100-3G Powered by Alarm Panel LED Status Indicators SDW-100-3G LED Status Indicators SDI-10 General Operation Product Trouble Shooting Final Commissioning Checklist Contact ID Reporting Codes Transmission Delay Times Specifications SDW-100-3G Specifications SDI-10 3 4 5 5 6 7 7 7 8 8 9 9 10 11 12 13 14 15 15 16 16 SafeDial Toolbox Settings and PING Icons Main Activity Screen Main Activity Screen Smartphone Information Page Input / Output Page History Page 17 18 19 20 21 22 23 Pocket Secure Providing Pocket Secure to You End Users Creating a User Installing the App Controlling Additional Alarms from One App Using the App SafeDial Toolbox & Pocket Secure FAQs SafeDial Tootbox Error Messages 24 25 26 27 27 28 29 32 Warning Liability Notes 34 34 34 Page 2 SafeDial Wireless SDW-100-3G . Introduction SafeDial Wireless Units SafeDial Wireless (SDW-100-3G) is a MultiPath GSM/GPRS/PSTN wireless device that can be used as a backup to a security PSTN service or as a primary wireless device in the event that there is no PSTN service available. All alarm events and system alerts are delivered in Contact ID directly to your Central Monitoring Stations PSTN receivers via your SafeDial 1345 service. There are no extra monitoring costs and no extra equipment required at your control room and with 4 hour polling & system integrity monitoring you will always know your alarm system‘s status SafeDial Toolbox Accompanying SafeDial Wireless is a handy application called SafeDial Toolbox™, a WEB based activation, installation and diagnostic tool for installers. With remote access via a PC, tablet or smartphone, Installers can quickly commission, test and interrogate their SafeDial Wireless™ device and even read or set the four (4) inputs and three (3) outputs provided on the unit – no guess work, leave the site knowing the installation is complete and fully functional. This handbook details the operation, connection and functionality of both the SafeDial Wireless device and the SafeDial Toolbox application. Pocket Secure Pocket Secure (iPhone & Android) is able to remotely arm & disarm any alarm system. Pocket Secure is a smartphone app which connects to the SafeDial Wireless servers via the internet. Once a connection is established, the last 100 events are scanned and the state of the alarm is determined and presented to the user. . To toggle the state of the alarm, the app presents an interface to pulse output 1 on the SafeDial Wireless unit in the field. This then forces the app to wait until the next open/close event is sent and updates the app with the new state. Page 3 SafeDial Wireless SDW-100-3G Features of SafeDial Wireless (SDW-100-3G) Features of Globes SafeDial Wireless device include: MultiPath GSM/GPRS and PSTN - Telstra SIM enabled PSTN line failure detection – seamless changeover to GSM/GPRS Four (4) hour integrity polling – Providing an Always ON health check at a very low cost Simplicity – simple installation with supplied antennae, power supply and software tools Low purchase price with fixed monthly cost. - No additional call charges. No GPRS receiver equipment required at the CMS. No extra monitoring fees as all events are reported to standard PSTN receivers - even a poll fail message All alarm events and health check exceptions are transmitted in Contact ID Continuous online health checks and reporting of alarm panel (including watchdog reset timer), phone line and dialler interface leads. PSTN typically used a primary path, therefore rebates are maintained. Client provided with the highest level of security. SafeDial 1345 enabled providing total portability should you ever change CMSs Remote interrogation (DC power, signal strength, battery status), testing and commissioning of all devices via a PC, iPad or smartphone using the web based SafeDial Toolbox App. Provides four (4) Inputs o Plus dedicated box Tamper Provides three (3) Outputs 13.8V battery charging circuit LED status indicators for easy onsite diagnostics. Future Proof with seamless firmware upgrades All communication acknowledged and sent using AES128 encryption. Compliant to AS/NZS2201.5:2008 Class 2, AS/NZS CISPR22, AS/NZS60950, AS/ACIFS002 Australian designed and supported product. Page 4 SafeDial Wireless SDW-100-3G How to Activate the SDW-100-3G You must be a registered user of SafeDial Toolbox. Globe administration will register you as a user at the time of your first hardware purchase. Your customer account number supplied by your Control Monitoring Station is required for activation. Before powering up, the unit must be activated via the web using the SafeDial Toolbox App on your Smartphone, PC or tablet. Go to www.Safedialtoolbox.com.au to activate your unit. NOTE: Refer to the SafeDial Toolbox Quick Start Guide or instructions in this manual. Installation and Commissioning Procedure Place the SDW-100-3G unit in the exact position where you intend to install it. Screw antenna onto SMA connector. Connect 14.5V DC power or a battery to power up. The ‘HEART BEAT’ LED will blink. The signal strength of the GSM signal will be displayed as either High, Medium or Low. The SDW-100-3G unit can take up to three (3) minutes to register with the network. The ‘On-line’ LED will come on steady indicating connectivity with the network. The connection between the SDW-100-3G and SDI-10 is polled and monitored. To comply with AS2201.5-2008, the SDI-10 MUST be installed within the alarm panel. Connect the SDI-10 contact ID interface. Make sure you check and set the “primary service” jumper selection to your preferred setting. I.e. PSTN as primary (link jumper removed) or GPRS/GSM as primary (link jumper fitted). NOTE: GPRS/GSM communications MUST be established in the first instance, prior to making PSTN the primary communications path. Program the alarm panel. Generate an event from the alarm panel. Check the operation and functionality of all parameters. Refer to Final Commissioning Checklist and SafeDial Toolbox functionality both detailed later in this document – refer Table of Contents. Never leave site without achieving a steady ‘On-line’ LED. Page 5 SafeDial Wireless SDW-100-3G Connecting the Alarm Panel Always use the original telephone lead supplied with the alarm panel. A four wire connection is required between the alarm panel and the SDI-10 module. Ring & Tip as input and R1 & T1 as the return line. Always connect the telephone communicator in Mode 3. A three wire connection is required between the alarm panel and the SDI-10 module as shown below. The wire connected to the “clock or data” signal of the alarm panel is used as a watchdog feature to ensure the panel is still alive. This feature should not be used with Tecom and Concept Panels. A four wire connection is required between the SDI-10 and the SDW-100-3G. The data on this connection is encrypted and supervised. Page 6 SafeDial Wireless SDW-100-3G Alarm Panel Programming The alarm panel must be programmed for tone dialling. The alarm panel must be programmed with the 1345 number your company provided on the SafeDial Wireless registration form. The alarm panel must report in Contact ID format. Panel must be programmed with a Hard ID. Choosing GSM/GPRS or PSTN Primary Reporting The unit comes pre-programmed as PSTN primary and GSM/GPRS back up. To set GSM/GPRS as the primary path and PSTN as the back- up the “primary service” jumper must be inserted into the SDI-10. To set PSTN as the primary path and GSM/GPRS as the back-up, the jumper must be removed from the SDI-10. If PSTN is used as the primary path, you must test the following: o Trigger the ‘tamper’ input on the SDW-100-3G unit. Verify with the monitoring centre that a tamper was received with the correct Customer ID account number. NOTE: GPRS/GSM communications MUST be established in the first instance, prior to making PSTN the primary communications path. Defaulting the SDW-100-3G Apply Battery or DC power for less than two (2) seconds remove power and then apply power again. LEDS will all flash together for four (4) seconds to confirm successful default. Page 7 SafeDial Wireless SDW-100-3G Input and Output Three (3) outputs: The Output are open collector 12V 50mA switching negative, for heavier loads a relay must be used. The outputs can be Opened, Closed or Pulsed remotely using The SafeDial Toolbox App. (www.Safedialtoolbox.com.au) Ensure there is a common negative between the SDW-100-3G and the device being switched. Output 1 is typically used for arming / disarming the alarm panel via Pocket Secure. Refer to Pocket Secure for wiring instructions – refer Table of Contents Four (4) Inputs: Tamper input does not require an EOL resistor. All other inputs must be terminated with a 10K resistor. The EOL resistor must be placed inside or as close to the sensor as possible. Battery Charging A dedicated 14.5V power supply is required if the battery is fitted. This is supplied as standard with the unit. Do not fit a battery if unit is powered by the Alarm Panel. Page 8 SafeDial Wireless SDW-100-3G SDW-100-3G Powered by Independent Power supply SDI-10 Powered by Alarm Panel RECOMMENDED WIRING SDI-10 and SDW-100-3G Powered by Alarm Panel Page 9 SafeDial Wireless SDW-100-3G LED Status Indicators SDW-100-3G Normal Operation Power Steady On GSM Blinking on data transmission SIM Off Battery Off Signal M or H Strength Steady On (L, M & H) Serial Blinking On-line Steady On Heart Beat Blinking LED STATUS DESCRIPTION POWER Steady On Indicates battery or 12 Volt GSM Steady On Not activated or network is not available Flash twice Indicates connectivity with the GSM network. (Flashes twice every six (6) seconds – approximately) Searching for GPRS network SIM B BATTERY (B-LOW) SIGNAL STRENGTH Blinking continuously Flashing once Not used Steady On Connected to GSM Network Indicates low battery voltage or no battery connected L (low) Steady On indicates Low signal strength M (medium) Steady On indicates Medium signal strength SERIAL H (high) Blinking Steady On indicates High signal strength Indicates connectivity between the SDW-100-3G and the SDI-10 ONLINE Steady On Correct normal operation Off No connection to network Blinking When the CPU has completed a power up test and is working properly HEART BEAT Page 10 SafeDial Wireless SDW-100-3G LED Status Indicators SDI-10 Normal Operations Heart Beat Blinking Link Blinking PSTN Off Panel Blinking when Alarm dials Off Hook Off Panel Comms Steady On GPRS Steady On LED STATUS DESCRIPTION HEART BEAT LINK Blinking When the CPU has completed a power up test and is working properly Indicates connectivity between the SDW-100-3G and the SDI-10 Blinking Off PSTN Steady On PANEL 1 Off Steady On OFF HOOK Blinking Steady On Indicates a fault with wiring between SDW-100-3G and SDI-10. Check blue and white wire. A Serial Interface Fail message (ID 353) will be sent to the CMS. Indicates that there is no line voltage on the incoming telephone (from the exchange). Indicates PSTN line voltage is present. Indicates a fault condition, being NO connectivity between the SDI-10 and the Alarm Panel Dialler. A dialler interface lead fault message (ID 352) will be sent to the CMS. Normal Condition. Blinks when the Alarm Panel dials. Indicates that the alarm panel dialler has grabbed the line. Off Alarm panel is not attempting to grab the line Steady On Indicates that the alarm panel sent a valid Contact ID message Pulses When panel dials or sends a message. Off Panel has not sent a valid contact ID message. Steady On Indicates connectivity to the SDW-100-3G. Off The SDW-100-3G is off line PANEL COMMS GPRS Page 11 SafeDial Wireless SDW-100-3G General Operation Background Polling The SDW-100-3G send a health check poll back via GPRS every 20 minutes. The poll times in the server is reset after every received poll. If no poll is received for a consecutive 4 hours, a “Poll Fail” message (Contact ID event message E356 39 970) is sent to the CMS. Alarm Panel Configuration It is standard practice to turn line monitoring off when using GPRS/GSM units. In some panels, line voltage monitoring is set with very tight tolerances resulting in the voltage threshold not being met occasionally when the GPRS/GSM units momentary drop the PSTN line to scan channels and change cells. If line monitoring is not disabled, the panel will randomly report “Telco Line Faults” or “Telco 1 Faults”. Communications Failure GPRS/GSM Primary and NO PSTN Backup In the event of a SafeDial Wireless product being off line, such as the SDW-100-3G not having GPRS connectivity (as indicated by the GPRS LEN being off), the SDI-10 will not generate a voltage or dial tone to the panel. This is a safeguard to make sure the panel does not dial the SDW-100-3G when it is unable to send the message. Such an event will be detected by the alarm panel and a fault condition will be displayed on the panel. GPRS/GSM Primary and PSTN Backup In this scenario, if GPRS/GSM connectivity failed, the alarm messages will be communicated back to the CMS via the PSTN network. Page 12 SafeDial Wireless SDW-100-3G Product Trouble Shooting Serial LED not flashing Indicates problem with serial connection from the SDW-100-3G to the SDI-10. Check BOTH jumpers are fitted on pins 13&14 and pins 15&16 of (JP2) in SDW-100-3G, for operation with SDI-10. Check SDW-100-3G and SDI-10 comms wires - blue wire to ‘A’, white wire to ‘B’ Battery LED steady on Indicates a low voltage on the battery. Check battery voltage and replace if necessary. On-line LED Off Check unit has been activated. Check the signal strength LED. Check GSM LED status for network availability. Signal Strength LED Low Reposition unit and power up again to recheck. Install High Gain Antenna NOTE: The SDW-100-3G unit may not operate reliably with a low signal Signal Strength LED’s all off. Check antenna and antenna connection. No network coverage in area. Reposition unit and power up again. NOTE: The SDW-100-3G unit may not operate reliably with a low signal Page 13 SafeDial Wireless SDW-100-3G Final Commissioning Check List PASS () ITEM NOTES ‘Heart Beat’ LED Blinking ‘On-line’ LED Steady On Never leave site without achieving a steady ‘On-line’ LED Signal Strength LED is M (medium) or H (high) Battery Low ‘B-low’ LED is Off ‘Power’ LED is steady On Tamper switch installed and connected Line Monitoring disabled Test SDW-100-3G alarm panel communication via GPRS/GSM (GPRS/GSM communications MUST be established prior to PSTN communications) Disconnect PSTN Generate an event from the alarm panel. Verify with the Control Monitoring Room that you have the correct Customer ID account and the event is received via GPRS/GSM. NOTE: This will appear at the PSTN receivers and be exactly the same as a PSTN communications alarm. Test alarm panel communication via PSTN Generate an event from the alarm panel. Verify with the Control Monitoring Room that you have the correct Customer ID account and the event is received via PSTN. ENSURE THE FOLLOWING ‘CONTACT ID REPORTING CODES LIST’ IS SENT TO YOUR CMS TOGETHER WITH YOUR ZONE LISTING Page 14 SafeDial Wireless SDW-100-3G GENERAL ALARMS SYSTEM TROUBLES CATEGORY ZONE EVENT ID PARTITION 300 39 956 Panel Faulty - No activity detected from alarm panel indicating possible problem with panel. 302 39 951 Battery Low – Battery voltage is low or absent. 313 39 953/954 337 39 950 DC Loss – 13.8V DC voltage low or absent. 338 39 951 Battery Fail – Battery voltage is low or absent. 350 39 953 Fail To Communicate – SDI-10 experienced trouble sending signals do not expect restore. 351 39 954/956 Phone Line Fail (No voltage). 352 39 955/956 Dialer Interface Lead Fail – Issue with dialer lead between SDI-10 unit and the alarm panel (4 Wire). 353 39 956 Serial Interface Fail – Issue with SDI-10 unit serial connection to SDW-100-3G 356 39 970 SDW-100-3G outstation is offline. 137 39 983 Tamper – SDI-10 box tamper. 140 39 981 Auxiliary 1 – Auxiliary input on SDW-100-3G unit. 140 39 982 Auxiliary 2 – Auxiliary input on SDW-100-3G unit. 140 39 983 Auxiliary 3 – Auxiliary input on SDW-100-3G unit. 140 39 984 Auxiliary 4 – Auxiliary input on SDW-100-3G unit. (Unique) DESCRIPTION Engineering Reset (changed encryption key to prevent duplication of a unit) – No action required. Transmission Delay Times List Tamper input status message are transmitted immediately. Message originating from the panel are forwarded immediately. Alarm panel interface fail sent if not restored within 90 seconds. Page 15 SafeDial Wireless SDW-100-3G Specifications SDW-100-3G Size: List 142 x 100 mm Weight: 0.25 Kg Antenna: Dual Band 2G 3G & NEXT G Modem: Siemens Power: 14.5V DC Plug pack must have approval Power Consumption: Standby: 0.05A Transmitting: 0.60 A Power Reporting: Powered from 14.5V plug pack (supplied). DC-Loss reported <11.8V DC-OK reported >12.8V Battery Low Fail DCV<11.6v Report delay 10 minute Restore DCV>12.5v Immediate Powered From Alarm Panel DC-Loss reported <10V DC-OK reported >11V Backup Battery: 12V/1.2AH sealed lead acid battery (Powers unit for about 30 hours) Auxiliary Input: TT, tamper input, (24Hr Zones) State change detected every second Serial Interface: Consult the relevant serial interface specifications Specifications SDI-10 Size: 70 x 50 x 20 mm Power: Power Consumption: Dialler Interface: 14.4V DC Standby: 0.23A Accepts Contact ID (Ademco-685) Telephone Lead: Fail Restore Interface Lead (Dialler): Fail Restore DCV< 4V for more than 18seconds DCV > 5V for more than 8 seconds DCV< 4V for more than 18seconds DCV > 5V for more than 8 seconds Response Dialler Interface: < 10 sec typical (seizing line to receiving ACK) < 50 sec absolute maximum Serial Interface: < 2 sec typical (dispatch to receiving ACK) < 50 sec absolute maximum Page 16 SafeDial Wireless SDW-100-3G SafeDial Toolbox Introduction SafeDial Toolbox is a secure web based platform designed for use by Bureaus and Installers. All users can interrogate their SafeDial Wireless outstations remotely for installation, commissioning, diagnostic and control purposes. SafeDial Toolbox has been optimised to run on any touch screen phone, PC, tablet or iPad. To access SafeDial Toolbox, simply go to www.safedialtoolbox.com.au You will be prompted to enter your issued email address and password. NOTE: If you enter the wrong password three times SafeDial will send your paasword to your registered email. Page 17 SafeDial Wireless SDW-100-3G Settings and PING Icons Once you have signed in, you will be greeted with the following screen. The TABS shown above and their functionality are as follows:SETTINGS ICON Clicking on the settings ICON opens the following screen which allows you to change your password. NOTE: If you enter the wrong password three times SafeDial will send your password to your registered email. Page 18 SafeDial Wireless SDW-100-3G Main Activity Screen PING ICON Clicking on the “Ping” ICON brings you back to the main screen (Top Left Hand Side) ACCOUNT The “Account” field is where the user enters his unique Account Number provided by the Control Monitoring Station. This is a unique four (4) digit number. SERIAL The “Serial” field is where the user enters the unique Serial Number of their SafeDial Wireless unit. The serial number can be found on the inside of the SafeDial Wireless product clearly identified on the printed label. This is a five (5) digit number starting with the digit “3”. REQUIREMENTS The “requirements” TAB is the home page where all status data will be displayed. Once you have entered the Account and Serial numbers and then select , information will be displayed on this page. The left hand side of the screen displays the products current status while the right hand side of the screen displays the last 50 Contact ID messages. Page 19 SafeDial Wireless SDW-100-3G Main Activity Screen - Smartphone NOTE: On a Smartphone (where the screen size is somewhat smaller), you need to swipe “left” to view the Contact ID messages. SWIPE SCREEN TO LEFT Page 20 SafeDial Wireless SDW-100-3G Information Page INFORMATION TAB The “information” TAB is the page where all product information such as hardware and software revisions are displayed Page 21 SafeDial Wireless SDW-100-3G Input / Output Page INPUT / OUTUT TAB The “Input / Output” page displays status information of all inputs and outputs available of the product. The outputs can be opened, closed and pulsed. The inputs report, OK or violated. Additional functionality available from the Input/Output page incudes: PSTN TIMER In a situation where GSM/GPRS is used as the primary, this timer allows you to swap over to PSTN so you can dial up and remotely program the alarm panel. By selecting the “START” button, the communications path will be switched to PSTN for a period of 45 minutes. If you wish to switch back prior to the 45 minutes expiring, simply select the “STOP” button. DEFAULT UNIT By selecting the “DEFAULT UNIT” button, the SDW-100 will be reset and loaded with its default settings. Page 22 SafeDial Wireless SDW-100-3G History Page HISTORY TAB The “HISTORY” page displays all previous activities/events and displays them with a time and date stamp. E.g. Inputs, Outputs, etc. All events are displayed but each event type can be turned on and off by selecting or deselecting the event on the right hand side (tick box). The events displayed are: Assign – Details of which CMS the product has been assigned too Notes – Notes such as Customer Details can be entered in the text box above for future reference. This will be invaluable information, particular if you install numerous units Reset – Records time and date of any unit RESET Toggle-Toggle relates to the activity of all Input and Output events. PSTN – PSTN displays any PSTN changeover activity Page 23 SafeDial Wireless SDW-100-3G Pocket Secure Introduction Pocket Secure is a smartphone app which connects to the SafeDial Wireless servers via the internet. Once a connection is established, the last 100 events are scanned and the state of the alarm is determined and presented to the user. To toggle the state of the alarm, the app presents an interface to pulse output 1 on the SafeDial Wireless unit in the field. This then forces the app to wait until the next open/close event is sent and updates the app with the new state Page 24 SafeDial Wireless SDW-100-3G Providing Pocket Secure to Your End Users Wiring to the panel 1. Program a zone on the alarm panel to be a ‘key switch’ zone. In the case of the diagram, zone 4 has been chosen. 2. Pocket secure pulses output 1 on the SDW unit, so wire output 1 to the previously programmed zone. Output 1 is normally open switching to negative. 3. Make sure there is a common negative between the Alarm panel and the SDW unit. Page 25 SafeDial Wireless SDW-100-3G Creating a User 1. Login to SafeDial Toolbox– using your existing Login 2. Enter the Serial number of the unit you wish to access and Ping the unit. Then click on “Users”. 3. Enter the details of the user you wish to set up for access to Arm & Disarm the alarm. Note: The email address you use cannot be the same as an email address already in use as a login to SafeDial Toolbox. Enter a password and re-enter to confirm. Select “End User” from the Drop Down box. A entry table will appear. Select:Serial No./ Name - Any Area / Output 1 Then Click – Update User. PLEASE NOTE: Only a Bureau Administrator (the user that signed up) is able to create/manage Pocket Secure users. Be sure that all information is correct, incorrect data can cause malfunction. Remember that a password must be 8 or more characters long with one digit and one uppercase character. Page 26 SafeDial Wireless SDW-100-3G Installing the App iPhone Android Open App Store. Search for "Pocket Secure", and then press ar Install Open Play Store. Search for "Pocket Secure", and then press Install Open Settings. Select Pocket Secure then enter the email and password of the user you created in step 2. Open Pocket Secure from your home screen. Then enter the email and password of the user you created in step 2. Open Pocket Secure from your home screen. Controlling Additional Alarms from the One App You can set up access to another Device, perhaps your Holiday house or Office. To do this, follow these steps. 1. Go back and login to SafeDial Toolbox. Choose users. 2. Find the User you created before and click on edit The following screen will appear, with all the information populated. 3. Select and click- “Add Device”. 4. A new table will appear. Insert Serial number of the new Device. Name it. (In this case “Office”) 5.Click on “Update User” Page 27 SafeDial Wireless SDW-100-3G Using the App When you login to the App as this user, you will have a choice from a dropdown menu at the top of the App. In this example I have a choice of “Home” or “Office” Once logged into the App, you will now have a choice of Home or Office and the App will display the state the Alarm is in. Green Lock indicates Alarm is “Off” and can be “Armed” by clicking on the red Arm button. The App will then display this grey lock with a spinning key hole, indicating that the System is being configured. The App then shows the alarm has been Armed and the lock is in Red, with the Disarm button in Green. Then if you choose Home from the drop down menu. It will show the alarm at “Home” is in a “Disarmed” state. Page 28 SafeDial Wireless SDW-100-3G SafeDial Toolbox & Pocket Secure FAQs Q. Can you remotely reconfigure Interface ports – PSTN & Panel? A. No this is a physical connection and can only be disabled by physical disconnection Q. Can you change a customer account code? A. The customer cannot change the CMS Account Code; it must be done by Globe as an Administrator. The customer needs to email us with: The unit serial number The new account number The Notes (Customer, location or address, etc.) they want us to put into the registration for that unit so they will know who it belongs to in the future when they have may SDW units. Once we have this, we (as Administrators) can simply go into the ACTIVATE screen, enter the above details and ACTIVATE the unit again. It will come up with a prompt telling you it is already activated, simply hit the ACTIVATE button selection it gives you. It used to be that the unit must be powered up but Rod has fixed this so this is no longer the case. NOTES: If you are doing it live, tell the customer to repower the unit for the change to take effect. It may take a little time (5minutes) or so for the server to register the change and the unit to be fully operational again. Q. Where do I find the notes I have written for each customer A. The notes are visible in the Notes section TAB. The notes are written with the quotation marks “NOTES”. Notes written by an Administrator are not seen by the customer. Q. How do I cancel a Customer? A. Report the deactivation to Globe and we will deactivate it for you. NB: This must be done in writing via email. Q. What does the RED text in SafeDial Toolbox mean? A. RED text in SafeDial Toolbox means that the unit has not been activated. Q. What does it mean when the customer receives a message in SafeDial Toolbox stating “…..will be sent to your mobile” when the customer tries to ACTIVATE his unit? A. This means that the registration process was not completed correctly. Please check that the registration was done correctly and then REACTIVATE the unit in SafeDial Toolbox as an Administrator to see if this fixed the problem. Page 29 SafeDial Wireless SDW-100-3G Q. What do I check if SafeDial Toolbox reports there is NO INTERFACE even though I have connected it? A. The things to check are as follows: Firstly check that the following 3 wires are connected correctly between the SDW-100 and the SDI-10 o A is connected A o B is connected to B o Ground is connected to Ground NOTE: The 13.8V lead on this 4 way connector is typically not used as the SDI-10 gets its power from the alarm panel. You can also check connection integrity between these connections using a multimeter:o Between A and Ground should be approximately 12V o Between B and Ground should be approximately 3V Next, ensure the two connector jumpers are fitted on the main SDW-100 unit. These are used to short PIN 13 to PIN 14 and PIN 15 to PIN 16. Q. How many records are stored in SafeDial Toolbox under the ACTIVATE window? A. You can scroll down through the records in the ACTIVATE screen which stores the last 100 events. The oldest records are dropped off this summary. It is recommended that the customer creates his own database as a permanent record. Q. How many records are stored in SafeDial Toolbox under the HISTORY window? A. You can scroll down through the records in the HISTORY screen which stores the last 1000 events. The oldest records are dropped off this summary. It is recommended that the customer creates his own database as a permanent record. Q. Why does Power Supply, Battery, and Dialler Interface show FAILED in SafeDial Toolbox when they are first powered up? A. It is normal for a SDW unit to indicate a FAILED condition for Power Supply, Battery and Dialler Interface when first powered up as this information is NOT available until the unit is ONLINE and fully operational. Q. Under what conditions can a unit be ported from one bureau to another? A. Globe requires a Porting Authority form to be signed before a unit can be ported from one Bureau to another. This is to protect the Bureau who sold the unit. The exception to this is when a customer has cancelled a service on the incumbent Bureau, in which case, in can be ported upon proof of cancelation. Q. What does Engineering Reset mean? A. An Engineering Reset is reported whenever a unit is powered off and on again. When an Engineering Reset occurs, the device is given its encryption code by the server. Page 30 SafeDial Wireless SDW-100-3G Q. Why are the Contact ID messages in SafeDial Toolbox shaded Green? A. Contact ID messages shaded in green indicate that messages are being processed but not yet completed / delivered. Q. Why can’t I re-activate a SafeDial Wireless unit to another 1345 number (Control Room)? A. This is a security feature built into the product to ensure that another Bureau cannot reprogram your unit without your / our consent. Should you ever need to re-activate a unit onto another 1345 number, please call Globe and we can do this for you as an Administrator. Q. How do I know if the messages are being generated by the Alarm Panel or the SafeDial Wireless unit? A. As per the example below, the message being generated comes from Zone: 066. Messages being generated by the SafeDial Wireless unit will be coming from Zone: 9xx. Page 31 SafeDial Wireless SDW-100-3G SafeDial Toolbox & Pocket Secure FAQs GSM Phone Line Fail - This means that there has been a PSTN line failure. No activity on Panel Keypad - This means that there has been a communications failure with the Alarm Panel. In most instances, it is because the Alarm Panel has stopped or changed the clock pulse while it goes off to do another process. The solution is to ground or cut off the grey wire that connects between the SDI-10 and the Alarm Panel. GSM Serial Interface Fail - This relates to a communications error between the SDW-100-3G and the SDI10. It is typically due to one of the following: Incorrect wiring between the devices Intermittent connections between the devices Missing our faulty jumper links between located on the SDW-100-3G. These are located on JP2 and short PIN 13 to PIN 14 and PIN 15 to PIN 16. GSM Dialler Lead Fail - This message can be reported for a couple of reasons. It can occur when the PSTN line is held up by the Alarm Panel for a longer than expected period of time, or This is typically reported if the cabling between the Alarm Panel and the SDI-10 is incorrect. Refer to previous question for reasons. Where the DIALLER INTERFACE reports “OK” but this “GSM Dialler Lead Fail” continues to report, it is likely to be a configuration problem with the panel, many of which have minor idiosyncrasies. Typical problems include:- Vista 10 and 20’s Level issue with SDI-10, fixed in newer versions of SDI-10’s - TCOM V10 Level issue with SDI-10, fixed in newer versions of SDI-10’s - Bosch 16 and 880’s Half dials and stops due to phone number being put in as a “0” rather than a “10”. “0” is identified as a stop command. Configured for Pulse dialling not Tone dialling - DL250 and DL300 Must put a 15 in front of the number to Tone dial (if not, it will Pulse Dial) - DSC15 Need to activate Dumb Dial A good way of checking if the SafeDial Wireless interface is working correctly is to: Plug in the SDI-10 4 pin Panel Dialler to Alarm Panel interface lead supplied Remove the cover from the Telephone Socket end of the lead Short out Pins 1&2 and separately short out Pins 5&6 Page 32 SafeDial Wireless SDW-100-3G Shorting Pins Interface Lead Supplied (Pin 1 to Pin2 & Pin 5 to Pin 6) If the DIALLER INTERFACE in SafeDial Toolbox reports OK, then the problem will typically be in the wiring or the Alarm Panel. It is highly recommended to use the leads supplied with the equipment and then simply connect them together. That is, use the SafeDial Wireless Interface lead supplied and the Alarm Panel Interface lead supplied. Dialler Interface Failed – This typically means that the cabling between the SDI-10 and Alarm Panel is incorrect. Typically on a 6 pin mode plug that comes with the alarm, Pins 2 and 6 are the incoming signals from the Alarm Panel and Pins 1 and 5 are the return signals to the Alarm Panel. Testing with a multimeter will typically indicate a voltage of approximately 30V on the input lines and approximately 30V on the output lines (when the alarm panel is in steady state – not transmitting). The corresponding pins on the SDI-10 Panel socket are Input (Pins 2 & 3 – Ring & Tip) and Return (Pins 1 & 4 – R1 & T1) Another test would be to plug a “but set” handset into the SDI-10 panel socket and dial any 8 digit number. This should return a “daDit” response. NOTE: Even though the FAILED indication is present, if the incoming signals from the Alarm Panel are wired correctly, messages will be sent back to the Control Room and therefore appear that all is OK. This however is NOT the case as alarms will continuously be sent back to the control room. GSM Fail to Communicate – This is typically reported when the SafeDial Wireless unit tries to send an event and it did not get through. This can be due to various reasons such as a busy cell, a failed call attempt, etc. which does occur occasionally in the real world. In this instance, the alarm panel will not receive a Kiss Off and will then resend the event. While we keep track of these failed attempts in our server, thus knowing we had a “Failed to Communicate” event, we do not resend the message as otherwise we could end up with multiple retries of the same message. You will see that we report this “Failed to Communicate” event at exactly the same time as the resent message. Phone Interface Failed – This means that there is no PSTN connected to the SDI-10. Telco Line Fail or “Telco 1 Fail - It is standard practice to turn line monitoring off when using GPRS/GSM units because GPRS/GSM units will momentary drop the PSTN line as they scan channels and change cells. In some panels, line voltage monitoring is set with very tight tolerances resulting in the voltage threshold not being met occasionally. Therefore, it is important that you disable PSTN line monitoring in the alarm panel which will inhibit this. If line monitoring is not disabled, the panel will randomly report “Telco Line Faults” or “Telco 1 Faults”. Page 33 SafeDial Wireless SDW-100-3G Warning INSTALLATION MUST BE CARRIED OUT BY SERVICE PERSONNEL ONLY CAUTION: RISK OF EXPLOSION IF BATTERY IS REPLACED BY AN INCORRECT TYPE. DISPOSE OF USED BATTERIES CORRECTLY. For correct operation the unit must be powered with an approved power supply and a 12V/1.3AH sealed lead acid battery. The unit must only be operated with the supplied antenna. Install the SDW-100 in a location that no person[s] is closer than 200 mm to the antenna at all times. Australian Standard AS2201 requires regular service by qualified and licensed technicians and regular testing. The unit must be installed in accordance with this manual and AS2201.1 for proper operation. Liability While every effort has been taken to ensure the accuracy of this document, Globe Telecom assumes no responsibility or liability for any errors or omissions. Globe Telecom reserves the right to make changes to this manual due to ongoing development. Notes ……………………………………………………………………………………………………………………… ……………………………………………………………………………………………………………………… ……………………………………………………………………………………………………………………… ………………………………………………………………………………………………....…………………… ……………………………………………………………………………………………………………………… ……………………………………………………………………………………………………………………… ……………………………………………………………………………………………………………………… ………………………………………………………………………………………………....…………………… Page 34