1
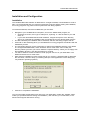
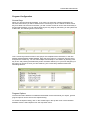
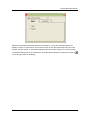
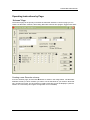
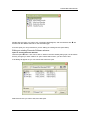
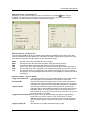
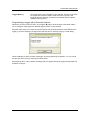
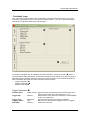
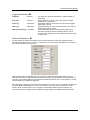
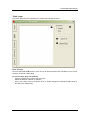
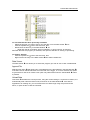
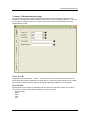
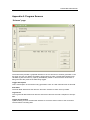
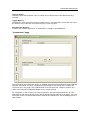
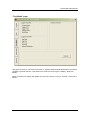
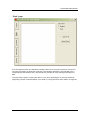
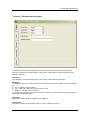
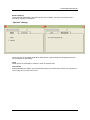
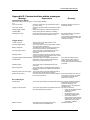
Manual – Recorder Software Manual Unidata Recorder Software Installation Guide and User’s Manual Revision History File name / Revision Date Authors Previous version BX 2004 RS/ JH Unidata Manual - Recorder SW Manual Issue 2.0 2007 AB/CB/JH/MS/KC Copyright © Unidata Pty Ltd 2000-2008. All rights reserved. No part of this publication may be reproduced, transmitted, transcribed, stored in a retrieval system, or translated into any spoken or computer language, in any form or by any means. Electronic, mechanical, magnetic, optical, chemical, manual or otherwise, without prior written permission of Unidata Pty Ltd 40 Ladner St, O’Connor Western Australia 6163. Unidata Manual - Recorder SW Manual Issue 2.0 Unidata Recorder Manual Contents CONTENTS ....................................................................................................................................................................2 SCOPE AND REFERENCES ....................................................................................................................................3 SCOPE ............................................................................................................................................................................ 3 REFERENCES ................................................................................................................................................................. 3 DEFINITIONS & A BBREVIATIONS............................................................................................................................... 3 OTHER COPYRIGHTS.................................................................................................................................................... 3 INTRODUCTION.........................................................................................................................................................4 SYSTEM REQUIREMENTS............................................................................................................................................. 4 INSTALLATION AND CONFIGURATION ........................................................................................................5 INSTALLATION.............................................................................................................................................................. 5 PROGRAM CONFIGURATION ....................................................................................................................................... 6 QUICK-START GUIDE..............................................................................................................................................8 OPERATING INSTRUCTIONS BY PAGE...........................................................................................................9 “SCHEME” PAGE .......................................................................................................................................................... 9 “INSTRUMENTS” PAGE .............................................................................................................................................. 13 “TEST MODE” PAGE ................................................................................................................................................... 14 “DATA” PAGE ............................................................................................................................................................. 16 “COMMS” (COMMUNICATIONS) PAGE .................................................................................................................... 18 APPENDIX A: PROGRAM SCREENS ................................................................................................................20 “SCHEME” PAGE ......................................................................................................................................................... 20 “INSTRUMENTS” PAGE ............................................................................................................................................... 21 “TEST MODE” PAGE ................................................................................................................................................... 22 “DATA” PAGE ............................................................................................................................................................. 23 “COMMS” (COMMUNICATIONS) PAGE .................................................................................................................... 24 “OPTIONS” DIALOGS .................................................................................................................................................. 25 APPENDIX B: COMMUNICATIONS STATUS MESSAGES ......................................................................26 APPENDIX C: PINOUTS AND CONNECTIONS ............................................................................................27 SQL / DB9 / DB25 PINOUTS................................................................................................................................... 27 2 Unidata Recorder Manual Scope and References Scope This manual covers the installation and use of the Unidata® Recorder Software, starting from version 1.00.0011. Other versions - whether later or earlier - may share functionality with this version, but this cannot be guaranteed. This manual does not cover operation of the PC the software is installed on, or manipulation of the operating system beyond that necessary to install and run the Recorder Software. References Starlog Version 3 User Manual. User Manual(s) for supported Recorder(s). Manual for attached modem if applicable. Definitions & Abbreviations Recorder A Unidata Data Logger that has integrated instrumentation. The term Recorder Instrument will be used in this document in reference to Unidata loggers that have integrated instruments. Generally the term is used in conjunction with the instrument name – e.g. ‘Water Level Recorder’ or ‘Turbidity Recorder’. Recorder Software A windows software package designed to support Unidata Recorders. DataLogger or Logger An electronic battery powered device that stores the values of attached instrumentation into non-volatile memory for retrieval later using a computer. The term Logger will be used in the document and software to refer to the internal logger fitted to a Recorder Instrument. Logging The process of recording information into the Recorder Instrument’s memory, for later retrieval and processing. Instrument Equipment that measures some aspect of its environment. Scheme A sequence of programming instructions that instructs a Recorder Instrument on what data to log, where to obtain the data from, and how often to do so. DWLR Digital Water Level Recorder Other Copyrights Microsoft®, Microsoft Excel, Windows® 95/98/Me/NT/2000/XP are all copyright Microsoft Corporation. 3 Unidata Recorder Manual Introduction The Unidata Recorder Software is designed for easy interaction with Unidata® logger based Recorder Instruments. The Recorder Software performs the following functions: Create and Edit schemes Program supported Unidata® Recorder Instruments View real-time data from supported Unidata® Recorder Instruments (status and current scheme information) Retrieve collected data from supported Unidata® Recorder Instruments. The Recorder Software currently supports all Unidata Recorder Instruments. Custom templates can be designed to allow the recorder software to be used with any Logger from Unidata except PDL and Macro Loggers. This allows Unidata customers and system integrators to offer a standalone Windows package for systems – if this is required please email [email protected] for more information. The Recorder Software runs identically on Windows 95, 98, Me, NT, 2000 and XP. Microsoft’s Windows Service Packs for your operating system are not required for correct operation. Support for more Recorder Instruments may be added in future releases. See http://www.unidata.com.au for more information. System Requirements The Unidata Recorder Software has no specific minimum system requirements above that necessary to run your Windows operating system. The program consumes 2-3Mb of RAM during operation. Ports and I/O An available serial (COM) port capable of communication at 9600 baud is required for communication with loggers. The serial port is not required for scheme creation and editing. A USB port equipped with an USB-Serial port converter is sufficient for Recorder to communicate with Recorder Instruments. Consult the documentation for your converter for assistance with correctly configuring your particular converter. 4 Unidata Recorder Manual Installation and Configuration Installation The Unidata® Recorder Software is distributed on a single CD-ROM, or downloaded as a set of files. It is recommended that you close all unnecessary programs before starting the installation, as running programs may prevent some system files from being updated. To install the software, insert the CD-ROM into your CD drive. • • • • • • • Navigate to your CD-ROM drive in Explorer, and run the SETUP.EXE program; or • Click Start, then Run, then type “F:\setup.exe”, replacing “F:” with the letter of your CD drive, or • If you have downloaded the Recorder Software, navigate in Explorer to the directory where you unzipped the installation files and double-click on the SETUP.EXE program. The files necessary for installation will be extracted, and then the Setup program will run. Press OK on the first dialog when you are satisfied no running programs will interfere with the installation process. The next dialog will give you the opportunity to change the installation directory. The default is C:\Program Files\Recorder\, which should be fine for most users. Don’t modify this directory unless you know you want to install to a specific directory. When you are happy with the installation directory, click the large button to continue. You will be asked to choose a folder to create program icons in for your Start Menu. The default should be fine for most users. Wait while the installation process copies files to your system. If presented with a dialog like the one below, choose to keep your existing files (the exact appearance of the dialog may vary between operating systems.) Click OK to complete the installation. You can now select the Recorder menu item from your Start Menu (Under the “Unidata” folder, unless you specified otherwise during the installation.) The first time you run Recorder, it will extract some support files before running. 5 Unidata Recorder Manual Program Configuration License Keys When you open the Recorder Software, if you have not previously unlocked (activated) any Recorder Instruments you will be asked for the License Keys to do so. Without a valid License Key for at least one Recorder Instrument, you will not have access to most of the functionality of the Recorder Software. You can add License Keys at any stage by left-clicking on the system box of Recorder, and selecting Enter License Key: Your License Keys should consist of five groups of five alphanumeric characters, in the form XXXXX-XXXXX-XXXXX-XXXXX-XXXXX. Enter the five groups for a single key into the boxes and press the submit key. You can add multiple License Keys in one session by entering each key in turn and pressing the Submit Key button. Recorder will tell you if you have mistyped your Key when you submit it. Once you have finished, your License Keys window should look something like this: Program Options Once the Recorder Software is installed and activated for the instruments you require, general program options can be set from the Options dialog. To access the Options dialog, click on the Unidata logo in the top left corner of the Recorder Software window. Select Options from the drop-down menu. 6 Unidata Recorder Manual Make sure the Enable Advanced Setup box is checked. You can then set global options for display of metric or imperial units, and choose to show or hide the Instruments tab on the main window. See the section on the Options dialogs under the Screens section for more information. Once these settings are to your satisfaction, close the Options dialog by clicking the Close box in the top right corner of the dialog. 7 Unidata Recorder Manual Quick-Start Guide Page 5 Install the Software Page 6 Install Licence Keys "License Keys" enable you to create and use schemes based on different Recorder Instruments. Each model or type of Recorder Instrument has its own License Key. Pages 9-11 Create a Scheme Open a Scheme A Scheme is a program for a Recorder Instrument - it contains instructions for the Recorder Instrument about what data to collect, how to process it and how often to record it. The Scheme also contains information on what additional instruments have been connected to the Recorder Instrument, and how to handle them. Schemes can be saved and loaded like a document on your computer. If you unload a Recorder Instrument, you will need the scheme that was used to record that data in order to process and display it correctly. Page 12 Program a Recorder Instrument "Programming" a Recorder Instrument loads the Scheme into its memory, and begins the logging process. A Recorder Instrument without a program cannot log anything, since it doesn't know what to do! Allow Recorder Instrument to Log Data Once programmed, the Recorder Instrument can be connected to any required instruments and left to log data by itself. Page 16 Retrieve Data from Recorder Instrument Retrieving data from, or "unloading", a Recorder Instrument copies the gathered data back onto your computer for display or analysis. Page 16 Display Data Save Data 8 The Recorder Software allows you to save the data you unload to file, or launch Notepad or Microsoft Excel to view the data and analyse it further. Unidata Recorder Manual Operating Instructions by Page “Scheme” Page The Scheme page is the primary tool within the Recorder Software. From this page you can create new Recorder schemes, edit existing Recorder schemes and program loggers with either. Creating a new Recorder scheme From the Scheme page, click the New Œ button as shown in the image above. The Recorder Software will ask you which recorder you want to use as the basis for your scheme. Note that only recorders for which you have entered a valid License Key for will be displayed. (See the section on License Keys in Program Configuration for more details) 9 Unidata Recorder Manual Double-click the logger you wish to use. The dialog will disappear, and the Channels box • will be filled with the default channels for the selected logger. From this point you can proceed as if you are editing an existing scheme (see below). Editing an existing Recorder Software scheme Open an existing Recorder Scheme Click the Open • button. This can be with or without a scheme already being open, but be aware that any changes you have made to an open scheme will be lost if you don’t save it first. A file dialog will appear so you can choose the scheme to open. Select the scheme you wish to edit, and click Open. 10 Unidata Recorder Manual Edit the scheme - Customisations Depending on the instrument that your scheme is based on, the Setup button may be available. If it is disabled (greyed out) then the instrument has no specific customisations available. The Setup dialog, if enabled, varies between loggers: Edit the scheme – Channels box The channels box • contains all available data parameters available to be logged, along with various calculations that are allowed. For information on adding Instruments to a scheme, which may add more channels, see the section on the “Instruments” Page. RAW MAX MIN TOT AVG avg The raw value of the parameter at time of logging. The highest value the parameter has taken during the last log interval. The lowest value the parameter has taken during the last log interval. A sum of the value of the parameter at each scan interval within the last log interval. The average value of the parameter, with samples being taken at each scan interval. The average value of the parameter, with samples being taken at each sub-interval. This option is currently disabled within Recorder, but is available for some instruments in Starlog V3. Edit the scheme – Scheme details Logger Description ‘ A text area that allows you to set a description for the current scheme. This description is not transferred to the Recorder Instrument. Scan Rate ’ Sets the interval between logger scans. At each scan, the Recorder Instrument will check its data parameters and perform any necessary calculations or manipulations (eg. MAX/MIN calculations, TOTalising). Log Interval “ Sets the interval between logs. At each log interval, the Recorder Instrument will record all data parameters being logged, both raw and calculated values. The log interval must be a whole multiple of the scan interval. eg. If you have a scan interval of 2 minutes, you can not set a log interval of 5 minutes. Logger Serial Number ” Set by user. This is an optional safeguard against programming a logger with an incorrect scheme. If you set this value, it will be checked against the Recorder Instrument’s serial number during any data unload processes. If the two do not match, no unload will take place. Log Size (bytes) • The total size of the data parameters being logged. 11 Unidata Recorder Manual Logger Memory The total memory space available in the selected Recorder Instrument for logged data. The time shown under the memory space is the length of time the Recorder Instrument will operate before it fills the available memory space. Programming a logger with a Recorder scheme Whenever you have a scheme open, the Program • button will be enabled. This button allows you to configure and program an attached logger with the current scheme. Recorder will prompt you to save the scheme (which also generates the files to be loaded on the logger) if you have made any changes since the last save. It will then bring up a small dialog: which will display a series of status messages, as the programming progresses. You can cancel this process at any time by clicking the Cancel button. See Appendix B for a list of status messages that may appear during the programming sequence, and their meanings. 12 Unidata Recorder Manual “Instruments” Page The Instruments page is only enabled when a scheme is currently open for editing, or has just been created. This page allows you to add “extensions,” which add functionality to your scheme. Adding instruments to a scheme Adding an instrument to a scheme is simple, and can be achieved in one of two ways: - Double-click with the left mouse button on an instrument in the Instrument Library Œ box. Select an instrument in the Instrument Library Œ box, and then press the Add Instrument • button (the ‘down arrow’ in the middle of the page.) Removal is equally simple, although there is only one method: - Select an instrument in the Scheme Instruments •, and then press the Remove Instrument Ž button (the ‘up arrow’ in the middle of the page.) Configuring additional instruments Some instruments that can be added to a scheme can be customised to some extent. These custom options are accessible via the Scheme Instruments Ž box. Double-click the instrument you wish to configure. A new dialog will appear with the options specific to that instrument or extension. 13 Unidata Recorder Manual “Test Mode” page The “Test mode” page provides basic configuration and status information about a Recorder Instrument connected to the PC. The screen is largely passive – you do not have the ability to change the configuration data shown via this page. To retrieve information from an attached Recorder Instrument, press the Connect Œ button. A communications dialog will appear, as with the Programming procedure on the Scheme page. If Recorder finds the attached Recorder Instrument, the three panels of the Test Mode page will show information about the Recorder Instrument and its scheme: Logger Information • Logging Parameters Ž Scheme Channels • Logger Information • Scheme Name Logger S/N Logger Time Logging Status Scan Rate 14 Alpha-numeric Eight character scheme name. May contain letters and numbers and certain other characters (A..Z, 0..9, -, _) Numeric Serial number of the Recorder Instrument. User-definable at time of programming. Date/Time Current time stored in the Recorder Instrument. Text May be one of the following: Stopped, Primed, Logging. Numeric Scan rate in seconds. Unidata Recorder Manual Logging Parameters Ž Log Rate Numeric Log Size Numeric First Log Date/Time Last Log Date/Time Memory Remaining Time/Size Log Interval in seconds. Should be a whole multiple of Scan Rate. Size of each log in bytes. This is the number of bytes recorded per Log Interval. Exact date and time of the first log in the current logged data memory space. Exact date and time of the most recent log in the current logged data memory space. Time in Days Minutes:Seconds remaining before the Recorder Instrument fills its available memory space. The size in Kb (kilobytes) of the remaining memory space is also shown. Scheme Parameters • For this section to display information, the Recorder Instrument must be programmed with a scheme that resides on your computer. If this is the case, this section will present a summary of the channels in the current scheme: Note that Recorder does not retrieve the channel configuration information directly from the Recorder Instrument. If the Recorder Instrument has been programmed with an old version of a scheme, or an entirely different one that has an identical name as one on your system, incorrect channel data may possibly be displayed. If the Recorder Instrument’s current scheme matches the version on your computer, the Scheme Channels • box will display the correct current values. If the Recorder Instrument’s current scheme does not exist at all on your computer, the Recorder Software will not display any channel information. Logger Information • and Logging Parameters Ž will still be displayed. 15 Unidata Recorder Manual “Data” page The “Data” page performs unloading and simple data storage functions. Data Window The main data window Œ shows a “tree” view of all sites that have been unloaded on your current computer, and their unload file(s). To - 16 view the date range of a data file: Click the expand box next to the site name, Select the data file you wish to examine, Hover your mouse cursor over the file name. A ‘tooltip’ will appear, showing the date range of the data in the selected file. Unidata Recorder Manual To - view data that has been previously unloaded: Select the program you wish to use to view the data, from the Data Viewer • box. Click the expand box next to the site name, then Double-click the file entry in the Data Window Œ, or Right-click the file, and select “Open in Notepad” or “Open in Excel” as required. Recorder will start the program you selected, and open the data file for viewing or processing. To delete a data file: Click the expand box next to the site name, then Right click the file entry in the Data window Œ and select “Delete File” Data Viewer The Data Viewer • box allows you to select the program you wish to use to view unloaded data. Append File Selecting this option Ž will append any unloaded data to the file selected in the Data Window Œ. If the site name of selected file does not match that of the logger, or no file is selected, this option is ignored and a new file is created. This option only takes effect when the Unload Data • button is pressed. Unload Data This button • activates the unload process, using the current settings. If a new file is created, it is automatically filed under the relevant site, and shown in the Data Window Œ. If the data is appended to an existing file, you can examine the new date range using the process shown above, or open the file to view the new data. 17 Unidata Recorder Manual “Comms” (Communications) page This page gives access to modem and serial port settings for communicating with Recorder Instrument. The Recorder Software supports either direct serial connections (“Direct”), or you can use a Hayes-compatible modem to connect to a remote Recorder Instrument that has been installed with a modem. Comm Port Œ The physical communications – “COM” – port to use to connect to the Recorder Instrument, or the port that the modem is attached to if connecting to a remote Recorder Instrument via modem. The number of choices will vary with the number of COM ports installed in your computer. Baud Rate • The baud rate to use while communicating with the Recorder Instrument, and/or the modem if connecting to a remote Recorder Instrument via modem. Choices: 9600 (Default) 4800 2400 1200 300 18 Unidata Recorder Manual Connection Ž Select the type of connection you are attempting. “Direct” selects a connection via a serial cable, “Phone Modem” selects a connection to a remote Recorder Instrument via modem. Choices: Direct (default) Phone Modem Dial Number • The number to dial if connecting to a remote Recorder Instrument via modem. This setting is disabled and ignored if the Connection type Ž is set to “Direct.” Modem Settings • Configuration – “AT” – commands to send to the modem before dialling, if connecting to a remote Recorder Instrument via modem. See your modem manual for commands supported by your particular modem. This setting is disabled and ignored if the Connection type Ž is set to “Direct.” 19 Unidata Recorder Manual Appendix A: Program Screens “Scheme” page The Scheme tab provides a graphical interface to the raw structure of scheme generation. From this page, the user can define what data is logged and how often. The Recorder Software will calculate log size and memory capacity automatically based on what Recorder Instrument is being used and the profile of the data being logged. Logger Description This is a description of the scheme being generated. There is a 255-character limit on this field. Scan Rate The Scan Rate determines how often the Recorder Instrument ‘looks’ at its input data. Log Interval The Log Interval determines how often the Recorder Instrument records a snapshot of its input data. Logger Serial Number Optional setting to force the Recorder Software to check the serial number of the connected recorder before unloading data. 20 Unidata Recorder Manual Log Size (bytes) The size of each data snapshot. This is a simple sum of all the sizes of the data items being recorded. Logger Memory The total size of the Recorder Instrument’s data memory. The date shown underneath the size is the “lifetime” of the Recorder Instrument using the current Log Size. Data Selection Window A table of the available data items, and selections for frequency and totalisation. “Instruments” page The Instruments page shows the ‘library’ of available instruments and extensions for the selected Recorder Instrument, and which instruments and extensions have already been added to the current scheme. This page is only enabled when a scheme has been created or opened, as it refers to the instruments installed/available for the current scheme. An “Instrument”, in this context, is a virtual construction. The Instrument defines zero or more data channels that can be logged, along with the default internal channels of the logger. For more information on the concepts of instruments, channels and transducers, see the Starlog Version 3 User’s Guide. 21 Unidata Recorder Manual “Test Mode” page This page connects to a Recorder Instrument on request and downloads identification and status variables in pseudo-real time. This leads to the other term for this type of display, “Real-time display”. When connected, the display will update once per scan period, or every 5 seconds - whichever is shorter. 22 Unidata Recorder Manual “Data” page From this page the user can download (“Unload”) data from a Recorder Instrument, and save it for further processing by third-party programs. The Recorder Software is not intended to be a comprehensive data analysis tool – this interface is provided for rapid viewing and analysis of data. The user has the option of saving the data in a new file or appending to a previous unload file. Appending a series of unloads allows you to build up a long continuous set of data in a single file. 23 Unidata Recorder Manual “Comms” (Communications) page The Comms (Communications) page provides the user with options for direct serial-cable connection parameters, and the ability to set up their modem with a number to dial and extra settings if required. Comm Port The computer’s communications port to use for direct and modems connections. Baud Rate The data rate to use for communication. In most instances this will be “9600”. This setting applies to a) PC ó Modem communications b) PC ó Recorder Instrument communications, and c) Modem ó Modem communications if a modem is being used to connect to a remote recorder, it will not attempt a higher connection speed than the specified value. Connection Select direct (serial cable) or modem communication. Dial Number The phone number for the modem to dial, if using a modem connection. 24 Unidata Recorder Manual Modem Settings Extra (optional) initialisation commands for the user’s modem. Consult your modem’s user’s manual for supported commands. “Options” dialogs Allows the user to set global (application-wide) options. See the Program Configuration section for more details on this dialog. Units Global option for the display of values in metric or imperial units. Instruments Enables/Disables the display of the Instruments page. Some users will not have any requirement for this page and can hide it from view. 25 Unidata Recorder Manual Appendix B: Communications status messages Message Explanation Remedy Comms Engine Status StarLite4W Communications Engine Comms engine initialised V1.1 Comm port closed COM port closed, either by manual intervention or by an error event. Comm port opened COM port opened to initiate communications with a logger. Loading logger program Shown during Recorder Instrument programming. - Unloading data Shown during Recorder Instrument unloading. - Wait(ing) for prompt Shown whenever the comms engine is waiting for the Recorder Instrument to deliver a prompt. May be interrupted by pressing the Cancel button on the communications status window. This operation will timeout if no Recorder Instrument is present. Restart the operation, if it was not completed normally. - Logger Status x.xx Kb to unload Total amount of ‘new’ data available on the Recorder Instrument. Checking logger battery The comms engine is retrieving the battery reading from the Recorder Instrument. Battery voltage OK The battery level has been read successfully from the Recorder Instrument, and is satisfactory. Checking logger scheme The comms engine is checking the name of the scheme currently loaded on the Recorder Instrument. Stopping scheme The comms engine is forcing the currently running scheme on the Recorder Instrument to stop, so that reprogramming can take place. Configuring logger: Starflow Model C The comms engine is configuring the Recorder Flow Recorder Instrument. The type of Recorder Instrument is shown here as a check for the user. Initializing logger The comms engine is initialising the Recorder Instrument. Retreiving pointers The comms engine is checking the data pointers in the Recorder Instrument, to determine what data is available. Retreiving scheme info from logger... The comms engine is retrieving additional scheme information from the Recorder Instrument. Scheme Found: site14 This is the name of the scheme currently loaded on the Recorder Instrument. If the Recorder Instrument type shown does not match what you expect, check that you have the correct Recorder Instrument and type connected. If the scheme shown here does not match what you expect, check that you have the correct Recorder Instrument connected. Error Messages Unload Failed Logger re-program failed Battery Level Low 26 The comms engine failed to complete a data unload. This may be caused by a Recorder Instrument timeout (check your physical connections), or a interruption by the user (restart the unload process.) The comms engine failed to complete the Recorder This may be caused by: Instrument programming sequence. • a Recorder Instrument timeout (check your physical connections), • an interruption by the user (restart the unload process.), • An incorrect scheme, or missing scheme files. (save the scheme again, and check that all files have been properly generated or updated.) The battery level reported by the Recorder Replace the battery. Instrument is below acceptable limits. Unidata Recorder Manual Appendix C: Pinouts and Connections SQL / DB9 / DB25 Pinouts 9 Wire Vented Cable SQL Pin # Wire Colour 1* Red/Orange 2 3 4 5* 6* 7 (centre) Yellow Black White Purple Blue Green/Brown Computer D25 D9 3 2 4 7 Modem D25 - Description +12V – Battery +ve 2 RXD (IN) RxD(OUT) – RS232 serial data 3 TXD (OUT) TxD(IN) – RS232 serial data 7 CD (OUT) RTS(IN) – Request to Send - RING (OUT) - DTR (IN) OUT – CMOS Control/HSIO Data 5 GND GND – Battery -ve/Signal ground SDI12 – Data I/O, HSIO Clock * - Function may vary between different Recorder Instruments. Check the documentation for your particular Recorder Instrument. 27