1
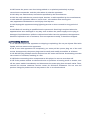
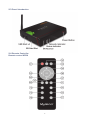
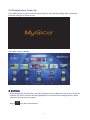
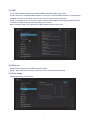
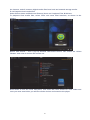
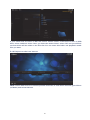
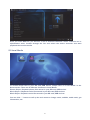
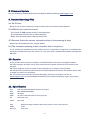
Android TV Box ENJOY TV DUAL CORE ATV1200 User Manual Thank you for purchasing this MyGica product. .Before using it, be sure to read the precautions contained in this User’s Guide. .Keep the User’s Guide in a safe place for future reference. .For the most up-to-date information about this product, visit official website at http://www.mygica.com 1. Safety Information Read and understand all instructions before using this product. If damage is caused by failure to follow the instructions, the warranty does not apply. 1.1 Warning To reduce the risk of electric shock, DO NOT remove the cover (or back). DO NOT attempt to repair the product, this could lead to the risk of injury, damage to the product . To reduce the risk of fire or electric shock, keep this product away from exposed direct sunlight, naked flames or heat, large amounts of moisture, dust, and sand. FCC Note (for U.S.A) This equipment has been tested and found to comply with the limits for a Class B digital device, pursuant to Part 15 of the FCC rules. These limits are designed to provide reasonable protection against harmful interference in a residential installation. This equipment generates, uses and can radiate radio frequency energy and, if not installed and used in accordance with the instructions, may cause harmful interference to radio or television reception, which can be determined by turning the equipment off and on. The user is encouraged to try to correct the interference by one or more of the following measures. - Reorient or relocate the receiving antenna. - Increase the separation between the equipment and receiver. - Consult the dealer or an experienced radio/TV technician for help. - This class B digital product meets all requirements of the Canadian Interference - Causing Equipment Regulations. 1.2 Precautions Important Safety Instructions Read these operating instructions carefully before using the unit. Follow all the safety instructions listed below. Keep these operating instructions handy for future reference. 1.2.1 Read these instructions. 1.2.2 Keep these instructions. 1.2.3 Heed all warnings. 1.2.4 Follow all instructions. 1.2.5 DO NOT use this apparatus near water. 1.2.6 DO NOT clean with any chemical detergent. Clean only with a dry cloth. 1.2.7 DO NOT block any ventilation openings. Install in accordance with the manufacturer’s instructions. 1.2.8 DO NOT install near any heat sources such as radiators, heat registers, stoves, or other apparatus that produce heat. 1 1.2.9 Protect the power cord from being walked on or pinched particularly at plugs, convenience receptacles, and the point where it exits the apparatus. 1.2.10 Only use attachments/accessories specified by the manufacturer. 1.2.11 Use only with the cart, stand, tripod, bracket, or table specified by the manufacturer, or sold with the apparatus. When a cart is used , use caution when moving the cart/apparatus combination to avoid injury from tip-over. 1.2.12 Unplug this apparatus during lightning storms or when unused for long period of time. 1.2.13 Refer all servicing to qualified service personnel. Servicing is required when the apparatus has been damaged in any way, such as when the power-supply cord or plug is damaged, liquid has been spilled or objects have fallen into the apparatus, the apparatus has been exposed to rain or moisture, does not operate normally, or has been dropped. 1.3 Handling Cautions 1.3.1 DO NOT expose this apparatus to dripping or splashing. Do not put objects filled with liquids, such as vases on the apparatus. 1.3.2 To turn this apparatus off completely, you must pull the power plug out of the wall socket. Consequently, the power plug must be easily and readily accessible at all times. 1.3.3 DO NOT plug multiple electric devices into the same wall socket. Overloading a socket can cause it to overheat, resulting in a fire. 1.3.4 Before connecting other components to this player, be sure to turn them off. 1.3.5 If the product makes an abnormal noise or produces a burning smell or smoke, turn off the power switch immediately and disconnect the power plug from the wall outlet. Then, contact the nearest customer service center for technical assistance. Do not use the product. Using the product as it is may cause a fire or an electric shock. 2 2. Introduction 2.1 Package Contents Enjoy TV Dual Core - ATV1200 HDMI Cable 3-3 AV Cable 3-3 YPbPr Cable Quick installation Guide Power Adapter 12V/1.5A IR Remote Controller (IR RC) 2.2 Product Features Dual Core ARM Cortex A9, 1.5GHz, RAM 1G, built in 2G-32G flash memory Powered by Android 4.1 OS Built in 802.11b/g/n WIFI module, wireless Internet access 2 USB interface, support mobile HDD, wired/wireless mouse and keyboard operation RJ45 10/100M Ethernet interface Support 1080P video playback HDMI video output, connect to HDTV for HD video playback Support weather, calendar, and desktop clock gadgets Support 2.4G wireless motion Remote Controller Support Flash Player 10.2 for hardware decoding, Flash 11.1 for software decoding ,playback online video Support music player, picture player and more family entertainment Support Micro SD card and Google Chrome browser and virtual private network access App Installer for application installation from USB/Micro SD card 3 2.3 Panel Introduction 2.4 Remote Controller Remote control KR34 4 [01] Power [10] Home [02] Mouse [11] Switch [03] Mute [12] Menu [04] Up [13] Volume + [05] Left [14] Notifications [06] Right [15] Page up [07] Down [16] Volume - [08] Enter [17] Page down [09] Exit Note: Click “Mouse”button once.. Push up/down/left/right to shift the cursor of the mouse . The remote change to a mouse Click “Mouse”again.. The remote change back to normal IR remote 2.5 Setup Connection Place ATV1200 on a flat platform near the TV, and make sure nothing block the remote control signal. 5 2.6 Display when Power Up 2.6.1 After power up, the TV will first show “MyGica” logo during loading. When loading is finished, it will go to Home screen. 2.6.2 Home Screen display. 3. Settings Using Navigation (4 directions), OK, EXIT, and Menu keys of Remote Controller to select the options, the option selected will be highlighted and confirmed by pressing OK key. Same operation for text input if needed. Select icon then press OK key. 6 3.1 WiFi 3.1.1 It will automatically scan ambient WiFi networks when select “ON”. 3.1.2 Connect an available WiFi network. If connect a secured WiFi network, corresponding password will be input firstly. Or fail to connect and need reset password. 3.1.3 Once build up the connection with a certain WiFi network successfully, ATV1200 will connect this WiFi network automatically when restart. Note: If factory reset, the password of WiFi network have to be reset. 3.2 Ethernet Connect Box and Router by RJ45 network cable. Press “ ON” in Ethernet setting, it will connect to network automatically. 3.3 Date usage Show data usage information. 7 3.4 More... 3.4.1 VPN Build and set VPN 3.4.2 Portable hotspot 3.4.2.1 Enable Portable hotspot 3.4.2.2 Configure WiFi hotspot 3.4.2.3 Choose different security way to share your network. 3.4.2.4 Help for any confusion 8 Note: WiFi and hotspot connection can not be applied at same time. Disconnect WiFi and connect Ethernet while using hotspot function. 3.4.3 Proxy settings Setup proxy server 3.5 Sound 3.5.1 Volumes Increase or decrease sound volumes 3.5.2 Touch Sounds If enable Touch sound, sound will be heard while move remote controller. 3.6 Display 3.6.1 Wallpaper Could be customized by User self 3.6.2 Output mode Default setting: 720p 9 3.6.3 Display position Use navigation keys and OK buttons of remote control to adjust display position when the screen is not display as full screen on your TV 3.6.4 Font size Change the font size of OSD 3.7 Storage Shows the storage used of the OS and SD card. 10 3.8 Apps List all apps installed. You can choose an application and force to shut down the app, uninstall the app, clear user data, move to SD card and clear cache data. 3.9 Accounts & sync Account setting and synchronization 3.10 Security 11 3.11 Language & input Change OSD language and input method. The default input method is android standard keyboard. If you are using our IR remote control, enter into “Default” option and switch to remote controller input method. 3.12 Backup & reset Back up my data: You can backup your application data, WiFi password and other settings. Factory data rest: You can reset all the settings and apps to factory default. Note: You might want to backup important data before resetting the box. Once you choose to rest to factory default, all data/apps will be deleted. 12 3.13 Date & Time Set date, time, time zone and time format 3.14 Accessibility N/A for ATV1200 3.15 Developer options If user want to do some debugging on box by ADB, enable USB debugging, you will get ADB function by Ethernet or WiFi network. 13 3.16 About MediaBox. Firmware version under build number. 4. Apps Install & Uninstall On ATV1200, you can install apps from Android Market over the Internet or other sources, such as other online sources, the internal storage and the USB storage device and SD card that you have mounted onto ATV1200. You also can manage apps on ATV1200 and Micro SD card, install/uninstall apps, stop running apps, or select other options. 5. Application Usage 5.1 XBMC Media Center XBMC Media Center allows you to play and view most videos, music such as podcasts from 14 the internet, and all common digital media files from local and network storage media. 5.1.1 Playback local media files Under Videos (same as Music and Pictures) there are 2 options, Files & Add-ons. To playback local media files, select ‘Files’ and enter Files interface, as shown in the picture: Select ‘Add Videos...’ and a pop up window “Add Video source” will comes out. Select ‘Browse’ and a list of devices will comes out. Scroll down to find the ‘Root filesystem’ and select OK, then search for ‘mnt’ folder and once you enter mnt folder, you will see all the devices connected to the player. 15 If your media files are store in SD Card, select ‘sdcard’ folder, if the files are store in USB drive, select ‘usbdrive’ folder. Once you select the desire folder, select ‘OK’ and you will find out that folder will be added to the Files list. You can enter that folder and playback media files you want. 5.1.2 Playback media from internet XBMC comes with some free internet podcast channels, to view these channels, goto Videos (or Music) and select Add-ons. 16 Once you enter Add-ons, you will see a list of different channels. These channels are in alphabetical order, browse through the list and select the desire channels and start playback the internet media. 5.2 Local Media To access media files in your SD card/USB device, simple click on ‘Local Media’ in the Home screen. There are 3 different functions in Local Media. Picture Player: Playback picture files stored in your SD card/USB devices. Movie Player: Playback movie files stored in your SD card/USB devices. Music Player: Playback music files stored in your SD card/USB devices. You can click ‘...’ button to call up the tool menu to change mode, subtitle, audio track, get information, etc. 17 5.3 Media Center There are three functions under Media Center, which are Media Server, Media Player and Settings. Media Server: Media Server lets you setup share folders to share files within local network. Media Player: Media Player lets you visit share folders on other devices in the same network. Settings: You can setup the device name on local network, turn on/off for auto 5.4 My Favorite folder When more and more applications being installed, the harder to find the application you used most. To help to solve this, there is a My Favorite folder on the home screen. You can store all your favorite applications in My Favorite folder by highlight the application then hold the OK button of the remote control. A windows will pop out asking if you want to add this app to My Favorite. Click Yes and this app will store in My Favorite Folder. 18 6 . MyGica Android tv box Airplay Function Stream videos, pictures and music from your iPhone/iPad wirelessly to your TV. Connect your iOS device (iPhone/iPad) and MyGica Android tv box to the same Wi-Fi network. Then when you playback photos, music or Youtube on your iOS device, the AirPlay icon will appear automatically. To stream the picture, video or music to your TV via MyGica andorid tv box, just simply tap on the AirPlay icon then select MyGica device on the device list. 7. MyGica RemoteIME Application Remote IME is an Application of Android smart phone/ tablet. Follow below instruction your Android phone or tablet will change to a remote control of MyGica Android TV box Connection: 1.1. Make sure MyGica Enjoy TV Box and your Android phone/Tablet are connected to the same network. 1.2. On MyGica Enjoy TV Box, goto settings > Wi-Fi and click on the router which is currently connected. (Usually it is the first router on the list with ‘Connected’ under the router name.) 19 A new window will pop out, showing information about this connection. Please take note on the IP address. Install RemoteIME on Android device. You can download RemoteIME apk from our website: http://www.mygica.com/down.asp?id=2 After you have download and install the apk, open RemoteIME on your Android phone/tablet device. Once the apk is open, click on the button and it will search for any MyGica Enjoy TV Box on the same network. When the search is finished, it will list out all the detected MyGica Enjoy TV Box with their IP address. Select the IP address of the MyGica Enjoy TV Box you want to connect and your Android phone/tablet will becomes a remote control of the connected MyGica Enjoy TV Box. 20 Using RemoteIME Once properly connected, your Android phone/tablet will becomes a remote control for MyGica Enjoy TV Box as shown in the picture: The remote control interface not only has buttons for up/down/left/right, ok, back, home, menu, and search, the black space on the top is actually work as a mouse pad and there are also the left & right mouse buttons. If you click on the switch to the keyboard layout as shown in the picture: 21 button, the interface will 8. Firmware Update You can download newest firmware from MyGica Official website: www.mygica.com 9. Trouble Shooting/FAQ 9.1 No Picture Refer to the TV user manual for how to select the correct video input channel. 9.2 USB Content cannot be read . The format of USB storage device is not supported . The supported memory size is 32G maximum. . Make sure that this player supports these files. 9.3 Remote Controller cannot respond quickly to the pressing of keys Make sure that batteries have enough power. 9.4 The firmware updating is not complete after a long time If you update the firmware over the online service, it may take a long time to download the firmware update files from the server. To save your time, update the firmware through the SD card. 10. Repairs If you contact us to repair your player, an administration fee may be charged if either: 10.1 An engineer is called out to your home at your request and there is no defect in the product. 10.2 You bring the unit to a repair center and there is no defect in the product. We will provide you with the amount of the administration fee before we make a home visit or begin any work on your player. We recommend you read this manual throughly, search for a solution on line at www.mygica.com, or contact MyGica Customer Care before seeking to repair your player. 11. Specification CPU GPU RAM ROM OS Dual core ARM CORTEX A9 1.5GHz, 3D engine Mali 400MP2 @400MHz 1G DDR3 4G, built in 2G-32G Flash memory(optional) Android 4.1 OS Ex-SD Max. 32G USB USB2.0x4, Support Mobile HDD, wired/wireless mouse and keyboard HDMI DC Input V1.4a 12V/1.5A 22 SD Slot Video Output Audio Output Max: 32G HDMI/CVBS/YPbPr HDMI/RCA/Coaxial/SPDIF IR receiver LAN WiFi RJ45 10/100M Ethernet interface IEEE 802.1 B/G/N 2.4G,wireless Internet access Audio Decoder MPEG WMA Other Audio Video Decoder Performance Max. 1920x1080p @ 30fps MP1, MP2, MP3 WMA Ver: 4, 4.1, 7, 8, 9 WMA Pro WAV, OGG, OGA, FLAC, ALAC, Ape, AAC, M4A, AC3,DTS,RM MPEG MPEG2 MPEG4 Divx H.264 Image DAT, MPEG, MPG, MPE MPEG, MPE, MPG, M2V, ISD, TS, VOB AVI, MOV, MP4, MKV, 3GP, 3GPP, FLC Divx 3, 4, 5(AVI),Xvid(AVI) AVI, MOV, MP4, MKV, TS, M2TS, M3TS, M4TS, M5TS, MTS, M4V, FLV H.263 AVI, FLV, 3GP, 3GPP, MOV, MP4, 3G2 VC1 AVI, TS WMV WMV, AVI Memory limitation, 8000x8000 pixels Movie Subtitle Font Sub-title Image Sub-title Storage System FAT16, FAT32, EXT2, EXT3, NTFS Size Net Weight 161 X 131 X 39mm 450g ASS, SMI, SRT, SSA , TXT idx/sub 12. Trademark Notice The terms HDMI and HDMI High-Definition Multimedia Interface, and the HDMI Logo are trademarks or registered trademarks of HDMI Licensing LLC in United States and other countries. 23