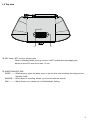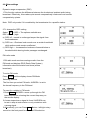
1
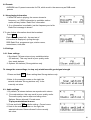
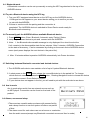
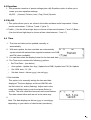
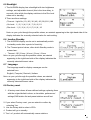
USER MANUAL This symbol is intended to alert the user to the presence of uninsulated“dangerous voltage”within the product’s enclosure that may be of sufficient magnitude to constitute a risk of electric shock to persons. This symbol is intended to alert the user to the presence of important operating and maintenance(servicing) instructions in the literature accompanying the appliance. Important Safety Instructions 1.Read these instructions. 2.Keep these instructions. 3.Heed all warnings. 4.Follow all instructions. 5.Only use power supply specified by the manufacturer. 6.Unplug this apparatus during lightning storms or when unused for long periods of time. 7.If an outside antenna or cable system is connected to the product, be sure the antenna or cable system is grounded so as to provide some protection against voltage surges and built-up static changes. Article 810 of the National Electrical Code, ANSI/NFPA 70, provides information with regard to proper grounding of the mast and supporting structure, grounding of the lead-in wire to an antenna discharge unit, size of grounding conductors, location of antenna-discharge unit, connection to grounding electrodes, and requirements for the grounding electrode. See figure A. Table of Contents 1.0 Function List . . . . . . . . . . . . . . . . . . . . . . . . . . . . . . . . . . . . . . . . . . . . . . . . . 3 1.1 Front View of the unit .. . . . . . . . . . . . . . . . . . . . . . . . . . . . . . . . . . . . . . . . 3 1.2 Rear View of the unit . . . . . . . . . . . . . . . . . . . . . . . . . . . . . . . . . . . . . . . . . . 4 1.3 Top View . . . . . . . . . . . . . . . . . . . . . . . . . . . . . . . . . . . . . . . . . . . . . . . . . . 5 2.0 Operation . . . . . . . . . . . . . . . . . . . . . . . . . . . . . . . . . . . . . . . . . . . . . . . . . . 6 2.1 DAB radio mode………... . . . . . . . . . . . . . . . . . . . . . . . . . . . . . . . . . . . . . . . 6 2.2 Scanning for stations . . . . . . . . . . . . . . . . . . . . . . . . . . . . . . . . . . . . . . . . . . 6 2.3 To do a full scan………………. . . . . . . . . . . . . . . . . . . . . . . . . . . . . . . . . . . . 6 2.4 Selecting stations . . . . . . . . . . . . . . . . . . . . . . . . . . . . . . . . . . . . . . . . . . . . . 7 2.5 Presets . . . . . . . . . . . . . . . . . . . . . . . . . . . . . . . . . . . . . . . . . . . . . . . . . . . . 7 2.6 Manual tune . . . . . . . . . . . . . . . . . . . . . . . . . . . . . . . . . . . . . . . . . . . . . . . . . 8 2.7 Now playing information . . . . . . . . . . . . . . . . . . . . . . . . . . . . . . . . . . . . . . . . 8 2.8 To view further information. . . . . . . . . . . . . . . . . . . . . . . . . . . . . . . . . . . . . . . 8 2.9 Other settings. . . . . . . . . . . . . . . . . . . . . . . . . . . . . . . . . . . . . . . . . . . . . . . . 9 3.0 Presets. . . . . . . . . . . . . . . . . . . . . . . . . . . . . . . . . . . . . . . . . . . . . . . . . . . . 10 3.1 Now playing information . . . . . . . . . . . . . . . . . . . . . . . . . . . . . . . . . . . . . . . . 10 3.2 Settings . . . . . . . . . . . . . . . . . . . . . . . . . . . . . . . . . . . . . . . . . . . . . . . . . . . . 10 3.2.1 Scan settings . . . . . . . . . . . . . . . . . . . . . . . . . . . . . . . . . . . . . . . . . . . . . . 10 3.3 Audio settings. . . . . . . . . . . . . . . . . . . . . . . . . . . . . . . . . . . . . . . . . . . . . . . . 10 3.4 Bluetooth mode . . . . . . . . . . . . . . . . . . . . . . . . . . . . . . . . . . . . . . . . . . . . . . 11 3.5 To pair a Bluetooth device using the NFC tag . . . . . . . . . . . . . . . . . . . . . . . 11 3.6 To manually pair the AURORA with an available Bluetooth device . . . . . . 11 3.7 Switching between Bluetooth connected and docked devices . . . . . . . . . . .11 3.8 AUX in mode . . . . . . . . . . . . . . . . . . . . . . . . . . . . . . . . . . . . . . . . . . . . . . . . 11 3.9 Alarms,snooze and sleep . . . . . . . . . . . . . . . . . . . . . . . . . . . . . . . . . . . . . . . 11 4.0 Alarms . . . . . . . . . . . . . . . . . . . . . . . . . . . . . . . . . . . . . . . . . . . . . . . . . . . . . 12 5.0 Snooze . . . . . . . . . . . . . . . . . . . . . . . . . . . . . . . . . . . . . . . . . . . . . . . . . . . . 13 5.1 Sleep . . . . . . . . . . . . . . . . . . . . . . . . . . . . . . . . . . . . . . . . . . . . . . . . . . . . . . 13 6.0 System settings . . . . . . . . . . . . . . . . . . . . . . . . . . . . . . . . . . . . . . . . . . . . . . .14 6.1 To navigate through the menus . . . . . . . . . . . . . . . . . . . . . . . . . . . . . . . . . . 14 6.2 Equaliser . . . . . . . . . . . . . . . . . . . . . . . . . . . . . . . . . . . . . . . . . . . . . . . . . . . 15 6.3 My EQ . . . . . . . . . . . . . . . . . . . . . . . . . . . . . . . . . . . . . . . . . . . . . . . . . . . . . 15 6.4 Time . . . . . . . . . . . . . . . . . . . . . . . . . . . . . . . . . . . . . . . . . . . . . . . . . . . . . . 15 6.5 Backlight . . . . . . . . . . . . . . . . . . . . . . . . . . . . . . . . . . . . . . . . . . . . . . . . . . .16 6.6 Inactive Standby . . . . . . . . . . . . . . . . . . . . . . . . . . . . . . . . . . . . . . . . . . . . .16 6.7 Language . . . . . . . . . . . . . . . . . . . . . . . . . . . . . . . . . . . . . . . . . . . . . . . . . . .16 6.8 Factory reset . . . . . . . . . . . . . . . . . . . . . . . . . . . . . . . . . . . . . . . . . . . . . . . . 16 6.9 Sw version . . . . . . . . . . . . . . . . . . . . . . . . . . . . . . . . . . . . . . . . . . . . . . . . . .17 7.0 Product Specification. . . . . . . . . . . . . . . . . . . . . . . . . . . . . . . . . . . . . . . . . .17 1.0 Function list 1.1 Front view of the unit 1 23 4 5 6 7 8 9 10 11 1: Speaker 2 : LCD Display 3: Press the Power Button to power On or power off. 4: Alarm Button---Enters alarm wizard or cancels alarm (when alarm is sounding) and cycles through On/Off state of alarms in standby. 5: Preset /Play Pause Button In FM/DAB Mode , Press and hold 2 sec into Preset stations Save Status Customer can Rotate Multi-function knob to Choose Select Stations to Save , then Press Select Knob to Save In FM/DAB Mode, Short press to Recall Preset Stations Customer can Rotate Navigation knob Choose Select Stations to recall, then Press Select Key to select to recall, In Bluetooth Mode, Press this Button to Play/Pause Status Switch 6 : Mode---Short press cycle through audio modes: DAB, FM, BT, AUXiliary Input 7: SELECT--- Rotate to channel change or press to select function 8: Menu /Info--- Short Press to Info Status , Press and hold to Menu Status 9 : Tune ---In FM/DAB Mode, Short press this key , Can Rotate Navigation knob choose station list In Bluetooth Mode,Short press(es) cycle through the paired device list.Press and hold into Bluetooth Discoverable mode. 3 10:EQ---Allow customer to create your own equaliser settings: My EQ… | Normal | Classic | Jazz | Pop | Rock | Speech 11:Back Button---In Menu mode,Short press to return to parent menu level, Press and hold button to exit menu. 1.2 Rear view of the unit 12 13 14 15 16 12 :Telescopic Aerial---Enable the unit to receive DAB / FM transmissions 13 :DC IN Jack---Used to connect 15V DC external switch power 14:USB Charge Jack---Output for DC 5V/2100mA *2 Charge Jack 15 :Headphone Jack---Φ3.5mm Headphone Jack 16 :Aux in jack---Φ3.5mm Audio in Jack 4 1.3 Top view 18 19 18: NFC Area---NFC function contact area When in Standby Mode you may connect a NFC enable device by tapping the device on the NFC area for at least 1.5 sec . 19: SLEEP/SNOOZE/ DIM SLEEP -------When playing, opens the sleep menu to set the time interval before the unit goes into Standby mode. SNOOZE ----When alarm is sounding, Allows you to set the snooze interval. DIM -----------When Power is on, allows you to Set Backlight Setting. 5 2.0 Operation This section describes the operating functions available for each of the audio sources. 2.1 DAB radio mode To enter DAB mode Press Mode until the display shows DAB 2.2 Scanning for stations 1.The first time you use AURORA or if the station list is empty the radio automatically performs a full scan to see what stations are available. 2.You may also need to start a scan manually to update the list of stations for one of the following reasons: New stations may become available from time to time. Stations close or can no longer be received (In the station list, invalid stations are indicated with a question mark in front of their name). If reception was not good for the original scan (for example the antenna was not up), this may result in an empty or incomplete list of available stations. If you have poor reception of some stations causing the audio to break up, you may wish to list only stations with good signal strength. 2.3 To do a full scan 1.Press and hold the Menu Info button.Press on the SELECT dial to start search 2.Once a scan is complete, the radio returns to playing the previously-selected station or first station on the station list. To remove stations that are listed but unavailable 1.Select Menu Info > Then select PRUNE. 2.This removes all invalid stations, indicated in the station list with a ‘?’ in front of the station name and populates the memory with updated stations. 6 2.4 Selecting stations To change station 1.Press TUNE Use the left/right rotary control to scroll through the list of stations and press Tune to display the station. 2. The playing screen is displayed with the new station details. 2.5 Presets AURORA has 10 preset memories for DAB. To store a station in a preset memory 1.Press and hold the Preset button until the display shows Preset Store. Presets (1-10) are displayed as either Empty or with the currently stored station name. 2.Use the left/right rotary control. Choose a preset memory then press to store the currently-playing station. 3.After confirming the preset station is stored the display reverts to the Now playing screen. To recall a preset station 1.Press the Preset button briefly, (the display will show Preset Recall). 2.Select one of the listed preset stations by using the left/right rotary control and press Select to choose the displayed preset station. 7 2.6 Manual tune As well as the normal method of scanning, you can also manually tune to a particular channel/frequency. This can be useful to achieve the best possible reception and also scanning a particular channel to update the station list. To manually tune Menu 1.Press and hold the Info button,then select “manual tune”. Use the left/right rotary control to display a particular channel/frequency, press Select to tune to that channel/frequency. 2.The display shows a live indication of the received signal strength on the selected frequency. 3.Adjustments to your antenna will be displayed on the screen as a signal strength bar graph 4. Note: On the bar graph display,the slightly larger rectangle indicates the audio quality threshold – if the signal strength as indicated by the solid rectangles, falls below this threshold the audio quality will deteriorate.At the same time AURORA scans for any DAB stations on the selected frequency and updates the station list with any new stations found. To listen to any stations found,return to the Now playing screen and select the required station from the station list as normal. 2.7 Now playing information While a station is playing, the screen shows its name and DLS (Dynamic Label Segment) information broadcast by the station such as programme name, track title and contact details. Long DLS info, over 16 characters scrolls across the display. 2.8 To view further information 1.Press Menu Info . Each time you press Menu Info , the next set of information is displayed, cycling through: DLS text, DL Plus information (this is only displayed if broadcast by the station), signal strength,programme type, ensemble name, channel number/frequency, signal error rate, bit rate,codec/DAB variant, time and date. 8 2.9 Other settings Dynamic range compression (DRC) 1.This function reduces the difference between the loudest and quietest audio being broadcast. Effectively, this makes quiet sounds comparatively louder and loud sounds comparatively quieter. Note: DRC only works if it is enabled by the broadcaster for a specific station. 2.To change the DRC setting Menu Select Info > DRC > The options available are: DRC off | low | high. a) DRC off ---sound is unchanged as per the signal from the broadcaster. b) DRC low ---Reduces loud sounds over a certain threshhold while quite sounds remain unaffected. c) DRC high --- Increases the loudness of sounds below a threshold while leaving louder passages unchanged. FM radio mode 1.FM radio mode receives analogue radio from the FM band and displays RDS (Radio Data System) information about the station and show (where broadcast). To enter FM mode Press Mode until the display shows FM Mode Selecting stations The first time you select FM radio, AURORA is set to the lowest frequency in the FM band. To scan for a station in FM mode 1.Press Select ,AURORA scans up through the FM band frequencies, showing the current frequency on the screen display. 2.A scan stops when a signal is found. AURORA can be set to stop at each station or only at stations with a strong signal . 3.Alternatively, you can Press tune Button , left/right rotary control on the front panel for a manual FM selection. 9 3.0 Presets AURORA has 10 preset memories for FM, which work in the same way as DAB mode presets 3.1 Now playing information 1. While FM radio is playing, the screen shows its frequency, or if RDS information is available, station name and any further ‘RadioText’ information. 2. If no information is available, just the frequency and a No RadioText message is shown. 3.To view further information about the broadcast Press Menu Info . Each time you press Info , the next set of information is displayed, cycling through: RDS RadioText, programme type, station name, mono/stereo, time,date. 3.2 Settings 3.2.1 Scan settings 1. By default, FM scan stops at any available station (All stations). This may result in poor quality audio from weak stations. 2. Options: All stations | Strong stations only To change the scan settings, to stop only at stations with good signal strength Menu 1.Press and hold Info > Scan setting then Strong stations only. 2.Note: In the example screen on the right, the asterisk indicates ‘Strong stations only’ is the currently set value. 3.3 Audio settings 1. By default, all stereo stations are reproduced in stereo. 2 . For weak stations, this may result in poor quality audio. The audio quality can be improved using mono. Options: Stereo allowed | Forced mono To play weak stations in mono 3. Press and hold Menu Info > Audio setting > Forced mono. 4. Note In the example screen on the right, the asterisk indicates ‘Stereo allowed’ is the currently set value. 10 3.4 Bluetooth mode A Bluetooth connection can be set up manually or using the NFC tag attached to the top of the AURORA device. 3.5 To pair a Bluetooth device using the NFC tag 1. Tap your NFC equipped smart device on the NFC tag on the AURORA device. A dialogue box will appear on your smart device asking you to confirm you wish to pair with theAURORA. 2. Choose to continue with the pairing and the connection is completed. The AURORA device is switched to Smart Device mode ready for Bluetooth audio streaming. 3.6 To manually pair the AURORA with an available Bluetooth device 1. Press MODE button, Enter Bluetooth, Automatic entry ‘Pairing’ Status 2. setup on your smart device to pair and connect with the AURORA. 3. Note: 1. the Bluetooth discoverable message is only displayed for a short time but the Unit remains in the discoverable state for two minutes. After 2 minutes, AURORA Connection to the state of dormancy , Can be connected by clicking on the smart device AURORA device name (each press displays the next device in the paired list), 4. After 10 minutes without operation AURORA automatically into Power shutdown 3.7 Switching between Bluetooth connected and docked devices 1.The AURORA radio device can maintain a list of up to 8 paired Bluetooth devices. 2. A short press on the TUNE button shows the current/first device in the paired list. To change which device is connected, press the TUNE button , Rotating Navigation knob to choose the device you need to connect. Press Select to confirm. 3. If your device does not appear in the list, you will need to pair with the radio device as above. 3.8 Aux In mode Aux In mode plays audio from an external source such as an MP3 player. Connection can be found on the back of the product. 3.9 Alarms, snooze and sleep 1.There are two versatile wake-up alarms with snooze facility, and a sleep function to turn the system off after a set period of time. 2.The alarm sound for each alarm can use a buzzer or a selection from the audio sources(except any Bluetooth connected source and Aux In mode) 11 To set the clock/calendar The settings for the internal clock, Alarm, Snooze and Sleep function are all accessible via the Systems Setting menu. 4.0 Alarms 1.Note: Alarms will only function when the AURORA unit is On (main power) or in Standby mode. An active alarm is indicated by its icon in the top line of the display. 2.Note: Alarms can be switched on or off in standby mode (see below), however, the alarm parameters can only be set when the AURORA is on. To set alarms Turn AURORA on. 1.To set or change alarm 1, press Alarm once, then press Select dial. 2.To set or change alarm 2, press Alarm twice, then press Select dial. 3.To exit alarm setting mode, press Alarm again. 4.The alarm setup prompts you for the following parameters. Select a value for each parameter in turn turning the left/right rotary control and press Select to confirm and move on to the next parameter. 5.Parameters • Alarm – Off | On • On time – hours and minutes ( time you want alarm ON) • Duration – 15 | 30 | 45 | 60 | 90 minutes If the alarm is not cancelled AURORA returns to standby after this time period. • Source – DAB | FM |Buzzer If DAB or FM is chosen as the audio source you will also be prompted to select the Last played station or one of the preset stations (if set). • Daily | Once | Weekends | Weekdays Choose the days on which the alarm is active. • Volume – (Adjust using the volume knob turn right / Left ) This is the volume the alarm will build up to. (Initially the alarm sounds at a low volume and gradually gets louder to the set volume). • Alarm – Off | On 6.In all listening modes active alarms are indicated by displaying the relevant Alarm 1 and/or Alarm 2 icons. At the set time, the alarm will sound, quietly at first, then gradually building up to the set volume. When an alarm sounds, the bell icon in the display flashes. 12 7. To turn alarms on or off in standby mode Press Alarm . The display shows the current alarm status. To switch the alarms on or off, press Alarm repeatedly to cycle through four states as shown below: To choose the displayed Alarm state, press Select . (to return to standby without changing the current alarm states, press Back ). 8.To cancel a sounding alarm and switch the radio to standby Press Power or Alarm . 5.0 Snooze 1. To temporarily silence a sounding alarm, press Sleep/Snooze/DIM Button 2. You can change the snooze period by repeatedly pressing Sleep/Snooze/DIM. Snooze periodsare 5, 10, 15 and 30 minutes. 3.The radio returns to standby for the set time period with a snooze countdown displayed. When the countdown reaches 0 (zero) 4.The alarm is triggered again.Press Power or Alarm to fully cancel a sounding alarm and switch the radio to standby 5.1 Sleep 1.To set the sleep timer while the radio is playing Press Sleep/Snooze/DIM. You can choose the sleep delaytime in minutes from: Sleep Off | 15 | 30 | 45 | 60 | 90. 2.Use left/right rotary control to cycle through the options (or press Sleep/Snooze/DIM repeatedly) then press Select to choose the displayed option. 3.Once you select a sleep delay period, the display returns to the Now playing screen with a sleep icon showing. After the sleep delay period the radio switches to standby mode. 13 6.0 System settings The System Settings allow you to tailor the AURORA with a variety of options to suit you. 1.To access system settings from any mode Menu Press and hold Info > System >. 2.The System Setting Menu options are: •Sleep •Equaliser •Time •Backlight •Inactive Standby •Language •Factory Reset •Sw version •BD address 6.1 To navigate through the menus The following controls are used to move about the menu tree to choose and select the 1. required settings: Select – (pressing the Left/Right rotary control) this selects the currently displayed option, if the option has a further sub-menu the first option of the sub-menu is displayed. 2.If the option is a setting value, the displayed value is selected and either the next setting is highlighted or, if there are no further settings, the display returns to the main menu for that setting. 3. Note 1.Current or default values are indicated by an asterisk (*) on the right-hand side of the top line of the character display. 2.Right/Left Rotary control – cycles forwards and backwards through the current menu or setting options. 3. Back – jumps back to the parent menu of the currently displayed menu or setting. 14 6.2 Equaliser 1. This presents a number of preset settings plus a My Equaliser option to allow you to create your own equaliser settings. My EQ… | Normal | Classic | Jazz | Pop | Rock | Speech 6.3 My EQ 1. This option allows you to set a bias in the treble and bass audio frequencies. Values can be set between -7 (Minus 7) and +7 (plus 7). 2.Treble – (Use the left and right keys to choose a bias value between -7 and +7) Bass – (Use the left and right keys to choose a bias value between -7 and +7) 6.4 Time 1. The time and date can be updated manually or automatically. 2. With auto-update, the time and date are automatically synchronised with national time signals broadcast over DAB and FM (when available). 3. You can also select the display format for the time and date. 4. The Time menu contains the following g options: • Set Time/Date – (see below) • Auto update - Update from Any | Update from DAB | Update from FM | No Update • Set 12/24 hour - 12 | 24 • Set date format - dd-mm-yyyy | mm-dd-yyyy. 5.Set time/date This option is for manually setting the time and date displayed. The time displays as hh:mm AM/PM, with the first value, hh, active (flashing). Adjust each value using the left/right rotary control and press Select to confirm. The next value then becomes active and flashes. The date values follow and are set in the same way. 6. Note: The date displays as dd-mm-yyyy or mm-ddyyyy depending on your choice of date format (see above). 15 6.5 Backlight 1. The AURORA display has a backlight with two brightness settings, and adjustable timeout (this is the time delay, in seconds, after which the display switches to the Dim level when set to standby). 2.There are three settings: •Timeout - Light On | 10 | 20 | 30 | 45 | 60 | 90 |120 | 180 •On level - 1 | 2 | 3 | 4 | 5 | 6 | 7 | 8 | 9 | 10 •Dim level - 1 | 2 | 3 | 4 | 5 | 6 | 7 | 8 | 9 | 10 Note: as you cycle through the possible values, an asterisk appearing to the right-hand side of the display indicates the currently selected value for each setting. 6.6 Inactive Standby 1. The AURORA display can be set to automatically switch to standby mode after a period of inactivity. 2. The Timeout period values, after which Standby mode is entered are: • Timeout - Off | 2 hour | 4 hour | 5 hour | 6 hour Note: as you cycle through the possible values, an asterisk appearing to the right-hand side of the display indicates the currently selected timeout value. 6.7 Language The language used for display messages can be selected from: English | Français | Deutsch | Italiano Note: as you cycle through the possible values, an asterisk appearing to the right-hand side of the display indicates the currently selected timeout value. 6.8 Factory reset 1. A factory reset clears all user defined settings,replacing them with the original default values, so time/date, preferences/ settings,DAB station list and preset stations are all lost. 2. If you select Factory reset, you are asked to confirm by selecting Yes. 3. Use the Rotary dial to select <YES> 4. Product will go to standby 5. Turn“ on” product will automatically rescan stations 16 6.9 Sw version This displays the current software version. BD address This displays the Bluetooth MAC address for the AURORA device. 7.0 Product Specification Function Description: DAB+/FM/Bluetooth /AUX function 5V/2.1A USB Charge Port x2 Alarm/Sleep/Snooze/Clock function Bluetooth V3.0 Compliant Bluetooth profile A2DP/AVRCP Frequency Range: DAB+ : Band III 174.928 ~ 239.200MHz; FM:87.5 ~ 108 MHz BLUETOOTH: 2402-2480 MHz Acoustic: Stereo Full Range Speaker Output 〈2.25”〉 Amplifier Power:7W*2rms@10% THD Frequency Response : 80Hz ~ 20KHz Power: 15V DC 2.67A Power usage in standby: 0.9 W Power usage when “ON” : 4 W Dimension: 295mm〈W〉x 92mm〈H〉x 170 mm〈D〉 17