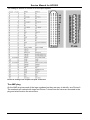
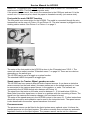
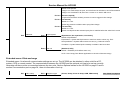
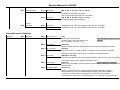
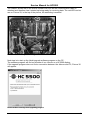
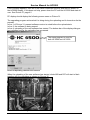
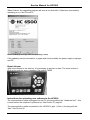
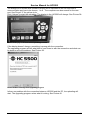
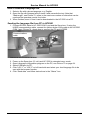
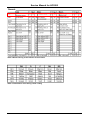
1
Service Manual for HC5500
Service Manual
HC5500
Revision 4
Contents:
THE HARDWARE ON THE HC5500................................................................................................................... 3
The Display.................................................................................................................................................. 3
CONNECTORS AT THE BACK OF THE HC5500....................................................................................................... 3
The AMP plug .............................................................................................................................................. 7
Communications cable ................................................................................................................................ 8
OPTIONAL EXTRAS FOR THE HC5500 ................................................................................................................ 10
Printer ........................................................................................................................................................ 10
Foot pedal for main ON/OFF function ....................................................................................................... 11
Speed sensor for Tractor: Wheel, gearbox or radar.................................................................................. 11
Pressure sensor ........................................................................................................................................ 11
Fan speed on TWIN .................................................................................................................................. 12
Tank gauge................................................................................................................................................ 13
SOFTWARE FOR HC5500................................................................................................................................ 16
Software program for HC5500................................................................................................................... 16
EXTENDED MENU ............................................................................................................................................ 19
Extended menu 1 Language ..................................................................................................................... 19
Extended menu 2 Unit ............................................................................................................................... 19
Extended menu 3 Sprayer type ................................................................................................................. 19
Extended menu 4 Data exchange ............................................................................................................. 20
Extended menu 5 Optional sensors .......................................................................................................... 21
Extended menu 6 Service interval............................................................................................................. 23
Extended menu 7 Factory settings............................................................................................................ 23
Extended menu 8 Settings ........................................................................................................................ 24
Extended menu 9 Jobcom......................................................................................................................... 27
SAFETRACK SETTINGS...................................................................................................................................... 31
Menu 3.6.5 Alignment Offset ..................................................................................................................... 36
Extended menu: E 8. 4.10 Safety factor.................................................................................................... 37
LOOKAHEAD .................................................................................................................................................... 38
What is the LookAhead? ........................................................................................................................... 38
How to use the LookAhead ....................................................................................................................... 39
Calibration of LookAhead .......................................................................................................................... 40
Pressure regulation valve for LookAhead ................................................................................................. 40
UPLOAD NEW SOFTWARE TO JOBCOM / HC5500...................................................................................... 42
1
Service Manual for HC5500
What you need .......................................................................................................................................... 42
Instructions for uploading new Jobcom software ...................................................................................... 42
Reset Jobcom............................................................................................................................................ 45
Instructions for uploading new software to the HC5500............................................................................ 45
Master Reset HC5500 ............................................................................................................................... 49
HYPERTERMINAL ............................................................................................................................................ 50
WHAT CAN THE TERMINAL BE USED FOR?........................................................................................................... 50
Readout example ...................................................................................................................................... 50
What you need .......................................................................................................................................... 51
SETTING UP THE SIMPLE TERMINAL ................................................................................................................... 51
SETTING UP THE TERMINAL ............................................................................................................................... 53
Terminal..................................................................................................................................................... 54
Communication port .................................................................................................................................. 54
Communications speed ............................................................................................................................. 55
Opened HyperTerminal ............................................................................................................................. 56
CHANGE SETTINGS IN THE TERMINAL ................................................................................................................. 56
Connected/Disconnected .......................................................................................................................... 57
Changing communications language ........................................................................................................ 57
Terminal is ready for transfer of data ........................................................................................................ 58
Capture Text.............................................................................................................................................. 58
SETTING UP THE CONTROLLER FOR DATA TRANSFER ........................................................................... 60
HC5500 & 6500 ......................................................................................................................................... 60
HANDLING THE DATA......................................................................................................................................... 60
Open the data file in Excel......................................................................................................................... 60
LANGUAGE TRANSFER .................................................................................................................................. 64
SOFTWARE AND HARDWARE FOR MAKING THE TRANSFER: .................................................................................. 64
STANDARD LANGUAGE FILES. ............................................................................................................................ 64
CONFIGURATION PROGRAM FOR HC 5500......................................................................................................... 64
HOW TO TRANSLATE A LANGUAGE FILE .............................................................................................................. 65
SENDING THE LANGUAGE FILE FROM PC TO HC5500 ......................................................................................... 65
PCB’S ................................................................................................................................................................ 66
PCB FOR LIQUID .............................................................................................................................................. 66
Breakout PCB............................................................................................................................................ 66
PCB for section valves, 9 sections ............................................................................................................ 67
PCB for section valves 13 sections ........................................................................................................... 71
PCB FOR HYDRAULIC ....................................................................................................................................... 71
PCB for SafeTrack..................................................................................................................................... 72
PCB FOR JOBCOM ........................................................................................................................................... 73
Resetting the Jobcom................................................................................................................................ 73
FAULT FINDING ON HC5500 & JOBCOM....................................................................................................... 75
LED´s on Jobcom ...................................................................................................................................... 75
Error code on the HC5500......................................................................................................................... 76
APPENDIX ......................................................................................................................................................... 77
REVISION .......................................................................................................................................................... 79
2
Service Manual for HC5500
The hardware on the HC5500
The Display
HARDI Controller 5500
External rate
Warning
Register no.
Boom line status
Manual
Multifunction
keys
Main readout
3rd line
4th line
Readout pre-sets & short cuts
Volume rate
Speed
Tank volume
Auto on
Remaining
Distance or Area
Area covered
Volume used
Connectors at the back of the HC5500
Picture 1 names the four sockets.
Docking
station
COM 1
Control
box
COM 2
Picture 1: Sockets on the back of the HC5500
3
Service Manual for HC5500
The socket functions are:
Docking station:
This is used if the HC5500 is connected to the tractor speed sensor or if
the foot pedal is attached. The foot pedal is described on pages 10 in
the section “Optional extras for the HC5500”. A closer look on the
socket can be seen on Picture 2, docking station. The pinning is
described on this picture.
Control box:
This is used for the liquid control box (Spray box 2) and this can also be
seen on Picture 2, Control box.
COM 1:
This can be used for either; dumping data, receiving data-software or it
is used for the connection to the printer. See Picture 2, COM 1.
COM 2:
This has the same function as COM 1 and it can be use for; dumping
data, receiving data-software or it is used for the connection to the
printer. See Picture 2, COM 2.
Control box
COM1
1
6
2
7
3
8
4
9
5
Sensors I2C (docking station)
RXD
RTS
TXD
CTS
12V
GND
DB9
COM2
1
6
2
7
3
8
4
9
5
RXD
RTS
TXD
CTS
12V
GND
1
9
2
10
3
11
4
12
5
13
6
14
7
15
8
DB15
+12V sensor
GND Sensor
Speed2
Area switch
+12V
+12V
GND
GND
I2Cscl
I2Csda
GND I2C
Reserved
Reserved
Reserved
Reserved
1 Flow1
14 Speed1
2 Option1
15 Option2
3 Option3
16 Option4
4 Option5
17 Option6
5 Option7
18 Option8
6 GND sensor
19 I2Cscl
7 I2Csda
20 GND I2C
8 PWM1 half bridge 100mA
21 PWM2 half bridge 100mA
9
22 Pressure H bridge 1
10 Pressure H bridge 2
23 +12V power input
11 +12V power input
24 +12V power input
12 12V GND
25 12V GND
13 12V GND
DB9
DB25
Picture 2: Plugs on the HC5500
4
Service Manual for HC5500
Cable between HC5500 and the Jobcom / Breakout Printed Circuit Board (PCB) is shown
on Picture 3.
Technical data:
Jacked:
Working temp:
Voltage rating:
Multi-cable :
Overall thickness:
Black, min 1.5 mm
0-70 deg C
>50 V
colour coded Din 47100
max 15.5 mm
Picture 3: 37 – 39 pole cable
The 37 - 39 pole connector has the same wiring combination for the hydraulic and fluid
system. Therefore the cables are coded with a dowel so they can not be connected to the
wrong box. The dowel is shown on Picture 4.
The actual coding of the cable is shown on Figure 1. The dowel is set
as when viewed into the plug on the cable. Re-coding the dowel
allows switching from liquid to hydraulic and vise-versa.
Picture 4: Dowel
5
Service Manual for HC5500
Cable for liquid
Cable for hydraulic
Figure 1: Coding of 37-39 pole cables
6
Service Manual for HC5500
The coding is shown on Picture 5 for the liquid system.
Picture 5: Coding of the 39 pole & 37 pole connectors
The AMP plug
On the AMP plug has each of the legs numbered so they are easy to identify, see Picture 6.
The numbers are marked with rings and Picture 7 shows how the wires are mounted in the
plug and what function the wires have.
7
Service Manual for HC5500
Picture 6: AMP plug
Picture 7: Coding of the AMP plug
Communications cable
The Communication cable is a crossed RS 232 cable pinned 2 to 3, 3 to 2, 5 to 5. “A HARDI
communication cable with hardware loop”. See Figure 1
Figure 1: Loop in communication cable. The picture shows how the PC is connected to the HC5500
with the communication cable. Port 1 (Com 1) is used as communication port on the HC5500. The
bottom picture shows the loop.
A closer look into the plug shows how it is done see Picture 8
8
Service Manual for HC5500
Picture 8: How the loop is made
The loop is made with a piece of wire as shown Picture 8. The blue and brown wire is
crossed in the plug in the other end.
The cable is marked with a yellow sticker at the end with the loop. When using the cable,
the looped (yellow) end is connected to the unit that will receive software. If the cable is
turned the wrong way, will there not be a connection between the two units.
The communication cable between the controller and the PC is shown on the spare part CD,
pages M302. See Picture 9.
Part number for the cable is 72271600 and can be ordered as a normal spare part.
Picture 9: Communications cable show non the spare part M302
9
Service Manual for HC5500
Optional extras for the HC5500
Printer
A printer can be fitted for the HC5500, as shown on Picture 10.
Printer
Picture 10: Printer for the HC5500
The printer can print out several kinds of data from the HC5500.
Picture 11 is an example of a register printed out, and Picture 12 a configuration printout.
The register printout gives the user sprayed area, volume rate that has been used etc.
The configuration printout Picture 12 is the configuration of the HC5500. This print is very
useful for giving a quick overview of how the controller is setup and spotting errors.
Picture 11: Print of the register
Picture 12: Print of the configuration
The connection from the printer to the HC5500 is done through COM 1 or COM 2 (these
ports are described in section “Connectors at the back of the HC5500” on page 3).
The printer is powered through the COM port so there is only one plug for the connection of
the printer.
For setting up the printer to the HC5500, the COM port must be setup. In the section
“Extended menu” / Extended menu 4 “Data exchange” page 20, shows where the COM
ports on the HC5500 are set up. The printer can be set up to either one of the two ports. In
10
Service Manual for HC5500
menu E4.1.1 Equipment type, Printer must be chosen and in menu E4.1.2 the baud rate
must be set to 9600. This will make the printer work.
If the printer does not work, then check the connection to the COM port and see if it is the
correct one. If it does not print, check the paper is threaded correctly (not reverse side).
Foot pedal for main ON/OFF function
The foot pedal is an extra option for the HC5500. The pedal is connected through the wire
harness that can be seen on Picture 13 and Picture 14. The wire harness is plugged into the
docking station socket. See Picture 2 or Picture 1 on page 3.
Picture 13: Foot pedal for the HC5500
Picture 14: Wire harness for the HC5500
The setup of the foot pedal to the HC5500 is done in the “Extended menu” E8.5.1. The
menu tree can be seen in section “Extended menu 8” on page 24. There are two choices
depending on the switch type.
The HC5500 can be set to a toggle or a pulse function.
The standard HARDI foot pedal is a toggle type.
Speed sensor for Tractor: Wheel, gearbox or radar
The HC5500 can have several different kinds of speed sensors. It can have an inductive
sensor mounted on the back wheel, (the same sensor as on the trailed sprayers) or it can
be connected to the tractors speed sensor, in the gearbox, or radar. The sensors are
connected to the HC5500 through wire harness on Picture 14.
The signal from the tractor or the radar must be between 0 - 5 Volt and below 2,000 Hz.
Most radar’s have this signal area, so there is no problem with the connecting of these. The
signal from the tractors can however change a lot from brand to brand.
The setup of the speed sensors in the HC5500 is done in the menu 3.1. Further instructions
about the connection and calibration can be read in the instruction book. The speed sensor
is also described in the section “speed transducer for tractor”.
Pressure sensor
The pressure sensor can be fitted to the liquid system as an optional extra. It informs the
present pressure is in the liquid system. The sensor normally does not have any automatic
regulation function on the liquid system. The pressure sensor can be set for a minimum
11
Service Manual for HC5500
pressure in the liquid system, so if the pressure drops below minimum, the pressure
regulation stops.
The HC5500 has min and max pressure alarm that will be shown in the HC5500 display.
Picture 15 Pressure sensor
The pressure sensor is connected to the “PCB for section valves”.
The version of the PCB used depends of what type of sprayer the sensor in mounted on.
For the wire connections to the PCB, see section “PCB’s” on pages 66.
When the pressure sensor is mounted on the sprayer, the HC5500 is setup to the sensor. In
section “Extended menu” / “Extended menu 55” on pages 21, the setup is shown.
The pressure sensor has a fixed measuring range in Bar. In Menu E5.1 is the minimum bar
typed in, and in menu E5.2 is the maximum bar typed in. The measuring range is written on
the pressure transducer. Our standard is 0 to 10 bar.
In menu E8.1.3 is the minimum allowed pressure typed in. In practice, this means the
regulation will stop if the pressure goes below this value.
These are the setting that have to be done in the Extended menu.
For a Display reading on the HC5500, the pressure sensor must be setup for the display. In
Menu 2.1 Display readout / Optional sensor Menu 2.1.3, the pressure sensor is chosen so
the actual pressure in the liquid system can be seen.
Further information about the display readout is described in the Instruction book for
HC5500.
Fan speed on TWIN
The Fan speed sensor can measure the revolutions on the blower unit on a TWIN sprayer.
The sensor is mounted on blower as Picture 16 shows.
For connecting the wiring from the Fan speed sensor see section “PCB’s” on pages 66.
Picture 16 Fan speed sensor
When the Fan speed sensor is mounted and the wires are connected, the HC5500 must be
setup for the sensor. In Extended menu 5.1, page 21, the Extended menu is shown. In
12
Service Manual for HC5500
menu E5.2 is the PPU value set. The PPU value can be seen in the menu tree on page 21.
These are all the setting that need to be done in the extended menu.
For getting a reading on the HC5500 display, the Fan speed sensor must be setup for the
display. In Menu 2.1, Display readout / Optional sensor, Menu 2.1.3, is the Fan speed
sensor chosen so the fan r/min can be seen.
Further information about the display readout is this described in the Instruction book for
HC5500.
Tank gauge
The tank gauge is a sensor that can measure how much liquid is in the tank. The tank
gauge has no automatic function. It can give a warning when the tank is about to run dry.
Picture 17 Tank gauge sensor
Technical specification for the sensor
Model:
S11
Range
0 to 250mBar
Accuracy
0.5% (0.25% BSL )
Supply voltage
12V (9-16V automotive)
Output
100-2600Hz, open collector NPN
Pull up
10K ohms to Vcc
Cable
1m
Process
G1/1B
Protection
IP67
Compensation
Thru Goretex membrane
Ordering the tank gauge:
Order number for the tank gauge kit:
Order number for 10K ohms resistance:
72373300
261202
Mounting of the Tank gauge
Wire between Jobcom and 26007300
Figure 2 Wire for connection between Jobcom and tank gauge
The wire, see Figure 2, is mounted with an AMP plug and three lose wires at the other end.
The wire is attached to the Jobcom in the section where the connection tank gauge is
13
Service Manual for HC5500
marked. Furthermore, the 10Kohm resistance is mounted into the same connection in
Jobcom. Figure 3 shows how the resistance must be mounted. Wire colours are also shown.
Black
wire
Signal
Blue
wire
+
Brown
wire
Figure 3 Mounting of the 10 K ohm resistance in the Jobcom
The cable from the Spray box has two lose wires which are not connected in the Jobcom.
These much be attached to the plug as shown on Picture 18
Left side = Green/Gray
Right side = Pink/Yellow
Picture 18 Connection of the two wires from Spray box cable
The sensor is mounted on the back side of the sump of the tank; see Appendix 1: Hole for
Tank Gauge on page 78.
Settings in the HC5500
“Extended menu” / “Extended menu 5 Optional sensors” pages 21 is the setup. In Menu E5.3
Tank gauge, there are two settings. They have to be as follows:
Menu
1 Type
2 PPU
Options
3
choose
Hardi
calibration
For testing the tank gauge is reading a frequency, go to the user Menu 4.5.3.3, Tank Gauge,
as the frequency will be shown here if setup correctly.
The frequency readout shall be between 100 and 200 Hz.
How does it work?
14
Service Manual for HC5500
The Tank gauge sensor measures the pressure created by the water in the tank. The
sensor sets data points for each 25 mm of water level. 100 data points are available. The
data points are registration marks where the tank sensor registers the pressure and
therefore how much water there is left in the tank at this water level. The data points can be
seen in Menu E8.2.3.
For setting the data points, the flow sensor must first be calibrated.
Next step is to fill the tank completely with a known quantity of water.
When the calibration starts, the flow sensor will register how much water is sprayed out and
the tank sensor will register the pressure for every 25 mm water level until the tank is empty.
At the end of the calibration, the actual verses the theoretical quantity of water is set just like
doing a “Tank Method” calibration of the nozzles. This will fine tune the flow sensor PPU.
The calibration of the Tank gauge is described in the instruction book.
When the Tank gauge is used in use, there are two modes:
• When the sprayer is moving
• When the sprayer is stationary
When the sprayer is moving, the HC5500 will calculate an average value of the read out
from the Tank gauge. The average value is necessary because of the movement of the
liquid in the tank will when the sprayer is moving. If a not averaged value was shown, the
readout would be useless for the driver.
When stationary, the value is not averaged. The movement of the liquid in the tank should
stop and the average value is therefore not necessary.
End nozzle kit
The End nozzle kit is connected to the “PCB for section valves”, seen on page 67. For
accurate boom width whilst using the end nozzles, Menu 3.3.4 needs to be set up. For more
information, see in the instruction book for the HC5500.
Picture 19 The End Nozzle kit
15
Service Manual for HC5500
Software for HC5500
The software on the HC5500 can be upgraded. Examples for this are improvements for
better performance of the SafeTrack and LookAhead systems and of course bug fixes.
When the software for the HC5500 is changed, it will be available from Hardi’s Technical
Service department. The software can be sent as an attached Zipped file on the E-mail. See
Picture 21. Uploading new software to the HC5500 will normally not have any visible effects
in the display and will not delete the setting / memory of the HC5500.
A Master reset can delete the setting and memory in HC5500. After a Master reset all
settings in the HC5500 must be set again.
Normally is a Master reset not necessary when new software is uploaded. If there are
problems with the unit after uploading software, then a Master reset may help.
The HC5500 software version is shown every time the controller is switched on.
The Jobcom software version can be seen in Extended menu E9.7. See Picture 20. This
menu will show what software version and what serial number the Jobcom has.
Picture 20 Software version on the Jobcom
Software program for HC5500
The software can be sent on a mail as Picture 21 shows.
Picture 21 Zipped software
When the Zip file is unpacked, a folder will show up as in Picture 22. The top of the picture
shows the upgrading program. The two other files are Bin files. These files are the software
versions for the HC5500 and the Jobcom.
The red circles are for HC5500 and the software version is written in the name ( 316 the
same as version 3.16 )
The other circle, the blue one, is the software for the Jobcom and also here the software
version shown is 1.11.
16
Service Manual for HC5500
Picture 22 Unzipped software file
Note: It is very important that these three files are in the same folder at all time otherwise
the upgrade program will not work.
When the upgrade program is activated, a dialogue will come up on the screen as Picture
23.
Picture 23 Display from the upgrade program
In the dialogue box, the software version for both the HC5500 and the Jobcom can be seen
before the software is uploaded. See Picture 23.
How to use the Hardi HC5500 upgrade program is described in section “Upload new
software to Jobcom / HC5500” on page 42.
If there is trouble with the uploading of the software or error codes appear, the error codes
can be seen in section “
17
Service Manual for HC5500
Error code on the HC5500” on page 76.
18
Service Manual for HC5500
Extended menu
Extended menu 1 is where the language in the HC5500 is chosen. There are standard
languages but there is also place for two local languages that can be uploaded to the
HC5500 by a service man. In section “Language transfer” page 64, instructions for how to
translate a language file and how to transfer the file to the HC550 is explained.
Extended menu 2 is for what kind of measuring unit the controller shall use.
Extended menu 3 is the basis setup of what kind of sprayer is the HC5500 attached to and
what kind of liquid system is mounted on the sprayer.
Extended menu 1 Language
E1 Language
[UK, D, DK, F, SF, HU, Local 1, Local 2]
Default is UK.
Local 1 & 2 are languages that can be added with a PC and the “HC 5500 Language config” software or another HC 5500.
Extended menu 2 Unit
E2 Unit
[Metric, US]
Extended menu 3 Sprayer type
E3 Sprayer type
E3.1 Field sprayer
E3.1.1 Liquid system
[Equalization, Not equalization, Circulation]
See “Description 1 EVC compared to
EFC” on page 29
Default is Equalization.
Equalization = System with liquid return to tank from section valves; e.g. EVC.
Not equalization = System without returns to tank; e.g. EFC on new COMMANDER.
Circulation = System where liquid constantly circulates in the boom lines
E3.1.2 Dual Line
E3.1.2.1 [Not present, 2 stage, 3 stage]
19
Service Manual for HC5500
Default is Not present.
2-stage: Line A will always be open, and Line B can be switched on and off automatically.
3-stage: Line A switches to B, then Line A comes on so both A & B are on.
E3.1.2.2 [Pressure, Speed]
If a pressure transducer is fitted, pressure is used to trigger the line change.
E3.1.2.3 [1.0 Second]
Default is 1.0 sec.
System lag prevents oscillation when spray lines change.
E3.1.2.4 [1.5 Seconds]
Default is 1.5 sec.
System overlap allows the activated spray line to stabilise before the other line is turned off.
E3.2 Mistblower
E3.2.1 Liquid system
[Equalization, Not equalization, Circulation]
Default is Equalization.
Equalization = System with liquid return to tank from section valves; e.g. EVC.
Not equalization = System without returns to tank; e.g. Solenoid controls.
Circulation = System where liquid constantly circulates in the boom lines
E3.2.2 Sub unit
[Standard, UCR]
Default = Standard (UCR affects menu 3.3)
UCR = Unit Canopy Row. Bases application on the size of the tree canopy.
Extended menu 4 Data exchange
Extended menu 4 is where all communicates settings are set up. The HC5500 can be attached to other units like a PC,
printers, GPS or remote control. The communication between the HC5500 and the optional unit has to be set up correctly
otherwise will there not be a connection between the two units. Section Optional extras for the HC5500 on page 10 and in
section Communication port on page 54, there is information of set up.
E4.1 COM 1 setup
E4.1.1 Equipment type
[Printer, Dump, Printer & dump, GSM, VRA/remote]
See “Printer” on page 10
20
Service Manual for HC5500
Dump is for data transfer to a PC via for example Microsoft
HyperTerminal.
GSM is not used.
Variable Rate Application/remote is dosage from an external
source.
Data
E4 exchange
E4.1.2 Baud rate
[9600, 2400, 1200]
9600 is ok for HARDI 12 volt printer.
E4.1.3 Protocol select
[HARDI GPS protocol]
Only one protocol available at the moment.
E4.2 COM 2 setup
E4.2.1 Equipment type
[Printer, Dump, Printer & dump, GSM, VRA/remote]
Dump is for data transfer to a PC via for example Microsoft
HyperTerminal.
See “Printer” on page 10
GSM is not used.
Variable Rate Application/remote is dosage from an external
source.
E4.2.2 Baud rate
[9600, 2400, 1200]
9600 is ok for HARDI 12 volt printer.
E4.2.3 Protocol select
[HARDI GPS protocol]
Only one protocol available at the moment.
Extended menu 5 Optional sensors
Extended menu 5 is for optional sensors that can be fitted. It is typically the Pressure, fan speed and Tank gauge.
Optional
E5 sensor
E5.1 Pressure
Connected to
section valve
PCB.
E5.1.1 Minimum value
[00.0]
See “Pressure sensor” on
page 11
4 -20 mAmp sensor. See sensor for minimum value.
E5.1.2 Maximum value
[00.0]
21
Service Manual for HC5500
See sensor specifications for maximum value.
E5.2 Fan speed
Connected to
section valve
PCB.
E5.3 Tank gauge
For sprayers with
Breakout PCB or
Jobcom.
E5.2.1 Optional sensor
[PPU]
See “Fan speed” on page 12
Digital input. One pulse per revolution = 1.00 PPU.
E5.3.1 Type
[Not present, Fillmeter, ME Tank Control, Hardi]
E5.3.2 PPU
[000.000 PPU ]
See “Tank gauge” on page 13
Connect to Breakout PCB or Jobcom.
Hardi has the Tank Gauge 0-250mbar pressure transducer fitted to sump.
E5.X Sensor x
Only with
Breakout PCB or
Jobcom
E5.4 Wind speed
E5.5 Wind direction
E5.6 Air temperature
E5.7 RH
Unit
Defaults
PPU
1
E5.5.1
min
0
E5.5.2
max
359
E5.6.1
min
-20
E5.6.2
max
70
E5.7.1
min
0
E5.7.2
max
100
E5.8 RPM sensor
PPU
1
E5.9 Extra 1
PPU
1
E5.10 Extra 2
PPU
1
E5.11.1
min
0
E5.11.2
max
5
E5.12.1
min
0
E5.12.2
max
5
E5.11 Extra 3
E5.12 Extra 4
22
Service Manual for HC5500
Extended menu 6 Service interval
Service
E6 interval
PIN = 04711
E6.1 A hours
10 hours.
E6.2 B hours
50 hours.
E6.3 C hours
250 hours.
E6.4 D hours
Hours are not defined.
E6.5 Nozzle
50 hours.
Extended menu 7 Factory settings
Factory
E7 settings
E7.1 Total register
E7.1.1
Register 0. Shows start & stop dates & time.
E7.1.2
Shows total volume & area.
E7.1.3
Shows average & max. speed.
E7.1.4
Shows distance travelled & spraying time.
E7.1.5
Show work rate & average volume rate.
E7.2 Master reset
PIN = 12345
Send
E7.3 configuration
Disabled in 3.16
Receive
E7.4 configuration
Disabled in 3.16
Resets all values except for Register 0.
E7.3.1 Config only
Readable text file that can be sent to a HC 5500 or a PC.
E7.3.2 With language
Readable text file
E7.4.1 Config only
Readable text file that can be received from a HC 5500 or a PC.
E7.4.2 With languages
Readable text file
E7.5 Send program
For sending HC 5500 program to PC
E7.6 Receive program
For receiving HC 5500 program from PC
23
Service Manual for HC5500
E7.7 Send Language
E7.7.1 Box to box
[UK, D, DK, F, SF, HU, Local 1, Local 2]
Readable text file. Select language.
Use communication cable Ref. No. 72271600.
E7.7.2 Box to PC
[UK, D, DK, F, SF, HU, Local 1, Local 2]
Readable text file. Select language.
Receive
E7.8 Language
E7.8.1 Box to box
Readable text file. Use communication cable Ref. No. 72271600.
E7.8.2 PC to box
Readable text file. Use communication cable Ref. No. 72271600.
E8.1.1 Min. duty cycle
[2%]
Extended menu 8 Settings
Settings
E8.1 Regulation
Minimum and default is 2%.
Increase value if motor hesitates to turn.
For LookAhead, set to 6% +/- 1%
E8.1.2 Min. speed
See “Description 2 Min. duty cycle” on
page 30
[0.5 km/h]
Minimum speed required before regulation valve will operate. Default is 0.5 km/h.
E8.1.3 Min. pressure
[0.0 Bar]
Default is 0.0 Bar. At 0.0 Bar, feature is disabled. Pressure transducer needed.
If pressure drops below the set value, the pressure regulation will stop.
E8.1.4 Valve test
[Start test? Yes, No]
This tests the regulation valve with position feedback. Valve must not be at max. setting.
Valve will increase 2 turns and then decrease 2 turns.
E8.1.5 Look Ahead
See “LookAhead” on page 38
[Yes, No]
Default = No. Regulation valve must have position feedback transducer and Boom sensor
must be fitted.
E8.1.6 Regulation delay
[0 to 9 sec]
Default = 3 seconds. This is time the regulation valve waits before starting.
Delay allows fluid system to stabilise before regulation valve starts operation.
For few boom sections and or big liquid flow, 3 seconds is recommended.
For many boom sections and or small liquid flow, 1 or 2 seconds is recommended.
24
Service Manual for HC5500
E8.2 Tank
E8.2.1 Tank size
[1000 L]
Value set if a Tank gauge is not fitted.
Maximum fill: CM 3200=3500, CM 4400=4900, CM 6600=7000
E8.2.2 (Future use)
E8.2.3 Data points
[0000]
Calibration values for HARDI Tank gauge.
E8.3 (Future use)
E8.4 Track
E8.4.1 Enable
[No, Yes]
To enable track function.
E8.4.2 Sensor test
E8.4.2.1 Front sensor
Approx. 2.50 V when straight.
E8.4.2.2 Rear sensor
Approx. 2.50 V when straight.
E8.4.2.3 Boom 1 sensor
0.8 V when unfolded and 5.0 V when folded.
Less then 0.5 V = not connected
E8.4.2.4 Boom 2 sensor
0.8 V when unfolded and 5.0 V when folded
Less then 0.5 V = not connected.
E8.4.2.5 Lock sensor
0.8 V when locked and 5.0 V when unlocked.
Less then 0.5 V = not connected.
E8.4.3 Chassis
[CM05 S, CM05 M, CM05 L]
Use S for 3200, M for 4400 & L for 6600.
E8.4.4 Sprayer drawbar
[100 cm]
Length from drawbar eye to anchor bolt for drawbar.
Caters for long or short trailer drawbars.
E8.4.5 Manual angling
[ 0% ]
To set steering speed when operated manually.
Note + and - can be changed by toggling.
25
Service Manual for HC5500
Use steps of 10% as a guide.
E8.4.6 Boom sensors
[1, 2]
Default: 1. This is the number of boom fold sensors present.
E8.4.7 Error print
[Yes]
Prints last 3 hazardous situations and shows Alteration log changes.
E8.4.8 Minimum radius
[6.0 m]
Minimum turning radius allowed for the trailer. Default = 6.0 m.
Tank size 3200 L= 6.5, 4400 L= 7.0, 6600 L= 9.0.
Increase to achieve a soft-stop (prevent bottoming out) on trapeze cylinders.
E8.4.9 Max speed
[18 km/h]
Maximum speed when the tracking function is active.
Beyond max speed max angling of sprayer is 10 degrees only.
E8.4.10 Safety factor
[100%]
Raising this value increases captiousness.
Default is 100% for a CM 4400.
For CM 3200, use 90% & for CM 6600, use 120%.
Use steps of 10% as a guide to changes.
E8.4.11 Boom type
[L, M, H]
Classification of boom type. Light, Medium or Heavy. Default: M
Not active in sw 3.16
E8.5 Misc.
E8.5.1 Foot switch
[Disable, toggle, pulse]
For remote ON/OFF of main switch, it allows the use of other switch
systems.
E8.5.2 Rate deviation
[XX %, 3-step]
See “Foot pedal” on
page 11
Default is 10%. Can be altered.
If set at 0%, this allows 3 rates to be set up in menu 1.1.
E8.5.3 Capacity left
[Distance, Area]
Affects readout from Display icon. Will show distance or area remaining.
26
Service Manual for HC5500
Extended menu 9 Jobcom
E9 Jobcom
E9.1 Enable
[Yes, No]
E9.2 Communication
[ACK; NACK; ID: Timeout]
ACK=acknowledged message, NACK= not acknowledged,
ID= identification where "0" is Jobcom, Timeout=No answer from Jobcom.
E9.3 ComLog
9 latest
communication
errors
E9.3.1 Date and time for error, ID of hardware with fault, M = Message No., E = Error
E9.3.X As above
E9.3.9 As above
E9.4 Input test
E9.4.1 Frequency
Shows actual
sensor reading.
E9.4.2 Switch
E9.4.1.1
Speed
hz
E9.4.1.2
Flow1
hz
E9.4.1.3
Flow2
hz
E9.4.1.4
Flow3
hz
E9.4.1.5
Tank gauge
hz
E9.4.1.6
Wind speed
hz
E9.4.1.7
Fan speed
hz
E9.4.1.8
RPM sensor
hz
E9.4.1.9
Extra 1
hz
E9.4.1.10 Extra 2
hz
E9.4.2.1
Pendulum lock
hi/lo
E9.4.2.2
Ladder up
hi/lo
E9.4.2.3
Future use
hi/lo
E9.4.2.4
Filter S
hi/lo
E9.4.2.5
Filter P
hi/lo
27
Service Manual for HC5500
E9.4.3 Analogue
E9.5 Reset Jobcom
E9.4.3.1
Slant
Volts
E9.4.3.2
Boom height
Volts
E9.4.3.3
Tilt L
Volts
E9.4.3.4
Tilt R
Volts
E9.4.3.5
Foam blop dist
Volts
E9.4.3.6
Twin angle
Volts
E9.4.3.7
Twin fan speed
Volts
E9.4.3.8
Distance L
Volts
E9.4.3.9
Distance R
Volts
E9.4.3.10 Distance centre
Volts
E9.4.3.11 Extra 3
Volts
E9.4.3.12 Extra 4
Volts
E9.4.3.13 Air temperature
Volts
E9.4.3.14 Relative humid
Volts
E9.4.3.15 Wind direction
Volts
E9.4.3.16 SV1 setpoint
Volts
E9.4.3.17 SV2 setpoint
Volts
SV = Smart Valve
Reset of Jobcom.
PIN needed.
E9.6 TWIN actuators
E9.6.1 Fan speed
[Fwd. Rev]
To reverse present setup for actuator.
E9.6.2 Air angle
[Fwd. Rev]
To reverse present setup for actuator.
E9.7 Serial number
Shows software version and serial number.
28
Service Manual for HC5500
Description 1 EVC compared to EFC
The difference between the EVC and the EFC section valve is that the EFC section valve has no pressure equalisation. The equalisation is
adjusted by the pressure regulation valve and is controlled by the computer.
Picture 24 shows the EVC section valve, the yellow circle being the equalisation valve. This is the clearest difference between the EVC
and the EFC when looking at the section valves.
Picture 25 shows the EFC. Here there are no equalisation adjustment valves.
Picture 24 EVC with the equalization system on the valve
Picture 25 EFC without the equalization on the valve
29
Service Manual for HC5500
Description 2 Min. duty cycle (or PWM, Pulse Width Modulation)
Figure 4 Pressure regulation valve with its duty circle
Figure 5 Duty circle for the pressure regulation
Menu: E 8.1.2
Minimum duty cycle (or PWM) is for adjusting the minimum/maximum adjust speed of the pressure regulation valve.
When the valve is trying to find the right flow, the speed of the valve must not be too high or to low. If the speed is too high, the valve will be
unsteady – if the speed is too low, the valve not move as it can not overcome the friction.
Adjustment of the valve can therefore be as follows; find out where the valve is unsteady and then reduce the min. duty cycle a bit.
The best setting for duty cycle is shown on Figure 5 in the circle. The red circle shows the duty circle as the setting should be. The flow,
bottom line, is stable and the duty circle is circling around the flow setting until it finds the right position.
30
Service Manual for HC5500
SafeTrack settings
There is no standard setting for the SafeTrack set up. The SafeTrack can be adjusted for different kinds of spraying.
For example; for spraying done at high speed (20 to 25 km/h), the SafeTrack must be set up so it reacts slowly and the dead zone could be
set higher then the standard setting. Another example; spraying with relatively low speed (7 to10 km/h) in a crop where the precision must
be high, the dead zone reduced for more precision.
The best settings for the sprayer can only be taught by trying different setting of the SafeTrack for the different spraying jobs.
“Table 1 Setting for the SafeTrack” are all the parameters for adjusting the SafeTrack. Each adjust is described with what happens if the
setting is changed and what effect will it have on the sprayer.
Settings for SafeTrack
Track wide
Menu 3.6.1
Decrease
Increase
Factory setting
180 cm
Reaction time
Steady driving
Precision on tracking
Should be set as the real track width on the sprayer.
Tractor drawbar
Menu 3.6.2
Shorter
Longer
80 cm
Dead zone
Menu 3.6.3
Decrease
5 cm
Increase
Effect on tracking system
Precision in curve
Overshoot/ taking corners
Faster
Slower
Overshooting
Taking corners
Filter for track deviation. Over 15 cm not recommended.
Reacting on small deviations.
Tendency to oscillate. May damage
the boom.
No oscillation but tendency to take
curve in large straight lines
Small corrections all
the time
More unstable.
High precision
Less corrections
Very steady
Low precision
31
Service Manual for HC5500
Damping
Menu 3.6.4
Little 0% No
damping
High 100 %Full
damping
80 %
How to react to a track deviation.
Alignment offset
Menu 3.6.5
Negative setting
0%
Positive setting
Sprayer moves to the right from the track
More aggressive. May damage the
boom.
Less aggressive
high
Very unsteady.
High precision
slow
Very steady
Low precision
Following the tractors track
Sprayer moves to the left from the track
Must follow the tractor in all situations, on
effect of having the sprayer driving in
offset line from the tractor.
If the value is over 10 cm, it is
recommended to manually adjust the front
angle sensor.
The sprayer must be adjusted in a practical situation to the individual tractor. Preferably in the field.
Sensitivity
Menu 3.6.6
Minimum radius
Menu E 8.4.8
Max speed
Menu E 8.4.9
6m
6 metre radius smallest radius the sprayer can take
18 km/h
!8 km/h is high and the sprayer can tip over at this speed. Sow careful driving.
Safety Factor
Menu E 8.4.10
80%
Safety factor can be set to 0% (OFF). At this setting will the sprayer react on max speed and minimum radius.
When the safety factor is 0%, for example when doing a demonstration, the following setting must be
undertaken. The rinsing tank is full, minimum track width 180 cm, big tyres, boom must be carried low
and the main tank to be no more that 50% full.
Table 1 Setting for the SafeTrack
For a better understanding of the how the adjustment parameters work, some of the menus are described with figures in the following
sections.
32
Service Manual for HC5500
Menu: 3.6.1 Track width
The track is measured from centre to centre of the wheels.
It is important that the right track width is entered.
The HC5500 will calculate the speed to the centre of machine, and not the speed of the
wheel.
If the track width is incorrect, will it have influence on the SafeTrack precision and Safety
factor.
Menu: 3.6.2 Tractor drawbar
Drawbar length
The tractor drawbar is measured from the rear axle to the drawbar bolt.
This has to be adjusted every time a new tractor is hooked on to the sprayer.
At the same time, check the rigidness of the tractor drawbar mounts. There should be no
sideways movement.
33
Service Manual for HC5500
Menu: 3.6.3 Dead zone
Dead zone
Tractor wheels ( ideal track )
These 5 cm gives the
dead zone.
Figure 6 Dead zone
How big must the dead zone be? Default is 5 cm.
High speed:
High precision:
Increase dead zone
Decrease dead zone
What is the dead zone?
The dead zone is how far away the SafeTrack can be from the ideal track before the
SafeTrack will adjust its course.
The tractor track is the ideal track for the sprayer and the sprayer will therefore try to follow
this track as close as possible.
To prevent excessive steering adjustments, the dead zone will prevent the SafeTrack to
react on to small corrections when it is active. This will also prevent excessive wear or
damage to the boom yaw mechanism.
When the dead zone is set to 5 cm, the SafeTrack will not react before it is 5 cm away from
the ideal track. On Figure 6 is the dead zone shown and described with drawings.
34
Service Manual for HC5500
Menu: 3.6.4 Damping
Damping area
Dead zone
Damping area
Figure 7 Damping area
When the sprayer is outside the dead zone, the SafeTrack will try to get back to the ideal
track.
If the damping is low, the reaction is fast. Fast reaction on the SafeTrack can result in
abrupt boom movements which may not be good for the boom.
If the damping is high, the reaction will be smooth but will also result in lower precision.
So the adjustment of the damping must be done when the sprayer is taken out and driven in
the field.
High speed:
High precision:
High damping
Low damping
35
Service Manual for HC5500
Menu 3.6.5 Alignment Offset
This setting is for an electronic adjustment of the front potentiometer from the HC5500. If
the sprayer is a little bit out of track, the sprayer can be adjusted back to the ideal track from
this menu.
Moving the sprayer right +
Moving the sprayer left -
Extended menu: E 8.4.3 Chassis
There are three different chassis in the HC5500 on for each size tank.
Chassis Setting
Commander 3200: S
Commander 4400: M
Commander 6000: L
If the HC5500 is not set up to the correct chassis, the SafeTrack will not be accurate.
36
Service Manual for HC5500
Extended menu: E 8.4.4 Sprayer drawbar
Figure 8 Sprayer drawbar
The sprayer drawbar is measured from the bolt hole, (for tractor pin) to the middle of the first
bolt that holds the drawbar on the sprayer. See Figure 8
Extended menu: E 8. 4.10 Safety factor
The Safety factor is a setting that shall prevent the sprayer for tipping over when turning.
The safety factor is a combination of 3 parameters.
1. Speed
2. Track wide
3. Angle of the front potentiometer
The safety factor prevents the sprayer from tipping by restricting the SafeTrack angle.
If the speed is too high, SafeTrack will reduce the angle (e.g. 50%) so the sprayer will not
follow the tractor 100% but the sprayer will not tip over.
OnFigure 9 is there a drawing of 3 positions of the SafeTrack.
If there is no risk of tipping the sprayer over, there are no restrictions from the Safety factor
and the SafeTrack will go to position 1 on drawing.
If the speed too high in a turn, the Safety Factor will reduce the angling (see Position 2).
Is the sprayer is over speeding, the Safety factor will give an alarm and begin to straighten
up the sprayer to position 3. The alarm can be accepted by pushing “Enter” on the HC5500
and the SafeTrack will operate normally again once the SafeTrack is set to “Manual” and
back to “Auto” on the Hydraulic control box.
1
2
3
Figure 9 Safety factor reducing angle
37
Service Manual for HC5500
LookAhead
The LookAhead can be activated in the extended menu E8.1.5.
There are no adjustments for the system, it can only be activated or disabled.
In section “Extended menu 8” on page 24, it shows where the LookAhead system is
activated or disabled in the HC5500.
What is the LookAhead?
The LookAhead is a system using the following components:
• Motor with a pulse generator (pressure regulation valve)
• Speed input (speed sensor)
• Boom position (boom sensor)
• Flow registration (flow sensor)
• Detection of section status (Spray box)
If the optional pressure sensor is fitted, the system switches from flow based sensing when
less than 5 Hz to pressure based sensing.
A description of how the pressure regulation valve works is in section
Pressure regulation valve for LookAhead” on page 40.
The LookAhead can predict the correct setting of the pressure regulation valve when the
main ON/OFF function is OFF e.g. on the headland. The pressure regulation valve will
continue to regulate in relationship to the speed and number of active sections.
When the main ON/OFF function is switched ON again e.g. in the crop, the pressure
regulation valve will be very close to the right position for the right flow.
When spraying, the LookAhead logs the valve position every time the correct application
has been maintained for more than 10 seconds.
When the sprayer is in transport position, the boom sensor deactivates the LookAhead so it
will not function on the road.
Figure 10 shows the LookAhead system compared to the old pressure regulation valve. The
main difference between the two valves is how fast the pressure regulation valve finds the
right flow. The three circles mark where changes are made in the flow.
38
Service Manual for HC5500
1
3
2
Figure 10 LookAhead system compared to the old pressure regulation valve.
Circle 1: Start position, the flow is set for 150 l/min, the flow is changed for 50 l/min and the
flow starts to drop.
Circle 2: The old pressure regulation valve drops down to 80 l/min and has to make a
calculation of how far the flow has dropped. Look Ahead knows where to go, so it is not
necessary to calculateate before the flow is very close to the wanted flow. The LookAhead
makes a little fine adjustment on the pressure regulation valve and finds the right flow very
fast. The old pressure regulation valve has to make several adjustments before the right
position is found and uses also a lot more time.
Circle 3: When the flow is increase to 150 l/min is the same happing again.
How to use the LookAhead
Operators with tractors that can changes gear without using the clutch are basically the
ones that will benefit mostly with Look Ahead.
New tractors are often driven with clutch free gearboxes, e.g. Vario – Dynashift – CVX.
These new gearboxes corrupt the Hardi-Matic system in the liquid system of the sprayer
because they can change the ground speed without increasing the rpm on the engine, PTO
or liquid pump on the sprayer.
When the LookAhead is active, the rpm on the PTO should be constant at all time, also in
the headland. The reason for this is that the pressure regulation valve reads the position on
the regulation valve and it registers the flow from the pump as well.
If the PTO rpm is changed, the flow and valve position relationship will be altered thus
making the logged LookAhead values less accurate.
39
Service Manual for HC5500
Calibration of LookAhead
LookAhead needs to be calibrated to the capacity of the nozzles. Boom size and number of
sections also have an influence so no standard calibration value that can be put into the
HC5500.
In some cases, LookAhead may have limited effect. For example:
1. Nozzles of low capacity are used (e.g. ISO 01, ISO 02).
2. The boom has many sections.
3. The larger flow house (diameter 20 mm) is fitted when the smaller one (diameter
13.5mm) could have been used.
4. A combination of all the above.
Recommendation is as follows:
Extended menu E8.1.1
Min. Duty Cycle (PWM) = 5%
Extended menu E8.1.6
Regulation delay = 3 seconds
Menu 3.4
Regulation constant = 50%
A lower PWM value (e.g. 2%) will result in the pressure regulation valve takes longer to
reach the correct application rate.
A higher PWM value (e.g. 8%) will result in the pressure regulation valve initially turns the
wrong way.
Pressure regulation valve for LookAhead
The new pressure regulation valve that works with the LookAhead system has a pulse
generator built on to the motor. See Picture 26.
It counts how many revolutions the motor has taken and hereby the electrical motor finds
marked positions.
When sprayer starts spraying, LookAhead registers the position (revolutions number on the
motor), speed and the flow to this position. When the sprayer is turned OFF, LookAhead will
use the registered flow, speed and valve positions and thereby be able to predict the
position of the pressure regulation valve when the sprayer is turned on again.
Picture 26 Pressure regulation valve with the pulse generator
40
Service Manual for HC5500
There are two versions of the pressure regulation valve with the knob colour-coded Blue
and Yellow.
The differences between these two valves are the gearing from the motor to the valve. On
Picture 26, the gearing can not be seen without removing the gearbox assembly from the
synthetic housing.
Normally is it the yellow pressure regulation valve that is use for LookAhead.
1. The yellow valve ratio is 1 to 150.
(one turn on valve gives 150 turns on
the motor)
2. The blue valve ratio is 1 to 80. (turns
faster then the yellow)
41
Service Manual for HC5500
Upload new software to Jobcom / HC5500
What you need
For uploading new software to the Jobcom, the communication cable is necessary. In
section “Communications cable” on page 8, the cable is described and how to use it.
The PC needs the software program Hardi upgrade HC5500. This program is described in
the section “Software for HC5500” on page 16.
Instructions for uploading new Jobcom software
The communication cable is plugged into the PC, the plug without the “Hardware halt” – this
is done before the computer is started up. See Picture 27.
Communication
cable
Picture 27 Communication cable attached to PC
The communication cable is plugged into the Jobcom before it is switched on. The plug
that is attached to the Jobcom is the one with the “halt”.
Picture 28 Communication cable attached to Jobcom
When the Jobcom and PC is connected can the PC be powered up and afterwards the
Jobcom.
The Jobcom is powered up on Spray box.
When the Jobcom is powered up, it will start up in another mode. The red light (watchdog
LED) will light up and HC 5500 will alarm that there is no communication to the Jobcom.
42
Service Manual for HC5500
The Jobcom knows that it will receive software as soon as the communication cable is
attached and therefore has it started up being ready for receiving data. The red LED can be
see on Picture 29, in the top of the picture, the watchdog is marked.
Picture 29 Jobcom ready for receiving software
Next step is to start up the Hardi upgrade software program on the PC.
The software program will find out whether it is a Jobcom or a HC5500 display.
If the upgrade program does not find a connection between the Jobcom and PC, Picture 30
will appear.
Picture 30 Error message from upgrading program
43
Service Manual for HC5500
If this message appears, then see if the cable is attached correctly and there is power on
the HC5500 display. If this does not help, power down the PC and the HC5500 and start all
over. See Picture 27, page 42
PC display should display the following screen seen on Picture 31.
The upgrading program writes what it is doing during the uploading and it shows how far the
process.
In line 1 of Picture 31, present software version is noted before the upload starts.
In line 3, the software is being erased.
In line 4, uploading of the new software has started. The bottom bar of the display dialogue
box indicates how far the uploading has processed.
The same program is used for
both HC 5500 and HC 6500
Picture 31 Uploading software to the Jobcom
When the uploading of the new software has started, diode N28 and D27 will start to flash
together with the watchdog as shown on Picture 32
Picture 32 Jobcom receiving software from the PC
44
Service Manual for HC5500
When finished, the upgrading program will write a line that tells if it has been successfully
uploading or not. See Picture 33.
Picture 33 Display message when the uploading is finish
If the updating was not successful, try again and check possibly the power supply to sprayer
and PC.
Reset Jobcom
With new software in the Jobcom, it is necessary to perform a reset. The reset is done in
E9.5 and a code for entry is needed. The code is 74650.
Picture 34 Master reset of the Jobcom
Instructions for uploading new software to the HC5500
The communication cable is plugged into the PC, the plug without the “Hardware halt” – this
is done before the computer is powered up. See Picture 27, page 42
The communication cable is attached to the HC5500 in port 1 (Com 1) the plug with the
“halt”. See Picture 35.
45
Service Manual for HC5500
Picture 35 Communication cable attached to the HC5500
The PC is now ready to be powered on. As soon the PC is running, the HC5500 can be
switched on as well. When the HC5500 is on, the display will write HARDWARE HALT. See
Picture 36. The HC5500 is waiting for contact to the Hardi HC5500 upgrade software
programme.
Picture 36 Connecting HC5500 to PC
On the PC, the upgrading program can be started up and the PC dialogue box should look
like Picture 37.
Picture 37 Ready for uploading
46
Service Manual for HC5500
The dialogue box shows what software version will be uploaded to the HC5500 and a
communication port has to be chosen, 1 to 9. The computer can also search for the com
port. See Picture 37 the yellow circle.
Click “Upload” to start the uploading. The display in the HC5500 will change. See Picture 38.
Picture 38 Display on HC5500 when uploading
If the display doesn’t change, something is wrong with the connection.
The upgrading program will tell what kind of error there is with the connection and what can
be done to solve the problem. See Picture 39.
Picture 39 Error message from upgrading program
Is there no problem with the connection between HC5500 and the PC, the uploading will
start. The upgrading program writes what it is doing. See Picture 40.
47
Service Manual for HC5500
Picture 40 Display in software program when uploading
In the first line of Picture 40, (red circle), the present software version is shown.
In line 4, the upgrading program starts to erase the software in the HC5500.
In line 5, the uploading of the new software has started.
The bar at the bottom of the dialogue box indicates the uploading is in process.
When finished, the upgrading program writes a line that tells if it has been successfully
uploading or not. See Picture 41.
Picture 41 Display when uploading is finish
48
Service Manual for HC5500
Master Reset HC5500
To access Extended menu, press and hold ESC button on HC 5500 and then power up
Spray box. A “bip” will indicate Extended menu is active and it will show E1.
With new software in the HC 5500, it is necessary to perform a reset. The reset is done in
E7.2 and a code for entry is needed. The code is 12345. See Picture 42. When keyed,
press “Enter” and the resetting will begin. When done, press “ESC” to exit the menu.
Picture 42 Master reset code
After reset, the HC5500 return to default values. Only the total register will not be reset.
Short cut for resetting the HC 5500: Press buttons “Arrow left”, “Enter”, “Arrow right”,
“Distance remaining” and then switch on the Spray box at the same time. The display will
then write “RESET”.
Picture 43 Shortcut for Master Reset
Start up the HC5500 and check the SW version when the HC5500 starts up.
When the display starts up it will write SET CLOCK – press ENTER if you want to ignore it.
49
Service Manual for HC5500
HyperTerminal
This is a programme found in Microsoft Office under “Programs, Accessories,
Communications”. There are two set ups for the HyperTerminal.
It can be setup with a little program Simple terminal that will run through the setting of the
terminal very fast. If this little program is not present, HyperTerminal is chosen.
Instruction for setup “Setting up the Simple Terminal” are on page 51.
What can the terminal be used for?
The HyperTerminal is used when data is dumped from a controller to a PC.
The controllers that can dump out data are the following:
•
•
HC 5500
HC 6500
There are different forms of data that can be read out of the controllers:
Where the user can read out the data from the controller:
•
•
•
•
Menu: 5.1.3
Menu: 5.1.1
Menu: 5.1.2
Menu E8.4.7
Read out Configuration
Read out Register
Read out all Registers
Error of recent hazardous SafeTrack situations
Readout example
On Picture 44 is an example shown from a controller opened in the program Notepad.
Picture 44: Readout from a controller
50
Service Manual for HC5500
What you need
For the data transfer to work, you need the following:
1. Communications cable, (ref. no. 72271600)
2. Notepad (*.txt)”software” on the PC
No more is needed to make a data dump from the HC5500 controller.
Setting up the Simple Terminal
Simple Terminal is the terminal started up by opening the file as shown on Picture 45.
Picture 45 The Simple Terminal
If the terminal cannot contact the communication port on the PC, the terminal will show an
error message as Picture 46.
Picture 46 Error message from the terminal
The error message can be changed in the settings of the terminal, so it is not critical. The
error message is accepted and the terminal will open up like Picture 47.
Picture 47 Opened terminal
51
Service Manual for HC5500
When the terminal looks like Picture 47, the terminal settings can be changed. For changing
the settings click on “Settings” on the menu bar as Picture 48 shows and choose “Settings”
again.
Picture 48 Adjusting the setting in the terminal
A dialogue box will show when “Settings” is chosen and the display should look like Picture
49.
Picture 49 The settings in the terminal
When the settings are like Picture 49, accept on “OK” and the terminal is ready for the data
transfer.
If the transferred data needs to be saved on the PC, is it necessary to tell the terminal
otherwise the transferred data will not be saved and therefore lost when the terminal is shut
down.
For saving the transferred data “Capture” must be activated. See Picture 50.
52
Service Manual for HC5500
Picture 50 Activate the Capture text
For choosing where to save the data file on PC, there is an option “Set capture file…”. See
Picture 51.
Picture 51 Saving the dump data as a data file
When entering this option, the following dialogue box will appear on the screen. Here the
data file can be placed in the PC and given a name. See Picture 52.
Picture 52 Where to save the data file
After going through this instruction, the terminal should be ready for receiving data from the
HC5500.
Setting up the terminal
Before using the terminal must it be set up for the HC5500 and if this is already done must it
be activated.
53
Service Manual for HC5500
If the HyperTerminal has never been used on the PC, it will show the following instruction
on getting started. On Picture 53, the path for opening the HyperTerminal is shown.
Picture 53 Path to HyperTerminal
If the path has been used before for receiving data from HC5500, a terminal will ready for
use, red circle, see Picture 53.
Terminal
If the terminal is not already available on the PC, then the terminal must have a name. This
is done as shown on Picture 54.
Picture 54 Name on terminal.
Communication port
After giving the terminal a name, the communication port is on the PC chosen, as shown on
Picture 55, “COM 1”.
54
Service Manual for HC5500
Picture 55: Communications port
Communications speed
The communication speed between the controller and the PC has to be correct. The
HC5500 can handle three different communication speed settings 9600, 2400 and 1200.
The recommended setting is 9600. On Picture 56, setting of the communication speed is
shown.
Picture 56: Communication speed 9600
55
Service Manual for HC5500
Opened HyperTerminal
After setting speed, the display on the PC, should look like Picture 57 and ready for use.
Picture 57: Opened HyperTerminal.
In the red circle on Picture 57, the setting of the terminal is shown; on Picture 58 is there a
shaper picture of the information.
Information shown at the bottom of the display is:
1. Connected/Disconnected,
2. What language is used in the terminal
3. What communication speed is the terminal using
Connected/
Disconnected
Language
Speed
Picture 58: Terminal information
If the terminal setup, as shown on Picture 58, with the settings; language on ”Auto detect”
and the communication speed on “Auto detect”, Then these setting must be set back to
1. Connected
2. Language - ANSI
3. Speed - 9600
For changing the settings go to: ”Change settings in the terminal”.
Change settings in the terminal
Is the terminal opened with the wrong settings, follow the following description.
56
Service Manual for HC5500
Connected/Disconnected
For changing any setting in an opened terminal, the terminal must be disconnected. This is
controlled on the bottoms shown on Picture 59. With this button, the terminal can be
Connected or Disconnected.
The terminal must be connected for receiving Data from the controller
Picture 59: Button for Connected/Disconnected
For changing the settings in the terminal; open “File” and click on “Properties” as shown.
Picture 60: Properties
The dialogue box that pops up should look like Picture 61, Properties.
In “Settings” the language can be changed as shown on Picture 62.
In “Configuration” the communication speed can be changed as shown on Picture 56.
Picture 61: Properties/settings
Changing communications language
Communications language must be ANSI as shown on Picture 62. “AUTO detect” can also
be chosen but will give problems when the data transfer begins. It is therefore
recommended that ANSI be chosen as communication language.
57
Service Manual for HC5500
Picture 62: Communications language
Terminal is ready for transfer of data
When the terminal is ready for transfer the information in the bottom of the display, must be
like Picture 63.
Picture 63: Information on terminal
Capture Text
The data that is read out can be used in different ways. The data can be shown on the
display or it can be saved as a data file.
If the data is to be saved, the terminal, must be setup to “Capture Text”.
For activating “Capture Text” see Picture 64.
Picture 64: Capture text
When ”Capture Text” is activated, the terminal will ask where the text file is to be saved on
the PC, see Picture 65.
58
Service Manual for HC5500
Picture 65: Saving the text file
The terminal will suggest where to save the file on the PC. If you want to place the file
another place, then click on ”Browse”. This will give you the opportunity for placing the text
file where you want it.
When the transfer it done, click ”Capture Text / Stop”. This will save the text file and end the
transfer. If a break in the transfer is needed can a click on “Pause” also seen on Picture 66.
Picture 66: Stop/pause Capture text
59
Service Manual for HC5500
Setting up the controller for data transfer
HC5500 & 6500
Before starting the data transfer must the controller be setup.
1. First the communication port must be chosen and setup for the data transfer. This is
done in Extended menu ”E.4.1.1, Equipment type” and the controller must be set on
“Dump” or “Printer & Dump”:
If “Dump” is chosen:
Data will be dumped ”raw” and the data from printed data in the controller will not be able to
be printed out of the controller, like menu 5.1
If “Print & Dump” is chosen:
Data can be written out ”raw” or the print data can be written out from the print menu.
2. After having chosen the communication port in extended menu, the controller is
ready for the transfer.
In menu 5.1 or 5.2 all the data that can be written out is chosen:
1. Register number
menu: 5.1.1
2. All registers
menu: 5.1.2
3. Configuration
menu: 5.1.3
4. Raw data
menu: 5.2.1
5. Raw data with head
menu: 5.2.2
As soon as one of these write out menus is chosen, the controller will start the transfer. On
the PC display should the transfer be visible.
Handling the data
The dumped data can be used in different ways. If the data is used for analyse later on, the
data must be saved. If not necessary to save the data, the data will be shown on the PC
screen and lost when the file is closed.
If the dumped data is to be opened with a spreadsheet after the transfer, the data must be
saved on the PC. How to save the data file is described in ”Capture Text” on page 58.
The data is saved as a Notepad data file. These files can also be opened in a spreadsheet
(e.g. Excel) but is has to be done the right way.
Open the data file in Excel
When the data file is to be opened in Excel, then Excel must be opened before the data file.
The data file can’t be opened with the function “Open with” see Picture 67. In Picture 67,
the Excel work sheet is opened before the data file and data file is opened from the Excel; it
can’t be done the other way around.
60
Service Manual for HC5500
Picture 67: Excel work sheet
When Excel opens the Notepad data file, the following dialogue box will appear. See Picture
68. The spreadsheet asks how the data file must be opened.
The data file must be opened as “Delimited”. See the Picture 68.
Picture 68: Text import 1
The next display will appear and Excel asks what symbols are used for marking the
columns.
There are several places in “Delimiter” that can be ticked. In the field “Other”, the
symbol ”|“ can be used. None of the other fields are marked.
61
Service Manual for HC5500
Picture 69: Text Import 2
In the next dialogue box, Picture 70, is there nothing to change just accept “finish” and go
on.
Picture 70: Text Import 3
After this, Excel should open and the display should look like Picture 71.
62
Service Manual for HC5500
Picture 71: Data file opened in Excel.
63
Service Manual for HC5500
Language transfer
The HC 5500 has UK, D, DK, SF and HU as standard languages. It also can store 2 local
languages. This allows you to write and download a local language.
Software and hardware for making the transfer:
PC, HC 5500 and Spray box with 12 volt power supply.
Standard language files.
Picture 72: Language file opened in Notepad
Configuration program for HC 5500
For sending the file from the PC to the HC5500 is this program needed.
If you don’t have this program, Customer Service/Technical Service can supply it.
Picture 73: Configuration program for the HC5500
64
Service Manual for HC5500
How to translate a language file
1. Select a file with a known language, e.g. English.
2. Open the file with Notepad and re-name it and overwrite the text. Note that
“MaxLength”, see Picture 72, refers to the maximum number of letters that can be
used and the spacebar counts for a letter.
3. When finished, save it. Now it can be downloaded to the HC 5500 via a PC.
Sending the language file from PC to HC5500
1. Connect RS 232 cable to HC 5500 COM 1 port and the Spray box. If using the
HARDI communication cable, connect the yellow sticker of the cable to the HC5500
COM 1 port. Picture 74, shows how to connect the PC and HC5500.
Communications
cable
Picture 74: PC connected to HC5500
2.
3.
4.
5.
Power up the Spray box (12 volt) and HC 5500 in extended menu mode.
Open Language configuration program on the PC, see Picture 73 on page 64.
Select COM port for PC.
Click “LOC 1” or “LOC 2” on left hand side and select your local language file to be
sent with the browser function.
6. Click “Send data” and follow instructions in the “Status” box.
65
Service Manual for HC5500
PCB’s
There are several different kind of PCB’s (Printed Circuit Board) on the sprayers. The PCB’s
can be divided into two main groups “Leaded components on PCB” and “Surface Mounted
Devices on PCB” (SMD)
The group with the “Leaded components on PCB” covers the PCB’s:
1. Breakout PCB, see Breakout PCB on pages 66
2. PCB for section valves, see PCB for Liquid on pages 66
3. Hydraulic PCB
Characteristic for these prints are that there is no intelligence “computer” in these PCB’s.
The components on these PCB are soldered on. This PCB can be repaired of a person that
can solder new components onto the PCB.
The group with the ‘Surface Mounted Devices on PCB are:
1. Jobcom see “PCB for Jobcom” on pages 73
On this print, there is intelligence, “a computer”, on the PCB. The PCB is a SMD print. The
components are soldered only to the surface of the print, not through holes like a normal
print. The SMD print is very difficult to repair if it breaks down, so the Jobcom is to be sent
back to Hardi in Denmark for repair.
Common for all the PCB’s are that all the connectors have a description for what function on
the sprayer is connected to the particular connector. Furthermore, a description of where
the wires that comes from the sensor or function must be mounted “+ / - or signal”. Picture
76 shows an example of how a PCB can look.
PCB for Liquid
There are four different kinds of PCB for liquid control;
1. Breakout PCB
Picture 75 on pages 67
2. 9 section’s PCB
Picture 76 on pages 68
3. 13 section’s PCB
Picture 77 on pages 71
4. Jobcom PCB
Picture 80 on pages 74
A further description of the PCB is made in each section.
The Breakout or Jobcom PCB is mounted in front of the sprayer in a grey box.
The 9 or 13 section PCB is mounted at the rear of the sprayer.
Breakout PCB
The Breakout PCB is used when the sprayer is without SafeTrack. The Breakout PCB will
split up the cable from the HC5500. The wires for the pressure regulation valve will be taken
out here and the rest of the cable from the HC5500 will go on to the PCB for section valves.
Page 71 shows the PCB for section valves 13 sections.
66
Service Manual for HC5500
Breakout PCB
From HC5500
Wire to PCB for
section valves
Power supply to pressure
regulation valve, and position
sensor
Picture 75 Breakout PCB
PCB for section valves, 9 sections
The difference between the 9 and 13 section PCB is the connection for the pressure
regulation valve.
On the 9 section PCB, the connection for the pressure regulations valve, see Picture 76, is
shown in the red circle.
On the 13 section PCB is there no connection for the pressure regulation valve, see Picture
77 on pages 71. This means that there cannot be a direct connection between the HC5500 /
Spray box 2 and the 13 section PCB. There has to be a Breakout PCB or Jobcom in
between.
The 9 section PCB will be used on a MASTER or MEGA sprayer, where all the section
valves and the pressure regulation are mounted at the same place on the sprayer. The
cable from the HC5500 will therefore not be split up before it is connected to the 9 section
PCB. The wiring for the two PCB’s is not the same, so they can not replace each other.
67
Service Manual for HC5500
Connec
tion 3
Connec
tion 2
Connec
tion 1
Picture 76 PCB for sections valves (9 section’s PCB)
(Order number for the 9 sections PCB is 72173900 )
Foam marker
From the foam marker connection is there a power supply 1 – 2 Amp. The PCB can pull up
to 5 Amp but the volts will then drop.
Connection of optional sensors:
Pressure sensor:
The wires from the Pressure sensor are attached to “Connection 3” on the PCB. See Picture
76.
Fan speed on TWIN:
The wires from the Fan speed sensor are connected to “Connection 2”. Picture 76.
End nozzle kit:
The wires from the End nozzle kit are connected to “Connection 1” on the PCB, on Picture
76.
68
Service Manual for HC5500
Table 2 General wiring to the PCB for section valves.
Table 3 Translations of the wiring colour coding
69
Service Manual for HC5500
Table 4 Wiring for the PCB for section valves with 6 sections and TWIN
Table 5 Wiring for the PCB for section valves with 7 sections and TWIN
70
Service Manual for HC5500
PCB for section valves 13 sections
Picture 77 PCB for section valves ”New Commander” (13 sections PCB)
On PCB “13 sections”, it indicates where the optional sensors must be connected.
For the Pendulum Lock, the End nozzle connection is used for controlling the cylinder as
described in section “PCB for section valves, 9 sections”, Table 2 on pages 69.
PCB for hydraulic
The PCB for hydraulic is also called DAH (Direct Activated Hydraulic ) and can be seen on
Picture 78.
The PCB controls the hydraulic system on the sprayer, boom hydraulic and SafeTrack.
If a sprayer is without SafeTrack, the PCB will be mounted as shown on Picture 78.
If it is with SafeTrack, the PCB will be mounted on top of the Jobcom, see Picture 80 on
pages 74.
Furthermore the PCB for SafeTrack will also be mounted, see Picture 79.
The part number for the hydraulic PCB is 26004300.
71
Service Manual for HC5500
From hydraulic
control box (tractor)
Boom up and
down (ParaLift)
To boom
hydraulics valves
Picture 78 PCB for hydraulic
Sprayer fitted with Y hydraulic
Y hydraulic is the most simple and economic hydraulic system. The sprayer will be without
SafeTrack and electric boom controls. Boom folding and lift up and down will be controlled
directly from the tractors hydraulic.
PCB for SafeTrack
The PCB for SafeTrack is mounted underneath the sprayer next to the hydraulic block for
the SafeTrack. Part number for the PCB is 26007600.
72
Service Manual for HC5500
PCB for SafeTrack
From lock
sensor
From Jobcom
Right
Left
To Steering valves
To lock
valve
From steering
sensors
Picture 79 PCB for SafeTrack
PCB for Jobcom
The Jobcom is a computer that handles the SafeTrack and AutoSectionControl fuction.
Resetting the Jobcom
When the Jobcom is reset, all the setting will return to default values including the
SafeTrack setting. Re-calibration will be necessary.
73
Service Manual for HC5500
Connection
between
Jobcom and
hydraulic
PCB
RS 485
Software
upload
Jobcom board
Hydraulic
PCB
To PCB for
SafeTrack
To hydraulic
block on Boom
J 15
From Spray
box 2
Emergency
only
To PCB for
sections
valves
Connection
between Jobcom
and hydraulic
PCB
To Hydraulic
control box
To pressure
regulation valve
TWIN + sensors
Picture 80 Jobcom
74
Service Manual for HC5500
Fault finding on HC5500 & JOBCOM
JOBCOM
FAULT
PROBABLE CAUSE
Power to Jobcom
Jobcom not responding or
unintended function
Jobcom not responding!
Will not uploaded Software
successfully.
CONTROL/REMEDY
Power supply not sufficient. The
power cable to the Jobcom has to
be a unbroken power line from the
battery.
The cable from the battery to
Jobcom has to be 6 square
millimetres. Fit 72266300 tractor
power cable. The fuse on the cable
has to be 25A
Communication error
Check menu E9.2 All cables
connections in the Jobcom,
Junction box and track assembly
box is checked, retighten screw on
the cables plugs.
Check If the 3 green LED´s Rx/Tx
are flashing 3-4 times per second
and N28/D27 red and green is
Flashing 2 times per second it
means communication between
Jobcom and HC5500 is OK
Cable incorrect, or incorrectly fitted Cable 72271600 has to be used.
The plug with the yellow tag has to
be mounted in the Jobcom.
LED´s on Jobcom
PCB
Component
Function
Rx
D54
Tx
D55
Rx
D56
Tx
D57
D27
D27
D28
D28
Watchdog
Watchdog
Indicates that the jobcom is sending
information to HC 5500 display
Indicates that there is information from the
HC 5500 display through RS485
Indicates that there is received information
from the HC 5500 display
Indicates that the jobcom is sending
information through RS485
Indicates software version by flashing X
number of time under start-up, after this the
LED will flash with 2Hz and indicate CPU
status.
Indicates software version by flashing YY
number of time under start-up, after this the
LED will flash with 1Hz and indicate CPU
status.
Is lighted constantly to indicate that the
jobcom is ready to receive software when
the cable 72271600 is connected to the PC.
When it’s lighted there is now outputs active.
Comments
RS485 for future use!
RS485 for future use!
D27 is working with D28
software version is
indicated as X.YY
D28 is working with D27
software version is
indicated as X.YY
75
Service Manual for HC5500
Error code on the HC5500
Error codes can be a combination of the below:
E.g. Code 6040: This is a combination of code 6000 and code 40 where 6000 means it
could not write to the serial port and 40 means a reply is missing.
Codes indicating the uploader program has gone into a non-existence mode:
555
666
777
888
999
Codes for Send Data () errors:
1000 Serial port is not open
2000 Could not write to serial port (API-call WriteFile() failure)
Codes for GetData() error:
5000 Serial port is not open
6000 Could not write to serial port (API-call WriteFile() failure)
7000 Number of bytes read from serial port was less than expected
8000 Checksum fault in the received data
Codes for UploadMain() error:
10
Could not send ’SN’ or ’MR’ or ’PM’ to the controller
20
No answer from controller on ’SN’ or ’MR’ commando
1..9 Controller answered ’SNx, ’MRx’ or ’PMx’ where x = 1..9 (0 expected)
30
Reply from controller not recognized (SN0 or MR0 expected)
40
Could not read the reply from ’PM’ from the serial port
Codes for SendProgram() errors:
100 Unknown controller type (HC5500 or JobCom)
200
Could not write a data-block to serial port
300
Answer from the controller not recognized as block acknowledge
400
Negative block acknowledge from the controller
500
Could not read block acknowledge from serial port
600
Could not send BLKEND to controller
700
Could not read answer on BLKEND from serial port
800 Controller gave illegal answer on BLKEND
Codes for SendProgramExternalFile() errors:
10000 Program file is too small
20000 Unknown controller type (HC5500 or JobCom)
30000 Could not write data-block to serial port
40000 Could not read block acknowledge from serial port
50000 Answer from the controller not recognized as block acknowledge
60000 Negative block acknowledge from the controller
70000 Could not send BLKEND to controller
80000 Could not read answer on BLKEND from serial port
90000 Controller gave illegal answer on BLKEND
76
Service Manual for HC5500
Appendix
Tank Gauge sensor
77
Service Manual for HC5500
Appendix 1: Hole for Tank Gauge sensor
78
Service Manual for HC5500
Revision
Date
Subject
04/09/2006 Error codes on HC5500
25/09/2006 Proof reading of whole document
Section
Error code on
the HC5500
Error code on
the HC5500
Pages
76
Written
By
PER
78
AF
79