1
User’s Guide
Copy Operations
.
Contents
1
Introduction
1.1
1.2
1.3
1.4
1.4.1
1.4.2
2
Available features ............................................................................................................................ 1-3
Explanation of manual conventions .............................................................................................. 1-9
Descriptions of originals and paper ............................................................................................ 1-10
User manuals ................................................................................................................................. 1-11
Printed manual ................................................................................................................................ 1-11
Introduction to the user manual DVD .............................................................................................. 1-11
Before making copies
2.1
2.1.1
2.1.2
2.1.3
2.1.4
2.1.5
2.1.6
2.1.7
2.1.8
2.1.9
2.1.10
2.1.11
2.1.12
2.1.13
2.1.14
2.1.15
2.1.16
2.1.17
2.2
2.2.1
2.3
2.3.1
2.3.2
2.3.3
2.3.4
2.3.5
2.3.6
2.3.7
2.3.8
2.3.9
2.3.10
2.3.11
2.3.12
2.3.13
2.4
2.5
2.6
2.7
2.8
2.8.1
2.8.2
Machine configuration .................................................................................................................... 2-3
Options.............................................................................................................................................. 2-3
External ............................................................................................................................................. 2-5
Internal............................................................................................................................................... 2-8
Large Capacity Unit LU-405............................................................................................................ 2-10
Large Capacity Unit LU-406............................................................................................................ 2-11
Finisher FS-524/Punch Kit PK-504/PK-505 .................................................................................... 2-12
Finisher FS-525/Punch Kit PK-504/PK-505 .................................................................................... 2-14
Finisher FS-610/Punch Kit PK-504/PK-505 .................................................................................... 2-16
Z Folding Unit ZU-604/ZU-605 ....................................................................................................... 2-19
Post Inserter PI-504 ........................................................................................................................ 2-21
Shift Tray SF-602 ............................................................................................................................ 2-22
Output Tray OT-505 ........................................................................................................................ 2-22
Authentication Unit (Biometric Type) AU-101 ................................................................................. 2-23
Authentication Unit (IC Card Type) AU-201 .................................................................................... 2-23
Control panel................................................................................................................................... 2-24
Basic settings screens .................................................................................................................... 2-26
Icons that appear in the screen....................................................................................................... 2-28
Adjusting the angle of the control panel ..................................................................................... 2-29
To adjust the angle of the control panel.......................................................................................... 2-29
Turning on the main power and the auxiliary power.................................................................. 2-31
Turning on the machine................................................................................................................... 2-31
Scanning during warm-up............................................................................................................... 2-32
Turning off the machine .................................................................................................................. 2-33
Automatically clearing settings (Automatic panel reset) ................................................................. 2-34
Automatically canceling the mode screen (System Auto Reset)..................................................... 2-34
Automatically conserving energy (Low Power mode) ..................................................................... 2-34
Automatically conserving energy (Sleep mode) .............................................................................. 2-35
Manually conserving energy............................................................................................................ 2-36
Automatically turning the machine on/off (Weekly Timer)............................................................... 2-36
Controlling each user’s use of this machine (User Authentication)................................................. 2-38
Controlling each account’s use of this machine (Account Track) ................................................... 2-42
Controlling use of this machine with Authentication Unit (Biometric Type) .................................... 2-45
Controlling use of this machine with the Authentication Unit (IC Card Type) ................................. 2-47
Loading paper into the tray 1 or 2................................................................................................ 2-50
Loading paper into the tray 3 or 4 ............................................................................................... 2-51
Loading paper into the LCT (LU-405/LU-406)............................................................................. 2-52
Loading paper into the bypass tray ............................................................................................. 2-55
Loading paper of a different size into paper trays ..................................................................... 2-59
Changing the size of paper that is loaded ...................................................................................... 2-59
When 5-1/2 × 8-1/2 or A5-size thick paper is loaded into a paper tray.......................................... 2-60
bizhub 751/601 (Version 2)
Contents-1
3
Basic copy operations
3.1
3.2
3.2.1
3.2.2
3.3
3.3.1
3.3.2
3.3.3
3.3.4
3.4
3.4.1
3.4.2
3.4.3
3.4.4
3.4.5
3.4.6
3.4.7
3.4.8
3.4.9
3.5
3.5.1
3.5.2
3.6
3.6.1
3.6.2
3.6.3
3.6.4
3.6.5
3.6.6
3.6.7
3.6.8
3.7
3.7.1
3.7.2
3.8
3.8.1
3.9
3.9.1
3.9.2
3.10
3.10.1
3.10.2
3.11
3.11.1
3.11.2
3.11.3
3.11.4
3.11.5
3.11.6
3.12
3.12.1
3.12.2
3.12.3
3.12.4
Contents-2
General copy operation................................................................................................................... 3-3
Operations that cannot be combined ............................................................................................ 3-6
Operations where the setting specified last is given priority ............................................................. 3-6
Operations where the setting specified first is given priority............................................................. 3-8
Feeding the original ......................................................................................................................... 3-9
Loading the original into the ADF ...................................................................................................... 3-9
Placing the original on the original glass ......................................................................................... 3-10
Scanning the original in separate batches ("Separate Scan" setting) ............................................. 3-11
Scanning a multi-page original from the original glass ................................................................... 3-15
Specifying original settings .......................................................................................................... 3-19
Specifying the original size ("Original Size" settings) ...................................................................... 3-19
Copying originals of mixed sizes ("Mixed Original" setting) ............................................................ 3-21
Loading folded (Z-folded) originals.................................................................................................. 3-23
Loading tab paper (Tab original settings) ........................................................................................ 3-24
Selecting the original orientation ("Original Direction" settings) ...................................................... 3-26
To select an original direction setting.............................................................................................. 3-27
Selecting the position of the binding margin ("Binding Position" settings) ..................................... 3-29
To select a binding position setting................................................................................................. 3-30
Changing scan settings for each original ........................................................................................ 3-32
Selecting a paper setting .............................................................................................................. 3-36
Automatically selecting the paper size ("Auto" paper setting) ........................................................ 3-36
Manually selecting the desired paper size ...................................................................................... 3-38
Specifying a zoom setting............................................................................................................. 3-39
Automatically selecting the zoom ratio ("Auto" zoom Setting)........................................................ 3-39
Specifying the zoom ratio of the original ("Full Size" setting).......................................................... 3-40
Typing in the zoom ratio (XY zoom setting) ..................................................................................... 3-41
Slightly reducing the copy ("Minimal" setting)................................................................................. 3-43
Selecting a preset zoom ratio (Enlarge and reduce settings) .......................................................... 3-44
Typing in separate X and Y zoom ratios (Individual zoom settings) ................................................ 3-45
Selecting a stored zoom ratio.......................................................................................................... 3-47
Storing the desired zoom ratio ........................................................................................................ 3-48
Selecting an original > copy setting............................................................................................. 3-50
Selecting single-sided copies.......................................................................................................... 3-51
Selecting double-sided copies ........................................................................................................ 3-52
Selecting a combined copy setting.............................................................................................. 3-55
Copying multiple original pages onto a single page (Combined copy settings) ............................. 3-57
Selecting the quality of the original ............................................................................................. 3-59
Loading originals with small print or photos ("Original Type" settings)........................................... 3-59
To select an original type setting..................................................................................................... 3-60
Selecting the density settings ...................................................................................................... 3-61
Adjusting the print density (Density settings) .................................................................................. 3-62
Adjusting the background density (Background removal settings) ................................................. 3-63
Selecting finishing settings........................................................................................................... 3-64
Separating copies by sets ("Sort" setting)....................................................................................... 3-66
Separating copies by pages ("Group" Setting)................................................................................ 3-67
Selecting the Output Tray................................................................................................................ 3-68
Outputting copies with their front sides facing up (Face up settings) ............................................. 3-69
Stapling copies (Staple settings) ..................................................................................................... 3-71
Punching holes in copies (Punch settings) ...................................................................................... 3-74
Selecting a folding setting ............................................................................................................ 3-77
Folding copies in half ("Half-Fold" setting) ...................................................................................... 3-78
Binding copies at the center ("Center Staple & Fold" setting)......................................................... 3-79
To fold copies in three ("Tri-Fold" setting)....................................................................................... 3-81
Z-Folding and outputting papers ("Z-Fold" setting) ........................................................................ 3-83
bizhub 751/601 (Version 2)
3.13
3.14
3.15
3.16
3.17
4
3-86
3-89
3-90
3-91
3-92
Additional copy operations
4.1
4.1.1
4.1.2
4.2
4.3
4.3.1
4.3.2
4.4
4.5
4.5.1
4.6
4.7
4.7.1
4.7.2
4.8
4.8.1
4.8.2
4.8.3
4.8.4
4.8.5
4.8.6
4.8.7
4.8.8
5
Manually using the finisher...........................................................................................................
Selecting not to rotate the image ................................................................................................
Scanning the next original to be copied while a copy job is being printed
(next job reservation) ....................................................................................................................
Temporarily stopping scanning/printing.....................................................................................
Deleting a paused job ...................................................................................................................
Checking the copy settings (Check Job) ...................................................................................... 4-3
To check the settings ........................................................................................................................ 4-3
To change the settings...................................................................................................................... 4-5
Printing a proof to check the settings (Proof Copy) .................................................................... 4-6
Checking the print image as a preview image (Advanced Preview) .......................................... 4-9
Preview screen .................................................................................................................................. 4-9
Checking the advanced preview ..................................................................................................... 4-13
Interrupting a copy job (Interrupt mode)..................................................................................... 4-15
Registering copy programs (Mode Memory) .............................................................................. 4-16
Deleting a copy program................................................................................................................. 4-19
Copying with programmed copy settings (Mode Memory) ....................................................... 4-20
Displaying function descriptions (Help) ...................................................................................... 4-22
Overview of help screens ................................................................................................................ 4-22
Displaying main help screens.......................................................................................................... 4-25
Specifying control panel settings (Accessibility mode) ............................................................. 4-27
Displaying the accessibility setting screen...................................................................................... 4-27
Setting the "Touch Panel Adjustment" function.............................................................................. 4-27
Setting the "Key Repeat Start/Interval Time" functions .................................................................. 4-29
Setting the "System Auto Reset Confirmation" function ................................................................ 4-31
Setting the "Auto Reset Confirmation" function ............................................................................. 4-33
Setting the "Enlarge Display Mode Confirmation" function ............................................................ 4-35
Setting the "Message Display Time" function................................................................................. 4-37
Setting the "Sound Setting" functions ............................................................................................ 4-38
Troubleshooting
5.1
5.2
5.2.1
5.2.2
5.2.3
5.2.4
5.2.5
5.2.6
5.2.7
5.2.8
5.2.9
5.2.10
5.2.11
5.2.12
5.2.13
5.2.14
5.2.15
5.2.16
5.2.17
5.2.18
5.2.19
5.2.20
When an error code appears.......................................................................................................... 5-3
When the message "misfeed detected." appears........................................................................ 5-5
Location of paper misfeed and illustration ........................................................................................ 5-6
Paper misfeed indications ................................................................................................................. 5-7
Clearing a paper misfeed in tray 1 "1" .............................................................................................. 5-8
Clearing a paper misfeed in tray 2 "2" ............................................................................................ 5-11
Clearing a paper misfeed in tray 3 and tray 4 "3""4" ...................................................................... 5-12
Clearing a paper misfeed in the LCT (Large Capacity Unit)"5"....................................................... 5-14
Clearing a paper misfeed in the bypass tray "6"............................................................................. 5-15
Clearing a paper misfeed in the vertical transport section "7" ....................................................... 5-15
Clearing a paper misfeed in the ADU unit "8" ................................................................................. 5-16
Clearing a paper misfeed in the ADU unit "9" ................................................................................. 5-18
Clearing a paper misfeed in the ADU unit "10" ............................................................................... 5-20
Clearing a paper misfeed in the ADU unit "11" ............................................................................... 5-21
Clearing a paper misfeed in the ADU unit "12" ............................................................................... 5-23
Clearing a paper misfeed in the ADU unit "13" ............................................................................... 5-25
Clearing a paper misfeed in the ADF "14" ...................................................................................... 5-27
Clearing a paper misfeed in the ADF "15" ...................................................................................... 5-28
Clearing a paper misfeed in Finisher FS-524/FS-525 "16" "18" ..................................................... 5-29
Clearing a paper misfeed in Finisher FS-610 "16" "18" .................................................................. 5-34
Clearing a paper misfeed in the Shift Tray "16" .............................................................................. 5-38
Clearing a paper misfeed in the Post Inserter "17"......................................................................... 5-39
bizhub 751/601 (Version 2)
Contents-3
5.2.21
5.3
5.4
6
Specifications
6.1
6.1.1
6.1.2
6.2
6.2.1
6.2.2
6.2.3
6.2.4
6.2.5
6.2.6
6.2.7
6.2.8
6.2.9
6.2.10
6.2.11
6.2.12
6.2.13
7
Clearing a paper misfeed in the Z Folding Unit "20" ....................................................................... 5-39
Simple troubleshooting ................................................................................................................. 5-43
Main messages and their remedies ............................................................................................. 5-47
Specifications................................................................................................................................... 6-3
Main unit ............................................................................................................................................ 6-3
Automatic Document Feeder DF-614................................................................................................ 6-4
Option specifications ...................................................................................................................... 6-5
Large Capacity Unit LU-405 .............................................................................................................. 6-5
Large Capacity Unit LU-406 .............................................................................................................. 6-5
Finisher FS-524 ................................................................................................................................. 6-6
Finisher FS-525 ................................................................................................................................. 6-7
Finisher FS-610 ................................................................................................................................. 6-8
Punch Kit PK-504/PK-505................................................................................................................. 6-9
Z Folding Unit ZU-604/ZU-605.......................................................................................................... 6-9
Post Inserter PI-504......................................................................................................................... 6-10
Shift Tray SF-602............................................................................................................................. 6-10
Output Tray OT-505......................................................................................................................... 6-11
Authentication Unit (Biometric Type) AU-101.................................................................................. 6-11
Authentication Unit (IC Card Type) AU-201..................................................................................... 6-12
Other options ................................................................................................................................... 6-12
Copy paper/originals
7.1
7.1.1
7.1.2
7.1.3
7.1.4
7.1.5
7.1.6
7.1.7
7.1.8
7.2
7.2.1
7.2.2
7.2.3
7.2.4
7.2.5
7.2.6
7.3
7.3.1
7.3.2
7.3.3
7.3.4
7.3.5
7.3.6
7.4
7.4.1
7.4.2
7.4.3
Contents-4
Copy paper ....................................................................................................................................... 7-3
Paper tray and equipment ................................................................................................................. 7-3
Paper weight...................................................................................................................................... 7-3
Paper Tray/Output Tray capacity ...................................................................................................... 7-4
Paper size .......................................................................................................................................... 7-4
Special paper..................................................................................................................................... 7-6
Precautions for paper ........................................................................................................................ 7-8
Paper storage .................................................................................................................................... 7-8
Auto Tray Switch Function ................................................................................................................ 7-8
Selecting the paper settings for bypass tray ................................................................................ 7-9
Automatically detecting the paper size ("Auto Detect" setting)......................................................... 7-9
Selecting a paper size setting (Size setting) .................................................................................... 7-10
Specifying a non-standard paper size (Custom size settings) ........................................................ 7-12
Storing a non-standard paper size (Custom size settings).............................................................. 7-14
Selecting a setting for oversized paper (Wide paper settings) ........................................................ 7-17
Specifying a paper type for bypass tray.......................................................................................... 7-19
Paper type setting for a tray ......................................................................................................... 7-21
To display the paper tray setting screen ......................................................................................... 7-21
To specify a standard size paper ("Standard Size 1" settings) ....................................................... 7-23
To specify a setting for standard special-sized paper (Special size settings)................................. 7-24
To specify a non-standard paper size (Custom size settings)......................................................... 7-25
To select a setting for oversized paper ........................................................................................... 7-27
Specifying a paper type................................................................................................................... 7-29
Originals.......................................................................................................................................... 7-31
Originals that can be loaded into the ADF....................................................................................... 7-31
Precautions for loading originals into the ADF ................................................................................ 7-32
Originals that can be loaded on the original glass .......................................................................... 7-33
bizhub 751/601 (Version 2)
8
Application functions
8.1
8.2
8.3
8.4
8.5
8.6
8.7
8.8
8.9
8.10
8.11
8.12
8.13
8.14
8.14.1
8.14.2
8.14.3
8.15
8.15.1
8.15.2
8.15.3
8.15.4
8.15.5
8.15.6
8.15.7
8.15.8
8.15.9
8.15.10
8.15.11
8.16
9
Replacing toner cartridges and staple cartridges and emptying hole-punch
scrap box
9.1
9.1.1
9.2
9.2.1
9.2.2
9.2.3
9.3
9.3.1
9.3.2
10
Inserting paper between OHP transparencies ("OHP Interleave" function) .............................. 8-3
Adding cover pages ("Cover Sheet" function).............................................................................. 8-6
Inserting different paper into copies ("Insert Sheet" function) ................................................. 8-10
Inserting copies of a different original for a specified page
("Insert Image" function) .............................................................................................................. 8-14
Specifying pages to be printed on the front side ("Chapters" function) .................................. 8-17
Scanning originals with different settings and printing copies all together
("Program Jobs" function)............................................................................................................ 8-21
Reversing black-and-white gradation of the original ("Neg./Pos. Reverse" function) ........... 8-26
Producing separate copies of each page in a page spread ("Book Copy" function) ............. 8-27
Tiling copy images ("Image Repeat" function) ........................................................................... 8-33
Dividing spread image into right and left pages using ADF
("Page Separation" function)........................................................................................................ 8-38
Adding a binding margin to copies ("Page Margin" function)................................................... 8-41
Adjusting the image to fit the paper ("Image Adjust" settings) ................................................ 8-44
Copying with the page layout of a booklet ("Booklet" function) .............................................. 8-47
Erasing specified area of copies (Erase)..................................................................................... 8-50
Erasing black marks along borders ("Erase" function).................................................................... 8-51
Erasing black marks along center fold ("Center Erase" function) ................................................... 8-53
Erasing outside areas of the original ("Non-Image Area Erase" function)....................................... 8-55
Printing the date/time or page number on copies (Stamp/Composition functions)............... 8-56
Printing the date/time ("Date/Time" function) ................................................................................. 8-57
Printing the page number ("Page Number" function)...................................................................... 8-60
Printing previously registered stamps ("Stamp" function) .............................................................. 8-63
Printing copy protection text ("Copy Protect" function).................................................................. 8-66
Printing repeating stamps ("Stamp Repeat" function) .................................................................... 8-73
Printing the image scanned first overlapped by the remaining original pages
("Overlay" function)
8-78
Saving a scanned image as a registered overlay ("Registered Overlay" function) ......................... 8-81
Using a registered overlay ("Registered Overlay" function) ............................................................ 8-85
Printing a header/footer ("Header/Footer" function) ....................................................................... 8-87
Printing the distribution control number ("Distribution Control Number" function)......................... 8-89
Printing the watermark onto copies ("Watermark" function)........................................................... 8-91
Saving the scanned original in a user box ("Save in User Box" function)................................ 8-93
Replacing the toner cartridge ........................................................................................................ 9-3
To replace the toner cartridge........................................................................................................... 9-5
Replacing the staple cartridge....................................................................................................... 9-7
To replace the staple cartridge in Finisher FS-524 ........................................................................... 9-8
To replace the staple cartridge in Finisher FS-525 ......................................................................... 9-11
To replace the staple cartridge in Finisher FS-610 ......................................................................... 9-15
Emptying hole-punch scrap boxes .............................................................................................. 9-18
To empty the hole-punch scrap box of the finisher ........................................................................ 9-20
To empty the hole-punch scrap box of the Z Folding Unit ............................................................. 9-21
Care of the machine
10.1
10.1.1
10.1.2
10.1.3
10.1.4
10.1.5
Cleaning .........................................................................................................................................
Cleaning the left partition glass.......................................................................................................
Cleaning the original glass ..............................................................................................................
Cleaning the document pad ............................................................................................................
Cleaning the paper take-up roller....................................................................................................
Cleaning the main unit.....................................................................................................................
bizhub 751/601 (Version 2)
10-3
10-3
10-3
10-4
10-4
10-4
Contents-5
10.1.6
10.1.7
10.1.8
10.2
10.2.1
10.3
11
10-5
10-6
10-7
10-8
10-8
10-9
Managing jobs
11.1
11.1.1
11.1.2
11.1.3
11.1.4
11.2
11.2.1
11.2.2
11.2.3
11.2.4
11.2.5
11.2.6
11.2.7
11.2.8
12
Cleaning the control panel...............................................................................................................
Care of Authentication Unit (Biometric Type) AU-101.....................................................................
Care of Authentication Unit (IC Card Type) AU-201........................................................................
Viewing counters (Meter Count)...................................................................................................
Viewing counters .............................................................................................................................
When the message "It is time for the scheduled inspection of the device." appears ............
Overview of Job List screen ......................................................................................................... 11-3
Jobs ................................................................................................................................................. 11-3
Multi-job feature .............................................................................................................................. 11-3
Job List screens .............................................................................................................................. 11-4
Left panel Job List ........................................................................................................................... 11-7
Performing operations on jobs..................................................................................................... 11-8
Deleting a job................................................................................................................................... 11-8
Checking job settings .................................................................................................................... 11-10
Checking job details ...................................................................................................................... 11-10
Displaying the Current Jobs list (stored jobs and active jobs) ...................................................... 11-12
Displaying the Job History list ....................................................................................................... 11-13
Printing a proof copy of a stored job............................................................................................. 11-14
Printing a stored job ...................................................................................................................... 11-15
Increasing printing priority ............................................................................................................. 11-17
Utility mode
12.1
12.1.1
12.2
12.2.1
12.2.2
12.2.3
12.2.4
12.3
12.3.1
12.3.2
12.3.3
12.3.4
12.3.5
12.3.6
12.3.7
12.3.8
12.3.9
12.3.10
12.4
12.4.1
12.4.2
12.4.3
12.4.4
12.4.5
12.4.6
12.4.7
12.4.8
12.4.9
12.4.10
12.4.11
Contents-6
Overview of Utility mode parameters .......................................................................................... 12-3
List of registration information and parameters .............................................................................. 12-3
Registering a destination .............................................................................................................. 12-8
Create One-Touch Destination ........................................................................................................ 12-8
Create User Box .............................................................................................................................. 12-8
Limiting Access to Destinations ...................................................................................................... 12-8
Displaying the destination registration screen............................................................................... 12-16
Specifying user settings.............................................................................................................. 12-17
System Settings............................................................................................................................. 12-17
Custom Display Settings ............................................................................................................... 12-19
Copier Settings .............................................................................................................................. 12-21
Scan/Fax Settings ......................................................................................................................... 12-23
Printer Settings .............................................................................................................................. 12-23
Change Password ......................................................................................................................... 12-23
Change E-Mail Address................................................................................................................. 12-23
Toner Supply ................................................................................................................................. 12-24
Change Icon .................................................................................................................................. 12-24
Displaying the User Settings screen.............................................................................................. 12-24
Specifying administrator settings .............................................................................................. 12-26
System Settings............................................................................................................................. 12-26
Administrator/Machine Settings .................................................................................................... 12-32
One-Touch/User Box Registration ................................................................................................ 12-32
User Authentication/Account Track............................................................................................... 12-33
Network Settings ........................................................................................................................... 12-36
Copier Setting................................................................................................................................ 12-37
Printer Settings .............................................................................................................................. 12-37
Fax Settings................................................................................................................................... 12-38
System Connection ....................................................................................................................... 12-38
Security Settings............................................................................................................................ 12-38
License Settings ............................................................................................................................ 12-41
bizhub 751/601 (Version 2)
12.4.12
12.4.13
12.5
12.6
12.6.1
12.6.2
12.6.3
12.6.4
12.6.5
12.6.6
12.6.7
12.6.8
12.6.9
12.6.10
12.6.11
12.7
12.7.1
12.7.2
12.8
12.8.1
12.8.2
12.8.3
12.8.4
12.9
12.9.1
12.9.2
12.9.3
12.9.4
12.9.5
12.9.6
12.10
12.10.1
12.10.2
12.10.3
12.11
12.11.1
12.12
13
12-41
12-42
12-44
12-45
12-45
12-47
12-49
12-51
12-53
12-55
12-56
12-58
12-60
12-62
12-63
12-64
12-64
12-66
12-67
12-67
12-67
12-68
12-69
12-72
12-72
12-73
12-74
12-74
12-78
12-79
12-80
12-80
12-83
12-84
12-85
12-85
12-87
Authentication Unit (Biometric Type AU-101)
13.1
13.2
13.2.1
13.2.2
13.2.3
13.2.4
14
OpenAPI Authentication Management Setting .............................................................................
Displaying the Administrator Settings screen ...............................................................................
Overview of weekly timer settings.............................................................................................
Finisher Adjustment ....................................................................................................................
Center Staple Position Adjustment ...............................................................................................
Half-Fold Position..........................................................................................................................
Punch Vertical Position Adjustment ..............................................................................................
Punch Unit Vertical Position Adjustment ......................................................................................
Punch Horizontal Position Adjustment..........................................................................................
Punch Unit Horizontal Position Adjustment ..................................................................................
Punch Resist Loop Size Adjustment .............................................................................................
1st Z-Fold Position Adjustment/2nd Z-Fold Position Adjustment ................................................
Tri-Fold Position Adjustment.........................................................................................................
2-Position Staple Pitch Adjustment ..............................................................................................
Post Inserter Tray Size Adjustment ...............................................................................................
Header/Footer Settings ..............................................................................................................
Specifying headers/footers ...........................................................................................................
Editing headers/footers .................................................................................................................
Authentication Method ...............................................................................................................
User authentication and account track .........................................................................................
When user authentication and account track are synchronized ...................................................
When user authentication and account track are used separately ...............................................
Selecting an authentication method..............................................................................................
User Authentication Setting .......................................................................................................
Administrative Settings—List ........................................................................................................
Default Function Permission .........................................................................................................
Public User Access .......................................................................................................................
User Registration...........................................................................................................................
User Counter .................................................................................................................................
Viewing user counters ...................................................................................................................
Account Track Setting ................................................................................................................
Account Track Registration...........................................................................................................
Account Track Counter .................................................................................................................
Viewing account counters .............................................................................................................
Password Rules...........................................................................................................................
Conditions of the password rules .................................................................................................
Enhanced Security Mode............................................................................................................
Safety information ......................................................................................................................... 13-3
Using Authentication Unit (Biometric Type) AU-101 .................................................................. 13-5
Settings of this machine.................................................................................................................. 13-6
Registering users............................................................................................................................. 13-8
Logging on to this machine........................................................................................................... 13-20
ID & Print function ......................................................................................................................... 13-22
Authentication Unit (IC Card Type AU-201)
14.1
14.2
14.2.1
14.2.2
14.2.3
14.2.4
Safety information ......................................................................................................................... 14-3
Using Authentication Unit (IC Card Type) AU-201 ..................................................................... 14-5
Settings of this machine.................................................................................................................. 14-5
Registering users............................................................................................................................. 14-8
Logging on to this machine........................................................................................................... 14-22
ID & Print function ......................................................................................................................... 14-24
bizhub 751/601 (Version 2)
Contents-7
15
Appendix
15.1
15.1.1
15.1.2
15.1.3
15.2
16
Entering text ...................................................................................................................................
Enlarging the keyboard....................................................................................................................
To type text......................................................................................................................................
List of available characters ..............................................................................................................
Glossary..........................................................................................................................................
15-3
15-5
15-6
15-6
15-7
Index
Contents-8
bizhub 751/601 (Version 2)
1
Introduction
Introduction
1
1
Introduction
Thank you for choosing this machine.
This manual contains details on the operation of the various functions of the machine, precautions on its use,
and basic troubleshooting procedures. In order to ensure that this machine is used correctly and efficiently,
carefully read this manual as needed.
For descriptions on trademarks and copyrights, refer to [Trademarks/Copyrights].
The illustrations used in this manual may appear slightly different from views of the actual equipment.
1.1
Available features
Automatically selecting the paper
The most appropriate paper size can automatically be selected based on the size of the loaded original and
the specified zoom ratio.
For details, refer to "Automatically selecting the paper size ("Auto" paper setting)" on page 3-36.
Adjusting copies to the size of the paper
The most appropriate zoom ratio can automatically be selected based on the size of the loaded original and
the specified paper size.
For details, refer to "Automatically selecting the zoom ratio ("Auto" zoom Setting)" on page 3-39.
Specifying separate horizontal and vertical zoom ratios
By specifying separate horizontal and vertical zoom ratios, copies of the original can be resized as desired.
For details, refer to "Typing in separate X and Y zoom ratios (Individual zoom settings)" on page 3-45.
ABC
ABC
ABC
Scanning the original in separate batches
An original with a large number of pages can be divided and scanned in separate batches. Double-sided
copies can be produced by using the original glass or the original pages can be alternately loaded onto the
original glass or into the ADF, and then all pages can be copied together as a single job.
For details, refer to "Scanning the original in separate batches ("Separate Scan" setting)" on page 3-11 and
"Scanning a multi-page original from the original glass" on page 3-15.
Carrying out half-fold/center staple & fold/tri-fold/Z-fold finishing process
Copies can be folded at their center ("Half-Fold" setting) or bound with staples after being folded in half
("Center Staple & Fold" setting). In addition, the copies can be folded in three ("Tri-fold" setting) or Z-folded
("Z-fold" setting).
For details, refer to "Selecting a folding setting" on page 3-77.
bizhub 751/601 (Version 2)
Half-Fold
Center Staple & Fold
Tri-Fold
Z-Fold
1-3
Introduction
1
Sorting copies
The finishing method for copies can be selected.
For details, refer to "Separating copies by sets ("Sort" setting)" on page 3-66, "Separating copies by pages
("Group" Setting)" on page 3-67.
ABC
ABC
ABC
Stapling copies
Multi-page originals can be copied and stapled together.
For details, refer to "Stapling copies (Staple settings)" on page 3-71.
ABC
ABC
Punching holes in copies
Holes for filing can be punched in the copies.
For details, refer to "Punching holes in copies (Punch settings)" on page 3-74.
ABC
Copying multiple original pages onto a single page
Multiple pages of the original can be printed together on a single page.
For details, refer to "Copying multiple original pages onto a single page (Combined copy settings)" on
page 3-57.
ABC
DEF
ABC DEF
Copying an original containing various page sizes
An original with various page sizes can be scanned and copied together.
For details, refer to "Copying originals of mixed sizes ("Mixed Original" setting)" on page 3-21.
ABC
1-4
ABC
bizhub 751/601 (Version 2)
Introduction
1
Adjusting copies according to the image quality of the original
The copies can be adjusted according to the image quality of the original.
For details, refer to "Loading originals with small print or photos ("Original Type" settings)" on page 3-59.
Inserting paper between copies of OHP
In order to prevent OHP from becoming stuck to each other, a page (interleaf) can be inserted between the
transparency copies.
For details, refer to "Inserting paper between OHP transparencies ("OHP Interleave" function)" on page 8-3.
DEF
ABC
ABC
DEF
Adding a cover page
Cover pages can be added to copies, or copies can be made using different paper (for example, colored
paper) for only the cover pages.
For details, refer to "Adding cover pages ("Cover Sheet" function)" on page 8-6.
COVER
ABC
ABC
Inserting different paper into copies
Different paper (such as colored paper) can be inserted for specified pages in the copies.
For details, refer to "Inserting different paper into copies ("Insert Sheet" function)" on page 8-10.
ABC
ABC
Inserting pages from a different original at specified locations in a copy
An original scanned later can be inserted for specified pages in an original scanned earlier for copying.
For details, refer to "Inserting copies of a different original for a specified page ("Insert Image" function)" on
page 8-14.
ABC
bizhub 751/601 (Version 2)
DEF
ABC
DEF
1-5
Introduction
1
Printing double-sided copies with the specified page on the front side
Double-sided copies can be printed with the specified pages on the front side.
For details, refer to "Specifying pages to be printed on the front side ("Chapters" function)" on page 8-17.
5
4
3
1
2
1
2
3
4
1
2
5
4
2
2
1
5
4
3
1
3
1
Copying with reversed colors
An original can be copied with the light- and dark-colored areas of the original image inversed.
For details, refer to "Reversing black-and-white gradation of the original ("Neg./Pos. Reverse" function)" on
page 8-26.
ABC
ABC
Separately copying a page spread
A page spread, such as in an open book or catalog, can be copied onto separate pages.
For details, refer to "Producing separate copies of each page in a page spread ("Book Copy" function)" on
page 8-27.
ABC
DEF
Repeating copy images
An original image can be repeatedly printed on a single sheet of paper.
For details, refer to "Tiling copy images ("Image Repeat" function)" on page 8-33.
1-6
bizhub 751/601 (Version 2)
Introduction
1
Splitting an original page into two copies
A single original page can be divided in two and each half can be printed on separate copies.
For details, refer to "Dividing spread image into right and left pages using ADF ("Page Separation" function)"
on page 8-38.
ABC DEF
ABC
DEF
Making copies for filing
Copies can be printed with a filing margin so they can easily be stored in filing binders.
For details, refer to "Adding a binding margin to copies ("Page Margin" function)" on page 8-41.
GHI
DEF
ABC
GHI
DEF
ABC
Adjusting the image to fit the paper size
When the copy paper is larger than the original, copies can be printed so that the original image fills the paper.
For details, refer to "Adjusting the image to fit the paper ("Image Adjust" settings)" on page 8-44.
ABC
ABC
Copying with the page layout of a magazine
Copies can be made with the pages arranged in a layout for center binding, such as for a magazine.
2
11 12
2
1
11
For details, refer to "Copying with the page layout of a booklet ("Booklet" function)" on page 8-47.
12 1
Erasing sections of copies
Areas, such as the shadows of punched holes, bindings/edges of books, and transmission information in
received faxes, can be erased in copies.
For details, refer to "Erasing black marks along borders ("Erase" function)" on page 8-51.
ABC
bizhub 751/601 (Version 2)
ABC
1-7
Introduction
1
Printing a sample copy
Before printing a large number of copies, a single sample copy can be printed so that it can be checked.
For details, refer to "Printing a proof to check the settings (Proof Copy)" on page 4-6.
Printing date/time or page number on copies
The date/time, page number, copy protect (hidden text for preventing unauthorized copying) or account track
number per set can be printed on copies.
For details, refer to "Printing the date/time or page number on copies (Stamp/Composition functions)" on
page 8-56.
GHI
DEF
ABC
GHI
DEF
ABC
GHI
DEF
ABC
Managing jobs
The print status of copy jobs can be checked and the jobs can be managed.
For details, refer to "Managing jobs" on page 11-3.
Programming copy settings
Frequently used copy settings can be programmed and recalled to be used with other copy jobs.
For details, refer to "Registering copy programs (Mode Memory)" on page 4-16.
Checking the copy settings
Screens showing the current copy settings can be displayed. From these screens, the copy settings can also
be changed.
For details, refer to "Checking the copy settings (Check Job)" on page 4-3.
Enlarging the size of text in touch panel screens
The text and buttons in the touch panel can be displayed in a larger size that is easier to read, allowing basic
operations to be easily performed.
For details, refer to the User manual – Enlarge Display Operations.
Displaying explanations of functions and settings
The name and function of parts and details of functions and settings appears in the Help screens.
For details, refer to "Displaying function descriptions (Help)" on page 4-22.
Interrupting a copy job
The copy job being printed can be interrupted in order for a different copy job to be printed.
For details, refer to "Interrupting a copy job (Interrupt mode)" on page 4-15.
1-8
bizhub 751/601 (Version 2)
Introduction
1.2
1
Explanation of manual conventions
The marks and text formats used in this manual are described below.
Safety advices
6 DANGER
Failure to observe instructions highlighted in this manner may result in fatal or critical injuries in fact
of electrical power.
%
Observe all dangers in order to prevent injuries.
7 WARNING
Failure to observe instructions highlighted in this manner may result in serious injuries or property
damage.
%
Observe all warnings in order to prevent injuries and to ensure safe use of the machine.
7 CAUTION
Failure to observe instructions highlighted in this manner may result in slight injuries or property
damage.
%
Observe all cautions in order to prevent injuries and to ensure safe use of the machine.
Sequence of action
1
The number 1 as formatted here indicates the first step of a
sequence of actions.
2
Subsequent numbers as formatted here indicate subsequent
steps of a sequence of actions.
Text formatted in this style provides additional assistance.
% Text formatted in this style describes the action that will
ensure the desired results are achieved.
?
An illustration inserted
here shows what operations
must be performed.
Tips
2
Note
Text highlighted in this manner contains useful information and tips to ensure safe use of the machine.
2
Reminder
Text highlighted in this manner contains information that should be reminded.
!
Detail
Text highlighted in this manner contains references for more detailed information.
Special text markings
[Stop] key
The names of keys on the control panel are written as shown above.
MACHINE SETTING
Display texts are written as shown above.
bizhub 751/601 (Version 2)
1-9
Introduction
1
2
Note
The machine illustrations shown in this manual can vary and depend on the machine configuration.
1.3
Descriptions of originals and paper
The descriptions used in this manual for originals and paper are explained below.
Whenever original and paper dimensions are mentioned in this
manual, the value shown as Y in the illustration refers to the width,
and the value shown as X refers to the length.
Lengthwise (w)
If the width (Y) of the paper is shorter than the length (X), the paper
has a vertical or portrait orientation, indicated by w.
Crosswise (v)
If the width (Y) of the paper is longer than the length (X), the paper
has a horizontal or landscape orientation, indicated by v.
1-10
bizhub 751/601 (Version 2)
Introduction
1.4
1
User manuals
This machine is provided with printed manuals and PDF manuals on the User manual DVD.
1.4.1
Printed manual
Quick Guide – Copy/Print/Fax/Scan/Box Operations
This manual contains operating procedures and descriptions of the most frequently used functions, allowing
the machine to immediately be used.
In addition, this manual contains notes and precautions that should be followed for safe use of the machine.
Be sure to read this manual before using the machine.
1.4.2
Introduction to the user manual DVD
The user manual DVD is included with this machine. In the initial screen, select the user manual to be viewed,
and then check the details for the various functions.
User manual – Copy Operations (this manual)
This user manual contains descriptions of Copy mode operations and machine maintenance.
Refer to this user manual for details on paper and originals, copy procedures using convenient Application
functions, replacing consumables and troubleshooting operations such as clearing paper misfeeds.
User manual – Enlarge Display Operations
This user manual contains details on operating procedures in Enlarge Display mode.
Refer to this manual for details on using copy, scanner, G3 fax and network fax operations in Enlarge Display
mode.
User manual – Print Operations (IC-208)
This user manual contains details on the printing functions that can be specified with the optional image
controller.
Refer to this user manual for details on operating procedures for using the printer functions.
User manual – Box Operations
This user manual contains operating procedures for using the user boxes on the optional hard disk.
Refer to this user manual for details on saving data in user boxes, retrieving data from user boxes and
transferring data.
User manual – Network Scan/Fax/Network Fax Operations
This user manual contains details on the network scan, G3 fax, and network fax operations.
Refer to this manual for details on using network scan function by E-Mail or FTP, G3 fax, Internet fax and IP
address fax operations.
In order to use the fax functions, the optional fax kit must be purchased separately.
User manual – Fax Driver Operations
This user manual contains details of the fax driver functions that can be used to send a fax directly from a
computer.
Refer to this user manual for operating procedures on using the PC-FAX functions.
In order to use the fax functions, the optional fax kit must be purchased separately.
User manual – Network Administrator
This user manual contains descriptions on setting methods for each function utilizing network connection,
mainly using the PageScope Web Connection.
Refer to this user manual for details on using network functions.
bizhub 751/601 (Version 2)
1-11
Introduction
1
User manual – Advanced Function Operations
This manual describes overview and usage of functions that become available by registering the optional
license kit and enabling its function, and functions that become available by connecting the MFP with
applications.
In order to use the functions effectively, please read this manual.
1-12
bizhub 751/601 (Version 2)
2
Before making copies
Before making copies
2
2
Before making copies
2.1
Machine configuration
2.1.1
Options
10
9
14
12
16
15
17
18
19
10
13
9
20
12
21
22
2
1
10
9
11
6
12
5
4
3
8
7
bizhub 751/601 (Version 2)
2-3
Before making copies
2
No.
*
2-4
Part name
Description
1
Main unit
Consists of a scanner, a printer, an ADF, and paper trays (4 trays and 1 bypass
tray).
2
Large capacity unit LU-405
Can be loaded with up to 4,000 sheets of paper (80 g/m2).
3
Large capacity unit LU-406
Can be loaded with up to 4,000 sheets of paper (80 g/m2).
4
Local Interface Kit EK-703
Installed when using the machine as a printer connected directly with a PC.
5
Security Kit SC-506
Installed to encode the data saved on the hard disk so that the hard disk can
be used more safely.
6
Hard Disk HD-510
Installed to increase the scanning capacity or enabling scanning of multiple
jobs.
7
Output Tray OT-505
Collects printed sheets.
8
Shift Tray SF-602
Separates copies fed out at an offset.
9
Z Folding Unit ZU-605/
ZU-604
Installed with the finisher to enable Z-folding and hole punching.
10
Post Inserter PI-504
Installed with the finisher to enable insertion of the cover sheet into the printed
sheets. In addition, you can operate the finisher manually.
11
Finisher FS-610
Collects printed sheets. Provides selectable finishing functions: sort, group,
offset-sort, offset-group, staple, face up, center staple & fold, half-fold, and trifold.
12
Punch Kit PK-504/PK-505
Installed with the finisher to enable hole punching.
13
Finisher FS-525
Collects printed sheets. Provides selectable finishing functions: sort, group,
offset-sort, offset-group, face up, and staple.
14
Finisher FS-524
Collects printed sheets. Provides selectable finishing functions: sort, group,
offset-sort, offset-group, face up, and staple.
15
Image Controller IC-208
Installed when this machine is used for network printing and network scanning.
16
Fax Kit FK-502
Allows this machine to be used as a fax machine.
17
Mount Kit MK-716
Used to install the Fax kit.
18
Authentication unit (biometric type) AU-101
Scans vein patterns in the finger to verify user authentication.
19
Authentication unit (IC card
type) AU-201
Reads the information stored on an IC card to verify user authentication.
20
Working Table WT-504
Provides an area to temporarily place originals and other materials. This is also
used when the authentication unit is installed.
21
Key Counter Socket
Required for installing the key counter.
22
Key Counter
Installed onto this machine to make the counter function available for printed
sheets.
23
i-Option LK-101*
Allows the Web Browser and Image Panel functions to be used from the control panel.
For details, refer to the User manual – Advanced Function Operations.
24
i-Option LK-102*
Allows PDF encryption, digital signatures and properties to be specified when
transmitting PDF documents with Scan mode or User Box mode operations.
For details, refer to the User manual – Advanced Function Operations.
25
Upgrade Kit UK-202*
Required in order to use i-Option LK-101 or i-Option LK-102.
Parts marked with an asterisk are not shown in the illustration.
bizhub 751/601 (Version 2)
Before making copies
2.1.2
2
External
3
2
1
4
21
5
6
20
7
8
19
9
18
10
17
11
16
15
14
13
12
2
Reminder
Do not grab the control panel to move the machine.
bizhub 751/601 (Version 2)
2-5
Before making copies
2
No.
2-6
Part name
Description
1
Left partition glass
Scans the original loaded into the ADF.
2
Document scales
Use as a guide when placing the original on the original glass.
3
Document pad
Presses down on the original positioned on the original glass.
4
Original glass
Scans the original placed face down.
5
Adjustable paper guides
Used to align the loaded original.
6
Paper tray
Load with the originals to be scanned facing up.
7
Original output tray
Feeds out scanned originals.
8
Control panel
Used to specify the various settings and perform operations such as starting.
9
[Power] (auxiliary power) key
Turns on/off the copying and scanning functions. Turning it off will terminate
all the functions other than printing, and receiving and outputting facsimile data, and then enter the sleep mode.
10
Adjustable document
guides
Used to align the loaded paper.
11
Bypass tray
Opened and used when printing onto paper that is not or cannot (such as thick
paper, overhead projector transparencies, envelopes or label sheets) be loaded into a paper tray.
12
Release lever for the vertical
transport door of the main
unit
Used to open the vertical transport door when clearing paper misfeeds.
13
Tray 4
A maximum of 550 sheets of A3 to A5 plain paper (64 g/m2) can be loaded.
14
Tray 3
A maximum of 550 sheets of A3 to A5 plain paper (64 g/m2) can be loaded.
15
Tray 2
A maximum of 1,100 sheets of A4 to A5 plain paper (64 g/m2) can be loaded.
16
Tray 1
A maximum of 1,650 sheets of A4 to A5 plain paper (64 g/m2) can be loaded.
17
Right front door
Opened when clearing paper misfeeds.
18
Left front door
Opened when turning the main power switch on and off and when clearing paper misfeeds.
19
Toner cartridge door
Opened when replacing a toner cartridge.
20
Machine status indicator
Indicates machine status by combining the color (blue or red) and the state
(steady on or blinking).
21
USB port (type A)
USB 2.0/1.1
Used for connecting external memory (USB memory device).
bizhub 751/601 (Version 2)
Before making copies
2
28
25
27
26
22
23
29
24
No.
Part name
Description
22
Network connector
(10Base-T/100BaseTX/1000Base-T)
Used for connecting the network cable when this machine is used for network
printing and network scanning.
23
USB port (type A)
USB 2.0/1.1
Used for connecting the USB cable for the authentication unit (biometric type)
or the authentication unit (IC card type).
24
RS-232C port
Used for connecting the modem for CS Remote Care.
25
Telephone jack 1
(LINE PORT1)
Used for connecting a general subscriber line.
26
Telephone jack 2
(LINE PORT2)
Used for connecting a general subscriber line.
This jack is used when the optional fax multi line kit has been installed.
27
Jack for connecting a telephone
(TEL PORT1)
Used for connecting the cord from a telephone.
28
Jack for connecting a telephone
(TEL PORT2)
Used for connecting the cord from a telephone.
29
Power cord
Supplies power to the machine.
bizhub 751/601 (Version 2)
2-7
Before making copies
2
2.1.3
Internal
20
19
18
17
1
2
13
3
12
4
11
10
9
8
7
6
5
16
15
14
2-8
bizhub 751/601 (Version 2)
Before making copies
No.
2
Part name
Description
1
Drum section
Forms the copy image.
2
Vertical transport door
Opened when clearing paper misfeeds in the vertical transport section.
3
Dial M1
Turned when clearing paper misfeeds within the ADU unit.
4
ADU unit
Pulled out when clearing paper misfeeds.
5
Cover M12
Opened when clearing paper misfeeds within the ADU unit.
2
Turned when clearing paper misfeeds within the ADU unit.
6
Dial m
7
Cover M3
Opened when clearing paper misfeeds within the ADU unit.
8
Cover M11
Opened when clearing paper misfeeds within the ADU unit.
9
Lever M4
Lowered to the left in order to pull out the ADU unit when clearing paper misfeeds.
10
Transport lever
Switched when printing on A5-size or 5-1/2 e 8-1/2 thick paper.
11
Dial M9
Turned when clearing paper misfeeds within the ADU unit.
12
Dial M7
Turned when clearing paper misfeeds within the ADU unit.
13
Lever M5
Lowered to the left when clearing paper misfeeds.
14
Cover M8
Opened when clearing paper misfeeds within the ADU unit.
15
Cover M6
Opened when clearing paper misfeeds within the ADU unit.
16
Fusing unit
Fuses the image that was formed onto the paper.
17
Dial M10
Turned when clearing paper misfeeds within the ADU unit.
18
Main power switch
Used to turn the machine on and off.
19
Toner-cartridge-securing lever
Pull toward you to remove the toner unit when replacing a toner cartridge.
20
Toner cartridge
Replaced when the toner is empty.
bizhub 751/601 (Version 2)
2-9
Before making copies
2
2.1.4
Large Capacity Unit LU-405
1
2
6
3
4
5
2
Reminder
Do not climb on, or place objects on this unit to prevent any damage.
Large Capacity Unit LU-405
2-10
No.
Part name
Description
1
Upper cover
Opened when loading paper or clearing paper misfeeds.
2
Lateral guides
Secures the sides of the paper to be loaded.
3
Tray bottom plate
Raised as the paper is used. Lower by pressing the bottom-plate-lowering
button.
4
Trailing edge stopper
Secures the trailing edges of the paper to be loaded.
5
Large capacity tray front
door
Opened when clearing paper misfeeds.
6
Tray bottom plate lower button
Pressed to lower the bottom plate in the paper tray when loading paper.
bizhub 751/601 (Version 2)
Before making copies
2.1.5
2
Large Capacity Unit LU-406
1
2
6
3
5
4
2
Reminder
Do not climb on, or place objects on this unit to prevent any damage.
Large Capacity Unit LU-406
No.
Part name
Description
1
Upper cover
Opened when loading paper or clearing paper misfeeds.
2
Lateral guides
Secures the sides of the paper to be loaded.
3
Tray bottom plate
Raised as the paper is used. Lower by pressing the bottom-plate-lowering
button.
4
Trailing edge stopper
Secures the trailing edges of the paper to be loaded.
5
Large capacity tray front
door
Opened when clearing paper misfeeds.
6
Tray bottom plate lower button
Pressed to lower the bottom plate in the paper tray when loading paper.
bizhub 751/601 (Version 2)
2-11
Before making copies
2
2.1.6
Finisher FS-524/Punch Kit PK-504/PK-505
1
2
3
4
13
5
6
7
14
8
12
11
10
2-12
9
bizhub 751/601 (Version 2)
Before making copies
2
Finisher FS-524
No.
Part name
Description
1
Front door
Opened when clearing paper misfeeds or jammed staples or when replacing
the staple cartridge.
2
Main finishing tray (Tray 2)
Collects printed pages.
3
Sub finishing tray (Tray 1)
Collects printed pages.
4
Guide lever FN4
Opened when clearing paper misfeeds.
5
Guide lever FN1
Opened when clearing paper misfeeds.
6
Misfeed-clearing dial FN3
Turned when clearing paper misfeeds within the finisher.
7
Guide lever FN2
Opened when clearing paper misfeeds.
8
Stacker unit
Removed when clearing paper misfeeds or jammed staples or when replacing
the staple cartridge.
9
Staple cartridge holder
Removed from the stacker unit when clearing jammed staples or when replacing the staple cartridge.
10
Handle FN7
Grabbed when removing and inserting the stacker unit.
11
Misfeed-clearing dial FN6
Turned when clearing paper misfeeds within the finisher.
12
Guide lever FN5
Opened when clearing paper misfeeds.
Punch Kit PK-504/PK-505
No.
Part name
Description
13
Punch kit
Punches holes for filing printed pages when the punch kit is installed with Finisher FS-524.
14
Hole-punch scrap box
Removed when emptying punch scraps that have accumulated from using the
Punch settings.
bizhub 751/601 (Version 2)
2-13
Before making copies
2
2.1.7
Finisher FS-525/Punch Kit PK-504/PK-505
1
2
3
4
13
5
6
7
14
8
12
11
10
2-14
9
bizhub 751/601 (Version 2)
Before making copies
2
Finisher FS-525
No.
Part name
Description
1
Front door
Opened when clearing paper misfeeds or jammed staples or when replacing
the staple cartridge.
2
Main finishing tray (Tray 2)
Collects printed pages.
3
Sub finishing tray (Tray 1)
Collects printed pages.
4
Guide lever FN4
Opened when clearing paper misfeeds.
5
Guide lever FN1
Opened when clearing paper misfeeds.
6
Misfeed-clearing dial FN3
Turned when clearing paper misfeeds within the finisher.
7
Guide lever FN2
Opened when clearing paper misfeeds.
8
Stacker unit
Removed when clearing paper misfeeds or jammed staples or when replacing
the staple cartridge.
9
Staple cartridge holder
Removed from the stacker unit when clearing jammed staples or when replacing the staple cartridge.
10
Handle FN7
Grabbed when removing and inserting the stacker unit.
11
Misfeed-clearing dial FN6
Turned when clearing paper misfeeds within the finisher.
12
Guide lever FN5
Opened when clearing paper misfeeds.
Punch Kit PK-504/PK-505
No.
Part name
Description
13
Punch kit
Punches holes for filing printed pages when the punch kit is installed with Finisher FS-525.
14
Hole-punch scrap box
Removed when emptying punch scraps that have accumulated from using the
Punch settings.
bizhub 751/601 (Version 2)
2-15
Before making copies
2
2.1.8
Finisher FS-610/Punch Kit PK-504/PK-505
1
2
3
4
5
8
17
9
6
7
14
18
13
10
12
11
2-16
bizhub 751/601 (Version 2)
Before making copies
2
16
15
bizhub 751/601 (Version 2)
2-17
Before making copies
2
Finisher FS-610
No.
Part name
Description
1
Main finishing tray (Tray 2)
Collects printed pages.
2
Sub finishing tray (Tray 1)
Collects printed pages.
3
Front door
Opened when clearing paper misfeeds or jammed staples or when replacing
the staple cartridge.
4
Guide lever FN4
Opened when clearing paper misfeeds.
5
Guide lever FN1
Opened when clearing paper misfeeds.
6
Misfeed-clearing dial FN3
Turned when clearing paper misfeeds within the finisher.
7
Guide lever FN2
Opened when clearing paper misfeeds.
8
Guide lever FN5
Opened when clearing paper misfeeds.
9
Guide lever FN9
Opened when clearing paper misfeeds.
10
Stacker unit
Pulled out when clearing paper misfeeds or jammed staples or when replacing
the staple cartridge.
11
Guide lever FN8
Opened when clearing paper misfeeds.
12
Misfeed-clearing dial FN7
Turned when clearing paper misfeeds within the finisher.
13
Handle FN6
Grabbed when removing and inserting the stacker unit.
14
Booklet tray
Collects copies printed using a Fold/Bind setting.
15
Guide lever FN10
Opened when clearing paper misfeeds.
16
Staple cartridge holder
Removed from the stacker unit when clearing jammed staples or when replacing the staple cartridge.
Punch Kit PK-504/PK-505
2-18
No.
Part name
Description
17
Punch kit
Punches holes for filing printed pages when the punch kit is installed with Finisher FS-610.
18
Hole-punch scrap box
Removed when emptying punch scraps that have accumulated from using the
Punch settings.
bizhub 751/601 (Version 2)
Before making copies
2.1.9
2
Z Folding Unit ZU-604/ZU-605
5
6
8
7
9
11
10
1
2
4
bizhub 751/601 (Version 2)
3
2-19
Before making copies
2
No.
2-20
Part name
Description
1
Z folding/transport unit
Pulled out when removing jammed paper.
2
Guide lever FN1
Opened when clearing paper misfeeds.
3
Hole-punch scrap box
Removed when emptying punch scraps that have accumulated from using the
Punch settings.
4
Front door
Opened when clearing paper misfeeds or punch scraps.
5
Guide lever FN6
Opened when clearing paper misfeeds.
6
Guide lever FN7
Opened when clearing paper misfeeds.
7
Guide lever FN8
Opened when clearing paper misfeeds.
8
Handle FN2
Grabbed when removing and inserting the unit.
9
Misfeed-clearing dial FN5
Turned when removing paper jammed in the Z folding unit.
10
Guide lever FN3
Opened when clearing paper misfeeds.
11
Misfeed-clearing dial FN4
Turned when removing paper jammed in the Z folding unit.
bizhub 751/601 (Version 2)
Before making copies
2.1.10
2
Post Inserter PI-504
5
6
4
3
2
1
No.
Part name
Description
1
Post inserter control panel
Operate when manually using the finisher. (See p. 3-86.)
2
Lower tray paper guide
Slide to fit the size of paper being loaded when loading with cover sheets.
3
Lower tray
Load with cover sheets.
4
Upper tray
Load with cover sheets.
5
Upper tray paper guide
Slide to fit the size of paper being loaded when loading with cover sheets.
6
Upper unit release lever
Raised to slide the upper unit to the left when clearing paper misfeeds.
bizhub 751/601 (Version 2)
2-21
Before making copies
2
2.1.11
Shift Tray SF-602
2.1.12
Output Tray OT-505
2-22
bizhub 751/601 (Version 2)
Before making copies
2.1.13
2
Authentication Unit (Biometric Type) AU-101
1
2
3
Rear view
Top view
2.1.14
No.
Part name
Description
1
Status indicator
Indicates the status of the authentication unit.
2
Security slot
Used for connecting the security cable to prevent thefts. (complies with the security cable standards of the Kensington Computer Products Group)
3
USB port (type mini-B)
Used to connect a USB cable (mini-B plug).
Authentication Unit (IC Card Type) AU-201
1
2
No.
Part name
Description
1
Card scanning area
Position the IC card on this area.
2
USB cable
Used for connecting this device to the machine.
Precautions for using the finisher:
Do not place objects on top of the finisher and below the paper output trays, otherwise the machine
may be damaged.
bizhub 751/601 (Version 2)
2-23
Before making copies
2
2.1.15
Control panel
1
2
3
4
22
5
21
20
19
6
18
17
7
16
8
15
14
No.
10
9
Part name
Description
1
Touch panel
Displays various screens and messages.
Specify the various settings by directly touching the panel.
2
Main Power indicator
Lights up in green when the machine is turned on with the main power switch.
3
[Power] (auxiliary power) key
Press to turn on/off machine operations. When turned off, the machine enters
a state where it conserves energy.
4
[Mode Memory] key
Press to register (store) the desired copy/fax/scan settings as a program or to
recall a registered program. (See p. 4-16.)
5
[Utility/Counter] key
Press to display the Meter Count screen and the Utility screen.
6
[Reset] key
Press to clear all settings (except programmed settings) entered in the control
panel and touch panel.
7
[Interrupt] key
Press to enter Interrupt mode. While the machine is in Interrupt mode, the indicator on the [Interrupt] key lights up in green and the message "Now in Interrupt mode." appears on the touch panel. To cancel Interrupt mode, press the
[Interrupt] key again.
8
[Stop] key
Pressing the [Stop] key while copying, scanning or printing temporarily stops
the operation.
9
[Proof Copy] key
Press to print a single proof copy to be checked before printing a large number
of copies. You can also display a finishing image using the current settings in
the touch panel. (Only when a hard disk is installed.) (See p. 4-6.)
[Start] key
Press to start the copy, scan or fax operation. When this machine is ready to
begin the operation, the indicator on the [Start] key lights up in blue. If the indicator on the [Start] key lights up in orange, the operation cannot begin.
Press to restart a stopped job. For details on jobs, refer to "Overview of Job
List screen" on page 11-3.
10
2-24
13 12 11
bizhub 751/601 (Version 2)
Before making copies
2
No.
Part name
Description
11
Data indicator
Flashes in blue while a print job is being received.
Lights up in blue when a print job is queued to be printed or while it is being
printed.
The indicator lights up in blue when there is saved fax data or unprinted fax
data.
12
[C] (clear) key
Press to clear a value (such as the number of copies, a zoom ratio, or a size)
entered using the keypad.
13
Keypad
Use to type in the number of copies to be produced.
Use to type in the zoom ratio.
Use to type in the various settings.
14
[Help] key
Press to display the Help Menu screen.
From this screen, descriptions of the various functions and details of operations can be displayed. (See p. 4-22.)
15
[Enlarge Display] key
Press to enter Enlarge Display mode.
16
[Accessibility] key
Press to display the screen for specifying settings for user accessibility functions. If authentication is performed with PageScope Authentication Manager,
it does not enter Enlarge Display mode.
17
[Power Save] key
Press to enter Power Save mode. While the machine is in Power Save mode,
the indicator on the [Power Save] key lights up in green and the touch panel
goes off. To cancel Power Save mode, press the [Power Save] key again.
18
[Access] key
If user authentication or account track settings have been applied, press this
key after entering the user name and password (for user authentication) or the
account name and password (for account track) in order to use this machine.
19
[Brightness] dial
Use to adjust the Brightness of the touch panel.
20
[User Box] key
Press to enter User Box mode.
While the machine is in User Box mode, the indicator on the [User Box] key
lights up in green. For details, refer to the User manual – Box Operations.
21
[Fax/Scan] key
Press to enter Fax/Scan mode.
While the machine is in Fax/Scan mode, the indicator on the [Fax/Scan] key
lights up in green.
For more details, refer to the User manual – Network Scan/Fax/Network Fax
Operations.
22
[Copy] key
Press to enter Copy mode. (As a default, the machine is in Copy mode.) While
the machine is in Copy mode, the indicator on the [Copy] key lights up in green.
2
Reminder
Do not apply extreme pressure to the touch panel, otherwise it may be scratched or damaged.
Never push down on the touch panel with force, and never use a hard or pointed object to make a
selection in the touch panel.
bizhub 751/601 (Version 2)
2-25
Before making copies
2
2.1.16
Basic settings screens
When the machine is ready to begin making copies after being turned on, the Basic screen appears.
To activate a function or to select a setting, lightly touch the desired button in the touch panel.
Basic screen
1
9
8
2
7
3
6
5
4
Quick Copy screen
1
9
2
7
3
4
2-26
5
bizhub 751/601 (Version 2)
Before making copies
Touching
2
displays Density settings, Background Removal settings, and [Finishing] in the left panel.
No.
Item Name
Description
1
Message display area
The status of the machine and details on operations are displayed.
2
Functions/settings display
area
Tabs and buttons for displaying screens containing various functions are displayed.
Touch a tab or button to display the corresponding screen for specifying the
settings.
3
Icon display area
Icons indicating the status of jobs and the machine are displayed.
4
[Auto Rotate OFF] button
Touch to copy with the image not rotated to fit the orientation of the loaded
paper.
5
[Separate Scan] button
Touch to scan the original in separate batches.
An original scanned in different batches can be treated as a single copy job.
6
[Finishing] button
Touch to specify settings for collating, grouping, stapling, or hole punching.
7
Left panel
When the [Job List] button is pressed, a screen showing the jobs currently being performed or waiting to be performed is displayed.
When the [Check Job] button is pressed, a screen showing the result of the
specified settings is displayed.
8
[Check Job] button
The result of the specified settings is displayed.
9
[Job List] button
Jobs currently being performed or waiting to be performed are displayed.
Various commands for checking and managing jobs are available.
!
Detail
The basic settings screen (Basic screen or Quick Copy screen) that appears can be set with the "Copier
Settings" parameter in the Custom Display Settings screen (displayed from the User Setting screen in
Utility/Counter mode). The arrangement of the buttons and screens differ with the Basic screen and
Quick Copy screen; however, the functions that can be set are the same. As a default, "Basic" is
selected. This manual contains descriptions of procedures using the Basic screen that appears when
"Basic" is selected.
The Quick Copy screen displays all of the settings from the Basic screen so that many settings can
easily be specified.
!
Detail
For details on switching the basic settings screen, refer to "Custom Display Settings" on page 12-19.
bizhub 751/601 (Version 2)
2-27
Before making copies
2
2
Note
If settings have been changed from the factory defaults, the tab for the screen containing the changed
settings appears framed with a green line.
The green line can be changed to another color with the "Color Selection Settings" parameter in the
Custom Display Settings screen (displayed from the User Setting screen in Utility/Counter mode).
2.1.17
Icons that appear in the screen
Icon
Description
Indicates that data is being sent from the machine, regardless of the current mode.
Indicates that data is being received from the machine, regardless of the current
mode.
If the warning screen was closed when a warning occurred, touch this button to display the warning screen again.
Appears when there is a message indicating that consumables must be replaced or
the machine requires maintenance. Touch this icon to display the message, and then
perform the replacement or maintenance procedure.
Appears when an error occurs with the connection to the POP server.
Indicates that paper is not loaded in the paper tray.
Indicates that very little paper remains in the paper tray.
Indicates that "Enhanced Security Mode" is set to "ON".
Appears when a USB drive is connected.
2-28
bizhub 751/601 (Version 2)
Before making copies
2.2
2
Adjusting the angle of the control panel
The control panel can be adjusted to any of three angles. In addition, the control panel can be tilted to the left.
Adjust the control panel to the angle that allows for easy operation.
2.2.1
To adjust the angle of the control panel
1
Pull the control panel release lever toward you, to release the
positioning lock.
2
Move the control panel to the desired position, then release
the lever.
bizhub 751/601 (Version 2)
2-29
Before making copies
2
3
To tilt the control panel to the left, hold the bottom of the
control panel, and then tilt the panel to the left.
2
Reminder
When tilting the control panel, do not grab the touch panel or the control panel.
2-30
bizhub 751/601 (Version 2)
Before making copies
2.3
2
Turning on the main power and the auxiliary power
This machine has two power controls: the main power switch and the [Power] (auxiliary power) key.
2.3.1
Turning on the machine
The main power switch turns on/off all functions of the machine. Normally, the main power switch is turned
on.
The [Power] (auxiliary power) key turns on/off machine operations, for example, for copying, printing or
scanning. When the [Power] (auxiliary power) key is turned off, the machine enters a state where it conserves
energy.
1
Open the left front door, and then set the main power switch
to "n".
2
Close the left front door.
3
Press the [Power] (auxiliary power) key.
Check that the touch panel is turned on.
!
Detail
When the [Power] (auxiliary power) key is turned on, the indicator on the [Start] key lights up in orange,
and a screen indicating that the machine is starting up appears.
After a few seconds, the message "Warming up. Ready to scan." appears on the touch panel, and the
indicator on the [Start] key lights up in blue, indicating that a job can now be queued.
The default settings are the settings that are selected immediately after the machine is turned on (the
power switch is set to "n") and before any setting is specified from the control panel or touch panel, and
those that are selected when the [Reset] key is pressed to cancel all settings specified from the control
panel or touch panel. The default settings can be changed. For more details, refer to "Custom Display
Settings" on page 12-19.
The factory default settings are the settings that were selected when this machine was sent from the
factory.
2
Note
A job can also be queued while the machine is warming up after the [Power] (auxiliary power) key is
turned on. For details, refer to "Scanning during warm-up" on page 2-32.
After the machine has finished warming up, the scanned image will be printed.
Refer to "Main unit" on page 6-3 for warm up time.
bizhub 751/601 (Version 2)
2-31
Before making copies
2
2.3.2
Scanning during warm-up
1
Press the [Power] (auxiliary power) key.
– For details on turning on the machine, refer to "Turning off the machine" on page 2-33.
The indicator on the [Start] key lights up in orange.
After the warm-up message is displayed, the Basic screen appears. The indicator on the [Start] key
lights up in blue.
2
Check that the message "Warming up. Ready to scan." appears on the touch panel.
3
Position the original to be copied.
–
For details on positioning the original, refer to "Feeding the original" on page 3-9.
4
Specify any other desired copy settings.
5
Using the keypad, specify the desired number of copies.
–
6
For details on specifying the number of copies, refer to "General copy operation" on page 3-3.
Press the [Start] key.
The original is scanned, and the job is added to the list of queued jobs.
–
If the "Copy Operating Screen" parameter in Utility mode was set to "Yes", touch [Next Copy Job]
to display the Basic screen.
–
After the machine has finished warming up, the jobs will automatically be printed.
How can the job being printed be stopped?
% Press the [Stop] key. For details, refer to "Temporarily stopping scanning/printing" on page 3-91.
?
2-32
bizhub 751/601 (Version 2)
Before making copies
2
!
Detail
While the machine is warming up to begin printing after it is turned on using the [Power] (auxiliary power)
key, copy settings can be specified and an original can be scanned to reserve a copy job. After the
machine has finished warming up, the copies are automatically printed.
The print order can be changed or jobs can be deleted from the Detail screen of a job from the Current
Jobs list in the Job List screen. For details, refer to "Managing jobs" on page 11-3.
2.3.3
Turning off the machine
1
Press the [Power] (auxiliary power) key.
Check that the touch panel is turned off.
2
Open the front door, and then set the main power switch to
"o".
3
Close the front door.
2
Reminder
When the machine is turned off, then on again with the main power switch, wait at least 10 seconds to
turn the machine on after turning it off. The machine may not operate correctly if it is turned on
immediately after being turned off.
Do not turn off the machine with the main power switch or the [Power] (auxiliary power) key while it is
making copies or printing, otherwise a paper misfeed may occur.
Do not turn off the machine with the main power switch or the [Power] (auxiliary power) key while it is
scanning or sending or receiving data, otherwise all scan data or transmission data will be deleted.
Do not turn off the machine with the main power switch while a queued job or stored data is waiting to
be printed, otherwise the jobs will be deleted.
!
Detail
The following are cleared when the main power switch and [Power] (auxiliary power) key are turned off.
Settings that have not been programmed
Jobs queued to be printed
bizhub 751/601 (Version 2)
2-33
Before making copies
2
2.3.4
Automatically clearing settings (Automatic panel reset)
If no operation is performed for a specified length of time (even if the [Reset] key is not pressed), settings that
have not been programmed, such as the number of copies, are cleared and return to their default settings.
This is the automatic panel reset operation.
As the factory default, the automatic panel reset operation is performed after 1 minute.
!
Detail
The length of time until the automatic panel reset operation is performed and whether or not it is
performed can be set from Utility mode. For details, refer to "System Settings" on page 12-26.
Whether or not the automatic panel reset operation is performed when there is a change of user can be
set from the Utility mode. For details, refer to "System Settings" on page 12-26.
2.3.5
Automatically canceling the mode screen (System Auto Reset)
If no operation is performed for a specified length of time, the screen is automatically changed to that for the
mode given priority.
This is the System Auto Reset operation.
As the factory default, the Copy mode screen is displayed after 1 minute.
!
Detail
The mode screen that is displayed when the System Auto Reset operation is performed can be changed
from the Utility mode. For details, refer to "System Settings" on page 12-26.
2.3.6
Automatically conserving energy (Low Power mode)
If no operation is performed for a specified length of time, the touch panel goes off and the machine
automatically enters a mode where it conserves energy.
This is the Low Power mode.
The machine can receive jobs even while it is in Low Power mode.
As the factory default, the machine enters Low Power mode after 15 minutes.
To recover from Low Power mode
1
Press the [Power Save] key.
2
The machine can receive jobs while it is warming up.
–
The touch panel comes on again and, after the machine has finished warming up, it is ready to begin
printing.
2
Note
As the factory default, pressing the [Power Save] key causes the machine to enter Low Power mode.
Settings in the Administrator Settings mode can be changed to put the machine in Sleep mode instead.
For details, refer to "System Settings" on page 12-26.
The Low Power mode can also be canceled by pressing any key in the control panel or by touching the
touch panel.
2-34
bizhub 751/601 (Version 2)
Before making copies
2
!
Detail
The length of time until the machine enters Low Power mode can be changed.
For details, refer to "System Settings" on page 12-17 and page 12-26.
2.3.7
Automatically conserving energy (Sleep mode)
If no operation is performed for a specified length of time, the machine automatically enters a mode where it
conserves energy.
Although the machine conserves more energy in Sleep mode than in Low Power mode, the machine must
warm up when Sleep mode is canceled to begin printing again, therefore taking more preparation time than
Low Power mode.
As the factory default, the machine enters Sleep mode after 60 minutes.
To recover from Sleep mode
1
Press the [Power Save] key.
2
The machine can receive jobs while it is warming up.
–
The touch panel comes on again and, after the machine has finished warming up, it is ready to begin
printing.
2
Note
The Sleep mode can also be canceled by pressing any key in the control panel or by touching the touch
panel.
!
Detail
As a default, the machine enters Low Power mode if no operation is performed for 15 minutes, and then
the machine enters Sleep mode after 60 minutes have elapsed.
The length of time until the machine enters Sleep mode can be changed. For details, refer to "System
Settings" on page 12-17 and "System Settings" on page 12-26.
Specify whether to bring the machine to the same condition as mains power off when the machine
enters Sleep mode or when the sub power switch is turned off. For details, refer to "System Settings"
on page 12-26.
bizhub 751/601 (Version 2)
2-35
Before making copies
2
2.3.8
Manually conserving energy
The machine can be manually set to an energy conservation mode (Low Power mode or Sleep mode).
%
Press the [Power Save] key (or press the [Power] (auxiliary
power) key).
– As the factory default, the machine enters Low Power
mode.
!
Detail
Whether the machine enters Low Power mode or Sleep mode when the [Power Save] key is pressed
can be set from the Administrator Settings mode.
For details, refer to "System Settings" on page 12-26.
2.3.9
Automatically turning the machine on/off (Weekly Timer)
The machine can be set to automatically enter Sleep mode according to a usage schedule determined by the
administrator so the machine’s use can be limited.
This is the Weekly Timer.
Follow the procedure described below to use the machine while the Weekly Timer is being used.
!
Detail
As the factory default, the Weekly Timer is not set. For details on setting the Weekly Timer, refer to
"System Settings" on page 12-26.
1
2-36
Press the [Power Save] key.
bizhub 751/601 (Version 2)
Before making copies
2
Type in the password (up to 8 digits) for non-business hours.
–
3
2
For details on setting the password for non-business hours, refer to "System Settings" on
page 12-26.
Touch [OK].
The message "It is now non-business hour. Set the Sleep Mode time." appears.
4
Using the keypad, again type in the length of time until the machine enters Sleep mode.
–
Specify a length of time between 5 minutes and 9 hours and 59 minutes.
How can a single digit be entered?
% First, type in "0". If a minutes setting of less than 5 is entered, the setting changes to 5 minutes. In
addition, a minutes setting of 60 or more cannot be specified.
?
5
Touch [OK].
The message "Ready to copy." appears on the touch panel.
2
Note
If the message "It is now non-business hour. Set the Sleep Mode time." or "It is now non-business hour.
To use the device, enter password using the keyboard or keypad and then touch [OK]." appears after
the [Power] (auxiliary power) key is pressed, the Weekly Timer is set.
bizhub 751/601 (Version 2)
2-37
Before making copies
2
!
Detail
During the set time, the copy operations can be performed as usual.
From the Password for Non-Business Hours screen (displayed from Administrator Settings mode), the
machine can be set so that the screen for entering the password for non-business hours is not
displayed.
The default setting for the "Password for Non-Business Hours" parameter is "No" (the screen is not
displayed).
2.3.10
Controlling each user’s use of this machine (User Authentication)
If user authentication settings have been specified by the administrator, only users that have been registered
can use this machine. In addition, the number of printed pages can be managed for each user.
0
0
0
1
When user authentication settings have been specified, only users who enter passwords for specified
users can use this machine.
Contact the administrator for a user name and password and for the server name.
If machine authentication or external server authentication has been set, a total of 1,000 users and
accounts can be registered.
Touch [User Name].
–
–
2-38
If a list of user names can be displayed, the desired user name can be selected from the list. Touch
[User Name List], touch the button for the desired user name to select it, and then touch [OK].
Users who have no access to a user name and password can touch [Public User Access] to use this
machine. For details on specifying public user settings, refer to "Selecting an authentication
method" on page 12-69 and "Public User Access" on page 12-74.
bizhub 751/601 (Version 2)
Before making copies
2
2
–
If "Enhanced Security Mode" is set to "ON", [Public User Access] and [User Name List] do not
appear.
–
If external server authentication was selected as the user authentication method, [Server Name]
appears with the name of the default server.
Touch [Server Name] to display the names of the registered servers, and then select the desired
server. For details on specifying settings for an external server authentication, refer to "Selecting an
authentication method" on page 12-69.
Type in the user name, and then touch [OK].
bizhub 751/601 (Version 2)
2-39
Before making copies
2
3
Touch [Password].
4
Type in the password, and then touch [OK].
5
Touch [Login] or press the [Access] key.
The Basic screen appears.
If account track settings have been applied, the account track
screen appears. However, if "Synchronize User Authentication
& Account Track" has been set to "Synchronize", the account
track screen does not appear if the users and accounts are
synchronized.
6
2-40
Make copies using the desired copy settings.
bizhub 751/601 (Version 2)
Before making copies
7
2
When you are finished printing, press the [Access] key.
A message appears, requesting confirmation to log off.
8
Touch [Yes], and then touch [OK].
The user authentication screen appears.
!
Detail
For details on specifying user authentication settings, refer to "User Authentication/Account Track" on
page 12-33.
It is possible to specify so that the logging-off confirmation screen does not appear. For details, refer
to "User Authentication/Account Track" on page 12-33.
2
Note
The user authentication settings can be used together with the account track settings. If the
"Synchronize User Authentication & Account Track" parameter is set to "Synchronize", complete user
authentication, and then log on by using the account track screen.
User authentication settings can be specified using the User Authentication parameters in
Administrator Settings mode, available from the Utility mode. Settings should be specified by the
administrator.
bizhub 751/601 (Version 2)
2-41
Before making copies
2
2.3.11
Controlling each account’s use of this machine (Account Track)
If the account track settings have been specified by the administrator, only users of registered accounts can
use this machine. In addition, the number of prints produced with each account can be controlled.
This is account track.
0
0
0
When account track settings have been specified, only users who enter passwords for specified
accounts can use this machine.
If you do not know the account name or password, contact your administrator.
A total of 1,000 users and accounts can be registered.
1
Touch [Account Name].
–
–
–
–
2-42
If [Password Only] is specified in the Administrator Settings, the following screen appears. Touch
[Password] and continue with step 4.
If the "Account Track Input Method" in the Administrator Settings is set to "Password Only", only
[Password] is displayed in the authentication screen. The password can be directly entered in the
authentication screen using the keypad. If the password consists of numerals only, touching [Login]
or pressing the [Access] key allows logging on without displaying a keyboard screen.
If the password consists of alphabet characters, numerals and symbols, touch [Password] and
continue with step 4.
After entering numerals using the keypad, touching [Password] allows alphabet characters or
symbols to be entered in succession.
bizhub 751/601 (Version 2)
Before making copies
2
Type in the account name, and then touch [OK].
3
Touch [Password].
4
Type in the password, and then touch [OK].
bizhub 751/601 (Version 2)
2
2-43
Before making copies
2
5
Touch [Login] or press the [Access] key.
The Basic screen appears.
6
Make copies using the desired copy settings.
7
When you are finished printing, press the [Access] key.
A message appears, requesting confirmation to log off.
8
Touch [Yes], and then touch [OK].
The account track screen appears.
!
Detail
The accounts can be managed in Administrator Settings mode, available from the Utility mode. Settings
should be specified by the administrator.
If "Account Track Input Method" on the General Settings screen of Administrator Settings mode was
set to "Password Only", log on is possible by only entering the password. For details, refer to "User
Authentication/Account Track" on page 12-33.
For details on specifying account track settings, refer to "Selecting an authentication method" on
page 12-69.
It is possible to specify so that the logging-off confirmation screen does not appear. For details, refer
to "User Authentication/Account Track" on page 12-33.
2-44
bizhub 751/601 (Version 2)
Before making copies
2.3.12
2
Controlling use of this machine with Authentication Unit (Biometric Type)
An authentication unit (biometric type) can be used with this machine to perform authentication. The
authentication unit (biometric type) authenticates the user by scanning the vein patterns in the finger.
2
Note
1-to-many authentication: Authentication is performed simply by positioning the finger.
1-to-1 authentication: Authentication is performed by typing in the user name and positioning the finger.
!
Detail
To use biometric authentication, register the vein patterns in the finger in advance.
For details on specifying authentication settings for the authentication unit (biometric type) and on
registering finger vein patterns, refer to chapter 12, "Authentication unit (Biometric Type AU-101)" of
this manual.
When "1-to-many authentication" has been specified
%
Place your finger on the authentication unit (biometric type).
bizhub 751/601 (Version 2)
2-45
Before making copies
2
The basic screen appears.
When "1-to-1 authentication" has been specified
2-46
1
Type in the user name.
2
Place your finger on the authentication unit (biometric type).
bizhub 751/601 (Version 2)
Before making copies
2
The basic screen appears.
2
Note
If the authentication unit (biometric type) cannot be used, it is possible to use this machine by entering
a [User name] and [Password].
2.3.13
Controlling use of this machine with the Authentication Unit (IC Card Type)
An authentication unit (IC card type) can be used with this machine to perform authentication. The
authentication unit (IC card type) authenticates users by reading the information registered on their IC card.
2
Note
Card Authentication: Authentication is performed simply by positioning the IC card.
Card Authentication + Password: Authentication is performed by positioning the IC card and entering
the password.
!
Detail
To use card authentication, register the card information in advance.
For details on specifying authentication settings for the authentication unit (IC card type) and on
registering IC card information, refer to chapter 13, "Authentication unit (IC Card Type AU-201)" of this
manual.
When "Card Authentication" has been specified
bizhub 751/601 (Version 2)
2-47
Before making copies
2
%
Place the IC card horizontally on the card scanning area of the
authentication unit (IC card type).
The Basic screen appears.
When "Card Authentication + Password" has been specified
2-48
bizhub 751/601 (Version 2)
Before making copies
1
Place the IC card horizontally on the card scanning area of the
authentication unit (IC card type).
2
Type in the password and then touch [Login] or press the [Access] key.
2
The Basic screen appears.
2
Note
If the authentication unit (IC card type) cannot be used, it is possible to use this machine by entering a
user name and password.
bizhub 751/601 (Version 2)
2-49
Before making copies
2
2.4
Loading paper into the tray 1 or 2
To load paper (tray 1 or 2)
1
Pull out the tray 1 or 2.
2
Raise the paper take-up roller.
3
Load the paper into the tray.
–
4
Load the paper so that it is flush against the right side of
the tray.
Fully push in the paper tray.
2
Reminder
Do not load so much paper that the top of the stack is higher than the , mark.
Make sure that the trailing-edge guide is adjusted to fit the size of the loaded paper.
If there is space between the trailing-edge guide and the paper, the paper will not be fed correctly.
Do not close the paper tray with too much force, otherwise the weight of the tray and paper will apply
an impact to the machine that may cause damage.
2-50
bizhub 751/601 (Version 2)
Before making copies
2.5
2
Loading paper into the tray 3 or 4
To load paper (tray 3 or 4)
1
Pull out the tray 3 or 4.
2
Raise the paper take-up roller.
3
Load the paper into the tray.
–
4
Slide the lateral guide to fit the size of paper being loaded.
–
5
Load the paper so that it is flush against the right side of
the tray.
Move the lateral guide while holding the release button
pressed. When the button is released, the guide is locked
in place.
Fully push in the paper tray.
2
Reminder
Do not load so much paper that the top of the stack is higher than the , mark.
2
Reminder
Make sure that the trailing-edge guide is adjusted to fit the size of the loaded paper.
If there is space between the trailing-edge guide and the paper or if the trailing-edge guide is not
correctly positioned, the paper will not be fed correctly.
Make sure that the lateral guide is correctly positioned against the edge of the loaded paper. If the
lateral guide is not positioned correctly, the paper size will not be correctly detected or the punched
holes will not be correctly positioned.
If custom-sized paper is loaded, there may be some space between the paper and the trailing-edge
guide. When loading the paper, make sure that it fits well against the right side of the paper tray, not
the trailing-edge guide.
bizhub 751/601 (Version 2)
2-51
Before making copies
2
2
Reminder
Do not close the paper tray with too much force, otherwise the weight of the tray and paper will apply
an impact to the machine that may cause damage.
2.6
Loading paper into the LCT (LU-405/LU-406)
2
Note
LCT is the optional Large capacity unit LU-405/LU-406.
2
Reminder
If the machine is turned off, the bottom plate cannot be raised. In addition, the bottom plate cannot be
lowered, even after the tray bottom plate lower button is pressed. When loading paper into the LCT, be
sure that the machine is turned on with both the main power switch and the auxiliary power key.
To load paper (LCT)
1
Open the upper cover.
2
Press the tray bottom plate lower button.
–
The tray bottom plate is lowered.
(LU-405)
(LU-406)
2-52
bizhub 751/601 (Version 2)
Before making copies
3
2
Load the paper into the tray.
(LU-405)
(LU-406)
)
4
Repeat steps 2 and 3 until the tray bottom plate cannot be
lowered any further.
(LU-405)
(LU-406)
5
Close the upper cover.
bizhub 751/601 (Version 2)
2-53
Before making copies
2
2
Reminder
Do not load the LCT with paper of other sizes than previously specified.
Do not load so much paper that the top of the stack does not exceed the , mark.
Make sure that the trailing edge stopper is adjusted to fit the size of the loaded paper. If there is space
between the trailing edge stopper and the paper, the paper will not be fed correctly.
2-54
bizhub 751/601 (Version 2)
Before making copies
2.7
2
Loading paper into the bypass tray
Paper can be fed manually through the bypass tray if you wish to copy onto paper that is not loaded into a
paper tray, or if you wish to copy onto thick paper, thin paper, tracing paper, tab paper, OHP transparencies,
label sheets, etc.
1
Open the bypass tray.
2
With the side to be printed on facing down, insert the paper as
much as possible into the feed slot.
3
Slide the lateral guides to fit the size of paper being loaded.
–
Push the paper guides firmly up against the edges of the
paper.
How is curled paper loaded?
% Flatten the paper before loading it.
?
bizhub 751/601 (Version 2)
2-55
Before making copies
2
4
Select the paper type.
–
5
To display a different list of paper types, touch
.
Touch [OK], and then touch [OK] in the next screen that appears.
The Basic screen appears again.
2-56
bizhub 751/601 (Version 2)
Before making copies
2
2
Reminder
When loading OHP transparencies, load them in the v orientation, as shown in the illustration. Do not
load OHP transparencies in the w orientation.
Load OHP transparencies one sheet at a time.
When loading tab papers, load them in the v orientation, as shown in the illustration. Do not load tab
papers in the w orientation.
Load label sheets one sheet at a time.
bizhub 751/601 (Version 2)
2-57
Before making copies
2
AB
ABC
C
Be sure to load letterhead paper so that the side to be printed on faces up, and select [Letterhead] for
the paper type of the bypass tray.
2
Note
The image will be printed on the surface of the paper facing down when the paper is loaded into the
bypass tray.
!
Detail
For details on the paper sizes, refer to "Copy paper" on page 7-3.
For details on selecting a setting for standard size paper, refer to "Selecting a paper size setting (Size
setting)" on page 7-10.
For details on selecting a setting for non-standard-size paper, refer to "Specifying a non-standard
paper size (Custom size settings)" on page 7-12.
For details on selecting a setting for wide paper, refer to "Selecting a setting for oversized paper (Wide
paper settings)" on page 7-17.
2-58
bizhub 751/601 (Version 2)
Before making copies
2.8
2
Loading paper of a different size into paper trays
The paper loaded into the tray 3 and 4 can be changed to that of a different size.
2
Note
To load paper of a different size into the tray 1 and 2 and the LCT, contact your service representative.
2.8.1
Changing the size of paper that is loaded
1
Pull out the tray 3 or 4.
2
Raise the paper take-up roller.
3
Remove the trailing-edge guide, and then insert it at the position for the desired paper size.
4
–
Press the button to remove the trailing-edge guide.
–
Insert the trailing-edge guide into the hole corresponding
to the size indicated on the bottom plate.
Load paper of the new size, and then slide the lateral guide to fit the size of the paper.
–
5
Move the lateral guide while holding the release button
pressed. When the button is released, the guide is locked
in place.
Fully push in the paper tray.
–
If paper other than standard-size paper or thick paper was loaded, specify the settings for the
loaded paper in the Paper Type screen. Refer to "Paper type setting for a tray" on page 7-21.
bizhub 751/601 (Version 2)
2-59
Before making copies
2
2
Reminder
Be sure to insert the trailing-edge guide at the position for the specified size. If there is space between
the trailing-edge guide and the paper, the paper will not be fed correctly.
Make sure that the lateral guide is correctly positioned against the edge of the loaded paper. If the
lateral guide is not positioned correctly, the paper size will not be correctly detected.
Do not close the paper tray with too much force, otherwise the weight of the tray and paper will apply
an impact to the machine that may cause damage.
2.8.2
When 5-1/2 × 8-1/2 or A5-size thick paper is loaded into a paper tray
If 5-1/2 e 8-1/2 or A5-size thick paper is loaded into a paper tray, the bypass tray or the LCT, the transport
lever must be correctly set in order to prevent paper misfeeds.
To set the transport lever
1
Open the front doors (left and right).
2
Turn lever M4 to the left, and then pull out the ADU unit.
M4
3
Set the transport lever to "5-1/2 e 8-1/2, A5 Thick paper".
Transport lever
4
Return the ADU unit to its original position.
5
Close the front doors (left and right).
2
Note
After using 5-1/2 e 8-1/2 or A5-size thick paper, be sure to reset the transport lever to "NORMAL".
2-60
bizhub 751/601 (Version 2)
3
Basic copy operations
Basic copy operations
3
Basic copy operations
3.1
General copy operation
3
This section contains information on the general operation for making copies.
The following procedure describes how to copy a single-sided original using basic copy operations.
2
Note
The maximum loading capacity of the output trays for the optional finisher may be limited depending
on the paper size and selected Finishing settings.
With continuous printing (multiple jobs), the warning "The output tray has reached its capacity. Remove
paper from the tray indicated by %." may appear, even if the paper was removed from the output trays.
For details on multiple jobs, refer to "Multi-job feature" on page 11-3.
Interrupting a print job resets the loading capacity of the output tray.
For details on the limitations of the loading capacity for the output trays, refer to "Specifications" on
page 6-3.
Some settings cannot be used together. For details on the settings that cannot be combined, refer to
"Operations that cannot be combined" on page 3-6.
1
Press the [Copy] key to display the Basic screen in Copy mode.
2
Position the original to be copied.
–
For details on positioning the original, refer to page 3-9.
bizhub 751/601 (Version 2)
3-3
Basic copy operations
3
3
Specify the desired copy settings.
–
–
–
–
–
–
–
–
–
–
–
–
4
Using the keypad, type in the desired number of copies.
–
3-4
The factory default settings for this machine are listed below.
[Density]: Auto
[Background Removal]: Standard
[Paper]: Auto (Auto Paper Select)
[Zoom]: Full Size (100.0%)
[Duplex/Combine]: 1 > 1
[Original Type]: Text/Photo
For details on selecting settings in the Original Setting screen, refer to page 3-19.
For details on selecting a Paper setting, refer to page 3-36.
For details on specifying a Zoom setting, refer to page 3-39.
For details on selecting the original and copy settings, refer to page 3-50.
For details on selecting the original image quality, refer to page 3-59.
For details on selecting a copy density setting, refer to page 3-61.
For details on specifying combined copy settings, refer to page 3-55.
For details on selecting Finishing settings, refer to page 3-64.
For details on selecting the Fold/Bind settings, refer to page 3-77.
For details on specifying settings to not rotate the image, refer to page 3-89.
For details on specifying settings for the Application functions, refer to page 8-3.
If the number of copies was incorrectly entered, press the [C] (clear) key in the keypad, and then
specify the correct number of copies.
bizhub 751/601 (Version 2)
Basic copy operations
5
3
Press the [Start] key.
–
–
To stop the copy operation being performed, press the
[Stop] key. For details, refer to page 3-91.
The next copy operation can be queued while a copy
operation is being performed. For details, refer to
page 3-90.
bizhub 751/601 (Version 2)
3-5
Basic copy operations
3
3.2
Operations that cannot be combined
Certain copy settings cannot be used together.
Specifying settings that cannot be combined will result in one of the following occurring.
The setting specified last is given priority. (The setting specified first is canceled.)
The setting specified first is given priority. (A warning message appears.)
3.2.1
Operations where the setting specified last is given priority
The procedure for setting the "Booklet" function after selecting the "2 Position" Staple setting is described
below.
1
3-6
Select the "2 Position" Staple setting.
bizhub 751/601 (Version 2)
Basic copy operations
2
3
Set the "Booklet" function.
The "2 Position" Staple setting is automatically canceled, and the "Booklet" function is set.
To select the "2 Position" Staple setting, cancel the "Booklet" function, and then select the "2 Position"
setting.
bizhub 751/601 (Version 2)
3-7
Basic copy operations
3
3.2.2
Operations where the setting specified first is given priority
If a warning message appears, indicating that settings cannot be combined, those settings cannot be
specified together.
The procedure for selecting the "2 Position" Staple setting after setting the "Booklet" function is described
below.
1
Set the "Booklet" function.
2
Select the "2 Position" Staple setting.
The message "Cannot be set with Booklet." appears and the "2 Position" Staple setting cannot be
selected.
The "Booklet" function remains selected and the "2 Position" Staple setting is canceled.
To select the "2 Position" Staple setting, cancel the "Booklet" function, and then select the "2 Position"
Staple setting.
3-8
bizhub 751/601 (Version 2)
Basic copy operations
3.3
3
Feeding the original
The original can be fed in either of the following two ways. Be sure to position the original correctly according
to the type of original being copied.
3.3.1
Document Feed Method
Features
Using the ADF
By using the ADF, a multi-page original can be fed automatically, one page at a
time. This feed method can also be used to automatically scan double-sided originals.
Using the original glass
Place the original directly on the original glass so that it can be scanned. This method is best with books and other originals that cannot be fed through the ADF.
Loading the original into the ADF
0
0
0
0
0
1
Do not load originals that are bound together, for example, with paper clips or staples.
For details on the types of originals that can be loaded into the ADF, refer to "Originals" on page 7-31.
Do not load more than 100 sheets or so many sheets that the top of the stack is higher than the , mark,
otherwise an original misfeed or damage to the original or machine may occur. However, a original that
exceeds 100 sheets can be scanned in separate batches. For details, refer to "Scanning the original in
separate batches ("Separate Scan" setting)" on page 3-11.
If the original is not loaded correctly, it may not be fed in straight or an original misfeed or damage to
the original may occur.
If the original is loaded in any orientation other than with the top of the original toward the back of the
machine, be sure to select the original orientation. For details on selecting the original orientation, refer
to "Selecting the original orientation ("Original Direction" settings)" on page 3-26.
Place the original in the original feed tray in the order to be
scanned with the side to be scanned faces up.
2
Load the original pages so that the top of the original is
toward the back or the right side of the machine.
A
A
–
Adjust the lateral guides to the size of the original.
–
–
–
For details on loading originals of mixed sizes, refer to
"Copying originals of mixed sizes ("Mixed Original"
setting)" on page 3-21.
For details on specifying the original orientation, refer to
"Selecting the original orientation ("Original Direction"
settings)" on page 3-26.
For details on specifying the binding margin position, refer
to "Selecting the position of the binding margin ("Binding
Position" settings)" on page 3-29.
bizhub 751/601 (Version 2)
3-9
Basic copy operations
3
3.3.2
Placing the original on the original glass
0
0
0
0
For details on the types of originals that can be placed on the original glass, refer to "Originals" on
page 7-31.
When placing the original on the original glass, be sure to lift open the ADF at least 20°.
If the original is placed on the original glass without the ADF being lifted at least 20°, the correct original
size may not be detected.
Do not place objects weighing more than 6.8 kg on the original glass. In addition, do not press down
extremely hard on a book spread on the original glass, otherwise the original glass may be damaged.
For thick books or large objects, make the copy without closing the ADF. When an original is being
scanned with the ADF open, do not look directly at the light that may shine through the original glass.
Although the light that shines through the original glass is bright, it is not a laser beam and, therefore,
is not as dangerous.
1
Lift open the ADF or the original cover.
2
Place the original face down on the original glass.
–
3
Load the original pages so that the top of the original is toward the back or the left side of the
machine.
Align the original with the
–
–
mark in the back-left corner of the original scales.
For details on selecting the original orientation, refer to "Selecting the original orientation ("Original
Direction" settings)" on page 3-26.
For details on specifying the binding margin position, refer
to "Selecting the position of the binding margin ("Binding
Position" settings)" on page 3-29.
Original scales
–
3-10
For transparent or translucent originals, place a blank
sheet of paper of the same size as the original over the
original.
bizhub 751/601 (Version 2)
Basic copy operations
–
4
3.3.3
3
For bound originals spread over two facing pages, such as
a book or magazine, position the top of the original toward
the back of this machine and align the original with the
mark in the back-left corner of the original scales, as
shown.
Close the ADF.
Scanning the original in separate batches ("Separate Scan" setting)
A large original can be divided and scanned in a number of batches.
A maximum of 100 original pages can be loaded into the ADF at one time. However, by specifying the
"Separate Scan" setting, an original that exceeds 100 pages can be scanned and treated as a single copy
job. In addition, the scanning location can be switched between the original glass and the ADF during the
scanning operation.
0
0
0
1
The loading capacity of the ADF is 100 sheets of plain paper (80 g/m2). Do not allow the original to be
loaded over the limit mark (,), even though the original count is less than 100.
The output method used with the "Separate Scan" setting can be set to "Page Print" or "Batch Print".
As a default, "Page Print" is selected.
For details on the output method used with the "Separate Scan" setting, refer to the description for
"Separate Scan Output Method" in "Copier Settings" on page 12-21.
Position the original to be copied.
–
2
For details on positioning the original, refer to "Feeding the original" on page 3-9.
In the Basic screen, touch [Separate Scan].
–
To cancel the "Separate Scan" setting, touch [Separate Scan] again to deselect it.
bizhub 751/601 (Version 2)
3-11
Basic copy operations
3
3
Press the [Start] key.
After the original has been scanned, the following message appears.
–
–
Load the next batch of the original, and then press the [Start] key.
If the "Separate Scan Output Method" parameter is set to "Batch Print", touch [Finish] in the
following screen, which appears while the original is scanned with the ADF, to continue to step 5
–
If the original cannot be loaded into the ADF, place it on the original glass. For details on the types
of originals that can be loaded into the ADF, refer to "Originals" on page 7-31.
To change the scanning settings, touch [Change Setting]. For details on changing the scanning
settings, refer to "Changing scan settings for each original" on page 3-32.
The buttons that appear in the screen for changing the settings differ depending on the specified
settings. Settings for the following can be changed.
1-Sided/2-Sided, Density/Background, Original Type, Binding Position, Zoom, Original Size, Frame
Erase, Center Erase
–
–
3-12
bizhub 751/601 (Version 2)
Basic copy operations
4
3
–
To cancel changes to the settings, touch [Cancel].
–
The amount of memory available can be checked beside "Memory" in the lower-left corner of the
screen.
To delete the image data, press the [Stop] key, and then delete the job. For details, refer to
"Temporarily stopping scanning/printing" on page 3-91.
After all original pages have been scanned, touch [Finish].
bizhub 751/601 (Version 2)
3-13
Basic copy operations
3
5
3-14
Press the [Start] key.
–
If the "Separate Scan Output Method" parameter is set to "Batch Print", touch [Print] or press the
[Start] key.
–
If the "Separate Scan Output Method" parameter is set to "Batch Print", the copy settings can be
changed. To change the copy settings, touch [Change Setting], and then touch [OK] after changing
the settings as desired.
bizhub 751/601 (Version 2)
Basic copy operations
3.3.4
3
Scanning a multi-page original from the original glass
When making double-sided or combined copies using the original glass, place each page of a multi-page
original on the original glass to scan it. The following procedure describes how to place single-sided original
pages on the original glass to make double-sided copies.
0
0
The output method used with the "Separate Scan" setting can be set to "Page Print" or "Batch Print".
As a default, "Page Print" is selected.
For details on the output method used with the "Separate Scan" setting, refer to "Copier Settings" on
page 12-21.
1
Lift open the ADF.
2
Position the first page or the first side of the original face down onto the original glass.
–
For details on positioning the original, refer to "Placing the original on the original glass" on
page 3-10.
3
Close the ADF.
4
In the Basic screen, touch [Duplex/Combine].
The Duplex/Combine screen appears.
bizhub 751/601 (Version 2)
3-15
Basic copy operations
3
5
Touch [1-Sided > 2-Sided].
6
Touch [Binding Position], select the binding position for the copy, and then touch [OK].
–
7
Touch [Original Direction], select the orientation of the loaded original, and then touch [OK].
–
8
3-16
For details on specifying the binding position, refer to "Selecting double-sided copies" on
page 3-52.
For details on specifying the original orientation, refer to "Selecting the original orientation ("Original
Direction" settings)" on page 3-26.
Touch [OK].
bizhub 751/601 (Version 2)
Basic copy operations
9
3
Press the [Start] key.
Scanning begins.
10
Position the second page or second side of the original onto the original glass, and then press the [Start]
key.
–
–
–
–
To scan the remaining pages in the original, repeat step 10.
To change the scanning settings, touch [Change Setting]. For details on changing the scanning
settings, refer to "Changing scan settings for each original" on page 3-32.
The buttons that appear in the screen for changing the settings differ depending on the specified
settings. Settings for the following can be changed.
1-Sided/2-Sided, Density/Background, Original Type, Binding Position, Zoom, Original Size, Frame
Erase, Center Erase
To cancel changes to the settings, touch [Cancel].
bizhub 751/601 (Version 2)
3-17
Basic copy operations
3
3-18
11
After all original pages have been scanned, touch [Finish].
12
Press the [Start] key.
–
If the "Separate Scan Output Method" parameter is set to "Batch Print", touch [Print] or press the
[Start] key.
–
If the "Separate Scan Output Method" parameter is set to "Batch Print", the copy settings can be
changed. To change the copy settings, touch [Change Setting], and then touch [OK] after changing
the settings as desired.
bizhub 751/601 (Version 2)
Basic copy operations
3.4
3
Specifying original settings
The following describes necessary settings depending on the status and placement of the originals to copy
them as desired.
3.4.1
Specifying the original size ("Original Size" settings)
Copies can be produced after specifying the original scanning size if the original size cannot be detected
automatically or if you wish to specify a certain original size.
1
Position the original to be copied.
–
2
For details on positioning the original, refer to "Feeding the original" on page 3-9.
In the Basic screen, touch [Original Setting].
The Original Setting screen appears.
3
Touch [Original Size].
The Original Size screen appears.
bizhub 751/601 (Version 2)
3-19
Basic copy operations
3
4
Select the original size, and then touch [OK].
–
–
Touch
or
to display a different list of standard sizes.
To specify a standard size, touch the button for the desired original size.
–
To specify a custom size, touch [Custom Size] to display the Custom Size screen. Specify the X and
Y sides of the paper, and then touch [OK].
Touch [X] or [Y], touch [<->] to switch between the integer and the fraction, and then touch [-] and
[+] to specify the size of the paper.
If a decimal value is displayed in the Custom Size screen, use the keypad to type in the setting. For
details on switching between decimal and fraction values, refer to "System Settings" on
page 12-17.
To cancel changes to the settings, touch [Cancel].
–
–
–
Custom Size screen
–
3-20
If a decimal value is displayed in the screen and the specified value is outside the allowable range,
the message "Input Error" appears. Type a value within the allowable range. If the value was
incorrectly entered, press the [C] (clear) key to erase the value, and then specify the correct value.
bizhub 751/601 (Version 2)
Basic copy operations
3.4.2
3
Copying originals of mixed sizes ("Mixed Original" setting)
Originals of different sizes can be loaded together into the ADF to be fed and scanned one by one
automatically.
0
0
1
Do not load more than 100 sheets or so many sheets that the top of the stack is higher than the , mark,
otherwise an original misfeed or damage to the original or machine may occur. However, an original
that exceeds 100 sheets can be scanned in separate batches. For details, refer to "Scanning the original
in separate batches ("Separate Scan" setting)" on page 3-11.
If the original is not loaded correctly, it may not be fed in straight or an original misfeed or damage to
the original may occur.
Slide the adjustable lateral guides of the ADF to fit the size of the largest page.
–
–
The possible combinations of original sizes differ depending on the widest original loaded (position
of the adjustable lateral guides).
For details on the mixed original sizes that can be loaded in the ADF, refer to "Originals that can be
loaded into the ADF" on page 7-31.
2
Align the originals as the references so that the side to be
scanned faces up.
3
Place the original in the original feed tray in the order to be scanned with the side to be scanned faces
up.
Slide the adjustable lateral guides against the edges of the original.
–
Load the original pages into the ADF so that the top of the
pages is toward the back or the left side of the machine.
bizhub 751/601 (Version 2)
3-21
Basic copy operations
3
4
In the Basic screen, touch [Original Setting].
The Original Setting screen appears.
5
Touch [Mixed Original].
–
3-22
To cancel the "Mixed Original" setting, touch [Mixed Original] again to deselect it.
bizhub 751/601 (Version 2)
Basic copy operations
3.4.3
3
Loading folded (Z-folded) originals
If folded originals are loaded into the ADF to be copied, the original size is correctly detected.
0
0
Load the original into the ADF.
The length of the first page of the original is detected, and all pages of the original are scanned at that
size.
1
Position the original to be copied.
–
–
2
Unfold folded originals before loading them into the ADF.
If the original is copied without being unfolded, a paper
misfeed may occur.
For details on loading the original, refer to "Loading the
original into the ADF" on page 3-9.
In the Basic screen, touch [Original Setting].
The Original Setting screen appears.
bizhub 751/601 (Version 2)
3-23
Basic copy operations
3
3
Touch [Z-Folded Original].
–
3.4.4
To cancel the "Z-Folded Original" setting, touch [Z-Folded Original] again to deselect it.
Loading tab paper (Tab original settings)
Using tab papers enables copying of an original including its index part.
1
Position the original to be copied.
–
2
Load tab papers into the bypass tray.
–
3-24
For details on loading the original, refer to "Loading the
original into the ADF" on page 3-9.
Tab papers can be loaded into the bypass tray. For details, refer to "Loading paper into the bypass
tray" on page 2-55.
bizhub 751/601 (Version 2)
Basic copy operations
3
3
In the Basic screen, touch [Original Setting].
The Original Setting screen appears.
4
Touch [Tab Original].
The Tab Original screen appears.
5
Select an original size, and then touch [OK].
bizhub 751/601 (Version 2)
3-25
Basic copy operations
3
3.4.5
Selecting the original orientation ("Original Direction" settings)
When copying double-sided originals or making double-sided copies or combined copies, specify the
original orientation, otherwise the copies may not be printed in the correct page order or correct front and
back page arrangement.
2
Note
As the factory default, the first setting (with the top of the original at the top (toward the back of the
machine)) is selected.
Original loading orientation
Using the ADF
Using the original glass
1
Icon
Description
Select this setting for an original loaded
with the top toward the back of this machine.
1
1
Select this setting for an original loaded
with the top toward the front of this machine.
1
•
1
•
1
1
•
1
•
3-26
Select this setting for an original
loaded into the ADF with the top of
the original toward the left side of
this machine.
Select this setting for an original
placed on the original glass with the
top of the original toward the right
side of this machine.
Select this setting for an original
loaded into the ADF with the top of
the original toward the right side of
this machine.
Select this setting for an original
placed on the original glass with the
top of the original toward the left
side of this machine.
bizhub 751/601 (Version 2)
Basic copy operations
3.4.6
3
To select an original direction setting
1
Position the original to be copied.
–
2
For details on positioning the original, refer to "Feeding the original" on page 3-9.
In the Basic screen, touch [Original Setting].
The Original Setting screen appears.
3
Touch [Original Direction].
The Original Direction screen appears.
bizhub 751/601 (Version 2)
3-27
Basic copy operations
3
4
Touch the button for the orientation of the loaded original, and then touch [OK].
–
3-28
To cancel the setting and select the default, press the [Reset] key.
bizhub 751/601 (Version 2)
Basic copy operations
3.4.7
3
Selecting the position of the binding margin ("Binding Position" settings)
If a double-sided original is loaded into the ADF, specify the position of the top of the back side of the original
by specifying the binding margin position for the original.
2
Note
As the factory default, "Auto" is selected as the position of the binding margin.
Original binding margin position
Original binding margin
Icon
Description
Left
Select this setting if the original is loaded with the
binding margin at the left.
Right
Select this setting if the original is loaded with the
binding margin at the right.
Top
Select this setting if the original that is loaded has
a binding margin at the top.
Auto
Select this setting to automatically select the position of the binding margin.
If the original length is 297 mm or less, a binding
position along the long side of the paper is selected.
If the original length is more than 297 mm: a binding position along the short side of the paper is selected.
ABC
AB
BCABC
ABC
ABC
When the original length is 297 mm
or less:
ABC
AB
2
ABC
ABC
Note
If "Auto" is selected, the binding margin is set
at the top or at the left.
When the original length is more
than 297 mm:
ABC
ABC
ABC
AB
bizhub 751/601 (Version 2)
3-29
Basic copy operations
3
3.4.8
To select a binding position setting
1
Position the original to be copied.
–
–
2
For details on positioning the original, refer to "Feeding the original" on page 3-9.
When loading an original with a binding margin, position the top of the original toward the back of
the machine.
In the Basic screen, touch [Original Setting].
The Original Setting screen appears.
3
Touch [Binding Position].
The Binding Position screen appears.
3-30
bizhub 751/601 (Version 2)
Basic copy operations
4
3
Touch the button for the desired binding margin position, and then touch [OK].
–
To cancel the setting and select the default, press the [Reset] key.
bizhub 751/601 (Version 2)
3-31
Basic copy operations
3
3.4.9
Changing scan settings for each original
When scanning an original while using the "Separate Scan" setting or when multi-page originals are scanned
from the original glass, the scan settings can be changed for each original. The following procedure describes
how to change the settings when the "Separate Scan" setting is used.
1
Position the original to be copied.
2
In the Basic screen, touch [Separate Scan].
3
Press the [Start] key.
Scanning begins.
4
Touch [Change Setting].
A screen appears, allowing you to change the settings.
3-32
bizhub 751/601 (Version 2)
Basic copy operations
5
3
Touch the button of the setting to be changed, select the desired setting, and then touch [OK].
–
–
The buttons that appear in the screen for changing the settings differ depending on the specified
settings. Settings for the following can be changed.
1-Sided/2-Sided, Density/Background, Original Type, Binding Position, Zoom, Original Size, Frame
Erase, Center Erase
To cancel changes to the settings, touch [Cancel].
Density/Background screen
Binding Position screen
bizhub 751/601 (Version 2)
3-33
Basic copy operations
3
Zoom screen
Frame Erase screen
Original Type screen
3-34
bizhub 751/601 (Version 2)
Basic copy operations
3
Center Erase screen
Original Size screen
–
–
6
For details on specifying the Zoom setting, refer to "Specifying a zoom setting" on page 3-39. For
details on specifying "Frame Erase" and "Center Erase" settings, refer to "Erasing black marks
along borders ("Erase" function)" on page 8-51.
The Original Size screen appears only when the "Mixed Original" setting is selected.
Touch [OK].
bizhub 751/601 (Version 2)
3-35
Basic copy operations
3
3.5
Selecting a paper setting
The paper size can be selected automatically according to the original size or it can be specified manually.
Specify the paper size according to the corresponding procedure, depending on the desired copy settings.
As the factory default, "Auto" is selected.
2
Note
If a setting for special paper is selected for a paper tray, that tray is not selected automatically with the
"Auto" Paper setting. (However, a paper tray set to "Single Side Only" is given priority to be selected
with single-sided printing.) Be sure to specify a paper setting when special paper is loaded into a paper
tray. For details, refer to "Specifying a paper type for bypass tray" on page 7-19.
If the "Auto Paper Select" was selected at the "Auto Zoom" setting, the Zoom screen appears. Touch
the button for the desired zoom ratio.
The "Auto" Paper setting cannot be combined with the "Auto" Zoom setting.
For details on specifying the priority of paper trays, refer to "Specifying user settings" on page 12-17.
3.5.1
Automatically selecting the paper size ("Auto" paper setting)
The size of the loaded original is detected, and copies are produced using paper of the same size.
If the "Full Size" Zoom setting was specified, paper of the same size as the original is selected.
If the zoom ratio was increased or decreased, a paper size that corresponds to the specified zoom ratio is
automatically selected.
1
In the Basic screen, touch [Paper].
The Paper screen appears.
3-36
bizhub 751/601 (Version 2)
Basic copy operations
2
Touch [Auto].
3
Touch [OK].
3
The Basic screen appears again.
bizhub 751/601 (Version 2)
3-37
Basic copy operations
3
3.5.2
Manually selecting the desired paper size
0
0
By also selecting the "Auto" Zoom setting, the most appropriate zoom ratio is selected based on the
size of the loaded original and the specified paper size. For details on the "Auto" Zoom setting, refer to
"Automatically selecting the zoom ratio ("Auto" zoom Setting)" on page 3-39.
Load the appropriate papers into the paper tray in advance.
1
In the Basic screen, touch [Paper].
The Paper screen appears.
2
Select the paper tray loaded with the desired paper.
3
Touch [OK].
The Basic screen appears again.
3-38
bizhub 751/601 (Version 2)
Basic copy operations
3.6
3
Specifying a zoom setting
The zoom ratio can be set in order to make a copy on paper with a size different than the original or to enlarge
or reduce the size of the copy image. As the factory default, "Full Size" is selected.
The following procedures describe how to specify the Zoom setting.
2
Note
The "Auto" Zoom setting cannot be combined with the "Auto" Paper setting.
3.6.1
Automatically selecting the zoom ratio ("Auto" zoom Setting)
The most appropriate zoom ratio is automatically selected based on the size of the loaded original and the
specified paper size.
0
0
If the "Auto" Zoom setting is selected and an enlargement is to be copied on paper larger than the
original, load the original with the same orientation as the paper.
If the "Auto Zoom" was selected at the "Auto Paper Select" setting, the Paper screen appears.
1
In the Basic screen, touch [Zoom].
The Zoom screen appears.
2
Touch [Auto].
3
Touch [OK].
The Basic screen appears again.
bizhub 751/601 (Version 2)
3-39
Basic copy operations
3
3.6.2
Specifying the zoom ratio of the original ("Full Size" setting)
A copy that is the same size as the original (100%) is produced.
0
Touch [+] to enlarge the zoom ratio, and touch [-] to reduce the zoom ratio in 0.1% increments.
1
In the Basic screen, touch [Zoom].
The Zoom screen appears.
2
Touch [Full Size].
3
Touch [OK].
The Basic screen appears again.
3-40
bizhub 751/601 (Version 2)
Basic copy operations
3.6.3
3
Typing in the zoom ratio (XY zoom setting)
By using the keypad, a zoom ratio between 25.0% and 400.0% can be typed in directly without changing the
height-to-width ratio.
0
0
1
If a value outside the allowable range is specified, the message "Input error" appears. Type a value
within the allowable range.
If the value was incorrectly entered, press the [C] (clear) key to erase the value, and then specify the
correct value.
The entered zoom ratio can be stored. For details on storing zoom ratios, refer to "Storing the desired
zoom ratio" on page 3-48.
In the Basic screen, touch [Zoom].
The Zoom screen appears.
2
Touch [XY Zoom].
bizhub 751/601 (Version 2)
3-41
Basic copy operations
3
3
Using the keypad, type in the desired zoom ratio (between 25.0% and 400.0%).
4
Touch [OK], and then touch [OK] in the next screen that appears.
The Basic screen appears again.
3-42
bizhub 751/601 (Version 2)
Basic copy operations
3.6.4
3
Slightly reducing the copy ("Minimal" setting)
An original image can be printed slightly smaller (93.0%) than the original size and centered in the copy.
0
The zoom ratio of the "Minimal" setting can be changed (between 90.0% and 99.9%). For details on
changing the zoom ratio for the "Minimal" setting or programming custom zoom ratios, refer to "Storing
the desired zoom ratio" on page 3-48.
1
In the Basic screen, touch [Zoom].
The Zoom screen appears.
2
Touch [Minimal].
3
Touch [OK].
The Basic screen appears again.
bizhub 751/601 (Version 2)
3-43
Basic copy operations
3
3.6.5
Selecting a preset zoom ratio (Enlarge and reduce settings)
The most suitable zoom ratios for copying from common standard original sizes to standard paper sizes are
preset.
1
In the Basic screen, touch [Zoom].
The Zoom screen appears.
2
Touch the button for the appropriate zoom ratio beside "Enlarge" and "Reduce", depending on the
original and paper sizes.
3
Touch [OK].
The Basic screen appears again.
3-44
bizhub 751/601 (Version 2)
Basic copy operations
3.6.6
3
Typing in separate X and Y zoom ratios (Individual zoom settings)
By using the keypad, separate zoom ratios can be typed in directly for the horizontal direction (between
25.0% and 400.0%) and for the vertical direction (between 25.0% and 400.0%).
By combining different horizontal and vertical zoom ratios, the copy image can be adjusted as shown below.
0
If a value outside the allowable range is specified, the message "Input error" appears. Type a value
within the allowable range.
If the value was incorrectly entered, press the [C] (clear) key to erase the value, and then specify the
correct value.
1
In the Basic screen, touch [Zoom].
The Zoom screen appears.
2
Touch [XY Zoom].
bizhub 751/601 (Version 2)
3-45
Basic copy operations
3
3
Touch [X] under "Set Individual Zoom", and then use the keypad to type in the desired zoom ratio
(between 25.0% and 400.0%) for the X direction.
4
Touch [Y] under "Set Individual Zoom", and then use the keypad to type in the desired zoom ratio
(between 25.0% and 400.0%) for the Y direction.
–
5
To cancel changes to the settings, touch [Cancel].
Touch [OK], and then touch [OK] in the next screen that appears.
The Basic screen appears again.
3-46
bizhub 751/601 (Version 2)
Basic copy operations
3.6.7
3
Selecting a stored zoom ratio
Copy zoom ratios that have been stored can be recalled to be used when desired.
In addition, stored copy zoom ratios can be changed.
0
0
0
As the factory default, "Full Size" is selected.
Touch [+] to enlarge the zoom ratio, and touch [-] to reduce the zoom ratio in 0.1% increments.
Stored zoom ratios can be changed to desired zoom ratios. For details on storing zoom ratios, refer to
"Storing the desired zoom ratio" on page 3-48.
1
In the Basic screen, touch [Zoom].
The Zoom screen appears.
2
Touch the button for the desired zoom ratio under "Set Zoom Ratio".
3
Touch [OK].
The Basic screen appears again.
bizhub 751/601 (Version 2)
3-47
Basic copy operations
3
3.6.8
Storing the desired zoom ratio
Three frequently used zoom ratios and the zoom ratio for the "Minimal" setting can be stored.
0
0
0
1
If a value outside the allowable range is specified, the message "Input error" appears. Type a value
within the allowable range.
If the value was incorrectly entered, press the [C] (clear) key to erase the value, and then specify the
correct value.
To store a "Minimal" zoom ratio, type in the desired zoom ratio between 90.0% and 99.9%.
The default zoom ratios (400.0%, 200.0% and 50.0%) are stored. When a new zoom ratio is stored, it
overwrites the zoom ratio stored with the selected button.
If a button stored with a zoom ratio is not touched before [OK] is touched, no setting is changed.
In the Basic screen, touch [Zoom].
The Zoom screen appears.
2
3-48
Touch [XY Zoom].
bizhub 751/601 (Version 2)
Basic copy operations
3
3
Using the keypad, type in the desired zoom ratio (between 25.0% and 400.0%).
–
To cancel changes to the settings, touch [Cancel].
4
Touch [Set Zoom].
5
Touch the button or [Minimal] where the new zoom ratio is to be stored.
– To cancel the setting and select the default, press the [Reset] key.
The specified zoom ratio is stored.
6
Touch [OK], and then touch [OK] in the next two screens that appear.
The Basic screen appears again.
bizhub 751/601 (Version 2)
3-49
Basic copy operations
3
3.7
Selecting an original > copy setting
The following four Original > Copy setting combinations are possible.
Original > Copy setting
Description
1-Sided > 1-Sided
Select this setting to produce single-sided copies from single-sided originals.
1
1-Sided > 2-Sided
1
Select this setting to produce one double-sided copy from two singlesided originals.
2-Sided > 1-Sided
1
Select this setting to produce two single-sided copies from one doublesided original.
2
1
2-Sided > 2-Sided
2
2
1
1
2
Select this setting to produce double-sided copies from double-sided
originals.
1
2
2
1
The following procedures describe how to select Original and Copy setting.
3-50
bizhub 751/601 (Version 2)
Basic copy operations
3.7.1
3
Selecting single-sided copies
0
0
As the factory default, "1-Sided > 1-Sided" is selected.
For details on using the original glass to scan multi-page originals, refer to "Scanning a multi-page
original from the original glass" on page 3-15.
1
In the Basic screen, touch [Duplex/Combine].
The Duplex/Combine screen appears.
2
Touch [1-Sided > 1-Sided] or [2-Sided > 1-Sided].
–
–
–
If "2-Sided > 1-Sided" is selected, specify the position of the binding margin and the orientation of
the loaded original, otherwise the copies will not be printed as desired.
If the binding position for the original is set to "Auto", the position of the binding margin is
automatically selected. A binding margin along the long side of the paper is selected if the original
length is 297 mm or less. If the original length is more than 297 mm, a binding margin along the short
side of the paper is selected.
If "Auto" is selected under "Original Bind Direction", the binding margin is set at the top or at the left.
bizhub 751/601 (Version 2)
3-51
Basic copy operations
3
–
3
Touch [Original Direction], select the orientation of the loaded original, and then touch [OK].
–
4
For a double-sided original, touch [Binding Position], select the binding position of the original, and
then touch [OK].
For details on specifying the original orientation, refer to "Selecting the original orientation ("Original
Direction" settings)" on page 3-26.
Touch [OK].
The Basic screen appears again.
3.7.2
Selecting double-sided copies
0
0
As the factory default, "1-Sided > 1-Sided" is selected.
For details on using the original glass to scan multi-page originals, refer to "Scanning a multi-page
original from the original glass" on page 3-15.
1
In the Basic screen, touch [Duplex/Combine].
The Duplex/Combine screen appears.
3-52
bizhub 751/601 (Version 2)
Basic copy operations
2
Touch [1-Sided > 2-Sided] or [2-Sided > 2-Sided].
–
–
–
–
–
3
3
Specify the position of the binding margin and the orientation of the loaded original, otherwise the
copies will not be printed as desired.
If the binding position for the original is set to "Auto", the position of the binding margin is
automatically selected. A binding margin along the long side of the paper is selected if the original
length is 297 mm or less. If the original length is more than 297 mm, a binding margin along the short
side of the paper is selected.
If "Auto" is selected under "Original Binding Position", the binding margin is set at the top or at the
left.
If the binding position for the copy is set to "Auto", the binding position is automatically determined
according to the orientation of the loaded original. If the original length is 297 mm or less, a binding
position along the long side of the paper is selected. If the original length is more than 297 mm, a
binding position along the short side of the paper is selected.
If the binding position for the copy is set to "Auto", the binding position is set at the top or at the left.
Touch [Binding Position].
–
For a single-sided original, select the binding position for the copy, and then touch [OK].
bizhub 751/601 (Version 2)
3-53
Basic copy operations
3
–
4
Touch [Original Direction], select the orientation of the loaded original, and then touch [OK].
–
5
For a double-sided original, select the binding positions for the original and the copy, and then touch
[OK].
For details on specifying the original orientation, refer to "Selecting the original orientation ("Original
Direction" settings)" on page 3-26.
Touch [OK].
The Basic screen appears again.
3-54
bizhub 751/601 (Version 2)
Basic copy operations
3.8
3
Selecting a combined copy setting
Original images of multiple pages (2, 4 or 8 pages) can be combined and printed on a single page, reducing
paper use.
The following three combined copy settings are available.
!
Detail
When select the combined copy setting, copies are produced with the most appropriate zoom ratio
(recommended zoom ratio) selected for the original and paper size. The zoom ratio that is selected can
be changed manually.
2
Note
As the factory default, "Auto Display Zoom Ratio" is selected.
The "Auto Zoom for Combine/Booklet" parameter in Utility mode can be set so that the recommended
zoom ratios are not used. In that case, specify the zoom ratio manually. For details, refer to "Custom
Display Settings" on page 12-19.
Setting
Description
2in1
Select this setting to print two original
pages on one page.
Horizontal
1
1
2
2
Vertical
1
1
2
2
4in1
Select this setting to print four original
pages on one page. The page arrangement (Numbering Direction setting) can
be specified.
Horizontal
1
1
2
2
3
3
4
4
1
1
2
2
3
3
4
4
Vertical
1
1
3
3
2
2
4
4
1
1
3
3
2
2
bizhub 751/601 (Version 2)
4
4
3-55
Basic copy operations
3
Setting
Description
8in1
Select this setting to print eight original
pages on one page. The page arrangement (Numbering Direction setting) can
be specified.
Horizontal
1
1
2
2
5
5
3
3
6
6
7
8
8
1
1
4
4
7
2
2
3
3
4
4
5
5
6
6
7
7
8
8
Vertical
1
1
3
3
2
2
5
5
4
4
6
6
1
1
8
8
5
5
2
2
6
6
3
3
7
7
4
4
7
7
8
8
The following procedure describes how to select a combined copy setting.
3-56
bizhub 751/601 (Version 2)
Basic copy operations
3.8.1
3
Copying multiple original pages onto a single page (Combined copy settings)
If a combined copy setting is selected, specify the position of the binding margin and the loading orientation
for the original, otherwise the copies may not be printed in the desired arrangement.
For details on specifying the position of the binding margin, refer to "Selecting the position of the binding
margin ("Binding Position" settings)" on page 3-29.
For details on specifying the original orientation, refer to "Selecting the original orientation ("Original
Direction" settings)" on page 3-26.
1
In the Basic screen, touch [Duplex/Combine].
The Duplex/Combine screen appears.
2
Select the desired combined copy setting.
bizhub 751/601 (Version 2)
3-57
Basic copy operations
3
–
Select the setting and page arrangement according to the orientation and number of the combined
pages.
If "4in1 / 8in1" is selected, whether the "Horizontal" or "Vertical" paper arrangement is selected can
be viewed in the touch panel.
However, this appears only if the "Left Pane Display Default" parameter in Utility mode is set to
"Check Job Settings".
If "2in1" was selected, the pages will be arranged as shown below.
Horizontal
Vertical
3
–
If "4in1 / 8in1" the 4in1/8in1 screen appears. Touch [Vertical] or [Horizontal] to select the
combination order of the original, and press [OK].
–
To cancel the setting, touch [No].
Touch [OK].
The Basic screen appears again.
3-58
bizhub 751/601 (Version 2)
Basic copy operations
3
3.9
Selecting the quality of the original
3.9.1
Loading originals with small print or photos ("Original Type" settings)
Select the setting for the text and image type of the original to better adjust the copy quality.
The following Original Type settings are available.
2
Note
As the factory default, "Text/Photo" is selected.
Icon
Description
Select this setting when copying originals containing only text.
The edges of copied text are reproduced with sharpness, providing an image that is easy to
read.
Text
Select this setting when copying originals containing both text and images.
Text/Photo
Select this setting to produce better reproductions of halftone original images (photographs,
etc.) that cannot be reproduced with the usual settings.
Photo
Select this setting when copying originals containing only text that appears faint (such as that
written with a pencil).
The copied text is reproduced so that it is darker, making it easier to read.
Dot Matrix Original
The following procedure describes how to select an Original Type setting.
bizhub 751/601 (Version 2)
3-59
Basic copy operations
3
3.9.2
To select an original type setting
1
Position the original to be copied.
–
2
For details on positioning the original, refer to "Feeding the original" on page 3-9.
In the Basic screen, touch [Original Type].
The Original Type screen appears.
3
3-60
Touch the button for the quality setting most appropriate for the loaded original.
bizhub 751/601 (Version 2)
Basic copy operations
3.10
3
Selecting the density settings
Specify the copy density and background density. Adjust to the best density according to the status of the
originals.
The following two density adjustments are available.
Function
Description
Density
The print image density can be adjusted to one of nine levels.
Each time [Lighter] or [Darker] is touched, the density is lightened or darkened by one
level.
Touch [Standard] to select the middle setting of the nine levels.
Touch [Auto] to automatically adjust the density level according to the original being
copied.
Background Removal
The density of the background color of the original can be adjusted to one of nine
levels.
Each time [Light] or [Dark] is touched, the background density is lightened or darkened by one level.
Touch [Standard] to select the middle setting of the nine levels.
The following procedures describe how to specify the density settings.
bizhub 751/601 (Version 2)
3-61
Basic copy operations
3
3.10.1
Adjusting the print density (Density settings)
1
In the Basic screen, touch [Density/Background].
The Density/Background Removal screen appears.
2
Select the desired Density setting.
–
–
–
–
3
3-62
Each time [Light] or [Dark] is touched, the density is lightened or darkened by one level.
To select the center setting (default setting), touch [Standard].
Touch [Auto] to automatically adjust the density level according to the original being copied.
To cancel the setting and select the default, press the [Reset] key.
Touch [OK].
bizhub 751/601 (Version 2)
Basic copy operations
3.10.2
3
Adjusting the background density (Background removal settings)
1
In the Basic screen, touch [Density/Background].
The Density/Background Removal screen appears.
2
Select the desired Background Removal setting.
–
–
–
3
Each time [Light] or [Dark] is touched, the density is lightened or darkened by one level.
To select the middle setting of the nine levels (default setting), touch [Standard].
To cancel the setting and select the default, press the [Reset] key.
Touch [OK].
bizhub 751/601 (Version 2)
3-63
Basic copy operations
3
3.11
Selecting finishing settings
Various settings can be selected for sorting and finishing copies fed into the copy output tray.
2
Note
As the factory default, "Group" is selected.
!
Detail
If no finisher is installed and all of the following conditions are met, printed copies are fed out and sorted
in an alternating crisscross pattern.
A4 - or B5-size paper is used.
Paper of the same size and type is loaded with the w orientation in one paper tray and with the v
orientation in another tray.
The "Auto" Paper setting is selected.
The "Auto" Paper setting is not selected when the "Mixed Original" setting is selected.
2
Note
From Administrator Settings mode, the machine can be set so that copies are fed out without being
shifted when the finisher is installed. As a factory default, the machine is set to shift the copies that are
fed out.
For details on specifying settings for shifting copies that are fed out when the finisher is installed, refer
to "System Settings" on page 12-17.
For details on "Fold/Bind", refer to "Selecting a folding setting" on page 3-77.
When the post inserter is installed with the finisher, the finisher can be operated manually. For details,
refer to "Manually using the finisher" on page 3-86.
Available Finishing Settings
Setting
Description
Sort
Select this setting to separate
each set of a multi-page original.
1
1
14
3
2
1
Group
Select this setting to separate
the copies of each page in a
multi-page original.
4
3
21
1
1
1
3-64
bizhub 751/601 (Version 2)
Basic copy operations
3
Setting
Description
Offset
If no finisher is installed
If the sorting conditions are met,
printed copies are fed out and
sorted in an alternating crisscross pattern.
1
1 43
4
1
3 11 2
2
1
1
If a finisher is installed
The copies are fed out and
stacked on top of each other
with each set shifted to separate
it.
1
1
4
1
4
3
1
3
1
2
1
Face Up
The copies are output with their
front sides facing up.
Fold/Bind
Select this setting to fold copies.
The copies can also be bound
with staples at the same time.
The "Fold/Bind" setting can be
used if the optional Finisher
FS-610 is installed.
Output Tray
The copies are output to the specified paper tray.
Staple
Select one of these settings to
bind the copies with a staple in
the corner or with two staples.
Punch
Holes are punched (2 or 4 holes)
in the copies for filing them.
2
1
1
1
1
The following procedures describe how to select Finishing settings.
2
Reminder
The Staple settings are available only if the optional finisher is installed.
The Punch settings are available only if the punch kit or Z folding unit is installed with the optional
finisher.
bizhub 751/601 (Version 2)
3-65
Basic copy operations
3
3.11.1
Separating copies by sets ("Sort" setting)
0
0
0
1
As the factory default, "Group" is selected.
If offset sorting is selected while no finisher is installed, printed copies will be fed out and sorted in an
alternating w and v pattern if the following conditions are met.
A4 - or B5-size paper is used.
Paper of the same size and type is loaded with the w orientation in one paper tray and with the v
orientation in another tray.
The "Auto" Paper setting is selected.
The "Auto" Paper setting is not selected when the "Mixed Original" setting is selected.
If offset sorting is selected while a finisher is installed, printed copies are fed out and stacked on top of
each other with each set shifted to separate it.
In the Basic screen, touch [Finishing].
The Finishing screen appears.
2
Touch [Sort].
–
3
To separate each set of copies, touch [Yes] under "Offset".
Touch [OK].
The Basic screen appears again.
3-66
bizhub 751/601 (Version 2)
Basic copy operations
3.11.2
3
Separating copies by pages ("Group" Setting)
0
0
0
1
As the factory default, "Group" is selected.
If offset sorting is selected while no finisher is installed, printed copies will be fed out and sorted in an
alternating w and v pattern if the following conditions are met.
A4- or B5-size paper is used.
Paper of the same size and type is loaded with the w orientation in one paper tray and with the v
orientation in another tray.
The "Auto" Paper setting is selected.
The "Auto" Paper setting is not selected when the "Mixed Original" setting is selected.
If offset sorting is selected while a finisher is installed, printed copies are fed out and stacked on top of
each other with each set shifted to separate it.
In the Basic screen, touch [Finishing].
The Finishing screen appears.
2
Touch [Group].
–
–
3
To separate each set of pages, touch [Yes] under "Offset".
When "Offset" is selected, the following Finishing settings are not available.
Face Up
Staple
Touch [OK].
The Basic screen appears again.
bizhub 751/601 (Version 2)
3-67
Basic copy operations
3
3.11.3
Selecting the Output Tray
0
The output tray can be selected only if the optional finisher is installed.
1
In the Basic screen, touch [Finishing].
–
When "Offset" is selected, the following Finishing settings are not available.
Face Up
Staple
The Finishing screen appears.
2
3-68
Touch [Output tray].
bizhub 751/601 (Version 2)
Basic copy operations
3
3
Select the output tray where copies are to be fed, and then touch [OK].
The Basic screen appears again.
3.11.4
Outputting copies with their front sides facing up (Face up settings)
The copies are output with their front sides facing up.
!
Detail
This can be specified for both sort output and group output.
1
In the Basic screen, touch [Finishing].
The Finishing screen appears.
bizhub 751/601 (Version 2)
3-69
Basic copy operations
3
2
Touch [Face Up].
–
–
–
–
3
To cancel the settings, touch [Face Up] again.
As the factory default, "OFF" is selected. The copies are output with their back sides facing up.
The following settings cannot be used together with the "Face Up" setting.
Booklet
Double-sided copying
Center Staple & Fold
Half-Fold
When "Face Up" is selected, the following Finishing settings are not available.
Offset
Staple
Punch
Tri-Fold
Z-Fold
Touch [OK].
The Basic screen appears again.
3-70
bizhub 751/601 (Version 2)
Basic copy operations
3.11.5
3
Stapling copies (Staple settings)
Copies can be fed out stapled either in the corner or at two places.
!
Detail
In order for the copies to be stapled, all of the following conditions must be met.
The paper width must be between 182 mm and 314 mm.
The paper length must be between 139 mm and 458 mm.
If the "Mixed Original" setting is selected, all copies must have the same paper width.
2
Reminder
Copies can be fed out stapled either in the corner or at two places only when the finisher is installed.
Copies can be fed out stapled either in the corner or at two places.
Finisher FS-524/FS-525
Tray
Paper weight
Paper size
Loading capacity
Main finishing tray
(Tray 2)
FS-524:
60 g/m2 to 90 g/m2
FS-525:
60 g/m2 to 80 g/m2
A3 w to A5 v,
11 e 17 w to
5-1/2 e 8-1/2 v,
Foolscap*1, 8K w,
16K w/v,
wide paper (A3W w
to A5W v,
11 e 17W w to
5-1/2 e 8-1/2W v)
2 sheets to 9 sheets binding: 100 sets*2
10 sheets to 20 sheets binding: 50 sets
21 sheets to 30 sheets binding: 30 sets
31 sheets to 40 sheets binding: 25 sets
41 sheets to 50 sheets binding: 20 sets
51 sheets to 60 sheets binding:
15 sets*3
61 sheets to 100 sheets binding:
10 sets*3
*1
Foolscap includes the following 4 types: 8-1/8 e 13-1/4 w, 8-1/4 e 13 w, 8-1/2 e 13 w, 8 e 13 w, one of
which can be selected. For details, contact the service representative.
*2
The value is for when using paper of which the length is between 150 mm and 417 mm. The value will be
50 sets if the paper length is not within this range.
*3
This is the loading capacity when Finisher FS-525 has been installed
Maximum number of bound pages:
Finisher FS-524:50 sheets (60 g/m2 to 90 g/m2)
Finisher FS-525:100 sheets (60 g/m2 to 80 g/m2)
Finisher FS-610
Tray
Main finishing tray
(Tray 2)
Paper Weight
2
60 g/m to 80 g/m
2
Paper Size
Loading Capacity
A3 w to A5 v,
11 e 17 w to
5-1/2 e 8-1/2 v,
Foolscap*1, 8K w,
16K w/v,
wide paper (A3W w
to A5W v,
11 e 17W w to
5-1/2 e 8-1/2W v)
2 sheets to 9 sheets binding: 100 sets*2
10 sheets to 20 sheets binding: 50 sets
21 sheets to 30 sheets binding: 30 sets
31 sheets to 40 sheets binding: 25 sets
41 sheets to 50 sheets binding: 20 sets
*1
Foolscap includes the following 4 types: 8-1/8 e 13-1/4 w, 8-1/4 e 13 w, 8-1/2 e 13 w, 8 e 13 w, one of
which can be selected. For details, contact the service representative.
*2
The value is for when using paper of which the length is 417 mm or less. The value will be 50 sets if the
length exceeds 418 mm.
Maximum number of bound pages: 50 sheets (60 g/m2 to 80 g/m2)
bizhub 751/601 (Version 2)
3-71
Basic copy operations
3
1
In the Basic screen, touch [Finishing].
The Finishing screen appears.
2
Under "Staple", touch either [Corner] or [2 Position].
–
–
–
3-72
To cancel the Staple setting, touch [None].
When a Staple setting is selected, the "Sort" setting is automatically selected.
The following settings cannot be used together with a Staple setting.
Offset
Face Up
bizhub 751/601 (Version 2)
Basic copy operations
3
3
Touch [Position Setting].
–
–
Select the stapling position, and then touch [OK].
When the "2 Position" Staple setting is selected.
–
When the "Corner" Staple setting is selected.
bizhub 751/601 (Version 2)
3-73
Basic copy operations
3
–
–
–
–
4
Touch [Auto] to automatically determine the stapling position according to the orientation of the
loaded original. If the original length is 314 mm or less, the long side of the paper is stapled. If the
original length is more than 314 mm, the short side of the paper is stapled.
If "Auto" is selected for the stapling position, load the original with the top toward the back of the
machine. If the original is loaded in any other orientation, the stapling will not be correctly
positioned.
If "Auto" is selected, the stapling position is set at the top or at the left.
To cancel the setting and select the default, press the [Reset] key.
If desired, touch [Original Direction], and then select the setting appropriate for the original.
–
5
For details on specifying the original orientation, refer to "Selecting the original orientation ("Original
Direction" settings)" on page 3-26.
Touch [OK].
The Basic screen appears again.
3.11.6
Punching holes in copies (Punch settings)
!
Detail
In order to be punch holes in the copies, all of the following conditions must be met.
The paper width must be between 182 mm and 297 mm.
The paper length must be between 182 mm and 432 mm.
If a Punch setting is to be selected, select the orientation in which the original is positioned. If an Original
Direction setting is not selected, holes may not be punched in the copies as desired.
For details on specifying the original orientation, refer to "Selecting the original orientation ("Original
Direction" settings)" on page 3-26.
2
Note
The Punch settings are available only if the punch kit or Z folding unit is installed with the optional
finisher.
*
3-74
Tray
Paper Weight
Paper Size
Main finishing tray
(Tray 2)
Plain paper (60 g/m2 to
90 g/m2), thick paper
(91 g/m2 to 128 g/m2)
2-Hole: A3 w to A5 w/v, 11 e 17 w to 5-1/2 e 8-1/2 w/v,
Foolscap*, 8K w, 16K w/v
4-Hole: A3 w, B4 w, A4 v, B5 v, 11 e 17 w, 8-1/2 e 11 w,
8K w, 16K v
Foolscap includes the following 4 types: 8-1/8 e 13-1/4 w, 8-1/4 e 13 w, 8-1/2 e 13 w, 8 e 13 w, one of which can
be selected. For details, contact the service representative.
bizhub 751/601 (Version 2)
Basic copy operations
1
3
In the Basic screen, touch [Finishing].
The Finishing screen appears.
2
Under "Punch", touch [2-Hole] or [4-Hole].
–
–
3
To cancel the Punch setting, touch [None].
A Punch setting cannot be used together with the "Face Up" setting.
Touch [Position Setting].
bizhub 751/601 (Version 2)
3-75
Basic copy operations
3
–
Select the punched hole position, and then touch [OK].
–
Touch [Auto] to automatically determine the position of the punched holes according to the
orientation of the loaded original. If the original length is 297 mm or less, the holes are punched
along the long side of the paper. If the original length is more than 297 mm, the holes are punched
along the short side of the paper.
If "Auto" is selected for the stapling position, load the original with the top toward the back of the
machine. If the original is loaded in any other orientation, the stapling will not be correctly
positioned.
If "Auto" is selected, the punched hole position is set at the top or at the left.
To cancel the setting and select the default, press the [Reset] key.
–
–
–
4
If desired, touch [Original Direction], and then select the setting appropriate for the original.
–
5
For details on specifying the original orientation, refer to "Selecting the original orientation ("Original
Direction" settings)" on page 3-26.
Touch [OK].
The Basic screen appears again.
3-76
bizhub 751/601 (Version 2)
Basic copy operations
3.12
3
Selecting a folding setting
By installing optional equipments, copies can be folded, or folded and bound with staples at the same time,
and then fed out. Available settings differ depending on the optional equipments installed.
Setting
Description
Compatible models
Half-Fold
Select this setting to fold copies in half before feeding them out.
(Refer to page 3-78.)
FS-610
Center Staple & Fold
Select this setting to staple copies at two places along the center,
then fold the copies in half before feeding them out. (Refer to
page 3-79.)
FS-610
Tri-Fold
Select this setting to fold copies in three before feeding them out.
(Refer to page 3-81.)
FS-610
Z-Fold
Select this setting to fold copies in half along the center, and additionally mountain-fold one of the halves before feeding them
out.
FS-524
FS-525
FS-610
2
Note
Copies can be folded in half or in three or bound at the center only if Finisher FS-610 is installed.
Z-folding is available when the Z folding unit is installed with the finisher. For details, refer to "Z-Folding
and outputting papers ("Z-Fold" setting)" on page 3-83.
bizhub 751/601 (Version 2)
3-77
Basic copy operations
3
3.12.1
Folding copies in half ("Half-Fold" setting)
Finisher FS-610
Paper weight
Paper size
Plain paper
(60 g/m2 to 90 g/m2)
Standard sizes:
A3 w, B4 w, A4 w, 11 e 17 w, 8-1/2 e 14 w, 8-1/2 e 11 w, 8K w, wide paper
(A3W w, B4W w, A4Ww, 11 e 17W w,8-1/2 e 11W w)
Custom sizes:
210 mm e 279 mm to 314 mm e 458 mm
Maximum number of folded sheets
Paper capacity
3 sheets
When folding 3 sheets (80 g/m2):
25 sets or less (with a paper length of 299 mm or less)
33 sets or less (others)
1
In the Basic screen, touch [Finishing].
The Finishing screen appears.
2
Touch [Fold/Bind].
The Fold/Bind screen appears.
3-78
bizhub 751/601 (Version 2)
Basic copy operations
3
Touch [Half-Fold].
–
–
4
3
As the factory default, the "Booklet" function is automatically specified when "Half-Fold" is
selected.
To cancel the "Half-Fold" setting, touch [No] or the button for a different setting.
Touch [OK], and then touch [OK] again.
The Basic Screen appears again.
3.12.2
Binding copies at the center ("Center Staple & Fold" setting)
Finisher FS-610
Paper weight
60 g/m2 to 80 g/m2
81
g/m2
to 90
g/m2
Paper size
Maximum number of
bound sheets
Standard sizes:
A3 w, B4 w, A4 w, 11 e 17 w, 8-1/2 e 14 w,
8-1/2 e 11 w, 8K w, wide paper (A3W w, B4W w,
A4W w, 11 e 17W w, 8-1/2 e 11W w)
Custom sizes:
210 mm e 279 mm to 314 mm e 458 mm
20 sheets
16 sheets
Maximum number of sheets that can be bound in the center
20 or more sheets (60 - 80 g/m2) or 19 + 1 sheets (200 g/m2)
Capacity
20 copies or less
15 copies or less (paper length: 299 mm or less)
1
In the Basic screen, touch [Finishing].
bizhub 751/601 (Version 2)
3-79
Basic copy operations
3
The Finishing screen appears.
2
Touch [Fold/Bind].
The Fold/Bind screen appears.
3
Touch [Center Staple & Fold].
–
–
–
–
4
If a cover sheet is added with the "Cover Sheet" function, the cover sheet (200 g/m2) can be stapled.
When the "Center Staple & Fold" setting is selected, the following factory default settings are
automatically selected.
1-Sided > 2-Sided
Booklet
Recommended zoom ratio (64.7%) when the "Booklet" function is selected
When the "Center Staple & Fold" setting is selected, the following Finishing settings are not
available.
Group
Offset
Staple
Punch
Face Up
To cancel the "Center Staple & Fold" setting, touch [No] or the button for a different setting.
Touch [OK], and then touch [OK] again.
The Basic screen appears again.
3-80
bizhub 751/601 (Version 2)
Basic copy operations
3.12.3
3
To fold copies in three ("Tri-Fold" setting)
Finisher FS-610
Paper weight
Paper size
Maximum number of tri-folded
sheets
60 g/m2 to 80 g/m2
A4 w, 8-1/2 e 11 w, 16K w
81 g/m2 to 90 g/m2
3 sheets
1 sheet
Number of folded sheets
Maximum number of sets
1 sheet
50 sets or less
!
Detail
When copies are to be folded in three, settings can be specified to select whether the printed side is on
the inside or the outside. For details on selecting the setting, refer to "Copier Settings" on page 12-21.
1
In the Basic screen, touch [Finishing].
The Finishing screen appears.
2
Touch [Fold/Bind].
The Fold/Bind screen appears.
bizhub 751/601 (Version 2)
3-81
Basic copy operations
3
3
Touch [Tri-Fold].
–
–
4
When the "Tri-Fold" setting is selected, the following Finishing settings are not available.
Group
Offset
Staple
Punch
Face Up
To cancel the "Tri-Fold" setting, touch [No] or the button for a different setting.
Touch [OK], and then touch [OK] again.
The Basic screen appears again.
3-82
bizhub 751/601 (Version 2)
Basic copy operations
3.12.4
3
Z-Folding and outputting papers ("Z-Fold" setting)
Copies can be Z-folded and output. In addition, originals of mixed sizes can be Z-folded and output in the
same specified paper size.
When the finished size is A4
!
Detail
The Z-folding function is not available in the following cases.
When the original size and output paper size are the same.
When a paper size on which a part of the original image will be lost is selected.
2
Note
Punching or stapling can be carried out with Z-folding before feeding the copies out.
!
Detail
For details on setting the mixed (size) originals, refer to "Copying originals of mixed sizes ("Mixed
Original" setting)" on page 3-21.
Finisher FS-524/FS-525/FS-610 and Z folding unit
Item
Description
Paper weight
50 g/m2 to 90 g/m2
Paper size
A3 w, B4 w, 11 e 17 w, 8-1/2 e 14 w, 8K w
Z-folded & stapled copies*
5 sheets
Paper capacity
30 sheets or less
*
Can be specified when the output paper size is A3 w, 11 e 17, 8-1/2 e 14 w, 8K w.
2
Note
Z-folding multiple overlapped papers as one unit is not possible.
bizhub 751/601 (Version 2)
3-83
Basic copy operations
3
!
Detail
When loading the originals into ADF, load them in the orientation where the side to be folded is on the
right.
When placing the original on the original glass, place it in the orientation where the side to be folded is
on the left.
1
In the Basic screen, touch [Finishing].
The Finishing screen appears.
2
Touch [Fold/Bind].
The Fold/Bind screen appears.
3-84
bizhub 751/601 (Version 2)
Basic copy operations
3
Touch [Z-Fold].
–
4
3
To cancel the "Z-Fold" setting, touch [Z-Fold] or the button for a different setting.
Touch [OK], and then touch [OK] again.
bizhub 751/601 (Version 2)
3-85
Basic copy operations
3
3.13
Manually using the finisher
If the post inserter is installed onto the finisher, the finisher can be operated manually by using the control
panel of the post inserter.
The following Finishing settings are available with each of the option configurations.
Finisher FS-524/FS-525 and post inserter
"Corner" Staple, "2 Position" Staple
Finisher FS-610 and post inserter
-
"Corner" Staple, "2 Position" Staple
Center Staple & Fold
Tri-Fold
Finisher FS-524/FS-525, post inserter and punch kit
-
"Corner" Staple, "2 Position" Staple
Punch settings
Finisher FS-610, post inserter and punch kit
-
"Corner" Staple, "2 Position" Staple
Center Staple & Fold
Tri-Fold
Punch settings
Corner Staple
2 Position
Staple
Center
Staple &
Fold
Tri-Fold
Punch
2
Reminder
Only load paper into the lower tray. Do not use the upper tray.
Paper weight
"Corner" Staple, "2
Position" Staple
Punch settings
3-86
Plain paper (60 g/m
to 90 g/m2)
2
Plain paper (60 g/m2
to 90 g/m2)
Thick paper (91
g/m2 to 128 g/m2)
Paper size
Number of sheets
Output tray
Standard sizes:
A3 w to A5 v,
11 e 17 w to
5-1/2 e 8-1/2 v,
Foolscap*1, 8K w,
16K w/v,
wide paper (A3W w
to A5W v,
11 e 17W w to
5-1/2 e 8-1/2W v)
Custom sizes:
182 mm e 139 mm
to
314 mm e 458 mm
Finisher FS-524
50 sheets (60 g/m2
to 90 g/m2)
Main finishing tray
(Tray 2)
2 holes:
A3 w to A5 w/v,
11 e 17 w to
5-1/2 e 8-1/2 w/v,
Foolscap*1, 8K w,
16K w/v
4 holes:
A3 w, B4 w, A4 v,
B5 v, 11 e 17 w to
8-1/2 e 11 w, 8K w,
16K v
200 sheets
Finisher FS-525
100 sheets (60 g/m2
to 80 g/m2)
Finisher FS-610
50 sheets (60 g/m2
to 80 g/m2)
16 sheets (81 g/m2
to 90 g/m2)
Main finishing tray
(Tray 2)
bizhub 751/601 (Version 2)
Basic copy operations
3
Paper weight
Paper size
Center Staple &
Fold*2
Plain paper (60 g/m
to 80 g/m2)
2
Standard sizes:
A3 w, B4 w, A4 w,
11 e 17 w,
8-1/2 e 14 w,
8-1/2 e 11 w, 8K w,
wide paper (A3W w,
B4W w, A4W w,
11 e 17W w,
8-1/2 e 11W w)
Custom sizes:
210 mm e 279 mm
to
314 mm e 458 mm
Tri-Fold*2
Plain paper (60 g/m2
to 90 g/m2)
A4 w, 8-1/2 e 11 w,
16K w
Number of sheets
Output tray
2
20 sheets (60 g/m
to 80 g/m2)
16 sheets (81 g/m2
to 90 g/m2)
Booklet tray
3 sheets (60 g/m2 to
80 g/m2)
1 sheet (81 g/m2 to
90 g/m2)
Booklet tray
*1
Foolscap includes the following 4 types: 8-1/8 e 13-1/4 w, 8-1/4 e 13 w, 8-1/2 e 13 w, 8 e 13 w, one of
which can be selected. For details, contact the service representative.
*2
Can be used only with Finisher FS-610.
!
Detail
When manually performing the hole-punching operation from the post inserter control panel, only two
holes can be punched.
Names of control panel parts
Center Staple & Fold
Corner Staple
[Finishing] key
2 Position Staple
[Punch] key
[Start/stop] key
Tri-Fold
bizhub 751/601 (Version 2)
3-87
Basic copy operations
3
Finishing
1
Load the paper into the lower tray of the post inserter.
–
–
–
–
–
2
Slide the paper guides to fit the size of the paper.
3
Press the [Finishing] key or [Punch] key, and then select the desired Finishing settings.
–
–
4
When the "Corner" or "2 Position" Staple settings, or the "Center Staple & Fold" or "Tri-Fold" setting
is selected, press the [Finishing] key, and the indicator lights up. When a Punch setting is selected,
press the [Punch] key, and the indicator lights up.
A Punch can be selected at the same time as the "Corner" or "2 Position" Staple setting. If the
settings are selected at the same time, the indicator lights up when the [Finishing] key is pressed.
When only a Punch setting is selected, all indicators except the one on the [Punch] key go off.
Press the [Start/Stop] key.
–
3-88
If the "Corner" or "2 Position" Staple settings are to be
used, load the paper face up
If a Punch setting is to be used, load the paper face up.
If the paper is to be stapled and folded at the center, load
the paper so that the side that is to be the front when
bound is face up.
If the paper is to be folded in three, load the paper so that
the side that is to be the outside when folded in three is
face up.
The loaded paper will be finished into one set.
Press the [Start/Stop] key during an operation to stop the operation.
bizhub 751/601 (Version 2)
Basic copy operations
3.14
3
Selecting not to rotate the image
Copies can be printed with the image not rotated to fit the orientation of the loaded paper.
Auto Rotate OFF
Original
Auto Rotate
2
Note
Depending on the paper size and zoom ratio, some parts of the image may be lost.
%
In the Basic screen, touch [Auto Rotate OFF].
bizhub 751/601 (Version 2)
3-89
Basic copy operations
3
3.15
Scanning the next original to be copied while a copy job is being
printed (next job reservation)
The settings for the next copy job can be specified and the original can be scanned while a copy job is being
printed so that it can be printed once the current copy job is finished.
0
0
0
1
3-90
Up to 51 copy jobs, including the current copy job, can be reserved.
A copy job can be reserved after scanning of the loaded original is finished. The next job cannot be
reserved while an original is being scanned.
To delete a reserved copy job, touch [Job List] in the left panel, and then touch [Job Details]. For details,
refer to "Deleting a job" on page 11-8.
When the message "Ready to accept another job." appears while the current job is being printed, an
original can be loaded, and copy settings can be specified for the next copy job.
–
For details on positioning the original, refer to "Feeding the original" on page 3-9.
–
If the "Copy Operating Screen" parameter in Utility mode is set to "Yes", touch [Next Copy Job]
while printing to display the Basic screen.
–
For details on specifying the screen that appears while printing, refer to "Custom Display Settings"
on page 12-19.
2
Press the [Start] key.
3
After the current copy job is finished, the next copy job begins.
bizhub 751/601 (Version 2)
Basic copy operations
3.16
3
Temporarily stopping scanning/printing
Follow the procedure described below to temporarily stop scanning the original and stop the printing
operation.
0
0
If an original is being scanned for a job, pressing the [Stop] key stops scanning.
For details on deleting a temporarily stopped job, refer to "Deleting a paused job" on page 3-92.
1
Press the [Stop] key while an original is being scanned or a job
is being printed.
Scanning/printing stops.
The Stopped Jobs screen appears.
2
To continue all stopped jobs, press the [Start] key.
bizhub 751/601 (Version 2)
3-91
Basic copy operations
3
3.17
Deleting a paused job
Follow the procedure described below to delete a temporarily stopped job.
0
0
0
1
For details on temporarily stopping a job being scanned or printed, refer to "Temporarily stopping
scanning/printing" on page 3-91.
Select only one job at a time to be deleted.
To continue a temporarily stopped job, press the [Start] key.
Press the [Stop] key while an original is being scanned or a job
is being printed.
Scanning/printing stops.
The Stopped Jobs screen appears.
2
Select the job to be deleted, and then touch [Delete].
The selected job is deleted.
3-92
bizhub 751/601 (Version 2)
4
Additional copy operations
Additional copy operations
4
Additional copy operations
4.1
Checking the copy settings (Check Job)
4
From the Check Job Details screens, the current copy settings can be checked and changed if desired.
4.1.1
To check the settings
1
Touch [Check Job] in the left panel, and then touch [Check Details].
The Check Job Settings screen appears.
bizhub 751/601 (Version 2)
4-3
4
Additional copy operations
4-4
bizhub 751/601 (Version 2)
Additional copy operations
2
4
After checking the settings, touch [Close].
The Basic screen appears again.
!
Detail
There are seven Check Job Settings screens. The number of the currently displayed screen appears to
the right of the screen title.
To display the previous screen, touch [
Back]. To display the next screen, touch [Forward
].
If the setting for a function has been changed from the default, the button for that function appears with
a colored box around it.
4.1.2
To change the settings
1
Touch [Check Job] in the left panel, and then touch [Check Details].
2
Touch [
3
Touch the button for the function whose setting is to be changed.
Back] or [Forward
] until the button for the function to be changed is displayed.
The screen for specifying the setting appears.
4
Follow the appropriate procedure to change the setting.
bizhub 751/601 (Version 2)
4-5
Additional copy operations
4
4.2
Printing a proof to check the settings (Proof Copy)
Before printing a large number of copies, a single proof copy can first be printed so that it can be checked.
This prevents copy errors from occurring.
1
Position the original to be copied.
–
2
Select the desired copy settings.
–
3
For details on positioning the original, refer to "Feeding the original" on page 3-9.
When printing a proof copy, specify multiple copies.
Press the [Proof Copy] key.
–
–
If an optional hard disk is not installed, go to step 6.
If an optional hard disk is not installed, the Select Proof
Copy Method screen does not appear.
The Select Proof Copy Method screen appears.
4
4-6
Touch [Print] for Mode, and then select the original direction.
–
When the original is placed on the original glass:
–
When the original is loaded into the ADF:
bizhub 751/601 (Version 2)
Additional copy operations
5
Press the [Start] key.
6
If the original was placed on the original glass, touch [Finish], and then press the [Start] key.
4
–
If the original was loaded into the ADF, printing of the proof copy begins without the screen
appearing confirming that scanning of the original is finished.
A single proof copy is printed.
7
Check the proof copy.
–
–
8
If the proof copy was printed as desired, continue with step 8.
To change the copy settings, continue with step 6.
Touch [Change Setting] in the screen that appeared when the proof copy was printed.
–
–
–
–
–
To stop copying while the proof copy screen is displayed, press the [Reset] key or the [C] (clear) key.
Otherwise, select the proof copy job to be stopped from the list of jobs in the left panel, and then
touch [Delete]. In the screen that appears, requesting confirmation to delete the job, touch [Yes],
and then touch [OK].
If no operation is performed within the specified length of time while this screen is displayed, the
copy job being proofed is registered as a stored job and the Basic screen appears again. Jobs are
registered as stored jobs under the following conditions.
When the automatic system reset operation is performed
After one minute (when "System Auto Reset" is set to "OFF")
For details on stored jobs, refer to page 11-14. If "System Auto Reset" is set to "OFF", the job is
stored if no operation is performed for 1 minute.
For details on the automatic system reset operation, refer to "Automatically conserving energy
(Sleep mode)" on page 2-35.
The number under "Number of Sets" in the screen that appeared when a proof copy is printed
indicates the number of sets printed as proof copies/total Number of Sets specified.
The number under "Total # of Pages Printed" in the screen that appeared when a proof copy is
printed indicates the number of copies printed as proof copies/the number of pages printed in the
proof copy.
bizhub 751/601 (Version 2)
4-7
Additional copy operations
4
9
In the screen allowing you to change the settings, change the copy settings as desired, and then touch
[OK].
To cancel changes to the settings, touch [Cancel].
–
–
–
–
10
Press the [Proof Copy] key to print another proof copy.
–
11
If the copy settings cannot be changed, stop printing the proof copy. Next, press the [Reset] key to
cancel the copy settings, and then specify the desired settings.
To stop copying while the screen for changing the settings is displayed, select the proof copy job
to be stopped from the list of jobs in the left panel, and then touch [Delete]. In the screen that
appears, requesting confirmation to delete the copy program, touch [Yes], and then touch [OK].
To cancel changes to the settings in the screen for changing the settings, press the [Reset] key while
the screen for changing the settings is displayed to reset the settings to those specified in step 2.
The number beside "Copies" in the screen for changing the settings is the number of copies that
will be printed when [Finish] is touched.
To stop the proof copy while scanning or printing, perform the operation described in "Temporarily
stopping scanning/printing" on page 3-91.
Touch [Print].
The remaining copies are queued as a copy job.
4-8
bizhub 751/601 (Version 2)
Additional copy operations
4.3
4
Checking the print image as a preview image (Advanced Preview)
Print image can be checked as a preview image before printing. This prevents print errors from occurring.
If an optional hard disk is not installed, print image cannot be checked with the Preview screen displayed.
4.3.1
Preview screen
In the Preview screen, originals that have been scanned in a wrong direction can be rotated and settings
specified before scanning can be changed.
Screen Layout
1
4
5
2
7
3
No.
6
8
Item Name
Description
1
[Prev. Page]/[Next Page]
Moves to the previous or next page from the current page.
2
-
The preview image appears.
Press [View Finishing] to apply the finishing status to the preview image.
3
Scroll bar
If the preview image is enlarged, use the scroll bar to scroll up or down, or to
the left or right of the image.
4
Zoom
Enlarges or reduces the preview image.
For details, refer to "Zoom" on page 4-10.
5
Page Rotation
Rotates the preview image by 180 degrees.
For details, refer to "Page Rotation" on page 4-10.
6
[View Finishing]
Applies the finishing state to the preview image. Touching [View Finishing]
again cancels the finishing preview.
For details, refer to "View Finishing" on page 4-11.
7
[Change Setting]
Settings for the scanned originals can be changed.
For details, refer to "Change Setting" on page 4-12.
8
[View Status]/[View Pages]
Switches the Preview screen between the status view and the page view.
Images can be rotated and settings can be changed in [View Pages]. Loading
of the image is finished in [View Status].
bizhub 751/601 (Version 2)
4-9
Additional copy operations
4
Zoom
In Zoom, the preview image can be enlarged to check the original in detail. By touching [+] or [-], the zoom
ratio can be changed between the full size or at a size of 2, 4 or 8 times the normal size. Use the scroll bars
in the right end and bottom end of the image to view the desired section of the image.
!
Detail
If the display size is changed, the finishing status cannot be viewed.
Page Rotation
In Page Rotation, a preview image can be rotated by 180 degrees to correct wrong original direction.
%
Touch [Rotate current page] to rotate the currently displayed page by 180 degrees.
%
Touch [Select page(s) to rotate] to display the list of scanned pages. Up to 8 scanned pages can be
displayed, and touching the arrows switches between the pages.
Touch [Select Odd] to rotate the odd pages among the scanned pages.
Touch [Select Even] to rotate the even pages among the scanned pages.
%
%
4-10
bizhub 751/601 (Version 2)
Additional copy operations
%
4
Touch [Select All ]to rotate all the scanned pages. Directly selecting a scanned page rotates the
selected page.
View Finishing
%
Touch [View Finishing] to display the finishing settings in the preview image with icons and texts, and
finishing status can be checked.
– Press [View Finishing] again to cancel the finishing view of the preview image.
bizhub 751/601 (Version 2)
4-11
Additional copy operations
4
Change Setting
In Change Setting, settings for the original to be scanned next can be changed.
2
Note
For details on the setting method, refer to the appropriate description section.
Touching [Preview] in the left pane displays the preview image. The settings displayed in the preview
image are limited to those apply to all original pages.
4-12
bizhub 751/601 (Version 2)
Additional copy operations
4.3.2
4
Checking the advanced preview
In Preview, finishing image of copies can be checked before printing.
1
Place the original on the original glass, or load the original into the ADF.
2
Select the desired copy settings.
3
Press the [Proof Copy] key.
The Select Proof Copy Method screen appears.
4
5
Touch [Preview on Screen] for Mode, and then select the original direction.
–
When the original is placed on the original glass:
–
When the original is loaded into the ADF:
Press the [Start] key.
Scanning of the original starts, and the Preview screen (View Status) appears.
bizhub 751/601 (Version 2)
4-13
Additional copy operations
4
6
Check the preview image.
–
–
–
–
7
Change the settings, and then touch [View Status].
–
8
To change the settings, touch [View Pages]. Go to step 7.
To start printing, press the [Start] key.
To scan more originals, touch [Finish], place (or load) the originals, and then press the [Start] key.
Press the [Stop] key to cancel the preview.
For details on the View Pages screen, refer to "Preview screen" on page 4-9.
Press the [Start] key.
–
Start printing.
!
Detail
When originals are scanned using the Program Jobs function, the finishing image can be previewed
after all the originals are scanned and [Finish] is touched. For details on the Program Jobs function, refer
to "Scanning originals with different settings and printing copies all together ("Program Jobs" function)"
on page 8-21.
When originals are scanned with the insert pages specified, the finishing image can be previewed both
after the originals are scanned first and after the insert pages are scanned. For details on the insert
pages, refer to "Inserting copies of a different original for a specified page ("Insert Image" function)" on
page 8-14.
When the Book Copy function or Booklet function is specified, the finishing status cannot be checked.
Print and check the finishing.
4-14
bizhub 751/601 (Version 2)
Additional copy operations
4.4
4
Interrupting a copy job (Interrupt mode)
The current jobs can be temporarily interrupted so an original can be copied with different copy settings.
This is convenient for quickly making a copy.
!
Detail
For details on making a copy after printing of the current job is finished, refer to "Increasing printing
priority" on page 11-17.
1
Position the original to be copied.
–
2
For details on loading the original, refer to "Loading the original into the ADF" on page 3-9.
Press the [Interrupt] key.
–
If a job is being printed, the message "The job is stopping."
appears.
The indicator on the [Interrupt] key lights up in green and
printing of the current job stops.
What settings are selected when the [Interrupt] key is
pressed?
% When the [Interrupt] key is pressed, all functions and
settings are reset to their defaults.
?
Why is the [Interrupt] key not available?
% The [Interrupt] key cannot be pressed while an original is being scanned.
?
3
Select the desired copy settings.
4
Press the [Start] key.
Printing for the interrupting job begins.
5
After the interrupting job has finished printing, press the [Interrupt] key.
The indicator on the [Interrupt] key goes off.
The copy settings return to those specified before printing was interrupted.
2
Note
If the interrupting job is cancelled, printing for the interrupted job automatically restarts.
bizhub 751/601 (Version 2)
4-15
Additional copy operations
4
4.5
Registering copy programs (Mode Memory)
Frequently used copy settings can be stored together as a program to easily be recalled. A maximum of 30
programs can be registered.
A name of up to 16 characters can be specified for the registered copy programs.
2
Note
If the optional hard disk is installed, a maximum of 100 copy programs can be registered.
1
Using the touch panel and control panel keys, specify the copy settings to be registered in the copy
program.
Can the current settings be checked?
% To check the currently specified copy settings, touch [Check Job] in the left panel, and then touch
[Job Details]. For details, refer to "Checking the copy settings (Check Job)" on page 4-3.
?
2
Press the [Mode Memory] key.
The Recall Copy Program screen appears.
3
From the copy program buttons that appear in the screen, touch the button where you wish to store
the copy settings, and then touch [Register Program].
–
–
There are three Recall Copy Program screens. Touch
and
to display a different screen.
If 30 copy programs have been registered, delete an unnecessary copy program. For details on
deleting copy programs, refer to "Deleting a copy program" on page 4-19.
The Register Copy Program screen appears.
4-16
bizhub 751/601 (Version 2)
Additional copy operations
4
Use the control panel keypad and the keyboard that appears in the touch panel to type in the name of
the copy program.
–
–
5
4
The program name can contain a maximum of 16 characters.
For details on typing in text, refer to "Entering text" on page 15-3.
After typing in the name, touch [OK].
–
–
The copy program can be given the same name as a copy program that has already been registered.
To stop specifying the name of the copy program, touch [Cancel].
bizhub 751/601 (Version 2)
4-17
Additional copy operations
4
The Recall Copy Program screen appears again. The copy program is registered and a button with the
entered copy program name appears.
6
?
%
Can the copy program name be corrected?
To change the entered copy program name, touch the button whose name is to be changed, and
then touch [Edit Name]. The Edit Name screen appears. Return to step 4 and repeat the procedure
to change the copy program name.
?
%
Can the specified settings for a copy program be checked?
To check the programmed copy settings, touch the button for the desired copy program, and then
touch [Check Program Settings]. For details, refer to "Copying with programmed copy settings
(Mode Memory)" on page 4-20.
Touch [OK] or [Cancel].
–
To return to the Basic screen, press the [Mode Memory] key.
!
Detail
To stop registering the program, press the [Reset] key or the [Mode Memory] key.
No matter which screen is displayed, the registration is cancelled.
Otherwise, continue to touch [Cancel] until the Basic screen is displayed.
The settings of a copy program cannot be changed.
If the copy program that was selected has been locked, [Edit Name] and [Delete] do not appear. For
details, refer to "System Settings" on page 12-17.
4-18
bizhub 751/601 (Version 2)
Additional copy operations
4.5.1
4
Deleting a copy program
1
In the Recall Copy Program screen, touch the button for the copy program to be deleted.
–
2
If the copy program to be recalled is not displayed, touch
program is displayed.
and
until the desired copy
Touch [Delete].
A message appears, requesting confirmation to delete the copy program.
3
Touch [Yes], and then touch [OK].
The Recall Copy Program screen appears again. The copy settings registered in the copy program are
erased.
bizhub 751/601 (Version 2)
4-19
Additional copy operations
4
4.6
Copying with programmed copy settings (Mode Memory)
Programmed copy settings can be recalled to be used again for copying.
1
Position the original to be copied.
–
2
For details on positioning the original, refer to "Feeding the original" on page 3-9.
Press the [Mode Memory] key.
The Recall Copy Program screen appears.
3
Touch the button for the copy program registered with the copy settings to be recalled.
–
–
4
Press the [Check Program Settings] key.
–
4-20
If the copy settings in the selected copy program are not to be checked, continue with step 8.
If the copy program to be recalled is not displayed, touch
and
until the desired copy
program is displayed.
The copy settings cannot be changed from the Check Job Settings screens.
bizhub 751/601 (Version 2)
Additional copy operations
4
The Check Job Settings screen appears.
There are four Check Job Settings screens. The number to the right of the screen title indicates the
number of the currently displayed screen.
].
To display the previous screen, touch [
Back]. To display the next screen, touch [Forward
5
Check the copy settings registered with the selected copy program.
6
Touch [Close].
The Recall Copy Program screen appears again.
7
Again touch the button for the copy program registered with the copy settings to be recalled.
–
8
If [OK] is touched with no copy program selected, the Basic screen appears again without a copy
program being recalled.
Touch [OK].
The programmed copy settings are recalled and the Basic screen appears again.
9
Press the [Start] key.
Copying begins with the recalled copy settings.
2
Note
To stop recalling a copy program, press the [Reset] key or the [Mode Memory] key or touch [Cancel].
bizhub 751/601 (Version 2)
4-21
Additional copy operations
4
4.7
Displaying function descriptions (Help)
Descriptions of the various functions and details of operations can be viewed.
There are two methods for displaying the Help screens.
Main Help screens (from the Basic screen)
Help screens for settings (from screens other than the Basic screen)
4.7.1
Overview of help screens
The following items are provided in the Help Menu screen.
Help Menu screen (1st level)
Item
Description
[Function]
Use to search for descriptions from a Help menu divided by the function
types and names.
[Search by Operation]
Use to search for descriptions from a Help menu divided by the operations.
[Function Map]
Displays the Function Map screen, which contains a chart of the available
functions and settings.
[Other Functions]
Check descriptions by selecting a Guidance menu grouped by useful
function.
[Name and Function of Parts]
Displays the Help menu for the name and function of each part.
Use to check the description of the main unit and its options.
[Service/Admin. Information]
Displays the name, extension number and e-mail address of the administrator.
[Replace Consumables]
Use to view the maintenance procedures for the machine.
!
Detail
The Help screens cannot be displayed when the following operations are being performed.
While scanning, while printing a proof copy, during Enlarge Display mode, during Accessibility mode
While the Help screens are displayed, the following keys are not available.
[Start], [Stop], [C] (clear), [Interrupt], [Proof Copy], [Access], [Mode Memory], [Enlarge Display]
Items in the Help Menu screen and other Help screens can be selected by touching the button or by
pressing the key in the keypad for the number of the desired item.
To display the next screen higher in the menu structure, touch [Close].
Touch [Exit] to exit the Help mode and return to the screen that was displayed before the [Help] key was
pressed.
4-22
bizhub 751/601 (Version 2)
Additional copy operations
4
Help screen (2nd level) (Example: Function)
Item
Description
[Copy], [Scan/Fax], [User Box], [Job List],
[Print], [Customize], [Image Panel], [Web
Browser]
Displays the first Help screen for each description.
!
Detail
The items displayed in the Help menu for the name and function of each part differ depending on the
options that are installed.
Help screen (bottom level) (Example: Function % Copy % Density/Background % Density)
bizhub 751/601 (Version 2)
4-23
Additional copy operations
4
Help screen (bottom level) (Example: Search by Operation % Copying % Copying Special Documents)
%
Touch [Shortcut to Function] to set the selected function.
!
Detail
If you are viewing the Help screen of a different function from the one that is currently selected,
[Shortcut to Function] cannot be selected.
For example, if you are in the Fax/Scan mode, [Shortcut to Function] on the Help screen for the Copy
mode, which is a different function from the Fax/Scan mode, cannot be selected.
Function Map screen (Example: Copy)
A chart of the available functions and settings are displayed in the function maps.
%
Select an item from the chart for the Help screen that you wish to view.
!
Detail
There are 12 Function Map screens for Copy mode. The top number indicates the number of the 12
screens that is currently displayed.
To display the previous screen, touch
. To display the next screen, touch
.
Press the key in the keypad for the number of the desired item in the Function Map screen.
To display the Help screen for "Function" that contains the selected item, touch [Close] in the Help
screen displayed by selecting an item in a Function Map screen.
To quit the Help mode, press the [Help] key or touch [Exit].
4-24
bizhub 751/601 (Version 2)
Additional copy operations
4.7.2
4
Displaying main help screens
As an example, the following procedures describe the Help screens that are displayed for copy operations
by using "Function".
1
With the Basic screen displayed, press the [Help] key.
The Help Menu screen appears.
2
Touch [Function] or press the [1] key in the keypad.
The Help screen for "Function" appears.
Is there more information about the buttons of the Help
screens?
% Refer to "Overview of help screens" on page 4-22.
?
bizhub 751/601 (Version 2)
4-25
Additional copy operations
4
3
Touch [Copy] or [Open], or press the [1] key in the keypad.
The Copy Help screen appears.
4
Touch [Open] or the right of the desired information, or press the key in the keypad for the number to
the left of the desired information to display the corresponding Help screen.
5
After checking the Help information, touch [Exit] or press the [Help] key again.
The Basic screen appears again.
4-26
bizhub 751/601 (Version 2)
Additional copy operations
4.8
4
Specifying control panel settings (Accessibility mode)
This section contains details on the procedures for specifying control panel settings and adjusting the touch
panel.
4.8.1
Displaying the accessibility setting screen
%
Press the [Accessibility] key.
The Accessibility Setting screen appears.
!
Detail
To exit the Accessibility Setting screen and return to the Basic screen, press the [Accessibility] key or
the [Reset] key, or touch [Close].
When the Enlarge Display mode is selected, the [Default Enlarge Display Setting] button appears to
allow specifying the default settings of the copy and fax/scan operations in the Enlarge Display mode.
4.8.2
Setting the "Touch Panel Adjustment" function
If the touch panel buttons do not respond correctly, the position of buttons in the touch panel may not be
correctly aligned with the position of the actual touch sensor and may need to be adjusted.
1
Display the Accessibility Setting screen.
–
2
For details on displaying the Accessibility Setting screen, refer to "Displaying the accessibility
setting screen" on page 4-27.
Touch [Touch Panel Adjustment] or press the [1] key in the keypad.
bizhub 751/601 (Version 2)
4-27
Additional copy operations
4
The Touch Panel Adjustment screen appears.
Why does the machine not respond when [Touch Panel
Adjustment.] is touched?
The touch sensors are not aligned on the touch panel.
% Press the [1] key in the keypad.
?
3
Touch the four check points [+], making sure that a sound is produced with each.
– The check points [+] can be touched in any order.
– To reset the adjustment, press the [C] (clear) key, and then touch the four check points [+].
If the check points have been touched correctly, the indicator on the [Start] key lights up in blue.
4
Press the [Start] key.
The touch panel is adjusted, and the Accessibility Setting screen appears again.
5
Touch [Close] or press the [Accessibility] key.
The Basic screen appears again.
2
Note
If the touch panel cannot be adjusted, contact the service representative.
!
Detail
To cancel the touch panel adjustment, press the [Stop] key or the [Reset] key.
4-28
bizhub 751/601 (Version 2)
Additional copy operations
4.8.3
4
Setting the "Key Repeat Start/Interval Time" functions
The length of time until the value begins to change after a touch panel button is held down and the length of
time for the value to change to the next number can be specified.
0
The settings specified for the Key Repeat Start/Interval Time functions are only applied in the Enlarge
Display mode.
1
Display the Accessibility Setting screen.
–
2
For details on displaying the Accessibility Setting screen, refer to "Displaying the accessibility
setting screen" on page 4-27.
Touch [Key Repeat Start/Interval Time] or press the [2] key in the keypad.
The Key Repeat Start/Interval Time screen appears.
bizhub 751/601 (Version 2)
4-29
Additional copy operations
4
3
Touch [+] and [-] to specify the starting time and the interval for the key repeat feature.
–
–
–
–
4
To extend the time, touch [+].
To reduce the time, touch [-].
Both settings can be set between 0.1 and 3.0 seconds in 0.1-second increments.
To cancel changes to the settings, press the [Reset] key.
Touch [OK].
The Accessibility Setting screen appears again.
5
Touch [Close] or press the [Accessibility] key.
The Basic screen appears again.
2
Note
The Enlarge Display mode is compatible with basic copy, scanning and fax functions. With the Enlarge
Display mode, text and illustrations are displayed at a larger size so that they can be seen more easily.
For details, refer to the User manual – Enlarge Display Operations.
As the factory default, "Time To Start" is set to 0.8 second and "Interval" is set to 0.3 second.
4-30
bizhub 751/601 (Version 2)
Additional copy operations
4.8.4
4
Setting the "System Auto Reset Confirmation" function
When the system auto reset operation is performed in Enlarge Display mode, a message can be displayed,
allowing you to choose either to continue operating without exiting Enlarge Display mode or to exit Enlarge
Display mode and return to the Basic screen.
In addition, it is possible to specify the display time for the message requesting confirmation to exit Enlarge
Display mode.
Yes: Enlarge Display mode is not exited.
No: Enlarge Display mode is exited, and the Basic screen is displayed.
1
Display the Accessibility Setting screen.
–
For details on displaying the Accessibility Setting screen, refer to "Displaying the accessibility
setting screen" on page 4-27.
For details on the automatic system reset operation, refer to "Automatically conserving energy (Sleep
mode)" on page 2-35.
2
Touch [System Auto Reset Confirmation] or press the [3] key in the keypad.
bizhub 751/601 (Version 2)
4-31
Additional copy operations
4
The System Auto Reset Confirmation screen appears.
3
Touch the button for the desired display time.
–
–
–
4
To not display the message requesting confirmation to exit Enlarge Display mode, touch [No].
To display the message requesting confirmation to exit Enlarge Display mode, touch the button ([30
second], [60 second], [90 second] or [120 second]) for the length of time that the message is to be
displayed.
To cancel changes to the settings, press the [Reset] key. All changes to the settings are canceled.
Touch [OK].
The Accessibility Setting screen appears again.
5
Touch [Close] or press the [Accessibility] key.
The Basic screen appears again.
2
Note
The Enlarge Display mode is compatible with basic copy, scanning and fax functions. With the Enlarge
Display mode, text and illustrations are displayed at a larger size so that they can be seen more easily.
For details, refer to the User manual – Enlarge Display Operations.
As the factory default, "No" is selected.
4-32
bizhub 751/601 (Version 2)
Additional copy operations
4.8.5
4
Setting the "Auto Reset Confirmation" function
When the automatic panel reset operation is performed in Enlarge Display mode, a message can be
displayed, allowing you to choose either to continue operating without resetting the current settings or to
reset the settings.
In addition, it is possible to specify when the message is displayed, requesting confirmation to reset the
settings in Enlarge Display mode.
As the factory default, "No" is selected.
Yes: The current settings are not reset.
No: The current settings are reset to the default settings.
2
Note
For details on the automatic panel reset operation, refer to "Automatically clearing settings (Automatic
panel reset)" on page 2-34.
1
Display the Accessibility Setting screen.
–
2
For details on displaying the Accessibility Setting screen, refer to "Displaying the accessibility
setting screen" on page 4-27.
Touch [Auto Reset Confirmation] or press the [4] key in the keypad.
bizhub 751/601 (Version 2)
4-33
Additional copy operations
4
The Auto Reset Confirmation screen appears.
3
Touch the button for the desired display time.
–
–
–
4
To not display the message requesting confirmation to reset the settings, touch [No].
To display the message requesting confirmation to reset the settings, touch the button ([30 second],
[60 second], [90 second] or [120 second]) for the length of time that the message is to be displayed.
To cancel changes to the settings, press the [Reset] key. All changes to the settings are canceled.
Touch [OK].
The Accessibility Setting screen appears again.
5
Touch [Close] or press the [Accessibility] key.
The Basic screen appears again.
2
Note
The Enlarge Display mode is compatible with basic copy, scanning and fax functions. With the Enlarge
Display mode, text and illustrations are displayed at a larger size so that they can be seen more easily.
For details on the Enlarge Display mode, refer to the User manual – Enlarge Display Operations.
If the time setting is the same for the automatic panel reset operation and the automatic system reset
operation, the display of the message requesting confirmation to exit Enlarge Display mode is given
priority and the message requesting confirmation to reset the settings in Enlarge Display mode is not
displayed.
4-34
bizhub 751/601 (Version 2)
Additional copy operations
4.8.6
4
Setting the "Enlarge Display Mode Confirmation" function
When the [Enlarge Display] key is pressed to change the display of the screen, a message can be displayed,
requesting confirmation to cancel the settings that cannot be specified in Enlarge Display mode.
As the factory default, "OFF" is selected.
Yes: The settings that cannot be displayed are cancelled, and the Enlarge Display mode is entered.
No: The Enlarge Display mode is not entered.
1
Display the Accessibility Setting screen.
–
2
For details on displaying the Accessibility Setting screen, refer to "Displaying the accessibility
setting screen" on page 4-27.
Touch [Enlarge Display Mode Confirmation] or press the [5] key in the keypad.
The Enlarge Display Mode Confirmation screen appears
bizhub 751/601 (Version 2)
4-35
Additional copy operations
4
3
Select whether or not the message is displayed.
–
4
To cancel changes to the settings, press the [Reset] key. All changes to the settings are canceled.
Touch [OK].
The Accessibility Setting screen appears again.
5
Touch [Close] or press the [Accessibility] key.
The Basic screen appears again.
2
Note
The Enlarge Display mode is compatible with basic copy, scanning and fax functions. With the Enlarge
Display mode, text and illustrations are displayed at a larger size so that they can be seen more easily.
For details on the Enlarge Display mode, refer to the User manual – Enlarge Display Operations.
If "OFF" is selected in the Enlarge Display Mode Confirmation screen, the screen is not displayed.
4-36
bizhub 751/601 (Version 2)
Additional copy operations
4.8.7
4
Setting the "Message Display Time" function
It is possible to specify the length of time for displaying warning messages, which appear, for example, when
an incorrect operation is performed.
As the factory default, "3 seconds" is selected.
1
Display the Accessibility Setting screen, and then touch
–
2
to display the next screen.
For details on displaying the Accessibility Setting screen, refer to "Displaying the accessibility
setting screen" on page 4-27.
Touch [Message Display Time] or press the [1] key in the keypad.
The Message Display Time screen appears.
3
Select setting for the desired amount of time that messages are displayed.
–
–
Touch [3 seconds] or [5 seconds] to select how long messages are displayed.
To cancel changes to the settings, press the [Reset] key. All changes to the settings are canceled.
bizhub 751/601 (Version 2)
4-37
Additional copy operations
4
4
Touch [OK].
The Accessibility Setting screen appears again.
5
Touch [Close] or press the [Accessibility] key.
The Basic screen appears again.
4.8.8
Setting the "Sound Setting" functions
With the Sound Setting functions, The sound level can be adjusted by selecting on from 16 levels provided
for the sounds that are produced, for example, when a key is pressed. Specified sound can also be muted in
this setting.
For details, see the table below.
As the factory default, "8" is selected for all operation sounds.
Operation Confirmation Sound
Sound ON/OFF Settings
Operation Confirmation
Sound
Successful Completion
Sound
All Sounds
Select to turn on/off all sounds in Sound Setting.
Operation Confirmation
Sound
Select to turn on/off all sounds in Operation Confirmation
Sound setting.
Successful Completion
Sound
Select to turn on/off all sounds in Successful Completion
Sound setting.
Completed Preparation
Sound
Select to turn on/off the Completed Preparation Sound setting.
Caution Sound
Select to turn on/off all sounds in Caution Sound setting.
Input Confirmation
Sound
When pressing a key in the control panel or a button on the
touch panel
Invalid Input Sound
When incorrectly pressing a key in the control panel or a button on the touch panel
Basic Sound
When switching settings and the default setting is selected
Completed Operation
Sound
When an operation is completed successfully
Completed Transmission Sound
When a communication operation is completed successfully
Completed Preparation
Sound
Caution Sound
4-38
When a device has finished setting up
Simple Caution Sound
(Level 1)
When it is almost time to replace supplies or a replaceable
part and a message appears in the touch panel
Simple Caution Sound
(Level 2)
When a user has performed an operation incorrectly
Simple Caution Sound
(Level 3)
When an error occurs that can be corrected by the user by referring to the message that appeared or the user manual
Severe Caution Sound
When an error occurs that cannot be corrected by the user or
requires a service representative
bizhub 751/601 (Version 2)
Additional copy operations
1
Display the Accessibility Setting screen, and then touch
–
2
4
to display the next screen.
For details on displaying the Accessibility Setting screen, refer to "Displaying the accessibility
setting screen" on page 4-27.
Touch [Sound Setting] or press the [2] key in the keypad.
The Sound Setting screen appears.
3
Touch the button or press the key in the keypad for the desired sound setting (2-5).
–
Sound settings 2 through 5 are available only if the corresponding sound setting on the Sound
ON/OFF Settings screen is set to "ON".
The screen for selected sound setting appears.
bizhub 751/601 (Version 2)
4-39
Additional copy operations
4
4
Touch the button or press the key in the keypad for the desired sound setting.
The screen for adjusting sound level appears.
5
6
Adjust the sound level.
–
To produce the sound, touch [Yes]. The sound level can be selected from 16 levels. Every touching
[Lower]/[Higher] increases/decreases a single level. To mute the sound, touch [No].
–
To cancel changes to the settings, press the [Reset] key. All changes to the settings are canceled.
Touch [OK], then touch [Close].
The Sound Setting screen appears again.
4-40
bizhub 751/601 (Version 2)
Additional copy operations
7
4
To enable/disable the sound setting collectively from 2 to 5, touch [Sound ON/OFF Settings] or press
the [1] key in the keypad.
The Sound ON/OFF Settings screen appears.
8
Select [On] or [No] for the desired setting item.
9
Touch [OK].
The sound Setting screen appears again.
10
Touch [Close].
The Accessibility Setting screen appears again.
11
Touch [Close] or press the [Accessibility] key.
The Basic screen appears again.
bizhub 751/601 (Version 2)
4-41
4
Additional copy operations
4-42
bizhub 751/601 (Version 2)
5
Troubleshooting
Troubleshooting
5
5
Troubleshooting
5.1
When an error code appears
There are three types of errors; errors that can be cleared by opening and closing the front door, errors that
can be cleared by turning the power off/on, and errors that cannot be cleared. Clear the error by following
the on-screen instructions. If the error cannot be cleared or released, contact your service representative with
the error code.
The phone number and fax number for the usual service representative appear in the center of the screen.
Example: Error that can be cleared by turning the power off/on (C-E0002)
Display in Enlarge Display mode
If the internal error occurs, the screen shown below appears.
2
Reminder
Since the machine may be damaged, contact the service representative according to the procedure
described below as soon as the call service representative screen appears.
bizhub 751/601 (Version 2)
5-3
Troubleshooting
5
5-4
1
Write down the trouble code (for example, C-E0002) in the call service representative screen.
2
Turn the machine off by using the [Power] (auxiliary power) key
and the main power switch.
3
Unplug the machine.
4
Contact the service representative, and inform them of the trouble code.
bizhub 751/601 (Version 2)
Troubleshooting
5.2
5
When the message "misfeed detected." appears
If a misfeed occurs during printing, the message "A paper misfeed has been detected. Remove the paper
according to the guide or illustration." appears, and the location of the misfeed is indicated by a number
accompanied with the procedure for clearing misfed paper on the screen.
At this time, printing cannot continue until the misfeed is adequately cleared.
Misfeed Location screen
bizhub 751/601 (Version 2)
5-5
Troubleshooting
5
5.2.1
Location of paper misfeed and illustration
If paper misfeeds have occurred at multiple locations, multiple numbers appear or flash. The flashing number
indicates the location where the paper misfeed should be cleared first.
Touching the [Illustration] key on the Misfeed Location screen displays another screen with the message
"Remove the misfed paper according to the guide or illustration.", and also with a description and illustration
for clearing misfed paper.
If the description extends over multiple pages, the [Next%] key is displayed. Touch [Next] to proceed to the
next screen.
Touching [JAM Location Display] returns to the Misfeed Location screen.
5-6
bizhub 751/601 (Version 2)
Troubleshooting
5.2.2
5
Paper misfeed indications
* The illustration above shows the main unit with the optional Finisher FS-610, Z folding unit, post inserter and
Large Capacity Unit LU-405 installed.
*
The illustration above shows the main unit with the optional shift tray installed.
*
The illustration above shows the main unit with the optional output tray installed.
bizhub 751/601 (Version 2)
5-7
Troubleshooting
5
No.
5.2.3
Description
1
Paper misfeed in tray 1
2
Paper misfeed in tray 2
3
Paper misfeed in tray 3
4
Paper misfeed in tray 4
5
Paper misfeed in the LCT (Large Capacity Unit LU-405/LU-406)
6
Paper misfeed in the bypass tray
7
Paper misfeed in the vertical transport section
8
Paper misfeed in the ADU unit
9
Paper misfeed in the ADU unit
10
Paper misfeed in the ADU unit
11
Paper misfeed in the ADU unit
12
Paper misfeed in the ADU unit
13
Paper misfeed in the ADU unit
14
Paper misfeed in the ADF
15
Paper misfeed in the ADF
16
Paper misfeed in Finisher FS-524/FS-525/FS-610 or shift tray
17
Paper misfeed in the post inserter
18
Paper misfeed in Finisher FS-524/FS-525/FS-610
20
Paper misfeed in the Z folding unit
Clearing a paper misfeed in tray 1 "1"
2
Note
For details of the locations of paper misfeeds, refer to "Paper misfeed indications" on page 5-7.
1
Pull out tray 1.
–
2
5-8
If the misfed paper extends over tray 1 and tray 2, also pull
out tray 2.
Remove any misfed paper.
bizhub 751/601 (Version 2)
Troubleshooting
5
3
Lift up the paper take-up roller, and then remove any paper
remaining in the tray.
4
Load the paper into the tray again, lower the paper take-up roller, and then close the tray.
5
Pull out tray 2, and then pull out the horizontal transport unit.
6
Open the horizontal transport unit cover.
7
Remove any misfed paper in the horizontal transport unit.
8
Return the horizontal transport unit and tray 2 to their original positions.
bizhub 751/601 (Version 2)
5-9
Troubleshooting
5
9
Open the vertical transport door.
–
5-10
If a large capacity unit is installed, open its large capacity
tray front door, and then open the vertical transport door.
10
Remove any misfed paper in the vertical transport section.
11
Close the vertical transport door.
bizhub 751/601 (Version 2)
Troubleshooting
5.2.4
5
Clearing a paper misfeed in tray 2 "2"
2
Note
For details of the locations of paper misfeeds, refer to "Paper misfeed indications" on page 5-7.
1
Pull out tray 2.
2
Remove any misfed paper.
3
Lift up the paper take-up roller, and then remove any paper
remaining in the tray.
4
Load the paper into the tray again, lower the paper take-up roller, and then close the tray.
5
Open the vertical transport door.
–
If a large capacity unit is installed, open its large capacity
tray front door, and then open the vertical transport door.
bizhub 751/601 (Version 2)
5-11
Troubleshooting
5
5.2.5
6
Remove any misfed paper in the vertical transport section.
7
Close the vertical transport door.
Clearing a paper misfeed in tray 3 and tray 4 "3""4"
2
Note
For details of the locations of paper misfeeds, refer to "Paper misfeed indications" on page 5-7.
5-12
1
Pull out tray 3 or tray 4.
2
Remove any misfed paper.
bizhub 751/601 (Version 2)
Troubleshooting
5
3
Lift up the paper take-up roller, and then remove any paper
remaining in the tray.
4
Load the paper into the tray again, lower the paper take-up roller, and then close the tray.
5
Open the vertical transport door.
–
If a large capacity unit is installed, open its large capacity
tray front door, and then open the vertical transport door.
6
Remove any misfed paper in the vertical transport section.
7
Close the vertical transport door.
bizhub 751/601 (Version 2)
5-13
Troubleshooting
5
5.2.6
Clearing a paper misfeed in the LCT (Large Capacity Unit)"5"
2
Note
For details of the locations of paper misfeeds, refer to "Paper misfeed indications" on page 5-7.
5-14
1
Open the large capacity tray front door.
2
Remove any misfed paper.
3
Open the upper cover.
4
Lift up the paper take-up roller, and then remove any paper
remaining in the tray.
bizhub 751/601 (Version 2)
Troubleshooting
5
5.2.7
5
Load the paper into the tray again, lower the paper take-up roller, and then close the upper cover.
Clearing a paper misfeed in the bypass tray "6"
2
Note
For details of the locations of paper misfeeds, refer to "Paper misfeed indications" on page 5-7.
5.2.8
1
Remove all paper from the bypass tray.
2
Load the paper into the tray again.
Clearing a paper misfeed in the vertical transport section "7"
2
Note
For details of the locations of paper misfeeds, refer to "Paper misfeed indications" on page 5-7.
1
Open the vertical transport door.
–
2
If a large capacity unit is installed, open its large capacity
tray front door, and then open the vertical transport door.
Remove any misfed paper in the vertical transport section.
bizhub 751/601 (Version 2)
5-15
Troubleshooting
5
3
5.2.9
Close the vertical transport door.
Clearing a paper misfeed in the ADU unit "8"
2
Note
For details of the locations of paper misfeeds, refer to "Paper misfeed indications" on page 5-7.
1
Open the right front door and the left front door.
2
Turn dial M2 to feed out the paper.
M2
M2
3
Lower lever M4, and then pull out the ADU unit.
M4
5-16
bizhub 751/601 (Version 2)
Troubleshooting
4
5
Raise lever M3, and then remove any paper.
M3
5
Return the ADU unit to its original position.
6
Return lever M4 to its original position, and then close the right front door and the left front door.
7 WARNING
Precaution for electrical shock
High voltage is generated around the drum unit inside the machine.
%
In order to reduce the risk of electric shock, do not touch any part in this unit when clearing paper
misfeeds.
7 CAUTION
Precaution for high temperature
The fusing unit inside the machine is extremely hot.
%
In order to reduce the risk of burns, do not touch any part in this unit when clearing paper misfeeds.
bizhub 751/601 (Version 2)
5-17
Troubleshooting
5
5.2.10
Clearing a paper misfeed in the ADU unit "9"
2
Note
For details of the locations of paper misfeeds, refer to "Paper misfeed indications" on page 5-7.
1
Open the right front door and the left front door.
2
Turn dial M1 and M2 to feed out the paper.
M2
M1
M2
M1
3
Lower lever M4, and then pull out the ADU unit.
M4
4
Raise cover M12, and then remove any paper.
M12
5-18
bizhub 751/601 (Version 2)
Troubleshooting
5
5
Raise cover M3, and then remove any paper.
M3
6
Return the ADU unit to its original position.
7
Return lever M4 to its original position, and then close the right front door and the left front door.
7 WARNING
Precaution for electrical shock
High voltage is generated around the drum unit inside the machine.
%
In order to reduce the risk of electric shock, do not touch any part in this unit when clearing paper
misfeeds.
7 CAUTION
Precaution for high temperature
The fusing unit inside the machine is extremely hot.
%
In order to reduce the risk of burns, do not touch any part in this unit when clearing paper misfeeds.
bizhub 751/601 (Version 2)
5-19
Troubleshooting
5
5.2.11
Clearing a paper misfeed in the ADU unit "10"
2
Note
For details of the locations of paper misfeeds, refer to "Paper misfeed indications" on page 5-7.
1
Open the right front door and the left front door.
2
Lower lever M4, and then pull out the ADU unit.
M4
3
Remove all paper from the ADU unit.
4
Return the ADU unit to its original position.
5
Return lever M4 to its original position, and then close the right front door and the left front door.
7 WARNING
Precaution for electrical shock
High voltage is generated around the drum unit inside the machine.
%
In order to reduce the risk of electric shock, do not touch any part in this unit when clearing paper
misfeeds.
5-20
bizhub 751/601 (Version 2)
Troubleshooting
5
7 CAUTION
Precaution for high temperature
The fusing unit inside the machine is extremely hot.
%
In order to reduce the risk of burns, do not touch any part in this unit when clearing paper misfeeds.
5.2.12
Clearing a paper misfeed in the ADU unit "11"
2
Note
For details of the locations of paper misfeeds, refer to "Paper misfeed indications" on page 5-7.
1
Open the right front door and the left front door.
2
Turn dial M9 and M10 to feed out the paper.
M10
M10
M9
M9
3
Remove all paper from the outlet.
–
If the finisher, shift tray or Z folding unit is installed, clear
paper misfeeds from each unit.
bizhub 751/601 (Version 2)
5-21
Troubleshooting
5
4
Lower lever M4, and then pull out the ADU unit.
M4
5
Lower lever M5.
M5
6
Open covers M6 and M8.
M6
M8
7
Turn dial M7, and then remove any paper.
M7
M7
5-22
8
Raise the lever for cover M6, and then close cover M6.
9
Return the ADU unit to its original position.
10
Return lever M4 to its original position, and then close the right front door and the left front door.
bizhub 751/601 (Version 2)
Troubleshooting
5
7 WARNING
Precaution for electrical shock
High voltage is generated around the drum unit inside the machine.
%
In order to reduce the risk of electric shock, do not touch any part in this unit when clearing paper
misfeeds.
7 CAUTION
Precaution for high temperature
The fusing unit inside the machine is extremely hot.
%
In order to reduce the risk of burns, do not touch any part in this unit when clearing paper misfeeds.
5.2.13
Clearing a paper misfeed in the ADU unit "12"
2
Note
For details of the locations of paper misfeeds, refer to "Paper misfeed indications" on page 5-7.
1
Open the right front door and the left front door.
2
Lower lever M4, and then pull out the ADU unit.
M4
bizhub 751/601 (Version 2)
5-23
Troubleshooting
5
3
Open cover M11.
M11
4
Turn dial M9, and then remove any paper.
M9
M9
5
Return cover M11 to its original position.
6
Return the ADU unit to its original position.
7
Return lever M4 to its original position, and then close the right front door and the left front door.
7 WARNING
Precaution for electrical shock
High voltage is generated around the drum unit inside the machine.
%
In order to reduce the risk of electric shock, do not touch any part in this unit when clearing paper
misfeeds.
7 CAUTION
Precaution for high temperature
The fusing unit inside the machine is extremely hot.
%
In order to reduce the risk of burns, do not touch any part in this unit when clearing paper misfeeds.
5-24
bizhub 751/601 (Version 2)
Troubleshooting
5.2.14
5
Clearing a paper misfeed in the ADU unit "13"
2
Note
For details of the locations of paper misfeeds, refer to "Paper misfeed indications" on page 5-7.
1
Open the right front door and the left front door.
2
Lower lever M4, and then pull out the ADU unit.
M4
3
Open cover M11.
M11
4
Remove any paper.
bizhub 751/601 (Version 2)
5-25
Troubleshooting
5
5
Return cover M11 to its original position.
6
Return the ADU unit to its original position.
7
Return lever M4 to its original position, and then close the right front door and the left front door.
7 WARNING
Precaution for electrical shock
High voltage is generated around the drum unit inside the machine.
%
In order to reduce the risk of electric shock, do not touch any part in this unit when clearing paper
misfeeds.
7 CAUTION
Precaution for high temperature
The fusing unit inside the machine is extremely hot.
%
In order to reduce the risk of burns, do not touch any part in this unit when clearing paper misfeeds.
5-26
bizhub 751/601 (Version 2)
Troubleshooting
5.2.15
5
Clearing a paper misfeed in the ADF "14"
2
Note
For details of the locations of paper misfeeds, refer to "Paper misfeed indications" on page 5-7.
1
Remove all original pages remaining in the paper tray.
2
Open the left-side cover, and then remove any original pages.
3
Open the paper feed unit, and then remove any original pages.
4
Close the paper feed unit and the left-side door.
bizhub 751/601 (Version 2)
5-27
Troubleshooting
5
5.2.16
5
Lift up the paper tray, and then remove any original pages.
6
Return the paper tray to its original position.
Clearing a paper misfeed in the ADF "15"
2
Note
For details of the locations of paper misfeeds, refer to "Paper misfeed indications" on page 5-7.
5-28
1
Remove all original pages remaining in the paper tray.
2
Lift open the ADF.
bizhub 751/601 (Version 2)
Troubleshooting
5.2.17
5
3
Open the document pad.
4
Open the original exit guides, and then remove any original
pages.
5
Close the document pad.
Clearing a paper misfeed in Finisher FS-524/FS-525 "16" "18"
This procedure describes the operations to be performed along the paper path where paper misfeeds may
occur.
Depending on the selected Finishing settings, the paper path changes, resulting in different locations in the
finisher where paper misfeeds may occur.
The method for clearing paper misfeeds in Finisher FS-524 is the same as that for FS-525. Here, the method
for FS-524 is described as an example.
1
Open the machine’s front door.
bizhub 751/601 (Version 2)
5-29
Troubleshooting
5
2
Lower guide lever FN2, and then remove any paper.
3
Return guide lever FN2 to its original position.
4
Lower guide lever FN4, and then remove any paper.
–
5
5-30
If the paper cannot be removed, turn misfeed-clearing dial
FN3 to feed out the paper.
Return guide lever FN4 to its original position.
bizhub 751/601 (Version 2)
Troubleshooting
6
5
Lower guide lever FN5, and then remove any paper.
–
If the paper cannot be removed, turn misfeed-clearing dial
FN3 to feed out the paper.
7
Return guide lever FN5 to its original position.
8
Grab handle FN7, and then pull out the stacker unit.
–
Slowly pull out the stacker unit as far as possible.
bizhub 751/601 (Version 2)
5-31
Troubleshooting
5
9
Remove any misfed paper from the stacker unit.
–
10
5-32
If the paper cannot be removed, turn misfeed-clearing dial
FN6 to feed out the paper.
Return the stacker unit to its original position.
bizhub 751/601 (Version 2)
Troubleshooting
5
–
11
When returning the stacker unit to its original position, do
not grab any part other than handle FN7, otherwise your
hand or fingers may be pinched.
Close the front door.
bizhub 751/601 (Version 2)
5-33
Troubleshooting
5
5.2.18
Clearing a paper misfeed in Finisher FS-610 "16" "18"
This procedure describes the operations to be performed along the paper path where paper misfeeds may
occur.
Depending on the selected Finishing settings, the paper path changes, resulting in different locations in the
finisher where paper misfeeds may occur.
5-34
1
Open the machine’s front door.
2
Lower guide lever FN2, and then remove any paper.
3
Return guide lever FN2 to its original position.
bizhub 751/601 (Version 2)
Troubleshooting
4
5
Lower guide lever FN4, and then remove any paper.
–
If the paper cannot be removed, turn misfeed-clearing dial
FN3 to feed out the paper.
5
Return guide lever FN4 to its original position.
6
Lower guide lever FN5, and then remove any paper.
–
7
If the paper cannot be removed, turn misfeed-clearing dial
FN3 to feed out the paper.
Return guide lever FN5 to its original position.
bizhub 751/601 (Version 2)
5-35
Troubleshooting
5
8
Grab handle FN6, and then pull out the stacker unit.
–
9
Lower guide lever FN9, and then remove any paper.
10
Open guide lever FN8, and then remove any paper.
–
5-36
Slowly pull out the stacker unit as far as possible.
If the paper cannot be removed, turn misfeed-clearing dial
FN7 to feed out the paper.
bizhub 751/601 (Version 2)
Troubleshooting
11
5
Lower guide lever FN10, and then remove any paper.
–
12
If the paper cannot be removed, turn misfeed-clearing dial
FN7 to feed out the paper.
Return the stacker unit to its original position.
bizhub 751/601 (Version 2)
5-37
Troubleshooting
5
–
13
5.2.19
5-38
When returning the stacker unit to its original position, do
not grab any part other than handle FN6, otherwise your
hand or fingers may be pinched.Return the stacker unit to
its original position.
Close the front door.
Clearing a paper misfeed in the Shift Tray "16"
1
Open the shift tray cover, and then slowly remove any misfed
paper.
2
Close the shift tray cover.
bizhub 751/601 (Version 2)
Troubleshooting
5.2.20
5
Clearing a paper misfeed in the Post Inserter "17"
!
Detail
For details on the positions of paper misfeeds, refer to "Paper misfeed indications" on page 5-7
5.2.21
1
Raise the upper unit release lever, and then slide the upper
unit to the left.
2
Slowly remove any misfed paper.
3
Return the upper unit to its original position.
Clearing a paper misfeed in the Z Folding Unit "20"
This procedure describes the operations to be performed along the paper path where paper misfeeds may
occur.
Depending on the selected Finishing settings, the paper path changes, resulting in different locations in the
Z folding unit where paper misfeeds may occur.
1
Open the machine’s front door.
bizhub 751/601 (Version 2)
5-39
Troubleshooting
5
2
Raise guide lever FN1, and then remove any paper.
FN1
3
Return guide lever FN1 to its original position.
4
Lower guide lever FN8 and guide lever FN2 of the finisher, and
then remove any paper.
FN8
FN2
5
Grab handle FN2, and then pull out the Z folding/transport
unit.
–
Slowly pull out the Z folding/transport unit as far as
possible.
FN2
6
Lower guide lever FN3, and then remove any paper.
FN3
5-40
bizhub 751/601 (Version 2)
Troubleshooting
5
If the paper cannot be removed, turn misfeed-clearing dial
FN4 to feed out the paper.
FN4
–
FN4
7
Lower guide lever FN6, and then remove any paper.
FN6
8
Raise guide lever FN7, and then remove any paper.
FN7
–
If the paper cannot be removed, turn misfeed-clearing dial
FN5 to feed out the paper.
FN
5
FN5
9
Return guide lever FN6 to its original position
bizhub 751/601 (Version 2)
5-41
Troubleshooting
5
10
Return the Z folding/transport unit to its original position.
–
When returning the Z folding/transport unit to its original
position, do not grab any part other than handle FN2,
otherwise your hand or fingers may be pinched.
FN2
11
5-42
Close the front door.
bizhub 751/601 (Version 2)
Troubleshooting
5.3
5
Simple troubleshooting
Main unit
Symptom
Possible cause
Remedy
The machine does not
start up when the main
power switch is turned on.
Is no power supplied from the electrical outlet?
Correctly insert the power supply
plug into the electrical outlet.
Has the [Power] (auxiliary power)
key been turned on?
Turn on the [Power] (auxiliary power) key.
Copying does not start.
Is the right front door of the machine open?
Securely close the upper right-side
door of the machine.
Is there no paper that matches the
original?
Load paper of the appropriate size
into the paper tray.
Is the copy density set too light?
Touch [Dark] in the Density screen
to copy at the desired copy density. (See p. 3-61.)
Is the paper damp?
Replace the paper with new paper.
(See p. 2-50, p. 2-51 and p. 2-55.)
Is the copy density set too dark?
Touch [Light] in the Density screen
to copy at the desired copy density. (See p. 3-63.)
Was the original not pressed close
enough against the original glass?
Position the original so that it is
pressed closely against the original
glass. (See p. 3-10.)
Is the paper damp?
Replace the paper with new paper.
(See p. 2-50, p. 2-51 and p. 2-55.)
Was the original not pressed close
enough against the original glass?
Position the original so that it is
pressed closely against the original
glass. (See p. 3-10.)
Is the original glass dirty?
Wipe the glass with a soft, dry
cloth. (See p. 10-3.)
Is the left partition glass dirty?
Clean the left partition glass with a
soft, dry cloth. (See p. 10-3.)
Is the document pad dirty?
Clean the document pad with a
soft cloth dampened with a mild
detergent. (See p. 10-4.)
Was the original printed on highly
translucent material, such as diazo
photosensitive paper or OHP
transparencies?
Place a blank sheet of paper on top
of the original. (See p. 3-10.)
Is a double-sided original being
copied?
If a thin double-sided original is being copied, the print on the back
side may be reproduced in the
copy. Touch [Light] on the Background Removal screen to select a
lighter background density. (See
p. 3-52.)
The printed output is too
light.
The printed output is too
dark.
The printed output is blurry.
There are dark specks or
spots throughout the printed output.
There are streaks in the
printed output.
bizhub 751/601 (Version 2)
5-43
Troubleshooting
5
Symptom
Possible cause
Remedy
The image is not aligned
properly on the paper.
Is the original incorrectly positioned?
Correctly position the original
against the original scales. (See
p. 3-10.)
Load the original into the ADF, and
slide the adjustable paper guides
to fit the size of the original. (See
p. 3-9.)
Is the original incorrectly positioned in the ADF?
If the original cannot be fed correctly through the ADF, make copies by positioning the original on
the original glass. (See p. 3-10.)
Is the left partition glass dirty (while
using the ADF)?
Clean the left partition glass with a
soft, dry cloth. (See p. 10-3.)
Are the adjustable lateral guides incorrectly positioned against the
edges of the original?
Slide the adjustable lateral guides
against the edges of the original.
Was curled paper loaded into the
paper tray?
Flatten the paper before loading it.
Was paper that curls easily (as with
recycled paper) used?
Remove the paper from the paper
tray, turn it over, and then load it
again.
The printed page is curled.
Replace the paper with paper that
is not damp. (See p. 2-50, p. 2-51
and p. 2-55.)
The edge of the printed
output is dirty.
ADF
5-44
Is the document pad dirty?
Clean the document pad with a
soft cloth dampened with a mild
detergent. (See p. 10-4.)
Was the selected paper size larger
than the original (with a Zoom setting of "Full Size" (100.0%)?
Select a paper size that is the same
size as the original.
Otherwise, select the "Auto" Zoom
setting to enlarge the copy to the
selected paper size. (See p. 3-36.)
Is the orientation of the original different from the orientation of the
paper (with a Zoom setting of "Full
Size" (100.0%)?
Select a paper size that is the same
size as the original. Otherwise, select a paper orientation that is the
same as that of the original.
Was the copy reduced to a size
smaller than the paper (with a reduced zoom ratio specified)?
Select a zoom ratio that adjusts the
original size to the selected paper
size. (See p. 3-36.)
Otherwise, select the "Auto" Zoom
setting to reduce the copy to the
selected paper size. (See p. 3-39.)
Even though the paper
misfeed was cleared, copies cannot be produced.
Are there paper misfeeds at other
locations?
Check the touch panel for other
paper misfeed indications, and
then remove any misfed paper at
all other locations. (See p. 5-7.)
Printing with the "2-Sided
> 1-Sided" or "2-Sided >
2-Sided" settings are not
possible.
Have settings been selected that
cannot be combined?
Check the combinations of the selected settings.
Copying is not possible
even though the password
is entered on a machine
with user authentication/account track settings
specified.
Did the message "Your account
has reached its maximum allowance." appear?
Contact your administrator.
The original is not fed.
Is the ADF slightly open?
Securely close the ADF.
Is the original one that does not
meet the specifications?
Check that the original is one that
can be loaded into the ADF. (See
p. 7-31 and p. 7-32.)
Is the original correctly loaded?
Position the original correctly. (See
p. 3-9.)
bizhub 751/601 (Version 2)
Troubleshooting
Finisher
Authentication
Unit (Biometric
Type)
5
Symptom
Possible cause
Remedy
The finisher cannot be
used.
Is no power supplied to the connector?
Check that the cord is correctly inserted into the connector.
The pages cannot be stapled.
Have the staples run out?
Replace the staple cartridge. (See
p. 9-7.)
The staple is incorrectly
positioned by 90 degrees.
Is the staple position correctly
specified?
Specify the desired position for
stapling. (See p. 3-71.)
The pages that were fed
out were not uniformly
loaded and the punched
holes or staples are incorrectly positioned.
Is the paper curled?
Remove the paper from the paper
tray, turn it over, and then load it
again.
Is there a gap between the lateral
guides in the paper tray and the
sides of the paper?
Slide the lateral guides in the paper
tray against the sides of the paper
so that there is no gap.
Even though a Punch setting was selected, holes
are not punched. (when
the punch unit is installed
on the finisher)
Did the message "Empty the holepunch scrap box." appear?
Empty the hole-punch scrap box.
(See p. 9-18)
Trouble
Possible cause
Remedy
The USB cable is connected between the authentication unit and the
machine, but the status indicator is not lit in green.
The USB port of the machine may
be malfunctioning.
Turn the machine off with the main
power switch and temporarily disconnect the USB cable from the
authentication unit or the machine
before connecting it again and
waiting 10 seconds before turning
on the machine with the main power switch.
The USB cable is connected between the authentication unit and the
computer, but the status
indicator is not lit in green.
The USB port of the computer may
be malfunctioning.
Restart the computer.
Is the authentication unit correctly
installed?
Refer to "Registering from Data
Administrator", and check if the
driver is correctly installed on the
computer. (p. 13-9)
A tone does not sound
from the machine when
scanning begins and when
authentication is completed.
Has the tone setting on the machine been set to "OFF"?
Refer to "Registering users", and
set the tone setting to "ON".
(p. 13-15)
The message "Failed to
register". appears on a
machine where registration failed.
With the authentication unit, the
scanning time is limited for each
scan. This message appears if
scanning is not possible within the
limited period of time.
For details on the scanning time,
consult with the technical representative.
Refer to the Quick Guide Authentication Unit (Biometric Type AU101) and check how to position the
finger for authentication and scanning in order to complete scanning
within the limited period of time.
Correctly position the finger to be
scanned on the scanner, and do
not move the finger until the scanning results are received. If the
area of the finger to be scanned is
dirty or chapped, a correct image
cannot be created and scanning
may not be completed. Wash your
hands and try scanning again, or
try to correct chapped fingers. If
the area of the finger to be scanned
is too wide or too thin (outside of
the finger width range of 10 mm to
25 mm), a correct image cannot be
created and scanning may not be
completed. Try widening your finger or inserting it deeper or less
deep into the scanner.
Logon failed. The message
"Failed to Authenticate."
appears on the machine.
The message "Failed to
read data. Place your finger once again and click
the [Start reading] button."
appears on a computer
where registration failed.
bizhub 751/601 (Version 2)
With the authentication unit, the
scanning time is limited to five seconds for each scan. This message
appears if scanning is not possible
within the five-second time period.
5-45
Troubleshooting
5
Authentication
Unit (IC
Card
Type)
Trouble
Possible cause
Remedy
Scanning does not begin.
Is the finger correctly positioned?
Refer to the Quick Guide Authentication Unit (Biometric Type AU101) and check how to position the
finger for authentication and scanning. Correctly position the finger
to be scanned on the scanner, and
do not move the finger until the
scanning results are received. If
the area of the finger to be scanned
is dirty or chapped, a correct image cannot be created and scanning may not be completed. Wash
your hands and try scanning again,
or try to correct chapped fingers. If
the area of the finger to be scanned
is too wide or too thin (outside of
the finger width range of 10 mm to
25 mm), a correct image cannot be
created and scanning may not be
completed. Try widening your finger or inserting it deeper or less
deep into the scanner.
Was the machine restarted after
the authentication unit was connected to it?
Turn the machine off with the main
power switch and temporarily disconnect the USB cable from the
authentication unit or the machine
before connecting it again and
waiting 10 seconds before turning
on the machine with the main power switch.
The Add New Hardware
Wizard starts when the authentication unit is connected to the computer.
Is the authentication unit connected to the same USB port used
when the driver was installed?
If the authentication unit is connected to a USB port different from
the one used when the driver was
installed, the Add New Hardware
Wizard may start. Use the same
USB port used when the driver was
installed.
The USB cable is connected between the authentication unit and the
machine, but the status indicator is not lit in green.
With the authentication unit, the
scanning time is limited to 10 seconds. This message appears if
scanning was not possible within
the limited period of time.
Refer to the Quick Guide Authentication Unit (IC Card Type AU-201)
and check how to position the IC
card in order to complete scanning
within the limited period of time.
Logon failed.
The message "Failed to
Authenticate." appears on
the machine.
If "Card Authentication + Password" was selected:
Is the password typed in correctly?
Check the password, and type it in
correctly.
Scanning does not begin.
Was the machine restarted after
the authentication unit was connected to it?
Turn the machine off with the main
power switch and temporarily disconnect the USB cable from the
authentication unit or the machine
before connecting it again and
waiting 10 seconds before turning
on the machine with the main power switch.
The Add New Hardware
Wizard starts when the authentication unit is connected to the computer.
Is the authentication unit connected to the same USB port used
when the driver was installed?
If the authentication unit is connected to a USB port different from
the one used when the driver was
installed, the Add New Hardware
Wizard may start. Use the same
USB port used when the driver was
installed.
The message appears on a
computer where registration failed
If any message other than those listed above appears, perform the operation described in the message. If
the problem is not corrected after the described operation is performed, contact your service representative.
5-46
bizhub 751/601 (Version 2)
Troubleshooting
5.4
5
Main messages and their remedies
Message
Cause
Remedy
Originals left on original glass.
The original was left on the original
glass.
Remove the original from the original
glass.
Paper of matching size is not available.
Select the paper size.
Paper of a suitable size is not loaded
in a paper tray.
Either select paper of a different size
or load paper of a suitable size.
Load paper into the bypass tray.
Paper of a suitable size is not loaded
in the bypass tray.
Load paper of the appropriate size
into the bypass tray.
The original size cannot be detected.
Select the paper size.
1: The original is not positioned correctly.
2: An original with a non-standard
size or with a size too small to be detected is loaded.
1: Position the original correctly.
2: Select the correct paper size.
The image will not fit on selected paper.
Change the direction of the original.
The image does not fit in the paper.
Load the original turned 90 degrees.
Cannot be set with XXX.
Functions that cannot be used together are selected.
Make copies using only one of the
functions.
The output tray has reached its capacity.
Remove all paper from the tray indicated by %.
Since the maximum amount of copies for the indicated finisher output
tray has been exceeded, the machine
is unable to make copies.
Remove all paper from the indicated
tray.
Enter User Name and password,
and then touch [Login] or press the
[Access] key.
User authentication settings have
been specified. Copies cannot be
made unless a user name and its correct password are entered.
Type in your user name and password. (See p. 2-38.)
Enter Account Name and password,
and then touch [Login] or press the
[Access] key.
Account track settings have been
specified. Copies cannot be made
unless an account name and its correct password are entered.
Type in your user name and password. (See p. 2-42.)
Your account has reached its maximum allowance.
The limit on the number of pages that
can be printed has been reached.
Contact the administrator of the machine.
The part indicated by % is open.
Ensure that it is properly closed.
Since a machine door or cover is
open or an option is not installed correctly, the machine is unable to make
copies.
Make sure that all doors and covers
are closed and that all options are installed correctly.
Install toner cartridge, and close all
doors.
The toner cartridge is not installed
correctly.
Reinstall the supplies or parts, or
contact your service representative.
Replenish paper.
The indicated tray has run out of paper.
Load paper into the indicated tray.
(See p. 2-50, p. 2-51, and p. 2-55.)
No more staples.
Replace the staple cartridge, or cancel stapling.
The staples have run out.
Replace the staple cartridge.
(See p. 9-7.)
Misfeed detected.
Since a paper misfeed occurred, the
machine is unable to make copies.
Clear the paper misfeed. (See p. 5-5.)
Reinsert the following # of originals.
After clearing a paper misfeed, it is
necessary to reload certain pages of
the original that have already been
fed through the ADF.
Load the indicated original pages into
the ADF.
An internal error occurred. Open
and then close the front door. If the
trouble code appears again contact
your Service Rep.
The machine malfunctioned and is
unable to make copies.
Clear the error by following the onscreen instructions. If the error cannot be cleared or released, contact
your service representative with the
error code displayed on the screen.
Malfunction detected.
Please call your Service Rep.
The machine malfunctioned and is
unable to make copies.
Inform your service representative of
the code displayed on the touch panel.
Now Downloading Program Data
from Firmware server.
1: CS Remote Care was activated by
the service representative.
2: Internet ISW is being downloaded.
Do not turn off the machine with the
[Power] (auxiliary power) key while
this message is displayed.
After turning off the machine with the
[Power] (auxiliary power) key, turn off
the main power switch, and then contact the service representative.
bizhub 751/601 (Version 2)
5-47
Troubleshooting
5
Message
Cause
Remedy
Cannot be accessed due to unauthorized access.
Please contact your administrator.
The authentication information has
become invalid since the authentication attempts have failed the specified number of times.
Contact the administrator of the machine.
The Administrator Password is not
valid due to unauthorized access.
The administrator password has become invalid since the authentication
attempts have failed the specified
number of times.
Turn the machine off, then on again.
Turn off the main power switch, and
then wait about 10 seconds before
turning it on again.
If any message other than those listed above appears, perform the operation described in the message.
5-48
bizhub 751/601 (Version 2)
6
Specifications
Specifications
6
6
Specifications
6.1
Specifications
6.1.1
Main unit
Item
Description
Name
bizhub 751/601
Type
Console
Document holder
Stationary (mirror scanning)
Photoconductor
OPC
Luminous source
White inert gas fluorescent lamp
Copying system
Laser electrostatic copy method
Developing system
Dry-type dual-component reverse magnetic brush developing
Fusing system
Heat roller fixing
Resolution
Scanning: 600 dpi e 600 dpi, Printing: 2400 dpi e 600 dpi
Document
Types: sheets, books (spread), three-dimensional objects
Size: Max. A3, 11 e 17
Thickness: Max. 30 mm, Weight: 6.8 kg
Detectable sizes for original glass:
A3 w to A5 w/v, B6 w, A6 w, 11 e 17 w to 5-1/2 e 8-1/2 w/v, Foolscap*2, 8K w,
16K w/v
Detectable sizes for ADF:
A3 w to A5 w/v, 11 e 17 w, 8-1/2 e 11 v, Foolscap*2
Paper types
Normal paper: 60 g/m2 to 90 g/m2, thin paper*1: 50 g/m2 to 59 g/m2, thick paper:
91 g/m2 to 200 g/m2, overhead projector transparencies*1, labels*1, tab paper*1, trace
paper*1, special paper*1, high-quality paper, user paper, recycled paper,
colored paper, letterhead
Paper sizes
Tray 1 and tray 2:
A4 v, B5 v, A5 v, 8-1/2 e 11 v, 5-1/2 e 8-1/2 v, 16K v
Tray 3 and tray 4:
Standard sizes: A3 w, B4 w, A4 w/v, B5 w/v, A5 v, 11 e 17 w, 8-1/2 e 14 w,
8-1/2 e 11 w/v, 5-1/2 e 8-1/2 v, Foolscap*2, wide paper (A3W w, B4W w, A4W w/v,
B5W w/v, A5W v, 11 e 17W w, 8-1/2 e 11W w/v, 5-1/2 e 8-1/2W v)
Custom sizes: 182 mm e 140 mm to 314 mm e 458 mm
Bypass tray:
Standard sizes: A3 w to A5 w/v, B6 w, 11 e 17 w, 8/1/2 e 11 v, Foolscap*2, wide
paper (A3W w, B4W w, A4W w/v, B5W w/v, A5W w/v,11 e 17W w,
8-1/2 e 11W w/v, 5-1/2 e 8-1/2W w/v)
Custom sizes: 100 mm e 140 mm to 314 mm e 458 mm
Image blank
Single-sided copying:
Leading edge and trailing edge: less than 3 mm, front and rear: less than 2 mm
Double-sided copying:
Front side:
Leading edge and trailing edge: less than 4 mm, front and rear: less than 2 mm
Back side:
Leading edge and trailing edge: less than 3 mm, front and rear: less than 2 mm
Paper tray capacity
Tray 1: 1650 sheets (64 g/m2 plain paper)
Tray 2: 1100 sheets (64 g/m2 plain paper)
Tray 3 and tray 4: 550 sheets (64 g/m2 plain paper)
Bypass tray: 100 sheets (64 g/m2 plain paper)
Warm-up time
bizhub 751: within 300 seconds, bizhub 601: within 270 seconds
First copy
bizhub 751: within 2.9 seconds, bizhub 601: within 3.3 seconds
Copy speed
bizhub 751: 75 sheets/min. (A4 v), 35 sheets/min. (A3 w)
bizhub 601: 60 sheets/min. (A4 v), 30 sheets/min. (A3 w)
bizhub 751/601 (Version 2)
6-3
Specifications
6
Item
Description
Magnification ratios
Full size: e 1.000 ± 1.0% or less
Enlargement (Fixed Zoom): e 1.154, e 1.224, e 1.414, e 2.000
Reduction (Fixed Zoom): e 0.500, e 0.707, e 0.816, e 0.866
Minimal Copy: 0.930
Zoom with Constant × and Y Ratio: e 0.250 to 4.000 (in 0.001 increments)
Independent Zoom: vertical e 0.250 to 4.000 (in 0.001 increments), horizontal e 0.250
to 4.000 (in 0.001 increments)
User-set zoom ratio: 3
Multiple copies/sets
1 to 9999 copies/1 to 9999 sets
Density adjustment
Copy Density: Automatic and manual (9 levels)
Background adjustment: Manual (9 levels)
Power requirements
AC 220 - 240 V, 10 A, 50 - 60Hz
Noise
75 dB or less (bizhub 751/601)
Power consumption
Max. 2,000 W (including options)
Dimensions
886 (W) e 859 (D) e 1140 (H) mm (main unit, ADF and control panel)
Space requirements *3
1275 (W) e 791 (D) mm (main unit and ADF)
Memory
1 GB
Weight
Approx. 224 kg (Main unit and ADF)
*1
Can only be fed through the bypass tray.
*2
Foolscap includes the following 4 types: 8-1/8 e 13-1/4 w, 8-1/4 e 13 w, 8-1/2 e 13 w, and 8 e 13 w, one
of which can be selected. For details, contact the service representative.
*3
The indicated spaced requirements represent the space required to fully extend the bypass tray.
In order to incorporate improvements, these product specifications are subject to change without notice.
6.1.2
Automatic Document Feeder DF-614
*
6-4
Item
Description
Name
DF-614
Document feed methods
Standard original: Single-sided, double-sided
Mixed original: Single-sided, double-sided
Original paper types
50 g/m2 to 200 g/m2
Original sizes
100 mm e 139.7 mm to 297 mm e 431.8 mm
Detectable sizes:
A3 w to A5 w/v, 11 e 17 w, 8-1/2 e 11 v, Foolscap*
Capacity of document feeder
Max. 100 sheets (80 g/m2)
Power requirements
Supplied from main unit
Maximum power consumption
53 W or less
Dimensions
625 (W) e 576 (D) e 154 (H) mm
Weight
Approx. 12.9 kg
Foolscap includes the following 4 types: 8-1/8 e 13-1/4 w, 8-1/4 e 13 w, 8-1/2 e 13 w, and 8 e 13 w, one of which
can be selected. For details, contact the service representative.
bizhub 751/601 (Version 2)
Specifications
6
6.2
Option specifications
6.2.1
Large Capacity Unit LU-405
6.2.2
Item
Description
Name
LU-405
Paper types
Normal paper (60 g/m2 to 90 g/m2), thick paper (91 g/m2 to 200 g/m2)
Paper sizes
Standard sizes:
A4 v, B5 v, 8-1/2 e11 v, 16K v, wide paper (A4W v, B5W v, 8-1/2 e 11W v)
Custom sizes:
182 mm e 257 mm to 223 mm e 314 mm
Paper tray capacity
4,000 sheets (80 g/m2)
Power requirements
Supplied from main unit
Maximum power consumption
82 W or less
Dimensions
430 (W) e 639 (D) e 690 (H) mm
Weight
Approx. 30 kg
Configuration
1 paper tray
Large Capacity Unit LU-406
*
Item
Description
Name
LU-406
Paper types
Normal paper (60 g/m2 to 90 g/m2), thick paper (91 g/m2 to 200 g/m2)
Paper sizes
Standard sizes:
A3 w, B4 w, A4 w/v, 11 e 17 w, 8-1/2 e 14 w, 8-1/2 e 11 w/v, Foolscap*, 8K w,
16K v, wide paper (A3W w, B4W w, A4W w/v, 11 e 17W w, 8-1/2 e 11W w/v)
Custom sizes:
195 mm e 210 mm to 314 mm e 458 mm
Paper tray capacity
4,000 sheets (80 g/m2)
Power requirements
Supplied from main unit
Maximum power consumption
100 W or less
Dimensions
670 (W) e 639 (D) e 695 (H) mm
Weight
Approx. 42 kg
Configuration
1 paper tray
Foolscap includes the following 4 types: 8-1/8 e 13-1/4 w, 8-1/4 e 13 w, 8-1/2 e 13 w, 8 e 13 w, one of which can
be selected. For details, contact the service representative.
bizhub 751/601 (Version 2)
6-5
Specifications
6
6.2.3
Finisher FS-524
Item
Description
Name
FS-524
Function
Straight delivery (sorted, grouped)
Offset delivery (sort and offset, group and offset)
Staple delivery
Output trays
Main finishing tray (Tray 1), sub finishing tray (Tray 2)
Offset width
30 mm
Paper types
Main finishing tray (Tray 2):
Sort, group, sort and offset, group and offset:
Plain paper (60 g/m2 to 90 g/m2), thick paper (91 g/m2 to 200 g/m2), thin paper
(50 g/m2 to 59 g/m2), label sheets, OHP transparencies, trace paper, tab paper,
special paper, high-quality paper, user paper, recycled paper, colored paper,
letterhead
Staple:
Plain paper (60 g/m2 to 90 g/m2), recycled paper, high-quality paper, user paper,
letterhead, special paper, thin paper, thick paper, colored paper
Sub finishing tray (Tray 1):
Sort, group:
Plain paper (60 g/m2 to 90 g/m2), thick paper (91 g/m2 to 200 g/m2), thin paper
(50 g/m2 to 59 g/m2), label sheets, OHP transparencies, trace paper, tab paper
Paper sizes
Main finishing tray (Tray 2):
Standard sizes:
A3 w to A5 w*1/v, 11 e 17 w to 5-1/2 e 8-1/2 w*1/v, Foolscap*2, 8K w, 16K w/v,
wide paper (A3W w to A5W v, 11 e 17W w to 5-1/2 e 8-1/2W v)
Custom sizes:
182 mm e 148 mm to 314 mm e 458 mm, 128 mm e 139 mm*1
Sub finishing tray (Tray 1):
Standard sizes:
A3 w to A5 w/v, B6 w, A6 w, 11 e 17 w to 5-1/2 e 8-1/2 w/v,13 e 19 w,
Foolscap*2, 8K w, 16K w/v, wide paper (A3W w to A5W w/v, 11 e 17W w to
5-1/2 e 8-1/2W w/v)
Custom sizes:
100 mm e 139 mm to 331 mm e 488 mm
Staple:
Standard sizes:
A3 w to A5 v, 11 e 17 w to 5-1/2 e 8-1/2 v, Foolscap*2, 8K w, 16K w/v, wide paper
(A3W w to A5W v, 11 e 17W w to 5-1/2 e 8-1/2W v)
Custom sizes:
182 mm e 139 mm to 314 mm e 458 mm
Output tray capacity
Main finishing tray (Tray 2):
B4 or larger: 1500 sheets
A4 to B5: 3000 sheets
A5 or smaller: 500 sheets
Sub finishing tray (Tray 1):
200 sheets
Staple settings
Maximum number of bound sheets: 50 sheets (60 g/m2 to 90 g/m2)
Punch settings
Uses the optional punch settings.
Power requirements
Supplied from main unit
Maximum power consumption
80 W or less
Dimensions
680 (800 when trays are pulled out) (W) e 656 (D) e 990 (H) mm
Weight
60 kg
Consumables
Staple cartridge
*1
Cannot be used with Finishing settings.
*2
Foolscap includes the following 4 types: 8-1/8 e 13-1/4 w, 8-1/4 e 13 w, 8-1/2 e 13 w, 8 e 13 w, one of
which can be selected. For details, contact the service representative.
6-6
bizhub 751/601 (Version 2)
Specifications
6.2.4
6
Finisher FS-525
Item
Description
Name
FS-525
Function
Straight delivery (sorted, grouped)
Offset delivery (sort and offset, group and offset)
Staple delivery
Output trays
Main finishing tray (Tray 2), sub finishing tray (Tray 1)
Offset width
30 mm
Paper types
Main finishing tray (Tray 2):
Sort, group, sort and offset, group and offset:
Plain paper (60 g/m2 to 90 g/m2), thick paper (91 g/m2 to 200 g/m2), thin paper
(50 g/m2 to 59 g/m2), label sheets, OHP transparencies, trace paper, tab paper, special paper, high-quality paper, user paper, recycled paper, colored paper, letterhead
Staple:
Plain paper (60 g/m2 to 90 g/m2), recycled paper, high-quality paper, user paper,
letterhead, special paper, thin paper, thick paper, colored paper
Sub finishing tray (Tray 1):
Sort, group:
Plain paper (60 g/m2 to 90 g/m2), thick paper (91 g/m2 to 200 g/m2), thin paper
(50 g/m2 to 59 g/m2), label sheets, OHP transparencies, trace paper, tab paper
Paper sizes
Main finishing tray (Tray 2):
Standard sizes:
A3 w to A5 w*1/v, 11 e 17 w to 5-1/2 e 8-1/2 w*1/v, Foolscap*2, 8K w, 16K w/v, wide
paper (A3W w to A5W v, 11 e 17W w to 5-1/2 e 8-1/2W v)
Custom sizes:
182 mm e 148 mm to 314 mm e 458 mm, 128 mm e 139 mm*1
Sub finishing tray (Tray 1):
Standard sizes:
A3 w to A5 w/ v, B6 w, A6 w, 11 e 17 w to 5-1/2 e 8-1/2 w/ v, 13 × 19 w, Foolscap*2,
8K w, 16K w/ v, wide paper (A3W w to A5W w/v, 11 e 17W w to
5-1/2 e 8-1/2W w/v)
Custom sizes:
100 mm e 139 mm to 331 mm e 488 mm
Staple:
Standard sizes:
A3 w to A5 v, 11 e 17 w to 5-1/2 e 8-1/2 v, Foolscap*2, 8K w, 16K w/v, wide paper
(A3W w to A5W v, 11 e 17W w to 5-1/2 e 8-1/2W v)
Custom sizes:
182 mm e 139 mm to 314 mm e 458 mm
Output tray capacity
Main finishing tray (Tray 2):
B4 or larger: 1500 sheets
A4 to B5: 3000 sheets
A5 or smaller: 500 sheets
Sub finishing tray (Tray 1):
200 sheets
Staple settings
Maximum number of bound sheets: 100 sheets (60 g/m2 to 80 g/m2)
Punch settings
Uses the optional punch settings.
Power requirements
Supplied from main unit
Maximum power consumption
80 W or less
Dimensions
680 (800) (W) e 656 (D) e 990 (H) mm
The value in parentheses is the dimension when the tray is pulled out.
Weight
60 kg
Consumables
Staple cartridge
*1
Cannot be used with Finishing settings.
*2
Foolscap includes the following 4 types: 8-1/8 e 13-1/4 w, 8-1/4 e 13 w, 8-1/2 e 13 w, 8 e 13 w, one of
which can be selected. For details, contact the service representative.
bizhub 751/601 (Version 2)
6-7
Specifications
6
6.2.5
6-8
Finisher FS-610
Item
Description
Name
FS-610
Function
Straight delivery (sorted, grouped)
Offset delivery (sort and offset, group and offset)
Staple, half-fold, center staple & fold, tri-fold
Output trays
Main finishing tray (Tray 2), sub finishing tray (Tray 1), Booklet tray
Offset width
30 mm
Paper types
Main finishing tray (Tray 2):
Sort, group, sort and offset, group and offset:
Plain paper (60 g/m2 to 90 g/m2), thick paper (91 g/m2 to 200 g/m2), thin paper
(50 g/m2 to 59 g/m2), label sheets, OHP transparencies, trace paper, tab paper, special paper, high-quality paper, user paper, recycled paper, colored paper, letterhead
Staple:
Plain paper (60 g/m2 to 80 g/m2), recycled paper, high-quality paper, user paper,
letterhead, special paper, thin paper, thick paper, colored paper
Sub finishing tray (Tray 1):
Sort, group:
Plain paper (60 g/m2 to 90 g/m2), thick paper (91 g/m2 to 200 g/m2), thin paper
(50 g/m2 to 59 g/m2), tab paper
Booklet tray:
Half-fold, tri-fold:
Plain paper (60 g/m2 to 90 g/m2)
Center staple & fold:
Plain paper (60 g/m2 to 80 g/m2)
Paper sizes
Main finishing tray (Tray 2):
Standard sizes:
A3 w to A5 w*1/v, 11 e 17 w to 5-1/2 e 8-1/2 w*1/v, Foolscap*2, 8K w, 16K w/v,
wide paper (A3W w to A5W v, 11 e 17W w to 5-1/2 e 8-1/2W v)
Custom sizes:
182 mm e 148 mm to 314 mm e 458 mm, 128 mm e 139 mm*1
Sub finishing tray (Tray 1):
Standard sizes:
A3w to A5 w/v, B6 w, A6 w, 13 e 19 w, 12 e 18 w to 5-1/2 e 8-1/2 w/v, Foolscap*2,
8K w, 16K w/v, wide paper (A3W w to A5W w/v, 11 e 17W w to 5-1/2 e 8-1/2W w/v)
Custom sizes:
100 mm e 139 mm to 331 mm e 488 mm
Staple:
Standard sizes:
A3 w to A5 v, 11 e 17 w to 5-1/2 e 8-1/2 v, Foolscap*2, 8K w, 16K w/v, wide paper
(A3W w to A5W v, 11 e 17W w to 5-1/2 e 8-1/2W v)
Custom sizes:
182 mm e 139 mm to 314 mm e 458 mm
Booklet tray:
Standard sizes (Half-fold, center staple & fold):
A3 w, B4 w, A4 w, 11 e 17 w, 8-1/2 e 14 w, 8-1/2 e 11 w, 8K w, wide paper
(A3W w, B4W w, A4W w, 11 e 17W w, 8-1/2 e 11W w)
Standard sizes (Tri-fold):
A4 w, 8-1/2 e 11 w, 16K w
Custom sizes (Half-fold, center staple & fold):
210 mm e 279 mm to 314 mm e 458 mm
Output tray capacity
Main output tray (Tray 2):
B4 or larger: 1500 sheets
A4 to B5: 2500 sheets
A5 or smaller: 500 sheets
Sub output tray (Tray 1):
200 sheets
Booklet tray:
Half-fold (3 sheets): 25 to 33 sets
Center staple & fold (5 sheets): 15 to 20 sets
Tri-fold (1 sheet): 50 sets
Staple settings
Maximum number of bound sheets: 50 sheets (60 g/m2 to 80 g/m2)
Maximum number of sheets bound with center staple & fold: 20 sheets
(60 g/m2 to 80 g/m2)
Punch settings
Uses the optional punch settings.
Power requirements
Supplied from main unit
Maximum power consumption
80 W or less
Dimensions
680 (800) (W) e 656 (D) e 990 (H) mm
The value in parentheses is the dimension when the tray is pulled out.
bizhub 751/601 (Version 2)
Specifications
6
Item
Description
Weight
Approx. 65 kg
Consumables
Staple cartridge
*1
Cannot be used with Finishing settings.
*2
Foolscap includes the following 4 types: 8-1/8 e 13-1/4 w, 8-1/4 e 13 w, 8-1/2 e 13 w, 8 e 13 w, one of
which can be selected. For details, contact the service representative.
6.2.6
Punch Kit PK-504/PK-505
Item
Description
Name
PK-505/PK-504
Function
Hole-punches for filing.
Number of holes
2 holes or 4 holes
Hole diameter
6.5 +/- 0.5 mm
Hole pitch
2-Hole/4-Hole: 80.0 +/- 0.5 mm
4-Hole Swedish punch: 21 mm +/- 1 mm / 70 mm +/- 1 mm / 21 mm +/- 1 mm
Paper types
Plain paper (60 g/m2 to 90 g/m2), thick paper (91 g/m2 to 128 g/m2)
Paper sizes
2 holes: A3 w to A5 w/v, 11 e 17 w to 5-1/2 e 8-1/2 w/v, Foolscap*, 8K w, 16K w/v
4 holes: A3 w, B4 w, A4 v, B5 v, 11 e 17 w, 8-1/2 e 11 w, 8K w, 16K v
Power requirements
Supplied from finisher
Dimensions
148 (W) e 509 (D) e 122 (H) mm
Weight
Approx. 3 kg
*
6.2.7
Foolscap includes the following 4 types: 8-1/8 e 13-1/4 w, 8-1/4 e 13 w, 8-1/2 e 13 w, 8 e 13 w, one of which can
be selected. For details, contact the service representative.
Z Folding Unit ZU-604/ZU-605
*
Item
Description
Name
ZU-604/ZU-605
Function
Hole-punches for filing.
Z-fold
Number of holes
2 holes or 4 holes
Hole diameter
6.5 +/- 0.5 mm
Hole pitch
2-Hole/4-Hole: 80.0 +/- 0.5 mm
4-Hole Swedish punch: 21 mm +/- 1 mm / 70 mm +/- 1 mm / 21 mm +/- 1 mm
Paper type for outputting
hole-punched paper
Plain paper (60 g/m2 to 90 g/m2), thin paper (50 g/m2 to 59 g/m2)
Paper size for outputting
hole-punched paper
2 holes: A3 w to A5 w/v, 11 e 17 w, 8-1/2 e 14 w to 5-1/2 e 8-1/2 w/v, Foolscap*,
8K w, 16K w/v
4 holes: A3 w to A4 w, B5 v, 11 e 17 w, 8-1/2 e 11 w, 8K w, 16K v
Fold type
Z-fold
Paper type for outputting zfolded paper
Plain paper (60 g/m2 to 90 g/m2), thin paper (50 g/m2 to 59 g/m2)
Paper size for outputting zfolded paper
A3 w, B4 w
Power requirements
Supplied from main unit
Dimensions
169 (W) e 660 (D) e 930 (H) mm
Weight
Approx. 38 kg
Foolscap includes the following 4 types: 8-1/8 e 13-1/4 w, 8-1/4 e 13 w, 8-1/2 e 13 w, 8 e 13 w, one of which can
be selected. For details, contact the service representative.
bizhub 751/601 (Version 2)
6-9
Specifications
6
6.2.8
Post Inserter PI-504
Item
Description
Name
PI-504
Configuration
2 (upper and lower) paper trays
Cover sheet type
Plain paper (60 g/m2 to 90 g/m2), thick paper (91 g/m2 to 200 g/m2), thin paper (50
g/m2 to 59 g/m2)
Cover sheet size
Upper tray:
Standard sizes:
A4 w/v to A5 v, 8-1/2 e 11w/v to 5-1/2 e 8-1/2v, 16Kw/v, wide paper (A4W w/v to
A5W v, 8-1/2 e 11W w/v to 5-1/2 e 8-1/2W v)
Lower tray:
Standard sizes:
A3 w to A5 v, 11 e 17 w to 5-1/2 e 8-1/2 v, Foolscap*, 8K w, 16K w/v, wide paper
(11 e 17W w to 5-1/2 e 8-1/2W v, A3W w to A5W v)
Custom sizes:
182 mm e 139 mm to 314 mm e 458 mm
Paper capacity
200 sheets for each of the upper and lower trays
Power requirements
Supplied from finisher
Maximum power consumption
30 W or less
Dimensions
511 (W) e 620 (D) e 220 (H) mm
Weight
Approx. 10.5 kg
*
6.2.9
Foolscap includes the following 4 types: 8-1/8 e 13-1/4 w, 8-1/4 e 13 w, 8-1/2 e 13 w, 8 e 13 w, one of which can
be selected. For details, contact the service representative.
Shift Tray SF-602
Item
Description
Name
SF-602
Function
Straight delivery (sorted, grouped)
Offset stack (sort and offset, group and offset)
Amount of shift
30 mm
Paper types
Plain paper (60 g/m2 to 90 g/m2), thick paper (91 g/m2 to 216 g/m2), thin paper
(52 g/m2 to 59 g/m2), OHP transparencies*1, trace paper*1, tab paper*1
Paper sizes
Standard sizes:
A3 w to A5 w/v, B6 w*1, A6 w, 11 × 17 w to 5-1/2 × 8-1/2 w/v,
7-1/4 × 10-1/2 w*1/v*1, Foolscap*2, 8K w, 16K w/v
Custom sizes:
105 mm × 139 mm to 305 mm × 458 mm*1,
139 mm × 139 mm to 314 mm × 458 mm
Output tray capacity
A4 to B5: 1250 sheets
B4 or larger, A5 v: 500 sheets
A5 w or smaller: 100 sheets
Power requirements
Supplied from main unit
Dimensions
400 (490) (W) × 600 (D) × 480 (H) mm
The value in parentheses is the dimension when the tray is pulled out.
Weight
Approx. 14 kg
*1
Cannot be used with Finishing settings.
*2
Foolscap includes the following 4 types: 8-1/8 × 13-1/4 w, 8-1/4 × 13 w, 8-1/2 × 13 w, 8 × 13 w, one of
which can be selected. For details, contact the service representative.
6-10
bizhub 751/601 (Version 2)
Specifications
6.2.10
6.2.11
6
Output Tray OT-505
Item
Description
Name
OT-505
Function
Paper output tray for main unit
Paper types
Plain paper (60 g/m2 to 90 g/m2), thick paper (91 g/m2 to 200 g/m2), thin paper
(50 g/m2 to 59 g/m2), OHP transparencies, trace paper, tab paper
Output tray capacity
Max. 150 sheets
Dimensions
215 (335) (W) × 365 (D) × 70 (H) mm
The value in parentheses is the dimension when the tray is pulled out.
Weight
Approx. 0.56 kg
Authentication Unit (Biometric Type) AU-101
Item
Description
Name
AU-101
Compatible finger width
10 mm to less than 25 mm
Interface
USB 2.0
Dimensions
Approx. 78 mm (W) × 95 mm (D) × 55 mm (H)
Weight
Approx. 150 g (not including the USB cable)
Power consumption
DC 5 V, 500 mA
Environment conditions
(when operating)
Temperature
10 to 35 °C
Humidity
10 to 80% (Must be no condensation)
Environment conditions
(when not operating)
Temperature
-10 to 60 °C
Humidity
10 to 80% (Must be no condensation)
Computer
Processor
PC/AT compatible, 1 GHz or more
Memory
128 MB or more
Hard disk drive
Available hard disk space: 100 MB or more
Monitor
800 × 600 pixels, 16-bit color or more
Network
TCP/IP protocol
Application
Microsoft Internet Explorer 6.0 (SP1 or later)
Microsoft .NET Framework 2.0 (Windows 2000)
Microsoft .NET Framework 2.0 SP2 (Windows XP)
Microsoft .NET Framework 3.5 SP1 (Windows Vista)
Interface
USB 1.1 or later
Supported operating systems
bizhub 751/601 (Version 2)
Windows 2000 Professional (SP4)
Windows XP Professional (SP3 or later)
Windows XP Professional x64 Edition (SP2 or later)
Windows Vista Enterprise (SP2 or later)*
Windows Vista Ultimate (SP2 or later)*
*
Supports 32-bit (x86)/64-bit (x64) environment.
6-11
Specifications
6
6.2.12
Authentication Unit (IC Card Type) AU-201
Item
Description
Name
AU-201
Dimensions
Approx. 92 mm (W) × 64 mm (D) × 16 mm (H)
Weight
Approx. 120 g
Power consumption
Through USB port
Environment conditions
(when operating)
Temperature
0 to 40 °C
Humidity
20 to 85% (Must be no condensation)
Environment conditions
(when not operating)
Temperature
-20 to 50 °C
Humidity
Induced reading/writing communication equipment
Compatible card Processor
Contactless IC card compliant with ISO 14443 Type A and
FeliCa
Computer
Processor
PC/AT compatible, 1 GHz or more
Memory
128 MB or more
Hard disk drive
Available hard disk space: 100 MB or more
Monitor
800 × 600 pixels, 16-bit color or more
Network
TCP/IP protocol
Application
Microsoft Internet Explorer 6.0 (SP1 or later)
Microsoft .NET Framework 2.0 (Windows 2000)
Microsoft .NET Framework 2.0 SP2 (Windows XP)
Microsoft .NET Framework 3.5 SP1 (Windows Vista)
Interface
USB 1.1 or later
Supported operating systems
6.2.13
20 to 85% (Must be no condensation)
Radio waves classification
Windows 2000 Professional (SP4)
Windows XP Professional (SP3 or later)
Windows XP Professional x64 Edition (SP2 or later)
Windows Vista Enterprise (SP2 or later)*
Windows Vista Ultimate (SP2 or later)*
*
Supports 32-bit (x86)/64-bit (x64) environment.
Other options
Image Controller IC-208
Mount Kit MK-716
Fax Kit FK-502
Hard Disk HD-510
Staple Kit SK-602
Staple MS-10A
Staple MS-5C
Key Counter Kit
Key Counter Socket
Security Kit SC-506
Working Table WT-504
Local Interface Kit EK-703
i-Option LK-101
i-Option LK-102
Upgrade Kit UK-202
6-12
bizhub 751/601 (Version 2)
7
Copy paper/originals
Copy paper/originals
7
7
Copy paper/originals
7.1
Copy paper
Available paper size/type is restricted in each equipment.
7.1.1
Paper tray and equipment
This machine is equipped with the following trays for loading copy paper.
Main unit trays: Tray 1, 2, 3 and 4
Bypass tray
Large capacity unit LU-405/406
Also, the following equipment is provided for conveying/delivering copies.
ADU (Automatic Duplex Unit) (built in to the main unit)
Finisher FS-524 (built-in staple unit)
Finisher FS-525 (built-in staple unit)
Finisher FS-610 (built-in stable unit and folding unit)
Punch Kit PK-504/PK-505 (for Finisher FS-524/525/610)
Z Folding Unit ZU-604/ZU-605 (built-in punch kit)
Post Inserter PI-504 (for Finisher FS-524/525/610)
Shift Tray SF-602 (for the machine without finisher)
Output Tray OT-505 (for the machine without finisher)
7.1.2
Paper weight
Paper trays
Paper Weight
Main unit trays (Tray 1,
2, 3 and 4)
60 g/m2 to 90 g/m2
Select "thick paper" when loading 91 g/m2 to 200 g/m2 paper.
Select "thin paper" when loading 50 g/m2 to 59 g/m2 paper.
Large capacity unit
LU-405
Large capacity unit
LU-406
Bypass tray
Post Inserter PI-504
Equipment
Paper Weight
Automatic Duplex Unit
60 g/m2 to 200 g/m2
Finisher FS-524 +
Punch Kit PK-505/
PK-504
Sort, group: 50 g/m2 to 200 g/m2
Sort and offset, group and offset: 50 g/m2 to 200 g/m2
Staple: 60 g/m2 to 90 g/m2
Punch: 60 g/m2 to 128 g/m2
Finisher FS-525 +
Punch Kit PK-505/
PK-504
Sort, group: 50 g/m2 to 200 g/m2
Sort and offset, group and offset: 50 g/m2 to 200 g/m2
Staple: 60 g/m2 to 80 g/m2
Punch: 60 g/m2 to 128 g/m2
Finisher FS-610 +
Punch Kit PK-505/
PK-504
Sort, group: 50 g/m2 to 200 g/m2
Sort and offset, group and offset: 50 g/m2 to 200 g/m2
Staple: 60 g/m2 to 80 g/m2
Half-fold, Tri-fold: 60 g/m2 to 90 g/m2
Center staple & fold: 60 g/m2 to 80 g/m2
Punch: 60 g/m2 to 128 g/m2
Z Folding Unit
ZU-604/ZU-605
Z-fold: 50 g/m2 to 90 g/m2
Shift Tray SF-602
52 g/m2 to 216 g/m2
Output Tray OT-505
52 g/m2 to 216 g/m2
bizhub 751/601 (Version 2)
7-3
Copy paper/originals
7
7.1.3
7.1.4
7-4
Paper Tray/Output Tray capacity
Paper trays
Capacity
Main unit paper tray
(Tray 1)
1650 sheets (64 g/m2)
Main unit paper tray
(Tray 2)
1100 sheets (64 g/m2)
Main unit paper tray
(Tray 3/4)
550 sheets (64 g/m2)
Large capacity unit
LU-405
4000 sheets (80 g/m2)
Large capacity unit
LU-406
4000 sheets (80 g/m2)
Bypass tray
Plain paper: 100 sheets (80 g/m2)
Special paper: 1 sheet
Post Inserter PI-504
200 sheets (80 g/m2)
Equipment
Capacity
Automatic Duplex Unit
Unlimited
Finisher FS-524
Main finishing tray (Tray 2):
B4 or larger: 1500 sheets (80 g/m2)
A4 to B5: 3000 sheets (80 g/m2)
A5 or smaller: 500 sheets (80 g/m2)
Staple: 100 to 20 sets (60 g/m2 to 90 g/m2)
Sub finishing tray (Tray 1):
200 sheets (80 g/m2)
Finisher FS-525
Main finishing tray (Tray 2):
B4 or larger: 1500 sheets (80 g/m2)
A4 to B5: 3000 sheets (80 g/m2)
A5 or smaller: 500 sheets (80 g/m2)
Staple: 100 to 20 sets (60 g/m2 to 80 g/m2)
Sub finishing tray (Tray 1):
200 sheets (80 g/m2)
Finisher FS-610
Main finishing tray (Tray 2):
B4 or larger: 1500 sheets (80 g/m2)
A4 to B5: 2500 sheets (80 g/m2)
A5 or smaller: 500 sheets (80 g/m2)
Staple: 100 to 20 sets (60 g/m2 to 80 g/m2)
Sub finishing tray (Tray 1):
200 sheets (80 g/m2)
Booklet tray:
Half-fold (tri-fold): 25 to 33 sets (80 g/m2)
Center staple & fold (5 sheets): 15 to 20 sets (80 g/m2)
Tri-fold (1 sheet): 50 sets (80 g/m2)
Shift Tray SF-602
A4 to B5: 1250 sheets (80 g/m2)
B4 or larger, A5 v: 500 sheets (80 g/m2)
A5 w or smaller: 100 sheets (80 g/m2)
Output Tray OT-505
150 sheets (80 g/m2)
Paper size
Paper Trays
Available Size
Main unit paper tray
(Tray 1/2)
A4 v, B5 v, A5 v, 8-1/2 e 11 v, 5-1/2 e 8-1/2 v, 16K v
Main unit paper tray
(Tray 3/4)
Standard sizes:
A3 w to A5 v, 11 e 17 w, 8-1/2 e 14 w, 8-1/2 e 11 w/v, 5-1/2 e 8-1/2 v, Foolscap*, wide
paper (A3W w to A5W v, 11 e 17W w, 8-1/2 e 11W w/v, 5-1/2 e 8-1/2W v)
Custom sizes:
182 mm e 140 mm to 314 mm e 458 mm
Large capacity unit
LU-405
Standard sizes:
A4 v, B5 v, 8-1/2 e 11 v, 16K v, wide paper (A4W v, B5W v, 8-1/2 e 11W v)
Custom sizes:
182 mm e 257 mm to 223 mm e 314 mm
bizhub 751/601 (Version 2)
Copy paper/originals
*
7
Paper Trays
Available Size
Large capacity unit
LU-406
Standard sizes:
A3 w, B4 w, A4 w/v, 11 e 17 w, 8-1/2 e 14 w, 8-1/2 e 11w/v, Foolscap*, 8K w, 16K w,
wide paper (A3W w, B4W w, A4W w/v, 11 e 17W w, 8-1/2 e 11W w/v)
Custom sizes:
195 mm e 210 mm to 314 mm e 458 mm
Bypass tray
Standard sizes:
A3 v to B6 w, 11 e 17 w, 8-1/2 e 14 w, 8-1/2 e 11 w/v, 5-1/2 e 8-1/2 w/v, wide paper
(A3W w to A5W w/v, 11 e 17W w, 8-1/2 e 11W w/v, 5-1/2 e 8-1/2W w/v)
Custom sizes:
100 mm e 140 mm to 314 mm e 458 mm
Post Inserter PI-504
Upper tray:
Standard sizes:
A4 w/v to A5 v, 8-1/2 e 11 w/v to 5-1/2 e 8-1/2 v, 16K w/v, wide paper (A4W w/v to
A5W v, 8-1/2 e 11W w/v to 5-1/2 e 8-1/2W v)
Custom sizes:
182 mm e 139 mm to 216 mm e 297 mm
Lower tray:
Standard sizes:
A3 w to A5 v, 11 e 17 w to 5-1/2 e 8-1/2 v, Foolscap*, 8K w, 16K w/v, wide paper
(A3W w to A5W v, 11 e 17W w to 5-1/2 e 8-1/2W v)
Custom sizes:
182 mm e 139 mm to 314 mm e 458 mm
Foolscap includes the following 4 types: 8-1/8 e 13-1/4 w, 8-1/4 e 13 w, 8-1/2 e 13 w, 8 e 13 w, one of which can
be selected. For details, contact the service representative.
Equipment
Available Size
Automatic Duplex Unit
Standard sizes:
A3 w to A5 w/v, B6 w, A6 w, 11 e 17 w to 5-1/2 e 8-1/2 w/v, Foolscap*2, 8K w,
16K w/v, wide paper (A3W w to A5W w/v, 11 e 17W w to 5-1/2 e 8-1/2W w/v)
Custom sizes:
105 mm e 140 mm to 314 mm e 458 mm
Finisher FS-524
Main finishing tray (Tray 2):
Standard sizes:
A3 w to A5 w*1/v, 11 e 17 w to 5-1/2 e 8-1/2 w*1/v, Foolscap*2, 8K w, 16K w/v, wide
paper (A3W w to A5W v, 11 e 17W w to 5-1/2 e 8-1/2W v)
Custom sizes:
182 mm e 148 mm to 314 mm e 458 mm, 128 mm e 139 mm*1
Sub finishing tray (Tray 1):
Standard sizes:
A3 w to A5 w/v, B6 w, A6 w, 11 e 17 w to 5-1/2 e 8-1/2 w/v, Foolscap*2, 8K w,
16K w/v, wide paper (A3W w to A5W w/v, 11 e 17W w to 5-1/2 e 8-1/2W w/v)
Custom sizes:
100 mm e 139 mm to 331 mm e 488 mm
Staple:
Standard sizes:
A3 w to A5 v, 11 e 17 w to 5-1/2 e 8-1/2 v, Foolscap*2, 8K w, 16K w/v, wide paper
(A3W w to A5W v, 11 e 17W w to 5-1/2 e 8-1/2W v)
Custom sizes:
182 mm e 139 mm to 314 mm e 458 mm
Finisher FS-525
Main finishing tray (Tray 2):
Standard sizes:
A3 w to A5 w*1/v, 11 e 17 w to 5-1/2 e 8-1/2 w*1/v, Foolscap*2, 8K w, 16K w/v, wide
paper (A3W w to A5W v, 11 e 17W w to 5-1/2 e 8-1/2W v)
Custom sizes:
182 mm e 148 mm to 314 mm e 458 mm, 128 mm e 139 mm*1
Sub finishing tray (Tray 1):
Standard sizes:
A3 w to A5 w/v, B6 w, A6 w, 11 e 17 w to 5-1/2 e 8-1/2 w/v, Foolscap*2, 8K w,
16K w/v, wide paper (A3W w to A5W w/v, 11 e 17W w to 5-1/2 e 8-1/2W w/v)
Custom sizes:
100 mm e 139 mm to 331 mm e 488 mm
Staple:
Standard sizes:
A3 w to A5 v, 11 e 17 w to 5-1/2 e 8-1/2 v, Foolscap*2, 8K w, 16K w/v, wide paper
(A3W w to A5W v, 11 e 17W w to 5-1/2 e 8-1/2W v)
Custom sizes:
182 mm e 139 mm to 314 mm e 458 mm
bizhub 751/601 (Version 2)
7-5
Copy paper/originals
7
Equipment
Available Size
Finisher FS-610
Main finishing tray (Tray 2):
Standard sizes:
A3 w to A5 w*1/v, 11 e 17 w to 5-1/2 e 8-1/2 w*1/v, Foolscap*2, 8K w, 16K w/v, wide
paper (A3W w to A5W v, 11 e 17W w to 5-1/2 e 8-1/2W v)
Custom sizes:
182 mm e 148 mm to 314 mm e 458 mm, 128 mm e 139 mm*1
Sub finishing tray (Tray 1):
Standard sizes:
A3 w to A5 w/v, B6 w, A6 w, 13 e 19 w, 12 e 18 w to 5-1/2 e 8-1/2 w/v, Foolscap*2,
8K w, 16K w/v, wide paper (A3W w to A5W w/v, 11 e 17W w to 5-1/2 e 8-1/2W w/v)
Custom sizes:
100 mm e 139 mm to 331 mm e 488 mm
Staple:
Standard sizes:
A3 w to A5 v, 11 e 17 w to 5-1/2 e 8-1/2 v, Foolscap*2, 8K w, 16K w/v, wide paper
(A3W w to A5W v, 11 e 17W w to 5-1/2 e 8-1/2W v)
Custom sizes:
182 mm e 139 mm to 314 mm e 458 mm
Booklet tray:
Standard sizes (Half-fold, center staple & fold):
A3 w, B4 w, A4 w, 11 e 17 w, 8-1/2 e 14 w, 8-1/2 e 11 w, 8K w, wide paper
(A3W w, B4W w, A4W w, 11 e 17W w, 8-1/2 e 11W w)
Standard sizes (Tri-fold):
A4 w, 8-1/2 e 11 w, 16K w
Custom sizes (Half-fold, center staple & fold):
210 mm e 279 mm to 314 mm e 458 mm
Shift Tray SF-602
Standard sizes:
A3 w to A5 w/v, B6 w*1, A6 w, 11 e 17 w to 5-1/2 e 8-1/2 w/v, 7-1/4 e 10-1/2 w*1/v*1,
Foolscap*2, 8K w, 16K w/v
Custom sizes:
105 mm e 139 mm to 305 mm e 458 mm*1,
139 mm e 139 mm to 314 mm e 458 mm
Output Tray OT-505
Standard sizes:
A3 w, B4 w, A4v, B5 w/v, 11 e 17 w, 8-1/2 e 14 w, 8-1/2 e 11 w/v, 5-1/2 e 8-1/2 w/v,
wide paper (A3W w, B4W w, A4W v, B5W w/v, 11 e 17W w, 8-1/2 e 11W w/v,
5-1/2 e 8-1/2W w/v)
Custom sizes:
100 mm e 140 mm to 314 mm e 458 mm
*1
Cannot be used with Finishing settings.
*2
Foolscap includes the following 4 types: 8-1/8 e 13-1/4 w, 8-1/4 e 13 w, 8-1/2 e 13 w, 8 e 13 w, one of
which can be selected. For details, contact the service representative.
7.1.5
Special paper
When loading the paper except normal (overhead projection transparent film, thick paper, colored paper
etc.), select the appropriate name from 10. A paper tray with this setting is not automatically selected when
the Auto Paper Select setting is specified or when the paper trays are switched automatically.
Available paper types depend on the paper tray.
For details on the paper setting for bypass tray, see "Specifying a paper type for bypass tray" on page 7-19.
For details on paper type setting for "Paper type setting for a tray" on page 7-21.
No.
7-6
Paper type/Icon
Description
1
OHP
Select this setting when overhead projection transparent films are loaded.
2
Special Paper
Select this setting when special paper, for example, high-quality paper, is loaded as
plain paper with a weight of 60 g/m2 to 90 g/m2.
bizhub 751/601 (Version 2)
Copy paper/originals
No.
7
Paper type/Icon
Description
3
Thick Paper
Select this setting when the thick paper that is loaded has a weight to 91 g/m2 to 200
g/m2.
4
Thin Paper
Select this setting when the Thin paper that is loaded has a weight of 50 g/m2 to 59
g/m2.
5
Letterhead
Select this setting when plain paper that is loaded has a weight of 60 g/m2 to 90 g/m2
and is already printed with a company name or preset text.
6
Colored Paper
Select this setting when plain colored paper weighing from 60 g/m2 to 90 g/m2 is loaded.
7
Tab Paper 1
Select this setting when tab paper is loaded.
8
Trace Paper
Select this setting when trace paper is loaded.
9
User Paper 1
Select this setting when paper that is loaded has a weight of 60 g/m2 to 90 g/m2 and
does not match with any other paper type. For details, contact your service representative.
10
User Paper 2
Select this setting when paper that is loaded has a weight of 60 g/m2 to 90 g/m2 and
does not match with any other paper type. For details, contact your service representative.
11
User Paper 3
Select this setting when paper that is loaded has a weight of 60 g/m2 to 90 g/m2 and
does not match with any other paper type. For details, contact your service representative.
12
Recycled
Select this setting when using recycled paper.
13
Fine
Select this setting when high-quality paper is loaded.
14
Labels
Select this setting when label sheets are loaded.
bizhub 751/601 (Version 2)
7-7
Copy paper/originals
7
7.1.6
Precautions for paper
Do not use the following types of paper.
Otherwise, decreased print quality, paper misfeeds or damage may result.
OHP transparencies that have already been fed through the machine (even if the transparency is still
blank)
Paper that has been printed on with a heat-transfer printer or an inkjet printer
Paper that is either extremely thick or extremely thin
Folded, curled, wrinkled, or torn paper
Paper that has been left unwrapped for a long period of time
Damp paper, perforated paper, or paper with punched holes
Extremely smooth or extremely rough paper, or paper with an uneven surface
Paper that has been treated, such as carbon-backed, heat-sensitive or pressure-sensitive paper
Paper that has been decorated with foil or embossing
Paper of a non-standard shape (not rectangular)
Paper that is bound with glue, staples or paper clips
Paper with labels attached
Paper with ribbons, hooks, buttons, etc., attached
7.1.7
Paper storage
Store paper in a cool, dark location with little humidity.
If the paper becomes damp, paper misfeeds may occur.
Paper that has not been loaded should be kept wrapped or placed in a plastic bag and stored in a cool, dark
location with little humidity.
Store the paper laying flat, not standing on its edge. Curled paper may cause paper misfeeds.
Keep paper out of the reach of children.
7.1.8
Auto Tray Switch Function
If the selected paper tray runs out of paper while a job is being printed and a different paper tray is loaded
with paper meeting the following conditions, the other paper tray is automatically selected so printing can
continue. If the optional large capacity unit LU-203 is installed, a maximum of 5,650 copies can be made
continuously. (The paper tray is automatically switched only if the "ATS Permission parameter" in the Utility
mode is set to "Permit".)
Operating Conditions (Set the following condition at "1 System Setting>3 Paper Tray Setting" of User
Setting.)
Select the paper trays to be selected automatically by "Auto Tray Select Setting", if Auto paper select
is functioned.
Tray Priority is available.
Select "Allow" at "Auto Tray Switch ON/OFF"
Select the same paper type at "Paper Type".
Load the following paper into the paper trays.
The same size in the same orientation.
The same paper type.
7-8
bizhub 751/601 (Version 2)
Copy paper/originals
7.2
7
Selecting the paper settings for bypass tray
This section describes the procedures for specifying the size and type of paper loaded in bypass tray.
!
Detail
For details on loading the paper into the bypass tray, refer to "Loading paper into the bypass tray" on
page 2-55.
7.2.1
Automatically detecting the paper size ("Auto Detect" setting)
The size of the paper loaded into bypass tray can be detected automatically.
1
In the Basic screen, touch [Paper].
The Paper screen appears.
2
Touch the button for bypass tray.
3
Touch [Change Tray Settings].
bizhub 751/601 (Version 2)
7-9
Copy paper/originals
7
4
Touch [Auto Detect].
As the factory default, "Auto Detect" is selected.
5
Touch [OK], and then touch [OK] in the next screen that appears.
The Basic screen appears again.
7.2.2
Selecting a paper size setting (Size setting)
The paper size can be set for the bypass tray so that it can be used with the specified paper size.
This is useful, for example, when the size of the paper that is loaded cannot be automatically detected (such
as with paper in inch sizes).
The following procedure describes how to specify the setting for 8-1/2 e 11 w loaded into the bypass tray.
1
In the Basic screen, touch [Paper].
The Paper screen appears.
7-10
bizhub 751/601 (Version 2)
Copy paper/originals
2
Select the button for the bypass tray.
3
Touch [Change Tray Settings].
4
Touch [Standard Size].
7
The Standard Size screen appears.
5
Touch [8-1/2 e 11 w].
bizhub 751/601 (Version 2)
7-11
Copy paper/originals
7
6
Touch [OK], and then touch [OK] in the next two screens that appear.
The Basic screen appears again.
The paper size for the bypass tray is set.
2
Reminder
If paper other than the specified paper size is loaded, a paper misfeed may occur since the paper size
is not automatically detected.
7.2.3
Specifying a non-standard paper size (Custom size settings)
If paper other than standard-size paper is loaded into the bypass tray, it will be necessary to enter the paper
size.
1
In the Basic screen, touch [Paper].
The Paper screen appears.
7-12
2
Select the button for the bypass tray.
3
Touch [Change Tray Settings].
bizhub 751/601 (Version 2)
Copy paper/originals
4
7
Touch [Custom Size].
The Custom Size screen appears.
5
Type in the length (X) and width (Y) of the paper.
–
Make sure that [X] is selected, touch [<->] to switch between the integer and the fraction, and then
touch [–] and [+] to type in the length of side X. (139.7 mm to 458.0 mm)
– Make sure that [Y] is selected, touch [<->] to switch between the integer and the fraction, and then
touch [–] and [+] to type in the length of side Y. (100.0 mm to 314.0 mm)
– If a decimal value is displayed in the Custom Size screen, use the keypad to type in the setting. For
details on switching between decimal and fraction values, refer to "System Settings" on
page 12-17.
– If a decimal value is displayed in the screen and the specified value is outside the allowable range,
the message "Input Error" appears. Type a value within the allowable range. If the value was
incorrectly entered, press the [C] (clear) key to erase the value, and then specify the correct value.
To cancel changes to the settings, touch [Cancel].
Can paper sizes be stored?
% Five non-standard paper sizes can be stored.
?
% To recall a stored paper size, touch the corresponding memory key.
% The names "memory1" through "memory5" can be changed. For details on changing the names,
refer to "Storing a non-standard paper size (Custom size settings)" on page 7-14.
% For details on storing paper sizes, refer to "Storing a non-standard paper size (Custom size
settings)" on page 7-14.
6
Touch [OK], and then touch [OK] in the next two screens that appear.
The Basic screen appears again.
bizhub 751/601 (Version 2)
7-13
Copy paper/originals
7
7.2.4
Storing a non-standard paper size (Custom size settings)
Five non-standard paper sizes can be stored.
Storing paper sizes that are used often allows the paper size to be quickly selected, without having to reenter the setting.
1
In the Basic screen, touch [Paper].
The Paper screen appears.
7-14
2
Select the button for the bypass tray.
3
Touch [Change Tray Settings].
bizhub 751/601 (Version 2)
Copy paper/originals
4
7
Touch [Custom Size].
The Custom Size screen appears.
5
Specify the × and Y sides of the paper, and then touch [Store].
–
Make sure that [X] is selected, touch [<->] to switch between the integer and the fraction, and then
touch [–] and [+] to type in the length of side X. (139.7 mm to 458.0 mm)
– Make sure that [Y] is selected, touch [<->] to switch between the integer and the fraction, and then
touch [–] and [+] to type in the length of side Y. (100.0 mm to 314.0 mm)
– If a decimal value is displayed in the Custom Size screen, use the keypad to type in the setting. For
details on switching between decimal and fraction values, refer to "System Settings" on
page 12-17.
– If a decimal value is displayed in the screen and the specified value is outside the allowable range,
the message "Input Error" appears. Type a value within the allowable range. If the value was
incorrectly entered, press the [C] (clear) key to erase the value, and then specify the correct value.
To cancel changes to the settings, touch [Cancel].
bizhub 751/601 (Version 2)
7-15
Copy paper/originals
7
6
Touch the memory button where the paper size is to be stored.
–
To change the name of a memory key, touch [Change Custom Size Name], and then touch the key
to be renamed.
Using the keyboard that appears, type in the name of the key, touch [OK], and then touch [Close]. For
details on typing in text, refer to "Entering text" on page 15-3.
7
Touch [OK], and then touch [OK] in the next three screens that appear.
The Basic screen appears again.
7-16
bizhub 751/601 (Version 2)
Copy paper/originals
7.2.5
7
Selecting a setting for oversized paper (Wide paper settings)
If paper one size larger than a standard size is being used in the bypass tray, specify a setting for wide paper.
!
Detail
By specifying paper one size larger than the document as wide paper, the document can be copied at
the center so that there is no loss of the document image.
When specifying wide paper for the bypass tray, non-standard-sized paper can be specified. When
using non-standard-sized paper, enter the paper size.
For details on the setting for tray 3 and tray 4, refer to "To select a setting for oversized paper" on
page 7-27
For details on loading the paper into the bypass tray, refer to "Loading paper into the bypass tray" on
page 2-55.
The following procedure describes how to specify the setting for wide paper loaded into the bypass tray.
1
In the Basic screen, touch [Paper].
The Paper screen appears.
2
Touch the button for the bypass tray.
3
Touch [Change Tray Settings].
bizhub 751/601 (Version 2)
7-17
Copy paper/originals
7
4
Touch [Wide Paper].
The Wide Paper screen appears.
5
Select the size of the paper to be loaded.
–
6
Touch
and
until the button for the desired paper size is displayed.
To change the size, touch [Change Size].
The Change Size screen for oversized paper appears.
7
Specify the X and Y sides of the paper, and then touch [OK].
–
–
–
–
7-18
Touch either [X] or [Y], press the [C] (clear) key to clear the current setting, and then use the keypad
to type in the size.
If a decimal value is displayed in the Custom Size screen, use the keypad to type in the setting. For
details on switching between decimal and fraction values, refer to "System Settings" on
page 12-17.
If the orientation of the loaded paper does not match the sizes specified for "X" and "Y", "Input
error" appears, even if the values are within the allowable range. In addition, do not enter the same
size for "X" and "Y".
If a decimal value is displayed in the screen and the specified value is outside the allowable range,
the message "Input Error" appears. Type a value within the allowable range. If the value was
incorrectly entered, press the [C] (clear) key to erase the value, and then specify the correct value.
bizhub 751/601 (Version 2)
Copy paper/originals
7
To cancel changes to the settings, touch [Cancel].
8
Touch [OK], and then touch [OK] in the next two screens that appear.
The Basic screen appears again.
2
Note
The selected size button is programmed with the entered paper size, so that the paper size is available
to be selected again without being typed in. In addition, the size can be changed.
7.2.6
Specifying a paper type for bypass tray
If paper other than plain paper, such as OHP transparencies or special paper, is loaded in bypass tray, be
sure to change the paper type setting.
1
In the Basic screen, touch [Paper].
The Paper screen appears.
bizhub 751/601 (Version 2)
7-19
Copy paper/originals
7
2
Touch the button for the bypass tray.
–
–
If a setting for special paper is selected, the bypass is not selected automatically with the "Auto"
Paper setting.
The auto tray switch feature applies only to paper trays specified with the same paper type setting.
3
Touch [Change Tray Settings].
4
Select the appropriate setting for the type of special paper that is loaded.
–
5
Touch the button for the desired paper type.
Touch [OK], and then touch [OK] in the next screen that appears.
The Basic screen appears again.
2
Reminder
If special paper is loaded into the bypass tray, be sure to select the corresponding paper type,
otherwise a paper misfeed may occur.
7-20
bizhub 751/601 (Version 2)
Copy paper/originals
7.3
7
Paper type setting for a tray
This section describes the procedures for specifying the size of paper loaded in the tray 3 and 4 and the type
of paper loaded in each paper tray.
7.3.1
To display the paper tray setting screen
The following procedure describes how to display the Paper Tray Setting screen.
1
Press the [Utility/Counter] key.
2
Touch [2 User Setting].
–
–
3
An item can also be selected by pressing the key in the keypad for the number beside the desired
button.
For "2 User Setting", press the [2] key in the keypad.
Touch [1 System Setting].
The System Setting screen appears.
bizhub 751/601 (Version 2)
7-21
Copy paper/originals
7
4
Touch [3 Paper Tray Setting].
The Paper Tray Setting screen appears.
2
Note
To change the paper size for paper loaded into the tray 3 and 4 and the LCT, contact your service
representative.
7-22
bizhub 751/601 (Version 2)
Copy paper/originals
7.3.2
7
To specify a standard size paper ("Standard Size 1" settings)
A standard paper size can be set for the tray 3 and 4.
The following procedure describes how to specify the setting for standard-sized paper loaded into the tray 3.
1
In the Paper Tray Setting screen, touch [5 Paper Type/Size Settings].
–
–
For details on displaying the Paper Tray Setting screen, refer to "To display the paper tray setting
screen" on page 7-21.
For details on loading the paper into tray 3 and 4, refer to "Loading paper into the bypass tray" on
page 2-55.
The Paper Type/Size settings screen appears.
2
Touch the button for the tray 3, and then touch [Standard Size 1] under "Paper Size".
3
Touch [OK].
If standard-sized paper is loaded into a paper tray, the paper size is automatically detected.
bizhub 751/601 (Version 2)
7-23
Copy paper/originals
7
7.3.3
To specify a setting for standard special-sized paper (Special size settings)
If standard centimeter-sized paper is being used in the tray 3 and 4, specify a setting for standard specialsized paper.
The following procedure describes how to specify the setting for standard special-sized paper loaded into
the tray 3.
1
In the Paper Tray Setting screen, touch [5 Paper Type/Size Settings].
–
–
For details on displaying the Paper Tray Setting screen, refer to "To display the paper tray setting
screen" on page 7-21.
For details on loading the paper into tray 3 and 4, refer to "Loading paper into the bypass tray" on
page 2-55.
The Paper Type/Size Settings screen appears.
2
7-24
Touch the button for the tray 3, and then touch [Special Size] under "Paper Size".
bizhub 751/601 (Version 2)
Copy paper/originals
7.3.4
7
3
Select the size of the paper to be loaded.
4
Touch [OK].
To specify a non-standard paper size (Custom size settings)
If custom-sized paper is being used in the tray 3 and 4, specify a setting for custom-sized paper.
The following procedure describes how to specify the setting for custom-sized paper loaded into the tray 3.
1
In the Paper Tray Setting screen, touch [5 Paper Type/Size Settings].
–
–
For details on displaying the Paper Tray Setting screen, refer to "To display the paper tray setting
screen" on page 7-21.
For details on changing the paper size for the tray 3 and 4, refer to "Loading paper into the bypass
tray" on page 2-55.
The Paper Type/Size Settings screen appears.
bizhub 751/601 (Version 2)
7-25
Copy paper/originals
7
2
Touch the button for the tray 3, and then touch [Custom Size] under "Paper Size".
The Paper Size screen appears.
3
Type in the length (X) and width (Y) of the paper.
–
–
–
–
4
7-26
Touch [<->] to switch between the integer and the fraction, and then touch [–] and [+] to type in the
length of side X. (139.7 mm to 458.0 mm)
Touch [<->] to switch between the integer and the fraction, and then touch [–] and [+] to type in the
length of side Y. (182.0 mm to 314.0 mm)
If a decimal value is displayed in the screen, use the keypad to type in the length. For details on
switching between decimal and fraction values, refer to "System Settings" on page 12-17.
If a decimal value is displayed in the screen and the specified value is outside the allowable range,
the message "Input Error" appears. Type a value within the allowable range. If the value was
incorrectly entered, press the [C] (clear) key to erase the value, and then specify the correct value.
Touch [OK].
bizhub 751/601 (Version 2)
Copy paper/originals
7.3.5
7
To select a setting for oversized paper
If paper one size larger than a standard size is being used in the tray 3 and 4, specify a setting for wide paper.
The following procedure describes how to specify the setting for wide paper loaded into the tray 3.
1
In the Paper Tray Setting screen, touch [5 Paper Type/Size Settings].
–
–
For details on displaying the Paper Tray Setting screen, refer to "To display the paper tray setting
screen" on page 7-21.
For details on loading the paper into tray 3 and 4, refer to "Loading paper into the bypass tray" on
page 2-55.
The Paper Type/Size Settings screen appears.
2
Touch the button for the tray 3, and then touch [Wide Paper] under "Paper Size".
The Paper Size screen appears.
bizhub 751/601 (Version 2)
7-27
Copy paper/originals
7
3
Select the size of the paper to be loaded.
–
–
–
7-28
Touch [X] or [Y] in "Change size", touch [<->] to switch between the integer and the fraction, and
then touch [–] and [+] to specify the size of the paper.
If a decimal value is displayed in the screen, use the keypad to type in the setting. For details on
switching between decimal and fraction values, refer to "System Settings" on page 12-17.
If a decimal value is displayed in the screen and the specified value is outside the allowable range,
the message "Input Error" appears. Type a value within the allowable range. If the value was
incorrectly entered, press the [C] (clear) key to erase the value, and then specify the correct value.
4
Select the desired image position.
5
Touch [OK].
bizhub 751/601 (Version 2)
Copy paper/originals
7.3.6
7
Specifying a paper type
This section describes the procedure for specifying a type of paper loaded in each tray.
2
Note
Selecting "Letterhead" will change the print side to the reverse side.
If a special paper type is selected, that tray is not selected automatically with the "Auto" Paper setting.
The auto tray switch feature applies only to the trays specified with the same paper type setting.
1
Press the [Utility/Counter].
2
Touch [2 User Settings], [1 System Settings], [3 Paper Tray Settings], and [5 Paper Type/Size Settings]
in sequence.
The Paper Type Settings screen appears.
bizhub 751/601 (Version 2)
7-29
Copy paper/originals
7
3
Touch to highlight the desired tray key under "Paper Tray" in the left side area of the screen, then touch
[Paper Type] on the right side.
The Paper Type screen appears.
4
Touch the desired paper type key to highlight it.
5
Touch [OK] to complete the setting.
–
7-30
To cancel the change, touch [Cancel].
bizhub 751/601 (Version 2)
Copy paper/originals
7.4
7
Originals
When making copies, load the original into the ADF or position it on the original glass.
To copy originals that cannot be loaded into the ADF, position them on the original glass.
7.4.1
Originals that can be loaded into the ADF
There are two methods for using the ADF. The machine will detect the original size automatically when the
original is positioned in the ADF, then select an appropriate paper size automatically by Auto Paper Select
function.
There are limits on the types of original that can be positioned with each method.
Normal method
For originals of mixed sizes
For Z-folded original
Normal method
Item
Description
Original paper weight
50 g/m2 to 200 g/m2
Original size
100 mm e 139.7 mm to 297 mm e 431.8 mm
Auto original size detect
A3 w to A5 w/v, 11 e 17 w, 8-1/2 e 11 v
Curling tolerance
10 mm or less
Paper capacity
100 sheets (80 g/m2)
Mixed Original Setting
The following chart shows the possible combinations of standard- size paper that can be used with the
"Mixed Original" setting.
Item
Description
Original paper weight
50 g/m2 to 200 g/m2
Auto original size detect
Two types of size combination are determined by the ADF guide width.
Width of A3 w/A4 v:
A3 w, B4 w, A4 w/v, B5 v, A5 v
Width of B4 w/B5 v:
B4 w, A4 w, B5 w/v, A5 v
Width of A4 w/A5 v:
A4 w, B5 w, A5 v
Width of A5 w: A5 w, B6 w
Curling tolerance
10 mm or less
Paper capacity
100 sheets (80 g/m2)
Z-Folded Original Setting
Item
Description
Original paper weight
50 g/m2 to 200 g/m2
Original size
100 mm e 139.7 mm to 297 mm e 431.8 mm
Auto original size detect
A3 w to A5 w/v, 11 e 17 w, 8-1/2 e 11 v
Curling tolerance
10 mm or less
Paper capacity
100 sheets (80 g/m2)
bizhub 751/601 (Version 2)
7-31
Copy paper/originals
7
Tab Original Setting
7.4.2
Item
Description
Original paper weight
50 g/m2 to 200 g/m2
Original size
A3 w, B4 w, A4 w/v, B5 w, 8-1/2 e 14 w, 8-1/2 e 11 w/v
Curling tolerance
10 mm or less
Paper capacity
100 sheets (80 g/m2)
Precautions for loading originals into the ADF
The following types of original should not be positioned into the ADF, otherwise paper misfeeds, damage to
the original or the machine trouble may occur.
Wrinkled, folded, curled, or torn original
Highly translucent or transparent original, such as overhead transparencies or trace paper
Coated original such as carbon-backed paper
Original printed on paper thicker than 201 g/m2
Original printed on paper thinner than 50 g/m2
Original printed on paper thicker than 50 g/m2 during double-sided copying
Original that are bound, for example, with staples or paper clips
Original that are bound in a book or booklet
Original that are bound together with glue
Original pages that have been cut or contain cutouts
Label sheets
Offset printing masters
Original with binder holes
Original that have just been printed with this machine
7-32
bizhub 751/601 (Version 2)
Copy paper/originals
7.4.3
7
Originals that can be loaded on the original glass
Use the original glass when originals are not suitable for use with the ADF, or when setting copying conditions
incompatible with the ADF.
The machine will detect the original size automatically when the original is positioned on the original glass
with ADF closed, then select an appropriate paper size automatically by Auto Paper Select function.
*
Item
Description
Original type
Sheets, books (spreads), three-dimensional objects
Original Size
128 mm e 139.7 mm to 297 mm e 431.8 mm
Auto Original Size Detect
A3 w to A5 w/v, B6 w, A6 w, 11 e 17 w to 5-1/2 e 8-1/2 w/v, Foolscap*, 8K w, 16K w/v
Maximum original
weight
6.8 kg
Maximum original thickness
30 mm
Foolscap includes the following 4 types: 8-1/8 e 13-1/4 w, 8-1/4 e 13 w, 8-1/2 e 13 w, 8 e 13 w, one of which can
be selected. For details, contact the service representative.
Observe the following precautions when placing the original on the original glass.
The size of original printed on paper in inch sizes (such as 11 e 17, 8-1/2 e 14, 8-1/2 e 11) cannot be
automatically detected. The setting must be specified by the service representative. For details, contact
the service representative.
If a custom-sized original is positioned, the "Auto Paper Select" and "Auto Zoom" settings cannot be
used since the original size cannot be detected automatically. If a custom-sized original is positioned,
select the size of the paper to be copied.
If highly translucent or transparent original, such as overhead transparencies or trace paper, are
positioned, the original size cannot be detected automatically. Place a blank sheet of paper of the same
size over the original.
Do not place objects exceeding 6.8 kg on the original glass, otherwise the original glass may be
damaged.
If a book is placed on the original glass, do not press it down extremely hard, otherwise the original
glass may be damaged.
bizhub 751/601 (Version 2)
7-33
7
7-34
Copy paper/originals
bizhub 751/601 (Version 2)
8
Application functions
Application functions
8
8
Application functions
8.1
Inserting paper between OHP transparencies ("OHP Interleave"
function)
In order to prevent copies printed onto OHP transparencies from sticking together as a result of the heat that
is produced during copying, paper (interleaves) can be inserted between the transparencies.
The interleaf can be kept blank, or copied from the same original as the transparency.
0
No Finishing setting can be used.
1
Position the original to be copied.
–
–
2
Load the OHP transparencies into the bypass tray, and load the interleaf paper into the desired paper
tray.
–
3
For details on positioning the original, refer to "Feeding the original" on page 3-9.
For details on loading OHP transparencies, refer to "Paper weight" on page 7-3 and "Loading paper
into the bypass tray" on page 2-55.
Use interleaf paper with the same size as the OHP transparencies.
Select [Transparency] as the paper type for the bypass tray, and then touch [OK].
–
For details on specifying the paper type settings, refer to "Specifying a paper type for bypass tray"
on page 7-19.
bizhub 751/601 (Version 2)
8-3
Application functions
8
4
Touch [Application], and then touch [Sheet/Cover/Chapter Insert].
–
To cancel changes to the settings for all Application functions, press the [Reset] key. All changes to
the settings are canceled.
The Sheet/Cover/Chapter Insert screen appears.
5
Touch [OHP Interleave].
The OHP Interleave screen appears.
8-4
bizhub 751/601 (Version 2)
Application functions
6
Select the paper tray loaded with the interleaf paper.
–
–
7
8
To cancel the setting and select the default, press the [Reset] key.
To cancel the "OHP Interleave" function, touch [No].
Select [Copy] or [Blank].
–
Selecting [Copy] will copy the original image also onto interleaves. To leave the interleaves blank,
touch [Blank].
8
Touch [OK].
9
Specify any other desired copy settings.
–
10
The number of copies is set to "1" and cannot be changed.
Press the [Start] key.
bizhub 751/601 (Version 2)
8-5
Application functions
8
8.2
Adding cover pages ("Cover Sheet" function)
Copies can be made using paper different from the main body of the original (excluding the cover pages),
and cover pages can be added using paper different from the copy.
The following types of cover pages and front and back cover page settings are available.
Setting
Description
Front Cover
Back Cover
Front (Copy)
The first page of the original is copied onto paper for the front cover sheet.
With double-sided copying, the second page of the original is copied onto
the back of the front cover sheet.
Front (Blank)
Paper for the front cover sheet is added as the first page of the copy.
The same operation is performed with double-sided copying.
Back (Copy)
The last page of the original is copied onto the back cover page.
With double-sided copying, a double-sided copy of the last two pages of the
original is printed on paper for the back cover sheet if the original contains
an even number of pages.
Back (Blank)
Paper for the back cover sheet is added after the last page of the copy.
The same operation is performed with double-sided copying.
3
12 4
REPORT
34
12
REPORT 4
3
12
3
12 4
34
22
1
REPORT 4
3
22
1
2
Note
If the optional post inserter is installed, outer front and back cover pages can be inserted from the post
inserter.
Cover page settings can be specified for paper loaded in the post inserter and in the paper trays. Paper
loaded in the post inserter is added at the front when it is specified as the outer front cover or it is added
at the back when it is specified as the outer back cover.
1
Position the original to be copied.
–
–
2
Load the paper for the cover pages and the paper for the main body of the original into separate paper
trays.
–
8-6
For details on positioning the original, refer to "Feeding the original" on page 3-9.
For an original that exceeds 100 pages, refer to "Scanning the original in separate batches
("Separate Scan" setting)" on page 3-11.
Use paper with the same size for the cover pages and for the main body of the original, and load
them in the same orientation.
bizhub 751/601 (Version 2)
Application functions
3
8
Touch [Application], and then touch [Sheet/Cover/Chapter Insert].
–
–
For details on using thick paper for the cover sheets and on loading the paper, refer to "Paper
weight" on page 7-3 and "Loading paper into the bypass tray" on page 2-55.
To cancel changes to the settings for all Application functions, press the [Reset] key. All changes to
the settings are canceled.
The Sheet/Cover/Chapter Insert screen appears.
4
Touch [Cover Sheet].
The Cover Sheet screen appears.
bizhub 751/601 (Version 2)
8-7
Application functions
8
5
Select the desired cover page settings.
–
–
–
6
–
To cancel the setting and select the default, press the [Reset] key.
To cancel the "Cover Sheet" function, touch [No].
The default setting for the paper tray loaded with cover pages can be specified from the Utility
mode. For details, refer to "Copier Settings" on page 12-21.
If the optional post inserter has been installed, [Outer Cover Sheet] appears.
–
–
If paper for cover pages has been loaded in the main unit, continue with step 6.
If paper for cover pages has been loaded in a tray of the post inserter, continue with step 9.
If desired, touch [Paper] under "Front Cover" or "Back Cover".
The corresponding Cover Paper screen appears.
7
8-8
Select the paper tray loaded with the paper for the cover pages, and then touch [OK].
bizhub 751/601 (Version 2)
Application functions
8
8
Touch [Outer Cover Sheet], and then specify the tray loaded with paper for the outer front cover or the
outer back cover.
9
Touch [OK], and then touch [OK] in the next screen that appears.
10
Specify any other desired copy settings.
11
Using the keypad, type in the desired number of copies.
12
Press the [Start] key.
bizhub 751/601 (Version 2)
8-9
Application functions
8
8.3
Inserting different paper into copies ("Insert Sheet" function)
Different paper (such as colored paper) can be inserted for specified pages in the copies.
There are settings ("Copy" and "Blank") for selecting whether or not the inserted pages are printed. When the
settings are combined with single-sided copying or double-sided copying, the copies are printed as shown
below.
If "Copy" is selected, the original is copied with the specified paper inserted for the specified pages.
When page 2 is specified
Finishing
Description
Single-sided copies
The specified paper is inserted for the 2nd sheet of the copy, and the 2nd sheet of the
original is copied onto it.
Double-sided copies
The back side of the 1st sheet of the copy is left blank, the specified paper is inserted for
the 2nd sheet of the copy, and a double-sided copy of the 2nd and 3rd sheets of the original are printed onto it.
Copy
56
34
2
1
REPORT 4 5 6
3
12
56
34
2
1
REPORT 4 5 6
3
12
5
6
3
REPORT
4
2
1
6
4
2
1
If "Blank" is selected, the specified paper is inserted after the specified page.
When page 3 is specified
Finishing
Description
Single-sided copies
The specified paper is inserted as the 4th sheet of the copy.
Double-sided copies
The back side of the 2nd sheet of the copy is left blank, and the specified paper is inserted
for the 3rd sheet of the copy.
Blank
3
12
REPORT
56
34
2
1
REPORT 4 5 6
3
12
3
12
6
45
4
1
4
6
2
1
6
3
5
REPORT
8-10
6
45
3
bizhub 751/601 (Version 2)
Application functions
8
!
Detail
The specified paper can be inserted at a maximum of 60 locations within an original of up to 999 pages.
In double-sided originals, one double-sided page is considered to be two pages (one for the front and
one for the back).
2
Note
If the optional post inserter is installed, paper can be inserted from the post inserter.
1
Position the original to be copied.
–
–
2
Load the paper to be used for the insertions sheets and the main body of the original into the desired
paper trays.
–
–
3
For details on positioning the original, refer to "Feeding the original" on page 3-9.
For an original that exceeds 100 pages, refer to "Scanning the original in separate batches
("Separate Scan" setting)" on page 3-11.
Use paper with the same size for the insertion sheets and for the main body of the original, and load
them in the same orientation.
To cancel changes to the settings for all Application functions, press the [Reset] key. All changes to
the settings are canceled.
Touch [Application], and then touch [Sheet/Cover/Chapter Insert].
–
–
For details on using thick paper for the insertion sheets and on loading the paper, refer to "Paper
weight" on page 7-3 and "Loading paper into the bypass tray" on page 2-55.
To cancel the setting and select the default, press the [Reset] key.
The Sheet/Cover/Chapter Insert screen appears.
bizhub 751/601 (Version 2)
8-11
Application functions
8
4
Touch [Insert Sheet].
–
To cancel the "Insert Sheet" function, touch [No].
The Insert Sheet screen appears.
5
Touch a button for a page number, and then use the keypad to type in the number of the page where
the paper is to be inserted.
–
–
–
–
–
There are four Insert Sheet screens. Touch
or
to display a different screen.
To arrange the page numbers in order, starting with the lowest number, touch [Sort].
To remove a page number that has been specified, touch the button for the page to be removed,
and then press the [C] (clear) key.
If the same page number is entered multiple times, copying is not possible. Delete repeated page
numbers.
If the entered page number is greater than the number of pages in the original, paper is not inserted.
[Post Inserter] appears if the optional post inserter has been installed.
–
–
If the insertion sheets are loaded into a paper tray of the main unit, continue with step 6.
If the insertion sheets are loaded into a tray of the post inserter, continue with step 10.
–
6
Under "Insert Type", touch either [Copy] or [Blank].
–
7
If "Copy" is selected, the original is copied with the specified paper inserted for the specified page.
If "Blank" is selected, the specified paper is inserted after the specified page.
Touch [Insert Paper].
The Insert Paper Settings screen appears.
8-12
bizhub 751/601 (Version 2)
Application functions
8
8
Select the paper tray loaded with the paper for the insertion sheets, and then touch [OK].
9
Touch [OK], and then touch [OK] in the next screen that appears.
10
Touch [Post Inserter].
–
Touch a button for a page number, and then use the keypad to type in the number of the page where
the paper is to be inserted.
–
–
–
There are four Post Inserter screens. Touch
or
to display a different screen.
To arrange the page numbers in order, starting with the lowest number, touch [Sort].
To remove a page number that has been specified, touch the button for the page to be removed,
and then press the [C] (clear) key.
If the same page number is entered multiple times, copying is not possible. Delete repeated page
numbers.
If the entered page number is greater than the number of pages in the original, paper is not inserted.
–
–
11
Select the paper tray loaded with the paper for the insertion sheets, and then touch [OK].
12
Touch [OK], and then touch [OK] in the next screen that appears.
13
Specify any other desired copy settings.
14
Using the keypad, type in the desired number of copies.
15
Press the [Start] key.
bizhub 751/601 (Version 2)
8-13
Application functions
8
8.4
Inserting copies of a different original for a specified page ("Insert
Image" function)
A multi-page original later scanned from the original glass can be inserted at the specified location in an
original first scanned with the ADF. The inserted original is added after the specified pages.
!
Detail
A separate original can be inserted at a maximum of 30 locations within an original of up to 999 pages.
In double-sided originals, one double-sided page is considered to be two pages (one for the front and
one for the back).
34
12
REPORT 4
3
12
1
REPORT
1
A
B
Load the original into the ADF.
–
–
2
1
AB
34
2
For details on positioning the original, refer to "Feeding the original" on page 3-9.
For an original that exceeds 100 pages, refer to "Scanning the original in separate batches
("Separate Scan" setting)" on page 3-11.
Touch [Application], and then touch [Sheet/Cover/Chapter Insert].
–
To cancel changes to the settings for all Application functions, press the [Reset] key. All changes to
the settings are canceled.
The Sheet/Cover/Chapter Insert screen appears.
8-14
bizhub 751/601 (Version 2)
Application functions
3
8
Touch [Insert Image].
–
–
To cancel the setting and select the default, press the [Reset] key.
To cancel the "Insert Image" function, touch [No].
The Insert Image screen appears.
4
Using the keypad, specify the pages where the image is to be inserted.
–
–
–
–
–
–
–
–
There are two Insert Image screens. Touch
and
to display a different screen.
The inserted original is added after the specified page.
To arrange the page numbers in order, starting with the lowest number, touch [Sort].
To remove a page number that has been specified, touch the button for the page to be removed,
and then press the [C] (clear) key.
If the original scanned from the original glass has more pages than the number of pages specified
in the Insert Image screen, the extra pages of the insertion original are printed at the end of the
original.
If the original scanned from the original glass has fewer pages than the number of pages specified
in the Insert Image screen, the missing insertion pages are not printed.
If the same page number is specified twice, two insertion original pages are added at the specified
location.
If the specified page number is greater than the total number of pages in the main original, the
corresponding insertion original page is added at the end of the original copy.
5
Touch [OK], and then touch [OK] in the next screen that appears.
6
Specify any other desired copy settings.
7
Using the keypad, type in the desired number of copies.
bizhub 751/601 (Version 2)
8-15
Application functions
8
8
Press the [Start] key.
Scanning begins.
9
Place the original to be inserted on the original glass.
–
10
For details on positioning the original, refer to "Feeding the original" on page 3-9.
Press the [Start] key.
Scanning begins.
11
Touch [Finish].
–
12
8-16
To insert a multi-page original, repeat steps 9 and 10 until all pages of the insertion original are
scanned in the order that they are to be inserted.
Press the [Start] key.
bizhub 751/601 (Version 2)
Application functions
8.5
8
Specifying pages to be printed on the front side ("Chapters" function)
When making double-sided copies, the pages specified as the first page of a chapter can be printed on the
front side of the paper. If the original was arranged so that the specified page would be printed on the back
side of a page, the page is left blank and the specified page is printed on the front side of the next page. In
addition, the specified page can be printed on different paper.
!
Detail
A maximum of 30 pages can be specified to be printed on the front side of the paper within an original
of up to 999 pages.
In double-sided originals, one double-sided page is considered to be two pages (one for the front and
one for the back).
3
6
5
1
4
3
1
8
7
6
2
2
1
5
3
4
8
7
7
6
8
2
3
7
3
8
7
2
1
6
4
2
7
5
1
2
1
3
4
6
5
3
5
4
1
3
1
3
1
2
Note
Make sure that the paper loaded for the first page of the chapter and for the copy have the same size
and orientation.
bizhub 751/601 (Version 2)
8-17
Application functions
8
1
Position the original to be copied.
–
–
2
For details on positioning the original, refer to "Feeding the original" on page 3-9.
For an original that exceeds 100 pages, refer to "Scanning the original in separate batches
("Separate Scan" setting)" on page 3-11.
Touch [Application], and then touch [Sheet/Cover/Chapter Insert].
–
To cancel changes to the settings for all Application functions, press the [Reset] key. All changes to
the settings are canceled.
The Sheet/Cover/Chapter Insert screen appears.
3
Touch [Chapters].
The Chapter screen (for editing) appears.
8-18
bizhub 751/601 (Version 2)
Application functions
4
Using the keypad, specify the first page of the chapters.
–
–
–
–
–
–
5
8
There are two Chapter screens. Touch
and
to display a different screen.
To arrange the page numbers in order, starting with the lowest number, touch [Sort].
To remove a page number that has been specified, touch the button for the page to be removed,
and then press the [C] (clear) key.
Under "Original > Copy", select "1-Sided > 2-Sided".
If the same page number is entered multiple times, copying is not possible. Delete repeated page
numbers.
If the specified page number is greater than the number of pages in the original, that page number
is ignored.
Under "Chapter Paper", touch [Copy Insert] or [None].
–
–
–
If "None" is selected, all pages of the copy are printed on the same paper.
To cancel the setting and select the default, press the [Reset] key.
To cancel the "Chapters" function, touch [No].
bizhub 751/601 (Version 2)
8-19
Application functions
8
–
8-20
If "Copy Insert" is selected, [Chapter Paper] appears. Touch [Chapter Paper], select the paper to be
used for the first page of the chapter, and then touch [OK].
6
Touch [OK], and then touch [OK] in the next screen that appears.
7
Specify any other desired copy settings.
8
Using the keypad, type in the desired number of copies.
9
Press the [Start] key.
bizhub 751/601 (Version 2)
Application functions
8.6
8
Scanning originals with different settings and printing copies all
together ("Program Jobs" function)
Loaded original pages can be scanned with different settings and their copies can be printed together.
Different Zoom or Paper settings can be specified for a part of the original or Finishing settings or a numbering
function can be set after the entire original is scanned, and then all copies can be printed together.
REPORT 4
3
12
REPORT
3
12
Original 2
4
123
00
01
Original 1
34
12
34
12
REPORT
4
123
Original 3
2
Note
100 original batches can be set.
The "Group" Finishing setting is not available when programming jobs. Instead, select "Sort".
1
Position the original to be copied.
–
–
2
For details on positioning the original, refer to "Feeding the original" on page 3-9.
When saving scanned data in a user box, some scanned data may be lost if more than 10,000 pages
are saved in the box.
Touch [Application], and then touch [Sheet/Cover/Chapter Insert].
–
To cancel changes to the settings for all Application functions, press the [Reset] key. All changes to
the settings are canceled.
The Sheet/Cover/Chapter Insert screen appears.
bizhub 751/601 (Version 2)
8-21
Application functions
8
3
Touch [Program Jobs], and then touch [OK].
4
Select the desired copy settings, and then press the [Start] key.
– To print a single copy to be checked, press the [Proof Copy] key.
Scanning begins.
5
Touch [Fix], and then touch [OK].
–
–
8-22
If the original was loaded on the original glass, touch [Finish] in the screen that appears, requesting
confirmation that scanning is finished.
If "Retry" was selected, touch [Change Setting] to change the copy settings.
bizhub 751/601 (Version 2)
Application functions
6
Position the next original, and then touch [Change Setting].
7
Select the desired copy settings, and then press the [Start] key.
8
–
–
To print a single copy to be checked, press the [Proof Copy] key.
Repeat steps 5 to 7 until all originals have been scanned. The amount of memory available can be
checked beside "Memory" in the lower-left corner of the screen. In addition, the number of original
batches can be checked beside "Scanned Batches".
– When the memory is full, a message appears. Select whether to delete the last part of the data and
scan it again, delete the last part of the data and print, or delete all of the original data.
– To cancel changes to the settings, touch [Cancel].
Scanning begins. After scanning is finished, touch [Fix], and then touch [OK].
Is there more information about the settings?
% Refer to the appropriate section.
?
8
After all original pages have been scanned, touch [Finish].
A message appears, requesting confirmation that scanning is finished.
bizhub 751/601 (Version 2)
8-23
Application functions
8
9
Touch [Yes], and then touch [OK].
–
10
8-24
If "No" was selected, touch [Change Setting] to change the copy settings.
Specify any other desired copy settings.
–
Touch [Print List], and then specify the printing method for the entire scanned original.
?
%
Is there more information about the settings?
Refer to the appropriate section.
bizhub 751/601 (Version 2)
Application functions
8
11
Using the keypad, type in the desired number of copies.
12
Touch [Start] or press the [Start] key.
–
If [Cancel] is touched, a message appears, requesting confirmation to delete the data. To stop
printing, touch [Yes], and then touch [OK].
bizhub 751/601 (Version 2)
8-25
Application functions
8
8.7
Reversing black-and-white gradation of the original ("Neg./Pos.
Reverse" function)
1
Position the original to be copied.
–
2
Touch [Application].
–
3
To cancel changes to the settings for all Application functions, press the [Reset] key. All changes to
the settings are canceled.
Touch [Neg./Pos. Reverse].
?
%
8-26
For details on positioning the original, refer to "Feeding the original" on page 3-9.
To cancel the "Neg./Pos. Reverse" function
Touch [Neg./Pos. Reverse] again.
4
Specify any other desired copy settings.
5
Using the keypad, type in the desired number of copies.
6
Press the [Start] key.
bizhub 751/601 (Version 2)
Application functions
8.8
8
Producing separate copies of each page in a page spread ("Book
Copy" function)
An open book or catalog can be copied with the left and right pages on separate sheets of paper.
The following copy methods are available, and there are settings for adding front and back covers.
Setting
Description
Book Spread
Both pages of the page spread are printed on the same page.
Separation
Separate copies of each page in the page spread are printed in the original page order.
The original is scanned to fit the size of paper that will be used.
Front Cover
The front cover and separate copies of each page in the page spreads are printed in the
original page order.
Front and Back Cover
The front cover, separate copies of each page in the page spreads and the back cover
are printed in the original page order.
SURVEYOR’S
REPORT
SURVEYOR’S
REPORT
0
Place the original on the original glass. Be sure to keep the ADF open throughout the scanning job.
1
Place the pages on the original glass, starting with the first page.
–
–
For details on positioning the original, refer to "Feeding the original" on page 3-9.
If "Front and Back Cover" was selected, the front cover is scanned before the back cover, and then
all page spreads are scanned in order.
How are the front and back covers copied?
% Scan the front cover, then the back cover, and then scan the remainder of the original.
?
2
Load the paper to be used into the desired paper tray.
bizhub 751/601 (Version 2)
8-27
Application functions
8
3
Touch [Application], and then touch [Book Copy/Repeat].
–
To cancel changes to the settings for all Application functions, press the [Reset] key. All changes to
the settings are canceled.
The Book Copy/Repeat screen appears.
4
Touch [Book Copy].
The Book Copy screen appears.
8-28
bizhub 751/601 (Version 2)
Application functions
5
8
Touch the button for the desired setting.
–
–
–
–
–
If "Separation", "Front Cover" or "Front and Back Cover" is selected, [Binding Position] appears.
Select the binding position of the original.
If desired, specify a Book Erase function. Touch the button for the erasing method, touch [-] and [+]
to specify the width of the area to be erased, and then touch "OK".
Touch [<-->] on the Frame Erase screen/Center Erase screen to switch between the integer and the
fraction, specify the width to be erased, and then touch [OK].
If a decimal value is displayed in the Frame Erase screen/Center Erase screen, use the keypad to
type in the setting. For details on switching between decimal and fraction values, refer to "System
Settings" on page 12-17.
If a decimal value is displayed in the screen and the specified value is outside the allowable range,
the message "Input Error" appears. Type a value within the allowable range. If the value was
incorrectly entered, press the [C] (clear) key to erase the value, and then specify the correct value.
bizhub 751/601 (Version 2)
8-29
Application functions
8
–
To cancel the "Book Copy" function, touch [No].
Frame Erase screen
Center Erase screen
?
%
What do the Book Erase functions do?
The shadow of the book binding and the shadow of the book edges can be erased from the copies.
The "Frame Erase" and "Center Erase" functions can be used together.
How are settings specified for the "Frame Erase" and "Center Erase" functions.
% Refer to "Erasing black marks along borders ("Erase" function)" on page 8-51. In addition, if the
"Frame Erase" or "Center Erase" function in the Application screen is previously specified, [Frame
Erase] or [Center Erase] under "Book Erase" appears highlighted.
?
6
8-30
Touch [OK], and then touch [Close].
bizhub 751/601 (Version 2)
Application functions
8
7
In the Basic screen, touch [Paper], and then select the paper tray loaded with the paper.
8
Specify any other desired copy settings.
–
To cancel the setting and select the default, press the [Reset] key.
9
Using the keypad, type in the desired number of copies.
10
Press the [Start] key.
–
For details on positioning the original, refer to "Scanning a multi-page original from the original
glass" on page 3-15.
– Position the next page and repeat step 10 until all pages of the original are scanned.
Scanning begins.
If "Book Spread" or "Separation" is selected, printing begins.
If "Front Cover" or "Front and Back Cover" is selected, continue with step 11.
11
After all original pages have been scanned, touch [Finish].
–
If "Front and Back Cover" was selected, the back cover is scanned after the front cover, and then
all page spreads are scanned in order.
SURVEYOR’S
REPORT
SURVEYOR’S
REPORT
bizhub 751/601 (Version 2)
8-31
Application functions
8
–
If "Front Cover" was selected, all page spreads are scanned in order after the front cover.
SURVEYOR’S
REPORT
12
8-32
Press the [Start] key.
bizhub 751/601 (Version 2)
Application functions
8.9
8
Tiling copy images ("Image Repeat" function)
An original image can be repeatedly printed on a single sheet of paper.
The possible number of repeating images is automatically selected based on the size of the loaded original,
the specified paper size and the zoom ratio.
The following repeating formats and settings are available.
Setting
Description
With Margin
Multiple copies are printed of the entire image within the specified area. The area around
the image appears as a margin.
Without Margin
Multiple copies of the selected area of the image are printed to fill the paper; however,
a part of the image may be cut off.
2/4/8 Repeat
A fixed number of copies of the selected image area are printed in the paper. The
number of repeating copies can be set to 2, 4 or 8 times. However, any part of the image
that does not fit within its specific section of the paper is cut off.
Original
With Margin
Without Margin
1
Position the original to be copied.
–
For details on positioning the original, refer to "Feeding the original" on page 3-9.
2
Load the paper to be used into the desired paper tray.
3
Touch [Application], and then touch [Book Copy/Repeat].
–
To cancel changes to the settings for all Application functions, press the [Reset] key. All changes to
the settings are canceled.
The Book Copy/Repeat screen appears.
bizhub 751/601 (Version 2)
8-33
Application functions
8
4
Touch [Image Repeat].
The Image Repeat screen appears.
5
Under "Layout", touch [With Margin] or [Without Margin], or touch [2/4/8 Repeat].
–
8-34
To cancel the "Image Repeat" function, touch [No].
bizhub 751/601 (Version 2)
Application functions
–
–
8
Touching [2/4/8 Repeat] displays the 2/4/8 Repeat screen, where the number of repeats and the
interval can be selected.
When selecting [2 Repeat], touch [2 Repeat Detail Settings] to specify Image Direction and Repeat
Interval Settings.
bizhub 751/601 (Version 2)
8-35
Application functions
8
6
Check the scanning size under "Scan Range", touch [OK], and then touch [Close] in the next screen
that appears.
–
–
If the original size does not appear under "Scan Range" or to specify the scanning area, touch [Set
Range], and then specify the scanning area from any of the screens.
To cancel changes to the settings, touch [Cancel].
Set Range screen
Custom Size screen
Can sizes in metrics be displayed?
% Touch
or
to display a different list of sizes.
?
Can any size be specified?
% Any size can be specified from the Custom Size screen. Touch [X] or [Y], touch [<-->] to switch
between the integer and the fraction, and then touch [–] and [+] to specify the size of the document.
If a decimal value is displayed in the screen, press the [C] (clear) key, and then use the keypad to
type in the setting. For details on switching between decimal and fraction values, refer to "System
Settings" on page 12-17.
If a decimal value is displayed in the screen and the specified value is outside the allowable range,
the message "Input Error" appears. Type a value within the allowable range. If the value was
incorrectly entered, press the [C] (clear) key to erase the value, and then specify the correct value.
?
8-36
bizhub 751/601 (Version 2)
Application functions
7
In the Basic screen, touch [Paper], and then select the paper tray loaded with the paper.
–
8
8
If settings were specified in the 2/4/8 Repeat screen, touch [Zoom] in the Basic screen, and then
specify the zoom ratio setting.
Specify any other desired copy settings.
–
To cancel the setting and select the default, press the [Reset] key.
9
Using the keypad, type in the desired number of copies.
10
Press the [Start] key.
bizhub 751/601 (Version 2)
8-37
Application functions
8
8.10
Dividing spread image into right and left pages using ADF ("Page
Separation" function)
A page spread image scanned from the ADF can be divided into two separate images of right and left pages.
A page spread image can be divided with the left and right halves copied onto separate pages. With singlesided copying, the two halves are printed on two separate pages. With double-sided copying, the two halves
are printed on the front and back sides of a single page.
1
Load the original in the ADF.
–
–
2
Load paper of size A4 v, B5 v, and 8-1/2 e 11 v into the desired paper tray.
–
3
8-38
For details on positioning the original, refer to "Feeding the original" on page 3-9.
For an original that exceeds 80 pages, refer to "Scanning the original in separate batches ("Separate
Scan" setting)" on page 3-11.
Available paper sizes are A4 v, B5 v, and 8-1/2 e 11 v. Auto Paper Select will not function.
Touch [Paper].
bizhub 751/601 (Version 2)
Application functions
8
4
Touch the desired tray key to select the tray loaded with A4 v, B5 v, and 8-1/2 e 11 v paper.
5
Touch [Application], and then touch [Book Copy/Repeat].
–
To cancel changes to the settings for all Application functions, press the Reset key, All changes to
the settings are canceled.
The Book Copy/Repeat screen appears.
6
Touch [Page Separation].
The Page Separation screen appears.
bizhub 751/601 (Version 2)
8-39
Application functions
8
7
Select the binding position of the spread original.
–
8
Touch [OK], and then touch [Close].
9
In the Basic screen, touch Paper, and then select the paper tray loaded with the paper.
10
Specify any other desired copy settings.
–
–
8-40
For the spread original to read from the left page to the right page, touch [Left Bind] to highlight it.
On the contrary, if the spread original reads from the right page to the left page, touch [Right Bind].
Auto Zoom will not function. The magnification can be changed as desired.
To cancel the setting and select the default press the [Reset] key.
11
Using the keypad, type in the desired number of copies.
12
Press the [Start] key.
bizhub 751/601 (Version 2)
Application functions
8.11
8
Adding a binding margin to copies ("Page Margin" function)
Copies can be printed with a binding margin so that the pages can easily be filed. When making double-sided
copies, the image orientation can be adjusted by specifying the position of the binding margin. In addition,
the image orientation can be adjusted without creating a binding margin.
"Left" setting
1
4
23
ABC
ABC
DEF
ABC
DEF
ABC
GHI
DEF
GHI 4
DEF
GHI
GHI 23
1
3
1
ABC
2 DEF
GHI
AB
3
E
D
GH
"Top" setting
22
4
ABC
1 ABC
ABC
DEF
DEF
ABC
GHI
DEF
GHI 4
DEF
GHI
GHI 22
1
23
4
ABC
1 ABCDEF
ABC
DEF
ABC
GHI
DEF
GHI 4
DEF
GHI
GHI 23
1
3
ABC
DEF
GHI
3
2 ABC
ABC 1
DEF
DEF
"Right" setting
ABC
ABC 1
DEFABC
DEF
ABC
GHIDEF
GHI
DEF
4 4GHI
GHI
2
2
1
3
ABC
1
DEF 2
GHIB
3 EFC
HI
!
Detail
If the positions of the staples or punched holes are different from the binding position, the positions of
the staples or punched holes are given priority.
1
Position the original to be copied.
–
2
For details on positioning the original, refer to "Feeding the original" on page 3-9.
Touch [Application], and then touch [Page Margin].
–
To cancel changes to the settings for all Application functions, press the [Reset] key. All changes to
the settings are canceled.
The Page Margin screen appears.
bizhub 751/601 (Version 2)
8-41
Application functions
8
3
Select the position of the binding margin.
–
–
–
–
To cancel the setting and select the default, press the [Reset] key.
To cancel the "Page Margin" function, touch [No].
If "Auto" is selected, the binding margin is set at the top or at the left.
If "Auto" is selected for the binding position, load the original with the top toward the back of the
machine. If the original is loaded in any other orientation, the correct position will not be selected.
What happens when "Auto" is selected?
% The factory default setting is "Auto". Touch [Auto] to automatically determine the binding position
according to the orientation of the loaded original. If the original length is 297 mm or less, a binding
position along the long side of the paper is selected. If the original length is more than 297 mm, a
binding position along the short side of the paper is selected.
?
4
Touch [-] or [+] to specify the binding margin width.
–
If "None" is selected, the binding margin width is set to 0 mm. When making double-sided copies,
the image orientation can adjusted without creating a binding margin.
– If a decimal value is displayed in the screen, use the keypad to type in the setting. For details on
switching between decimal and fraction values, refer to "System Settings" on page 12-17.
– If a decimal value is displayed in the screen and the specified value is outside the allowable range,
the message "Input Error" appears.
Type a value within the allowable range. If the value was incorrectly entered, press the [C] (clear) key
to erase the value, and then specify the correct value.
How can the entered margin position be corrected?
% Without changing the margin width, change the margin position.
?
5
If necessary, touch [Image Shift].
The Image Shift screen appears.
8-42
bizhub 751/601 (Version 2)
Application functions
6
Adjust the position of the image, and then touch [OK].
–
–
–
7
8
Touch [Left], [Right], [Top] or [Bottom] to select the direction to be adjusted, and then use the
keypad or touch [-] and [+] to specify the adjustment amount.
To cancel the shift, touch [No Shift].
To adjust the position of the image on the back side of the paper when printing double-sided copies,
touch [Change Back Shift].
If desired, touch [Original Direction], and then select the setting appropriate for the original.
–
For details on specifying the original orientation, refer to "Selecting the original orientation ("Original
Direction" settings)" on page 3-26.
8
Touch [OK].
9
Specify any other desired copy settings.
10
Using the keypad, type in the desired number of copies.
11
Press the [Start] key.
bizhub 751/601 (Version 2)
8-43
Application functions
8
8.12
Adjusting the image to fit the paper ("Image Adjust" settings)
Use this function to make a copy adjusting the position of printed image.
The Centering function centers the original image on copy paper.
Setting
Description
Centering
The image is centered in the paper without being enlarged.
Full Scan
The full image is scanned without triming to create margins. Even if text is printed to
the edges of the original, it can be copied without being cut off.
Full Scan
Centering
!
Detail
Normally, images are trimmed by 3 mm at the top, 4 mm at the bottom, and 2 mm on each side
(left/right) from the paper size.
If [Full Scan] is selected, images are not trimmed but copied to the edge of the sheet.
1
Position the original to be copied.
–
2
For details on positioning the original, refer to "Feeding the original" on page 3-9.
Touch [Application], and then touch [Image Adjust].
–
To cancel changes to the settings for all Application functions, press the [Reset] key. All changes to
the settings are canceled.
The Image Adjust screen appears.
8-44
bizhub 751/601 (Version 2)
Application functions
3
Select the image adjusting method.
–
4
8
To cancel the "Setting", touch [No].
Check the original size, and then touch [OK].
–
If the original size cannot be detected automatically or to specify the original size, touch [Original
Size], and then specify the original size from any of the screens.
–
–
Touch
or
to display a different list of standard sizes.
To specify a custom size, touch [Custom Size] to display the Custom Size screen. Touch [X] or [Y]
to select the dimension, and use the keypad to specify the desired value. (To enter a value, press
the [C] (clear) key, and then use the keypad to type in the new value.)
bizhub 751/601 (Version 2)
8-45
Application functions
8
–
5
Specify any other desired copy settings.
–
8-46
If a value outside the allowable range is specified, the message "Input Error" appears. If "Input Error"
appeared or if the value was incorrectly entered, press the [C] (clear) key, and then specify the
correct value.
To cancel the setting and select the default, press the [Reset] key.
6
Using the keypad, type in the desired number of copies.
7
Press the [Start] key.
bizhub 751/601 (Version 2)
Application functions
8.13
8
Copying with the page layout of a booklet ("Booklet" function)
The page order of the scanned original is automatically arranged to produce double-sided copies in a page
layout for center binding, such as for a magazine. Stapling is possible only when optional saddle stitcher on
the finisher is installed.
“Left Bind” setting
5
4
6 3
3
8
1
78
3 6
5
12
REPORT
4
REPORT
7
12
3
3
2
68 1
78
“Right Bind” setting
6
2
7
61 8
REPORT
1
8
!
Detail
Generally, a multiple of 4 original pages is required with a single-sided original, and a multiple of 2
original pages is required with a double-sided original. If there are not enough pages, blank pages are
automatically added at the end.
For details on stapling, refer to "Binding copies at the center ("Center Staple & Fold" setting)" on
page 3-79.
For an original that exceeds 100 pages, refer to "Scanning the original in separate batches ("Separate
Scan" setting)" on page 3-11.
The width of the binding margin is automatically specified.
1
Position the original to be copied.
–
2
For details on positioning the original, refer to "Feeding the original" on page 3-9.
Touch [Application], and then touch [Booklet].
–
To cancel changes to the settings for all Application functions, press the [Reset] key. All changes to
the settings are canceled.
bizhub 751/601 (Version 2)
8-47
Application functions
8
3
Touch [Left Bind] or [Right Bind].
–
–
–
–
–
8-48
If the original contains only pages in the landscape orientation, they will be bound at the top,
regardless of which setting is selected.
To cancel the setting and select the default, press the [Reset] key.
To cancel the "Booklet" function, touch [No].
To adjust the image position widthwise and lengthwise as desired, touch [Image Shift], specify the
shift amount, then touch [OK].
For details of shift amount setting, refer to "Adding a binding margin to copies ("Page Margin"
function)" on page 8-41.
bizhub 751/601 (Version 2)
Application functions
–
8
To make the specified amount of blank space in the center between the two images on a page,
touch [Page Spacing].
Select [Front/Back] to make the same amount of blank space, or [Front Side]/[Back Side] to specify
the different amount for each, then use [-], [+], or control panel keypad to enter the desired amount.
Touch [OK] to complete the setting.
4
Touch [OK].
5
Specify any other desired copy settings.
6
Using the keypad, type in the desired number of copies.
7
Press the [Start] key.
bizhub 751/601 (Version 2)
8-49
Application functions
8
8.14
Erasing specified area of copies (Erase)
When the original is scanned from the original glass, black copy marks may be produced along borders and
center line, and also around punch holes.
Use this function to eliminate them from the copies and lower the toner consumption at the same time.
The following three settings are provided for the Erase function. These are compatible with each other.
Setting
Description
Frame Erase
This function erases black marks along the borders of printed sheets which tend to
be created when using the original glass to scan thick original such as a book. Use
this function also for the original already having black marks along borders.
Refer to "Erasing black marks along borders ("Erase" function)" on page 8-51
Center Erase
This function erases black marks along the center fold of printed sheets which tend
to be created when using the original glass to scan thick original such as a book. Use
this function also for the original already having black marks along the center fold.
Refer to "Erasing black marks along center fold ("Center Erase" function)" on
page 8-53
Non-Image Area Erase
This function detects the original size placed on the original glass and erases outside
area of the original.
Refer to "Erasing outside areas of the original ("Non-Image Area Erase" function)" on
page 8-55
Frame Erase
Center Erase
Non-Image Area Erase
8-50
bizhub 751/601 (Version 2)
Application functions
8.14.1
8
Erasing black marks along borders ("Erase" function)
Copies can be produced by erasing unwanted areas around the original, such as the transmission information
on received faxes and the shadows of punched holes.
With frame erasing, the same width can be erased along all four sides of the original or a different width can
be erased along each side of the original.
1
Position the original to be copied.
–
2
For details on positioning the original, refer to "Feeding the original" on page 3-9.
Touch [Application], and then touch [Erase].
–
To cancel changes to the settings for all Application functions, press the [Reset] key. All changes to
the settings are canceled.
The Erase screen appears.
3
Touch [Frame Erase].
The Frame Erase screen appears.
bizhub 751/601 (Version 2)
8-51
Application functions
8
4
Touch the button for the desired position to be erased.
–
–
To cancel the setting and select the default, press the [Reset] key.
To cancel the "Frame Erase" function, touch [No].
What happens when [Frame] is selected?
% The same width is erased on all four sides of the original. The factory default setting is "Frame".
?
?
%
5
Touch [<->] to switch between the integer and the fraction, and then touch [–] and [+] to specify the
width to be erased.
–
–
–
–
8-52
Can the settings be combined?
"Frame" cannot be combined with the other settings ("Top", "Left", "Right" or "Bottom").
To specify a different width to be erased depending on the position, specify different settings for
"Top", "Left", "Right", and "Bottom".
When using the keypad to specify the settings, press the [C] (clear) key, and then specify the setting.
If a decimal value is displayed in the screen, press the [C] (clear) key, and then use the keypad to
type in the setting. For details on switching between decimal and fraction values, refer to "System
Settings" on page 12-17.
If a decimal value is displayed in the screen and the specified value is outside the allowable range,
the message "Input Error" appears.
Type a value within the allowable range. If the value was incorrectly entered, press the [C] (clear) key
to erase the value, and then specify the correct value.
6
Touch [OK].
7
Specify any other desired copy settings.
8
Using the keypad, type in the desired number of copies.
9
Press the [Start] key.
bizhub 751/601 (Version 2)
Application functions
8.14.2
8
Erasing black marks along center fold ("Center Erase" function)
This function erases black marks along the center fold of printed sheets which tend to be created when using
the original glass to scan thick original such as a book.
Use this function also for the original already having black marks along the center fold.
With frame erasing, the same width can be erased along all four sides of the original or a different width can
be erased along each side of the original.
1
Position the original to be copied.
–
2
For details on positioning the original, refer to "Feeding the original" on page 3-9.
Touch [Application], and then touch [Erase].
–
To cancel changes to the settings for all Application functions, press the [Reset] key. All changes to
the settings are canceled.
The Erase screen appears.
3
Touch [Center Erase].
The Center Erase screen appears.
bizhub 751/601 (Version 2)
8-53
Application functions
8
4
Touch [<->] to switch between the integer and the fraction, and then touch [–] and [+] to specify the
width to be erased.
–
–
–
When using the keypad to specify the settings, press the [C] (clear) key, and then specify the setting.
To cancel the setting and select the default, press the [Reset] key.
To cancel the "Center Erase" function, touch [No].
What happens when a value outside of the allowable range is specified?
% The massage "Input error" appears. If "Input error" appears or if the erased width was incorrectly
entered, press the [C] (clear) key in the keypad, and then specify the correct value.
?
8-54
5
Touch [OK].
6
Specify any other desired copy settings.
7
Using the keypad, type in the desired number of copies.
8
Press the [Start] key.
bizhub 751/601 (Version 2)
Application functions
8.14.3
8
Erasing outside areas of the original ("Non-Image Area Erase" function)
This function detects the original size placed on the original glass and erases outside areas of the original.
1
Position the original to be copied.
–
2
For details on positioning the original, refer to "Feeding the original" on page 3-9.
Touch [Application], and then touch [Erase].
–
To cancel changes to the settings for all Application functions, press the [Reset] key. All changes to
the settings are canceled.
The Erase screen appears.
3
Touch [Non-Image Area Erase], then touch [OK].
–
–
To cancel the setting and select the default, press the [Reset] key.
To cancel the "Non-Image Area Erase" function, touch the key again.
4
Specify any other desired copy settings.
5
Using the keypad, type in the desired number of copies.
6
Press the [Start] key.
bizhub 751/601 (Version 2)
8-55
Application functions
8
8.15
Printing the date/time or page number on copies (Stamp/Composition
functions)
The date/time or page number can be added to copies at the specified location, or a distribution number can
be added when multiple copies are made.
The following Stamp/Composition functions are available and can be combined.
Function
Description
Date/Time
Select a format and print the date or time on the specified pages.
Page Number
Select a format and print page numbers starting with the specified page number.
Stamp
•
•
Preset Stamp
Print copies with previously stored preset stamps overlapping pages.
Registered Stamp
Print copies with a stamp registered with the Copy Protection Utility overlapping pages.
Copy Protect
Print copies with copy protection text (hidden text that prevents unauthorized copying), such
as a preset stamp or the date.
Stamp Repeat
Print copies with text (such as registered stamps, preset stamps or the date) repeating
throughout the page.
Overlay
Copies can be printed with the contents of the first original page overlapped by (as an overlay
image) the remaining original pages.
Registered Overlay
A previously scanned image can be stored on the HDD (Register Overlay Image) and recalled
when needed to printed overlapping a document (Recall Overlay Image).
Header/Footer
The date and time or a distribution number can be printed on each page.
This function is available only when specified by the administrator.
Distribution Control
Number
Print four-digit distribution number to fill the background of each copied set.
Watermark
Print the desired letter type selected from preset watermarks in the center of printed page
background.
3
12
REPORT
00
REPORT
3
12
01
3
12
3
12
!
Detail
The [Registered Overlay] key appears only when the machine is equipped with in HDD.
To use Header/Footer function, a header/footer should be registered in advance from Administrator
mode.
For details on registering headers/footers, refer to "Specifying headers/footers" on page 12-64.
!
Detail
For details on printing a date/time stamp, refer to page 8-57.
For details on printing a page number stamp, refer to page 8-60.
For details on printing a stamp, refer to page 8-63.
For details on printing a copy protection stamp, refer to page 8-66.
For details on printing a repeating stamp, refer to page 8-73.
For details on printing an overlay, refer to page 8-78.
For details on printing a registered overlay, refer to page 8-81.
8-56
bizhub 751/601 (Version 2)
Application functions
8
For details on printing a header/footer, refer to page 8-87.
For details on printing a distribution control number, refer to page 8-89.
For details on printing a watermark, refer to page 8-91.
8.15.1
Printing the date/time ("Date/Time" function)
1
Position the original to be copied.
–
2
For details on positioning the original, refer to "Feeding the original" on page 3-9.
Touch [Application], and then touch [Stamp/Composition].
–
To cancel changes to the settings for all Application functions, press the [Reset] key. All changes to
the settings are canceled.
The Stamp/Composition screen appears.
3
Touch [Date/Time].
The Date/Time screen appears.
bizhub 751/601 (Version 2)
8-57
Application functions
8
4
Touch buttons under "Date Format", "Time Format" and "Pages" to specify the various settings.
–
–
–
To cancel the "Date/Time" function, touch [No].
To print the date/time only on the first page, touch [1st Page Only].
The stamp will not be printed on blank pages inserted using the "Cover Sheet", "Insert Sheet" and
"Chapters" functions.
Can the time be omitted?
% If "None" is selected, the time is not printed.
?
5
Touch [Print Position], and then select the printing position.
–
–
8-58
To make fine adjustments to the printing position, touch [Adjust Position]. Select the desired
direction under "Left & Right Adjustment" or "Top & Bottom Adjustment", touch [<->] to switch
between the integer and the fraction, touch [–] and [+] to specify the adjustment amount, and then
touch [OK].
If a decimal value is displayed in the screen, press the [C] (clear) key, and then use the keypad to
type in the adjustment amount. For details on switching between decimal and fraction values, refer
to "System Settings" on page 12-17.
bizhub 751/601 (Version 2)
Application functions
–
8
If a decimal value is displayed in the screen and the specified value is outside the allowable range,
the message "Input Error" appears.
Type a value within the allowable range. If the value was incorrectly entered, press the [C] (clear) key
to erase the value, and then specify the correct value.
What are the limits on the adjustment amount?
% The print position can be finely adjusted in 0.1 mm increments.
?
?
%
6
Can no adjustments be made?
To make no left/right or up/down adjustments, touch [No Adjustment].
If necessary, specify the other settings.
–
To specify the text size, touch [Text Size], and then select the size The factory default is 10 pt.
7
Touch [OK], and then touch [Close] in the next screen that appears.
8
Specify any other desired copy settings.
–
To cancel the setting and select the default, press the [Reset] key.
9
Using the keypad, type in the desired number of copies.
10
Press the [Start] key.
bizhub 751/601 (Version 2)
8-59
Application functions
8
8.15.2
Printing the page number ("Page Number" function)
1
Position the original to be copied.
–
2
For details on positioning the original, refer to "Feeding the original" on page 3-9.
Touch [Application], and then touch [Stamp/Composition].
–
To cancel changes to the settings for all Application functions, press the [Reset] key. All changes to
the settings are canceled.
The Stamp/Composition screen appears.
3
Touch [Page Number].
The Page Number screen appears.
8-60
bizhub 751/601 (Version 2)
Application functions
4
8
Using the keypad, type in the starting page number for printing.
–
–
–
–
–
–
If desired, touch [Chapter], and then use the keypad to type in the chapter number. The entered
chapter number is printed if "1-1, 1-2...." is selected under "Page Number Type".
The setting for "Page Number" can be set to a number between –99999 and 99999, and the setting
for "Chapter" can be set to a number between –100 and 100.
When specifying a setting for "Starting Page Number", switch the number between positive and
negative by pressing the key.
If a negative value is specified, the numbers are not printed until the numbering reaches 1. For
example, if "–1" was specified, the numbers are printed starting with "1" on the third copied page.
To print multiple chapters, specify the first page of each chapter using the "Chapters" function. For
details, refer to "Specifying pages to be printed on the front side ("Chapters" function)" on
page 8-17.
To cancel the "Page Number" function, touch [No].
5
Select a setting under "Page Number Type".
6
Touch [Print Position], and then select the printing position.
–
–
To make fine adjustments to the printing position, touch [Adjust Position]. Select the desired
direction under "Left & Right Adjustment" or "Top & Bottom Adjustment", touch [<->] to switch
between the integer and the fraction, touch [–] and [+] to specify the adjustment amount, and then
touch [OK].
If a decimal value is displayed in the screen, press the [C] (clear) key, and then use the keypad to
type in the adjustment amount. For details on switching between decimal and fraction values, refer
to "System Settings" on page 12-17.
bizhub 751/601 (Version 2)
8-61
Application functions
8
–
If a decimal value is displayed in the screen and the specified value is outside the allowable range,
the message "Input Error" appears.
Type a value within the allowable range. If the value was incorrectly entered, press the [C] (clear) key
to erase the value, and then specify the correct value.
What are the limits on the adjustment amount?
% The print position can be finely adjusted in 0.1 mm increments.
?
?
%
7
If necessary, specify the other settings.
–
To also specify settings for the "Cover Sheet", "Insert Sheet" and "Chapters" Application functions,
touch [Insert Sheet Setting], and then select the settings for the pages to be printed.
–
Blank pages inserted using the "Cover Sheet", "Insert Sheet" and "Chapters" functions are only
counted, but page numbers are not printed on them.
If "Print on Back Cover Only" or "Do Not Print Page Number" is selected under "Cover Sheet", page
numbers are printed starting with "2" in single-sided copies and starting with "3" in double-sided
copies.
If "Do Not Print #" is selected, inserted pages are only counted, but page numbers are not printed
on them. If "Skip the Page(s)" is selected, inserted pages are not counted and page numbers are
not printed on them.
–
–
8-62
Can no adjustment be made?
To make no left/right or up/down adjustments, touch [No Adjustment].
bizhub 751/601 (Version 2)
Application functions
–
To specify the text size, touch [Text Size], and then select the size. The factory default is 10 pt.
8
Touch [OK], and then touch [Close] in the next screen that appears.
9
Specify any other desired copy settings.
–
8.15.3
8
To cancel the setting and select the default, press the [Reset] key.
10
Using the keypad, type in the desired number of copies.
11
Press the [Start] key.
Printing previously registered stamps ("Stamp" function)
1
Position the original to be copied.
–
–
2
Use the Copy Protection Utility to register a registered stamp. For details on registering stamps,
refer to the manual of the Copy Protection Utility.
For details on positioning the original, refer to "Feeding the original" on page 3-9.
Touch [Application], and then touch [Stamp/Composition].
–
To cancel changes to the settings for all Application functions, press the [Reset] key. All changes to
the settings are canceled.
The Stamp/Composition screen appears.
bizhub 751/601 (Version 2)
8-63
Application functions
8
3
Touch [Stamp].
–
To cancel the "Stamp" function, touch [No].
The Stamp screen appears.
4
Select the desired stamp under "Stamp Type/Preset Stamps" or "Stamp Type/Registered Stamps".
–
–
5
Select the desired setting under "Pages".
–
–
8-64
Touch
or
to display a different list of preset or registered stamps.
Only one stamp can be selected.
To print the stamp only on the front cover, touch [1st Page Only].
The stamp will not be printed on blank pages inserted using the "Cover Sheet", "Insert Sheet" and
"Chapters" functions.
bizhub 751/601 (Version 2)
Application functions
6
8
Touch [Print Position], and then select the printing position.
–
–
–
To make fine adjustments to the printing position, touch [Adjust Position]. Select the desired
direction under "Left & Right Adjustment" or "Top & Bottom Adjustment", touch [<->] to switch
between the integer and the fraction, touch [–] and [+] to specify the adjustment amount, and then
touch [OK].
If a decimal value is displayed in the screen, press the [C] (clear) key, and then use the keypad to
type in the adjustment amount. For details on switching between decimal and fraction values, refer
to "System Settings" on page 12-17.
If a decimal value is displayed in the screen and the specified value is outside the allowable range,
the message "Input Error" appears.
Type a value within the allowable range. If the value was incorrectly entered, press the [C] (clear) key
to erase the value, and then specify the correct value.
What are the limits on the adjustment amount?
% The print position can be finely adjusted in 0.1 mm increments.
?
?
%
Can no adjustments be made?
To make no left/right or up/down adjustments, touch [No Adjustment].
bizhub 751/601 (Version 2)
8-65
Application functions
8
7
Select the desired settings for "Text Size".
–
8.15.4
As the factory default, the following setting is selected.
Text Size: Std.
8
Touch [OK], and then touch [Close] in the next screen that appears.
9
Specify any other desired copy settings.
10
Using the keypad, type in the desired number of copies.
11
Press the [Start] key.
Printing copy protection text ("Copy Protect" function)
!
Detail
If the "Copy Protect" function is set, hidden text is printed in order to prevent unauthorized copying.
When an original printed with copy protection text is copied, the hidden text appears clearly repeated
in the copies so that the reader knows that it is a copy.
The copy protection text is printed on all pages. The pages cannot be specified.
8-66
bizhub 751/601 (Version 2)
Application functions
1
Position the original to be copied.
–
2
8
For details on positioning the original, refer to "Feeding the original" on page 3-9.
Touch [Application], and then touch [Stamp/Composition].
–
To cancel changes to the settings for all Application functions, press the [Reset] key. All changes to
the settings are canceled.
The Stamp/Composition screen appears.
3
Touch [Copy Protect].
bizhub 751/601 (Version 2)
8-67
Application functions
8
4
Select the desired type of copy protection text.
–
To cancel the Copy Protect function, touch [No].
–
Touching [Registered Stamp] or [Preset Stamp] displays a screen containing buttons for the
available stamps. Touch the button for the desired stamp, and then touch [OK].
Use the Copy Protection Utility to register a registered stamp. For details on registering stamps,
refer to the manual of the Copy Protection Utility.
The selected copy protection text formats appear in a column at the center of the screen. Up to eight
text lines can be combined.
Multiple registered stamps or preset stamps cannot be selected.
–
–
–
8-68
bizhub 751/601 (Version 2)
Application functions
–
–
–
–
–
–
–
5
8
Touching [Date/Time] displays the Copy Protect > Date/Time screen. Select the desired settings
under "Date Format" and "Time Format", and then touch [OK].
The copy protection date and time that is printed is the date and time when the original is scanned.
Touching [Other] displays a screen for specifying settings for other stamps. Touch the button for the
desired stamp, and then touch [OK].
To cancel the changes to the settings in each copy protection settings screen, touch [No].
To print the copy job number, touch [Yes] under "Job Number".
To print the serial number of this machine, touch [Yes] under "Serial Number". For details on
specifying settings for the serial number, contact your service representative.
To print the copy distribution number, touch [Yes] under "Distribution Control Number". A
distribution number between 1 and 99,999,999 can be specified.
Touch [Detailed Settings].
The Detailed Settings screen appears.
bizhub 751/601 (Version 2)
8-69
Application functions
8
6
Touch the desired button to change the setting values in each setting screen, and then touch [Close].
–
–
As the factory default, the following settings are selected.
Density: Std.; Copy Protect Pattern: Emboss Text; Text Size: Std.; Background Pattern: Pattern 1
The setting under "Pattern Contrast" in the Copy Protect Pattern screen can only be specified in
single increments between –2 and +2.
Density screen
Copy Protect Pattern screen
8-70
bizhub 751/601 (Version 2)
Application functions
8
Text Size screen
Background Pattern screen
7
If desired, touch [Change Pos./Delete], and then change the arrangement of the text.
–
To change the arrangement order, touch [Change Position], select the copy protection text to be
moved, and then touch either [Up] or [Down].
–
To add a space to the copy protection text, touch [Insert Space]. Touch either [Up] or [Down] to
move the round mark that appeared beside the specified copy protection text type, and then touch
[Insert].
bizhub 751/601 (Version 2)
8-71
Application functions
8
Insert Space scrren
–
To delete the copy protection text, touch [Delete], and then touch the button for the copy protection
text to be deleted.
Delete scrren
8
Touch [OK] and then touch [Close] in the next screen that appears.
9
Specify any other desired copy settings.
–
8-72
To cancel the setting and select the default, press the [Reset] key.
10
Using the keypad, type in the desired number of copies.
11
Press the [Start] key.
bizhub 751/601 (Version 2)
Application functions
8.15.5
8
Printing repeating stamps ("Stamp Repeat" function)
1
Position the original to be copied.
–
2
For details on positioning the original, refer to "Feeding the original" on page 3-9.
Touch [Application], and then touch [Stamp/Composition].
–
To cancel all settings for the Application functions, press the [Reset] key.
The Stamp/Composition screen appears.
3
Touch [Stamp Repeat].
The Stamp Repeat screen appears.
bizhub 751/601 (Version 2)
8-73
Application functions
8
4
Select the desired type of repeating stamp.
–
To cancel the "Stamp Repeat" function, touch [No].
–
Touch [Registered Stamp] or [Preset Stamp] to display a screen containing buttons for the available
stamps. Touch the button for the desired stamp, and then touch [OK].
Use the Copy Protection Utility to register a registered stamp. For details on registering stamps,
refer to the manual of the Copy Protection Utility.
The selected repeating stamp formats appear in a column at the center of the screen. Up to eight
text lines can be combined.
Multiple registered stamps or preset stamps cannot be selected.
–
–
–
8-74
bizhub 751/601 (Version 2)
Application functions
–
–
–
–
–
–
–
5
8
Touching [Date/Time] displays the Stamp Repeat > Date/Time screen. Select the desired settings
under "Date Type" and "Time Type", and then touch [OK].
The repeating stamp date and time that is printed is the date and time when the original is scanned.
Touching [Other] displays a screen for specifying settings for other stamps. Touch the button for the
desired stamp, and then touch [OK].
To cancel the changes to the settings in each repeating stamp settings screen, touch [No].
To print the copy job number, touch [Yes] under "Job Number".
To print the serial number of this machine, touch [Yes] under "Serial Number". For details on
specifying settings for the serial number, contact your service representative.
To print the copy distribution number, touch [Yes] under "Distribution Control Number". A
distribution number between 1 and 99,999,999 can be specified.
Touch [Detailed Settings].
The Detailed Settings screen appears.
bizhub 751/601 (Version 2)
8-75
Application functions
8
6
Touch the desired button to change the setting values in each setting screen, and then touch [Close].
–
As the factory default, the following settings are selected. Density: Std.; Text Size: Std.
Density screen
Text Size screen
8-76
bizhub 751/601 (Version 2)
Application functions
7
8
If desired, touch [Change Pos./Delete], and then change the arrangement of the text.
–
To change the arrangement order, touch [Change Position], select the repeating stamp text to be
moved, and then touch either [Up] or [Down].
Change Position screen
–
To add a space to the repeating stamp, touch [Insert Space]. Touch either [Up] or [Down] to move
the round mark that appeared beside the specified repeating stamp type, and then touch [Insert].
Insert Space screen
bizhub 751/601 (Version 2)
8-77
Application functions
8
–
To delete the repeating stamp text, touch [Delete], and then touch the button for the repeating
stamp text to be deleted.
Delete screen
8.15.6
8
Touch [OK], and then touch [Close].
9
Specify any other desired copy settings.
10
Using the keypad, type in the desired number of copies.
11
Press the [Start] key.
Printing the image scanned first overlapped by the remaining original pages
("Overlay" function)
Copies can be printed with the contents of the first scanned original page overlapped by the remaining
original pages.
In addition, a scanned original can be stored as a registered overlay and recalled and used later.
8-78
bizhub 751/601 (Version 2)
Application functions
8
1
Position the original for the overlay.
2
Touch [Application], and then touch [Stamp/Composition].
The Stamp/Composition screen appears.
3
Touch [Overlay].
–
To cancel the "Overlay" function, touch [No].
The Overlay screen appears.
bizhub 751/601 (Version 2)
8-79
Application functions
8
4
Select the desired settings for "Pages".
–
To print the overlay image only on the first copied page, touch [1st Page Only] under "Pages".
5
Touch [Close].
6
Specify any other desired copy settings.
7
Using the keypad, type in the desired number of copies.
8
Press the [Start] key.
!
Detail
If you cannot save a job with an overlay specified in a user box, select [Utility/Counter] - [User Settings]
- [Copier Settings] - [Separate Scan Output Method], and set to [Page Print]. For details, refer to
"Custom Display Settings" on page 12-19.
8-80
bizhub 751/601 (Version 2)
Application functions
8.15.7
8
Saving a scanned image as a registered overlay ("Registered Overlay" function)
1
Position the original to be stored as overlaying image.
2
Touch [Application], and then touch [Stamp/Composition].
The Stamp/Composition screen appears.
3
Touch [Registered Overlay].
The Registered Overlay screen appears.
bizhub 751/601 (Version 2)
8-81
Application functions
8
4
Touch [Register Overlay Image].
–
To cancel the Registered Overlay function, touch [No].
The Register Overlay Image screen appears.
5
Touch [New].
–
–
8-82
To overwrite the registered overlay with the new image, select a registered overlay, and then touch
[Overwrite].
To delete a registered overlay, select a registered overlay, and then touch [Delete].
bizhub 751/601 (Version 2)
Application functions
–
8
After touching the button for the registered overlay, the date that the overlay was registered
appears.
The Image Name Registration screen appears.
6
Type in the image name, and then touch [OK].
–
Touch the buttons in the keyboard that appears in the screen to type. For details on typing in text,
refer to "Entering text" on page 15-3.
bizhub 751/601 (Version 2)
8-83
Application functions
8
7
Check the original size of [Original Size], and then touch [OK].
–
8-84
If the original size cannot be detected automatically or to specify the original size, touch [Original
Size], and then specify the original size from any of the screens.
To cancel changes to the settings, touch [Cancel].
8
Touch [OK], and then touch [Close].
9
Specify any other desired copy settings.
10
Press the [Start] key.
bizhub 751/601 (Version 2)
Application functions
11
8
The original is scanned, then saved as a registered overlay.
2
Note
With the "Restrict User Access" parameter in Administrator mode, changes to a registered overlay
without administrator permission can be prevented.
8.15.8
Using a registered overlay ("Registered Overlay" function)
1
Position the original for overlay.
2
Touch [Application], and then touch [Stamp/Composition].
The Stamp/Composition screen appears.
bizhub 751/601 (Version 2)
8-85
Application functions
8
3
Touch [Registered Overlay].
The Registered Overlay screen appears.
4
Touch the button for the "Registered Overlay" to be used, and then touch [OK].
–
–
–
8-86
To cancel the "Registered Overlay" function, touch [OK].
After touching the button for the registered overlay, the date that the overlay was registered
appears.
To print the overlay image only on the first copied page, touch [1st Page Only] under "Pages".
5
Touch [OK] and then touch [Close] in the next screen that appears.
6
Specify any other desired copy settings.
7
Using the keypad, type in the desired number of copies.
8
Press the [Start] key.
bizhub 751/601 (Version 2)
Application functions
8.15.9
8
Printing a header/footer ("Header/Footer" function)
0
In order to use headers/footers, a header/footer must be registered in advance from Administrator
mode. For details on registering headers/footers, refer to "Specifying headers/footers" on page 12-64.
1
Position the original to be copied.
–
For details on positioning the original, refer to "Feeding the original" on page 3-9.
2
Touch [Application], and then touch [Stamp/Composition].
3
Touch [Header/Footer].
–
–
To cancel changes to the settings for all Application functions, press the [Reset] key. All changes to
the settings are canceled.
If no header/footer is registered in Administrator mode, [Header/Footer] does not appear.
The Header/Footer screen appears.
bizhub 751/601 (Version 2)
8-87
Application functions
8
4
Under "Recall Header/Footer", touch the button of the header/footer to be used, and then touch [OK].
–
8-88
To check or temporarily change the header/footer settings, touch [Check/Change Temporarily].
5
Touch [OK], and then touch [Close].
6
Specify any other desired copy settings.
7
Using the keypad, type in the desired number of copies.
8
Press the [Start] key.
bizhub 751/601 (Version 2)
Application functions
8.15.10
8
Printing the distribution control number ("Distribution Control Number" function)
1
Position the original to be copied.
–
2
For details on positioning the original, refer to "Feeding the original" on page 3-9.
Touch [Application], and then touch [Stamp/Composition].
–
To cancel changes to the settings for all Application functions, press the [Reset] key. All changes to
the settings are canceled.
The Stamp/Composition screen appears.
3
Touch [Distribution Control Number].
The Distribution Control Number screen appears.
bizhub 751/601 (Version 2)
8-89
Application functions
8
4
Using the keypad, type in the starting distribution control number for printing.
–
5
Select the desired setting under "Pages".
–
–
6
To print the distribution control number only on the first page, touch [1st Page Only].
The distribution control number will not be printed on blank pages inserted using "Cover Sheet",
"Insert Sheet", and "Chapters" functions.
If necessary, specify the other settings.
–
–
8-90
To cancel the Distribution Control Number function, touch [No].
As the factory default, the following settings are selected.
Density: Standard, Text Size: Standard
To specify the density, touch [Density], and then select the desired density.
bizhub 751/601 (Version 2)
Application functions
–
8.15.11
8
To specify the text size, touch [Text Size], and then select the desired size.
7
Touch [OK], and then touch [Close].
8
Specify any other desired copy settings.
9
Using the keypad, type in the desired number of copies.
10
Press the [Start] key.
Printing the watermark onto copies ("Watermark" function)
1
Position the original to be copied.
–
2
For details on positioning the original, refer to "Feeding the original" on page 3-9.
Touch [Application], and then touch [Stamp/Composition].
–
To cancel changes to the settings for all Application functions, press the [Reset] key. All changes to
the settings are canceled.
The Stamp/Composition screen appears.
bizhub 751/601 (Version 2)
8-91
Application functions
8
3
Touch [Watermark].
The Watermark screen appears.
4
Select the desired watermark.
–
8-92
To cancel the Watermark function, touch [No].
5
Touch [OK], and then touch [Close].
6
Specify any other desired copy settings.
7
Using the keypad, type in the desired number of copies.
8
Press the [Start] key.
bizhub 751/601 (Version 2)
Application functions
8.16
8
Saving the scanned original in a user box ("Save in User Box" function)
A scanned original can be saved in a user box. Documents saved in user boxes can be printed when
necessary.
!
Detail
For details on the user box settings, refer to the User manual – Box Operations.
1
Position the original to be copied.
2
Touch [Application], and then touch [Save in User Box].
3
Touch [User Box].
A screen for selecting a user box appears.
bizhub 751/601 (Version 2)
8-93
Application functions
8
4
5
8-94
Select the user box where the data is to be saved.
–
–
–
Touch the tab containing the desired user box, and then button for the user box.
To type in a user box number to specify the user box, touch [Enter User Box No.].
It is not necessary to enter the password when saving data, even if a password has been specified
for the box.
–
Touching [Search User Box] displays the Search User Box screen.
User boxes can be searched for by the first letter of their name. Touch [etc] or the button that
includes the first letter of the user box name to display a list of user boxes starting with the selected
letter. A user box can be selected from this screen.
Touch [OK].
bizhub 751/601 (Version 2)
Application functions
8
6
Check the name of the document to be saved. To change the name that is automatically specified,
touch [Document Name].
7
After typing in the name, touch [OK].
–
8
For details on typing in text, refer to "Entering text" on page 15-3.
Select whether or not a copy will also be printed when the data is saved. To print a copy, touch [Yes]
beside "Save & Print".
bizhub 751/601 (Version 2)
8-95
Application functions
8
9
Touch [OK].
– To cancel the "Save in User Box" function, touch [No].
The Application screen appears again.
10
Specify any other desired copy settings.
11
Press the [Start] key.
If [Yes] beside "Page Print" was selected, the scanned original is copied and the document data is
saved in the specified user box.
If [No] beside "Page Print" was selected, the data for the scanned original is saved in the specified user
box.
!
Detail
For details on using documents saved in user boxes, refer to the User manual – Box Operations.
If you cannot save a job with an overlay specified in a user box, select [Utility/Counter] - [User Settings]
- [Copier Settings] - [Separate Scan Output Method], and set to [Page Print]. For details, refer to
"Custom Display Settings" on page 12-19.
8-96
bizhub 751/601 (Version 2)
9
Replacing toner cartridges
and staple cartridges and
emptying hole-punch scrap
box
Replacing toner cartridges and staple cartridges and emptying hole-punch scrap box
9
Replacing toner cartridges and staple cartridges and
emptying hole-punch scrap box
9.1
Replacing the toner cartridge
9
When the toner is about to run out, an advanced warning message similar to the one shown below appears.
!
Detail
When the message appears, prepare to replace the toner cartridge according to your maintenance
agreement.
2
Note
After the message appears, the machine stops operating. Replace the toner cartridge according to your
maintenance agreement.
!
Detail
For details on replacing the toner cartridge, refer to "To replace the toner cartridge" on page 9-5.
bizhub 751/601 (Version 2)
9-3
9
Replacing toner cartridges and staple cartridges and emptying hole-punch scrap box
Display in Enlarge Display mode
When the toner is about to run out, [ ! ] appears on the screen.
Touch [ ! ] to display the following message.
When the toner is empty, the screen shown below appears.
7 WARNING
Precaution for the empty toner cartridge
If it is thrown into a fire, the toner may ignite and cause a dangerous situation.
%
DO NOT THROW toner or the empty toner cartridge into a fire!
7 CAUTION
Precaution for storing and handling the toner cartridge
If too much of toner is inhaled or toner gets in your eyes, your health may be affected.
%
Keep the toner cartridge away from children.
%
Be careful not to spill toner inside the machine or get toner on your clothes or hands.
%
If your hands become soiled with toner, immediately wash them with soap and water.
%
If toner gets in your eyes, immediately flush them with water, and then seek professional medical
attention.
9-4
bizhub 751/601 (Version 2)
Replacing toner cartridges and staple cartridges and emptying hole-punch scrap box
9.1.1
9
To replace the toner cartridge
0
Use the same number toner cartridge as described on the label applied on the upper left side of the
toner cartridge cover. Otherwise, machine trouble may occur.
1
Open the toner cartridge door.
2
Pull out the cartridge holder.
–
While pulling the toner unit lever toward you, pull the
cartridge holder out toward you as far as possible.
3
Withdraw and pull up the used toner cartridge to remove it.
4
Remove the new toner cartridge form the box.
–
5
The toner within the toner cartridge may have become compacted. Be sure to handle steps 5 until
the toner is mostly broken up before installing the cartridge.
Shake the new toner cartridge by turning it over about five
times.
bizhub 751/601 (Version 2)
9-5
Replacing toner cartridges and staple cartridges and emptying hole-punch scrap box
9
6
Remove the cover from the new toner cartridge.
7
Set the toner cartridge, making sure that it is correctly
oriented.
–
9-6
With the label at the end of the toner cartridge facing up,
insert the bottom of the cartridge into the slot in the
cartridge holder.
8
Return the cartridge holder to its original position
9
Close the toner cartridge door.
bizhub 751/601 (Version 2)
Replacing toner cartridges and staple cartridges and emptying hole-punch scrap box
9.2
9
Replacing the staple cartridge
When the staple cartridge is empty, the message "Replace staple cartridge." appears.
Replace the staple cartridge.
Display in Enlarge Display mode
When staples are about to run out, [ ! ] appears on the screen.
Touch [ ! ] to display the following message.
bizhub 751/601 (Version 2)
9-7
Replacing toner cartridges and staple cartridges and emptying hole-punch scrap box
9
2
Reminder
Be sure to replace the staple cartridge only after the message appears, otherwise the machine may be
damaged.
9.2.1
To replace the staple cartridge in Finisher FS-524
1
Open the front door.
2
Grab handle FN7, and then pull out the stacker unit.
–
9-8
Slowly pull out the stacker unit as far as possible.
bizhub 751/601 (Version 2)
Replacing toner cartridges and staple cartridges and emptying hole-punch scrap box
3
Remove the staple cartridge holder.
–
Hold the lever on the staple cartridge holder, and then pull
the holder down to remove it.
4
Remove the empty staple cartridge from the staple cartridge
holder.
5
Load the new staple cartridge into the staple cartridge holder.
–
6
9
Do not remove the remaining staples, otherwise the
machine will not be able to staple after the cartridge is
replaced.
Install the staple cartridge holder.
–
Check that the staple cartridge holder is securely inserted
as far as possible.
bizhub 751/601 (Version 2)
9-9
Replacing toner cartridges and staple cartridges and emptying hole-punch scrap box
9
7
Return the stacker unit to its original position.
–
8
9-10
When returning the stacker unit to its original position, do
not grab any part other than handle FN7, otherwise your
hand or fingers may be pinched.
Close the front door.
bizhub 751/601 (Version 2)
Replacing toner cartridges and staple cartridges and emptying hole-punch scrap box
9.2.2
9
To replace the staple cartridge in Finisher FS-525
1
Open the front door.
2
Grab handle FN7, and then pull out the stacker unit.
–
3
Slowly pull out the stacker unit as far as possible.
Remove the staple cartridge holder.
–
Hold the lever on the staple cartridge holder to pull it up,
and then pull it downward and out to remove it.
bizhub 751/601 (Version 2)
9-11
Replacing toner cartridges and staple cartridges and emptying hole-punch scrap box
9
4
Push the portion of the staple cartridge holder indicated by
"PUSH" to open the cover of the staple cartridge holder.
5
Remove the empty staple cartridge.
6
Load a new staple cartridge.
7
Remove the tape from the staple cartridge, and then close the
cover of the staple cartridge holder.
–
9-12
Do not remove the remaining staples, otherwise the
machine will not be able to staple after the cartridge is
replaced.
bizhub 751/601 (Version 2)
Replacing toner cartridges and staple cartridges and emptying hole-punch scrap box
8
Install the staple cartridge holder.
–
9
9
Check that the staple cartridge holder is securely inserted
as far as possible.
Return the stacker unit to its original position.
bizhub 751/601 (Version 2)
9-13
Replacing toner cartridges and staple cartridges and emptying hole-punch scrap box
9
–
10
9-14
When returning the stacker unit to its original position, do
not grab any part other than handle FN7, otherwise your
hand or fingers may be pinched.
Close the front door.
bizhub 751/601 (Version 2)
Replacing toner cartridges and staple cartridges and emptying hole-punch scrap box
9.2.3
9
To replace the staple cartridge in Finisher FS-610
1
Open the front door.
2
Grab handle FN6, and then pull out the stacker unit.
–
3
Slowly pull out the stacker unit as far as possible.
Remove the staple cartridge holder.
–
Hold the lever on the staple cartridge holder, and then pull
the holder up to remove it.
bizhub 751/601 (Version 2)
9-15
Replacing toner cartridges and staple cartridges and emptying hole-punch scrap box
9
4
Remove the empty staple cartridge from the staple cartridge
holder.
5
Load the new staple cartridge into the staple cartridge holder.
–
6
Slowly peel off the stopper tape.
7
Install the staple cartridge holder.
–
9-16
Do not remove the remaining staples, otherwise the
machine will not be able to staple after the cartridge is
replaced.
Check that the staple cartridge holder is securely inserted
as far as possible.
bizhub 751/601 (Version 2)
Replacing toner cartridges and staple cartridges and emptying hole-punch scrap box
8
Return the stacker unit to its original position.
–
9
9
When returning the stacker unit to its original position, do
not grab any part other than handle FN6, otherwise your
hand or fingers may be pinched.
Close the front door.
bizhub 751/601 (Version 2)
9-17
Replacing toner cartridges and staple cartridges and emptying hole-punch scrap box
9
9.3
Emptying hole-punch scrap boxes
If the hole-punch scrap box of the punch kit installed with the finisher becomes full, the message shown
below appears (if the box can be emptied by the user).
2
Note
The setting for emptying the hole-punch scrap box should be specified by the service representative.
For details, contact the service representative.
The default setting is "Service". If a message appears, immediately contact the service representative.
<Screen when a Punch setting is selected>
9-18
bizhub 751/601 (Version 2)
Replacing toner cartridges and staple cartridges and emptying hole-punch scrap box
9
<Screen while a job is being performed>
<Display in Enlarge Display mode>
!
Detail
When performed by user
If the hole-punch scrap box has become full while a job is being performed, the job being performed is
paused. To continue the job without canceling the Punch setting, empty the hole-punch scrap box. To
cancel the Punch setting and continue the job, touch [Cancel Punching].
When performed by service representative
If the hole-punch scrap box has become full while a job is being performed, the job being performed is
paused. To continue the job, touch [Cancel Punching]. However, the continued job is printed without
holes being punched.
bizhub 751/601 (Version 2)
9-19
Replacing toner cartridges and staple cartridges and emptying hole-punch scrap box
9
9.3.1
To empty the hole-punch scrap box of the finisher
Follow the procedure described below to empty the hole-punch scrap box.
9-20
1
Open the front door.
2
Pull out the hole-punch scrap box.
3
Empty the hole-punch scrap box.
4
Insert the hole-punch scrap box into its original position.
5
Close the front door.
bizhub 751/601 (Version 2)
Replacing toner cartridges and staple cartridges and emptying hole-punch scrap box
9.3.2
9
To empty the hole-punch scrap box of the Z Folding Unit
Follow the procedure described below to empty the hole-punch scrap box.
1
Open the front door.
2
Pull out the hole-punch scrap box.
3
Empty the hole-punch scrap box.
4
Insert the hole-punch scrap box into its original position.
5
Close the front door.
bizhub 751/601 (Version 2)
9-21
9
9-22
Replacing toner cartridges and staple cartridges and emptying hole-punch scrap box
bizhub 751/601 (Version 2)
10
Care of the machine
Care of the machine
10
Care of the machine
10.1
Cleaning
10
This section describes the procedures for cleaning each part.
Be sure to turn off the main power switch before cleaning it.
10.1.1
Cleaning the left partition glass
Keep the glass clean; otherwise soil marks may be copied, resulting
in dark lines on the copies.
Raise the ADF, and clean the left partition glass by wiping it with a
soft, dry cloth.
2
Reminder
Never use solvents, such as benzene or thinner, to clean the left partition glass.
10.1.2
Cleaning the original glass
Keep the glass clean; otherwise spots may be copied.
Raise the ADF, and clean the surface of the original glass by wiping
it with a soft, dry cloth.
2
Reminder
Never use solvents, such as benzene or thinner, to clean the original glass.
bizhub 751/601 (Version 2)
10-3
Care of the machine
10
10.1.3
Cleaning the document pad
Keep the pad clean; otherwise spots may be copied.
Raise the ADF, and clean the document pad by wiping it with a soft,
dry cloth.
2
Reminder
Never use solvents, such as benzene or thinner, to clean the document pad.
10.1.4
Cleaning the paper take-up roller
Keep the roller clean; otherwise soil marks may be copied, resulting
in dark lines on the copies.
Clean the paper take-up rollers by wiping them with a soft, dry cloth.
2
Reminder
Never use solvents, such as benzene or thinner, to clean the paper take-up roller.
10.1.5
Cleaning the main unit
Clean the surface of the main unit by wiping it with a soft cloth
dampened with a mild household detergent.
2
Reminder
Never use solvents, such as benzene or thinner, to clean the main unit.
10-4
bizhub 751/601 (Version 2)
Care of the machine
10.1.6
10
Cleaning the control panel
Clean the control panel by wiping it with a soft, dry cloth.
2
Reminder
Pressing too hard on the control panel or the touch panel may damage them. Never use a mild
household detergent, glass cleaner, benzin or thinner to clean the control panel or touch panel.
bizhub 751/601 (Version 2)
10-5
Care of the machine
10
10.1.7
Care of Authentication Unit (Biometric Type) AU-101
2
Reminder
Before cleaning the authentication unit, disconnect it from the machine. If a force is applied to the USB
port, it may be damaged.
When cleaning the authentication unit, do not allow water to enter the authentication unit, otherwise the
system may be damaged.
Never use organic solvents, such as benzene or alcohol, to clean the authentication unit, otherwise it
may be damaged.
2
Note
When disconnecting or connecting the authentication unit, turn off the machine with the main power
switch, and then wait at least 10 seconds before turning it on again. The machine may not operate
correctly if it is turned on immediately after being turned off.
Hold the plug when plugging and unplugging the USB cable, otherwise the cable may be damaged.
Care of the housing
Frequency: Once a month, or when it is dirty
Wipe the housing with a soft, dry cloth. If the housing cannot be cleaned by wiping it, wash it with a cloth
dampened with a mild detergent and wrung out well. After the housing is cleaned, rinse the cloth and wring
it out well before wiping off the detergent.
Care of the scanner
Frequency: Once a month, or when it is dirty or covered with fingerprints
Care of the scanner Frequency: Once a month, or when it is dirty or covered with fingerprints Clean the
scanner with a soft cloth used to wipe eyeglass lenses. If it is extremely dirty, clean it with an eyeglass lens
cleaner.
10-6
bizhub 751/601 (Version 2)
Care of the machine
10.1.8
10
Care of Authentication Unit (IC Card Type) AU-201
2
Reminder
Before cleaning the authentication unit, disconnect it from the machine. If a force is applied to the USB
port, it may be damaged.
When cleaning the authentication unit, do not allow water to enter the authentication unit, otherwise the
system may be damaged.
Never use organic solvents, such as benzene or alcohol, to clean the authentication unit, otherwise it
may be damaged.
2
Note
When disconnecting or connecting the authentication unit, turn off the machine with the main power
switch, and then wait at least 10 seconds before turning it on again. The machine may not operate
correctly if it is turned on immediately after being turned off.
Hold the plug when plugging and unplugging the USB cable, otherwise the cable may be damaged.
Frequency: Once a month, or when it is dirty
Wipe the authentication unit with a soft, dry cloth. If the authentication unit cannot be cleaned by wiping it,
wash it with a cloth dampened with a mild detergent and wrung out well. After the authentication unit is
cleaned, rinse the cloth and wring it out well before wiping off the detergent.
bizhub 751/601 (Version 2)
10-7
Care of the machine
10
10.2
Viewing counters (Meter Count)
10.2.1
Viewing counters
The Meter Count screen can be displayed so that the total number of prints since counting started can be
viewed.
In addition, the list of counters can be printed.
1
Press the [Utility/Counter] key.
2
Touch [Meter Count], and then touch [Check Details] in the left panel.
3
The Meter Count screen appears.
?
%
4
Can the list of counters be printed?
Touch [Print List], select the paper size, and then press the [Start] key.
Touch [Close], and then touch [Close] in the next screen that appears.
The Basic screen appears again.
2
Note
The list of counters can be displayed even while the machine is copying or printing.
10-8
bizhub 751/601 (Version 2)
Care of the machine
10.3
10
When the message "It is time for the scheduled inspection of the
device." appears
A periodic maintenance will be required after 250,000 copies for bizhub 751/601.
If the message "It is time for the scheduled inspection of the device." appears, contact your service
representative and request a periodic maintenance inspection.
bizhub 751/601 (Version 2)
10-9
10
10-10
Care of the machine
bizhub 751/601 (Version 2)
11
Managing jobs
Managing jobs
11
11
Managing jobs
11.1
Overview of Job List screen
11.1.1
Jobs
Specifying the desired copy settings, then pressing the [Start] key queues the copy operation in this machine.
This queued operation is called a job. In the same way, operations for making scans and computer printouts
are also queued as jobs.
Jobs that are being performed and the job log can be checked from the Job List screens.
Jobs are printed starting with the one at the top of the Current Jobs list.
Jobs are numbered in the order that they were programmed and are queued to be performed (printed).
2
Note
The job number identifies the job; it does not indicate the printing order. In addition, the job number
does not change until the job is deleted.
By using the "Increase Priority" function, the selected job can be moved to the front of the queue so
that it is printed first.
11.1.2
Multi-job feature
While one job is being printed, another job can be queued. A total of 250 jobs can be queued.
The number of jobs possible for each operation is listed below.
Operation
Number of jobs
Copy
5
Interrupted copy
1
Scan
5
Print
10
Fax (Off Hook TX)
1
Fax (Memory TX)
50
Fax (Timer TX)
20
Fax RX
100
Fax (Polling RX)
1
Fax (Polling TX)
1
Sharing
56
Total
250
*
The values listed above are for reference and may differ from the actual values depending on other settings.
When one job is finished being printed, the next queued job automatically begins.
2
Note
Up to 250 jobs, including print jobs, scanner transmission jobs, fax transmission jobs and received
fax/save jobs, can be queued.
bizhub 751/601 (Version 2)
11-3
Managing jobs
11
11.1.3
Job List screens
From the Job List screen, lists of jobs being performed by this machine and the jobs that have been
performed in addition to the job details can be viewed, and the job settings can be changed.
!
Detail
To display the Job List screen, touch [Job List] in the left panel, and then touch [Job Details].
From the Job List screen, the following tabs for the various functions can be displayed.
Print
Lists print jobs for copying, computer printing, and received faxes.
Send
Lists fax and scanner transmission jobs.
Receive
Lists fax transmission jobs.
Save
Lists jobs for saving documents in user boxes.
2
Note
As the factory default, the Current Jobs list on the Print tab is displayed in the Job List screen.
The screen for each function listed above can be displayed from any other Job List screen. However, if a
different tab is selected while a setting is being changed, that setting is canceled.
A Current Jobs list and a Job History list can be displayed for each function.
Current Jobs:
Lists jobs that are queued and being performed, allowing you to check the current status of the
machine.
Job History:
Lists jobs that have been completed, including jobs that were not performed due to an error, allowing
you to check the history and result of all jobs.
The type of jobs to be displayed can be selected from the Current Jobs list and Job History list. For example,
the lists of stored jobs and active jobs can be displayed in the Current Jobs list on the Print tab, and the lists
of deleted jobs, completed jobs and all jobs can be displayed in the Job History list. The types of jobs that
can be selected differ depending on the selected tab.
The function of each button in the Job List screens is described below.
11-4
bizhub 751/601 (Version 2)
Managing jobs
11
Button name
Description
[Print] button
Touch to display the Print tab of the Job List
screen.
[Send] button
Touch to display the Send tab of the Job List
screen. For details, refer to the User manual – Network Scan/Fax/Network Fax Operations.
[Receive] button
Touch to display the Receive tab of the Job List
screen. For details, refer to the User manual – Network Scan/Fax/Network Fax Operations.
[Store] button
Touch to display the Store tab of the Job List
screen. For details, refer to the User manual – Box
Operations.
[Current Jobs] button
A selected button indicates which job list is
currently displayed.
Touch to switch from the Job History list to the
Current Jobs list. This lists the jobs that are currently being performed and the jobs that are
queued (waiting) to be performed.
[Job History] button
Touch to switch from the Current Jobs list to the
Job History list. This list the jobs that have been
performed.
[Delete] button*1
A job can be deleted from the Current Jobs list. For
details, refer to "Deleting a job" on page 11-8.
[Increase Priority] button (displayed on the Current Jobs list of
the Print tab)
The next job to be printed after the current job is
finished can be changed. For details, refer to "Increasing printing priority" on page 11-17.
The buttons that appear differ depending on the
tab or list (Current Jobs or Job History) that is displayed.
[Release Held Job] button
(displayed on the Current Jobs list of the Print tab)
Touch to display the list of stored jobs. The settings of a stored job can be changed, or the job can
be printed or deleted.
[Check Job Set.] button*1
The settings for a job in the Current Jobs list can be
checked. For details, refer to "Checking job settings" on page 11-10.
[Deleted Jobs] button
[Finished Jobs] button
[All Jobs] button
(displayed on the Job History list of the Print tab)
Touch to select the type of jobs displayed in the
Job List screen. Change the display mode by
touching the appropriate button.
[Detail] button
Touch to display screens for checking the status,
results, error details, user name, queued time,
completed time, number of original pages and
number of copies for jobs in the Current Jobs and
Job History lists. For details, refer to "Checking job
details" on page 11-10.
and
buttons
[Close] button
*1
When there are more jobs than the seven that can
be displayed at one time, touch these arrows to
display jobs higher or lower in the list (higher or
lower in the printing order).
Touch to quit Job List mode and returns to the
screen that was displayed before [Job List] was
touched.
Displayed when the Current Jobs list is displayed.
bizhub 751/601 (Version 2)
11-5
Managing jobs
11
The following information is listed in the Print tab.
11-6
Item Name
Description
No.
Job identification number assigned when the job is queued
User Name
Displays the type (source) of the job. "COPY" is displayed for copy jobs.
Status (Current Jobs list only)
Displays the status of the job
Document Name
Displays the name of the file for print jobs sent from the computer.
If user authentication settings have been applied, the names of documents are
not displayed for other users.
The name of confidential documents is not displayed.
Time Stored
Displays the time that the job was queued.
Org.
Displays the number of pages in the original.
Copies
Displays the number of Copies to be printed.
With jobs listed as "Printing" in the Current Jobs list, a count of the number of
Copies printed is displayed.
Result (Job History list only)
Displays the result of the operation (Job Complete, Deleted Due To Error, Deleted by User, Reset Modes).
bizhub 751/601 (Version 2)
Managing jobs
11.1.4
11
Left panel Job List
The job list or the job status can be displayed in the left panel of the main screen.
1
Touch [Job List] in the left panel.
A list of jobs appears in the left panel.
–
If the "Job Display Setting" parameter (available from the User Setting screen) is set to "Status
Display", the job status is displayed in the left panel.
–
–
–
To display the Job List screen, touch [Job Details].
To delete a job, select the job from the job list, and then touch [Delete].
When there are more jobs than the seven that can be displayed at one time, touch
display other jobs.
and
to
!
Detail
As the factory default, the display for the sub display area is that when "Job Display Setting" is set to
"List Display".
For details on specifying the default display for the left panel and the display method for the left panel
Job List, refer to "Custom Display Settings" on page 12-19.
bizhub 751/601 (Version 2)
11-7
Managing jobs
11
11.2
Performing operations on jobs
11.2.1
Deleting a job
A queued job or job being printed (job on the Current Jobs list) can be deleted.
1
Touch [Job List] in the left panel, and then touch [Job Details].
The Job List screen appears.
2
In the Print tab, display the job to be deleted.
–
3
Jobs on the Job History list cannot be deleted.
Select the job to be deleted, and then touch [Delete].
–
–
If the job to be deleted is not displayed, touch
or
until the desired job is displayed.
If an incorrect job was selected, select a different job or touch the button for the selected job again
to deselect it.
A message requesting confirmation to delete the job appears.
11-8
bizhub 751/601 (Version 2)
Managing jobs
11
4
Check the information that is displayed, touch [Yes] if the correct job is indicated, and then touch [OK].
–
To quit deleting the job, touch [No], and then touch [OK].
The screen displayed before [Delete] was touched appears again, and the job is deleted from the
Current Jobs list.
5
Touch [Close] or press the [Reset] key.
The Basic screen appears again.
2
Note
If user authentication settings have been applied and the machine is set so that jobs cannot be deleted
by other users, the job is not deleted.
A job being performed can also be deleted by selecting the job in the sub display area, then touching
[Delete].
bizhub 751/601 (Version 2)
11-9
Managing jobs
11
11.2.2
Checking job settings
Job settings for stored jobs, jobs being printed, jobs queued to be printed and held jobs can be checked.
1
Touch [Job List] in the left panel, and then touch [Job Details].
The Job List screen appears.
2
Display the list containing the job whose settings are to be checked.
3
Select the job to be checked, and then touch [Check Job Set.].
–
If an incorrect job was selected, select a different job or touch the button for the selected job again
to deselect it.
– The contents and number of Job Settings screens differ depending on the job that was selected.
– The upper number to the left of [
Back] indicates the number of the currently displayed screen.
The lower number indicates the total number of screens.
].
– To display the previous screen, touch [
Back]. To display the next screen, touch [Forward
The Check Job Settings screen appears.
4
After checking the settings, touch [Close] or press the [Reset] key.
–
–
11.2.3
To return to the screen displayed before [Check Job Set.] was touched, touch [Close].
To return to the Basic screen, press the [Reset] key.
Checking job details
The following information can be checked from the Job List screen.
Print tab
Status (Receiving, Print Wait, Printing, Stop Print, Print Err, Job Stored)*1, Result (Job Complete,
Deleted Due To Error, Deleted by User, Reset Modes)*2, Error Details*2, User Name, Document Name,
Output Tray, hours (Job Start, Job End*2), Prints (Original, # of Sets), External Server Information
Send tab
Status (Transferring, Waiting, Dialing, Waiting To Redial)*1, Result (Job Complete, Deleted Due To Error,
Deleted by User)*2, User Name, Document Name, Address Type (E-Mail, FTP, File (SMB), TWAIN, Fax,
WebDAV, Others), Dest (Detail*3), hours (Job Start, Type), Prints (Document), External Server
Information
Receive tab
Status (Receiving, Dialing (only with polling reception), Print Wait, Printing, Stop Print, Print Err, Saving
to Memory)*1, Result (Job Complete, Deleted Due To Error, Deleted by User, Reset Modes)*2, Error
Details*2, User Name, Document Name, Output Tray, hours (Job Start, Type), Prints (Document), box
number, box name, External Server Information
Save tab
Status (Receiving, Saving to Memory)*1, Result (Job Complete, Deleted Due to Error, Deleted by User,
Reset Modes)*2, Error Details*2, User Name, User Box (box number/box name), hours (Job Start), Prints
(Original)
11-10
*1
Displayed only for jobs on the Current Jobs list
*2
Displayed only for jobs on the Job History list
bizhub 751/601 (Version 2)
Managing jobs
*3
1
11
Displayed only for jobs on the Currently Jobs list transmitted to multiple destinations
Touch [Job List] in the left panel, and then touch [Job Details].
The Job List screen appears.
2
Display the list containing the job whose details are to be checked.
3
Select the job whose details are to be checked, and then touch [Detail].
–
If an incorrect job was selected, select a different job or touch the button for the selected job again
to deselect it.
The Detail screen appears.
4
After the desired information has been checked, touch [Close] or press the [Reset] key.
–
–
To return to the screen displayed before [Job Details] was touched, touch [Close].
To return to the Basic screen, press the [Reset] key.
!
Detail
To delete the job, touch [Delete] in the Detail screen.
If [Detail] appears in the Detail screen for a job selected from the Send tab, detailed information is
available on the multiple destinations that the data was sent to with broadcast transmission. To view
the information, touch [Detail].
bizhub 751/601 (Version 2)
11-11
Managing jobs
11
11.2.4
Displaying the Current Jobs list (stored jobs and active jobs)
The Current Jobs list of received print jobs for Copy mode and Fax mode and for computer printing is
displayed.
1
Touch [Job List] in the left panel, and then touch [Job Details].
The Job List screen appears.
2
Touch the button for the desired list.
–
To display the stored jobs, touch [Release Held Job] to display the Release Held Job screen.
To return to the Job List screen, touch [Cancel].
!
Detail
For details on the function of each button, refer to "Job List screens" on page 11-4.
From the Release Held Job screen, proof copies of stored jobs can be printed. For details, refer to
"Printing a proof copy of a stored job" on page 11-14.
Stored jobs can be printed from the Release Held Job screen. For details, refer to "Printing a stored
job" on page 11-15.
To give priority for output to a job, touch [Increase Priority] in the Current Jobs list. For more details,
refer to "Increasing printing priority" on page 11-17.
11-12
bizhub 751/601 (Version 2)
Managing jobs
11.2.5
11
Displaying the Job History list
1
Touch [Job List] in the left panel, and then touch [Job Details].
The Job List screen appears.
2
Touch [Job History].
The Job History list of the Print tab appears.
3
Touch the button for the desired list.
–
–
–
Deleted Jobs: Displays only jobs that were deleted before they were finished.
Finished Jobs: Displays only jobs that were correctly completed.
All Jobs: Displays all jobs.
bizhub 751/601 (Version 2)
11-13
Managing jobs
11
11.2.6
Printing a proof copy of a stored job
A single copy of a stored job can be printed in order to be checked.
The Held Jobs list contains jobs such as those for which a proof copy was being printed when the automatic
system reset operation was performed.
2
Note
For details on displaying the screen, refer to "Displaying the Current Jobs list (stored jobs and active
jobs)" on page 11-12.
1
In the Current Jobs list of the Print tab, touch [Release Held Job].
The Release Held Job screen appears.
2
From the job list, select the job whose proof copy is to be printed, and then touch [Proof Copy] key.
–
If the job to be removed from the Held Jobs list is not displayed, touch
or
until the desired
job is displayed.
– If an incorrect job was selected, touch the button for the selected job again to deselect it.
– After the single proof copy is printed, check the print result.
How is printing of a proof copy stopped?
% Press the [Stop] key.
?
!
Detail
To change the settings, touch [Check Job Set.] in the Release Held Job screen. For details, refer to
"Printing a stored job" on page 11-15.
11-14
bizhub 751/601 (Version 2)
Managing jobs
11.2.7
11
Printing a stored job
A job is removed from the Held Jobs list and printed.
2
Note
For details on displaying the screen, refer to "Displaying the Current Jobs list (stored jobs and active
jobs)" on page 11-12.
1
In the Current Jobs list of the Print tab, touch [Release Held Job].
The Release Held Job screen appears.
2
Select the job to be removed from the Held Jobs list.
–
–
–
3
If the job to be removed from the Held Jobs list is not displayed, touch
and
until the desired
job is displayed.
If an incorrect job was selected, select a different job or touch the button for the selected job again
to deselect it.
To continue without changing the specified copy settings, continue with step 5.
Touch [Change Setting].
The Change Setting screen appears.
bizhub 751/601 (Version 2)
11-15
Managing jobs
11
4
In the Change Setting screen, change the copy settings as desired, and then touch [OK].
Is there more information about the settings?
% Refer to the appropriate section.
?
?
%
5
Can a proof copy be printed?
For details on printing a proof copy, refer to "Printing a proof copy of a stored job" on page 11-14.
In the Release Held Job screen, touch [OK] or press the [Start] key.
The stored job appears in the Current Jobs list and is printed.
How is the removal of a job from the Held Jobs list stopped?
% Touch [Cancel].
?
11-16
bizhub 751/601 (Version 2)
Managing jobs
11.2.8
11
Increasing printing priority
The next job to be printed after the current job being printed can be selected.
If an Administrator mode parameter was set so that the output priority of jobs cannot be changed, [Increase
Priority] does not appear and the output priority of the jobs cannot be specified.
If the job currently being printed can be interrupted, printing is interrupted and printing of the job given priority
begins. Printing of the interrupted job is automatically restarted once printing for the job given priority is
finished.
If the job currently being printed cannot be interrupted (a job has already been interrupted or a job was
already given priority), printing is interrupted after printing for the current job is finished.
1
Display the Job History list of the Print tab.
–
2
For details on displaying the screen, refer to "Displaying the Current Jobs list (stored jobs and active
jobs)" on page 11-12.
Touch [Increase Priority].
The Increase Priority screen appears.
3
In the job list, touch the button for the job to be given priority to select it, and then touch [OK].
–
–
If the job to be given priority is not displayed, touch
and
until the desired job is displayed.
If an incorrect job was selected, select a different job or touch the button for the selected job again
to deselect it.
The selected job moves to the top of the list and printing of the job begins.
How can the change in the printing priority be stopped?
% Touch [Cancel].
?
bizhub 751/601 (Version 2)
11-17
11
11-18
Managing jobs
bizhub 751/601 (Version 2)
12
Utility mode
Utility mode
12
12
Utility mode
12.1
Overview of Utility mode parameters
12.1.1
List of registration information and parameters
This section describes the buttons available when the [Utility/Counter] key is pressed.
2
Note
The buttons that appear in the Utility mode parameters differ depending on the specified settings.
List of Utility mode parameters
First-level menu
Second-level menu
Third-level menu
Details
[1] One-Touch/User Box
Registration
[1] Create One-Touch
Destination
[1] Address Book (Public)
Refer to "Create OneTouch Destination" on
page 12-8.
[2] Address Book (Personal)
[3] Group
[4] E-mail Settings
[2] Create User Box
[1] Public/Personal User
Box*
Refer to "Create User Box"
on page 12-8.
[2] Bulletin Board User Box
[3] Relay User Box
[2] User Settings
[3] Limiting Access to Destinations
[1] Apply Levels/Groups to
Destinations
Refer to "Limiting Access
to Destinations" on
page 12-8
[1] System Settings
[1] Language Selection
Refer to "System Settings"
on page 12-17.
[2] Measurement Unit Settings
[3] Paper Tray Settings
[4] Power Save Settings
[5] Output Settings
[6] Blank Page Print Settings
[7] Density for Original
Type
[8] Page Number Print Position
[2] Custom Display Settings
[1] Copier Settings
[2] Scan/Fax Settings
Refer to "Custom Display
Settings" on page 12-19.
[3] Copy Screen
[4] Fax Active Screen
[5] Color Selection Settings
[6] Left Panel Display Default
[7] Search Option Settings
bizhub 751/601 (Version 2)
12-3
Utility mode
12
First-level menu
Second-level menu
Third-level menu
Details
[2] User Settings
[3] Copier Settings
Auto Booklet ON when
Fold & Staple (Machine
with SD-507 only)
Refer to "Copier Settings"
on page 12-21.
Auto Zoom For Combine/
Booklet
Auto Sort/Group Selection
Default Copy Settings
Default Enlarge Display
Settings
When AMS Direction is Incorrect
Separate Scan Output
Method
Enlargement Rotation
Auto Zoom (Platen)
Auto Zoom (ADF)
Specify Default Tray when
APS Off
Select Tray for Insert
Sheet
Tri-Fold Print Side
Print Jobs During Copy
Operation
Automatic Image Rotation
Printed side when copying
1 sheet from Original
Glass
[4] Scan/Fax Settings
Black Compression Level
Default Scan/Fax Settings
Refer to "Scan/Fax Settings" on page 12-23.
Default Enlarge Display
Settings
[5] Printer Settings
[1] Basic Settings
[2] Paper Setting
Refer to "Printer Settings"
on page 12-37.
[3] PCL Settings
[4] PS Setting
[5] XPS Settings
[6] TIFF/PDF Image Paper
Setting
[7] Print Reports
[8] Image Shift Settings
[9] Stamp Settings
[6] Change Password
[7] Change E-Mail Address
12-4
Changes the password for
the user who is currently
logged on. Refer to
"Change Password" on
page 12-23.
E-Mail Address
Changes the e-mail address for the user who is
currently logged on. Refer
to "Change E-Mail Address" on page 12-23
[8] Toner Supply
Refer to "Toner Supply" on
page 12-24.
[8] Change Icon
Changes the icon for the
user who is currently
logged on.
bizhub 751/601 (Version 2)
Utility mode
12
First-level menu
Second-level menu
Third-level menu
Details
[3] Administrator Settings
[1] System Settings
[1] Power Save Settings
Refer to "System Settings"
on page 12-26.
[2] Output Settings
[3] Date&Time Settings
[4] Daylight Saving Time
[5] Weekly Timer Settings
[6] Restrict User Access
[7] Expert Adjustment
[8] List/Counter
[9] Reset Settings
[0] User Box Settings
(next screen)
[1] Size Settings
[2] Stamp Settings
For details of [1] Size Settings, contact your service
representative.
[3] Blank Page Print Settings
[4] Page Number Print Position
[5] Skip Job Setting
[6] Application Key Settings
[8] Advanced Preview Setting
[2] Administrator/Machine
Settings
[1] Administrator Registration
[2] Input Machine Address
[3] One-Touch/User Box
Registration
[1] Create One-Touch
Destination
[2] Create User Box
Refer to "Administrator/Machine Settings" on
page 12-32.
Refer to "One-Touch/User
Box Registration" on
page 12-32.
[3] One-Touch/User Box
Registration List
[4] Maximum Number of
User Boxes
[4] User Authentication/Account Track
[1] General Settings
[2] User Authentication
Settings
Refer to "User Authentication/Account Track" on
page 12-33.
[3] Account Track Settings
[4] Print without Authentication
[5] Print Counter List
[6] External Server Settings
[7] Limiting Access to Destinations
[8] Authentication Device
Setting
[9] Auth/Acct Track Common Setting
bizhub 751/601 (Version 2)
12-5
Utility mode
12
First-level menu
Second-level menu
Third-level menu
Details
[3] Administrator Settings
[5] Network Settings
[1] Network Setting
Refer to "Network Settings" on page 12-36.
[2] TCP/IP Settings
[3] NetWare Settings
[4] HTTP Server Settings
[5] FTP Settings
[6] SMB Settings
[7] LDAP Settings
[8] E-Mail Settings
[9] SNMP Settings
[0] AppleTalk Settings
(next screen)
[1] Bonjour Setting
[2] TCP Socket Settings
[3] Network Fax Settings
[4] WebDAV client Settings
[5] Web Service Settings
[7] SSDP Settings
[8] Detail Settings
[9] IEEE802.1X Authentication Settings
[6] Copier Settings
Auto Zoom (Platen)
Auto Zoom (ADF)
Refer to "Copier Settings"
on page 12-21.
Specify Default Tray when
APS Off
Select Tray for Insert
Sheet
Print Jobs During Copy
Operation
Tri-Fold Print Side
Automatic Image Rotation
Printed side when copying
1 sheet from Original
Glass
[7] Printer Settings
USB Timeout
Network Timeout
Refer to "Printer Settings"
on page 12-23.
Print XPS Errors
[8] Fax Settings
[1] Header Information
[2] Header/Footer Position
Refer to "Fax Settings" on
page 12-38.
[3] Line Parameter Setting
[4] TX/RX Settings
[5] Function Settings
[6] PBX Connection Setting
[7] Report Settings
[8] Job Settings List
[9] Multi Line Setting
[0] Network Fax Setting
12-6
bizhub 751/601 (Version 2)
Utility mode
12
First-level menu
Second-level menu
Third-level menu
Details
[3] Administrator Settings
[9] System Connection
[1] Open API Settings
Refer to "System Connection" on page 12-38.
[2] Admin. transmission
[3] Prefix/Suffix Automatic
Setting
[0] Security Settings
[1] Administrator Password
Refer to "Security Settings" on page 12-38.
[2] User Box Administrator
Setting
[3] Administrator Security
Levels
[4] Security Details
[5] Enhanced Security
Mode
[6] HDD Settings
[4] Security Detail provides
[Audit Log Setting]. For
details, please contact
your service representative.
[7] Function Management
Settings
[8] Stamp Settings
[0] Driver Password Encryption Setting
(next screen)
[1] Flash Memory Lock
Password
(next screen)
[1] License Settings
[1] Get Request Code
[2] Install License
Refer to "License Settings" on page 12-41.
[3] List of Enabled Functions
[2] OpenAPI Certification
Management Setting
*
[1] Restriction Code Settings
Refer to "OpenAPI Authentication Management
Setting" on page 12-41.
If an optional hard disk is not installed, [Confidential RX User Box] appears.
bizhub 751/601 (Version 2)
12-7
Utility mode
12
12.2
Registering a destination
This section describes the function and main registration parameters that can be specified after pressing the
[Utility/Counter] key, then touching [One-Touch/User Box Registration].
12.2.1
Create One-Touch Destination
Parameter
Description
Address Book (Public)
Specify settings for registering fax and scan destinations. For details, refer to the User
manual – Network Scan/Fax/Network Fax Operations.
Address Book (Personal)
Group
E-mail Settings
2
Note
If user authentication settings have been specified, [1 One-Touch Destination/User Box Registration]
cannot be selected when no user has logged on. However, after a user has logged on, [1 One-Touch
Destination/User Box Registration] appears.
Items for registering fax destinations appear only when the fax kit is installed or when Internet fax
functions are available.
12.2.2
Create User Box
Parameter
Description
Public/Personal User Box
Specify settings for registering user box destinations. For details, refer to the User manual – Box Operations and the User manual – Network Scan/Fax/Network Fax Operations.
Bulletin Board User Box
Relay User Box
2
Note
[2 Bulletin Board User Box] and [3 Relay User Box] appear only when the fax kit is installed or when
Internet fax functions are available.
If an optional hard disk is not installed, the [Confidential RX User Box] key appears instead of the
[Public/Personal] key.
12.2.3
Limiting Access to Destinations
Access Level
Using the Access Level settings on this machine, the security of registered destinations can be managed by
permitting/prohibiting viewing of the destination information or fax transmissions to the destination.
Access permission levels can be set to one of six levels between 0 and 5, with the higher number indicating
higher security.
2
Note
The access level that is set for user, destination, and group level on the Limiting Access to Destinations
can be used when user authentication settings have been specified.
12-8
bizhub 751/601 (Version 2)
Utility mode
12
Level settings
The access permission level can be specified for each user and destination. The destinations that can be
accessed by users can be limited according to the access permission levels specified for the user and
destination. For example, a level 2 user can access destinations in levels 0 through 2, but cannot access
destinations in levels 3 through 5. A level 5 user can access all destinations in levels 0 through 5.
Destinations
Level 5
Level 4
Level 3
Level 5 user
access range
Level 2
Level 2
user access
range
Level 1
Level 0
2
Note
For details on the access permission level settings for user, refer to "User Authentication/Account
Track" on page 12-33.
As a default, the access permission level specified for public users is level 0.
Group
In addition to users and destinations, groups with access permissions can be created and given a name.
When users and destinations are registered in these groups, a destination registered in a group can be
accessed by users registered to the same group.
In addition, by applying access permission levels to groups, users not registered in a group can be given
access permissions according to the conditions of the specified level.
A destination can be registered in only one group. However, a user can be registered in multiple groups.
Access Allow Level 3
User 1
Destination 1
User 3
User 2
bizhub 751/601 (Version 2)
Destination 2
12-9
Utility mode
12
Specifying a group setting
1
Display the Administrator Settings screen.
–
2
For details on displaying the Administrator Settings screen, refer to "Displaying the Administrator
Settings screen" on page 12-42.
Touch [4 User Authentication/Account Track].
The User Authentication/Account Track screen appears.
3
Touch [7 Limiting Access to Destinations].
The Limiting Access to Destinations screen appears.
4
Touch [1 Create Group].
–
–
A maximum of 20 groups can be registered.
In the Create Group screen, touch the button for a group, touch [Details], and then check the
destinations and names of users belonging to that group.
The Create Group screen appears.
5
Touch the button for the desired group, and then touch [Edit].
The Edit screen appears.
6
Touch [Group Name].
The Group Name screen appears.
12-10
bizhub 751/601 (Version 2)
Utility mode
12
7
Type in the group name (up to 24 characters), and then touch [OK].
– For details on typing in text, refer to "Entering text" on page 15-3.
The group name is specified.
8
Select the desired access permission level.
The access permission level for the group is specified.
9
Touch [OK].
Specifying a destination level
1
Display the Administrator Settings screen.
–
2
For details on displaying the Administrator Settings screen, refer to "Displaying the Administrator
Settings screen" on page 12-42.
Touch [4 User Authentication/Account Track].
The User Authentication/Account Track screen appears.
3
Touch [7 Limiting Access to Destinations].
The Limiting Access to Destinations screen appears.
4
Touch [2 Apply Levels/Groups to Destinations].
The Apply Levels/Groups to Destinations screen appears.
bizhub 751/601 (Version 2)
12-11
Utility mode
12
5
Touch the button for the desired destination.
–
12-12
For an address book destination, touch the index button for the first letter of the destination, and
then search for the destination.
bizhub 751/601 (Version 2)
Utility mode
12
6
Touch the button for the desired setting.
–
–
–
–
–
Either an access permission level or an access permission group can be specified for each
destination.
Only one access permission group can be specified for a single destination.
To specify the destination group, touch [Apply Group]. Touch the button for the desired group, and
then touch [OK].
Touch the button for a group, touch [Details], and then check the destinations and names of users
belonging to that group.
To specify the destination level, touch [Apply Level]. Touch the button for the desired level, and then
touch [OK].
bizhub 751/601 (Version 2)
12-13
Utility mode
12
Specifying a user level
1
Display the Administrator Settings screen.
–
2
For details on displaying the Administrator Settings screen, refer to "Displaying the Administrator
Settings screen" on page 12-42.
Touch [4 User Authentication/Account Track].
The User Authentication/Account Track screen appears.
3
Touch [7 Limiting Access to Destinations].
The Limiting Access to Destinations screen appears.
4
Touch [3 Apply Levels/Groups to Users].
The Apply Levels/Groups to Users screen appears.
5
Select either "Public User Box" or "Personal User Box" as the user type, and then touch the button for
the desired User.
–
–
12-14
The "Public User Box" and "Personal User Box" settings appear only when access by a public user
is permitted.
If use by a public user is permitted, "Public" appears as the user name. As the default, level 0 is
specified.
bizhub 751/601 (Version 2)
Utility mode
12
6
Touch the button for the desired setting.
–
–
–
–
–
Both an access permission level and an access permission group can be specified for each user.
A single user can be registered in multiple access permission groups.
To specify the user group, touch [Apply Group]. Touch [Yes], touch the button for the desired group,
and then touch [OK].
Touch the button for a group, touch [Details], and then check the destinations and names of users
belonging to that group.
To specify the user level, touch [Apply Level]. Touch [Yes], touch the button for the desired level,
and then touch [OK].
bizhub 751/601 (Version 2)
12-15
Utility mode
12
12.2.4
Displaying the destination registration screen
Follow the procedure described below to display the One-Touch/User Box Registration screen by pressing
[Utility/Counter] key.
1
Press the [Utility/Counter] key.
2
Touch [1 One-Touch/User Box Registration].
–
An item can also be selected by pressing the key in the keypad for the number beside the desired
button.
For [1 One-Touch/User Box Registration], press the [1] key in the keypad.
The One-Touch/User Box Registration screen appears.
2
Note
To finish specifying settings in the Utility mode, press the [Utility/Counter] key. Otherwise, exit the Utility
mode by touching [Close] in each screen until the screen for the Copy, Fax/Scan or Box mode appears.
12-16
bizhub 751/601 (Version 2)
Utility mode
12
To exit the Utility mode, press the [Utility/Counter] key. Or, repeat touching [Close] until the Copy,
Fax/Scan, or Box screen appears. With an optional i-Option LK-101 installed in the machine, the Utility
mode can also be terminated by touching [Close] repeatedly until the screen specified in Application
Key Settings appears.
12.3
Specifying user settings
This section describes the function and main registration parameters that can be specified after pressing the
[Utility/Counter] key, then touching [User Settings].
12.3.1
System Settings
Language Selection
Description
Default Setting
Select the language of the touch panel message.
English
Measurement Unit Settings
Description
Default Setting
Select one of the following as the measurement units in which values are displayed in
the touch panel.
mm (Numerical Value), inch (Numerical Value), inch (Fraction)
mm (Numericial Value)
Paper Tray Settings
*
Parameter
Description
Default Setting
Auto Tray Selection
Settings
Select the paper trays that are selected automatically when
the "Auto" Paper setting is specified. In addition, specify the
priority of the paper trays when the auto tray switch operation
is performed.
Tray priority order: Tray 1
% Tray 2 % Tray 3 %
Tray 4 % Bypass % LCT*
Auto Tray Switch
ON/OFF
Select whether or not a paper tray loaded with paper of the
same size is selected automatically when a paper tray that
was selected manually becomes empty while printing copies.
Restrict
No Matching Paper in
Tray Setting
Select the operation that is performed when there is no paper
of the corresponding size in the specified paper tray.
• Stop Printing (Tray Fixed):
The machine stops operating.
• Switch Trays (Tray Priority):
When the corresponding size or type of paper is not loaded in the specified paper tray, a different paper tray is selected if it contains paper of the corresponding size.
Stop Printing (Tray Fixed)
Print Lists
Select the paper tray used for printing lists, such as the sales
counter and consumables indicators.
Tray 1, 1-Sided
Paper Type/Size Settings
Specify the paper type to be use for each tray.
Plain Paper
Post Inserter Alert Display Setting
Specify whether to display the paper size and paper orientation during the tray display or an alarm indication for the post
inserter.
Yes
Appears when the optional Large capacity unit LU-405/406 is installed.
bizhub 751/601 (Version 2)
12-17
Utility mode
12
Power Save Settings
Parameter
Description
Default Setting
Low Power Mode Settings
Specify the desired length of time (between 1 and 240 minutes) until the machine enters Power Save mode.
15 minutes
Sleep Mode Settings
Specify the desired length of time (between 1 and 240 minutes) until the machine enters Sleep mode.
60 minutes
2
Note
[Low Power Mode Settings] appears only if the "Administrator Security Levels" parameter in
Administrator mode is set to [Level 1], [Level 2].
!
Detail
For details on the "Administrator Security Levels" parameter, refer to "Security Settings" on
page 12-38.
Output Settings
Parameter
Description
Print/Fax Output Setting
Specify settings for printing. For details, refer to the User manual – Print Operations.
Default Setting
Output Tray Setting
Select the copy output tray for each
type of job (copies, printouts, reports and faxes).
Copy: Tray 2
Print: Tray 2
Print Reports: Tray 2
Fax: Tray 2
2
Note
The "Output Tray Settings" parameter is available only if the optional finisher is installed.
Blank Page Print Settings
Description
Default Setting
Select whether or not stamps and overlays are printed on blank pages.
Do Not Print
Density for Original Type
12-18
Description
Default Setting
Shift the exposure level darker/lighter within 6 levels for each original type, which will be
reflected to 9 levels of the Density setting available on the Basic screen.
Text/Photo: 3
Text: 3
Photo: 3
Dot Matrix Original: 2
bizhub 751/601 (Version 2)
Utility mode
12
Page Number Print Position
Description
Default Setting
Specify the print position of the stamp on back pages when duplex printing and booklet
are used in combination.
All the same
2
Note
[Output Settings], [Blank Page Print Settings], [Density for Original Type], and [Page Number Print
Position] appear only if the "Administrator Security Levels" parameter in Administrator mode is set to
"Level 2".
12.3.2
Custom Display Settings
Copier Settings
Parameter
Description
Default Setting
Default Tab
Specify the default display for the Basic screen in Copy
mode.
• Basic:
This is the normal basic display.
• Quick Copy:
Displays all selectable items for the "Paper" function,
"Zoom" function and "Duplex/Combine" function. The
normal Basic screen appears as a different tab.
Basic
Shortcut Key 1
Shortcut keys for frequently used Application functions can
be added to the Basic screen of Copy mode.
OFF
Shortcut Key 2
Scan/Fax Settings
Parameter
Description
Default Tab
Specify settings for faxing and scanning. For details, refer to the
User manual – Network Scan/Fax/Network Fax Operations.
Program Default
Address Book Index Default
Shortcut Key 1
Shortcut Key 2
Default Address Book
Default Address Type
Copy Screen
Parameter
Description
Default Setting
Copy Operating Screen
Select the screen that is displayed while printing.
• Yes: A screen for reserving a copy job appears while
printing and, if [Program Next Job] is touched, a job can
be reserved.
• No: A copy job can be reserved while the Basic screen
in Copy mode is displayed.
No
Fax Active Screen
Parameter
Description
TX Display
Specify settings for faxing. For details, refer to the User manual – Network
Scan/Fax/Network Fax Operations.
RX Display
bizhub 751/601 (Version 2)
12-19
Utility mode
12
Color Selection Settings
Parameter
Description
Default Setting
Select Color
Select the color that indicates that the button is selected.
Green
Left Panel Display Default
Parameter
Description
Default Setting
Left Panel Display Default
Select the information displayed as the default in the left
panel.
• Job List:
A list of the jobs that are being performed and queued
to be performed is displayed.
• Check Job Settings:
The currently specified copy settings are displayed.
Job List
Job Display Setting
Select the job list information displayed in the left panel.
• List Display:
A list of the jobs that are being performed and queued
to be performed is displayed.
• Status Display:
The progress of the job being performed is displayed.
List Display
Parameter
Description
Default Setting
Uppercase and Lowercase
Letters
Select whether or not to differentiate between uppercase
and lowercase letters.
Differentiate
Search Option Screen
Select whether or not to display [Uppercase and Lowercase Letters] setting in the advanced search.
OFF
Search Option Settings
12-20
bizhub 751/601 (Version 2)
Utility mode
12.3.3
12
Copier Settings
Parameter
Description
Default Setting
Auto Booklet ON when
Fold & Staple
Select whether or not the "Booklet" function is selected automatically when the "Center Staple & Fold" setting is selected. This parameter is available only if optional finisher is
installed.
Auto Select Booklet
Auto Zoom For Combine/
Booklet
Select whether or not the preset zoom ratios are automatically selected when the "Auto" Paper setting is selected
and a combined copy setting or the "Booklet" function is
selected.
• Auto Display Zoom Ratio:
The following zoom ratios are specified.
2in1, Booklet: 64.7%
4in1: 50.0%
8in1: 32.3%
• Off:
The zoom ratio is not selected automatically.
Auto Display Zoom Ratio
Auto Sort/Group Selection
Select whether or not the "Sort" setting is automatically selected when 2 or more copies are set to be printed in a single job.
• Yes:
When an original is loaded into the automatic document feeder and the [Start] key is pressed, the "Group"
setting is automatically selected if the original consists
of only one page, and the "Sort" setting is automatically
selected if the original consists of two or more pages.
• No:
The "Sort" or "Group" setting is not selected automatically.
Yes
Default Copy Settings
Specify the default settings for Copy mode.
The copy settings selected when the machine is turned on
(the power switch is set to "n") or the [Reset] key is pressed
can be specified.
• Current Setting:
The settings specified from the touch panel before Utility mode was entered are set as the default settings for
Copy mode.
• Factory Default:
The factory default settings are set as the default settings for Copy mode.
Factory Default
Default Enlarge Factory
Default
Specify the default settings for Enlarge Display mode.
• Current Setting:
The settings specified in the Enlarge Display mode before Utility mode was entered are set as default settings
for the Enlarge Display mode.
• Factory Default:
The factory default settings are set as the default settings for the Enlarge Display mode.
Factory Default
When AMS Direction is Incorrect
Select whether or not printing continues when the paper
and original orientations are different with the "Auto Paper
Select" setting selected.
• Print:
The Zoom setting is automatically set and the copy is
printed on paper of the specified size in the specified
orientation.
• Delete Job:
The job is deleted, and no copies are printed.
Print
Separate Scan Output
Method
Select whether copies are printed as the original is being
scanned or after the entire original has been scanned when
scanning an original in separate batches or when scanning
a multiple-page document from the original glass.
• Page Print:
Printing of copies that can be printed begins while the
original is being scanned.
• Batch Print
Printing begins after all pages of the original have been
scanned.
Page Print
bizhub 751/601 (Version 2)
12-21
Utility mode
12
Parameter
Description
Default Setting
Enlargement Rotation
Select whether an image that exceeds 297 mm in the main
scanning direction (left/right direction on the original glass
and ADF) is rotated when the copies are printed.
• Allow:
An enlargement rotation is performed.
• Restrict:
The enlargement rotation is prohibited.
Allow
Auto Zoom (Platen)
Select whether or not the "Auto" Zoom setting is automatically selected when a paper tray is selected (except when
the "Auto" Paper setting is selected) while an original is
placed on the original glass.
OFF
Auto Zoom (ADF)
Select whether or not the "Auto" Zoom setting is automatically selected when a paper tray is selected (except when
the "Auto" Paper setting is selected) while an original is
loaded into the ADF.
ON
Specify Default Tray when
APS Off
Select which paper tray is selected when the "Auto" Paper
setting is canceled.
• Tray Before APS ON:
The paper tray that was being used before the "Auto"
Paper setting was selected is selected.
• Default Tray:
Tray 1 is used.
Tray Before APS ON
Select Tray for Insert Sheet
Select the default paper tray loaded with paper for the cover pages (front cover), inserted pages and chapter title pages.
Tray 2
Tri-Fold Print Side
Whether to fold copies with the printed surface inward or
outward can be selected when copies are output tri-folded.
This function can be used if the optional Finisher FS-610 is
installed.
Inside
Print Jobs During Copy
Operation
Select whether or not print data or fax data can be accepted for printing while a copy operation is being performed.
• Accept:
Print data and fax data can be accepted and printed.
• Receive Only:
Print data and fax data is printed after the copy operation is finished.
Accept
Automatic Image Rotation
Select whether or not the image is automatically rotated
when the original and copy paper orientations are different.
• When Auto Paper / Auto Zoom / Reduce is set:
If the "Auto" Paper setting, "Auto" Zoom setting or a
Reduce setting is selected, the image is automatically
rotated to fit the orientation of the paper.
• When Auto Paper / Auto Zoom is set:
If the "Auto" Paper setting or "Auto" Zoom setting is
selected, the image is automatically rotated to fit the
orientation of the paper.
• When Auto Zoom / Reduce is set:
If the "Auto" Zoom setting or a Reduce setting is selected, the image is automatically rotated to fit the orientation of the paper.
• When Auto Zoom is set:
If the "Auto" Zoom setting is selected, the image is automatically rotated to fit the orientation of the paper.
When Auto Paper/Auto
Zoom is set
Printed side when copying
1 sheet from Original Glass
Specify whether the copies of originals scanned from the
original glass are output with the printed sides facing up or
down.
• Face Down:
Copies are output with the printed sides facing down.
• Face UP:
Copies are output with the printed sides facing up.
Face Down
2
Note
[Auto Zoom (Platen)], [Auto Zoom (ADF)], [Specify Default Tray when APS Off], [Select Tray for Insert
Sheet], and [Automatic Image Rotation] appear only if the "Administrator Security Levels" parameter in
Administrator mode is set.
[Print Jobs During Copy Operation] appears only if the "Administrator Security Levels" parameter in
Administrator mode is set to "Level 2".
12-22
bizhub 751/601 (Version 2)
Utility mode
12
When the Enlarge Display mode is selected, the [Default Enlarge Display Setting] button appears to
allow specifying the default settings of the copy and fax/scan operations in the Enlarge Display mode.
!
Detail
For details on the "Administrator Security Level" parameter, refer to "Security Settings" on page 12-38.
For details on the default settings and the factory default settings, refer to page 2-31.
To change the default settings for Fax/Scan mode, press the [Fax/Scan] key, enter Utility mode, and
then select a setting for this parameter.
12.3.4
Scan/Fax Settings
Parameter
Description
Black Compression Level
Specify settings for scanning. For details, refer to the User manual – Network
Scan/Fax/Network Fax Operations.
Default Scan/Fax Settings
Default Enlarge Display Settings
12.3.5
Printer Settings
Parameter
Description
Basic Settings
Specify settings for printing. For details, refer to User manual – Print Operations (IC-208).
Paper Settings
PCL Settings
PS Setting
XPS Settings
TIFF/PDF Image Paper Setting
12.3.6
Print Reports
The Print function settings can be printed as a report. For details, refer to
User manual – Print Operations (IC-208).
Image Shift Settings
Make adjustment on Image Shift function used in Printer mode. For details,
refer to the User manual – Print Operations (IC-208).
Stamp Settings
Specify settings for Stamp function used in Printer mode. For details, refer
to the User manual – Print Operations (IC-208).
Available paper types depend on the paper tray.
Change Password
Description
The password for the user who is currently logged on can be changed.
After typing in the current password, type in the new password.
This parameter is available when "User Authentication" is set to "ON (MFP)".
12.3.7
Change E-Mail Address
Description
The e-mail address for the user who is currently logged on can be changed.
This parameter appears only when a user other than a public user is logged on.
2
Note
[Change E-Mail Address] appears only if the "Administrator Security Levels" parameter in Administrator
mode is set to "Level 2"
bizhub 751/601 (Version 2)
12-23
Utility mode
12
12.3.8
Toner Supply
Description
When the toner density becomes low, the density level can be restored while the machine is stopped.
12.3.9
Change Icon
Description
The icon registered for the user who is currently logged on can be changed.
This parameter appears only when a user other than a public user is logged on.
12.3.10
Displaying the User Settings screen
Follow the procedure described below to display the User Settings screen by pressing [Utility/Counter] key.
1
Press the [Utility/Counter] key.
2
Touch [2 User Settings].
–
12-24
An item can also be selected by pressing the key in the keypad for the number beside the desired
button.
For [2 User Settings], press the [2] key in the keypad.
bizhub 751/601 (Version 2)
Utility mode
12
The User Settings screen appears.
2
Note
To finish specifying settings in the Utility mode, press the [Utility/Counter] key. Otherwise, exit the Utility
mode by touching [Close] in each screen until the screen for the Copy or Box mode appears.
bizhub 751/601 (Version 2)
12-25
Utility mode
12
12.4
Specifying administrator settings
This section describes the function and main registration parameters that can be specified after pressing the
[Utility/Counter] key, then touching [Administrator Settings].
12.4.1
System Settings
Power Save Settings
Parameter
Description
Default Setting
Low Power Mode Settings
Specify the desired length of time (between 1 and 240 minutes) until the machine enters Power Save mode.
15 minutes
Sleep Mode Settings
Specify the desired length of time (between 1 and 240 minutes) until the machine enters Sleep mode.
60 minutes
Specify whether to bring the machine to the same condition
as the main power off when the machine enters Sleep mode
or the sub power switch is turned off.
ON
Power Save Key
Select which low power mode is entered when the [Power
Save] key is pressed.
• Low Power:
The touch panel goes off and the machine enters a mode
where it conserves energy.
• Sleep:
Although the machine conserves more energy in Sleep
mode than in Power Save mode, the machine must warm
up when Sleep mode is canceled, therefore taking more
preparation time than Power Save mode.
Low Power
Enter Power Save Mode
Specify settings for faxing. For details, refer to the User manual – Network Scan/Fax/Network Fax Operations.
Normal
Hibernation
Setting*
*
This item appears when an optional fax kit, hard disk or the image controller IC-208 is not installed, the USB memory
is not connected, and the weekly timer is set to [OFF].
Output Settings
Parameter
Description
Print/Fax Output
Setting
Specify settings for printing. For details, refer to the User manual –
Network Scan/Fax/Network Fax Operations and the User manual –
Print Operations.
Default Setting
Output Tray Settings
Select the finishing tray for each type of job (copies, printouts, reports and faxes).
Copy: Tray 2
Printer: Tray 2
Print Reports: Tray 2
Fax: Tray 2
Shift Output Each
Job
Select whether or not printed copies are fed out shifted when "Offset" is selected while a finisher is installed.
• Yes: Pages are fed out shifted.
• No: Pages are fed out without being shifted.
Yes
Date/Time Settings
Description
Default Setting
Specify the current date and time. In addition, the time zone can be set between -12:00
and 13:00 (in 30-minute increments).
Time Zone: +00:00
Daylight Saving Time
12-26
Description
Default Setting
Select whether or not the machine’s internal clock observes daylight saving time. If
"Yes" is selected, a setting appears so that the length of time for adjusting the current
time can be set. The length of time applied for daylight saving time can be set between
1 and 150 minutes in 1-minute increments.
No
bizhub 751/601 (Version 2)
Utility mode
12
Weekly Timer Settings
Parameter
Description
Default Setting
Weekly Timer
ON/OFF Settings
Select whether or not the weekly timer is used.
OFF
Time Settings
Specify the time of each day that the machine is turned on/off.
-
Date Settings
Specify the individual dates or the days of the week that the machine is turned on/off.
-
Select Time for
Power Save
If the machine is turned off at a specific time, for example, during the lunch break, the time for turning the machine off and on
can be specified.
No
Password for NonBusiness Hours
If the machine is turned off with the weekly timer function, select
whether or not use is limited with a password. In addition, if
"Yes" is selected, specify the password that must be entered.
No
!
Detail
If the weekly timer is set, the machine will be turned on/off at the specified time. Settings can be
specified to require a password in order to turn the machine on or to allow fax and print jobs to be
received after the machine has been turned off by the timer.
Various weekly timer settings in the Weekly Timer Settings screen can be combined. For details on the
various settings, refer to "Overview of weekly timer settings" on page 12-44.
Restrict User Access
Parameter
Description
Default Setting
Copy Program Lock Settings
Select the registered copy programs that are prevented from being changed or deleted.
-
Delete Saved Copy Program
Select the registered copy programs to be deleted.
-
Restrict Access to Job
Settings
Changing Job Priority
Select whether or not to allow the print priority of
jobs to be changed.
Allow
Delete Other User
Jobs
Select whether or not jobs from other users can
deleted when the user authentication settings
have been specified.
Restrict
Registering and
Changing Addresses
Select whether or not to allow registered destinations to be changed.
Allow
Changing Zoom
Ratio
Select whether or not to allow stored zoom ratios
to be changed.
Allow
Change the
"From" Address
Select whether or not to allow the specified From
address to be changed.
Allow
Change Registered Overlay
Select whether or not to allow registered image
overlays to be changed.
Allow
Restrict Broadcasting
Select whether to prevent multiple recipients from
being specified for fax transmissions.
OFF
Restrict Operation
bizhub 751/601 (Version 2)
12-27
Utility mode
12
Expert Adjustment
Parameter
Description
Default Setting
Density for Original Type
Shift the exposure level darker/lighter within 5 levels for each original type, which will be reflected to
9 levels of the Density setting available on the Basic screen.
Text: 3
Text/Photo: 3
Photo: 3
Dot Matrix Original: 2
Erase
Adjustment
Non-Image Area
Erase
Select the condition for Non-Image Area Erase to
function.
Except Original
Glass e1.0
Non-Image Area
Erase Setting
Select the setting method, erasing mode, and
original density for the Non-Image Area Erase
function.
Erase Setting: Specify
How to Erase: Rectangular
Original Density: Standard
ADF Frame Erase
Specify the erasing width for the ADF Frame Erase
function.
3 mm
Leading Edge Adjustment
Adjust the starting print position between -3.0 mm
and +6.0 mm at the leading edge of the paper
(with respect to the paper feed direction). Adjustments can be specified for each paper type.
0.0 mm
Centering
Adjust the starting print position between -6.4 mm
and +6.3 mm at the left edge of the paper (with respect to the paper feed direction).
0.0 mm
Vertical Adjustment
If the copy image is distorted (stretched or compressed), the paper feed speed and printing
speed can be synchronized to adjust the distortion of the copy image between -1.35 and +5.00.
0.0%
Horizontal Adjustment
If the copy image is distorted (stretched or compressed), the zoom ratio in the transverse feed direction of the original can be adjusted between 1.0% and +1.0%.
0.0%
Printer
Adjustment
2nd-Side
Size
Adjustment
12-28
Adjust the zoom ratio for the back side of double-sided copies for each
paper tray.
Adjust Ratio:[No Selection], [-0.1%], [-0.2%], [-0.3%]
No Selection
bizhub 751/601 (Version 2)
Utility mode
12
Parameter
Description
Default Setting
Center Staple Position*1
Adjust the stapling position (between -12, 8 mm
and 12, 7 mm) when printing with the "Center Staple & Fold" setting.
0.0 mm
Half-Fold Position*1
Adjust the folding position (between -12, 8 mm
and 12, 7 mm) when printing with the "Center Staple & Fold" setting.
0.0 mm
Punch Vertical Position Adjustment*2
Adjust the vertical position of the punched holes
between -5.0 mm and 5.0 mm.
0.0 mm
Punch Unit Vertical
Position Adjustment *3
Adjust the vertical position of the punched holes
between - 5.0 mm and 5.0 mm for each paper
size.
0.0 mm
Punch Horizontal
Position Adjustment*2
Adjust the horizontal position of the punched
holes between -5.0 mm and 5.0 mm.
0.0 mm
Punch Unit Horizontal Position Adjustment *3
Adjust the horizontal position of the punched
holes between - 5.0 mm and 5.0 mm.
0.0 mm
Punch Resist Loop
Size Adjustment*2
Adjust the hole-punching shift for double-sided
printing and outputting cover pages between
-16.0 mm and 16.0 mm.
0.0 mm
1st Z-Fold Position
Adjustment*3
Adjust the 1st folding position between - 12.8 mm
and + 12.7 mm for each paper size.
0.0 mm
2nd Z-Fold Position Adjustment*3
Adjust the 2nd folding position between - 12.8
mm and + 12.7 mm for each paper size.
0.0 mm
Tri-Fold Position
Adjustment*1
Adjust the folding positions (between -12.8 mm
and 12.7 mm) when printing with the "Tri-Fold"
setting.
0.0 mm
2-Position Staple
Pitch Adjustment*1
Adjust the distance (between 128 mm and 160
mm) between staples when printing with the "2
Position" Staple setting ("Staple" and "Center
Staple & Fold").
128 mm
Post Inserter
Feeder
Size
Adjustment*4
Adjust the sensor for detecting the size of paper
loaded in the paper trays of the post inserter.
-
Scanner Adjustment: Leading
Edge
Adjust the starting scan position between -2.0 mm
and +6.0 mm at the leading edge of the original
(with respect to the image scan direction).
0.0 mm
Scanner Adjustment: Centering
Adjust the starting scan position between -3.0 mm
and +3.0 mm at the left edge of the original (with
respect to the image scan direction).
0.0 mm
Vertical Adjustment
If the scanned image is distorted (stretched or
compressed), the zoom ratio in the feed direction
of the original in the scanner area can be adjusted
between -2.0% and +2.0%.
1.00%
ADF Centering
Adjust the center position in the transverse feed
direction of the original between -3.0 mm and +3.0
mm.
0.0 mm
Copy Protect Density Adjustment
Adjust the density of hidden text printed as copy
protection.
200 to 255: 219
Finisher
Adjustment
Scanner
Area
*1
Appears only when Finisher FS-610 is installed.
*2
Appears only when finisher is installed with punch kit.
*3
Appears only when Z folding unit is installed.
*4
Appears only when post inserter is installed.
!
Detail
[Finisher Adjustment] appears only when an optional finisher is installed.
The Finisher Adjustment parameters that are available differ depending on the model of the installed
finisher.
bizhub 751/601 (Version 2)
12-29
Utility mode
12
List/Counter
Parameter
Description
Management List
Job Settings List
Paper Size/Type Counter
The machine settings can be printed.
Store combinations of paper sizes and paper types to be
counted.
Reset Settings
Parameter
Description
Default Setting
System Auto Reset
Specify the desired length of time until the automatic system reset operation is performed.
• Priority Mode:
Select the setting ("Box", "Copy" or
"Scan/Fax") for the mode that the machine
enters when the automatic system reset operation is performed.
• System Auto Reset Time:
Specify the setting (between 1 and 9 minutes
or "OFF") for the desired length of time until
the automatic system reset operation is performed.
Priority Mode:
Copy
System Auto Reset
Time: 1 Minute
Auto Reset
Select the setting (between 1 and 9 minutes or
"OFF") for the desired length of time until the automatic panel reset operation is performed for
each mode (Copy, Scan/Fax and Box).
Copy: 1 Minute
Scan/Fax: 1 Minute
Box: 1 Minute
When Account is
changed
Select whether or not the settings are reset (initialized) when the user has changed.
This machine detects that the user has changed
when the optional key counter has been removed
or when the user has logged off if user authentication or account track settings are specified.
Reset
When original
is set on ADF
Select whether or not the settings are reset when
an original is loaded into the automatic document
feeder.
Do Not Reset
Next Job
Staple Setting:
Select whether the same Staple setting from the
previous job is set or the setting is canceled when
that job begins and the settings for the next job
can be specified.
OFF
Original Set/Bind Direction:
Select whether the same Original Direction and
Binding Position settings from the previous job are
set or the settings are canceled when that job begins and the settings for the next job can be specified.
OFF
Reset Data After Job:
Select whether or not to reset the address and
other settings after scanning or fax transmission.
When "Confirm with User"* is specified, whether
or not to hold the address and other settings can
be selected after scanning or fax transmission.
Reset All
Select whether or not to activate the automatic
system reset after the proof copy operation is performed.
Yes
Job Reset
System Auto Reset for Proof Copy
2
Reminder
Even if the System Auto Reset Time is [OFF], the System Auto Reset function is activated after 1 minute
of no operation of the machine during the User Authentication or Account Track. However, when in the
Enlarge Display mode, the System Auto Reset function is not activated.
If user authentication settings have been specified or "Enhanced Security Mode" has been set to "ON",
the logoff from Administrator mode or user authentication mode will be performed according to the
"System Auto Reset Time" parameter.
12-30
bizhub 751/601 (Version 2)
Utility mode
12
When the optional i-Option LK-101 is registered, the setting can be specified from Priority Mode:
[Application Menu], [Fax/Scan], [Copy].
When LK-101 is registered, [Auto Reset] can be used to configure the Web Browser settings.
Factory default: 1 minute
If "Confirm Address (TX)" is set to "ON", "Confirm with User" in [Job Reset] - [Next Job] - [Reset Data
After Job] cannot be used.
User Box Settings
Parameter
Description
Delete Unused User Box
Specify settings for using boxes. For details, refer to the User manual – Box
Operations.
Delete Secure Print Documents
Auto Delete Secure Document
Specify settings for using boxes. For details, refer
to the User manual – Box Operations.
Encrypted PDF Delete Time
Default Setting
1 day
1 day
ID & Print Delete Time
1 day
Document Hold Setting
ON
External Memory
Function Settings
Save Document
OFF
Print Document
ON
ID & Print Delete after Print Setting
Confirm with User
Document Delete Time Setting
1 day
Stamp Settings
Parameter
Description
Default Setting
Header/Footer Settings
Program or delete header/footer settings.
-
Fax TX Settings
Select whether or not the stamp settings are canceled when
a fax is sent.
Cancel
Blank Page Print Settings
Description
Default Setting
Select whether or not stamps and overlays are printed on blank pages when a Stamp/Composition function is set.
Do Not Print
Page Number Print Position
Description
Default Setting
Specify the print position of the stamp on back pages when duplex printing and booklet are
used in combination.
All the Same
Skip Job Setting
Parameter
Description
Default Setting
Fax
Select whether or not to skip jobs for the fax transmission.
ON
other than Fax
Select whether or not to skip jobs for other functions than fax transmission.
ON
bizhub 751/601 (Version 2)
12-31
Utility mode
12
Application Key Settings
Description
Default Setting
Functions can be assigned to Key 1 and Key 2.
Key 1: Scan/Fax
Key 2: Copy
<Advanced Preview Setting>
12.4.2
Parameter
Description
Default Setting
Original Direction Confirmation Screen
Configure settings to fax or scan a document. For details, refer to the User manual – Network Scan/Fax/Network Fax Operations.
ON
Administrator/Machine Settings
Parameter
Description
Administrator Registration
Specify the administrator information displayed in the Service Representative/Administrator Information screen of the Help screen and the From address
for sending e-mail from the machine.
Input Machine Address
Register the name of the machine and its e-mail address. The registered machine name is added to the names of files that are sent and to originals saved in
user boxes. As the factory default, the machine name is specified as
"KMBT_751/601". The registered e-mail address is used with Internet faxing.
2
Note
When entering the device name while registering the machine address, do not use characters that
cannot be used by the operating system.
12.4.3
One-Touch/User Box Registration
Parameter
Description
Create One-Touch Destination
Specify settings for registering fax, scan and user box destinations. For details,
refer to the User manual – Network Scan/Fax/Network Fax Operations and the
User manual – Box Operations.
Create User Box
12-32
One-Touch/User Box Registration
List
The lists of address book destinations, group destinations, program destinations and titles/text can be printed to be checked. For details, refer to the User
manual – Network Scan/Fax/Network Fax Operations.
Maximum Number of User Boxes
Specify the maximum number of user boxes for each user. For details, refer to
the User manual – Box Operations.
bizhub 751/601 (Version 2)
Utility mode
12.4.4
12
User Authentication/Account Track
General Settings
Description
Default Setting
Specify user authentication and account track settings in order to control the use of this
machine.
• User Authentication:
Select either "External Server Authentication" or "ON (MFP)" as the user authentication method. To quit user authentication, select "OFF".
• Public User Access:
Select whether or not the machine can be used by an unauthenticated user. This
cannot be selected if "User Authentication" is set to "OFF".
• The machine can be used without authentication if [ON (Without Login)] is touched
when logging on as a public user. When logging on as an authorized user, the [Access] key must be pressed first to display the authentication screen.
• Account Track:
Select whether or not account tracking is used to control the machine.
• Account Track Input Method:
To authenticate using an account name and password, touch [Account Name &
Password]. To authenticate using only a password, touch [Password Only]. No setting can be selected when "Account Track" is set to "OFF". If both user authentication and account track settings are specified, "Account Name & Password" cannot
be selected.
• Synchronize User Authentication & Account Track:
Select whether or not user authentication and group authentication are synchronized. This appears only when "User Authentication" is set to "External Server Authentication" or "ON (MFP)" and "Account Track" is set to "On".
• When # of Jobs Reach Maximum:
To stop the job being printed and begin printing the next job when the limit specified
for account track or user authentication is reached, touch [Skip Job]. To stop the all
jobs when the limit is reached, select [Stop Job].
• Number of User Counters Assigned:
Adjust the number of users and accounts that can be registered.
Example: When "Number of User Counters Assigned" is set to "50", 950 accounts
can be registered.
• Ticket Hold Time Setting:
Specify the desired length of holding time (between 1 and 60 minutes) of Kerveros
authentication ticket. The holding time setting is applied when Active Directory is selected as the authentication server type.
User Authentication: OFF
Public User Access: Restrict
Account Track: OFF
Account Track Input Method: Account name & password
Synchronize User Authentication & Account Track:
Synchronize
When # of Jobs Reach
Maximum: Skip Job
Number of User Counters
Assigned: 500
Ticket Hold Times Settings: 60 min
User Authentication Settings
Parameter
Description
Default Setting
User Name List
Select whether or not a list of user names is displayed in the user authentication screen.
OFF
Default Function
Permission
Operations that are possible with this machine
can be limited when authenticating with an external server.
Copy: Allow
Scan: Allow
Fax: Allow
Print: Allow
User Box: Allow
Print Scan/Fax TX: Allow
Save to External Memory: Allow
ID & Print Settings
Whether or not to use the ID & Print function can
be selected. Also, whether to print unauthorized
jobs or public user jobs immediately or to save
them in the ID & Print User Box can be selected.
ID & Print: OFF
Public User: Print Immediately
ID & Print Operation Settings
Specify the printing method when using the ID &
Print function.
• Print All Jobs:
All the jobs are printed with a single authentication operation.
• Print Each Job:
The stored jobs are printed one at a time.
Print All Jobs
User Registration
Register the users of this machine. In addition, the
password, number of prints allowed, authentication information and function permissions can be
specified for each user.
-
User Counter
The copy, print and fax/scan use for each user
can be checked.
-
Administrative Settings
bizhub 751/601 (Version 2)
12-33
Utility mode
12
2
Note
The user authentication parameters appear only if "User Authentication" on the General Settings screen
is set to any setting other than "OFF".
[Save to External Memory] appears if "Save Document" is set to ON (displayed by touching [User Box
Settings] on the System Settings screen, then [External Memory Function Settings]).
If authentication is performed with PageScope Authentication Manager, [User Registration] does not
appear.
!
Detail
When user authentication is performed using an optional authentication unit by placing your finger or
IC card on the authentication unit, jobs saved in the ID & Print User Box can be printed.
Account Track Settings
Parameter
Description
Account Track Registration
Register the accounts using this machine. In addition, the password and number of
prints allowed can be specified for each account.
Account Track Counter
The copy, print and scan/fax use for each account can be checked.
2
Note
The account track parameters appear only if "Account Track" on the General Settings screen is set to
"ON".
If authentication is performed with PageScope Authentication Manager, [Account Track Settings] does
not appear.
Print Without Authentication
Description
Default Setting
Select whether or not printing is permitted without specifying a user or account. If printing is permitted, prints are counted for public users.
Restrict
Print Counter List
Description
Default Setting
This parameter appears only if user authentication or account track settings have been
specified. The use for each user or account can be checked.
Paper Tray: Tray 1
Simplex/Duplex: 1-sided
Print Item: All Info.
External Server Settings
Description
Specify the external server that performs user authentication.
12-34
bizhub 751/601 (Version 2)
Utility mode
12
Limiting Access to Destinations
Parameter
Description
Create Group
Groups for permitting access to destinations can be registered and edited.
Apply Levels/Groups to Destinations
The access permission level and the group with access permissions can be
specified for each destination.
Apply Levels/Groups to Users
The access permission level and the group with access permissions can be
specified for each user.
Authentication Device Settings
Parameter
Description
Default setting
General Settings
Specify the settings for the installed authentication unit.
• Card Authentication: Select the IC card type and operation settings.
• Bio Authentication: Select the beep and operation
settings.
When the authentication
unit (IC card type) has been
installed:
IC Card Type: FeliCa
Operation Settings: Card
Authentication
When the authentication
unit (biometric type) has
been installed:
Beep Sound: ON
Operation Settings: 1-tomany authentication
Logoff Settings
Select whether or not the user is logged off after a scan
or fax is sent or after the copy original is scanned.
Do not log off
!
Detail
The Authentication Device Settings parameters are available only if the optional authentication unit is
installed.
The authentication units of the IC card type and the biometric type cannot be installed at the same time.
If [SSFC] is selected for the IC card type, specify company code and company identification code. For
details, refer to the manual provided with the authentication unit.
Auth/Acct Track Common Setting
Parameter
Description
Default setting
Logout Confirmation
Screen Display Setting
Select whether or not to display the logging-off confirmation screen after pressing the [Access] key.
ON
bizhub 751/601 (Version 2)
12-35
Utility mode
12
12.4.5
Network Settings
Parameter
Description
Network Setting
Specify settings for using the network. For details, refer to the User manual –
Network Scan/Fax/Network Fax Operations.
TCP/IP Settings
NetWare Settings
HTTP Server Settings
FTP Settings
SMB Settings
LDAP Settings
E-mail Settings
SNMP Settings
AppleTalk Settings
Bonjour Setting
TCP Socket Settings
WebDAV Client Settings
Web Service Settings
SSDP Settings
Detail Settings
IEEE 802.1x Authentication Settings
Network Fax Settings
12-36
Specify settings for using network faxing. For details, refer to the User manual –
Network Scan/Fax/Network Fax Operations.
bizhub 751/601 (Version 2)
Utility mode
12.4.6
12.4.7
12
Copier Setting
Parameter
Description
Default Setting
Auto Zoom (Platen)
Select whether or not the "Auto" Zoom setting is automatically selected when a paper tray is selected (except when the
"Auto" Paper setting is selected) while an original is placed on
the original glass.
OFF
Auto Zoom (ADF)
Select whether or not the "Auto" Zoom setting is automatically selected when a paper tray is selected (except when the
"Auto" Paper setting is selected) while an original is loaded
into the ADF.
ON
Specify Default Tray when
APS Off
Select which paper tray is selected when the "Auto" Paper
setting is canceled.
• Tray Before APS ON:
The paper tray that was being used before the "Auto" Paper setting was selected is selected.
• Default Tray:
Tray 1 is used.
Tray Before APS ON
Select Tray for Insert Sheet
Select the default paper tray loaded with paper for the cover
pages (front cover), inserted pages and chapter title pages.
Tray 2
Print Jobs During Copy
Operation
Select whether or not print data or fax data can be accepted
for printing while a copy operation is being performed.
• Accept:
Print data and fax data can be accepted and printed.
• Receive Only:
Print data and fax data is printed after the copy operation
is finished.
Accept
Tri-Fold Print Side
Whether to fold copies with the printed surface inward or outward can be selected when copies are output tri-folded. This
function can be used if the optional Finisher FS-610 is installed.
Outside
Automatic Image Rotation
Select whether or not the image is automatically rotated when
the original and copy paper orientations are different.
• When Auto Paper / Auto Zoom / Reduce is set:
If the "Auto" Paper setting, "Auto" Zoom setting or a Reduce setting is selected, the image is automatically rotated to fit the orientation of the paper.
• When Auto Paper / Auto Zoom is set:
If the "Auto" Paper setting or "Auto" Zoom setting is selected, the image is automatically rotated to fit the orientation of the paper.
• When Auto Zoom / Reduce is set:
If the "Auto" Zoom setting or a Reduce setting is selected, the image is automatically rotated to fit the orientation
of the paper.
• When Auto Zoom is set:
If the "Auto" Zoom setting is selected, the image is automatically rotated to fit the orientation of the paper.
When Auto Paper/Auto Zoom is set
Printed side when copying
1 sheet from Original Glass
Specify whether the copies of originals scanned from the
original glass are output with the printed sides facing up or
down.
• Face Down:
Copies are output with the printed sides facing down.
• Face UP:
Copies are output with the printed sides facing up.
Face Down
Printer Settings
Parameter
Description
USB Timeout
Specify settings for registering print destinations. For details, refer to the User
manual – Print Operations.
Network Timeout
Print XPS Error
bizhub 751/601 (Version 2)
12-37
Utility mode
12
12.4.8
Fax Settings
Parameter
Description
Header Information
Specify settings for registering fax destinations. For details, refer to the User
manual – Network Scan/Fax/Network Fax Operations.
Header/Footer Position
Line Parameter Setting
TX/RX Settings
Function Settings
PBX Connection Setting
Report Settings
Job Settings List
Multi Line Setting
Network Fax Settings
Specify settings for using network faxing. For details, refer to the User manual –
Network Scan/Fax/Network Fax Operations.
2
Note
[8 Fax Settings] appears only when the fax kit is installed or when Internet fax functions are available.
12.4.9
System Connection
Parameter
Description
Open API Settings
Specify settings for registering network connections. For details, refer to the
User manual – Network Scan/Fax/Network Fax Operations.
Admin. transmission
The administrator can send the machine status to the service representative. For
details, contact your service representative
[Prefix/Suffix Automatic Setting]
Select whether to automatically add prefix and suffix to a destination number.
If [Prefix/Suffix Automatic Setting] is set to [ON], the other settings will be restricted. For details, refer to the User manual – Network Administrator.
2
Note
[2 Administrator Settings] is displayed when the machine is managed by CS Remote Care.
12.4.10
Security Settings
Administrator Password
Description
Default Setting
The administrator password used to specify the Administrator mode settings can be
specified or changed. The administrator password can contain between 0 and 8 digits
(characters). If the "Password Rules" parameter is set to "Enabled", only an administrator password with 8 digits can be specified.
12345678
User Box Administrator Setting
Description
Specify settings for using boxes. For details, refer to the User manual – Box Operations.
12-38
bizhub 751/601 (Version 2)
Utility mode
12
Administrator Security Levels
Description
Default Setting
Specify the range of Administrator mode parameters available to users.
• Level 1:
Low Power Mode Settings, Auto Zoom (Platen), Auto Zoom (ADF), Specify Default
Tray when APS Off, Select Tray for Insert Sheet, Automatic Image Rotation are available to users.
• Level 2:
Low Power Mode Settings, Output Settings, Density for Original, Page Number Print
Position, Blank Page Print Settings, Auto Zoom (Platen), Auto Zoom (ADF), Specify
Default Tray when APS Off, Select Tray for Insert Sheet, Automatic Image Rotation,
Copy Operating Screen, Change E-Mail Address are available to users.
• Prohibit:
None of the parameters that are available to users with "Level 1" or "Level 2" are
available.
Prohibit
Security Details
Parameter
Description
Default Setting
Password Rules
Select whether or not password rules are applied.
Invalid
Prohibited Functions
When Authentication Error
Select the operations that are prohibited if user authentication
failed.
• Mode 1: Operations cannot be performed for a fixed
length of time.
• Mode 2: When authentication has failed repeatedly, the
control panel can no longer be operated. The number of
times of failed authentication can be set between 1 and 5.
If operation of the control panel is restricted, touch [Release], and then select the items whose operation restrictions are canceled.
• Users & Accounts: Operations for user authentication and
account track
• Secure Print: Operations for confidential documents
• User Box: Operations for password-protected boxes
• SNMP: Operations for SNMP v3 Write user authentication
• Release Time Settings: Specify the length of time until
prohibited operations are automatically unlocked. The
time can be set between 1 and 60 minutes.
Mode 1 Release Time
Settings: 5 min.
Confidential Document
Access Method
The operation method for confidential documents can be
viewed. If "Prohibited Functions When Authentication Failed"
is set to "Mode 1", this parameter is set to "Mode 1". If "Prohibited Functions When Authentication Failed" is set to
"Mode 2", this parameter is set to "Mode 2".
Mode 1: Type in the ID and password for the confidential document, and then select the document.
Mode 2: Enter the Secure Print ID, select the document, and
then enter the password for authentication.
Mode 1
Manual Destination Input
Select whether or not a recipient can be typed in manually in
a recipient input screen.
Allow
Print Data Capture
Select whether or not data for a print job can be captured. For details, refer to the User
manual – Print Operations.
Restrict Fax TX
Select whether or not fax transmissions are prohibited.
OFF
Hide Personal Information
Select whether or not the file name and destination are hidden
in the job log.
OFF
Display Activity Log
Select whether or not the communication log is displayed.
ON
Delete Job Log
The entire job log can be cleared.
-
Secure Print Only
This setting is for the print operations. For details, refer to the User manual – Print Operations.
Web browser contents access
This setting is for the use of an application that interacts with the Web browser. For details, refer to the User manual – Advanced Function Operations.
bizhub 751/601 (Version 2)
12-39
Utility mode
12
!
Detail
The operation of the "Prohibited Functions When Authentication Error" parameter applies to the
following passwords.
User passwords, account passwords, user box passwords, passwords for confidential documents, and
the administrator password
If the control panel cannot be operated even after touching [Release] from the "Prohibited Functions
When Authentication Error" parameter to specify the items whose operation restrictions are canceled
or if an operation is prohibited from a failed attempt to authenticate the administrator password, restart
the machine. Restart the machine, wait for the time specified in "Release Time Settings", and then
perform the administrator authentication.
2
Reminder
When the machine is turned off, then on again with the main power switch, wait at least 10 seconds to
turn the machine on after turning it off. The machine may not operate correctly if it is turned on
immediately after being turned off.
Enhanced Security Mode
Description
Settings necessary for applying enhanced security mode appear. Select whether or not to apply enhanced mode settings when the necessary settings are specified. For details, contact your service representative.
HDD Settings
Parameter
12-40
Description
Default Setting
Check HDD Capacity
Information concerning the hard disk capacity is displayed.
Overwrite Temporary Data
Specify whether or not to overwrite the temporary image data
saved on the hard disk with all operations for copying, scanning, faxing and computer printing. For details on the settings, refer to the User manual – Box Operations. By
specifying a setting to overwrite temporary data, the area of
the hard disk where image data is saved after printing or
sending can be overwritten, and the data can be erased. This
process prevents disclosure of image data on the hard disk.
NO
Overwrite All Data
Select this parameter to overwrite and delete all data on the
entire hard disk in the specified patterns for mode 1 through
mode 8 when returning the machine from lease or disposing
the machine in order to prevent disclosure of the data. For details on the settings, refer to the User manual – Box Operations. Before performing this operation, contact your service
representative.
Mode 1
HDD Lock Password
Specify the password for protecting data on the hard disk. For details, refer to the User
manual – Box Operations.
Format HDD
Format the hard disk. For details, refer to the User manual – Box Operations.
HDD Encryption Setting
This setting appears when the optional Security kit is installed.
Specify an encryption passphrase to encrypt data in the hard disk.
For details, refer to the User manual – Box Operations. When a setting is specified, all
data written to the hard disk is encrypted to protect it. If the encryption key is changed,
the hard disk will be reformatted.
bizhub 751/601 (Version 2)
Utility mode
12
Function Management Settings
Parameter
Description
Default Setting
Network Function Usage Settings
Specify settings for network functions that are difficult to count when
managing operations.
ON
!
Detail
The following functions cannot be used if "Network Function Usage Settings" is set to "OFF".
PC-FAX transmission
Using the HDD TWAIN driver to view and retrieve documents in user boxes
Using PageScope Box Operator to view and retrieve documents in user boxes
Using PageScope Scan Direct to retrieve documents in user boxes
Using PageScope Job Spooler to view and retrieve documents in user boxes
Box operations using the PageScope Web Connection (The User Box tab does not appear.)
Stamp Settings
Parameter
Description
Apply Stamps
Select whether or not a stamp is added when printing or sending.
Delete Registered Stamp
Select whether or not stamps registered for copy protection can be deleted.
Driver Password Encryption Setting
Description
Default setting
The encryption password for the printer driver can be changed. For details, refer to the
User manual – Print Operations.
Use Factory Default
Flash Memory Lock Password
12.4.11
Description
Default setting
The lock password of flash memory can be changed or released.
Use Factory Default
License Settings
Parameter
Description
Get Request Code
Issues the request code for this machine that registers in the License Management Server (LMS).
Install License
Select the function to be enabled, and then type in the license code acquired from the
License Management Server (LMS).
List of Enabled Functions
Enabled functions can be checked.
2
Note
For details on Install License, refer to the Quick Guide [Copy/Print/Fax/Scan/Box Operations].
12.4.12
OpenAPI Authentication Management Setting
Parameter
Description
Restriction Code Settings
Configure settings to prevent our deprecated OpenAPI connection application from being registered in this machine. For details, contact your service representative.
bizhub 751/601 (Version 2)
12-41
Utility mode
12
12.4.13
Displaying the Administrator Settings screen
Follow the procedure described below to display the Administrator Settings screen by pressing
[Utility/Counter] key.
1
Press the [Utility/Counter] key.
2
Touch [3 Administrator Settings].
–
12-42
An item can also be selected by pressing the key in the keypad for the number beside the desired
button. For [3 Administrator Setting], press the [3] key in the keypad.
bizhub 751/601 (Version 2)
Utility mode
12
3
Type in the administrator password, and then touch [OK].
–
For details on typing in text, refer to "Entering text" on page 15-3.
The Administrator Settings screen appears.
2
Note
To finish specifying settings in the Utility mode, press the [Utility/Counter] key. Otherwise, exit the Utility
mode by touching [Close] in each screen until the screen for the Copy, Fax/Scan or Box mode appears.
2
Reminder
The default administrator password is "12345678". The administrator of this machine should change
the administrator password.
Be sure to keep the administrator password in a safe place. If the administrator password is lost, it must
be specified by the service representative. For details, contact the service representative.
bizhub 751/601 (Version 2)
12-43
Utility mode
12
12.5
Overview of weekly timer settings
Various weekly timer settings in the Weekly Timer Setting screen can be combined. A general procedure is
described below.
0
0
If the weekly timer has been set, leave the machine plugged into the electrical outlet even if the machine
has been turned off.
Press the [Utility/Counter] key, touch [Administrator Settings], then [System Settings], then [Weekly
Timer Setting], and correctly specify the necessary settings.
1
Set "Weekly Timer ON/OFF Settings" to "ON".
2
Specify times for "Time Settings".
3
Specify dates for "Date Settings".
4
Specify the desired settings for "Select Time for Power Save" and "Password for Non-Business Hours".
The weekly timer is set.
12-44
bizhub 751/601 (Version 2)
Utility mode
12
12.6
Finisher Adjustment
12.6.1
Center Staple Position Adjustment
The stapling position when printing with the "Center Staple & Fold" setting can be adjusted for each paper
size.
2
Note
[Center Staple Position Adjustment] does not appear if optional Finisher FS-610 is not installed.
If the angle of the staple must be adjusted, contact your service representative.
!
Detail
For details on the "Center Staple & Fold" setting, refer to "Binding copies at the center ("Center Staple
& Fold" setting)" on page 3-79.
For the procedure on adjusting the center folding position, refer to "Half-Fold Position" on page 12-47.
0
0
Adjust the center folding position before adjusting the center stapling position.
Before making any adjustments, use the "Center Staple & Fold" setting to print a single sample copy.
Perform the adjustment while checking the sample that was created.
1
Display the Administrator Settings screen.
–
2
For details on displaying the Administrator Settings screen, refer to "Displaying the Administrator
Settings screen" on page 12-42.
Touch [1 System Settings].
The System Settings screen appears.
3
Touch [7 Expert Adjustment].
The Expert Adjustment screen appears.
4
Touch [5 Finisher Adjustment].
The Finisher Adjustment screen appears.
5
Touch [1 Center Staple Position].
The Center Staple Position screen appears.
6
Touch the button for the paper size to be adjusted.
–
If the paper size to be adjusted is not displayed, touch
displayed.
bizhub 751/601 (Version 2)
and
until the desired paper size is
12-45
Utility mode
12
7
Compare the width of the left pages of the copy sample with the width of the right pages to check for
the center of the paper.
–
–
–
8
If the staple position is too far to the left of the center of the paper, touch [+] to increase the
adjustment (between 0.1 mm and 12.7 mm).
Each time [+] or [-] is touched, the value is increased or decreased by one increment.
If the staple position is too far to the right of the center of the paper, touch [-] to reduce the
adjustment (between -0.1 mm and -12.8 mm).
Touch [OK].
– To cancel the setting and select the default, press the [Reset] key.
The stapling position is adjusted.
If the stapling position was at the center of the paper in step 7, this completes the procedure.
9
Use the "Center Staple & Fold" setting to print another sample copy.
10
Check the print result.
–
–
12-46
Check that the stapling position is adjusted to the center of the paper.
If more adjustment is necessary, repeat steps 6 through 9.
bizhub 751/601 (Version 2)
Utility mode
12.6.2
12
Half-Fold Position
The folding position when printing with the "Half-Fold" setting can be adjusted for each paper size and for
each paper type.
2
Note
[Half-Fold Position] does not appear if optional Finisher FS-610 is not installed.
If the angle of the center folding position must be adjusted, contact your service representative.
!
Detail
For details on the "Center Staple & Fold" setting, refer to "Binding copies at the center ("Center Staple
& Fold" setting)" on page 3-79.
0
Before making any adjustments, use the "Half-Fold" setting to print a single sample copy. Perform the
adjustment while checking the sample that was created.
1
Display the Administrator Settings screen.
–
2
For details on displaying the Administrator Settings screen, refer to "Displaying the Administrator
Settings screen" on page 12-42.
Touch [1 System Settings].
The System Settings screen appears.
3
Touch [7 Expert Adjustment].
The Expert Adjustment screen appears.
4
Touch [5 Finisher Adjustment].
The Finisher Adjustment screen appears.
5
Touch [2 Half-Fold Position].
The Half-Fold Position screen appears.
6
Touch the button for the paper size to be adjusted.
–
If the paper size to be adjusted is not displayed, touch
displayed.
bizhub 751/601 (Version 2)
and
until the desired paper size is
12-47
Utility mode
12
7
Compare the width of the left pages of the copy sample with the width of the right pages to check for
the center of the paper.
–
–
–
8
If the folding position is too far to the left of the center of the paper, touch [+] to increase the
adjustment (between 0.1 mm and 12.7 mm).
Each time [+] or [-] is touched, the value is increased or decreased by one increment.
If the folding position is too far to the right of the center of the paper, touch [-] to reduce the
adjustment (between -0.1 mm and -12.8 mm).
Touch [OK].
– To cancel the setting and select the default, press the [Reset] key.
The center folding position is adjusted.
If the folding position was at the center of the paper in step 7, this completes the procedure.
9
Use the "Half-Fold" setting to print another sample copy.
10
Check the print result.
–
–
12-48
Check that the folding position is adjusted to the center of the paper.
If more adjustment is necessary, repeat steps 6 through 9.
bizhub 751/601 (Version 2)
Utility mode
12.6.3
12
Punch Vertical Position Adjustment
The vertical position of punched holes when printing with a Punch setting can be adjusted for each paper
size.
2
Note
[Punch Vertical Position Adjustment] appears only if optional punch kit is installed on the finisher.
For details on the Punch settings, refer to "Punching holes in copies (Punch settings)" on page 3-74.
0
Before making any adjustments, use a Punch setting to print a sample copy. Perform the adjustment
while checking the sample that was created.
1
Display the Administrator Settings screen.
–
2
For details on displaying the Administrator Settings screen, refer to "Displaying the Administrator
Settings screen" on page 12-42.
Touch [1 System Settings].
The System Settings screen appears.
3
Touch [7 Expert Adjustment].
The Expert Adjustment screen appears.
4
Touch [5 Finisher Adjustment].
The Finisher Adjustment screen appears.
5
Touch [3 Punch Vertical Position Adjustment].
The Punch Vertical Position screen appears.
6
Touch the button for the paper size to be adjusted.
–
If the paper size to be adjusted is not displayed, touch
displayed.
bizhub 751/601 (Version 2)
and
until the desired paper size is
12-49
Utility mode
12
7
Check the sample copy for the punch positions and for the center of the paper.
–
–
–
8
If the punch positions are too far above the center of the paper, touch [+] under "Adjust Value" to
increase the adjustment (between 0.1 mm and 5.0 mm).
Each time [+] or [-] is touched, the value is increased or decreased by one increment.
If the punch positions are too far blow the center of the paper, touch [-] under "Adjust Value" to
increase the adjustment (between -0.1 mm and -5.0 mm).
Touch [OK].
– To cancel the setting and select the default, press the [Reset] key.
The vertical position of the punched holes is adjusted.
If no adjustment of the vertical position of the punched holes was necessary in step 7, this completes
the procedure.
9
Use a Punch setting to print another sample copy.
10
Check the print result.
–
–
12-50
Check that the vertical position of the punched holes was adjusted.
If more adjustment is necessary, repeat steps 6 through 9.
bizhub 751/601 (Version 2)
Utility mode
12.6.4
12
Punch Unit Vertical Position Adjustment
The vertical position of punched holes when printing with a Punch setting can be adjusted for each paper
size.
2
Note
[Punch Unit Vertical Position Adjustment] appears only if optional Z folding unit is installed.
For details on the Punch settings, refer to "Punching holes in copies (Punch settings)" on page 3-74.
0
Before making any adjustments, use a Punch setting to print a sample copy. Perform the adjustment
while checking the sample that was created.
1
Display the Administrator Settings screen.
–
2
For details on displaying the Administrator Settings screen, refer to "Displaying the Administrator
Settings screen" on page 12-42.
Touch [1 System Settings].
The System Settings screen appears.
3
Touch [7 Expert Adjustment].
The Expert Adjustment screen appears.
4
Touch [5 Finisher Adjustment].
The Finisher Adjustment screen appears.
5
Touch [4 Punch Unit Vertical Position Adjustment].
The Punch Unit Vertical Position screen appears.
6
Touch the button for the paper size to be adjusted.
–
If the paper size to be adjusted is not displayed, touch
displayed.
bizhub 751/601 (Version 2)
and
until the desired paper size is
12-51
Utility mode
12
7
Check the sample copy for the punch positions and for the center of the paper.
–
–
–
8
If the punch positions are too far above the center of the paper, touch [+] under "Adjust Value" to
increase the adjustment (between 0.1 mm and 5.0 mm).
Each time [+] or [-] is touched, the value is increased or decreased by one increment.
If the punch positions are too far blow the center of the paper, touch [-] under "Adjust Value" to
increase the adjustment (between -0.1 mm and -5.0 mm).
Touch [OK].
– To cancel the setting and select the default, press the [Reset] key.
The vertical position of the punched holes is adjusted.
If no adjustment of the vertical position of the punched holes was necessary in step 7, this completes
the procedure.
9
Use a Punch setting to print another sample copy.
10
Check the print result.
–
–
12-52
Check that the vertical position of the punched holes was adjusted.
If more adjustment is necessary, repeat steps 6 through 9.
bizhub 751/601 (Version 2)
Utility mode
12.6.5
12
Punch Horizontal Position Adjustment
The horizontal position of punched holes when printing with a Punch setting can be adjusted for each paper
size.
2
Note
[Punch Horizontal Position Adjustment] appears only if optional punch kit is installed on the finisher.
For details on the Punch settings, refer to "Punching holes in copies (Punch settings)" on page 3-74.
0
Before making any adjustments, use a Punch setting to print a sample copy. Perform the adjustment
while checking the sample that was created.
1
Display the Administrator Settings screen.
–
2
For details on displaying the Administrator Settings screen, refer to "Displaying the Administrator
Settings screen" on page 12-42.
Touch [1 System Settings].
The System Settings screen appears.
3
Touch [7 Expert Adjustment].
The Expert Adjustment screen appears.
4
Touch [5 Finisher Adjustment].
The Finisher Adjustment screen appears.
5
Touch [5 Punch Horizontal Position Adjustment].
The Punch Horizontal Position Adjustment screen appears.
bizhub 751/601 (Version 2)
12-53
Utility mode
12
6
Check the horizontal position of the punched holes.
–
–
To increase width A, touch [+] to increase the adjustment (between 0.1 mm and 5.0 mm).
Each time [+] or [-] is touched, the value is increased or decreased by one increment.
A
–
To decrease width A, touch [-] to decrease the adjustment (between -0.1 mm and -5.0 mm).
A
7
Touch [OK].
– To cancel the setting and select the default, press the [Reset] key.
The horizontal position of the punched holes is adjusted.
If no adjustment of the horizontal position of the punched holes was necessary in step 6, this completes
the procedure.
8
Use a Punch setting to print another sample copy.
9
Check the print result.
–
–
12-54
Check that the horizontal position of the punched holes was adjusted.
If more adjustment is necessary, repeat steps 6 through 9.
bizhub 751/601 (Version 2)
Utility mode
12.6.6
12
Punch Unit Horizontal Position Adjustment
The horizontal position of punched holes when printing with a Punch setting can be adjusted.
2
Note
[Punch Unit Horizonal Position Adjustment] appears only if optical Z folding unit is installed.
For details on the Punch settings, refer to "Punching holes in copies (Punch settings)" on page 3-74.
0
Before making any adjustments, use a Punch setting to print a sample copy. Perform the adjustment
while checking the sample that was created.
1
Display the Administrator Settings screen.
–
2
For details on displaying the Administrator Settings screen, refer to "Displaying the Administrator
Settings screen" on page 12-42.
Touch [1 System Settings].
The System Settings screen appears.
3
Touch [7 Expert Adjustment].
The Expert Adjustment screen appears.
4
Touch [5 Finisher Adjustment].
The Finisher Adjustment screen appears.
5
Touch [6 Punch Unit Horizontal Position Adjustment].
The Punch Unit Horizontal Position Adjustment screen appears.
6
Check the horizontal position of the punched holes.
–
–
To increase width A, touch [+] to increase the adjustment (between 0.1 mm and 5.0 mm).
Each time [+] or [-] is touched, the value is increased or decreased by one increment.
A
bizhub 751/601 (Version 2)
12-55
Utility mode
12
–
To decrease width A, touch [-] to decrease the adjustment (between -0.1 mm and -5.0 mm).
A
7
Touch [OK].
– To cancel the setting and select the default, press the [Reset] key.
The horizontal position of the punched holes is adjusted.
If no adjustment of the horizontal position of the punched holes was necessary in step 6, this completes
the procedure.
8
Use a Punch setting to print another sample copy.
9
Check the print result.
–
–
12.6.7
Check that the horizontal position of the punched holes was adjusted.
If more adjustment is necessary, repeat steps 6 through 9.
Punch Resist Loop Size Adjustment
When printing with a Punch setting, the angle of punched holes along the side of the paper can be adjusted.
2
Note
[Punch Resist Loop Size Adjustment] appears only if optional punch kit is installed on the finisher.
For details on the Punch settings, refer to "Punching holes in copies (Punch settings)" on page 3-74.
0
Before making any adjustments, use a Punch setting to print a sample copy. Perform the adjustment
while checking the sample that was created.
1
Display the Administrator Settings screen.
–
2
For details on displaying the Administrator Setting screen, refer to "Displaying the Administrator
Settings screen" on page 12-42.
Touch [1 System Settings].
The System Settings screen appears.
3
Touch [7 Expert Adjustment].
The Expert Adjustment screen appears.
4
Touch [5 Finisher Adjustment].
The Finisher Adjustment screen appears.
12-56
bizhub 751/601 (Version 2)
Utility mode
12
5
Touch [7 Punch Resist Loop Size Adjustment].
The Punch Resist Loop Size Adjustment screen appears.
6
Touch the button for the desired adjustment parameter.
7
Check the angle of the punched holes.
–
–
8
If the punched holes are angled, touch [+] to change the adjustment. If the angle cannot be adjusted
by touching [+] or if the paper is wrinkled, touch [-] to change the adjustment.
Each time [+] or [-] is touched, the value is increased or decreased by one increment.
Touch [OK].
– To cancel the setting and select the default, press the [Reset] key.
The angle of the punched holes is adjusted.
If no adjustment of the angle of the punched holes was necessary in step 6, this completes the
procedure.
9
Use a Punch setting to print another sample copy.
10
Check the print result.
–
–
Check that the angle of the punched holes was adjusted.
If more adjustment is necessary, repeat steps 7 through 10.
bizhub 751/601 (Version 2)
12-57
Utility mode
12
12.6.8
1st Z-Fold Position Adjustment/2nd Z-Fold Position Adjustment
The first and second folding position when printing with the "Z-Fold" setting can be adjusted for each paper
size.
2
Note
[1st Z-Fold Position Adjustment] and [2nd Z-Fold Position Adjustment] do not appear if optional Z
folding unit is not installed.
0
Before making any adjustments, use the "Z-Fold" setting to print a single sample copy. Perform the
adjustment while checking the sample that was created. In addition, to adjust both the 1st and 2nd
folding positions for Z-folding, be sure to adjust the 1st folding position first.
1
Display the Administrator Settings screen.
–
2
For details on displaying the Administrator Settings screen, refer to "Displaying the Administrator
Settings screen" on page 12-42.
Touch [1 System Settings].
The System Settings screen appears.
3
Touch [7 Expert Adjustment].
The Expert Adjustment screen appears.
4
Touch [5 Finisher Adjustment].
The Finisher Adjustment screen appears.
5
Touch [8 1st Z-Fold Position Adjustment] or [9 2nd Z-Fold Position Adjustment].
The Z-Fold Position Adjustment screen appears.
6
12-58
Touch the button for the paper size to be adjusted.
bizhub 751/601 (Version 2)
Utility mode
12
7
Check the folding positions in the sample copy.
–
–
If the folding position is too far on the left side of the paper, touch [+] under "Adjust Value" to
increase the adjustment (between 0.1 mm and 12.7 mm).
Each time [+] or [-] is touched, the value is increased or decreased by one increment.
1st Z-fold position
2nd Z-fold position
–
If the folding position is too far on the right side of the paper, touch [-] under "Adjust Value" to
increase the adjustment (between -0.1 mm and -12.8 mm).
1st Z-fold position
2nd Z-fold position
–
Adjust values so that the distance between the left edge of the paper and the 2nd Z-folding position
is 2 mm or more.
2 mm or more
8
Touch [OK].
– To cancel the setting and select the default, press the [Reset] key.
The folding positions are adjusted.
If no adjustment of the folding positions were necessary in step 7, this completes the procedure.
bizhub 751/601 (Version 2)
12-59
Utility mode
12
9
Use the "Z-Fold" setting to print another sample copy.
10
Check the print result.
–
–
12.6.9
Check that the folding positions were adjusted.
If more adjustment is necessary, repeat steps 6 through 10.
Tri-Fold Position Adjustment
The folding position when printing with the "Tri-Fold" setting can be adjusted for each paper size.
2
Note
[Tri-Fold Position Adjustment] does not appear if optional Finisher FS-610 is not installed.
0
Before making any adjustments, use the "Tri-Fold" setting to print a single sample copy. Perform the
adjustment while checking the sample that was created.
1
Display the Administrator Settings screen.
–
2
For details on displaying the Administrator Settings screen, refer to "Displaying the Administrator
Settings screen" on page 12-42.
Touch [1 System Settings].
The System Settings screen appears.
3
Touch [7 Expert Adjustment].
The Expert Adjustment screen appears.
4
Touch [5 Finisher Adjustment].
The Finisher Adjustment screen appears.
5
Touch [10 Tri-Fold Position Adjustment].
The Tri-Fold Position Adjustment screen appears.
6
12-60
Touch the button for the paper size to be adjusted.
bizhub 751/601 (Version 2)
Utility mode
12
7
Check the folding positions in the sample copy.
–
–
–
8
If the folding position is too far on the right side of the paper, touch [+] under "Adjust Value" to
increase the adjustment (between 0.1 mm and 12.7 mm).
Each time [+] or [-] is touched, the value is increased or decreased by one increment.
If the folding position is too far on the left side of the paper, touch [-] under "Adjust Value" to increase
the adjustment (between -0.1 mm and -12.8 mm).
Touch [OK].
– To cancel the setting and select the default, press the [Reset] key.
The folding positions are adjusted.
If no adjustment of the folding positions were necessary in step 7, this completes the procedure.
9
Use the "Tri-Fold" setting to print another sample copy.
10
Check the print result.
–
–
Check that the folding positions were adjusted.
If more adjustment is necessary, repeat steps 6 through 10.
bizhub 751/601 (Version 2)
12-61
Utility mode
12
12.6.10
2-Position Staple Pitch Adjustment
The distance between staples when printing with the "2 Position" Staple setting ("Staple" and "Center Staple
& Fold") can be adjusted.
2
Note
[2-Position Staple Pitch Adjustment] does not appear if optional Finisher FS-610 is not installed.
0
Before making any adjustments, use the "2 Position" Staple setting to print a sample copy. Perform the
adjustment while checking the sample that was created.
1
Display the Administrator Settings screen.
–
2
For details on displaying the Administrator Settings screen, refer to "Displaying the Administrator
Settings screen" on page 12-42.
Touch [1 System Settings].
The System Settings screen appears.
3
Touch [7 Expert Adjustment].
The Expert Adjustment screen appears.
4
Touch [5 Finisher Adjustment].
The Finisher Adjustment screen appears.
5
Touch [Forward
], and then touch [1 2-Position Staple Pitch Adjustment].
The Adjust Spacing of 2 Staples screen appears.
6
Touch the button for the setting to be adjusted.
7
Check the stapling positions in the sample copy.
–
–
8
Touch [+] or [-] under "Adjust Value" to adjust the distance (between 128 mm and 160 mm) between
the staples.
Each time [+] or [-] is touched, the value is increased or decreased by one increment.
Touch [OK].
The distance between the staples is adjusted.
If no adjustment of the distance between the staples was necessary in step 7, this completes the
procedure.
9
12-62
Use the "2 Position" Staple setting to print another sample copy.
bizhub 751/601 (Version 2)
Utility mode
12
10
Check the print result.
–
–
12.6.11
Check that the distance between the staples was adjusted.
If more adjustment is necessary, repeat steps 6 through 10.
Post Inserter Tray Size Adjustment
The sensors for detecting the size of paper loaded in the paper trays of the optional post inserter can be
adjusted.
2
Note
[Post Inserter Tray Size Adjustment] appears only if optional post inserter is installed.
1
Display the Administrator Setting screen.
–
2
For details on displaying the Administrator Settings screen, refer to "Displaying the Administrator
Settings screen" on page 12-42.
Touch [1 System Settings].
The System Settings screen appears.
3
Touch [7 Expert Adjustment].
The Expert Adjustment screen appears.
4
Touch [5 Finisher Adjustment].
The Finisher Adjustment screen appears.
5
Touch [Forward
], and then touch [2 Post Inserter Tray Size Adjustment].
The Post Inserter Tray Size Adj. screen appears.
6
Load the selected paper in the paper tray for the post inserter, and then press the [Start] key.
7
Touch [Close].
bizhub 751/601 (Version 2)
12-63
Utility mode
12
12.7
Header/Footer Settings
Follow the procedures described below to specify headers/footers used with the Stamp/Composition
functions available from the Application tab.
12.7.1
Specifying headers/footers
1
Display the Administrator Settings screen.
–
2
For details on displaying the Administrator Settings screen, refer to "Displaying the Administrator
Settings screen" on page 12-42.
Touch [1 System Settings].
The System Settings screen appears.
3
Touch [Forward
], and then touch [2 Stamp Settings].
The Stamp Settings screen appears.
4
Touch [1 Header/Footer Settings].
The Header/Footer Settings screen appears.
5
Touch [New].
The Header/Footer Settings > New screen appears.
12-64
bizhub 751/601 (Version 2)
Utility mode
12
6
Touch [Name].
The New > Name screen appears.
7
Type in the header/footer name (up to 16 characters long), and then touch [OK].
–
For details on typing in text, refer to "Entering text" on page 15-3.
The header/footer name is specified.
bizhub 751/601 (Version 2)
12-65
Utility mode
12
8
Under "Header Settings" or "Footer Settings", touch [Print], and then select the type of header/footer
to be printed.
Touch [Close].
9
Select the desired setting under "Pages", and specify the desired settings for "Text Size" and "Print
Position".
10
Touch [OK].
!
Detail
To print the header/footer only on the first page, touch [1st Page Only].
12.7.2
Editing headers/footers
1
In the Header/Footer Settings screen, touch the button of the header/footer to be edited.
2
Touch [Check/Edit].
– To delete the header/footer, touch [Delete].
The Check/Edit screen appears.
3
12-66
Touch [OK].
bizhub 751/601 (Version 2)
Utility mode
12.8
12
Authentication Method
Specify user authentication and account track settings in order to control the use of this machine.
User authentication settings are specified to manage individuals, and account track settings are specified to
manage groups and multiple users.
By specifying both user authentication and account track settings, the number of prints made by each
account can be managed for each individual user.
2
Note
A total of 1,000 users and accounts can be registered on this machine.
If an authentication mode is set, the authentication screen is displayed while this machine is in standby.
In order to use this machine when user authentication or account track settings are specified, the user
name and password must be entered. For details, refer to "Controlling each user’s use of this machine
(User Authentication)" on page 2-38.
User authentication and account track can be specified without synchronizing.
12.8.1
User authentication and account track
User authentication and account track can be used to specify the following settings.
User Authentication
–
Limits on the available functions (copy operations, scanning operations, fax operations, printing,
document storing operations, transmitted document printing and saving document to the external
memory)
–
Counters for printing/scanning by each user
–
Management of group user boxes and personal user boxes for each owner
–
Management of the level and the group with permissions to access destinations by each owner
–
Delete jobs of other users
Account Track
–
Counters for printing/scanning from each account
–
Operates the group box
12.8.2
When user authentication and account track are synchronized
User 1
Account
Group A
User 2
Group B
This setup is used when the machine is used by multiple departments and the use by each employee is
managed by each department. With this setup, statistics can be maintained on each employee (each user)
and on each department (each account).
To manage the use of this machine in this way, specify the following authentication settings.
Parameter on Authentication Method screen
Settings
User Authentication
Select "ON (External Server)" or "ON (MFP)".
Account Track
Select "ON", and then specify the account name and password.
Synchronize User Authentication & Account Track
Select "Synchronize".
Account Name (on User Registration screen)
Select an account name if "ON (MFP)" was selected.
bizhub 751/601 (Version 2)
12-67
Utility mode
12
2
Note
For details on external server authentication, refer to the User manual – Network Administrator.
12.8.3
When user authentication and account track are used separately
User 1
Account
Group A
User 2
Group B
Group C
This setup is used when the machine is used by multiple employees with each employee performing multiple
duties, which are to be totaled separately. With this setup, statistics can be maintained for each employee
(each user) and on each duty of the employee (each account). In addition, totals can be maintained on each
employee (each user) and each duty (each account) even if the same duty is performed by two different
employees.
To manage the use of this machine in this way, specify the following authentication settings.
12-68
Parameter on Authentication Method screen
Settings
User Authentication
Select "ON (External Server)" or "ON (MFP)".
Account Track
Select "ON", and then specify the account name and password.
Synchronize User Authentication & Account Track
Select "Do Not Synchronize".
bizhub 751/601 (Version 2)
Utility mode
12.8.4
12
Selecting an authentication method
1
Display the Administrator Settings screen.
–
2
For details on displaying the Administrator Settings screen, refer to "Displaying the Administrator
Settings screen" on page 12-42.
Touch [4 User Authentication/Account Track].
The User Authentication/Account Track screen appears.
3
Touch [1 General Settings].
The General Settings screen appears.
4
Specify a setting for "User Authentication".
–
–
–
–
5
Specify a setting for "Public User Access".
–
–
–
6
To prohibit unregistered users from using this machine, touch [Restrict].
To allow this machine to be used by touching [Public User Access] in the authentication screen
without entering a user name or password even though user authentication settings have been
applied, touch [Allow].
"ON (Without Login)" allows the machine to be used without authentication when logging on as a
public user. When logging on as an authorized user, the [Access] key must be pressed first to
display the authentication screen.
Specify a setting for "Account Track".
–
–
7
To cancel user authentication, touch [OFF].
To use an external server to perform user authentication, touch [External Server Authentication], and
then select the server type.
In order to use an external server, the external server must first be registered.
To use this machine’s authentication system to perform user authentication, touch [ON (MFP)]
To cancel account tracking, touch [OFF].
To use the account track function, touch [ON].
Specify a setting for "Account Track Input Method".
–
–
To allow this machine to be used after the account name and password are entered in the account
track screen, touch [Account Name & Password].
To allow this machine to be used after the password is entered in the account track screen, touch
[Password Only].
bizhub 751/601 (Version 2)
12-69
Utility mode
12
8
Specify a setting for "Synchronize User Authentication & Account Track".
–
–
9
Synchronize
"ON (MFP)" is set and "Account Track" is set to "ON", this setting allows this machine to be used
simply by entering user authentication information the first time that the machine is used if the
corresponding account was specified during user registration.
When "External Server Authentication" is selected and "Account Track" is "ON", and once the
machine is used with the appropriate user authentication and account track information entered,
this setting allows the machine to be used simply by entering user authentication information by
being synchronized with the authenticated account.
Do Not Synchronize
This setting requires that all information be entered for user authentication and account track each
time that the machine is used.
Touch
.
The second screen is displayed.
10
Specify a setting for "When # of Jobs Reach Maximum".
–
–
11
Specify a setting for "Number of User Counters Assigned".
–
–
12
Use the keypad to type in the time. (1 to 60 minutes)
Specify the holding time of Kerveros authentication ticket. The holding time setting is applied when
Active Directory is selected as the authentication server type.
Touch [OK].
–
12-70
Press the [C] (clear) key to erase the value, and then use the keypad to specify the desired value
(between 1 and 999).
If user authentication and account track settings have been applied, counters can be assigned to
both accounts and users, and counts for both can be totaled.
Specify "Ticket Hold Time Setting".
–
–
13
To skip the job when the limit specified with user authentication or account track is reached, touch
[Skip Job].
To stop all jobs when the limit specified with user authentication or account track is reached, touch
[Stop Job].
If the setting for "User Authentication", "Account Track" or "Number of User Counters Assigned"
was changed, the message "Are you sure you want to clear all data?" appears.
bizhub 751/601 (Version 2)
Utility mode
12
14
Touch [Yes], and then touch [OK].
–
–
To stop clearing the usage data without changing the settings, touch [No].
If the setting for any of the following is changed, the data is not cleared. "Public User Access",
"When # of Jobs Reach Maximum", "Synchronize User Authentication & Account Track" or "Ticket
Hold Time Setting"
– To cancel the setting and select the default, press the [Reset] key.
The authentication method is set.
Continue by specifying settings for user authentication and account track.
2
Reminder
Do not use a name including uppercase and lowercase of the same character for the user name of the
external server. Since bizhub 751/601 cannot differentiate between uppercase and lowercase letters,
the operation may not be performed correctly.
2
Note
"Synchronize User Authentication & Account Track" can be specified if "User Authentication" is set to
"ON (External Server)" or "ON (MFP)" and "Account Track" is set to "ON".
If "Synchronize User Authentication & Account Track" is set to "Synchronize", even when "Public User
Access" is set to "Allow", "Public User Access" changes to "Restrict".
"Number of User Counters Assigned for Users" can be specified if "User Authentication" is set to "ON
(External Server)" or "ON (MFP)" and "Account Track" is set to "ON".
If the number of user counters is set to "50", up to 950 accounts can be registered.
!
Detail
For details on external server authentication, refer to the User manual – Network Administrator.
If "Synchronize User Authentication & Account Track" was set to "Do Not Synchronize", use by a public
user is not permitted.
If both user authentication and account track settings have been applied, "Account Name & Password"
is selected.
A public user can be set to provide temporary access to this machine. If public user access is permitted,
it is recommended that limitations be placed on the machine functions that can be used. For details,
refer to "User Registration" on page 12-74.
If account track settings have been applied while "User Authentication" is set to "ON (MFP)" or "ON
(External Server)", type in the user name and password in the user authentication screen, and then type
in the account name and password in the account track screen.
When "ON (MFP)" is selected and "Account Track" is "ON", and once the machine is used with the
appropriate user authentication and account track information entered, the authenticated account is
registered to the account name. The machine can be used simply by entering user authentication
information from the next time.
bizhub 751/601 (Version 2)
12-71
Utility mode
12
12.9
User Authentication Setting
User authentication settings can be specified.
12.9.1
Administrative Settings—List
User authentication settings can be specified to display [List] in the user authentication screen and the User
Name screen. Touch [List] to display a list of registered user names from which the desired user name can
simply be selected. (The default setting is "OFF".)
1
Display the Administrator Settings screen.
–
2
For details on displaying the Administrator Settings screen, refer to "Displaying the Administrator
Settings screen" on page 12-42.
Touch [4 User Authentication/Account Track].
The User Authentication/Account Track screen appears.
3
Touch [2 User Authentication Settings].
The User Authentication Setting screen appears.
Why is [2 User Authentication Settings] not available?
% [2 User Authentication Settings] is not available if "User Authentication" on the General Settings
screen is set to "OFF".
?
4
Touch [1 Administrative Settings].
5
Touch [User Name List].
Buttons for the available settings appear.
6
Touch the button for the desired setting.
Whether or not a user name list button appears is set.
12-72
bizhub 751/601 (Version 2)
Utility mode
12.9.2
12
Default Function Permission
If external server authentication was selected, limitations can be placed on the machine functions that can
be used by an authorized user. (The default setting is "Allow".)
The following operations can be limited.
Copy operations
Scan operations
Fax operations
Printing from a printer
Saving documents on the hard disk
Printing the transmitted document
Saving the document to the external memory
Manual destination input
2
Note
To limit machine use by registered users, specify settings in the User Registration screen.
With "Print Scan/Fax TX", printing can be prevented when scanning or faxing a document saved in a
box.
1
Display the Administrator Settings screen.
–
2
For details on displaying the Administrator Settings screen, refer to "Displaying the Administrator
Settings screen" on page 12-42.
Touch [4 User Authentication/Account Track].
The User Authentication/Account Track screen appears.
3
Touch [2 User Authentication Settings].
The User Authentication Setting screen appears.
Why is [2 User Authentication Settings] not available?
% [2 User Authentication Settings] is not available if "User Authentication" on the General Settings
screen is set to "OFF".
?
4
Touch [1 Administrative Settings].
5
Touch [Default Function Permission].
The Function Permission screen appears.
6
Touch the button for the desired settings.
7
Touch [OK].
The default function permissions are set.
bizhub 751/601 (Version 2)
12-73
Utility mode
12
12.9.3
Public User Access
If user authentication settings have been specified and public user access is permitted, there are two
methods for authenticating the public user.
Allow: Touch [Public User] in the authentication screen to display the Basic Screen and operate the machine.
ON (Without Login): The machine can be used without authentication when logging on as a public user. When
logging on as an authorized user, the [Access] key must be pressed first to display the authentication screen.
(The default setting is "Restrict".)
1
Display the Administrator Settings screen.
–
2
For details on displaying the Administrator Settings screen, refer to "Displaying the Administrator
Settings screen" on page 12-42.
Touch [4 User Authentication/Account Track].
The User Authentication/Account Track screen appears.
3
Touch [1 General Settings].
4
Touch [Public User Access].
Buttons for the available settings appear.
5
Touch the button for the desired setting.
The public user authentication method is set.
!
Detail
[Public User Access] is not available if "User Authentication" is set to "OFF".
To log on as a general user when "Public User Access" is set to "On (Without Login)", press the [Access]
key to display the Basic screen.
12.9.4
User Registration
The password, number of prints allowed, and function permissions can be specified for each user of this
machine.
In addition, if an authentication unit is installed on this machine, the user’s IC card or the vein patterns of their
finger can be registered.
As an example, the following procedure describes how to register a user with authentication performed by
the machine.
0
0
0
1
A total of 1,000 users and accounts can be registered on this machine.
If "Public User Access" on the General Settings screen is set to "Allow", a public user is added.
Function limitations can be specified for the public user.
If "Account Track" on the General Settings screen is set to "ON", the number of users set for "Number
of User Counters Assigned" can be registered.
Display the Administrator Settings screen.
–
2
For details on displaying the Administrator Settings screen, refer to "Displaying the Administrator
Settings screen" on page 12-42.
Touch [4 User Authentication/Account Track].
The User Authentication/Account Track screen appears.
3
Touch [2 User Authentication Settings].
The User Authentication Setting screen appears.
Why is [2 User Authentication Settings] not available?
% [2 User Authentication Settings] is not available if "User Authentication" on the General Settings
screen is set to "OFF".
?
4
12-74
Touch [2 User Registration].
bizhub 751/601 (Version 2)
Utility mode
12
5
Touch the button for the desired user, and then touch [Edit].
The Edit screen for the user appears.
6
Touch [User Name].
The User Name screen appears.
7
Type in the user name (up to 64 characters long), and then touch [OK].
–
–
–
For details on typing in text, refer to "Entering text" on page 15-3.
Once a user name is registered, it cannot be changed.
A user name that has already been registered cannot be used again.
The user name is set.
8
Touch [Password].
The Password screen appears.
Why is [Password] not available?
% [Password] is not available if "User Authentication" on the General Settings screen is set to "ON
(External Server)".
?
9
Type in the password (up to 64 characters long), and then touch [OK].
For confirmation, the Password screen appears again. Retype the same password, and then touch
[OK]. The user password is set.
10
Touch [E-Mail Address].
The E-Mail Address screen appears.
bizhub 751/601 (Version 2)
12-75
Utility mode
12
11
Type in the e-mail address (up to 320 characters), and then touch [OK].
The e-mail address is set.
If the e-mail address exceeds 69 characters, [Detail] appears in the User Registration screen. Touch
[Details] to display the E-Mail Address Details screen and the entire e-mail address.
12
To use the account track function, touch [Account Name].
– [Account Name] appears only if "Account Track" on the General Settings screen been set to "ON".
The Account Name screen appears.
13
Touch the button for the desired account, and then touch [OK].
–
Before an account name can be selected, accounts must have been registered.
For details on registering accounts, refer to "Account Track Registration" on page 12-80.
The account is set.
14
Touch [Max. Allowance Set].
The Max. Allowance Set screen appears.
15
To specify the maximum number of prints allowed, use the keypad to type in the desired value.
–
16
To specify no maximum for prints, touch [No Limit].
Touch [OK].
The maximum number of prints allowed is set.
17
To use authentication unit (biometric type) or authentication unit (IC card type), touch [Register Auth.
Info.].
– [Register Auth. Info.] appears only if an authentication unit is installed on this machine.
The Register Auth. Info. screen appears.
18
Touch [Edit].
–
–
19
When using authentication unit (biometric type), place a finger on the authentication unit and
register the vein patterns.
When using authentication unit (IC card type), place an IC card on the authentication unit and
register the card information.
Touch [Function Permission].
The Function Permission screen appears.
12-76
bizhub 751/601 (Version 2)
Utility mode
12
20
Touch the button for the desired setting for each operation.
–
–
To permit the operation to be performed, touch [Allow].
To prohibit the operation to be performed, touch [Restrict].
–
Touch [All Users] to apply the settings in the current screen to all registered users. Touch [All Users],
touch [OK], and then touch [OK] in the next screen that appears.
With "Print Scan/Fax TX", printing can be prevented when scanning or faxing a document saved in
a box.
Depending on the function limitation settings that are specified, a different Basic screen may appear
when logging on. The Basic screen that appears changes in the following order: Copy % Scan %
Fax % Box.
If no operation is permitted, user authentication cannot be performed.
–
–
–
21
Touch [OK].
The function permissions are set.
22
Touch [Forward
], and then touch [Icon].
The Select Icon screen appears.
23
Select an icon to display in the user list, and then touch [OK].
The icon is set.
24
Touch [OK].
–
–
To cancel the settings in the current screen, touch [Cancel].
To delete the selected user information, touch [Delete] in the User Registration screen.
bizhub 751/601 (Version 2)
12-77
Utility mode
12
12.9.5
User Counter
The following data for each user can be checked.
Copy + Print
This table shows the total number of pages printed with copy and print operations.
Total: Total number of printed pages
Max Allowance: Limits specified during user registration for the number of pages
Large Size: Total number of pages printed on large-sized paper
Copy
This table shows the total number of pages printed with copy operations.
Total: Total number of copied pages
Large Size: Total number of pages copied on large-sized paper
Print
This table shows the total number of pages printed with print operations.
Total: Total number of printout pages
Large Size: Total number of printout pages printed on large-sized paper
Fax/Scan
Total: Total number of pages scanned/total number of prints in the Fax and Scan modes.
Large Size: Total number of pages scanned/total number of prints in the Fax and Scan modes for paper
specified as large-size paper
Original Counter
This counter shows the number of original pages that were scanned.
Paper Counter
This counter shows the number of pages used for printing.
Fax TX
Fax TX: Total number of pages transmitted with fax operations
2
Note
Counting automatically continues with user counters when using external server authentication.
The public user access is counted as "public" of the counter.
The user box administrator access is counted as "BoxAdmin" of the counter.
12-78
bizhub 751/601 (Version 2)
Utility mode
12.9.6
12
Viewing user counters
1
Display the Administrator Settings screen.
–
2
For details on displaying the Administrator Settings screen, refer to "Displaying the Administrator
Settings screen" on page 12-42.
Touch [4 User Authentication/Account Track].
The User Authentication/Account Track screen appears.
3
Touch [2 User Authentication Settings].
The User Authentication Setting screen appears.
Why is [2 User Authentication Settings] not available?
% [2 User Authentication Settings] is not available if "User Authentication" on the General Settings
screen is set to "OFF".
?
4
Touch [3 User Counter].
5
Touch the button for the desired user, and then touch [Counter Details].
The Counter Details screen for the user appears.
6
Touch the button for the counter to be viewed, and then check the counter.
–
–
7
To clear the counters for the current user, touch [Clear Counter] in the Counter Details screen for
the current user. A confirmation message appears, asking whether the counter should be cleared.
To clear the counters for the displayed user, touch [Yes] in the confirmation message screen, and
then touch [OK]. The maximum number allowed is not cleared.
To clear the counters for all users, touch [Reset All Counters] in the User Counter screen. A
confirmation message appears, asking whether the counters should be cleared. To clear the
counters for all users, touch [Yes] in the confirmation message screen, and then touch [OK]. The
maximum number allowed is not cleared.
Touch [Close].
bizhub 751/601 (Version 2)
12-79
Utility mode
12
12.10
Account Track Setting
12.10.1
Account Track Registration
The password and number of prints allowed can be specified for each account using this machine.
2
Note
A total of 1,000 users and accounts can be registered on this machine.
1
Display the Administrator Settings screen.
–
2
For details on displaying the Administrator Settings screen, refer to "Displaying the Administrator
Settings screen" on page 12-42.
Touch [4 User Authentication/Account Track].
The User Authentication/Account Track screen appears.
3
Touch [3 Account Track Settings].
The Account Track Setting screen appears.
4
Touch [1 Account Track Registration].
5
Touch the button for the desired account, and then touch [Edit].
The Edit screen for the account appears.
If “Account Name & Password” was selected:
12-80
bizhub 751/601 (Version 2)
Utility mode
12
–
If "Account Name & Password" was selected, the same account name cannot be used more than
once.
If “Password Only” was selected:
–
6
The screen that appears differs depending on the setting selected for "Account Track Input
Method".
Touch [Account Name].
The Account Name screen appears.
7
Type in the account name (up to 8 characters long), and then touch [OK].
–
–
–
For details on typing in text, refer to "Entering text" on page 15-3.
If [Name] was displayed, type in the account name (up to 20 characters), and then touch [OK].
If "Account Track Input Method" was set to "Account Name & Password", the same account name
cannot be registered more than once.
The account name is set.
8
Touch [Password].
–
If "Account Track Input Method" was set to "Password Only", the same password cannot be
registered more than once.
The Password screen appears.
9
Type in the password (up to 8 characters long), and then touch [OK].
A screen for retyping the password appears.
bizhub 751/601 (Version 2)
12-81
Utility mode
12
10
Retype the password specified in step 9, and then touch [OK].
The user password is set.
11
Touch [Max. Allowance Set].
The Max. Allowance Set screen appears.
12
13
To specify the maximum number of prints allowed, use the keypad to type in the desired value.
–
To specify no maximum for color and black prints, touch [No Limit].
–
Touch [All Accounts] to apply the settings in the current screen to all registered accounts. Touch [All
Accounts], touch [OK], and then touch [OK] in the next screen that appears in order to display a
message and apply the settings to all accounts. At this time, do not turn off the machine with the
main power switch.
Touch [OK].
The maximum number of prints allowed is set.
14
Touch [OK].
–
12-82
To delete the selected account information, touch [Delete].
bizhub 751/601 (Version 2)
Utility mode
12.10.2
12
Account Track Counter
The following data for each account can be checked.
Copy + Print
This table shows the total number of pages printed with copy and print operations.
Total: Total number of printed pages
Max Allowance: Limits specified during account registration for the number of pages
Large Size: Total number of pages printed on large-sized paper
Copy
This table shows the total number of pages printed with copy operations.
Total: Total number of copied pages
Large Size: Total number of pages copied on large-sized paper
Print
This table shows the total number of pages printed with print operations.
Total: Total number of printout pages
Large Size: Total number of printout pages printed on large-sized paper
Fax/Scan
Total: Total number of pages scanned/total number of prints in the Fax and Scan modes.
Large Size: Total number of pages scanned/total number of prints in the Fax and Scan modes for paper
specified as large-size paper
Original Counter
This counter shows the number of original pages that were scanned.
Paper Counter
This counter shows the number of pages used for printing.
Fax TX Count
Total number of pages transmitted with fax operations
2
Note
The public user access is counted as "public" of the counter.
bizhub 751/601 (Version 2)
12-83
Utility mode
12
12.10.3
Viewing account counters
1
Display the Administrator Settings screen.
–
2
For details on displaying the Administrator Settings screen, refer to "Displaying the Administrator
Settings screen" on page 12-42.
Touch [4 User Authentication/Account Track].
The User Authentication/Account Track screen appears.
3
Touch [3 Account Track Settings].
The Account Track Setting screen appears.
4
Touch [2 Account Track Counter].
5
Touch the button for the desired account, and then touch [Counter Details].
The Counter Details screen for the account appears.
6
Touch the button for the counter to be viewed, and then check the counter.
–
–
7
12-84
To clear the counters for the current account, touch [Clear Counter] in the Counter Details screen
for the current account. A confirmation message appears, asking whether the counter should be
cleared. To clear the counters for the displayed account, touch [Yes] in the confirmation message
screen, and then touch [OK]. The maximum number allowed is not cleared.
To clear the counters for all accounts, touch [Reset All Counters] in the Account Track Counter
screen containing a list of all accounts. A confirmation message appears, asking whether the
counters should be cleared. To clear the counters for all accounts, touch [Yes] in the confirmation
message screen, and then touch [OK]. The maximum number allowed is not cleared.
Touch [Close].
bizhub 751/601 (Version 2)
Utility mode
12.11
12
Password Rules
If password rules have been applied, the following limitations are applied to the passwords in order to
increase security.
If password rules are applied and already specified passwords do not meet the password rules, those
passwords are not accepted when they are entered. In that case, ask the administrator to change the
passwords to meet the following conditions.
!
Detail
The following conditions apply to the characters used in passwords.
Uppercase and lowercase letters are differentiated.
Symbols other than the plus sign (+) and quotation mark (") can be used.
12.11.1
Conditions of the password rules
Administrator password
Limitations on the number of characters
Limitations on registering/changing
8 alphanumeric characters and symbols
•
•
A password that consists of a repetition of the same character cannot be registered.
The same password as one before being changed cannot be
registered.
2
Note
Use when specifying administrator settings.
User passwords
Limitations on the number of characters
Limitations on registering/changing
8 or more alphanumeric characters and symbols
•
•
A password that consists of a repetition of the same character cannot be registered.
The same password as one before being changed cannot be
registered.
2
Note
Use when specifying user authentication settings.
Account passwords
Limitations on the number of characters
Limitations on registering/changing
8 alphanumeric characters and symbols
•
•
A password that consists of a repetition of the same character cannot be registered.
The same password as one before being changed cannot be
registered.
2
Note
Use when specifying account track settings.
bizhub 751/601 (Version 2)
12-85
Utility mode
12
Box passwords
Limitations on the number of characters
Limitations on registering/changing
8 alphanumeric characters and symbols
•
•
A password that consists of a repetition of the same character cannot be registered.
The same password as one before being changed cannot be
registered.
2
Note
Specify 8 characters (numbers, * or #) as the fax transmission password for boxes.
Confidential document passwords
Limitations on the number of characters
Limitations on registering/changing
8 alphanumeric characters and symbols
•
A password that consists of a repetition of the same character cannot be registered.
2
Note
If any password not following the Password Rules, Secure Print cannot be performed.
12-86
bizhub 751/601 (Version 2)
Utility mode
12.12
12
Enhanced Security Mode
When enhanced security mode is applied on this machine, various security settings are set in order to
increase security when managing scan data. Restrictions are applied to user operations, public user access
is prohibited, and box operations and print jobs are limited.
There are various settings that must first be specified or are forcibly set in order for "Enhanced Security
Mode" to be set to "ON". Before setting "Enhanced Security Mode" to "ON", be sure to check the settings
for the security functions.
2
Reminder
If there are settings that are incompatible with the enhanced security Mode, "Enhanced Security Mode"
cannot be set to "ON".
!
Detail
Certain conditions must be met in order for the enhanced security features to be applied. For details,
contact your service representative.
The settings that must be specified or are forcibly set cannot be changed after "Enhanced Security
Mode" is set to "ON".
Required settings
The following settings must first be specified in order to set "Enhanced Security Mode" to "ON".
Administrator mode parameters
Settings
User Authentication/Account Track—General Settings—
User Authentication
Select "ON (External Server)" or "ON (MFP)".
System Connection—Open API Settings—SSL
The button must be displayed.
Security Settings—Administrator Password
Specify a password that meets the password rules.
Security Settings—HDD Settings—HDD Lock Password
*Otherwise, install the optional security kit.
Specify the hard disk locking password.
Security Settings/Security Details/Prohibited Functions
When Authentication Error/Release Time Settings
Specify 5 minutes or longer.
Security Settings/Flash Memory Lock Password
Specify the flash memory locking password.
!
Detail
If "Account Track" is set to "ON" in the General Settings screen, set "Account Track Input Method" to
"Account Name & Password".
[SSL] appears when a certificate is registered with PageScope Web Connection.
bizhub 751/601 (Version 2)
12-87
Utility mode
12
Changed settings
For increased security, the following settings are set when "Enhanced Security Mode" is set to "ON".
Administrator mode parameters
Changed settings
System Settings—Restrict User Access—Restrict Access to Job Settings—Registering and Changing Addresses
Set to "Restrict".
User Authentication/Account Track—General Settings—
Public User Access
Set to "Restrict".
User Authentication/Account Track—User Authentication
Settings—Administrative Settings—User Name List
Set to "OFF".
User Authentication/Account Track—Print Without Authentication
Set to "Restrict".
Security Settings—User Box Administrator Setting
Set to "Restrict".
Security Settings—Security Details—Password Rules
Set to "Enable".
Security Settings—Security Details—Prohibited Functions When Authentication Error
Set to "Mode 2" and three times or less for checking.
Security Settings—Security Details—Confidential Document Access Method
Set to "Mode 2".
Security Settings—HDD Setting—Overwrite Temporary
Data
Set to "Mode 1".
2
Note
The number of times for checking for "Prohibited Functions When Authentication Error" can be
changed to a number between 1 and 3.
A changed setting cannot be changed when "Enhanced Security Mode" is set to "OFF".
When "Password Rules" is set to "Enable", a password that does not meet the password rules is
considered a failed attempt during authentication. For details on the password rules, refer to "Password
Rules" on page 12-85.
When "Overwrite Temporary Data" is set to "Mode 2", it cannot be changed to "Mode 1" even if
"Enhanced Security Mode" is "ON".
For details on the changed network settings, refer to the User manual – Network Scan/Fax/Network Fax
Operations.
User operation limitations
When "Enhanced Security Mode" is set to "ON", an icon appears in the screen and limitations are placed on
the user for the following operations.
A public user cannot use this machine.
The list of users does not appear in the user authentication screen.
When user authentication has failed the specified number of times, the control panel can no longer be
operated. If operation of the control panel is restricted, touch [Release], and then select the items
whose operation restrictions are canceled.
The destination cannot be changed by the user.
This machine’s counter data cannot be retrieved by PageScope Net Care or PageScope
VISUALCOUNT-MASTER.
An application performing the write operation with SNMP v1/v2c cannot be connected.
Write users using SNMP v3 must be authenticated.
2
Note
For details on the limitations placed on the user for box operations, refer to the User manual – Box
Operations.
For details on the limitations placed on the user for printing, refer to the User manual – Print Operations.
For details on canceling operation restrictions applied when authentication failed, refer to "Security
Settings" on page 12-38.
12-88
bizhub 751/601 (Version 2)
13
Authentication Unit
(Biometric Type AU-101)
Authentication Unit (Biometric Type AU-101)
13
13
Authentication Unit (Biometric Type AU-101)
13.1
Safety information
Carefully read this information, and then store it in a safe place.
Before using this device, carefully read this information and follow it to operate the device correctly.
After reading this information, store it in the designated holder with the warranty.
Important information
The reprinting or reproduction of the content of this publication, either in part or in full, is prohibited without
prior permission.
The content of this publication is subject to change without notice.
This publication was created with careful attention to content; however, if inaccuracies or errors are noticed,
please contact your sales representative.
The marketing and authorization to use the our company’s product mentioned in this information are
provided entirely on an "as is" basis.
Our company’s assumes no responsibility for any damage (including lost profits or other related damages)
caused by this product or its use as a result of operations not described in this information. For disclaimers
and warranty and liability details, refer to the user manual Authentication unit (Biometric type AU-101).
This product is designed, manufactured and intended for general business use. Do not use it for applications
requiring high reliability and which may have an extreme impact on lives and property. (Applications requiring
high reliability: Chemical plant management, medical equipment management and emergency
communications management)
Use with other authentication devices is not guaranteed.
In order to incorporate improvements in the product, the specifications concerning this product are subject
to change without notice.
For safe use
Warning
•
Do not this product near water, otherwise it may be damaged.
•
Do not cut, damage, modify or forcefully bend the USB cable. A malfunction may
occur as a result of a damaged or cut USB cable.
•
Do not disassembly this device, otherwise it may be damaged.
bizhub 751/601 (Version 2)
Symbol
13-3
Authentication Unit (Biometric Type AU-101)
13
Regulation notices
USER INSTRUCTIONS FCC PART 15 - RADIO FREQUENCY DEVICES (For U.S.A. Users)
FCC part 15
FCC: Declaration of Conformity
Product Type
Authentication unit (Biometric type)
Product Name
AU-101
This device complies with Part 15 of the FCC Rules
Operation is subject to the following two conditions:
• This device may not cause harmful interference, and this device must accept any interference received, including
interference that may cause undesired operation.
NOTE: This equipment has been tested and found to comply with the limits for a Class B digital device,
pursuant to Part 15 of the FCC Rules.
These limits are designed to provide reasonable protection against harmful interference in a residential
installation. This equipment generates, uses and can radiate radio frequency energy and, if not installed and
used in accordance with the instructions, may cause harmful interference to radio communications.
However, there is no guarantee that interference will not occur in a particular installation. If this equipment
does cause harmful interference to radio or television reception, which can be determined by turning the
equipment off and on, the user is encouraged to try to correct the interface by one or more of the following
measures:
Reorient or relocate the receiving antenna.
Increase the separation between the equipment and receiver.
Connect the equipment into an outlet on a circuit different from that to which the receiver is connected.
Consult the dealer or an experienced radio/TV technician for help
7 WARNING
The design and production of this unit conform to FCC regulations, and any changes or modifications
must be registered with the FCC and are subject to FCC control.
%
Any changes made by the purchaser or user without first contacting the manufacturer will be subject
to penalty under FCC regulations.
INTERFERENCE-CAUSING EQUIPMENT STANDARD (ICES-003 ISSUE 4) (For Canada Users)
This Class B digital apparatus complies with Canadian ICES-003.
Cet appareil numérique de la classe B est conforme à la norme NMB-003 du Canada.
13-4
bizhub 751/601 (Version 2)
Authentication Unit (Biometric Type AU-101)
13.2
13
Using Authentication Unit (Biometric Type) AU-101
The Authentication Unit (Biometric Type) AU-101 is a biometric authentication system that performs user
authentication by scanning vein patterns in a finger. Log on to this machine and print job operation can be
authenticated with finger vein patterns when using this machine with user authentication settings specified.
The status of the authentication unit is indicated by a status indicator and tone.
Status indicator
Device status
Lit (green)
Standing by/authentication completed
Flashing (green)
Authenticating/scanning
Lit (red)
Authentication failed/scanning failed
Off
The authentication unit is not detected.
Tone
Device status
One short beep
Starting to scan
One short beep
Retrying after authentication failed
One short beep
Authentication completed
Two short beeps
Authentication failed
In order to use the authentication unit, user finger vein patterns must first be registered with the machine.
A registered user can log on to this machine or print a print job after completing authentication with their
finger vein patterns.
The following procedures describe how to specify the necessary settings on the machine, register users, and
perform the logon and print job operations after completing authentication.
2
Note
Align the index finger with the indentation and notch in the scanner, and then position the finger so that
the tip lightly touches the edge of the scanner. Place your thumb and middle finger down to hold the
authentication unit in place on both sides, and avoid moving the index finger being used for
authentication.
2
Reminder
Do not place any object other than your finger in the scanner of the authentication unit while scanning,
otherwise the device may malfunction.
Do not disconnect the cable connecting the authentication unit to the computer while scanning,
otherwise the system may become unstable.
bizhub 751/601 (Version 2)
13-5
Authentication Unit (Biometric Type AU-101)
13
13.2.1
Settings of this machine
!
Detail
User authentication on the machine must be set for machine authentication.
2
Note
This device does not support external server authentication.
To combine account track settings with user authentication settings, set Synchronize User
Authentication & Account Track to "Synchronize". When you set "Do Not Synchronize", the ID & Print
function cannot be used.
1
From the control panel of the multifunctional product, touch [4 User Authentication/Account Track] on
the Administrator Settings screen, and then touch [1 General Settings].
2
Set "User Authentication" to "ON (MFP)", and then touch [OK].
3
Touch [8 Authentication Device Settings], then [1 General Settings], then [Bio Authentication].
4
Select the desired settings under "Beep Sound" and "Operation Settings".
–
–
13-6
Under "Beep Sound", select whether or not a beep is produced when scanning of the finger vein
pattern is completed successfully.
Under "Operation Settings", select the logon method after registration.
1-to-many authentication: Logon is possible simply by positioning the finger.
1-to-1 authentication: Logon is possible by entering a user name and positioning the finger.
bizhub 751/601 (Version 2)
Authentication Unit (Biometric Type AU-101)
–
13
For details on logging on, refer to "Logging on to this machine" on page 13-20.
5
Touch [OK], and then touch [OK] in the next screen that appears.
6
Touch [2 Logoff Settings].
7
Select whether or not the user is logged off when scanning of the document is finished after the user
has logged on to this machine.
8
Touch [OK].
9
Touch [Close], and then touch [Close] in the next screen that appears.
bizhub 751/601 (Version 2)
13-7
Authentication Unit (Biometric Type AU-101)
13
13.2.2
Registering users
There are two methods for registering users.
Connecting the authentication unit to the machine and registering directly from the machine
Connecting the authentication unit to a computer and registering using Data Administrator
!
Detail
Registered user data is stored on the hard disk of the machine. If the user authentication method on the
machine is changed or the hard disk is reformatted, the registered user data is erased.
Registering from the control panel of this machine
1
From the control panel of the machine, touch [4 User Authentication/Account Track] on the
Administrator Settings screen, and then touch [2 Authentication System], then [2 User Registration].
–
13-8
[2 User Authentication Settings] is not available if "User Authentication" on the General Settings
screen is set to "OFF".
2
Touch the button for a registration number, and then touch [Edit].
3
Touch [Register Auth. Info.].
bizhub 751/601 (Version 2)
Authentication Unit (Biometric Type AU-101)
4
Touch [Edit].
5
Position the finger on the authentication unit to scan the finger vein pattern.
–
13
Scan the finger vein pattern three times, removing and repositioning the same finger, and touch [OK]
after each time.
6
Touch [Close], and then touch [Close] in the next screen that appears.
7
Type the user name and the password.
8
If desired, specify the function limitations.
9
Touch [OK].
10
Touch [Close].
Registering from Data Administrator
In order to use Data Administrator, settings must be specified on the machine and the setup procedure must
be performed. The setup procedure includes installing BioDriver (USB-Driver) of the authentication unit, then
installing Data Administrator Bio Plugin.
2
Reminder
Data Administrator ver. 4.0 or later must first be installed on the computer. For details on the operating
environment and installation procedure for Data Administrator, refer to the user manual for the Data
Administrator.
bizhub 751/601 (Version 2)
13-9
Authentication Unit (Biometric Type AU-101)
13
Checking the currently installed version
1
From the "Help" menu of Data Administrator, click "Version Information".
–
–
2
Click the [Plug-in version] button.
3
From the "Plug-in information list", check the version of the Data Administrator plug-in.
–
13-10
If the version appears as "3.x": This software cannot be used. Install version 4.x.
If Data Administrator ver. 3.x is installed, it is removed when version 4.x is installed.
If the plug-in version appears as "4.x": This software can be used.
bizhub 751/601 (Version 2)
Authentication Unit (Biometric Type AU-101)
13
Setup
1
Turn off the machine with the main power switch, and then disconnect the authentication unit from the
machine.
2
Install BioDriver (USB-Driver).
–
–
Plug the cable from the authentication unit into the USB port on the computer.
The Found New Hardware Wizard starts.
3
Select "Yes, now and every time I connect a device", and then click [Next].
4
Insert the application DVD included with the authentication unit into the DVD drive of the computer.
5
Select "Install from a list or specific location (Advanced)", and then click [Next].
bizhub 751/601 (Version 2)
13-11
Authentication Unit (Biometric Type AU-101)
13
6
Select the "Include this location in the search" check box, check that the application DVD appears as
a location to be searched, and then click [Next].
–
If the application DVD does not appear as a location to be searched for the driver, click [Browse],
select the BioDriver (USB-Driver) folder on the DVD, and then click [OK].
The installation begins.
13-12
bizhub 751/601 (Version 2)
Authentication Unit (Biometric Type AU-101)
7
Click [Finish].
8
Repeat steps 5 through 7.
13
The installation of BioDriver (USB-Driver) is completed.
9
Install Data Administrator Bio Plugin.
Open the DA_Bio_Plugin folder on the application DVD, and then click "setup.exe".
10
Select the language, and then click [OK].
The installer starts up.
11
Follow the instructions that appear on the screen to complete the installation.
12
Click [Next].
bizhub 751/601 (Version 2)
13-13
Authentication Unit (Biometric Type AU-101)
13
13-14
13
Select "I accept the terms of the license agreement", and then click [Next].
14
Click [Install].
bizhub 751/601 (Version 2)
Authentication Unit (Biometric Type AU-101)
15
13
Click [Finish].
Data Administrator Bio Plugin is installed, and the setup is completed.
Registering users
2
Reminder
In order to register users with Data Administrator, the authentication unit must be connected to the USB
port of the computer, and the computer and this machine must be connected over a network.
USB
Network
This machine
Computer
1
Authentication unit
If the authentication unit is connected to the machine, turn off the machine with the main power switch,
and then disconnect the authentication unit.
–
–
–
If the authentication unit is connected to the computer, continue with step 4.
When the machine is turned off, then on again with the main power switch, wait at least 10 seconds
to turn the machine on after turning it off. The machine may not operate correctly if it is turned on
immediately after being turned off.
Hold the plug when plugging and unplugging the USB cable, otherwise the cable may be damaged.
2
Turn on the machine with the main power switch.
3
Connect the authentication unit to the USB port of the computer installed with Data Administrator.
–
–
–
Do not connect other USB devices to the same port where the authentication unit is connected. If
enough USB power is not provided, the authentication unit may not operate correctly.
When using a USB hub, be sure to use a self-powered USB hub that can provide 500 mA or more.
After connecting the authentication unit, wait at least 5 seconds before operating it.
bizhub 751/601 (Version 2)
13-15
Authentication Unit (Biometric Type AU-101)
13
4
Start up Data Administrator, and then import the device information for the machine.
–
For details on importing the device information, refer to the user manual for Data Administrator.
The Device information pane appears.
5
13-16
Select "User authentication settings" in the Function selection pane, and then click [Add].
bizhub 751/601 (Version 2)
Authentication Unit (Biometric Type AU-101)
6
13
Select a template, and then click [OK].
The User settings dialog box appears.
7
Type in the user name and password, click the Vein Authentication tab, and then click [Import].
–
If desired, type in the e-mail address.
bizhub 751/601 (Version 2)
13-17
Authentication Unit (Biometric Type AU-101)
13
8
Position the finger on the authentication unit, and then click [Start reading].
–
–
–
9
Click [Register].
10
Click [OK].
–
13-18
Scan the finger vein pattern three times, removing and repositioning the same finger each time.
After scanning the finger vein patterns, place the same finger, and press [Authentication Test].
If your finger vein patterns have been authenticated in the authentication test, press [New]. If
authentication has failed, retry scanning the finger.
Repeat steps 5 through 10 until all users have been registered.
bizhub 751/601 (Version 2)
Authentication Unit (Biometric Type AU-101)
11
Click [Export to the device].
–
12
13
To change the registered data, select the user name, and then click [Edit].
Click [Write].
–
Data Administrator is equipped with a batch copy feature that allows the registered user data to be
specified on multiple machines specified to be used with the authentication unit.
The registered user data is specified on the machine.
13
Click [OK].
bizhub 751/601 (Version 2)
13-19
Authentication Unit (Biometric Type AU-101)
13
14
Disconnect the authentication unit from this USB port of the computer.
15
Turn off the machine with the main power switch, connect the authentication unit, and then turn on the
machine with the main power switch.
–
–
13.2.3
When the machine is turned off, then on again with the main power switch, wait at least 10 seconds
to turn the machine on after turning it off. The machine may not operate correctly if it is turned on
immediately after being turned off.
Hold the plug when plugging and unplugging the USB cable, otherwise the cable may be damaged.
Logging on to this machine
Follow the procedures described below to log on to this machine by completing authentication with finger
vein patterns.
When "1-to-many authentication" has been specified
13-20
1
Position the registered finger on the authentication unit.
2
The user is authenticated, and the Basic screen appears.
bizhub 751/601 (Version 2)
Authentication Unit (Biometric Type AU-101)
13
When "1-to-1 authentication" has been specified
1
Type in the user name.
2
Position the registered finger on the authentication unit.
The user is authenticated, and the Basic screen appears.
2
Note
If authentication fails many times, the authentication data may not be registered correctly. Therefore,
register the user again.
bizhub 751/601 (Version 2)
13-21
Authentication Unit (Biometric Type AU-101)
13
13.2.4
ID & Print function
Print jobs sent from a computer are saved in the ID & Print user box on the machine and can be printed after
authentication is completed with finger vein patterns. This is called the ID & Print function.
In addition, documents saved in the ID & Print user box can be checked and specified to be printed from the
control panel of the machine.
2
Note
For details on the printer driver settings and Box mode functions, refer to the user manual included with
the machine.
ID & Print (For Windows)
Specifying settings on the Configure tab
1
For Windows 2000/NT 4.0, click the [Start] button, point to "Settings", and then click "Printers".
For Windows XP/Server 2003, click the [Start] button, and then click "Printers and Faxes".
For Windows Vista/Server 2008, click the [Start] button, and then click "Control panel", "Hardware and
Sound", and "Printers".
For Windows 7/Server 2008 R2, click the [Start] button, and then click "Control panel", and "Devices
and Printers".
–
–
–
13-22
If "Printers and Faxes" does not appear in the Start menu in Windows XP/Server 2003, open the
Control Panel from the Start menu, select "Printers and Other Hardware", and then select "Printers
and Faxes".
For Windows Vista/Server 2008, if the control panel is in the classic view, double-click "Printers".
For Windows 7/Server 2008, if the control panel is in an icon view, click "Devices and Printers".
2
Right-click the icon of the installed printer, and then click "Properties".
3
Click the Configure tab.
4
Select "User Authentication" under "Device Option".
5
Select "ON (Device)" from the "Setting" drop-down list.
6
Select "ID & Print" under "Device Option".
7
Select "Allow" from the "Setting" drop-down list.
8
Click [Apply], and then click [OK].
bizhub 751/601 (Version 2)
Authentication Unit (Biometric Type AU-101)
13
Sending a print job
1
Open the data in the application, click [File], and then click [Print].
2
Check that the printer name has been selected in "Printer Name" or "Select Printer". If the printer is not
selected, click to select the printer.
–
The Print dialog box differs depending on the application.
3
Click [Preferences] (or [Properties]).
4
Click the Basic tab.
5
Click the [Authentication/Account Track] button.
bizhub 751/601 (Version 2)
13-23
Authentication Unit (Biometric Type AU-101)
13
6
Select "Recipient User", and then enter the user name and password.
–
7
Click [Verify] to check the user ID.
8
Click [OK].
–
9
13-24
If [User Authentication/Account Track] - [User Authentication Settings] - [Administrative Setting] [ID & Print Settings] - "Public User" is set to "Save" in the Administrator Settings of the machine and
the public user job is permitted, public user jobs are also saved in the [ID & Print User Box].
If the user name or the password is incorrect, type in the correct information.
Click the [OK] button.
bizhub 751/601 (Version 2)
Authentication Unit (Biometric Type AU-101)
10
13
From the "Output Method" drop-down list, select "Print".
–
If [User Authentication/Account Track] - [User Authentication Settings] - [Administrative Setting] [ID & Print Settings] - "ID & Print" is set to "ON" in the Administrator Settings of the machine, general
print jobs are also saved in the [ID & Print User Box].
11
Specify the desired settings, and then click [OK].
12
Click [Apply], and then click [Print].
The print job is sent.
13
Print a print job.
<When 1-to-many authentication has been specified>
–
"Begin Printing": The print job is printed.
"Print & Access": The print job is printed, and the user is logged in to the Basic screen.
"Access": The print job is not printed, and the user is logged in to the Basic screen.
– Make sure that either "Begin Printing" or "Print & Access" is selected.
– You can also select "Access" and select a print job to print. For details, refer to "Selecting the print
job to be printed from the control panel" on page 13-30.
– Place the finger you have registered on the authentication unit when 1-to-many authentication has
been specified.
– Enter the user name and place the finger you have registered on the authentication unit when 1-to1 authentication has been specified.
The user is authenticated, and the print job is printed.
bizhub 751/601 (Version 2)
13-25
Authentication Unit (Biometric Type AU-101)
13
ID & Print (for Macintosh)
Setting printer information
1
Open the "Print & Fax" dialog box (or "Printer Setup Utility"/"Print Center" dialog box.)
–
–
2
Open the "Printer Info" dialog box.
–
–
3
For "Print & Fax" dialog box, click [Option & supply] (OSX 10.5/10.6) or [Printer Setup] (OSX 10.4).
For "Printer Setup Utility"/"Print Center" dialog box, select "Information" from the "Printer" menu.
Select "Installable Options".
–
–
13-26
The "Print & Fax" dialog box can be opened from "System References" on the Apple menu
(OS X 10.4/10.5/10.6).
The "Printer Setup Utility"/"Print Center" dialog box can be opened from "HDD" - "Applications" "Utilities" (OSX 10.2/10.3).
For OSX 10.5/10.6, click [Driver].
For OSX 10.2/10.3/10.4, select "Installable Options".
4
Click the "ID & Print" check box to put a check mark in it.
5
Click [Apply Changes], and then close the "Printer Info" dialog box.
bizhub 751/601 (Version 2)
Authentication Unit (Biometric Type AU-101)
13
Sending a print job
1
Open the data in the application, click [File], and then click "Print".
2
Check that the printer name has been selected.
–
The Print dialog box differs depending on the application.
3
From the drop-down menu, select "Output Method".
4
Select the "User Authentication" check box.
The User Authentication dialog box appears.
bizhub 751/601 (Version 2)
13-27
Authentication Unit (Biometric Type AU-101)
13
5
Select "Recipient User", and then enter the user name and password.
–
If [User Authentication/Account Track] - [User Authentication Settings] - [Administrative Setting] [ID & Print Settings] - "Public User" is set to "Save" in the Administrator Settings of the machine and
the public user job is permitted, public user jobs are also saved in the [ID & Print User Box].
6
Click the [OK] button.
7
From the "Output Method" drop-down list, select "Print".
–
8
If [User Authentication/Account Track] - [User Authentication Settings] - [Administrative Setting] [ID & Print Settings] - "ID & Print" is set to "ON" in the Administrator Settings of the machine, general
print jobs are also saved in the [ID & Print User Box].
Specify the desired settings, and then click [Print].
The print job is sent.
13-28
bizhub 751/601 (Version 2)
Authentication Unit (Biometric Type AU-101)
9
13
Print a print job.
<When 1-to-many authentication has been specified>
–
"Begin Printing": The print job is printed.
"Print & Access": The print job is printed, and the user is logged in to the Basic screen.
"Access": The print job is not printed, and the user is logged in to the Basic screen.
– Make sure that either "Begin Printing" or "Print & Access" is selected.
– You can also select "Access" and select a print job to print. For details, refer to "Selecting the print
job to be printed from the control panel" on page 13-30.
– Place the finger you have registered on the authentication unit when 1-to-many authentication has
been specified.
– Enter the user name and place the finger you have registered on the authentication unit when 1-to1 authentication has been specified.
The user is authenticated, and the print job is printed.
bizhub 751/601 (Version 2)
13-29
Authentication Unit (Biometric Type AU-101)
13
Selecting the print job to be printed from the control panel
Follow the procedure described below to select the document to be printed from those saved in the ID & Print
user box.
1
Touch [Screen Operation].
<When 1-to-many authentication has been specified>
2
Log in to the machine.
–
Place the finger you have registered on the authentication unit when 1-to-many authentication has
been specified.
– Enter the user name and place the finger you have registered on the authentication unit when 1-to1 authentication has been specified.
The user is authenticated, and the Basic screen appears.
3
13-30
Press the [User Box] key in the control panel.
bizhub 751/601 (Version 2)
Authentication Unit (Biometric Type AU-101)
4
Touch [Use Document].
5
Touch [System User Box].
bizhub 751/601 (Version 2)
13
13-31
Authentication Unit (Biometric Type AU-101)
13
6
Touch [ID & Print User Box], and then touch [OK].
7
Select the document to be printed.
–
–
–
–
13-32
Multiple documents can be selected.
To select all documents, touch [Select All].
To cancel the selection of all documents, touch [Reset].
To check various information, such as the date/time when the document was stored and the
document name, touch [Detail View].
bizhub 751/601 (Version 2)
Authentication Unit (Biometric Type AU-101)
8
13
Touch [Print] under "Action".
– To delete the document, touch [Delete].
– To check the document details, touch [Document Details].
– To cancel the operation, touch [Cancel].
The selected document is printed.
2
Note
If authentication fails many times, the authentication data may not be registered correctly. Therefore,
register the user again.
bizhub 751/601 (Version 2)
13-33
13
13-34
Authentication Unit (Biometric Type AU-101)
bizhub 751/601 (Version 2)
14
Authentication Unit (IC Card
Type AU-201)
Authentication Unit (IC Card Type AU-201)
14
14
Authentication Unit (IC Card Type AU-201)
14.1
Safety information
Carefully read this information, and then store it in a safe place.
Before using this device, carefully read this information and follow it to operate the device correctly.
After reading this information, store it in the designated holder with the warranty.
Important information
The reprinting or reproduction of the content of this publication, either in part or in full, is prohibited without
prior permission.
The content of this publication is subject to change without notice.
This publication was created with careful attention to content; however, if inaccuracies or errors are noticed,
please contact your sales representative.
The marketing and authorization to use the our company’s product mentioned in this information are
provided entirely on an "as is" basis.
Our company’s assumes no responsibility for any damage (including lost profits or other related damages)
caused by this product or its use as a result of operations not described in this information. For disclaimers
and warranty and liability details, refer to the user manual Authentication unit (Biometric type AU-201).
This product is designed, manufactured and intended for general business use. Do not use it for applications
requiring high reliability and which may have an extreme impact on lives and property. (Applications requiring
high reliability: Chemical plant management, medical equipment management and emergency
communications management)
Use with other authentication devices is not guaranteed.
In order to incorporate improvements in the product, the specifications concerning this product are subject
to change without notice.
For safe use
Warning
•
Do not this product near water, otherwise it may be damaged.
•
Do not cut, damage, modify or forcefully bend the USB cable. A malfunction may
occur as a result of a damaged or cut USB cable.
•
Do not disassembly this device, otherwise it may be damaged.
•
Do not store the IC card within 40 mm of the card scanning area.
bizhub 751/601 (Version 2)
Symbol
14-3
Authentication Unit (IC Card Type AU-201)
14
Regulation notices
USER INSTRUCTIONS FCC PART 15 - RADIO FREQUENCY DEVICES (For U.S.A. Users)
FCC part 15
FCC: Declaration of Conformity
Product Type
Authentication unit (Biometric type)
Product Name
AU-201
This device complies with Part 15 of the FCC Rules
Operation is subject to the following two conditions:
• This device may not cause harmful interference, and this device must accept any interference received, including
interference that may cause undesired operation.
NOTE: This equipment has been tested and found to comply with the limits for a Class B digital device,
pursuant to Part 15 of the FCC Rules.
These limits are designed to provide reasonable protection against harmful interference in a residential
installation. This equipment generates, uses and can radiate radio frequency energy and, if not installed and
used in accordance with the instructions, may cause harmful interference to radio communications.
However, there is no guarantee that interference will not occur in a particular installation. If this equipment
does cause harmful interference to radio or television reception, which can be determined by turning the
equipment off and on, the user is encouraged to try to correct the interface by one or more of the following
measures:
Reorient or relocate the receiving antenna.
Increase the separation between the equipment and receiver.
Connect the equipment into an outlet on a circuit different from that to which the receiver is connected.
Consult the dealer or an experienced radio/TV technician for help
7 WARNING
The design and production of this unit conform to FCC regulations, and any changes or modifications
must be registered with the FCC and are subject to FCC control.
%
Any changes made by the purchaser or user without first contacting the manufacturer will be subject
to penalty under FCC regulations.
INTERFERENCE-CAUSING EQUIPMENT STANDARD (ICES-003 ISSUE 4) (For Canada Users)
This Class B digital apparatus complies with Canadian ICES-003.
Cet appareil numérique de la classe B est conforme à la norme NMB-003 du Canada.
14-4
bizhub 751/601 (Version 2)
Authentication Unit (IC Card Type AU-201)
14.2
14
Using Authentication Unit (IC Card Type) AU-201
Authentication Unit (IC Card Type) AU-201 is an IC card authentication system that performs user
authentication by IC cards. Log on to this machine and print job operation can be authenticated with IC cards
when using this machine with user authentication settings specified.
In order to use the authentication unit, user IC card IDs must first be registered with the machine.
A registered user can log on to this machine or print a print job after completing authentication with their IC
card IDs.
The following procedures describe how to specify the necessary settings on the machine, register users, and
perform the logon and print job operations after completing authentication.
2
Reminder
Do not disconnect the USB cable while the authentication unit is being used, otherwise the system may
become unstable.
Do not store the IC card within 40 mm of the card scanning area.
14.2.1
Settings of this machine
!
Detail
User authentication on this machine must be set for machine authentication.
2
Note
This device does not support external server authentication.
To combine account track settings with user authentication settings, set Synchronize User
Authentication & Account Track to "Synchronize". When you set "Do Not Synchronize", the ID & Print
function cannot be used.
1
From the control panel of this machine, touch [4 User Authentication/Account Track] on the
Administrator Settings screen, and then touch [1 General Settings].
2
Set "User Authentication" to "ON (MFP)", and then touch [OK].
–
For details on specifying settings for "Public User Access" and "Account Track", refer to "Selecting
an authentication method" on page 12-69
bizhub 751/601 (Version 2)
14-5
Authentication Unit (IC Card Type AU-201)
14
3
Touch [Yes], and then touch [OK].
4
Touch [8 Authentication Device Settings], then [1 General Settings], then [Card Authentication].
5
Select the desired settings under "IC Card Type" and "Operation Settings".
–
–
6
14-6
Under "Operation Settings", select the logon method after registration.
Card Authentication: Logon is possible simply by positioning the IC card.
Card Authentication + Password: Logon is possible by positioning the IC card and entering the
password.
For details on logging on, refer to "Logging on to this machine" on page 14-22.
Touch [OK], and then touch [OK] in the next screen that appears.
bizhub 751/601 (Version 2)
Authentication Unit (IC Card Type AU-201)
14
7
Touch [2 Logoff Settings].
8
Select whether or not the user is logged off when scanning of the document is finished after the user
has logged on to this machine.
9
Touch [OK].
10
Touch [Close], and then touch [Close] in the next screen that appears.
bizhub 751/601 (Version 2)
14-7
Authentication Unit (IC Card Type AU-201)
14
14.2.2
Registering users
There are two methods for registering users.
Connecting the authentication unit to this machine and registering directly from the machine
Connecting the authentication unit to a computer and registering using Data Administrator
!
Detail
Registered user data is stored on the hard disk of this machine. If the user authentication method on
the machine is changed or the hard disk is reformatted, the registered user data is erased.
Registering from the control panel of this machine
14-8
1
From the control panel of this machine, touch [4 User Authentication/Account Track] on the
Administrator Settings screen, and then touch [2 User Authentication Settings], then [2 User
Registration].
2
Touch the button for a registration number, and then touch [Edit].
3
Touch [Register Auth. Info.].
bizhub 751/601 (Version 2)
Authentication Unit (IC Card Type AU-201)
14
4
Touch [Edit].
5
Position the IC card on the authentication unit, and then touch [OK].
6
After the message "Registered" appears, touch [Close], and then touch [Close] in the next screen that
appears.
7
Type the user name and the password.
8
If desired, specify the function limitations.
9
Touch [OK].
10
Touch [Close].
bizhub 751/601 (Version 2)
14-9
Authentication Unit (IC Card Type AU-201)
14
Registering from Data Administrator
In order to use Data Administrator, settings must be specified on the machine and the setup procedure must
be performed. The setup procedure includes installing IC Card Driver (USB-Driver) of the authentication unit,
then installing Data Administrator IC Card Plugin.
2
Reminder
Data Administrator ver. 3.0 or later must first be installed on the computer. For details on the operating
environment and installation procedure for Data Administrator, refer to the user manual for the Data
Administrator.
Checking the currently installed version
1
From the "Help" menu of Data Administrator, click "Version Information".
–
–
2
Click the [Plug-in version] button.
3
From the "Plug-in information list", check the version of the Data Administrator plug-in.
–
14-10
If the version appears as "3.x": This software cannot be used. Install version 4.x.
If Data Administrator ver. 3.x is installed, it is removed when version 4.x is installed.
If the plug-in version appears as "4.x": This software can be used.
bizhub 751/601 (Version 2)
Authentication Unit (IC Card Type AU-201)
14
Setup
1
Turn off the machine with the main power switch, and then disconnect the authentication unit from the
machine.
2
Install IC Card Driver (USB-Driver).
–
–
Plug the cable from the authentication unit into the USB port on the computer.
The Found New Hardware Wizard starts.
3
Select "Yes, now and every time I connect a device", and then click [Next].
4
Insert the application DVD included with the authentication unit into the DVD drive of the computer.
5
Select "Install from a list or specific location (Advanced)", and then click [Next].
bizhub 751/601 (Version 2)
14-11
Authentication Unit (IC Card Type AU-201)
14
6
Select the "Include this location in the search" check box, check that the application DVD appears as
a location to be searched, and then click [Next].
–
If the application DVD does not appear as a location to be searched for the driver, click [Browse],
select the IC Card Driver (USB-Driver) folder on the DVD, and then click [OK].
The installation begins.
14-12
bizhub 751/601 (Version 2)
Authentication Unit (IC Card Type AU-201)
7
14
Click [Finish].
The installation of IC Card Driver (USB-Driver) is completed.
8
Install Data Administrator IC Card Plugin.
Open the IC_Card_Plugin folder on the application DVD, and then click "setup.exe".
9
Select the language, and then click [OK].
The installer starts up.
bizhub 751/601 (Version 2)
14-13
Authentication Unit (IC Card Type AU-201)
14
14-14
10
Follow the instructions that appear on the screen to complete the installation.
11
Click [Next].
12
Select "I accept the terms of the license agreement", and then click [Next].
bizhub 751/601 (Version 2)
Authentication Unit (IC Card Type AU-201)
13
Click [Install].
14
Click [Finish].
14
Data Administrator IC Card Plugin is installed, and the setup is completed.
bizhub 751/601 (Version 2)
14-15
Authentication Unit (IC Card Type AU-201)
14
Registering users
2
Reminder
In order to register users with Data Administrator, the authentication unit must be connected to the USB
port of the computer, and the computer and machine must be connected over a network.
USB
Network
This machine
Computer
1
If the authentication unit is connected to this machine, turn off the machine with the main power switch,
and then disconnect the authentication unit.
–
–
–
If the authentication unit is connected to the computer, continue with step 4.
When the machine is turned off, then on again with the main power switch, wait at least 10 seconds
to turn the machine on after turning it off. The machine may not operate correctly if it is turned on
immediately after being turned off.
Hold the plug when plugging and unplugging the USB cable, otherwise the cable may be damaged.
2
Turn on the machine with the main power switch.
3
Connect the authentication unit to the USB port of the computer installed with Data Administrator.
–
–
–
–
4
14-16
Authentication unit
Do not connect other USB devices to the same port where the authentication unit is connected. If
enough USB power is not provided, Authentication unit (IC Card Type) may not operate correctly.
When using a USB hub, be sure to use a self-powered USB hub that can provide 500 mA or more.
After connecting the authentication unit, wait at least 5 seconds before operating it.
If the data have already been read out, proceed to 7.
Find this device in the window, then double-click it.
bizhub 751/601 (Version 2)
Authentication Unit (IC Card Type AU-201)
5
Click [Import].
6
Click [Yes].
bizhub 751/601 (Version 2)
14
14-17
Authentication Unit (IC Card Type AU-201)
14
7
Start up Data Administrator, and then import the device information for this machine.
–
For details on importing the device information, refer to the user manual for Data Administrator.
The Device information pane appears.
8
14-18
Select "User authentication settings" in the Function selection pane, and then click [Add].
bizhub 751/601 (Version 2)
Authentication Unit (IC Card Type AU-201)
9
14
Select a template, and then click [OK].
The User settings dialog box appears.
10
Type in the user name and password, click the IC card authentication tab.
–
11
If desired, type in the e-mail address.
Position the IC card on the authentication unit, and then click [Start reading].
–
The card ID can also be registered by selecting "Input the card ID directly".
bizhub 751/601 (Version 2)
14-19
Authentication Unit (IC Card Type AU-201)
14
12
Click [OK].
–
13
Click [Export to the device].
–
14-20
Repeat steps 8 through 12 until all users have been registered.
To change the registered data, select the user name, and then click [Edit].
bizhub 751/601 (Version 2)
Authentication Unit (IC Card Type AU-201)
14
14
Click [Write].
–
Data Administrator is equipped with a batch copy feature that allows the registered user data to be
specified on the multiple machines specified to be used with the authentication unit.
The registered user data is specified on the machine.
15
Click [OK].
16
Disconnect the authentication unit from this USB port of the computer.
17
Turn off the machine with the main power switch, connect the authentication unit, and then turn on the
machine with the main power switch.
–
–
When the this machine is turned off, then on again with the main power switch, wait at least 10
seconds to turn the machine on after turning it off. The machine may not operate correctly if it is
turned on immediately after being turned off.
Hold the plug when plugging and unplugging the USB cable, otherwise the cable may be damaged.
bizhub 751/601 (Version 2)
14-21
Authentication Unit (IC Card Type AU-201)
14
14.2.3
Logging on to this machine
Follow the procedures described below to log on to this machine by completing authentication with IC card
IDs.
When "Card Authentication” has been specified" has been specified
14-22
1
Position the registered IC card on the authentication unit.
2
The user is authenticated, and the Basic screen appears.
bizhub 751/601 (Version 2)
Authentication Unit (IC Card Type AU-201)
14
When "Card Authentication + Password" has been specified
1
Position the registered IC card on the authentication unit, and then type in the password.
2
Touch [Login] or press the [Access] key.
The user is authenticated, and the Basic screen appears.
2
Note
The notification beep sounds while scanning. The notification beep is canceled by touching [Login] or
pressing the [Access] key to complete authentication. This is a normal operation of the device.
If authentication fails many times, the authentication data may not be registered correctly. Therefore,
register the user again.
bizhub 751/601 (Version 2)
14-23
Authentication Unit (IC Card Type AU-201)
14
14.2.4
ID & Print function
Print jobs sent from a computer are saved in the ID & Print user box on this machine and can be printed after
authentication is completed with IC card IDs. This is called the ID & Print function.
In addition, documents saved in the ID & Print user box can be checked and specified to be printed from the
control panel of this machine.
2
Note
For details on the printer driver settings and Box mode functions, refer to the user manual included with
this machine.
ID & Print (For Windows)
Specifying settings on the Configure tab
1
For Windows 2000/NT 4.0, click the [Start] button, point to "Settings", and then click "Printers".
For Windows XP/Server 2003, click the [Start] button, and then click "Printers and Faxes".
For Windows Vista/Server 2008, click the [Start] button, and then click "Control Panel", then "Hardware
and Sound", then "Printers".
For Windows 7/Server 2008 R2, click the [Start] button, and then click "Control panel", and "Devices
and Printers".
–
–
–
14-24
If "Printers and Faxes" does not appear in the Start menu, open the Control Panel from the Start
menu, select "Printers and Other Hardware", and then select "Printers and Faxes".
If Control Panel in Windows Vista/Server 2008 is displayed in the Classic view, double-click
"Printers".
For Windows 7/Server 2008, if the control panel is in an icon view, click "Devices and Printers".
2
Right-click the icon of the installed printer, and then click "Properties".
3
Click the Configure tab.
4
Select "User Authentication" under "Device Option".
5
Select "Device" from the "Setting" drop-down list.
6
Select "ID & Print" under "Device Option".
7
Select "Allow" from the "Setting" drop-down list.
8
Click [Apply], and then click [OK].
bizhub 751/601 (Version 2)
Authentication Unit (IC Card Type AU-201)
14
Sending a print job
1
Open the data in the application, click [File], and then click [Print].
2
Check that the printer name has been selected in "Printer Name" or "Select Printer". If the printer is not
selected, click to select the printer.
–
The Print dialog box differs depending on the application.
3
Click [Preferences] (or [Properties]).
4
Click the Basic tab.
5
Click the [Authentication/Account Track] button.
bizhub 751/601 (Version 2)
14-25
Authentication Unit (IC Card Type AU-201)
14
6
Select "Recipient User", and then enter the user name and password.
–
7
Click [Verify] to check the user ID.
8
Click [OK].
–
9
14-26
If [User Authentication/Account Track] - [User Authentication Settings] - [Administrative Setting] [ID & Print Settings] - "Public User" is set to "Save" in the Administrator Settings of the machine and
the public user job is permitted, public user jobs are also saved in the [ID & Print User Box].
If the user name or the password is incorrect, type in the correct information.
Click the [OK] button.
bizhub 751/601 (Version 2)
Authentication Unit (IC Card Type AU-201)
10
14
From the "Output Method" drop-down list, select "Print".
–
If [User Authentication/Account Track] - [User Authentication Settings] - [Administrative Setting] [ID & Print Settings] - "ID & Print" is set to "ON" in the Administrator Settings of the machine, general
print jobs are also saved in the [ID & Print User Box].
11
Specify the desired settings, and then click [OK].
12
Click [Apply], and then click [Print].
The print job is sent.
13
Position the registered IC card on the authentication unit.
–
–
Make sure that "Begin Printing" is selected.
To select the print job to be printed, touch [Screen Operation]. For details, refer to "Selecting the
print job to be printed from the control panel" on page 14-32.
The user is authenticated, and the print job is printed.
bizhub 751/601 (Version 2)
14-27
Authentication Unit (IC Card Type AU-201)
14
ID & Print (for Macintosh)
Setting printer information
1
Open the "Print & Fax" dialog box (or "Printer Setup Utility"/"Print Center" dialog box.)
–
–
2
Open the "Printer Info" dialog box.
–
–
3
For "Print & Fax" dialog box, click [Option & supply] (OSX 10.5/10.6) or [Printer Setup] (OSX 10.4).
For "Printer Setup Utility"/"Print Center" dialog box, select "Information" from the "Printer" menu.
Select "Installable Options".
–
–
14-28
The "Print & Fax" dialog box can be opened from "System References" on the Apple menu
(OS X 10.4/10.5/10.6).
The "Printer Setup Utility"/"Print Center" dialog box can be opened from "HDD" - "Applications" "Utilities" (OSX 10.2/10.3).
For OSX 10.5/10.6, click [Driver].
For OSX 10.2/10.3/10.4, select "Installable Options".
4
Click the "ID & Print" check box to put a check mark in it.
5
Click [Apply Changes], and then close the "Printer Info" dialog box.
bizhub 751/601 (Version 2)
Authentication Unit (IC Card Type AU-201)
14
Sending a print job
1
Open the data in the application, click [File], and then click "Print".
2
Check that the printer name has been selected.
–
The Print dialog box differs depending on the application.
3
From the drop-down menu, select "Output Method".
4
Select the "User Authentication" check box.
The User Authentication dialog box appears
bizhub 751/601 (Version 2)
14-29
Authentication Unit (IC Card Type AU-201)
14
5
Select "Recipient User", and then enter the user name and password.
–
If [User Authentication/Account Track] - [User Authentication Settings] - [Administrative Setting] [ID & Print Settings] - "Public User" is set to "Save" in the Administrator Settings of the machine and
the public user job is permitted, public user jobs are also saved in the [ID & Print User Box].
6
Click the [OK] button.
7
From the "Output Method" drop-down list, select "Print".
–
8
If [User Authentication/Account Track] - [User Authentication Settings] - [Administrative Setting] [ID & Print Settings] - "ID & Print" is set to "ON" in the Administrator Settings of the machine, general
print jobs are also saved in the [ID & Print User Box].
Specify the desired settings, and then click [Print].
The print job is sent.
14-30
bizhub 751/601 (Version 2)
Authentication Unit (IC Card Type AU-201)
9
14
Print a print job.
<When 1-to-many authentication has been specified>
–
"Begin Printing": The print job is printed.
"Print & Access": The print job is printed, and the user is logged in to the Basic screen.
"Access": The print job is not printed, and the user is logged in to the Basic screen.
– Make sure that either "Begin Printing" or "Print & Access" is selected.
– You can also select "Access" and select a print job to print. For details, refer to "Selecting the print
job to be printed from the control panel" on page 14-32.
– Place the finger you have registered on the authentication unit when 1-to-many authentication has
been specified.
– Enter the user name and place the finger you have registered on the authentication unit when 1-to1 authentication has been specified.
The user is authenticated, and the print job is printed.
bizhub 751/601 (Version 2)
14-31
Authentication Unit (IC Card Type AU-201)
14
Selecting the print job to be printed from the control panel
Follow the procedure described below to select the document to be printed from those saved in the ID & Print
user box.
1
Touch [Screen Operation].
<When IC card authentication has been specified>
2
Log in to the machine.
–
–
Place the IC card you have registered on the authentication unit when IC card authentication has
been specified.
Place the IC card you have registered on the authentication unit and enter the password when IC
card authentication + password has been specified.
The user is authenticated, and the Basic screen appears.
3
14-32
Press the [User Box] key in the control panel.
bizhub 751/601 (Version 2)
Authentication Unit (IC Card Type AU-201)
4
Touch [Use Document].
5
Touch [System User Box].
6
Touch [ID & Print User Box], and then touch [OK].
bizhub 751/601 (Version 2)
14
14-33
Authentication Unit (IC Card Type AU-201)
14
7
Select the document to be printed.
–
–
–
–
8
Multiple documents can be selected.
To select all documents, touch [Select All].
To cancel the selection of all documents, touch [Reset].
To check various information, such as the date/time when the document was stored and the
document name, touch [Detail View].
Touch [Print] under "Action", and then touch [OK].
– To delete the document, touch [Delete].
– To check the document details, touch [Document Details].
– To cancel the operation, touch [Cancel].
The selected document is printed.
2
Note
If authentication fails many times, the authentication data may not be registered correctly. Therefore,
register the user again.
14-34
bizhub 751/601 (Version 2)
15
Appendix
Appendix
15
15
Appendix
15.1
Entering text
The following procedure describes how to use the keyboard that appears in the touch panel for typing in the
names of registered users and custom paper sizes. The keypad can also be used to type in numbers.
Any of the following keyboards may appear.
Example
Password input screen
Screen for entering the name of a custom paper size
bizhub 751/601 (Version 2)
15-3
15
Appendix
Touching [Shift] switches the keyboard display between lowercase letters (numbers) and uppercase letters
(symbols).
15-4
bizhub 751/601 (Version 2)
Appendix
15.1.1
15
Enlarging the keyboard
The keyboard can be displayed larger so that it easier to read.
1
While the keyboard is displayed, touch [Enlarge ON].
The keyboard is displayed enlarged.
2
To cancel the enlarged display and return the keyboard to its normal size, touch [Enlarge OFF] while the
keyboard is displayed enlarged.
2
Note
The keyboard is used in the same way, even when it is displayed enlarged.
bizhub 751/601 (Version 2)
15-5
Appendix
15
15.1.2
To type text
%
Touch the button for the desired character from the keyboard that appeared.
– To type in uppercase letters or symbols, touch [Shift].
– Numbers can also be typed in with the keypad.
The entered characters appear in the text box.
2
Note
To revert to the setting when the keyboard was displayed, touch [Cancel].
To clear all entered text, press the [C] (clear) key.
Some buttons may not appear, depending on the characters being entered.
!
Detail
To change a character in the entered text, touch
and
to move the cursor to the character to be
changed, touch [Delete], and then type in the desired letter or number.
15.1.3
List of available characters
Type
Characters
Alphanumeric characters/
symbols
15-6
bizhub 751/601 (Version 2)
Appendix
15.2
15
Glossary
The words used in Copy mode are described below.
Abbreviation
ADF
Automatic document feeder; Can be used to automatically scan the original
ADU
Automatic duplex unit; used to print automatically on both sides of paper.
APS
"Auto Paper Select" setting
ATS
Automatic paper-tray-switching feature (ATS = Auto Tray Switch)
LCT
Large capacity tray; can be loaded with a large amount of paper to feed it into the copier main body.
A
Auto Zoom
Select this setting to automatically select the appropriate zoom ratio after an original is placed on the original
glass or loaded into the ADF and the paper size is selected.
Auto Paper Select
Select this setting to detect the original placed on the original glass or loaded into the ADF, then automatically
select paper of the same size if "e1.0" is selected or select the paper size appropriate for the specified zoom
ratio.
B
Background Removal
Select a setting to adjust the density of the background color of the original to one of nine levels.
C
Change Tray Settings
Touch this button to specify a paper size or type not loaded in a paper tray or to copy on paper other than
normal paper.
Chapters
Set this function to specify chapter title pages that must be printed on the front side of the paper when
printing double-sided copies.
Combine
Select a setting to arrange reduced copies of multiple original pages on a single copy page. The settings for
the number of pages that can be combined are "2 in 1", "4 in 1" and "8 in 1".
Copy Protection
Set this function to print hidden text in order to prevent improper copying. When an original printed with copy
protection text is copied, the hidden text appears clearly repeated in all pages of the copies so that the reader
knows that it is a copy.
Cover Mode
Set this function to add paper from the specified paper tray to the copies as a cover page.
D
Density
Select a setting to adjust the density of the print image to one of nine levels.
Duplex
Select the setting to specify if the scanned original and the printed copy are printed on just one side or both
sides.
F
Fold & Staple
Set this function to fold the copies in half and staple them together at the center.
Finishing
Select from the settings that are available for sorting and finishing copies when they are fed into the finishing
tray.
bizhub 751/601 (Version 2)
15-7
Appendix
15
G
Group (Copy/Finishing)
Select this setting to separate the copies of each page in the original. The specified number of copies of the
second page is printed after all copies of the first page are finished.
Group (reference permission)
Use this feature to limit the addresses that each user can reference and to manage security.
I
Insert Image
Set this function to later scan multiple images from the original glass and insert them at the desired locations
in an original scanned with the ADF, then feed out all copies together.
Insert Sheet
Set this function to insert paper from the specified paper tray into the copies as chapter title pages.
M
Margin
Select the setting for the position of the binding margin for the loaded original. Selecting the appropriate
setting prevents the copy from being printed upside-down when making double-sided copies from singlesided original or when making single-sided copies from double-sided originals.
Minimal
Select this setting to produce a copy with the original image slightly reduced.
Mixed Original
Select this setting to detect the size of each original page and print a copy on paper of the appropriate size
when an original with different page sizes is loaded together into the ADF.
N
Neg-/Pos. Reverse
Set this function to copy the original with the light- and dark-colored areas or the colors (gradations) of the
image inversed.
O
Offset
Select this setting to separate copies that are fed out.
OHP Interleave
Set this function to insert paper between OHP that are being copied.This prevents OHP from sticking
together.
Original Type
Select the setting for the image type of the original to better adjust the copy quality.
Original Direction
Select the setting for the orientation that the original is placed on the original glass or loaded into the ADF.
P
Paper
Select settings for the type and size of paper to be printed on.
Preview
Print image can be checked as a preview image before printing.
Proof Copy
Press this key to print a single sample copy and stop the machine so that it can be checked before printing
a large number of copies. This prevents copy errors from occurring in a large number of copies.
Punch
Select the setting to punch holes in the copies for filing.
S
Save in User Box
Temporarily saves the job on the hard disk so that it can later be recalled and used again
Separate Scan
Scans an original exceeding the maximum 80 pages that can be loaded into the ADF by scanning the original
in separate batches. The original can be scanned and treated as a single copy job. In addition, the scanning
location can be switched between the original glass and the ADF during the scanning operation.
15-8
bizhub 751/601 (Version 2)
Appendix
15
Sheet/Cover/Chapter Insert
Select from the functions that are available to edit copies as desired
Sort
Select this setting to separate each set of the copies. The second copy set is printed after all of the first copy
set is finished.
Staple
Select a setting to staple copies together.
X
XY Zoom
Touch this button to use the keypad to specify the zoom ratio for producing an enlarged/reduced copy of the
loaded original.
Z
Zoom
Specify the zoom ratio of the copy.
bizhub 751/601 (Version 2)
15-9
15
15-10
Appendix
bizhub 751/601 (Version 2)
16
Index
Index
16
16
Index
Symbols
[Power] (auxiliary power) key 2-31
Numerics
1st Z-Fold Position Adjustment/2nd Z-Fold Position
Adjustment 12-58
2in1 3-55
2-Position Staple Pitch Adjustment 12-62
4in1 3-55
8in1 3-55
A
Accessibility 4-27
Account track 2-42
Account Track Settings 12-80
ADF 3-9, 7-31, 15-7
Administrator Settings 12-26
Administrator/Machine Setting 12-32
Authentication method 12-67
Authentication unit 2-45, 2-47
Authentication unit (biometric type) 2-45
Authentication unit (IC card type) 2-47
Auto Paper setting 3-36
Auto Reset Confirmation 4-33
Auto Zoom setting 3-39
Automatic panel reset 2-34
B
Background Removal 3-61, 3-63
Basic screen 2-26
Binding Position 3-29
Biometric authentication 2-45
Book Copy 8-27
Booklet 8-47
Bypass tray 2-6, 2-55
C
Call service representative 5-3
Center Staple & Fold 3-77, 3-79
Center Staple Position 12-45
Change Icon 12-24
Chapters 8-17
Check Job 4-3
Cleaning 10-3
Combined pages 3-55
Conserving energy 2-34, 2-35, 2-36
Consumables 9-3
Control panel 2-24, 2-29
Copier Settings 12-21, 12-37
Cover Sheet 8-6
Create One-Touch Destination 12-8
Create User Box 12-8
bizhub 751/601 (Version 2)
Current Jobs list 11-12
Custom Display Settings 12-19
Custom Size settings 7-14, 7-25
D
Deleting jobs 11-8
Density 3-61, 3-62
Destination registration 12-8, 12-32
Double-sided copying 3-52
E
Emptying hole-punch scrap boxes 9-18
Enlarge Display Mode Confirmation 4-35
Enlarge/Reduce settings 3-44
Entering text 15-3
Erase 8-50, 8-51, 8-53, 8-55
F
Face Up 3-64, 3-69
Fax Settings 12-38
Fax/Scan Settings 12-23
Features 1-3
Finisher FS-524 2-12
Finisher FS-525 2-14
Finisher FS-610 2-16
Finishing 3-64
Folding 3-77
Full Size 3-40
Fusing unit 2-9
G
Glossary 15-7
Glossy 3-61
Group 3-64, 3-67
H
Half-Fold 3-77, 3-78
Half-Fold Position 12-47
Header/Footer 12-64
Help 4-22
I
IC card authentication 2-47
Icons 2-28
Image Adjustment 8-44
Image Repeat 8-33
Increase Priority 11-17
Individual Zoom 3-45
Insert Image 8-14
Insert Sheet 8-10
Internal 2-8
Interrupt 4-15
16-3
Index
16
J
Job History list 11-13
Job List screen 11-3
K
Key Repeat Start/Interval Time 4-29
L
Large Capacity Unit LU-405 2-10
Large Capacity Unit LU-406 2-11
Left panel Job List 11-7
Lever M4 2-60
License Settings 12-41
Limiting Access to Destinations 12-8
Loading paper 2-50, 2-51, 2-52, 2-55
Low power mode 2-34
M
Machine Configuration 2-3
Main messages and their remedies 5-47
Main power switch 2-31
Manual conventions 1-9
Message 10-9
Message Display Time 4-37
Meter Count 10-8
Minimal 3-43
Mixed Original 3-21, 15-8
Mode Memory 4-16, 4-20
N
Neg./Pos. Reverse 8-26
Network Setting 12-36
Non-standard-sized paper 7-12
O
Offset 3-64
OHP Interleave 8-3
One-Touch Destination/User Box Registration 12-32
Options 2-3
Original > Copy settings 3-50
Original Direction 3-26, 15-8
Original feeding 3-9
Original glass 3-10
Original orientation 1-10
Original Type 3-59, 15-8
Originals 7-31
Output Tray OT-505 2-22
Oversized paper 7-17
Oversized paper settings 7-27
P
Page Margin 8-41
Paper misfeed 5-5
Paper misfeed indications 5-7
Paper storage 7-8
Paper take-up roller 2-50
Password Rules 12-85
Periodic maintenance 10-9
16-4
Post Inserter PI-504 2-21, 3-86, 5-39
Post Inserter Tray Size Adjustment 12-63
Power save 2-34, 2-35, 2-36
Prefix/Suffix Automatic Setting 12-38
Preview 4-9
Printer Settings 12-23, 12-37
Program Jobs 8-21
Proof Copy 4-6
Punch Horizontal Position Adjustment 12-53
Punch Kit PK-504/PK-505 2-12, 2-14, 2-15, 2-16
Punch Resist Loop Adjustment 12-56
Punch settings 3-64, 3-74
Punch Unit Horizontal Position Adjustment 12-55
Punch Unit Vertical Position Adjustment 12-51
Punch Vertical Position Adjustment 12-49
Q
Queuing copy jobs 3-90
Quick copy screen 2-26
R
Recall Copy Program 4-20
Replacing the staple cartridge 9-7
S
Save in User Box 8-93
Security Settings 12-38
Selecting the output tray 3-68
Separate Scan 3-11
Set Zoom 3-48
Shift Tray SF-602 2-22
Simple troubleshooting 5-43
Single-sided copying 3-51
Sleep mode 2-35
Sort 3-64, 3-66
Sound Setting 4-38
Special Size settings 7-24
Stamp/Composition 8-56
Standard Size 1 settings 7-23
Staple cartridge 9-7
Staple settings 3-64, 3-71
Stored jobs 11-14, 11-15
System Auto Reset 2-34
System Auto Reset Confirmation 4-31
System Connection 12-38
System Settings 12-17, 12-26
T
Tab Original Settings 3-24
Temporarily stopping 3-91
Text Enhancement 3-61
Text entry 15-3
Toner cartridge 9-3
Touch panel 2-26, 4-27
Transport lever 2-60
Tray 1 2-5, 2-50
Tray 2 2-5, 2-50
bizhub 751/601 (Version 2)
Index
16
Tray 3 2-5, 2-51
Tray 4 2-5, 2-51
Tri-Fold 3-77, 3-81
Tri-Fold Position Adjustment 12-60
Trouble code 5-3
Trouble shooting 5-3
U
User authentication 2-38
User Authentication Setting 12-72
User Authentication/Account Track 12-33
User manuals 1-11
User Settings 12-17
Utility mode 12-3
W
Warm-up 2-32
Weekly timer 2-36, 12-44
Wide Paper settings 7-17
X
XY Zoom 3-41
Z
Z Folding Unit ZU-604/ZU-605 2-19
Z-Fold 3-77, 3-83
Z-Folded Original 3-23
bizhub 751/601 (Version 2)
16-5
Index
16
bizhub 751/601 (Version 2)
16-6


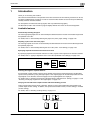


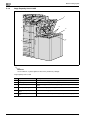


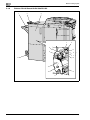
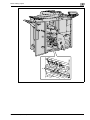


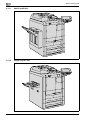
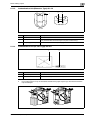


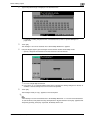


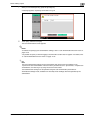
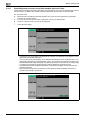
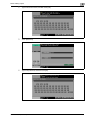
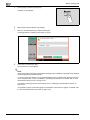
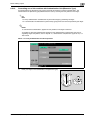


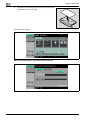

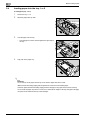


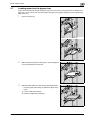
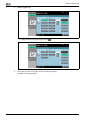


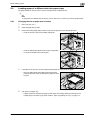


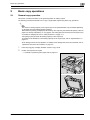
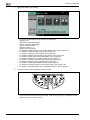

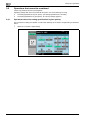

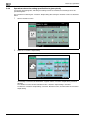
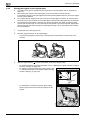
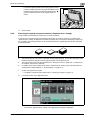
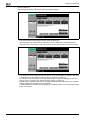


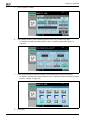

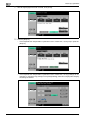


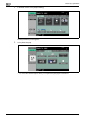


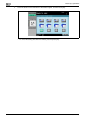

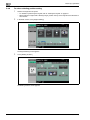


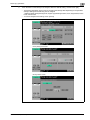


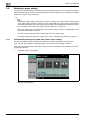
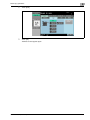

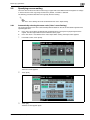
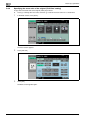
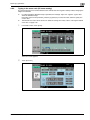
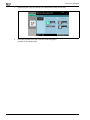

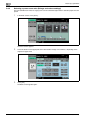
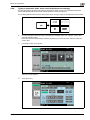
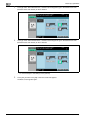

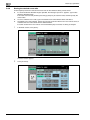
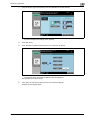

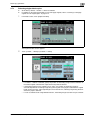


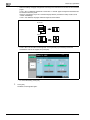


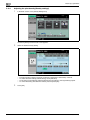
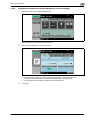


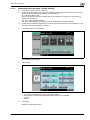
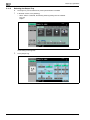


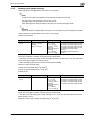
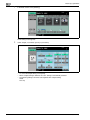
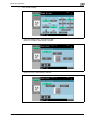
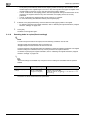


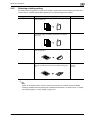


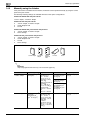
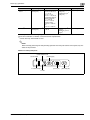


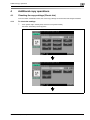
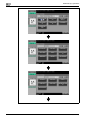
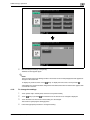

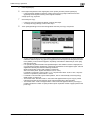

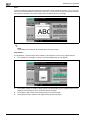
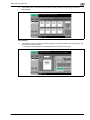


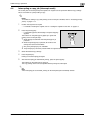


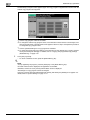
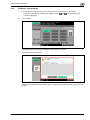


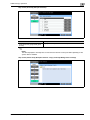


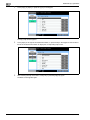
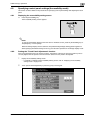
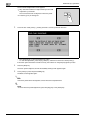
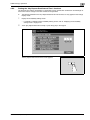

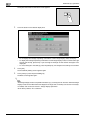


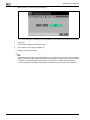

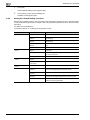
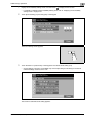
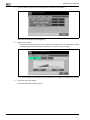
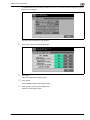


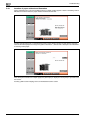

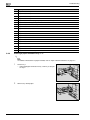


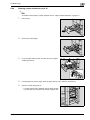
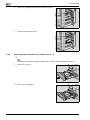
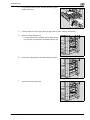
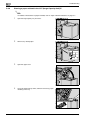


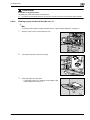
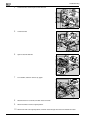
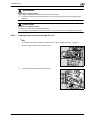


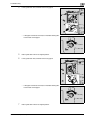

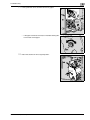

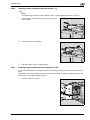

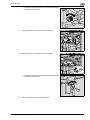
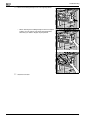
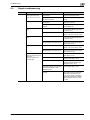
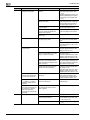


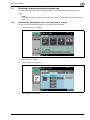

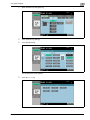
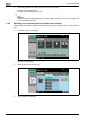

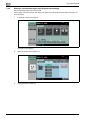

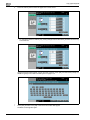


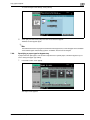
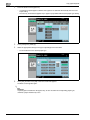

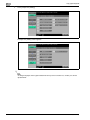
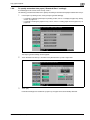


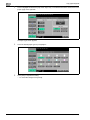
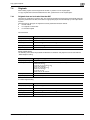


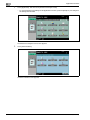


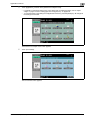
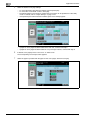
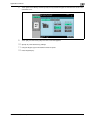

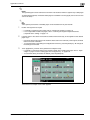
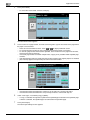
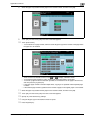
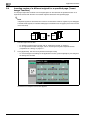
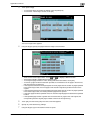
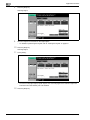
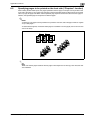

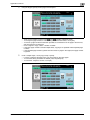
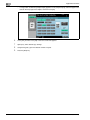


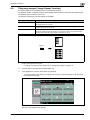


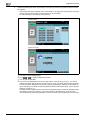
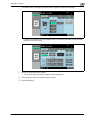
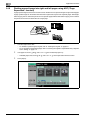


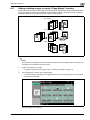
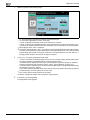

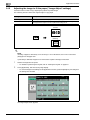
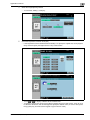

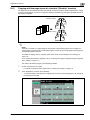


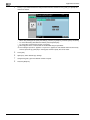


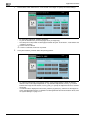
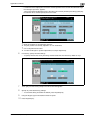
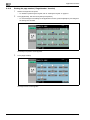

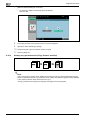

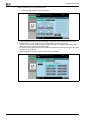


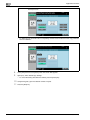
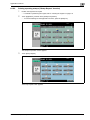


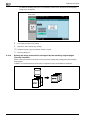
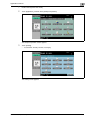

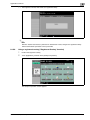

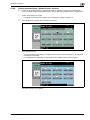
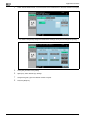

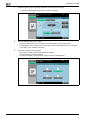


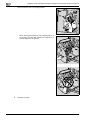

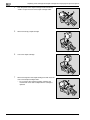
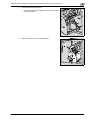
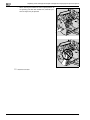
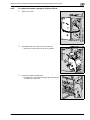
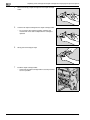

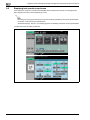


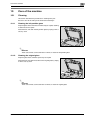


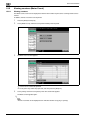
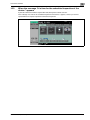


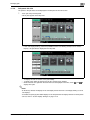
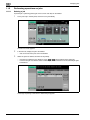
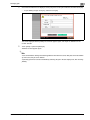

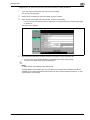


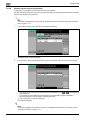


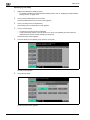


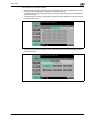


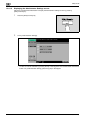
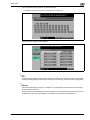
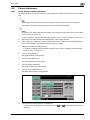
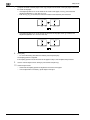

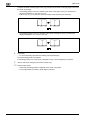
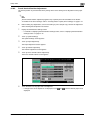


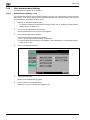

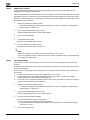
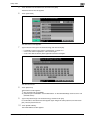
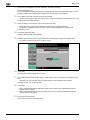


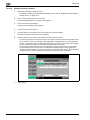


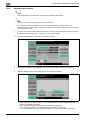

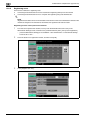
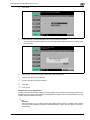


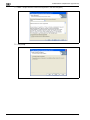


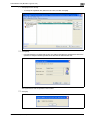
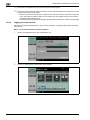

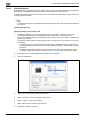

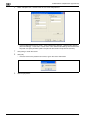


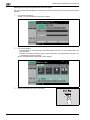
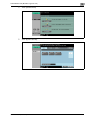


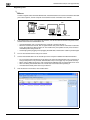
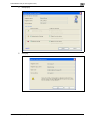


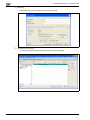
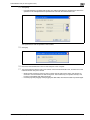


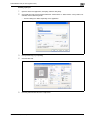


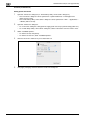

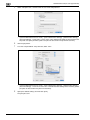
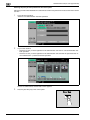


![User's Guide [Print Operations]](http://vs1.manualzilla.com/store/data/006865851_1-707f03be75ff1c81e6e96aa922adf3d2-150x150.png)