1
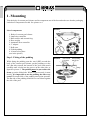
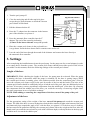
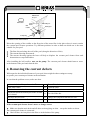
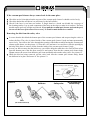
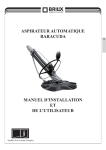
EN
AUTOMATIC BARACUDA VACUUM
POOL CLEANER
INSTALLATION
AND
USER GUIDE
i
Please, carefully read the instruction
EN
1. Mounting
Take the body of vacuum pool cleaner and its components out of the box and make sure that the packaging
includes all components needed. See picture no.1
Picture 1
List of components:
1.
1. Body of vacuum pool cleaner
2. Immersion controller
3. Ball rectifier and external ring
4. Hose weight
5. Automatic flow controller
6. 2” adapter
7. Defl ector
8. Folded padding
9. 10 metres long hose
(not in the picture)
3.
5.
2.
4.
6.
7.
Step 1. Fitting of the padding
Picture 2
While fitting the padding, turn the word „UP” towards the
body of the vacuum pool cleaner, put the padding over the
disc (flat side towards the bottom of the pool) and stretch
carefully until it locks into the groove on the other side, as
figured in picture 2. The padding must be put on flat side
down, up on the folded side. When it‘s put correctly, it turns
loosely. It is impossible to use the padding the other way
round. Elevated folds of the padding must point upwards.
The flat side of the padding should be reversed down against
the side of the pool.
2
8.
The main body
of the vacuum
pool cleaner
Folded padding
in the groove
Flange
Diaphragm
cleaner
EN
Step 1. Connect the deflector
Picture 3
Insert the bottom end of the segment into the groove on
the body of the vacuum pool cleaner Insert the top end
of the segment into the detaining clip adjusted to the
nosepiece. See picture 3.
De
t
n
te
Step 2. Connect the immersion controller
Picture 4
Fix the immersion controller into the bottom adjusting
sleeve of the U shape. Make sure that the protective
detaining latch on both sides of the immersion controller
are in the position „locking”. See picture 4.
Terminal
latch
Flat
latch
Folded padding
in the groove
Flat latch
Step 3. Fastem the weights on the hose and
fit it together.
TABLE
The hose of the vacuum pool cleaner is delivered in
components that must be assembled. You will need
as many components to reach the furthest part of
the pool from the point of the connection of the vacuum
pool cleaner, plus one additional piece. You will also
have to add the weights into the hose for the reason
that the hose is not floating on the water level.
The maximum weights required is assigned according
to the maximum depth of the pool. The deeper the pool
is, the more weights you will need. The number of weights
suitable for your pool is explained in the Table.
3
Depth of the pool
Setting of the weights
120 cm or less
1 weight: 10 to 30 cm
from the nosepiece
More than 120 cm
but less than 210 cm
2 weights: the first one 10 to 30 cm
and the second one 182 cm from
the nosepiece
more than 210 cm,
but less than 365 cm
3 weights: the first one 10 to 30 cm,
and the second one 182 cm
and the third one 305 cm from
the nosepiece
More than 365 cm
4 weights: the first 10 to 30 cm,
the second 182 cm, the third 305 cm
and the fourth 365 cm from
the nosepiece
EN
Wet slightly both ends in the pool and stick them together by
turning. See picture 5. Repeat the process until you put together
the amount of components required. When you stick the weight
into the hose, according the instruction in the Table A, connect
the hose to the vacuum pool cleaner. See picture 6.
Picture 5
Ending „socket”
Ending „plug”
One component has two „socket” endings and the hose protector. This component should be
assembled last and should be installed to the vacuum pool cleaner connection.
Assembled vacuum pool cleaner should look like as follows:
Picture 6
NOTE: The lenght of the hose in the picture
is not life size. You will need more
components than is shown in the picture.
Ending „socket” beside components „plug”/„drawer”
10-30 cm
182 cm
305 cm
The weight on the hose
Component „drawer”/„drawer”
2. Installation
The vacuum pool cleaner is assessed for the use in many different kinds of pools, consequently it compounds
a wide rank of different components (e.g. 2” adapter and the valve-cover for automatic flow controller).
Your need of these components depend on concrete parameters of your pool.
This guide describes the standard installation to the skimmer and appropriate installation to the hypotonic pipeline.
Read up both situations to find out the most suitable solution for your pool and follow the instructions.
Standard installation
Picture 7
Pools with one skimmer through the use of automatic flow
controller. The advantage of this installation is the automatic
flow controller automatically balances the flow between
the skimmer and the vacuum pool cleaner. We strongly
recommend to use the automatic flow controller to ensure
maximum safety and effort of the vacuum pool cleaner. The
valve automatically reacts to the changes of the flow by
which means ensures changes in the effort of the vacuum
pool cleaner necessary for providing required detergent
effect.
4
To fit the hose to this ending
Automatic flow
controller
2” adapter
Insert into
the bottom of the skimmer
EN
1. Turn the pool pump off.
Picture 8
Top part of the skimmer
2. Close the main plug and all other tap-hole pipes
except the pipe from skimmer to which the vacuum
pool cleaner will be fitted.
3. Pull the skimmer basket off.
4. Press the 2” adapter into the connector in the bottom
part of the skimmer, see picture 8.
5. Press the automatic flow controller into the 2”
adapter. The end of the controller indicating
„Connect To the hose to this end” must point upwards.
The hose led
through
the opening of
the skimmer
Connect
the hose
to this
end
Automatic
flow
controller
2” adapter
6. Place the vacuum pool cleaner in the pool and leave
it to go down. Insert the hose down until it contains water and no air.
7. Lace the end of the hose through the mouth of the skimmer and connect the hose directly to
the automatic flow controller.
3. Settings
After completing the installationm activate the pool pump. Let the pump run for several minutes in order
to to empty the air from the system. The vacuum pool cleaner should proceed the speed of 240-360 cm
per minute. In this moment, check the following settings of the vacuum pool cleaner.
Lenght of the hose
IMPORTANT: While checking the lenght of the hose, the pump must be activated. When the pump
is running, the hose is shortened, while the pump is switched off, the hose is getting longer. While
the vacuum pool cleaner is running, place it the furthest possible from the connection point. (You can
move the vacuum pool cleaner easily in the pool by means of the bar and the brush.) The hose of the
vacuum pool cleaner should be sufficiently long to reach the end of the pool, plus one additional piece of
the hose. If necessary, remove superfluous components from the middle part of the hose. By removing
the components from the middle part of the hose, you avoid the necessity of removing weights. Store
the extra components in case of possible exchange.
NOTE: While adding or removing the components of the hose, turn off the pump of the pool.
Adjustment of the hose
For the appropriate setting of the weight of the hose, turn off the pump and watch the vacuum pool
cleaner. The load of the hose is correct at that time when the disc remains straight at the bottom of the pool
and immersed pipes contain the angle of 45° with the floor, see picture 9. For the best way of cleaning,
the hose must not be pulled nor lifted by the vacuum pool cleaner. Move the weight on the hose after one
thumb, until you reach the correct load. In pools with a different depth, set firstly the hose in the deep part
and then move it towards the shallow part.
5
EN
Check if the immersion mechanism moves loosely and if the immersed controller is installed.
(See the page 2 – how to install the immersion controller.)
Shorten the deflector by 1,27 cm (Pull up the top end of the deflector from the detent clamp
conncected to the nosepiece. Shorten it by 1,27 cm, then put it back into the detaining clamp.)
Picture 9
1. The hose is too light
2. Controller load
of the hose
3. The hose is too heavy
The hose is too light. If the hose goes up towards the surface at an angle bigger than 45º, move
the weight closer to the vacuum pool cleaner or move the first two weights together closely.
2. The correct load of the hose.
3 The hose is too heavy. If the hose is dropping at an angle smaller than 45º, move the weight
in the direction from the vacuum pool cleaner or move the first two weights further from each
other.
1.
IMPORTANT: Backwater may act under the pressure on the hose of the vacuum pool cleaner and thus
influence its delivery. It may displace the vacuum pool cleaner from the end of the pool where the return
pipe is placed, or may cause that the vacuum pool cleaner will remain only in one part of the pool. To avoid
this, use the spherical rectifier belonging to your vacuum pool cleaner.
Installation:
At first, make sure that the pump of the pool is turned off.
Replace the original rectifier of the vacuum pool cleaner by the ball rectifier.
Change the security ring and tighten it. Make sure that the opening of the ball rectifier is properly
directed before the complete tightening. See “Locations of the ball rectifier”.
6
EN
Picture 10
Walk around
the pool
Ball rectifier
Connector
holder
Wall of the pool
Ball
rectifier
Return pipes
Security ring
Locations of the ball rectifier
Direct the opening of the rectifier to the diversion of the water flow in the place where it won‘t restrain
the vacuum pool cleaner operations. Try different positions in order to find out which one is the most
suitable for your pool:
The flow directed along the wall of the pool (along the direction of tiles).
The current directing downwards.
The current directing against the hose will help to displace the vacuum pool cleaner from such
obstructions as steps and ladders.
After installing the ball rectifier, turn on the pump. The vacuum pool cleaner should start to move
at the bottom of the pool and clean the dirt.
4. Removing the current defects
With regard to the individual features of your pool, there might be other settings necessary
to operate your vacuum pool cleaner at the maximum.
In case that the problem occurs, make sure that:
Is the main drain of the pool turned off?
»»
Turn off the drain.
Is the filter clean?
»»
Clean the filter.
Is the basket sieve clean?
»»
Clean the basket sieve.
Did the dirt block the bottom part of the vacuum
pool cleaner?
»»
Get rid off the dirt.
The hose does not seal?
»»
Change the component that doesn’t seal.
Is the dirt in the automatic flow controller?
»»
Cleane the valve.
If the vacuum pool cleaner doesn’t move or change course:
Make sure that the main drain and all other suction piping are shut – except the intake to whom
the vacuum pool cleaner is connected.
Check if there isn’t any dirt in the filter or in the basket of the pump.
7
EN
Make sure there isn’t any dirt in the safety valve of the vacuum pool cleaner. It should restrain
the operation or the flow.
The pump and the filtration system of the pool might be too small (not able to ensure the flow of
4,5m3/h) Consult the expert in pools.
If the vacuum pool cleaner remains at one part of the pool
Check the backwater and divert it as necessary by the ball rectifier.
Check that the hose is sufficiently long and reach the bottom of the pool.
Check that the hose is properly loaded.
If the vacuum pool cleaner stops on the main drain
Check that the main drain is shut. You might need a special help from an expert in pools.
Make sure that the grill is installed on the main drain.
If the main drain is not at the same levele as the bottom part of the pool, consult an expert in
pools.
If the vacuum pool cleaner slows down or stops and there are air bubbles in return pipe
Find and fix the air leak causing the defection on pump’s delivery.
Check if the hose doesn’t run out.
Check the hypotonic connection. It should be immersed in order not to take any air in the system.
Check if the cover of the pump’s basket is not loose, cracked, worn or missing the O-rings. If you
need help, consult an expert in pools.
If the vacuum pool cleaner draws air or remains on the surface
Make sure that the immersion mechanism moves freely and that the immersion controller is
installed. (See picture 4 – how to install the immersion controller.)
Check if the automatic regulating valve is properly installed. Make sure it isn’t blocked with
the dirt.
Make sure that the water level is at least 8 cm under the edge of the pool.
Check if the vacuum pool cleaner moves in an appropriate speed 240-360 cm per minute.
If the vacuum pool cleaner remains by the stairs on the shallow end
Check the backwater and divert it in required direction by the means of the ball rectifier.
Check if the automatic regulating valve is properly installed. Make sure it isn’t blocked with
the dirt.
Check if the hose is long enough to reach the furtest point of the pool including the stairs.
Check if the hose has appropriate load for the shallow end of the pool.
Check if the vacuum pool cleaner moves in an appropriate speed 240-360 cm per minute.
8
EN
If the vacuum pool cleaner always comes back in the same place
Check the swivel joint placed on the top part of the vacuum pool cleaner. It should revolve freely.
Check the backwater and divert it as necessary by the ball rectifier.
Check if the hose is not bent nor broken. A single bend or a break can disable the coverage of
the cleaning surface. Lay up each component of the hose on the edge (or other level surface). The hose
should remain perfectly straight and smooth. If you pull the vacuum pool cleaner up from the pool,
do not roll the hose up because of its recovery. It would remain bended or cranked.
Removing the dirt from the safety valve
It occurs that the dirt block the bottom part of the vacuum pool cleaner and stop moving the valve or
reduce the flow. The valve is placed inside of the vacuum pool cleaner’s body and must permanently
move freely. You will see the valve through the opening of the deflector while turning the vacuum pool
cleaner upside down, see the picture 11. Seize the valve and move it to and fro or rinse the opening by
the help of the hose to remove all dirt from the inside of the vacuum pool cleaner’s body.
In case you fail to remove the dirt in this way, you will be obliged to undo the valve. Pull off four valves
from the bottom part of the disc first, unscrew it and remove from the the vacuum pool cleaner body.
Thanm remove the screw from deflector, pull it out and finally take out the safety valve. See picture 12.
While the dirt has being removed, put the valve back into the vacuum pool cleaner body, fasten
the deflector in its place and secure it. See picture 12.
Picture 11
Look on the vacuum pool cleaner from bellow
Bottom
of the disc
Latch
is inside
Deflector
Folded padding
Picture 12
Deflector
Disc
(no need to remove it)
9
Safety valve
The vacuum pool
cleaner body
EN
Maintenance
The vacuum pool cleaner does not require almost any maintenance. Look over it time to time and make
sure that:
The safety valve moves freely and there is no dirt preventing this move.
The disc is not too worn. If the disc is used after moving at the bottom of the pool, this is the right time
to change it.
While storing the vacuum pool cleaner, do not roll up the hose. Leave it remaining straight on
the sheltered place protected against the direct sun. When you disconnect the parts of the hose, try to leave
the weight in place.
The vacuum pool cleaner hose is specially designed in order to ensure the optimal efficiency of the vacuum
pool cleaner. In case you need to change it, use only original parts.
Denial of responsibility for your pool and vacuum pool cleaner
Your pool life is influenced by many factors. Automatic vacuum pool cleaner is a passive
product that won’t have any influence on the pool life.
Pleasem be aware of damages, change of colours and peeling off the paint over time caused independently
or combined with ageing, water texture imbalance, incorrect installation or other factors. Automatic
vacuum pool cleaner will not remove nor cause wear-out of the solid pool tiling. In fact, the pool tiling
will eventually cause the wear-out of the vacuum pool cleaner.
The same is valid for vinyl tiling for embedded pools because the vinyl surface is also influenced by its
surroundings and factors (chemistry of water, insulation and construction supporting walls quality and
the pool bases. All these factors may contribute to the damage of the pool surface. In case, this situation
occurs, please, bear in mind that it isn’t caused by the vacuum pool cleaner. The producer refuses all
responsability for reparation or exchange for every from the pool components of the customer.
The pool owner must assume the responsability for the condition and maintenance of the pool surface,
water and edges of the pool.
10
EN
List of components:
S250B
S250Q
S250M
S250C
S250G
S250W
S250L
S250A
S250T
S250N
S250F
S250K
S250H
S250I
11
S250R
EN
Conditions of guarantee
Conditions of guarantee abide by the trading and guarantee conditions of your supplier.
Secure disposal of the product after the lifetime expiry
After the lifetime expiry, ensure its ecologic disposal by a skilled company
Complaints and customer service
Complaints abide appropriate consumer protection rights. In the event of unrecoverable effect
address the written complaint to your supplier.
Date................................................................
Supplier
12