1
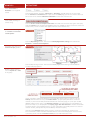
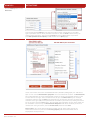
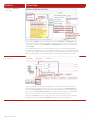
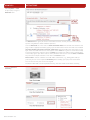
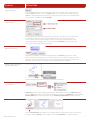
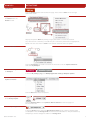
QUICK USER GUIDE
FOR MORE TRAINING MATERIALS VISIT:
www.reaxys.com/info/welcome-pack
HOW DO I…
INSTRUCTIONS
Register for a password.
Click the Register button in the upper right part of the screen.
Change password.
Click the My Settings button. Then click the Change Password link.
Find out about tested
environments involving
Windows, Mac, and Java.
Click the About Reaxys link located at the bottom of the Query page.
Find information about
the databases included in
a Reaxys search.
Click on one of the hyperlinks towards the top of the Query page to display the info sites
for those databases.
Select a Structure Editor.
Click the Structure Editor button located in the lower right side of the structure box on the
Query page. Click the structure box to open the Structure Editor. If you are on the Start page,
you will first have to click the box on the far left labeled Substances/Reactions to open the
structure box.
Use these external
structure editors:
– Accelrys ISIS/Draw
– ChemDraw
– Accelrys/Draw
– ICEdit
– CrossFire SE
1. Install the external structure editor.
2.Download the Reaxys Structure Editor Plug-in from
http://www.reaxys.com/info/support_downloads and install it.
Download ChemDraw/Reaxys Plug-in:
http://scistore.cambridgesoft.com/ScistoreProductPage.aspx?ItemID=5943 and install.)
Download the ICEdit/Reaxys Plug-in from
http://www.infochem.de/content/downloads/iceditinreaxys.pdf)
3.Click the My Settings button. Then click the Modify Application Settings link, select your
structure editor and click Save.
HOW YOU THINK HOW YOU WORK
HOW DO I…
Select Substances or
Reactions as the type of
search.
Create a structure from a
name CAS#, InChIkey, or
smiles string.
INSTRUCTIONS
Click the approptiate selection, Substances or Reactions, located above the structure box
on the Standard and Advanced tab. If you are on the Start page, you will first have to click the
box on the far left labeled Substances/Reactions to view the structure box.
Click the Create structure template from name link under the Structure box, type in the query
and click Submit. (Use the operator dropdown menu, if needed). If several structures share the
same name, a list of structures will appear with the most relevant first.
Customize the settings
for reaction or substance
search options.
Click the My Settings button. Then click the Modify Application Settings link and look for
Reaction or Structure Search Options.
Customize the settings for
structure display options.
Click the My Settings button. Then click the Modify Application Settings link and look for
Structure Display Options.
Display a form so that I
can use keywords or data
in my query.
Select a category and click to display the corresponding form. Type in a query or use the
Lookup table to select an entry. Click Add to Form if: 1). your query contains a structure/
reaction, 2). You have already entered some data on the Query page, or 3). You plan to add
additional data to your query. Click Replace & Search if you had previously entered data in a
particular field (i.e., it is displayed on the Query page). Click Add &Search if the data entered on
the form contains your complete query, i.e., your query does not already contain a structure/
reaction or data, and you do not plan to add any more to the query.
Searching the Literature fields together with a structure or reaction will retrieve a list
of all substances and all reactions from documents that fit the bibliographic search criteria.
If, instead, you wish to do a Literature search you can find information here.
QUICK USER GUIDE • 2013
2
HOW DO I…
INSTRUCTIONS
Use the Lookup tables in the
Data forms.
Click the appropriate Lookup link to open the index to select specific data. In the index,
type in your data. Click to select your data from the list. Use the Shift and Control keys to
make multiple selections. Then click the Transfer button to add the data to your form.
Click Add Specified Fields to Query to add the data to the Query page.
Customize a Data form.
Select a form from the buttons labeled Identification, Reaction, Bibliographic, etc. and click to
open it. Then click the Add/Remove properties link at the bottom of the form. The Add/Remove
box is displayed with all of the available fields shown on the left and the fields chosen in your
current form on the right. Select a field from the left (use the Shift or Ctrl keys for multiple
selections) and then click the Add button (between the left and right columns) to move your
selection to the right. (Adjust the placement of the fields in your new list by clicking the arrows
on the far right). Click the Save button. The new fields will now appear on your form. Fields can
be removed in a similar way: click Add/Remove Properties and select the fields you want to
remove from the right column, click the middle arrow, and then click Save.
Please note: If you cannot find the field you need on the left, begin typing part of the
field name into the entry box next to Find any property and the relevant fields will be
displayed at the top of the list.
QUICK USER GUIDE • 2013
3
HOW DO I…
INSTRUCTIONS
Customize a Data form
(continued).
Many fields in Reaxys have been mapped to fields in PubChem and eMolecules and
those results appear automatically when you do a substance search. There are also
many fields that are unique to PubChem and eMolecules that can be searched from
within Reaxys.
For example eMolecules has a unique field for the parent compound identification.
This field can be added to your customized form. Notice that in the example above you
can hover over a hyperlink on the right side to see which databases contain that field.
When the field appears in only one database, the name of the database is shown.
Save a Data Form
for future use.
Select the appropriate radio button (Reactions, Substances, Literature). Select the
desired fields by clicking any of the buttons on the bottom of the Standard tab and
then clicking Add to form near each field. If a field you need does not already appear
on the form, click Add/Remove fields (see above), and then select the needed fields.
You can mix fields from any of the categories (Physical, Identification, etc.).
Then click the Save button in the top right corner to save the form to your computer.
Retrieve the form by clicking the Import button (next to the Save button.)
QUICK USER GUIDE • 2013
4
HOW DO I…
INSTRUCTIONS
Add a keyword or data
to your query using the
Advanced form.
The Advanced form gives you access to the data structure so that you can create complex
queries using different fields and data operators.
Click the Advanced tab. Then click the Show Searchable Fields link towards the bottom of the
page. Find the appropriate field by typing a partial field name into the box under the words If
you don’t know the field code search for a topic here. Relevent field names will appear as you
type. Select the field from the list that appears. Select exists for a general search of that field,
or click the field name and then click the Lookup link to open the index to select specific data.
In the index, type in your data. Click to select your data from the list. Use the Shift and Control
keys to make multiple selections. Then click the Transfer button.
Please note: If several subfields are listed under a field name, e. g., boiling point and b.p.
pressure, you can use the operator Proximity when building your query with these fields.
This will ensure that your results are aligned.
The Basic Index fields are for keyword searching. The other fields are for data searching.
Perform Literature
Searching.
QUICK USER GUIDE • 2013
5
HOW DO I…
INSTRUCTIONS
Perform Literature
Searching (continued).
To find a list of specific citations with their associated substances and reactions
(if any), do any of the following:
• Click the Literature picture on the Start page to open the default Literature form.
•Click the Literature radio button on the Standard tab and then click the Literature
button at the bottom to open the default Literature form.
•Click the Literature radio button on the Advanced tab and then click the Show
Searchable Fields link at the bottom of the page. Scroll to bibliographic Data.
Use the field at the top of the page on the default Literature form to find keywords
or phrases that may be contained in titles, abstracts, or author names. Use wildcards (*)
and operators like and, or, near (within a few words), and next (adjacent words).
Use the Lookup link next to each field to search the index.
Click here for information on using the Advanced tab.
Please Note: Clicking the Substances or Reactions radio button will allow for
bibliographic searching, but the results will be structure/ reaction lists with their
associated citations and most likely will include additional citations that were
not in your query.
Save a query.
Click the Save button in the upper right corner of the Query tab.
Set the number
of hits per page.
Click the My Settings button. Then click the Modify Application Settings link.
To temporarily change the number of hits per page, select the appropriate number
from the drop-down menu in the lower left side of the Results page.
Change the structure
and text highlight colors.
Click the My Settings button. Then click the Modify Application Settings link.
Change the size of
substances or reactions.
Use the zoom buttons on the toolbar on the results page.
Show/Hide reaction
or Substance details.
Click the appropriate button on the tool bar on the results page..
Generate a list of
associated reactions from
a substance list.
From the Substances (Table) results tab, select the link for All Preps (substances
in the list are products in the reactions) or All Reactions (substances in the list
can be products or reactants).
Limit results to
specific hits.
Click the check-boxes (left side of hit) to select the hits, and then click the
Limit to Selection button.
QUICK USER GUIDE • 2013
6
HOW DO I…
INSTRUCTIONS
Limit results to hits with
specific properties.
Find the appropriate filter on the left side of the results screen, select properties and
click the Limit to button. If the word more appears at the bottom of the filter, click the
more link and specify property data in the pop-up box. After filtering, the available data
for the hit will include a link called Hit Data.
Limit results to a
specific author.
Some filters give you the choice of entering the value or selecting the value from a list.
For example, to filter by author, find the appropriate filter on the left side of the
results screen, click to select author(s). If the list is very long, clicking the more link
will not display the complete list. In this case, click the By Value tab in the filter and
type in the sname (wildcards can be used).
View the results from
different databases.
By default, the Reaxys results will be displayed on the Results page. You can hover
over the tab for other databases to see the number of results and then click the tab to
view the results from within Reaxys. If no results were found in Reaxys, the tab for the
database with the largest number of hits will automatically be selected.
View a single substance in
multiple data-bases.
Click the Reaxys logo under a structure and select a database.
View supplier availability
and pricing info.
eMolecules pricing and availability information is displayed by clicking the eMolecules tab.
Click the flask icon under a substance to find options for linking to eMolecules, a free website,
Accelrys ACD database (requires a license), and CambridgeSoft’s ACX (requires a license).
Create an Alert.
Click the Create Alert link under the first breadcrumb in the upper left corner of the results
screen or click the History button and then click the Create Alert link under the query.
QUICK USER GUIDE • 2013
7
HOW DO I…
INSTRUCTIONS
Save Results.
Click the History button from the Results page. Then click the Store link on the right
side of the screen.
Copy a substance
or reaction from the
Results screen.
Display the Options Menu by clicking the grey box below a substance (or below
any substance in a reaction), or click directly on a substance, and select the appropriate
option. You can also click the arrow in the reaction and then select an option.
Start an AutoPlan.
Click the Synthesize link under a structure in the results or in the Synthesis Planner
and select by Autoplan.
Select the settings
for Autoplan.
From the My Settings page, click Modify Application Settings>Autoplan options.
Close tabs in the
Synthesis Planner.
Click the Close X to reveal the options.
Copy a synthesis plan
to the Reaxys Report.
Click the Report button on the Synthesis Planner tool bar or click the page curl
on one of the tabs.
Filter using histograms.
From the Results page, select the Open Analysis View button. Select a category from
the dropdown menu of Histogram A and then click the desired bins. Analyze the data by
comparing it to other categories and bins in Histogram B.
QUICK USER GUIDE • 2013
8
HOW DO I…
INSTRUCTIONS
Select specific
details to copy to the
Reaxys Report.
To select a detail, look for a page curl image as you hover over details. Click the page
curl to see the options specific to that detail and click to select.
Select a whole list of
details to copy to the
Reaxys Report.
A whole list of facts can be copied by clicking the header on the list of facts.
View your selected
facts in the Report.
After making your selections, click the Report button on the button bar to open your
Reaxys Report.
Add notes to selected
facts in the Report.
Click the Annotation link on the upper right side of an item to add notes to the selected fact.
Display the structure for a
selected fact in the Report.
Click the Show Substance link to display the substance that goes with the
selected fact. The substance will display even though it was not selected with the fact
on the results page.
Regroup selected facts
in the Reaxys Report.
Click the Regroup button to reconstruct your report by collecting individual items that were
derived from the same record and combining them into one item.
Email the selected facts
to a colleague.
Click the Send button to email your comments to colleagues along with your
Reaxys Report as an attachment to an email.
Export.
Click the Output button and select from several options.
Start a Synthesis Plan.
Click the Synthesize link below a substance to start a plan using that substance. Alternatively,
you can click the Synthesis Plans button from the button bar and then click the New button in
the upper left side of the screen to begin a search from within the Synthesis Planner.
Link to external docs.
Links to Title/Abstract, Full Text, and View Citing Articles appear with references
when available.
QUICK USER GUIDE • 2013
9
TOPIC
PAGE
Register for a password.
1
Change password.
1
Find out about tested environments involving Windows, Mac, and Java.
1
Find information about the databases included in a Reaxys search.
1
Select a Structure Editor.
1
Use these external structure editors:
1
- Accelrys ISIS/Draw
- ChemDraw
- Accelrys Draw
- ICEdit
- CrossFire SE
Select Substances or Reactions as the type of search.
2
Create a structure from a name CAS#, InChIkey, or smiles string.
2
Customize the settings for reaction or substance search options.
2
Customize the settings for structure display options.
2
Display a form so that I can use keywords or data in my query.
2
Use the Lookup tables in the Data forms.
3
Customize a Data form.
Save a Data Form for future use.
4
Add a keyword or data to your query using the Advanced form.
5
Perform Literature Searching.
QUICK USER GUIDE • 2013
3-4
5-6
Save a query.
6
Set the number of hits per page.
6
Change the structure and text highlight colors.
6
Change the size of substances or reactions.
6
Show/Hide reaction or Substance details.
6
Generate a list of associated reactions from a substance list.
6
Limit results to specific hits.
6
Limit results to hits with specific properties.
7
Limit results to a specific author.
7
View the results from different databases.
7
View a single substance in multiple data-bases.
7
View supplier availability and pricing info.
7
Create an Alert.
7
Save Results.
8
Copy a substance or reaction from the Results screen.
8
Start an AutoPlan.
8
Select the settings for Autoplan.
8
10
TOPIC
QUICK USER GUIDE • 2013
PAGE
Close tabs in the Synthesis Planner.
8
Copy a synthesis plan to the Reaxys Report.
8
Filter using histograms.
8
Select specific details to copy to the Reaxys Report.
9
Select a whole list of details to copy to the Reaxys Report.
9
View your selected facts in the Report.
9
Add notes to selected facts in the Report.
9
Display the structure for a selected fact in the Report.
9
Regroup selected facts in the Reaxys Report.
9
Email the selected facts to a colleague.
9
Export.
9
Start a Synthesis Plan.
9
Link to external docs.
9
11
Copyright © 2013 Reed Elsevier Properties SA. All rights reserved. Reaxys® and the Reaxys®
trademark are owned and protected by Reed Elsevier Properties SA. All rights reserved.