1
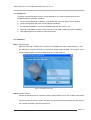
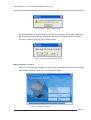
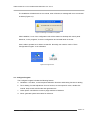
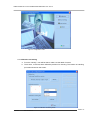
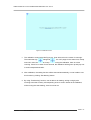
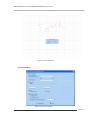
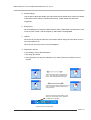
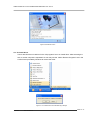
USER GUIDE
DRIVER AND TOOL OF TOUCH SCREEN
USER GUIDE OF TOUCH SCREEN DRIVER AND TOOL Ver2.2
CONTENT
1.0. Induction -----------------------------------------------------------------------------2
2.0. Installation ---------------------------------------------------------------------------2
3.0. Configure Program -----------------------------------------------------------------5
3.1 Calibration and testing ---------------------------------------------------------6
3.2 Touch setting ---------------------------------------------------------------------8
3.3 Other options ------------------------------------------------------------------- 10
3.4 About --------------------------------------------------------------------------- 10
4.0. Un-install driver ------------------------------------------------------------------ 11
5.0. Other features --------------------------------------------------------------------- 12
5.1 Language ----------------------------------------------------------------------- 12
5.2 Rotation ------------------------------------------------------------------------ 12
Doc ID:
Doc Version:1.0
PAGE 2/ 12
USER GUIDE OF TOUCH SCREEN DRIVER AND TOOL Ver2.2
1.0. Introduction
This driver and tool is design for touch screen application. To provide complete functions and
simplified operation methods, it features:
a. Work on whole MS Windows platform, from Win98, ME, 2000, XP, XP64, Vista, to Vista64
b. Support 8 languages and match the language automatically.
c.
Provide silent installation, very short installation step and time, easy to use
d. With high compatibility and less conflict; Will not occupy USB or RS232 port after installation
e. With digital signature and ready for Vista requirement
2.0. Installation
Step 1. Setup Program
When the driver CD is inserted into computer, the installation tool will run automatically. Or, Find
the “Setup.exe” program in directory of touch driver, double click to execute. The screen of “Touch
Screen Setup Program” showed as below (Figure 2-1), will come out.
Figure 2-1 Installation main menu
Step 2. Product Options
Choose the interface of touch controller. It will be USB or RS232. Then, click “Install” to start setup.
If there is a previous version, system will detect and show the warning message as below (Figure
2-2). Please uninstall the previous version first.
Doc ID:
Doc Version:1.0
PAGE 3/ 12
USER GUIDE OF TOUCH SCREEN DRIVER AND TOOL Ver2.2
Figure 2-2 Warning message of previous version
The system will detect hardware connection as well. If the controller is not plugged in USB port or
the connection is not done properly. The warning will come out as below (Figure 2-3). Please
check the connection, then click “OK” to continue setup.
Figure 2-3 Warning message of hardware missing
Step 3. Installation progression
If there is no error detected by system, the driver will be installed silently. There will be a counting
bar showed on the button of the “Touch Screen Setup Program”.
Figure 2-4 Installation is progressing
Doc ID:
Doc Version:1.0
PAGE 4/ 12
USER GUIDE OF TOUCH SCREEN DRIVER AND TOOL Ver2.2
The installation will take less than one minute, when it finishes; a message will come out showed
as below (Figure 2-5):
Figure 2-5 Message of installation completed
After installation, icons of the configuration tool will be created on desktop and control panel.
Moreover, in the “programs”, there are configuration and uninstall tools on the bar.
User is able to operate touch without re-start PC. Normally, user need to use the “Touch
Configuration Program” to do calibration.
Figure 2-6 Program Icons
3.0. Configure Program
The Configure Program includes the following feature:
a. Calibration : Provide 5, 16 and 25 points calibration functions and drawing function for testing.
b. Touch Setting: Provide adjustment of touch function, such as speed of cursor, double click
interval, beep sound, left off mode and right button etc.
c.
Other options: simulate the mouse to popup task bar of Windows
d. About: generate system information for reference.
Doc ID:
Doc Version:1.0
PAGE 5/ 12
USER GUIDE OF TOUCH SCREEN DRIVER AND TOOL Ver2.2
Figure 3-1 configuration screen
3.1. Calibration and testing
a. From the “Identify”, user will be able to make sure the detail of screen.
b. There are 5, 16 and 25, three calibration precision for choosing. The location of matching
point also showed on the screen.
Figure 3-2 calibration and testing screen
Doc ID:
Doc Version:1.0
PAGE 6/ 12
USER GUIDE OF TOUCH SCREEN DRIVER AND TOOL Ver2.2
Figure 3-3 Calibration screen
c.
The calibration screen looks like Figure 3-3. User will touch on the center of cross sign.
Then waits the sign
changed to
, the “OK” popup. At the same time, if beep
sound is in used, there will be a beep. While running the calibration, there is a timer
counting. If there is no action for 30 seconds, the calibration will be given up and jump out
to avoid unexpected situation.
d. After calibration, the testing function will be executed automatically, or user is able to use
this function by clicking “Test drawing” button.
e. By using “Test drawing” function, user is able to do drawing, writing or single point
touching to test the accuracy and responding of touch screen. Same as the calibration,
while running the “test drawing”, there is a timer too.
Doc ID:
Doc Version:1.0
PAGE 7/ 12
USER GUIDE OF TOUCH SCREEN DRIVER AND TOOL Ver2.2
Figure 3-4 drawing test screen
3.2. Touch setting
Figure 3-5 Menu of Touch setting
Doc ID:
Doc Version:1.0
PAGE 8/ 12
USER GUIDE OF TOUCH SCREEN DRIVER AND TOOL Ver2.2
a. Mouse settings
User is able to adjust the double click interval and mouse speed which values are related
to Windows Control Panel. For better performance, a slow double click interval is
suggested.
b. Beep sound
When the Beep box is ticked, the beep sound is active. While there is a beep sound, user
touch the touch screen. And the Frequency and Duration are adjustable.
c.
Options
When the Lift off mode is ticked, the click reaction will be change to active after un-touch
from active after touch.
When Cursor off is ticked, the cursor will disappear.
d. Right button options
In this catalog, user is able to decide to
z
Not using right button,
z
Use right button as using the notification icon, there will be icon created for user to
operate.
The touch will be swap to right button for
once. After touching, it will swap back
unless user click the mouse icon again
The touch will be swap to right button all the
time. Unless user click the mouse icon to
change to back
When user close the small window of the
swap icon, there will be a icon created on
the task bar for operation
Figure 3-6 Icons for right button
Doc ID:
Doc Version:1.0
PAGE 9/ 12
USER GUIDE OF TOUCH SCREEN DRIVER AND TOOL Ver2.2
z
Simulated by touch down period: When user touch the panel for the pre-set period long,
the right button function will turn up after un-touching.
3.3. Other options
One function, Edge compensation, is provided in “Other option”. It simulates that user use a
mouse moving the edge to popup the hidden task bar. User is able to select the four edges to
set up the function. When user touch the selected edge about 5mm to the boarder, driver will
let the cursor get to boarder dramatically to the effect.
Figure 3-7 Edge compensation screen
3.4. About
When “About” is opened, there is information about hardware and software is collected to
understand the platform easier and make maintenance simpler.
Doc ID:
Doc Version:1.0
PAGE 10/ 12
USER GUIDE OF TOUCH SCREEN DRIVER AND TOOL Ver2.2
Figure 3-8 the About screen
4.0. Un-install driver
User is able find the un-install tool in the “All programs” bar to un-install driver. After executing the
tool, to re-start computer is requested. Or user may use the “Add or Remove Programs” tool in the
Control Panel provided by Windows to remove the driver.
Figure 4-1 Un-install screen and rebootwarning message
Doc ID:
Doc Version:1.0
PAGE 11/ 12
USER GUIDE OF TOUCH SCREEN DRIVER AND TOOL Ver2.2
5.0. Others Features
5.1. Language
Driver supports Chinese (Traditional and Simplified), English, Japanese, Korean, French,
German, Italian currently. Driver will match the right language to the Windows System
automatically.
5.2. Rotation
Driver supports rotation function. Touch driver will change the rotation figure according to the
video card status. The rotation function will support depending on the video card, please consult
with the provider.
NOTE
Provider reserves the right to change product or specifications without notice. All
trademark is belong to all origin company.
Doc ID:
Doc Version:1.0
PAGE 12/ 12