1
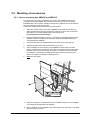
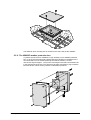
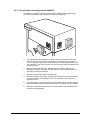
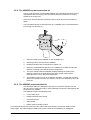
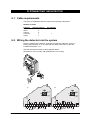
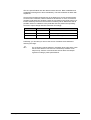
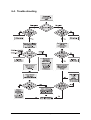
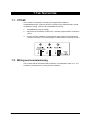
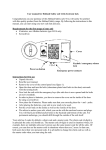
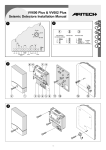
VV600/VV602Plus
Vault Protection System
Planning and Installation
manual
VV600Plus English version
Revision 1A: September 2000
Aritech is a division of InterlogiX B.V.
Copyright
© InterlogiX B.V. 2000. All rights reserved. No part of this publication may be reproduced, transmitted, stored in a retrieval
system, or transmitted in any form, or by any means – electronic, photocopying, recording, or otherwise – without the prior written
permission of InterlogiX B.V.. InterlogiX B.V. reserve the right to change information without notice.
CONTENTS
1.
General information..................................................................................................................... 3
1.1. Application ........................................................................................................................... 3
1.2. Function............................................................................................................................... 4
1.3. Detecting and Testing.......................................................................................................... 4
1.3.1.
The detection function.......................................................................................... 4
1.3.2.
The testing system ............................................................................................... 5
1.4. Features of the System ....................................................................................................... 5
2.
Basic Equipment of the VV600Plus System.............................................................................. 6
2.1. System components ............................................................................................................ 6
3.
Functional description ................................................................................................................ 7
3.1. The VV600Plus standard seismic detector ......................................................................... 7
3.1.1.
Sensor element .................................................................................................... 7
3.1.2.
The integration channel........................................................................................ 7
3.1.3.
The counting channel........................................................................................... 7
3.1.4. The explosion channel............................................................................................... 8
3.1.5. Power supply ............................................................................................................. 8
3.1.6. Sabotage protection .................................................................................................. 8
3.1.7. Alarm-output circuitry................................................................................................. 8
3.2. The VV602Plus ATM seismic detector................................................................................ 9
3.2.1.
Sensor element .................................................................................................... 9
3.2.2.
The low integrating channel ................................................................................. 9
3.2.3.
The high integrating channel................................................................................ 9
3.2.4.
The explosion channel ......................................................................................... 9
3.2.5.
Power supply........................................................................................................ 9
3.2.6.
Sabotage protection ............................................................................................. 9
3.2.7.
Alarm output circuitry ........................................................................................... 9
4.
Planning instructions ................................................................................................................ 10
4.1. Planning limitations............................................................................................................ 10
4.1.1.
Electric motors, transformers, fans, air conditioners.......................................... 10
4.1.2.
Water piping....................................................................................................... 10
4.1.3.
Ultrasound detectors .......................................................................................... 10
4.1.4.
Bells ................................................................................................................... 10
4.1.5.
Human activity.................................................................................................... 10
4.2. Detection range of the VV600/602Plus ............................................................................. 10
4.2.1.
The vault or safe sensitivity test ......................................................................... 11
4.3. Planning a vault protection ................................................................................................ 12
4.4. Planning safe, document cabinet and filing cabinet protection ...................................... 13
4.4.1.
Detectors mounted inside the safe .................................................................... 13
4.4.2.
Detectors mounted on the outside of the safe ................................................... 13
4.4.3.
Filing cabinets .................................................................................................... 14
4.5. Planning the protection of an automatic teller machine (ATM) and a night deposit box 14
4.5.1.
Automatic teller machine.................................................................................... 14
4.5.2.
Night safe deposit box........................................................................................ 15
4.6. Planning guide-lines .......................................................................................................... 15
5.
Installation.................................................................................................................................. 16
5.1. General instructions for system components .................................................................... 16
5.2. Mounting directly onto a steel surface ............................................................................... 16
5.3. Mounting on steel and concrete using a mounting plate ................................................ 17
5.4. The mounting plate VM600P ............................................................................................. 17
5.4.1.
Mounting on concrete......................................................................................... 18
5.4.2.
Mounting plate for welding VM604P .................................................................. 19
5.5. Mounting of accessories.................................................................................................... 20
Planning and Installation manual VV600/VV602Plus
1
5.5.1.
5.5.2.
5.5.3.
5.5.4.
5.5.5.
5.5.6.
Recess mounting box VM602P and VM610P.................................................... 20
The VM603P weather protection box................................................................. 21
The movable mounting plate kit VM651P .......................................................... 22
The VM652P key-hole protection kit .................................................................. 23
The VM654P armoured cable kit ....................................................................... 23
The junction box VM655P .................................................................................. 24
6.
Connecting the detector ........................................................................................................... 25
6.1. Cable requirements ........................................................................................................... 25
6.2. Wiring the detector into the system ................................................................................... 25
6.3. Control and function test.................................................................................................... 26
6.4. Trouble shooting................................................................................................................ 28
7.
The Testsystem.......................................................................................................................... 29
7.1. VT705P.............................................................................................................................. 29
7.2. Wiring and commissioning ................................................................................................ 29
2
Planning and Installation manual VV600/VV602Plus
1. GENERAL INFORMATION
1.1. Application
The Aritech VV600Plus Vault Protection System is a seismic system designed to
detect attempts to break into vaults, safes, night deposit safes, automatic teller
machines and other enforced physical areas. The detection technology used will
react within seconds to all breaking and entering tools such as drill hammers, side
grinders, acetylene cutters termic lances etc. At the same time it allows for free
movement around the protected area without the risk of creating false alarms.
The Aritech VV600Plus system has been field proven to be a very effective and
reliable solution for safe, vault and atuomatic teller machines protection. It provides
protection with the highest security level possible. A complete range of accessories
makes it application efficient and easy to use.
Of the many applications possible, we mention:
•
Banks and post offices:
Vaults, safes, coin cabinets, automatic teller machines and night safe deposit
boxes.
•
Military defence:
Safes, filing cabinets, weapon stores, early warning systems on gates and
other physical barriers.
•
Government buildings:
Archives, safes, document safes and computer data storage areas.
•
Industry:
Safes, filing cabinets and other storage areas.
•
Pharmacies and hospitals:
Drug cabinets, vaults and safes and instrument stores.
•
Computer rooms:
Tape and disk cabinets, safes.
•
Jewellers shops:
Vaults, safes and show-cases.
•
Museums:
Safes, vaults and store rooms.
•
Galleries:
Show-cases.
•
Private homes:
Safes.
Planning and Installation manual VV600/VV602Plus
3
1.2. Function
The detection principle is based on the structural vibrations generated in walls,
floors, ceilings and doors upon an attempt to break through such physical barriers.
The Aritech VV600Plus System features a high level of discrimination between real
attacks and normal background noise generated by human activities, effectively
reducing the level of unwanted alarms to almost zero.
To achieve this, three important parameters are analysed before an alarm is
triggered:
•
signal strength (amplitude)
•
signal frequency
•
signal duration
These parameters are very different between real attacks and "normal" background
vibrations. In general, one may describe the signal characteristics of a true break-in
attempt as per below:
Explosive means generate a signal with a very high amplitude and a short
duration.
Mechanical destruction generates signals with a moderate to high amplitude and
a long signal duration.
Rotating devices generate signals with a moderate to high amplitude and a long
signal duration.
Thermal devices generate signals with low amplitude and a long signal duration.
In the "Functional description", therefore, you will find that different analysing
channels deal with different types of signals in the Aritech VV600Plus System.
The application of surface mount technology in the actual sensor device itself, has
enabled the incorporation of complex circuits in a small housing, thus providing
unobtrusive, aesthetically pleasing detectors without operational trade-offs.
1.3. Detecting and Testing
The Aritech VV600Plus System consists of two main system functions which in
close co-operation guarantee an extremely high security level:
•
the detecting function
•
the testing function
1.3.1. The detection function
The core of the Aritech VV600Plus System is the vibration detectors VV600Plus
and VV602Plus. Each VV600/602Plus seismic detector is a fully equipped vibration
detector. This means that all necessary processing electronics is incorporated
within each VV600/602Plus unit. Each such unit is ready to co-operate with almost
any control panel presently available. No intermediate signal processing is
necessary, no vulnerable slave microphones are used. The VV600Plus utilises the
most advanced microelectronic processing circuits to reduce the risk of false
alarms while maintaining the highest detection level. The unique counting channel
that is featured on the VV600Plus allow higher sensitivity settings on safe and
document cabinets without generating nuisance alarms from ambient noise. It will
also detect attacks with hammers, sledgehammers, crowbars and hydraulic jacks
at a very early stage.The VV602Plus model is used to protect night deposit safes
and automatic teller machines (ATM’s). The counting channel has been omitted in
4
Planning and Installation manual VV600/VV602Plus
the VV602Plus and replaced by two integrating channels, to cope with the knocking
sound of the cassettes being deposited in the night deposit safe and the pay out
procedure in ATM’s, which may otherwise generate nuisance alarms. This adapted
signal processing does however not affect the detection efficiency.
A full range of mounting accessories for different applications facilitates a wide
range of mounting requirements.
1.3.2. The testing system
In order to provide the highest level of security, a daily test of the function of all
VV600Plus and VV602Plus detectors in a system is required.
Therefore, the Aritech VV600Plus System features a full functional test system that
may be operated in parallel with the detection system itself. When activated, the
test system will test the following important functions the detection system:
•
Proper acoustical connection between VV600/602Plus seismic detectors and
the protected surface.
•
Proper signal processing capability of circuits inside the VV600/602Plus
seismic detectors.
•
Proper functioning of alarm-output circuitry of the VV600/602Plus seismic
detectors.
The actual tester is designated VT705P and is mounted inside the detector cover.
The tester only consists of a signal generator. The electronics to generate the test
signal is incorporated in the detector. This gives a very simple and cost efficient test
transmitter that is very easy to install.
1.4. Features of the System
•
Will detect all known methods of attack against vaults, safes ATM’s etc.
•
Compact and unobtrusive design using advanced microelectronics.
•
Compatible with virtually all control units.
•
Each seismic detector has full processing capability.
•
Sensitivity adjustment available over a wide range.
•
Unique advanced signal processing differentiates between ambient noise and
real attacks.
•
Unique test system using a self contained test transmitter in each detector.
•
Three analysing channels.
•
Counting circuit effectively suppress false alarms but maintaining best
detection capability.
•
Full tamper protection.
•
Wide operating temperature range facilitates application in severe
environments.
•
Approved by VdS and many other approval bodies
•
Calibrated and easily adjustable sensitivity setting to adapt to various
applications.
•
The detectors intergration level can be measured with a Voltmeter on
connection no. 4.
•
Full range of accessories enables a wide range of applications to suit any
requirements.
Planning and Installation manual VV600/VV602Plus
5
2.
BASIC EQUIPMENT OF THE VV600PLUS SYSTEM
2.1. System components
VV600Plus
Safe and vault vibration
detector
VV602Plus
Detector for protection of
ATM’s and Night Safe
Deposit Boxes
VM610P
Floor mounting box
VM603P
Damp resistant mounting
box
VM654P
8 conductor armed cable kit
VM655P
Tamper resistant metal
junction box
VM600P
Mounting plate
VM651P
Moveable mounting kit
VT705P
Remote test transmitter
VM604P
Steel plate for tack welding
VT610P
Hand held test unit
VM652P
Keyhole protection kit
VM602P
Recess mounting box
VT611P
Safe application test sensor
VM653P
Spacer for keyhole kit
6
Planning and Installation manual VV600/VV602Plus
3. FUNCTIONAL DESCRIPTION
3.1. The VV600Plus standard seismic detector
The VV600Plus is a fully equipped seismic detector, compatible with almost any
commercially available security control panel, without the need of any additional
processing circuitry.
FUNCTIONAL DESCRIPTION OF THE VV600PLUS
Test
Internal VVT
Test
oscillator
Integrating
channel
Accelero
meter
Counting
channel
Alarm
output
Sabotage
protection
Explosion
channel
Signalconditioning
Sensitivity
Power
supply
11
Spare
10
Test
9
Sabotage
8
Sabotage
7
Spare
6
Alarmrelay
5
Alarmrelay
4
Testpoint
3
Alarm LED
2
-
1
9-15 VDC
+
3.1.1. Sensor element
The VV600Plus is sensing the structural vibrations caused by an attack against the
protected surface. A piezo-electric sensor converts the seismic signal into an
electric signal. This signal is then analysed in three independent signal processing
channels.
3.1.2. The integration channel
The integrating channel is designed to recognise low to medium amplitude signals
with long duration, like those caused by electric power tools or termic tools like a
burning bar or acetylene torch. The signal is first amplified in a preamplifier and
filtered in a band pass filter only allowing relevant frequencies to pass. After
processing, the signal is fed into an integrator which stores the incoming signals.
When a pre-set level is reached, the level detector triggers the alarm. The
sensitivity of this channel is set by adjusting the pre-amplification level.
3.1.3. The counting channel
The counting channel is designed to detect attacks with mechanical means like
hydraulic jack and hammer and chisel.
It avoids having to set the integrating channel to high sensitivity and long integrator
discharge times to cope with intermittent, short duration mechanical attacks. The
incoming signal is amplified and pulse formed for a pre-set time to avoid counting
multiple bounces. At the first incoming pulse, the counter counts 1 and starts the
timer. If a second pulse is detected within 180 seconds the counter counts 2 and
restarts the timer to look for a third pulse. If a second pulse is not detected within
180 seconds the counter will be reset. Five consecutive counts trigger the alarm.
The sensitivity of this channel is pre-set and is not affected by the sensitivity setting
of the integration channel.
Planning and Installation manual VV600/VV602Plus
7
3.1.4. The explosion channel
The explosion channel is set to detect very high amplitude and short duration
signals as caused by explosives. An alarm will immediately be triggered by the level
detector when the pre-set amplitude is detected. The sensitivity is pre-set and is not
affected by the sensitivity setting of the integration channel.
3.1.5. Power supply
The supply voltage is first filtered and regulated thus providing insensitivity to
electrical interference. The internal voltage requirement is 6 V thus allowing the
detector to operate in a broad voltage range. The power supply features extremely
good protection against high energy electrical surges. The transient absorbers and
the general design of the detector also give a very good protection against RFI, for
example from GSM cellphones.
3.1.6. Sabotage protection
Of course, the VV600Plus seismic detector is equipped with comprehensive antitamper provisions, a tamper alarm is given when an attempt is made to:
•
Pry the unit off the wall
•
Burn or weld the unit
•
Lower the supply voltage below 7,5 V
•
Open the unit
The detector is equipped with a solid state relay and consequently no protection
against outside magnetic fields is necessary.
3.1.7. Alarm-output circuitry
The circuitry may be activated by all three detection channels. The alarm output
provides two forms of alarm signals:
•
One potential free normally closed contact, opening in alarm.
•
One open collector transistor output, going out of conductive mode upon
alarm condition.
The transistor is being protected against short circuit with a series resistor.
8
Planning and Installation manual VV600/VV602Plus
3.2. The VV602Plus ATM seismic detector
The Aritech VV602Plus detector is a seismic detector capable of detecting
vibrations from an attack on an automatic teller machine (ATM) or night safe
deposit box to which it is attached, but still disregarding the vibrations created by
the normal operation of the protected object.
FUNCTIONAL DESCRIPTION OF THE VV602PLUS
Test
Internal VVT
Test
oscillator
Low level
integrating
channel
Accelerometer
High level
integrating
channel
Alarm
output
Sabotage
protection
Explosion
channel
11 S
10 Te
9
S
8
S
7
S
6
A
5
A
4
Te
3
A
2
-
Signal conditioning
Sensitivity
Power
supply
91
+
3.2.1. Sensor element
As in VV600Plus.
3.2.2. The low integrating channel
The low integrating channel looks at the low amplitude, long duration signals. This
integrating channel is inhibited until the signal amplitude reaches a certain pre-set
level. Upon reaching this amplitude level, the signal is further processed and
integrated. At the same time a timer is started. As long as the signal is constantly
available the timer will run, upon an interruption of the signal, the timer will reset the
channel to inhibited state after a pre-set time.
3.2.3. The high integrating channel
To prevent signals from the night-safe or the ATM from disturbing the VV602Plus,
upon the first appearance of high amplitude signals, these signals are treated as if
coming from the protected unit itself and are inhibited from reaching the integrator.
At the same time a timer is started. After a short period of time the high integration
channel timer runs out and if the signal still is present, the signal is released for
integration.
3.2.4. The explosion channel
As in VV600Plus.
3.2.5. Power supply
As in VV600Plus.
3.2.6. Sabotage protection
As in VV600Plus.
3.2.7. Alarm output circuitry
As in VV600Plus.
Planning and Installation manual VV600/VV602Plus
9
4. PLANNING INSTRUCTIONS
4.1. Planning limitations
Although the Aritech seismic detectors are designed to provide a high level of
immunity against nuisance alarm sources, some precautions have to be observed.
Below we would like to mention some circumstances to preferably avoid:
4.1.1. Electric motors, transformers, fans, air conditioners.
Do not apply the detectors in close proximity of electrical devices creating
mechanical vibrations in the protected structure. If possible avoid mechanical
contact between such devices and the protected surface, or reduce the vibrations
by using suitable insulating materials.
4.1.2. Water piping
The flow of water through piping, when in mechanical contact with the protected
structure, emits a strong signal in the structure itself, which may cause nuisance
alarms.
4.1.3. Ultrasound detectors
May emit a signal that is within the frequency range of the detectors. It is advisable
to avoid placing ultrasound detectors closer than two meters from the protected
surface. It is useful to remember, in this respect, that it is not normally the detector
itself picking up the ultrasound signals, but mainly metal objects attached to the
protected surface (vault door, steel cabinets, etc.).
4.1.4. Bells
May generate overtones in the frequency range of the detectors. A simple solution
is to suppress the overtones through application of a piece of tape on the bell.
4.1.5. Human activity
Normally, people in close proximity to the protected area are not a problem. It is
impossible, however, to always predict their activities. It is therefore advisable to
keep a look-out for: floors running over the vault’s ceiling, stair-ways adjacent to
vaults and safes on concrete or marble floors. In most cases, carpeting or the
application of insulation materials will solve any problems that may occur.
4.2. Detection range of the VV600/602Plus
The range of each installation depends on:
•
The construction of the vault or safe.
•
The vibration characteristics of the construction.
•
The sensitivity required in each sensor.
•
The natural vibrations and ambient noise level in the premises.
To determine these factors, it is best to perform a field test. The field test should
include the following:
•
Visual inspection of the vault or safe.
•
A test to determine the existence of irregularities in the construction.
•
A noise test.
•
A plan to define the location of each sensor.
As a guide-line we have made a table showing the range as a function of the
methods of attack and type of material in the construction of the protected surface.
10
Planning and Installation manual VV600/VV602Plus
DETECTION RANGE IN METERS OF THE VV600PLUS & VV602PLUS
Material
Sensitivity
setting
Concrete K-35
Steel
Brick
Concrete K-35
Steel
Brick
Concrete K-35
Steel
Brick
Concrete K-35
Steel
Brick
Concrete K-35
Steel
Brick
-
Termic
lance
1 / Gmax
2 / Gref.
3 / Gmin
4
5
4
8
3
3
4
1
2
2
1
1
-
Method of attack
Diamond Drilling
disk
14
14
8
9
9
6
6
6
4
5
5
3
4
4
2
14
14
8
9
9
6
6
6
4
5
5
3
4
4
2
The exact detection range can only be determined by practical tests
on site.
This table is only to be regarded as a guide line and gives the detection radius in
meters as a function of material, attack method and selected sensitivity. Please
note that cracks and joints in the material may reduce the range.
Corners in the structure will reduce the range by approx. 25%. The above
mentioned detection ranges for concrete are applicable on vaults and strong rooms
cast according to most national norms for such structures.
4.2.1. The vault or safe sensitivity test
Where the surface of the vault or safe shows cracks, gaps, or has other
irregularities, perform a test to determine if the protection range of each sensor will
be affected. Additional detectors may be needed for full coverage. For concrete,
block and brick construction, perform the following test, using an electric drill and a
6 mm carbide tipped drill bit.
For test on steel the test equipment VT610P and VT611P should be used.
1. Locate any irregularity in the construction. The mortar between bricks and
blocks should be considered as irregularities.
2. Install a detector at one side of the suspected irregularity.
3. Wire the detector to power and alarm circuit.
4. Set sensitivity to Gmax.
5. Drill into the wall at a point equal to the protection radius (R) depending on the
construction type as described in visual inspection section. Check for an alarm.
6. If an alarm does not occur, assume that the irregularity limits the protection
range of the detector. Drill again closer to the sensor until an alarm occurs and
identify where it happens.
7. Take all irregularities into account when spacing detectors. Additional detectors
may be required.
-
The separation between vault door and the frame will require an
additional detector on the door to encounter a possible attenuation at
this point.
Planning and Installation manual VV600/VV602Plus
11
4.3. Planning a vault protection
As a general rule it is recommended to have one detector on each wall, floor, and
ceiling inside the vault and one detector on, or inside the vault door. The detectors
should be recess mounted with VM602P or surface mounted with the VM600P on
the walls. We recommend to mount them at least about 1,80m high to keep clear
from safes, document cabinets, and customer deposit boxes.
The range is reduced at joints between walls and floor and/or ceiling if the
reinforcement bars are not connected. Joints, severe cracking or doors should be
regarded as insulating and additional detectors shall be applied on both sides of
this irregularity.
As the vault door is regarded to be isolated from the walls by its hinges, it is
recommended to have one detector on or preferably inside the vault door. New
vault doors normally have cable channels inside the hinges to provide easy
connection of the detector to the alarm system.
The detector can also be mounted on the outside of the vault door. This gives a
very efficient protection against torch-cutting and a thermic lance as the vault door
acts like a membrane and picks up the signal even before the attack on the surface
has started. The detector could be surface mounted either fixed directly on the
surface or with the VM600P or VM604P mounting plates or it may be mounted on
the movable plate VM651P.
Be careful when you drill into the vault door, so that you don’t damage the
mechanical protection of the door.
If you are installing the detectors in an existing vault you can protect the walls on
either side of the door with a detector mounted on the door frame.
Layout plan
It is recommended to prepare a plan to define the location of each sensor and other
components of the system. A fold out plan will help in doing this.
12
Planning and Installation manual VV600/VV602Plus
4.4. Planning safe, document cabinet and filing cabinet
protection
Most of the attacks against safes are aimed at the door and the locking
mechanism. It is, therefore, advisable to mount a detector on the door where the
lock is situated. The hinges my attenuate the signal transmission from the body to
the door. We therefore recommend to use one detector on the body of the safe as
well.
4.4.1. Detectors mounted inside the safe
Mount the first detector on a suitable space on the body of the safe, normally this is
at the front top side of the safe. Mount the second detector on the inside of the
door, close to the hinges. Use flexible cable kit VM654P together with the junction
box VM655P. Also add a magnetic contact on the door. Cable outlet facilities are
normally provided in new safes. If not, we recommend mounting the detectors on
the outside.
4.4.2. Detectors mounted on the outside of the safe
We recommend a two detector layout, with one detector on the side of the safe,
close to the hinges. If you use the junction box VM655P and the steel cable kit
VM654P you will have a safe and reliable installation. The second detector can be
mounted on the door in three different ways as illustrated:
•
Mounted fixed, close to the hinge providing a short distance to the junction box
with the cable kit VM654P.
•
Mounted on the key-hole protection plate VM652P close to the lock, see 5.5.4.
•
With the movable mounting kit VM651P, mount the detector in such way that
the cable prevents opening the door when the detector is on the night position
plate, see 5.5.3.
Although the detectors are better protected when mounted on the inside, detectors
mounted on the outside will have a deterring effect.
The VM651P and VM652P have the advantage of forcing the staff to handle the
alarm installation properly. It prevents the staff forgetting to remove keys or properly
closing the safe doors.
Planning and Installation manual VV600/VV602Plus
13
4.4.3. Filing cabinets
Normally the lock is placed on one side of the upper drawer on the front. We
therefore recommend to use one detector placed on the side of the cabinet close to
the lock. If special high security on one drawer is required we recommend to use
the movable mounting kit VM651P on that drawer. Mount the night position plate on
the drawer and the day position plate on the side together with the junction box
VM655P. Use cable kit VM654P.
4.5. Planning the protection of an automatic teller machine
(ATM) and a night deposit box
For both units we recommend the use of VV602Plus which is specially adapted to
handle the noise created when the units are in operation. We recommend to have
one unit on the safe body and one unit on the door.
-
If you want to mount a detector on a light weight safe we do
recommend you to contact Aritech for further information.
The VV602Plus can be mounted directly on the surface, with the movable mounting
kit VM651P, or the key-hole protection kit VM652P. In any case we would
recommend using the junction box VM655P and cable kit VM654P.
4.5.1. Automatic teller machine
Normally the best points for detectors are the door and as close to the dispenser
opening as possible, as these are the most likely points of attack. See illustration.
detectors
14
Planning and Installation manual VV600/VV602Plus
4.5.2. Night safe deposit box
Protection is planned exactly as a safe. Attenuate the chute and the landing place
with rubber insulating material to reduce the noise created by the falling cash boxes
when deposited.
detectors
rubber pad
4.6. Planning guide-lines
Do’s:
Do prepare a vault layout plan showing vault dimensions and locations of all
equipment to be installed.
Do check that vault is constructed of monolithic concrete or concrete with steel
liner, or where constructed of concrete block or brick, masonry must be bonded
with Portland cement.
Do check that sensors are mounted directly to masonry or steel surface and that
approved mounting hardware is used.
Do install at least one sensor on each wall as well as on the floor and ceiling.
Do protect vault door with sensor mounted as close as possible to side of door,
embedding it in door frame.
Do perform drill tests, whenever possible, on the outside of the vault.
Do apply silicone sealant around all openings of sensor (cover, screw heads, and
cable port) after surface-mounting sensor on floor.
Dont’s:
Don’t assume that covered concrete walls are free of cracks, loose mortar or other
irregularities.
Don’t install sensors permanently before determining sensitivity settings and
ambient noise level.
Don’t install sensor on cinder block or other unproved masonry surface without
contacting Aritech.
Don’t mount sensor on rough surfaces, sand all surfaces.
Don’t allow test signal transmitter to make contact with mounting plate or sensor on
mansonry installaiton.
Planning and Installation manual VV600/VV602Plus
15
5. INSTALLATION
5.1. General instructions for system components
The VV600Plus and VV602Plus seismic detectors have cast zinc housing, with the
outside dimensions of 101 x 81 x 28 mm, and a weight of 380 g.
By removing the screw holding the cover to the chassi gives access to:
•
Mounting holes
•
Terminal
•
Sensitivity setting
•
Mounting space for testtransmitter VT705P
•
Tamper switch
5.2. Mounting directly onto a steel surface
In most cases it is advisable to mount the detector directly onto a steel surface
using the bolts provided and threaded holes which you will have to make.
For mounting the following tools are recommended:
16
•
Mounting plate VM600P used as drill template.
•
Electric drill hammer.
•
Felt pen.
•
High speed steel drill, diam. 3.3 mm (for M4 tap).
•
High speed steel drill, diam. 4.2 mm (for M5 tap).
•
High speed steel drill, diam. 10 mm.
•
Tap M4 (to mount VV600Plus on steel surface).
•
Oil to cool drill and tap.
Planning and Installation manual VV600/VV602Plus
1.
Define the exact location of the VV600Plus.Using the felt pen, mark the
location of the 3 threaded mounting holes. Use the mounting plate VM600P as
a template and use a centre punch for exact location of the drill holes.
2.
Drill three holes, using a 3.3 mm diam. drill, as deep as the steel surface will
allow.
3.
Thread the holes with a M4 tap.
4.
Remove burrs with a 10 mm drill bit.
5.
Mount the detector to the steel surface using the three M4 screws supplied.
6.
If a VT705P test transmitter is used, it can be mounted in the detector’s righthand bottom corner, see illustration on previous page.
5.3. Mounting on steel and concrete using a mounting
plate
In the following cases you should use the VM600P or VM604P mounting plates:
•
Always use the VM600P mounting plate for surface mounting on concrete.
•
Use the VM604P welding mounting plate when drilling in the protected steel
surface is impractical or impossible.
•
Use the VM600P mounting plate when replacing Securitas SSD70/SSD
2000/SSD 4000 or Cerberus GM 31/35/36/550/560
5.4. The mounting plate VM600P
A
B
C
D
E
F
G
=
=
=
=
=
=
=
Mounting holes for VV600Plus & VV602Plus
Mounting holes for Securitas SSD70.
Mounting holes for Cerberus GM 31,35, 550, 560
Mounting hole for expansion plug or recess mounting box.
Mounting holes for Securitas 2000.
Mounting hole for expansion plug to the test transmitter, VT705P.
Mounting holes for accessories
Planning and Installation manual VV600/VV602Plus
17
5.4.1. Mounting on concrete
In order to surface mount the VV600/602Plus on concrete, a VM600P mounting
plate is always required. Please follow the instructions below carefully.
1.
Define the exact location of the VV600Plus and hold the VM600P mounting
plate to the wall.
2.
Mark the location of the hole for the expansion plug on the wall.
3.
Drill a hole using a 9 mm drill. The hole shall be at least 60 mm deep, but if the
surface finish is thicker than 10 mm, drill deeper, making sure at least 50 mm
of the expansion plug is in the concrete itself. You will need to use a longer
bolt in this case.
4.
Introduce the expansion plug into the hole you have just drilled and make sure
that the top end of the plug does not stick out of the wall. Note that only the
supplied metal expander should be used.
If no test transmitter is used, go to no. 9.
5.
Rotate the mounting plate 180o, drill a marker hole in the concrete through the
hole F (6,5 mm), see ill. A, in the lower right hand corner. Rotate the mounting
plate back 180o and tighten the bolt, see ill. B.
6.
Drill a hole using a 9 mm drill on the spot you marked before. See point 2
above.
7.
Introduce the expansion plug into the hole you have just drilled and make sure
that the top end of the plug does not stick out of the wall. Fix the VT705P test
transmitter with the bolt provided with the plug.
8.
Tighten the VT705P bolt. Make sure that the VT705P does not touch the
VM600P mounting plate.
9.
18
It is recommended that all bolts are tightened at the first service after
installation, to compensate for inevitable material expansion in both
wall and plug.
After completion of the mounting of the VM600P, install the VV600Plus
detector with the three supplied M4 screws.
Planning and Installation manual VV600/VV602Plus
5.4.2. Mounting plate for welding VM604P
1.
Remove paint or other surface finish from the area where the VM604P will be
mounted.
2.
Fix the mounting plate into position on the surface and ensure that it can’t
move during the welding process.
3.
Weld the VM604P mounting plate to the surface. First weld the points 1,2,3,4
then weld the seams 5 and 6 on the inside of the two slots, see illustration.
4.
Mount the VV600/602Plus detector to the VM604P mounting plate, using the
three M4 screws supplied.
Planning and Installation manual VV600/VV602Plus
19
5.5. Mounting of accessories
5.5.1. Recess mounting box VM602P and VM610P
For recess mounting of the VV600Plus in concrete, the VM602P/610P recess
mounting boxes are available. Not only will this accessory give a nice and tidy
installation but it also ensures a better coverage of the detector as it is anchored in
the reinforcement bars of the concrete.
For the best results, please follow the instructions below:
1.
Select the exact location where the VV600Plus units shall be mounted and
make arrangements with the construction company to be on the construction
site when the concrete casting shutters are being put up.
Do not forget floors and ceilings !
2.
On the pre-defined locations, drill two 7 mm holes in the panel and mount the
VM602P recess mounting box to the panel using the two M5 threaded pins
enclosed with the VM602P.
3.
Fasten the bracket in the tapered hole on the back of the mounting box.
4.
Weld the bracket to the reinforcement bars in the wall.
5.
After completion of the mounting of the VM602P to the wooden concrete
shutter, introduce the conduits into the holes on the sides of the mounting box.
Seal the holes around the conduit, to prevent concrete from running into the
mounting box. Attaching the conduit to the reinforcement rods will prevent
them from falling out during the casting process.
6.
Save the cover plate.
7. When the casting is completed mount the VV600Plus detector on the VM600P
mounting plate supplied with the VM602P.
8. After completion of the installation and a successful test, mount the cover plate
with the enclosed screws.
20
Planning and Installation manual VV600/VV602Plus
The VM610P, floor mounting box is mounted in the same way as the VM602P.
5.5.2. The VM603P weather protection box
To protect the sensor from vandalism or high humidity, use a VM603P protection
box. In an environment with high humidity and large variations in temperature it is
recommended to mount a heat resistor (a few Watt is sufficient, 12 VAC/
100 Ohm/2 W gives approx. 1,5 W) in the mounting box and drill a small drain hole
in the lowest point of the box. This will give a far better result then trying to seal the
box with silicone, which will only result in condensation problems.
Planning and Installation manual VV600/VV602Plus
21
5.5.3. The movable mounting plate kit VM651P
The VM651P movable mounting kit is designed to enable movable (day/ night)
mounting of VV600Plus and VV602Plus on vault and safe doors.
22
1.
The night position plate shall be mounted close to the keyhole or the code
wheel on the door (the night position plate has a little tap in the right-hand
corner). The best way to connect the VM651P is in series with the alarm relay
of the detector. This way the system can only be armed when the detector is in
the night position.
2.
Mark the three mounting holes. Drill/tap holes for the three M4 bolts as
described in chapter 5.2. Make sure the holes you drill in the door does not
damage the locking mechanism.
3.
Mount the night position plate using M4 bolts.
4.
Mount the junction box and day position plate together on the side of the safe
or on the wall close to the detector in such a way that the cable prevents
opening the door.
5.
On metal surface mount exactly as the night position plate. On other surfaces
than steel suitable screws and expanders have to be selected by the installer.
6.
Mount the VV600/602Plus detector on the base plate of the VM651P kit with
the three screws supplied.
Planning and Installation manual VV600/VV602Plus
5.5.4. The VM652P key-hole protection kit
The key hole protection mounting plate VM652P has a stainless steel lever which in
night position will cover the key hole and thereby stop the intruder from inserting
explosives in the key hole.
At the same time the detector protects the safe or vault door from other kinds of
attack.
The lock/release button must always face up (1).VM652P can be mounted with the
lever facing any direction (2).
1.
Select a location for the VM652P on the vault/safe door.
2.
Mounting holes A are used for the VM652P.
3.
Drill/tap mounting holes as described in chapter 5.2.
4.
Mount the VV600/602Plus detector on the VM652P cover plate and wire the
detector according to the desired system configuration.
5.
The micro-switch inside the VM652P should preferably be wired into the
detector’s alarm loop to inhibit arming the alarm system if the keyhole
protection lever is not in the protected position.
6.
The location of the lever can be changed if necessary. To open the mounting
plate and re-position the lever, the centre screw (B in the illustration) has to be
removed.
5.5.5. The VM654P armoured cable kit
The armoured cable kit is designed to be used as a protective transfer from the
door of a safe or vault to the body or wall. Preferably it should be used together with
the junction box VM655P.
The VM654P includes the following items:
•
8 core cable, white
•
Flexible stainless steel conduit
•
Protective ferrules
•
Cable straps
•
Plastic insert for double conduit
The protective ferrules are used on the two ends of the steel conduit to protect the cable from the
sharp edges. The cable straps are used to secure the conduit in the VV600Plus or VV602Plus.
Planning and Installation manual VV600/VV602Plus
23
5.5.6. The junction box VM655P
The VM655P is a well protected junction box. It has a steel insert in the lid to
protect it from drilling and a tamper contact to protect it from being opened. The
junction box has two terminal blocks with a total of 26 terminal, two of which are
used for the tamper switch and one for the screen to the base. There is a plastic
strap for strain relief for the cable and flexible conduit.
24
Planning and Installation manual VV600/VV602Plus
6. CONNECTING THE DETECTOR
6.1. Cable requirements
The wiring of VV600Plus detectors requires the following cable layout:
Number of Leads
Features
Power
Alarm
Tamper
Test LED
Test in
System common
2
2
2
1
1
Per detector
1
6.2. Wiring the detector into the system
Bring the cable(s) to the detector, feed them through the cable inlet, cut them,
leaving approximately 10 cm of cable after the strain relief. Remove the wire
insulation with about 1 cm.
Wire the terminals according to wiring diagram below.
(Illustration A: Form-A relay. and illustration B: Form-C relay)
A
Planning and Installation manual VV600/VV602Plus
B
25
6.3. Control and function test
•
Check the proper mounting of the detector, the VT705P and the cabling
around them
•
Check the proper wiring of the system, preferably against a wiring diagram.
•
Apply power to the detector.
•
Perform the following tests:
1.
Press the front of the VT610P, hand tester against the protected surface at the
fringe of the expected coverage area. Press the button. A buzzing sound will
be heard. The generated frequency is similar to the frequency of a termic
lance attack. The VV600Plus should give an alarm within 30 seconds and the
VV602Plus within 45 seconds.
1
2
2.
26
Knock firmly with a hammer around the detector with two-second intervals
between blows. After five blows, the VV600Plus shall alarm. To protect the
surface from damage it is advised to use a small aluminium plate between
hammer and surface. This test simulates the attack with hammer and chisel
and is only valid for VV600Plus.
Planning and Installation manual VV600/VV602Plus
Give one powerful blow near the detector with a hammer. Both VV600Plus and
VV602Plus should give an alarm immediately. This test simulates an attack with
explosives.
Check up the background signal level in the detector to prevent nuisance alarm.
Connect a DC volt-meter, internal resistance 20 KOhm/V or more, to terminal 2
(negative) and terminal 4 (positive). Place the volt-meter in the range around 3 V.
Put the sensitivity selector in the maximum sensitivity Gmax. Make sure that all
possible causes for vibrations in the protected area are present and operating.
Check the output voltage and take measures accordingly.
For VV600Plus
For VV602Plus
Measure
0.7 V
0V
None
1.4 V
2V
Reduce range/remove source
2.5 V
3.5 V
Alarm, reduce range/ remove source
Preferably, you should try to remove the source of ambient noise instead of
reducing the range.
-
Do not forget to set the detector’s sensibility at the right value. Close
the lid of the detector and check for closed-loop condition of the
tamper-loop. Perform a functional test of both alarm and tamper
signals according to panel specifications.
Planning and Installation manual VV600/VV602Plus
27
6.4. Trouble shooting
28
Planning and Installation manual VV600/VV602Plus
7. THE TESTSYSTEM
7.1. VT705P
The VT705P is a testsystem consisting of a testgenerator inside the
VV600/602Plus and a crystal unit which is mounted on the protected object, inside
the detector housing. There are two possiblitities for testing:
1.
Test disabled (ex-factory setting).
2.
Internal test of the detector’s electronics = Position jumper between connection
1 and 2.
3.
Function test of the detector and its physical contact with the protected object
= Position connector from test transmitter VT705P between connection 2 and 3.
7.2. Wiring and commissioning
The VT705P shall be mounted inside the detector, see illustration under 5.4.1. The
VT705P is connected over a 2 Pole plug to the detector.
Planning and Installation manual VV600/VV602Plus
29
4466-1A