1
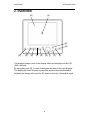
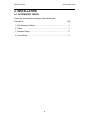
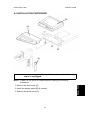
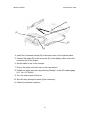
DISPLAY EDITOR
(Machine Code: A997)
28 December 1993
SPECIFICATIONS
1. SPECIFICATIONS
Maximum: A3 (lengthwise) or
11" x 17" (lengthwise)
(Scanned through the copier.)
Display:
LCD (Monochrome), 8 gradations
640 x 480 dots
Zoom In/Out:
100% (33 dpi), 150% (50 dpi), 200% (67 dpi),
300% (100 dpi)
Display Speed:
Less than 2 seconds
Editing:
Screen and cursor
Power Consumption:
19.5W
Power Source:
5V/less than 1.5A and 24V/less than 10.5 from
the copier.
Dimensions (W x D x H):
280 x 232 x 50 mm
11.0" x 9.14" x 1.97"
Weight:
less than 1.5 Kg or 33.1 lb
Remarks:
The holder is required for installation.
Display Editor
Original Size:
1
OVERVIEW
28 December 1993
2. OVERVIEW
[A]
[B]
[K]
[M]
[C]
[D]
[E]
[F]
[H] [I]
[G]
[J]
[L]
The scanned image is sent to the display editor and displayed on the LCD
(640 x 480 dot).
By using the cursor [A], it is able to designate an area of the original image.
The display [B] shows 8 levels of grayscale, and the data communication
between the display editor and the IPU board is done by 3 bit parallel signal.
2
28 December 1993
EXPLANATION FOR EACH KEY
3. EXPLANATION FOR EACH KEY
Full Image Key [D]
Zoom 1 Key [E]
Zoom 2 Key [F]
Zoom 3 Key [G]
Image Shift Key [H]
Cursor Key [I]
Point Key [J]
Clear Key [K]
Close Key [L]
All Clear Key [M]
Function
Sends the scan start command to the copier, and scanning of the
original is performed. After the scanning, the entire original image is
shown on the display editor (100%).
The data scanned with 100 dpi is changed to about 33 dpi.
The entire A3 or DLT original image can be displayed.
The data scanned with 100 dpi is changed to 50 dpi. (150%
enlargement)
The data scanned with 100 dpi is changed to about 67 dpi. (200%
enlargement)
The data scanned with 100 dpi is displayed with about 100 dpi.
(300% enlargement)
Press to shift the image up and down, left and right by using the
cursor key according to the block diagram displayed at the lower left
corner.
The cursor on the display will appear at the center after pressing the
scan key, zoom keys and image shift key. The cursor shown on the
display will move to the desired position by pressing this key.
Sends the information of the current location of the cursor to the
copier.
The previously marked point before pressing the close key will be
canceled.
Press to close an area.
All specified dimensions or areas will be canceled.
Display Editor
Key
Scan Key [C]
3
INSTALLATION
28 December 1993
4. INSTALLATION
4.1 ACCESSORY CHECK
Check the accessories according to the following list:
Description
Q’ty
1. Key Description Decal .....................................................................1
2. Cable ...............................................................................................1
3. Harness Clamp ................................................................................2
4. Truss Screw.....................................................................................4
4
28 December 1993
INSTALLATION
4.2 INSTALLATION PROCEDURE
[B]
[A]
[C]
CAUTION: When installing the display editor, make sure that the
copier is unplugged.
1. Remove the front cover [A].
2. Install the display editor [B] (4 screws).
3. Remove the small cover [C].
5
Display Editor
NOTE: Holder (A702) must be installed before starting the following
procedure.
INSTALLATION
28 December 1993
[G]
[D]
[F]
[E]
[H]
4. Install the 2 harness clamps [D] to the lower cover of the optional table.
5. Connect the cable [E] to the connector [F] of the display editor and to the
connector [G] of the copier.
6. Set the cable to the 2 wire cramps.
7. Plug in the power cord and turn on the main switch.
8. Enable the editor operation by selecting "Display" in the SP modes (page
4-11, No. 417 Editor).
9. Turn the main switch off and on.
10. Stick the key description decal [H] as necessary.
11. Check the machine operation.
6