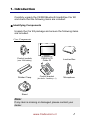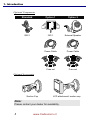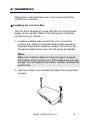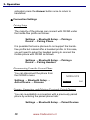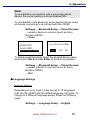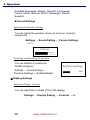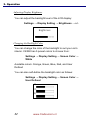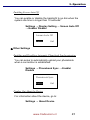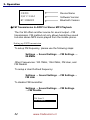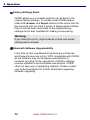
1
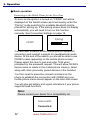
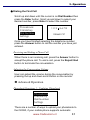
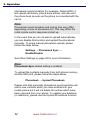
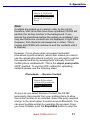
Bluetooth Handsfree Car Kit with LCD USER’S MANUAL Model: CK390 www.tradevision.nl Contents 1. Introduction·································································· 1 n Identifying Components ··············································1 Core Components ······························································ 1 Optional Components ·························································· 2 Optional Accessories··························································· 2 2. Installation ··································································· 3 n Installing the Junction Box ··········································3 o Connecting the Power Supply······································4 p Connecting Accessories ·············································5 q Preparing the Control Module ······································6 Installing the battery ···························································· 6 Attaching the control module ················································· 7 r Installing the Caller ID Display ·····································9 s Installing the Microphone ············································10 Installing the Microphone ····················································· 10 3. Operation ···································································· 11 n How to Operate the Car Kit ·········································11 Understanding the icons on your screen ·································· 11 o Basic operation·························································12 Connecting to the Mobile Phone for the First Time····················· 12 p Dialing the First Call ··················································13 Receiving and Ending a Phone Call········································ 13 Adjusting the Conversation Volume ········································ 13 Phonebook Functions 1 – Updating Phonebook ························ 13 Phonebook Functions 2 – Search for a Name to Call ················· 16 Accessing Received, Dialed, and Missed Calls ························· 17 Dialing a Number································································ 17 Initiating Private Calls ·························································· 17 r Connection Settings ··················································18 Pairing Setup ····································································· 18 Disconnecting From the Current Phone ··································· 18 Viewing, Connecting, and Deleting (Previously Paired Phones) ···· 18 s Language Settings ····················································19 Language Settings ······························································ 19 www.tradevision.nl t Sound Settings ·························································20 Adjusting the Speaker Volume ·············································· 20 Disabling and Enabling the Keytone ······································· 20 u Display Settings ························································20 Adjusting Display Contrast···················································· 20 Adjusting Display Brightness ················································· 22 Changing the Backlight Color ················································ 22 Enabling Screen Auto Off ····················································· 23 v Other Settings ··························································23 Enabling and Disabling Automatic Phonebook Synchronization ···· 23 Finding Out About the Device················································ 23 w FM Transmission & A2DP for Stereo MP3 Playback ········24 Setting up FM Transmission ················································· 24 Using A2DP Media Player ···················································· 25 Factory Settings Reset ···············································26 Bluetooth Software Upgradeability ································26 www.tradevision.nl 1. Introduction Carefully unpack the CK390 Bluetooth Handsfree Car Kit and check that the following items are included: n Identifying Components Unpack the Car Kit package and ensure the following items are included. Core Components Control module (one 23A battery) Rubber Clasp CK390 LCD Caller ID Junction Box Control bracket Microphone (hex bolt x 2 and key x 1) Stand Note: If any item is missing or damaged, please contact your dealer. www.tradevision.nl 1 1. Introduction Optional Components Standard Option 1 Option 2 ISO 2 ISO 1 External Speaker Power Cable Power Cable Fuse set Fuse set Optional Accessories Suction Cup LCD attachment/ suction cup Note: Please contact your dealer for availability. 2 www.tradevision.nl 2. Installation This section demonstrates how to set up and install the CK390 into a vehicle. n Installing the Junction Box The Car Kit is designed to work with the 12/ 24-volt power supply of the vehicle. Refer to the following to install the junction box in a vehicle. 1. Locate a suitable place inside the car to mount the junction box. Select a dry place that avoids excessive heat and mechanical vibration. Ideally, the junction box should be hidden from view, but still easily accessible. Note: Make sure that the cables are long enough to support the location of the junction box. If the cables are not long enough, do not lengthen the cables. Instead, relocate the junction box. 2. Use two screws (not included) to fasten the junction box in place. www.tradevision.nl 3 2. Installation o Connecting the Power Supply (For Options 1 and 2 only) The following illustration demonstrates how to connect the Car Kit’s power cables to the vehicle’s electrical system. Important: The blue cable must be connected to the 12/ 24V switched to enable the Car Kit to go into standby mode. Do not connect the blue cable to the +12/ 24V permanent. Doing so may discharge the battery of the vehicle and prevent the Car Kit from being reset. 4 www.tradevision.nl 2. Installation p Connecting Accessories The following illustration shows where to connect accessory devices. Item Description Caller ID The caller ID should be placed on the dash within view of the driver and passenger. (See Installing the Caller ID Display on page 9.) Microphone Ideally, the microphone should be located in front of the user and above waist height. Speaker For best reception, the speaker should be mounted at least 80cm (30 inches) from the Car Kit’s microphone. www.tradevision.nl 5 2. Installation q Preparing the Control Module The control module is designed to attach to the inside of the steering wheel on the left or right side. Installing the battery Before attaching the control module, install the supplied battery. 1. Remove the battery cover from the rear of the control module and remove the old battery (if any). 2. Insert the new battery with the correct polarity as shown below. 3. Put the battery cover back on. 6 www.tradevision.nl 2. Installation Attaching the control module Refer to the following to attach the control module: 1. Attach the rubber clasp to the two notches on one side of the bracket base. 2. Pull tightly on the rubber clasp and position the bracket base on the inside of the steering wheel. 3. Wrap the rubber clasp tightly around the steering wheel and secure it on the other two notches on the bracket base. www.tradevision.nl 7 2. Installation 4. Attach the bracket cover with the two supplied hex bolts. 5. Slide the control module into the module bracket as shown. (To remove the control module, push the release button to the right and remove the control module.) 6. Now the remote is stabled and attached to the wheel. 8 www.tradevision.nl 2. Installation r Installing the Caller ID Display The caller ID is designed to sit on the dashboard once it is attached to the stand. Remove the adhesive cover from the sticker pad (attached) from the base and press firmly to secure in place. If you wish to attach the LCD display elsewhere, such as next to the car radio, detach the base from the stand by removing the screw as demonstrated. Turn the stand inwards and apply a sticker pad (provided) to the back of the stand. Position the stand and press firmly to secure in place. www.tradevision.nl 9 2. Installation s Installing the Microphone Before installing the microphone, take note of the following: Make sure that the cable can reach from the microphone to the speaker. If the cable is too short, relocate the microphone. Do not lengthen the cable. The supplied microphone is uni-directional. For best results, place the microphone in front of the person talking. It has a reception angle of 60 degrees, and is most effective within a 60-cm radius. Installing the Microphone Find a suitable place for the microphone. Remove dust and grease from the surface. 1. Remove the protective cover from the Velcro and press it firmly onto the bottom of the microphone. 2. Remove the protective cover from the other Velcro pad and firmly press the pad in place. 3. Attach the microphone. 10 www.tradevision.nl 3. Operation n How to Operate the Car Kit Understanding the icons on your screen Please see below for the explanations of the icons on the main screen. CK390 remote control and optional 2538 remote control www.tradevision.nl 11 3. Operation o Basic operation Connecting to the Mobile Phone for the First Time As soon as the ignition is turned on “CK390” text will be displayed on the backlit screen and it will quickly enter the “Pairing” mode searching for available Bluetooth mobile phones for pairing up. If the pairing screen does not display automatically, you will need to turn on this function manually. See Connection Settings on page 18. Pairing CK390 You will need to switch on the mobile phone’s Bluetooth connection and conduct a search for new Bluetooth audio device. At the end of the search you should be able to see CK390’s name appearing on the mobile phone screen. Please select this item to pair and enter 1234 when prompted by the password request. This will allow CK390’s device name to reside in the mobile phone memory, listed along with other previously paired devices in the handset. You then need to press the connect command on the phone to establish the connection with CK390 and your mobile phone name should appear on the main idle screen. You will also get battery and signal indications if your phone supports these functions. Note: Please contact your dealer for a compatibility list. Nokia 6230i Connected 12 www.tradevision.nl 3. Operation p Dialing the First Call Scroll up and down until the cursor is on Dial Number then press the Enter button. Scroll up and down to select your desired number, press Enter to select the number. Phonebook Call History Dial Number Settings 12345678 0286655757 Once you have finished selecting the telephone number, press the Answer button to call the number you have just entered. Receiving and Ending a Phone Call When there is an incoming call, press the Answer button to accept the phone call. To end a call, press the Reject/ End button to terminate the conversation. Adjusting the Conversation Volume User can adjust the volume during the conversation by pressing the up and down scroll button on the remote. q Advanced Operation Phonebook Functions 1 – Updating Phonebook Phonebook Call History Dial Number Settings There are a number of ways to upload your phonebook to the CK390, if your mobile phone supports automatic www.tradevision.nl 13 3. Operation phonebook synchronization (for example, Nokia 6230i), it will upload call history, phone book entries, and also sort the phone book as soon as the phone is connected with the car kit. Note: Phonebook synchronization and sorting time may differ depending on size of phonebook list. This may affect the initial remote control response at start up. In the event that you do not wish to upload automatically, you can disable this function and upload the phonebook manually. To setup manual phonebook upload, please follow the steps below: Settings → Phonebook Sync → Enable/Disable See Other Settings on page 22 for more information. Note: Phonebook Sync default setting is enabled. To upload the contacts manually from both phone memory and the SIM card, please follow the steps below: Phonebook → Upload Phonebook Please note that automatic phonebook synchronization will add in new contacts which you have entered into your mobile phone but it will not delete the entries which have been removed from your phone. To update your deletions (or additions), please use the Upload Phonebook function. 14 www.tradevision.nl 3. Operation Name & Numbers Upload Phonebook Receive Contact Back Note: Contacts are picked up in random order by the car kit, therefore, after all entries have been uploaded, CK390 will perform the sorting function in the background. If you access the phonebook before the sorting is completed, you may see that some contacts are not displayed in right order (however, first character will always be in order). This is normal and CK390 will continue to sort the contacts until it is finished. However, if your phone does not support automatic phonebook synchronization (which also means you cannot use the upload phonebook function) you will need to upload the required entries by sending them manually from the mobile phone via Bluetooth. This is the object push profile (OPP) method. To use the OPP method for uploading contacts please use the following steps: Phonebook → Receive Contact Name & Numbers Upload Phonebook Receive Contact Back As soon as you select Receive Contact, the CK390 temporarily disconnects from your mobile phone to allow the contact entries to be included. Select the entry required and go to the send option to select send via Bluetooth. You can send multiple entries by repeating the process. Once you have finished, push the Reject/End button to stop the www.tradevision.nl 15 3. Operation receiving contacts process and re-establish the Bluetooth link with the last connected mobile phone. Note: Some phones support sending multiple contacts at one time using the OPP method. It is recommended that no more than one hundred selections be sent at a time. Phonebook Functions 2 – Search for a Name to Call After the phonebook is uploaded it will reside in the car kit’s memory. You can search these entries to call by going through the A-Z index and selecting the first character of the name to look up a particular entry. For instance, choose W for William, in the Name & Numbers menu and it will list the names starting with W. To choose a desired phonebook, scroll up and down the alphabetical list and select a letter entry. Phonebook → Name & Numbers → ABCDEFGHIJKLMNOP 0286655757 ABCDEFGHIJ Erica Office Andy Select the desired contact and press the Answer/Call button to dial out. Alternatively, press the Enter button in the idle screen to instantly access the phonebook’s A-Z index. 16 www.tradevision.nl 3. Operation Accessing Received, Dialed, and Missed Calls CK390 can sync with your mobile phone’s call history. To access the previously dialed calls please go through the following steps: Call History → Calls Dialed To access received calls Call History → Calls Received To access the missed calls: Call History → Calls Missed Dialing a Number To dial a desired number please go to Dial Number and scroll up and down to the number you wish to call, press Enter to select the number. Once you have selected the telephone number, press the Answer button to call the telephone number you have just entered. Phonebook Call History Dial Number Settings 12345678 0286655757 Initiating Private Calls A privacy function is available in the CK390 car kit. The handsfree feature is disabled when the privacy function is enabled allowing for the use of the handset during the conversation. To initiate the private call function, simultaneously press both scroll buttons on the remote control during a call. Once www.tradevision.nl 17 3. Operation activated, press the Answer button once to return to handsfree. r Connection Settings Pairing Setup The majority of the phones can connect with CK390 under the hands-free profile as follows: Settings → Bluetooth Setup → Pairing a Device → Pairing Phone It is possible that some phones do not support the handsfree profile but instead offer a headset profile. In this case, you will need to setup the headset pairing to connect the mobile phone with CK390 as follows: Settings → Bluetooth Setup → Pairing a Device → Pairing Headset Disconnecting From the Current Phone You can disconnect the phone from the CK390’s menu: Settings → Bluetooth Setup → Active Device → Disconn NOKIA N95 Disconn Viewing, Connecting, and Deleting (Previously Paired Phones) You can re-establish a connection with a previously paired phone by entering the paired phone lists: Settings → Bluetooth Setup → Paired Devices 18 www.tradevision.nl Exit 3. Operation Note: To re-establish a connection with a previously paired device, the current pairing must be disabled first. To re-establish a link please go to the desired device name and press connecting to re-connect with the CK390: Settings → Bluetooth Setup → Paired Devices → select a device to connect (such as Sony Ericsson K800i) → Conn Sony Ericsson K800i Nokia N95 Nokia N80 Sony Ericsson K800i Conn Del Exit To delete a pairing simply select the desired device name and scroll to Del and press Enter to confirm the deletion: Settings → Bluetooth Setup → Paired Devices → select a device to connect (such as Sony Ericsson K800i) → Del s Language Settings Language Settings Depending on your region, there are up to 10 languages built into the CK390 and the default language is English. To change to a different language simply follow the following steps: Settings → Language Setup → English www.tradevision.nl 19 3. Operation Available languages: English, Spanish, Portuguese, French, Italian, German, Dutch, Norwegian, Danish, Swedish. t Sound Settings Adjusting the Speaker Volume You can adjust the speaker volume to suit your required sound level: Settings → Sound Setting → Volume Settings →+/Volume Disabling and Enabling the Keytone You can disable or enable the CK390’s keytone: Keytone Settings Settings → Sound Setting → Keytone Settings → Enable/Disable Enable u Display Settings Adjusting Display Contrast You can adjust the contrast of the LCD display: Settings → Display Setting → Contrast → +/- 20 www.tradevision.nl Exit 3. Operation Contrast www.tradevision.nl 21 3. Operation Adjusting Display Brightness You can adjust the backlight level of the LCD display: Settings → Display Setting → Brightness → +/Brightness Changing the Backlight Color You can change the color of the backlight to suit your car’s interior. CK390 has 5 preset colors to choose from: Settings → Display Setting → Screen Color → White Available colors: Orange, Green, Blue, Red, and User Defined You can also self-define the backlight color as follows: Settings → Display Setting → Screen Color → User Defined R G B 22 www.tradevision.nl 3. Operation Enabling Screen Auto Off You can enable or disable the backlight to go dim when the system idle time is longer than 10 seconds: Settings → Display Setting → Screen Auto Off → Enable/ Disable Screen Auto Off Enable Exit v Other Settings Enabling and Disabling Automatic Phonebook Synchronization You can setup to automatically upload your phonebook when a connection is established: Settings → Phonebook Sync → Enable/ Disable Phonebook Sync Enable Exit Finding Out About the Device For information about the device, go to: Settings → About Device www.tradevision.nl 23 3. Operation CK390 Device Name S/W V 2.5AF Software Version BT: 200B009 Bluetooth Version w FM Transmission & A2DP for Stereo MP3 Playback The Car Kit offers another source for sound output – FM transmission. FM method not only allows hands-free sound but also stereo MP3 music played from the mobile phone. Setting up FM Transmission To setup FM frequency, please use the following steps: Settings → Sound Settings → FM Settings → 88.8MHz Other Frequencies: 100.1MHz, 106.2 MHz, FM User, and FM Disable To setup a User Defined frequency: Settings → Sound Settings → FM Settings→ FM User To disable FM transmitter: Settings → Sound Settings → FM Settings → FM Disable FM User 2 FM Disable 24 www.tradevision.nl 3. Operation To enable or disable hands-free output via FM transmitter: Settings → Sound Settings → Volume Output FM → Enable/Disable HF OUTPUT FM Enable Exit Using A2DP Media Player To enter Media Player interface: Settings → Sound Settings → Media Player Alternatively, press the up scroll button to gain access to the media player instantly. Use the Media Menu buttons to Play, Pause, jump to Previous or Next songs, and Stop playing. www.tradevision.nl 25 3. Operation Factory Settings Reset CK390 allows you to master reset the car kit back to the original factory settings. To master reset CK390 please press both Answer and Reject buttons at the same time for few seconds until you hear a series of beeps which indicate that car kit has been reset back to the original factory settings and is also available for making a new pairing. Warning: If you reset the car kit, all phonebook entries and paired settings will be erased. Bluetooth Software Upgradeability From time to time new Bluetooth phones are introduced and these phones may not be 100% compatible with CK390 as the software may not recognize new features or functions provided on the new phone. CK390’s software must be updated to accommodate new phones. CK390 offers an easy way of upgrading software. Please contact your authorized dealer for further information regarding software upgrading. 26 www.tradevision.nl