1
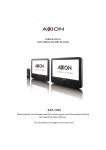
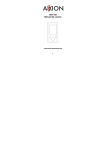
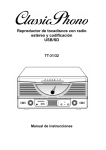
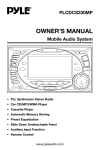
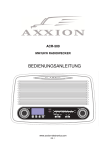
ABT-100
User Manual
www.axxion-electronics.com
1
Cautions
• Do not place naked flames, such as lighted candles on or
near the product.
• Do not place objects filled with liquids, such as vases on or
near the product.
• Do not use or store this product in a place where it is subject
to direct sunlight, heat, excessive dust or vibration.
• Do not use this product with wet hands.
• Do not clean this product with water or other liquids.
• Do not block or cover the slots and holes in the product.
• Do not push foreign objects into the slots or holes in the
product.
• Do not attempt to open this product yourself. There are no
user serviceable parts inside.
• Do not allow children access to plastic bags.
Safety Warnings
• Before using this product, read and follow all warnings and
instructions.
• This product is not intended for use by young children. Young
children should be properly supervised.
• This product is intended for household use only and not for
commercial or industrial use.
• Do not expose to dripping or splashing.
• No naked flame sources, such as lighted candles, should be
placed on the product.
• Ventilation should not be impeded by covering ventilation
openings with items such as newspapers, table cloths,
curtains and the like.
• Make sure the unit is adjusted to a stable position.
When participating in the traffic listening to a
personal music player can make the listener less aware of
potential dangers such as approaching cars.
2
Damage caused by using this product in an unstable position
or by failure to follow any other warning or precaution
contained within this user manual will not be covered by
warranty.
We, suggests retaining the packaging in case for future
transport of the product.
If at any time in the future you should need to dispose of this
product please note that: All batteries and accumulators need
to be removed from this product (Removal of Waste Batteries
and Accumulators).
3
What’s in the box?
Operating Unit
User Manual
Earphones
USB Cable
4
Content
Buttons location and usages
Basic Operation
Driver install and Video format transfer
Button function
Bluetooth
Music
Video
Pictures
Recordings
Setttings
Ebook
Floder View
Tools
Technical Specification
5
Buttons location and usages
(1)
(2)
(3)
(4)
(5)
(6)
(7)
(8)
(9)
(10)
(11)
Power button / Return back function
Reset
Previous function
Play / Pause function / Enter into Sub menu
Next function
Volume +
Volume USB port
Micro SD card slot / MIC
Earphone jack
Hook for neck strap
6
Basic Operation
Power on and off
Long press 3 seconds
to turn on or turn off the player.
Return function
Short press the
to return back major menu interface .
Play Button function
Short press
to play or pause ,
Long press
to enter into or return back sub menu .
Volume Button Funtion
Press + /- button to s adjust the volume.
When below warning picture displays on screen , you can
button , or pls reduce your
choose to continue by press
volume to avoid hearing damage under high volume for long
periods.
7
Insert and pull out the Micro SD card
Inserting: put the Micro SD card face up, and slightly,
force the card into the slot.
Pulling : Slightly push the Micro SD card, and it will bounce by
a section , and then you can take it out.
Caution: Please perform inserting and pulling operation when
power is off ! Otherwise, it will lead to loss or damage
the files in the card. If no card is inserted, the
computer will be unable to perform read and write
operation for the disk notes of the later moving disk.
(Micro SD card ).
Driver and Software Utilities Installation
If you are using Windows 98/98SE, you have to install the
driver before downloading any files to your player.
Note: If you are using Windows Me/2000/XP, you may skip the
following installation procedures.
Step 1: select “CD installer” into Enable status from “set” menu
of unit.
Step 2: player should be connect with PC, there are
accordingly show mobile hard-disk of player in PC, named
CD-ROM, Double click on to find the driver installation. Firstly
8
install software utilities(EndUserTools_4.36) ,Follow the
screen-menu to complete the installation, and then restart
your computer.
Step 3: After installation is completed, please converting
different video format to .AMV video
Converting different video format to AMV video
Step 1: After installing the driver and software utilities
( EndUserTools_4.36 ) , click Start button, select All
Programs > MP3 Player Utilities 4.36 > AMV Convert Tool.
Step 2: Click on the Input File button to select the .ASF video
file you want to convert to an .AMV video file. Also click on the
Output File button to select the destination path for the AMV
video file.
Step 3: Click Convert button to start converting process. You
will see .AMV video file was converted.
Note: The software can convert .DAT, .WMV, .AVI video
format into .AMV format. But if the resolution for the desired
files less than 128x120, you may not convert it correctly.
Operation of Bluetooth
Press
/
to select “Bluetooth” menu ,Press
9
to
enter the bluetooth menu.
There are BT control /Search Device/Device list /All music//BT
Now playing for your select by press
/
/
, and Press
to select the“BT control” is turn BT on , then seach
the device with bluetooth fuction and match with it.
And please open the other device support bluetooth function
accordingly , then play the music, you can enjoy the music
from bluetooth speakers or other bluetooth devices.
Press
/
to select
“All music”, you can choose to
play music from local folder and card folder.
If you want to close the bluetooth function, press
confirm “Yes ” by press
and
to exit the Bluetooth status
Unit will automatically save records of BT device into “Device
list”.once next play , unit will automatically match with device
from “Device list”.
Operation of Music
Press
/
to select “Music” menu , you can choose
music from All Songs/ Artists / Albums/Genres /Play Lists/
Album list/Audio books, press
button to play music. You
can pause music by press
,then long press
to add
your favorite songs into “ Playlist on the go “ folder.
When music playing , you can select next or previous song by
10
press
/
,pause playing by short press , or enter into
sub menu to set “Play mode /Sound setting /Add to playlist/
Remove from playlist /Sleep timer /Delete/bookmarks” by long
press
button ,and confirm current setting by press
.
After setting , long press to return back sub menu and return
back major menu by press
Play Mode
You can choose Repeat / Shuffle/ Repeat setting from “Play
mode” by Press
/
” , press
to confirm your setting.
Sound setting
You can choose Equalizer/Variable/Speedplayback from
“Sound setting” by Press
/
” and press
to
confirm your setting.
Creat Playlist
Press
/
to select “Create Playlist” ,it firstly prior to
scan and display songs from Micro SD card once insert Micro
SD card. And vice versa ,only display songs from Unit itself
when remove Micro SD card ,
Press
/
to select one songs , enter into sub menu to
“add playlist “by long press
,confirm “Yes”to add your
songs into “Playlist on the go 1” floder , “Playlist on the go 2”
floder , or “Playlist on the go 3” floder.
11
If remove Micro SD card , it is impossible to display songs ftom
Micro SD card in these Playlist on the go folders ,
Operation of Video
Press
/
to select
your video by press
/
to start playing.
“Video”menu ,You can choose
button ,then press
button
When video playing ,you can enter into sub menu to set
“ Brightness /Repeat /Delete video/Create playlist” by long
press
button.
and confirm current setting by press
.
After setting , long press to return back sub menu and return
back major menu by press
Operation of Pictures
Press
/
button to select “Pictures” and press
to
show photos, You can enter into sub menu to set ” Now
playing/ Brightness /backlight timer/Slideshow setting/Delete
picture/Creat playlist” by Long Press
setting by press
, and confirm current
.
After setting , long press to return back sub menu and return
back major menu by press
Slideshow setting
12
Press
/
to choose Slideshow setting , you can
set“Timer per slide /Repeat/Shuffle/Thumbnail” by press
. and press
to confirm your setting.
/
Operation of Recordings
Press
/
to select “Recordings” menu ,you can enter
into sub menu to set
“Start voice recording / Recordings
library /Record format / Record setting “and confirm current
setting by press
.
After setting , return back menu by press
Start voice recording
Press
/
Press
button to start or pause record ,After finish
to choose “Start voice recording” to record .
recording , press
to exit recording,choose “YES” to save
records by press
.
Recordings library
press
/
to choose “Recordings library” to check
records or delete records.by press
Record format
press
/
to choose record format MP3/WAV/ACT,
13
confirm your desired format by press
Record setting ,
Press
/
to set bitrate
(512bps/768bps/1024bps/1536bps)
/ Tarck AVR mode
(normal /AVR mode )/ Set record scene ( normal/ train/
meeting/long range/ disable noise cancellation ), confirm your
setting by press
Operation of Settings
Press
/
to select “settings” menu and press
button to set “Play mode /Sound settings/Sleep timer/Display
setting/ Date and Time/Slideshow setting /Language
/Information /Legal/ Format device/Factory setting /CD
Installer .
After setting , press
to return back menu
Play mode
Press
/
to select “Play mode ” and press
button
to set “Music from (all songs/ this artist/ this album/this genre) /
Repeat / Shuffle “and press
to confirm setting.
Sound settings
14
Press
/
to select “Sound settings ” and press
button to choose Equalizer/key tone and press
to confirm
setting.
Sleep timer
Press
/
to choose Off/ set sleep timer(1Mins to 99
Mins ),and press
to confirm setting.
Display Setting
Press
/
to set
blacklight brightness/ backlight
time( from 10Sec/ 20 Sec / 30 Sec / Always on) / screensaver
(None /Digital clock/Album art/screen off) and
press
to confirm setting.
Date & Time
Press
/
press
to confirm setting.
to set time settings and date settings , and
Slideshow setting
/
to choose Timer per slide/ repeat/ shuffle and
Press
press
to confirm setting.
Language
Press
/
to choose your desired language and press
15
to confirm, return main menu by press
Information
Press
/
to check player information /Disk space/ File
type supported , return main menu by press
.
Operation of EBOOK
Press
/
to select “EOOK” menu, Press
/
to
select TXT flies , press
to read and entre into sub menu
by long press
to set “ play setting/ Delete
ebook/Bookmark
select/Deletebookmark/Add bookmark/Add bookmark/Page
select ”
Operation of Folder view
Press
/
to select “folder view ” menu , to check all
records ,pictures,music,video files and files from Micro SD
card , press
button to play files.
Operation of Tools
Press
/
to select “Tools” menu ,and press
button
to set “Calender/Stopwatch”, and confirm setting by press
button.
16
Technical Specification
Flash Memory
4GB
MP3 compressed rate
MP3(8 – 320 kbps) WMA(5-384kbps)
supported
OGG/ ACC/APE/WAV
Video format supported
AMV
Photo format supported
JPEG/BMP/GIF
Bluetooth
Support
Battery
140mAh
Interface
USB2.0 high speed
1.8” Color TFT display (128*160
Display
resolution )
Acessories
GB,User manual,Earphones,USB cable
Weight
31g
Dimensions
72 mm(W) x 48 mm(H) x 9mm(D)
17
Trouble Shooting
What should I do if there’s no sound when playing?
You should check the volume first. If the volume has been
turned up, maybe the memory format of the device is
incorrect.
Service and support
For information:
http://www.axxion-electronics.com/
For support:
http://axxionsupport.zendesk.com
Axxion helpdesk:
Germany
The Netherlands
1ct P/min)
Belgium
France
0900-1520530
0900-23553626
(Local charges)
(Local charges +
02-6200115
0170480005
(Local charges)
(Local charges)
The helpdesk is accessible from Monday to Friday from 9 AM
till 6 PM. In case your device needs repair, our helpdesk will
redirect you to your local dealer.
Axxion offers service and warranty in accordance to European
law, which means that in case of repair (both during and after
the warranty period), you should contact your local dealer.
Please note: It is not possible to send products to directly
Axxion for repair.
Important note: If this unit will be opened, or accessed in any
way by a non-official service center, the warranty expires
immediately.
18
Hereby, STL Group BV, Ankerkade 20 NL 5928
PL Venlo, declares that this product is in
compliance with the essential requirements and
other relevant provisions of Directive 1999/5/EC.
This product operates at 2400 - 2483.5 MHz and is designated
only to be used inside a normal household environment. This
product is suited for this purpose within all EU counties.
This symbol indicates that the relevant electrical
product or battery should not be disposed of as
general household waste in Europe. To ensure the
correct waste treatment of the product and battery,
please dispose them in accordance to any
applicable local laws of requirement for disposal of
electrical equipment or batteries. In so doing, you will help to
conserve natural resources and improve standards of
environmental protection in treatment and disposal of electrical
waste (Waste Electrical and Electronic Equipment Directive).
WARNING: Prolonged exposure to loud sounds
from personal music players may lead to
temporary or permanent hearing loss.
All rights reserved
19