1
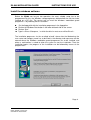
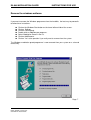
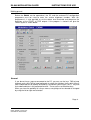
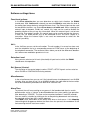
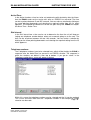
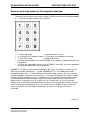
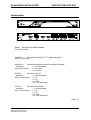
USER MANUAL
EA-946 Modulation Guard
Manufacturer:
Eela audio
Het Riet 8a
5431 NM Cuijk
The Netherlands
Tel: (+31) 485 331182
E-mail: [email protected]
Internet: www.eela-audio.com
Dealer:
EA 946 MODULATION GUARD
INSTRUCTIONS FOR USE
Contents.
Fuction
Features
Instalation
Step 1
Step 2
Step 3
Remark
Step 4
Step 5
Step 6
Step 7
Step 8
Step 9
Install the windows software
Remove the windows software
General.
Software settings/items
Functional options:
Unit :
Detection Level:
Ext (Source) Control:
Miscellaneous:
AlarmTime:
ActionTime:
Dial interval:
Telephone numbers:
Adding a telephone number:
Removing a telephone number:
Selecting a telephone number from the list:
Function buttons
Upload:
Download:
? Help:
Cancel:
OK:
Operational principle
Remote: answering a service call coming from the EA-946 :
Remote control by means of the telephone dial pad
Connections
3
3
4
4
4
4
4
4
4
4
5
5
5
6
7
8
9
9
9
9
9
9
9
10
10
10
11
11
11
12
12
12
12
12
12
13
14
15
16
Page 2
EELA AUDIO Het Riet 8 A
5431NM The Netherlands
EA 946 MODULATION GUARD
INSTRUCTIONS FOR USE
Function
The EA946 is meant to monitor the signal going to the transmitter to detect silence in
case of a failure in the audio feed. There is also an external fault-detect input available
on the EA946 by means of a DC (optocoupler) input, which can e.g. monitor a fault
signal output of the transmitter (“no carrier”). When a fault occurs and the preset
‘ActionTime’ has passed, the EA946 shall try to contact 1 out of 5 programmed
telephone numbers and the AUX-SOURCE will be activated and routed to the
transmitter. After the telephone connection has been established, the called person
(service engineer) can control the unit by means of his dial pad (DTMF) to select
monitoring the STUDIO signal or the AUX source signal, START or STOP the AUXsource and change over the transmitter routing relay from STUDIO to AUX-source.
Features
- Detection at AUDIO failure and at activating an external optocoupler input.
- Acoustic pre-alarm by means of built-in buzzer.
- 4 preset "No-Audio" detect levels .
- Unit identification.
- To be configured over external PC with included Windows PC program.
- 5 programmable service telephone numbers.
- Settings are being stored in a non-volatile re-programmable EEPROM memory.
- Built-in Dialler.
- Connection to Telephone lines only over officially approved Telephone line
interface such as the EA815/1 (Telecom approved) or over PABX.
- DTMF remote control possibility (monitoring, start & stop external AUX source,
transmitter routing change over and reset).
- 5 Status led's.
- Start/Stop optocoupler outputs.
- Remote alarm (optocoupler) output.
- External alarm (optocoupler) input.
Page 3
EELA AUDIO Het Riet 8 A
5431NM The Netherlands
EA 946 MODULATION GUARD
INSTRUCTIONS FOR USE
Installation
Step 1
Connect the outputs (L/R) of the studio desk or the studio's output router (what usually
goes to the transmitter) to the inputs (L/R) at the back of the EA946 marked
"STUDIO".
Step 2
Connect the audio signal (L/R) coming from the AUX-source to the inputs (L/R)
marked "EXT".
Step 3
Connect the outputs of the unit marked "OUT" (L/R) to the inputs of the transmitter or
the line feeding the transmitter.
Remark
Make sure you do not reverse the LEFT and the RIGHT signals!
Step 4
Connect the START and STOP control outputs to the remote control inputs of the
AUX-source. The START and STOP outputs can be found on the 9 pin D-sub
connector marked "CTL_out" at the back of the EA946. Please note the polarity of
these optocoupler outputs.
Step 5
Connect a line coming from a home exchange or PABX to the socket marked
MONITOR I/O. If you want to use a direct outside line you have to use an officially
approved Telephone line interface, such as the EELA AUDIO EA815/1 PTT approved
TELEPHONE HYBRID. This can be connected with the -for this purpose dedicated- 9
pin D-sub connector marked 'HYBRID I/O' of the EA946 by means of a full wired 1 to
1 D-sub cable.
Step 6
Connect a RS232 cable between the RS232 port of an IBM-compatible computer and
the 9 pin D-sub connector marked "PC_port" of the EA946.
Page 4
For programming, connect audiosignal to the EA946
EELA AUDIO Het Riet 8 A
5431NM The Netherlands
EA 946 MODULATION GUARD
INSTRUCTIONS FOR USE
Step 7
Connect the 5 pin DIN connector of the Mains adaptor included in the delivery to the
connector on the unit marked "POWER". Before you plug the MAINS adaptor in the
socket, make sure the delivered MAINS adapter is suitable for your local MAINS
Voltage and Frequency. Now connect the MAINS power supply to the MAINS voltage.
The ON-led at the front of the EA946 will light up to show the unit is in operation, and
after 3 seconds the internal buzzer will give a short beep to confirm the start up
procedure has been successful.
Step 8
Now install the Windows modulation guard programme in the way it is described in the
next chapter.
Step 9
Set the EA946 in such a way as described in the chapter “making presets”. The EA946
is now ready for use.
Page 5
EELA AUDIO Het Riet 8 A
5431NM The Netherlands
EA 946 MODULATION GUARD
INSTRUCTIONS FOR USE
Install the windows software
Before the EA946 can be put into operation, the most suitable setup has to be
programmed. For this, the Windows setup programme, delivered with the unit has to be
installed on a PC first. The easiest way to install the Windows “modulation guard
programme” is by following these instructions:
Put the floppy disk with the installation programme in the floppydrive.
Click on the Windows Start button in the lower lefthand side on the screen.
Click on “Run”.
Type in <Drive>:\Setup.exe , in which the drive in most cases will be Drive A .
The installation progresses via the so-called “wizard”, where after the Welcoming, the
user name and company name has to be filled in, the directory and map name can be
entered where the Windows modulation guard programme has to be installed, and
where a confirmation is asked to allow the system to start the installation. Then the
installation begins; the progress of the installation can be followed by means of the
progress bars.
Page 6
EELA AUDIO Het Riet 8 A
5431NM The Netherlands
EA 946 MODULATION GUARD
INSTRUCTIONS FOR USE
Remove the windows software
If you want to remove the Windows programme from the harddisk, the best way to proceed is
to follow these instructions:
Click on the Windows Start button on the lower lefthand side of the screen.
Click on Settings.
Click on Control panel.
Double-click on Add/Remove programs.
Select ‘Modulation Guard’ in the list.
Click on Add/Remove.
Click on ‘Yes’ at the question if you really want to remove from the system.
The Windows modulation guard programme is now removed from your system on a safe and
correct way.
Page 7
EELA AUDIO Het Riet 8 A
5431NM The Netherlands
EA 946 MODULATION GUARD
INSTRUCTIONS FOR USE
Making preset
Before the EA946 can be operational, the PC and the enclosed PC configuration
programme must be used to enter the service telephone numbers. With this
programme it is also possible to set the detect level threshold and determine the
behaviour of the START & STOP outputs. If the program is started it will give the
screen layout as shown below.
General.
If you do not have a mouse connected to the PC, you can use the keys TAB to jump
forwards and <shift>TAB to jump backwards to select the right box. Items which have a
letter underlined can be quickly activated by simultanous pressing the <ALT> key and
that underlined letter in the requested function. These are the so-called hot-keys.
When you have the posibility of using a mouse, everything can be selected or changed
by using the left or right mouse button.
Page 8
EELA AUDIO Het Riet 8 A
5431NM The Netherlands
EA 946 MODULATION GUARD
INSTRUCTIONS FOR USE
Software settings/items
Functional options:
In the Error detection box you can determine on which fault situations the EA946
should react. With Audio error selected, you want the EA946 to react when the level of
the audio signal comes below a selected minimum level. The External input can be used
for two different facilities, e.g. Extern Error detect and Inhibit unit. When selecting the
external input to become ‘Inhibit unit’ control, this input can be used to disable the
guarding function of the unit e.g. by a time-clock. When this external input is set to have
an external ‘Error detect’ function, this control input can be used to activate the alarm as
if there was no audio present e.g. to be connected to the ‘no carrier’ output of a
transmitter. When the external input is not used, we recommend to select the ‘No
function’ possibility.
Unit :
In the ‘Unit’ box you can set the unit number. The unit number is in case of an alarm sent
over the telephone line by a coresponding amount of DTMF tones at the beginning of
the telephone connection. The amount of tones allows you to tell the differrence between
units when more modulation guards are in use.
Detection Level:
Here you can select out of 4 levels (threshold) of input level at which the EA946
should come into operation.
Ext (Source) Control:
The character of the control output used as START & STOP signals can be set to be
either PULSE or CONTINUOUS closing contacts.
Miscellaneous:
In the miscellaneous box you can set if the internal buzzer should operate in an ALARM
situation. Also you have to set if in an ALARM situation the audio feed to the transmitter
has to be automatically diverted to the other AUX source or not.
AlarmTime:
To prevent the unit from reacting on any pause in the broadcasted signal a certain
period can be set for a "silence" to be allowed before the system comes into operation
after detecting a "ERROR". The time can be anywhere between 5 and 255 seconds.
You can make a selection by clicking on the arrow pointing downwards and selecting
the required setting from the list which appeares.
Page 9
The EA946 starts count-down to the Alarm time when a fault occurs. If this occurring
(intermitting)fault disappeares before the Alarm-time has passed, the countdown at the
next occurring fault will start from scratch.
EELA AUDIO Het Riet 8 A
5431NM The Netherlands
EA 946 MODULATION GUARD
INSTRUCTIONS FOR USE
ActionTime:
In the Action time box a time has to be set to determine with what delay after the Alarmtime the EA946 sends out the service calls after an ‘ERROR’ has occurred. The time
can be anywhere between 5 and 255 seconds. You can make a selection by clicking on
the arrow pointing downwards and selecting the required setting from the list which
appeares. The elapsed time before the service call goes out by the EA946 thus equals
the Alarm Time + Action Time.
Dial interval:
In the Dial interval box a time can be set to determine the time the unit will keep on
ringing one telephone number before, when not answered, going on to the next. The
time can be anywhere between 30 and 120 seconds. You can make a selection by
clicking on the arrow pointing downwards and selecting the required setting from the list
which appeares.
Telephone numbers:
The 5 telephone numbers have to be selected here, which will be tried by the EA946 in
sequence after the ActionTime has passed in an ERROR situation. The sequence in
which the numbers are dailed is from top to bottom. If you go for ‘select’ in the
Telephone number box a screen will appear as below:
Within this screen the telephone numbers can be selected and the list can be updated.
This list can also have more then the 7 telephone numbers in the example so
a wider
Page
10
selection can be made.
EELA AUDIO Het Riet 8 A
5431NM The Netherlands
EA 946 MODULATION GUARD
INSTRUCTIONS FOR USE
Adding a telephone number:
By selecting ‘Add’, a new telephone number can be added to the list, which can be used
later.
A name as well as a telphone number has to be inserted; the OK-button will not be
active until the data is complete. After entering a name the TAB key can be used to jump
to the field for entering the telephone number. The entry can be confirmed with the OK
or the <enter> key. A name automatically is limited to 20 characters, a telephone
number is limited to 20 digits including the wait signs. A '-' sign or a ‘+’ sign will cause a
break of approx. .5 seconds to wait for e.g. call progress tones if the EA946 is
connected through a home-exchange. The EA946 can only make dial-up connections
using the TONE (DTMF) mode.
Removing a telephone number:
You can remove a telephone number from the list shown by first selecting the number to
be deleted and then selecting the ‘Remove’-button.
Selecting a telephone number from the list:
A telephone number can be added to the Phonenumbers list, by first selecting the
number you want to add and then selecting the OK-button. The number selected will be
inserted on the position in the Phone list box where you have did ‘select’. Not all 5
numbers have to be enterred. If e.g. only 2 numbers are used, the EA946 will, because
of the lack of a third possibility, automatically return to dialling the first number when a
connection has not been established before that time.
Page 11
EELA AUDIO Het Riet 8 A
5431NM The Netherlands
EA 946 MODULATION GUARD
INSTRUCTIONS FOR USE
Function buttons
Upload:
With this feature, it is possible to send the settings made in the configuration programme
to the EA946. A progress bar (as shown below) displays the progressing of the upload
procedure.
After uploading, the Windows programme checks if the data which has been sent to the
EA946 arrived well. The progreesing of this check is also dispalyed by means of a
progress bar. If the check is completed, the result is being displayed for 2 seconds to
the user. The two possible messages are as follows.
Download:
This feature allows you to get the settings of the EA946 back to the windows
programme. In this way you can check how the EA946 was set, or make quick changes
on an existing configuration. The progressing of the download procedure is shown in the
same way as with the upload procedure by means of a progress bar. Also is the data
verified after downloading and the result shown in the same way as in the upload
procedure.
? Help:
This function shows the Help file , which gives a short explanation about the programme.
Cancel:
By means of Cancel you can leave the programme without saving the settings which
have been made or changed to the Harddisk.
OK:
Page 12
By selecting Ok you can leave the programme in a way that also the settings
are saved on the Harddisk .
EELA AUDIO Het Riet 8 A
5431NM The Netherlands
EA 946 MODULATION GUARD
INSTRUCTIONS FOR USE
Operational principle
After the downloading has been successful, or after the RESET switch is pressed, the
EA946 automatically comes into operational (guard) mode. The AUDIO-signal and the
external (if “error detect” function is activated) control input are being monitored.
- The green LED "AUDIO present" indicates there is a signal present on the "STUDIO"
input which is above the programmed minimum level. If for some reason the signal
should drop below this minimum the LED "AUDIO present" will go out and the LED
"AUDIO ERROR" will flash. This flashing means there is an error detected but the
EA946 will not yet take any action.
- If the external ERROR input is activated the LED "EXT ERROR" will start flashing.
Also in this case the flashing means that there is an external error detected but the
EA946 will not yet take any action.
If the studio signal remains below the preset level, or the external error input is
activated, longer then the preset "AlarmTime" the internal buzzer will give (when
enabled) a warning sign.
- If during the "ActionTime" the studio signal has not returned above the preset
minimum level the LED "AUDIO ERROR" shall be lit permanently and the AUX-source
will be activated and routed to the transmitter (if the option ‘Audio error’ was enabled in
the Error detection box of the configuration program).
- If during the "ActionTime" the external input still is active, the LED "EXT ERROR"
shall be lit permanently and the AUX-source will be activated and routed to the
transmitter (if the option ‘Error detect’ is selected in the ‘External input function’ box of
the configuration program).
The LED "BACKUP" indicates the AUX-source is active and routed to the transmitter.
In both cases the EA946 will, after the "ActionTime" has past, try to make contact with
any of the (max.) 5 preprogrammed service telephone numbers.
The LED "DIAL" will now flash as a sign the EA946 is dialling out trying to make a
connection.
This "DIAL" LED will be lit constantly if a connection has been established.
An external alarm OUTPUT is available to activate at this stage an external warning
sign. It is activated when an error occurs and the Alarmtime has passed. It is
deactivated again when the ActionTime has passed.
Page 13
EELA AUDIO Het Riet 8 A
5431NM The Netherlands
EA 946 MODULATION GUARD
INSTRUCTIONS FOR USE
The EA946 returns to its normal monitoring mode if the studio signal returns (or the
external error input is not active) before the "ActionTime" has past, the flashing LED
"AUDIO ERROR" (and/or LED "EXT ERROR") will go out; the buzzing will also stop.
If the EA946 has to return to its normal monitoring mode after the "ActionTime" has
past this can only be done by determining what has caused the unit to become active
(no audio or external, indicated by LED's), first take away this cause (LED's go out)
and RESET the unit by pressing the "RESET" button on the front panel of the unit or
by means of the reset possibility over the telephone line.
The external control input can also be used to disable the guard function of the unit. By
applying a voltage on this optoisolator input the unit interrupts its function e.g. by a clock
to monitor only certain airtime. For this application of the control input the function of this
input has to be set to “Inhibit Unit” in the configuration programme.
Remote: answering a service call coming from the EA-946 :
Always make sure the persons who could expect a service call from the EA946 know
of this possibility, can recognise such a service call and know how to answer or
operate in this case !
Answering a service call and remote control of the unit is only possible with a
telephone which can give tone-dialling (DTMF tone supported).
After a fault has been detected for a period of time longer then the "ActionTime", the
EA946 starts dialling the first of the (max.) 5 preprogrammed service telephone
numbers. If there is no answer within the set ‘Dial interval time’, it tries the second
number in the list. The EA946 keeps dialling the numbers in the list until any of the
calls is being answered. A service call coming from the EA946 can be recognised by
an intermitting tone (DTMF "1") seperated by a approx. 1 sec. break. The amount of
sequential DTMF tones is equal to the identification number set. This should be
answered by pressing any key on the telephone dial pad. If the EA946 has accepted
the tone-command, the intermitting tone which could be heard stops and now the
service call is answered. You should try to send the command tone in the off-time of
the receiving intermitting tone coming from the EA946 . If the intermitting tone doesn't
stop, then try to press a key again. After the call has been answered in the correct
way, the EA946 can then be controlled remotely in listening to the connected audio
sources, rerouting any of these signals to the transmitter, controlling the AUX-source
machine and even force a reset.
Page 14
EELA AUDIO Het Riet 8 A
5431NM The Netherlands
EA 946 MODULATION GUARD
INSTRUCTIONS FOR USE
Remote control by means of the telephone dial pad
The control commands are existing of a figure (DTMF tone) and have to be preceded by
a '*'. The layout and the functions are as follows;
* 1 monitoring studio.
* 3 monitoring AUX source.
* 4 Transmitter line routed to studio. * 6 Transmitter line routed to AUX source.
* 7 Start AUX source.
* 9 Stop AUX source.
* # Break the connection and reset of EA946 when remotely is determined that error
is corrected.
• * 0 Break the connection without reset of EA946; Reset then has to be perfomed
manual in the studio after error is corrected.
•
•
•
•
EXAMPLE: The AUX source can be monitored by pressing '* 3' and then, if necessary the
AUX source can be started with '* 7' and/or stopped with '* 9'. The studiosignal can be
monitored by pressing '* 1'. After checking the available audio sources, you can select the
source feeding the transmitter. By pressing '* 4' the signal coming from the studio is routed
to the transmitter and by pressing '* 6' the AUX-source is routed to the transmitter. After it
has been determined what is the best signal to be transmitted, you can disconnect in 2
different ways: e.g by pressing ‘* #’ or pressing ‘* 0’. By pressing ‘* #’ this will reset the
EA946, the line will be disconnected and the unit will resume its guarding function. The line
can also be disconnected by pressing ‘* 0’ in which case the EA946 wil not reset but will
stay e.g. routed to the AUX source and waiting for a manual reset after the error is
corrected.
Page 15
EELA AUDIO Het Riet 8 A
5431NM The Netherlands
EA 946 MODULATION GUARD
INSTRUCTIONS FOR USE
Connections
Front view EA946
Rear view EA946
Power Connection for MAINS Adaptor
5 pin DIN Female
Hybrid I/O
Connection for EA815/1 PTT approved hybrid.
9 pin D-sub Female
Monitor I/O
Connecting telephone extension (home exchange).
connector
1 = not connected
3 pin XLR Female
2 = tel-a wire
3 = tel-b wire
RS-232
Connection for PC
connector
1 = not connected
9 pin D-sub Female
2 = Tx
3 = Rx
5 = GND
4-9 = not connected
RS-232
Connection for EA946
connector
1 = not connected
9 pin D-sub Female
2 = Rx
3 = Tx
5 = GND
4-9 = not connected
Page 16
EELA AUDIO Het Riet 8 A
5431NM The Netherlands
EA 946 MODULATION GUARD
INSTRUCTIONS FOR USE
Control
Connections for control external AUX source.
connector
1 = gnd
9 pin D-sub Female
2 = start (+)
3 = stop (+)
4 = alarm (+)
5 = extern error (+)
6 = start (-)
7 = stop (-)
8 = alarm (-)
9 = extern error (-)
Ext L & R
Connection from EXTernal AUX source.
connectors
1 = gnd
3 pin XLR Female
2 = signal (+)
3 = signal (-)
Studio L & R
Connection from STUDIO
connectors
1 = gnd
3 pin XLR Female
2 = signal (+)
3 = signal (-)
Out L & R
Connection to Transmitter
connectors
1 = gnd
3 pin XLR Male
2 = signal (+)
3 = signal (-)
Page 17
EELA AUDIO Het Riet 8 A
5431NM The Netherlands