1
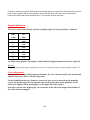
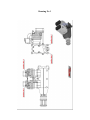
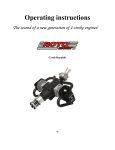
Operating instructions
Czech Republic
-1-
User’s Manual for Roto 85 FSI Engine
Congratulations on purchasing the four stroke engine ROTO,
manufactured exclusively in the Czech Republic.
You have purchased a new four stroke twin cylinder gasoline engine. It is important to follow a
few necessary steps to insure a successful first start in your model airplane.
Since the engine has been started and tested by the manufacturer, it will perform as required.
The engine has been adjusted and tested with an attached 25/10 propeller and the ROTO FS
exhaust. Recommended rpm are 1200 – 6000.
Packaging content:
Engine
Ignition
Sparkplug wrench
Silicon hose
Tie straps
1 piece
1 piece
1 piece
2 pieces
4 pieces
Engine Mounting
For mounting the engine inside the model airplane,we recommend using 5mm high strength steel
bolts, large flat washers and lock nuts.
Warning!
Check the engine mounting for tightness periodically.
Engine Installation
It is necessary to provide enough fresh air to the intake of the carburetor. (In case of lack of air,
the engine may exhibit poor performance and it may fluctuate at the maximum speed.)
It is necessary to ensure sufficient cooling of the cylinder heads and of the cylinders by sufficient
supply of fresh air from the propeller and/or from the ambient environment.
Exhaust
The elbows of the exhaust can rotate. As soon as the desired position is achieved, the center 19
mm bolt can be tightened to fix them in place.
Warning!
Do not damage the exhaust elbows ends! The extension pieces that can be attached to them might not
seal properly.
The silicon hose is used to seal the joint between the exhaust elbows and the ROTO FS exhaust
pipes or between the extension piece and the ROTO FS exhaust pipe. The extension piece and the
ROTO FS exhaust pipe are not part of the packaging !
Use the included tie straps on both ends of the silicon hose to connect the extension piece or the
exhaust pipe.
-2-
Warning!
Do not reduce the diameter of the exhaust pipes.
Warning
The silicone hose properly seals only if the contact surfaces are clean of dirt and grease. If repeated
connection is made, contact surfaces have to be cleaned and degreased.
Warning!
The gap between the elbows and the exhaust pipe should not exceed 2mm.
Fuel System
The gas line needs to be connected to the carburetor. Remove the protective cap from the
carburetor’s threaded nozzle and connect the gas line to it.
Warning!
Reinstalling the protective cap during extended periods while the engine is removed is recommended to
prevent the carburetor from drying up and therefore causing the engine to malfunction..
Carburetor
There is an air intake attached to the carburetor that must not be covered!
Warning!
Do not remove or alter the air intake! It is a part of the engine responsible for its correct operation.
Engine Oil Discharge
There is a small amount of unburnd engine oil used to lubricate the crankcase that needs to be
discharged. Please remove the cap from the small yellow threaded nozzle on the bottom side of the
engine and connect a hose to it routing the oil away, toward the chassis is preferred.
Warning!
Keep the discharge hose clear otherwise, engine damage can occur!
Propeller Mounting
It is very important to mount the propeller correctly. There are 6 high strength steel 5 mm screws
used. Please tighten them evenly. Also, make sure that the propeller is sitting flush with the
mounting plate.
Warning!
Check for tightness of the screws regularly, especially when the propeller is new and made of wood. If
the propeller comes loose, the mounting screws can break and the engine would require authorized
repair work.
-3–
In order to mount the propeller flush with the mounting plate you can measure the distance between one
blade of the propeller and an attached object, then rotate the blade 180° and measure the distance
between the other blade and an attached object. The distance must be the same!
Engine Lubrication
The correct engine lubrication is achieved by adding engine oil to the gasoline in a 1:40ratio.
Gas
Oil
Liter
Liter
1
0,025
2
0,05
3
0,075
4
0,1
5
0,125
6
0,15
Use 95-98 octane gasoline. The engine oil used should be high performance two stroke engine oil.
Warning!
To achieve long lasting engine performance always use high performance superior quality engine oil!
Valve Adjustment
In order to achieve long lasting engine performance, the valve clearance needs to be checked and
adjusted if necessary after 2-3 hours of operation.
To check and adjust the valve clearance: remove the valve cover by unscrewing the mounting
screws, moving the engine into its top dead center position (the mark on the propeller carrier
needs to be aligned with the parting plane on the upper side of the engine).
After that, you can start adjusting the valve clearance on the side of the engine where neither of
the rocker arms are engaged.
-4-
Clearance adjustment:
Loosen the lock nut using a wrench. After the desired clearance is achieved by turning the screw
with a screwdriver, retighten the lock nut. Then proceed to the next valve.
Intake valve- 0,1mm or 0.004"
Exhaust valve- 0,1mm or 0.004"
After rotating the crankshaft by 180° repeat on the next valves and reassemble it.
If you do not have much experience doing the valve adjustment in this manner:
1. Send the engine to an authorized repair shop for the valve adjustment.
2. Get the information from the manufacturer at [email protected]
Now the engine has been set up and no further adjustment will be needed unless other engine
work is being done.
Ignition
Warning!
Don't remove the sensors of the ignitions from the back engine cover.
Installing the ignitions is an important part of mounting the engine into the model airplane.
The ignitions has to be placed in a place where it cannot be affected by excessive heat from the
cylinder heads or the exhaust system.
If the ignitions reaches a temperature of 60° C it will automatically turn off and the engine will
stop running.
Warning!
Make sure the ignition gets sufficient cooling.
Connect the high voltage spark plug wires to the spark plugs and secure them with a 3mm screw
that is between the ribs on the upper side of the cylinder head.
Warning!
Do not bend the high voltage spark plug wires!
-5-
Connecting the Ignition
Recommended power for ignition is a 4-9V!
The batteries used for ignition have to be the high demand type!
Some NiMH types might not work well for ignition purposes!
Warning!
The batteries should be fully charged before each flight!
Starting for the First Time
The first start has to follow these steps:
Due to the safe transportation of the engine to the customer are needles of the carburetor
adjustment supplied externally.
After removing the engine from the box, it is necessary needles screwed into its place. Needles can
not be wrong placed, each needle has a different thread.
Remove the needles from the safety tube and screw both needles fully, then set the needles as
follows:
needle "H" loosen for 1.5 turns
needle "L" loosen for 1.5 turns
By this is carburetor basic settings for the first start the engine.
!!!!!!!!!!!!!!!Make sure the ignition is turned off!!!!!!!!!!!!!!!!!!!!!!!!!!!!
Engage the carburetor choke while, if possible, covering the carburetor air intake with your finger
to achieve the best engine suction. Spin the propeller blade approximately ten times then uncover
the carburetor air intake, turn the choke off, turn the ignition on and start the engine without the
choke. The only time this method is used is during the initial suction of gasoline into the
carburetor.
Allow the engine to warm up to its operating temperature . Let the engine run for 30 minutes for
4000 rpm.
The next step is fine-tuning the carburetor according to which exhaust system and propeller have
been used. Use the knob marked “H” to fine-tune the highest output of the engine and the knob
marked “L” to fine-tune the highest rpm.
The idle speed can be adjusted using the controls on the radio transmitter.
For regular engine starting, use of the “choke less” method is recommended:
Turn off the ignition, activate the carburetor choke, spin the propeller several times in order to
suck gasoline into the engine, then turn the choke off, turn the ignition on and start the engine.
-6 -
Warning!
This method of starting the engine is recommended if the engine is started several times per week. If it is
done less frequently, another method is preferred.
Another way of starting the engine:
First, turn the carburetor choke and the ignition on. After the engine turns over, turn the choke
off and start the engine.
Warning!
Do not remove the gasoline from the chamber after use. This would let air into the system and make it
harder for the engine to start!
Safety Instructions
Always use caution when handling the engine!!!
Even slow spinning of the propeller can start the engine and cause an injury!!!
Make sure to have the model airplane secured in place when starting the engine so it does not take
off and cause an injury!!!
Do not approach people with the model airplane while its engine is running!!!
Do not touch the engine after flight, you can burn yourself!!!
Do not jeopardize your safety, follow the instructions and enjoy your new ROTO engine.
Peter Cita - Manufacturer of ROTO Engines
-7-
WARANTY REGISTRATION CARD
Product name:
Type:
Product serial number:
Date of purchase:
Signature:
Dealer’s name, address:
Stamp:
ROTOmotor s.r.o.
Zbečník 259, 549 31 Hronov
Czech Republic
www.rotomotor.cz, e-mail: [email protected]
Tel.:00420 491 485 211, 00420 777 596
-8-
Drawing No. 1