1
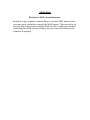
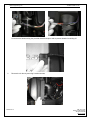
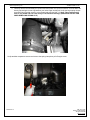
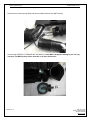
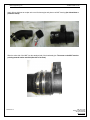
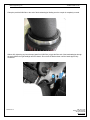
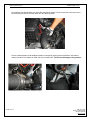
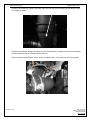
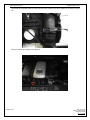
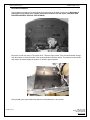
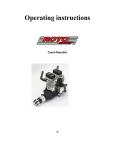
www.vf-engineering.com
VW MKV Rabbit 2.5 CAI
COLD AIR INTAKE INSTALLATION
GUIDE FOR VW MKV 2.5L RABBIT
2006-7 (150hp model)
NOT CARB APPROVED
WARNING: DO NOT BEGIN INSTALLATION PRIOR TO
READING THE PRE INSTALL NOTES ON PAGES 2-4
VF ENGINEERING
www.vf-engineering.com
M-F 9:00AM – 5:30PM (PST)
1365 N. Dynamics St. #E, Anaheim CA 92806 • Phone: (714) 528-0066 • Fax: (714) 528-0067
PAGE 1 of 14
P/N: VF-010-39
© 2007 VF Engineering
All rights reserved
Rev 2.7..25.07
www.vf-engineering.com
VW MKV Rabbit 2.5 CAI
IMPORTANT PRE-INSTALL NOTES:
- SPECIAL INSTALL NOTES FOR COLD AIR SYSTEMS
*** COLD AIR INTAKE SYSTEMS LOCATE THE AIR FILTER LOW DOWN IN THE DRIVER SIDE
CORNER OF THE FRONT BUMPER. AS SUCH THE AIR FILTER IS SUCCEPTIBLE TO INGEST RAIN
WATER AND POSSIBLY CAUSE PERMANENT AND TERMINAL ENGINE DAMAGE DUE TO
HYDROLOCK. IF YOU INSTALL THIS PRODUCT, IT IS ASSUMED THAT YOU ARE UNDERTAKING
THIS RISK AT YOUR OWN WILL AND HOLD VF-ENGINEERING HARMLESS TO LIABILITY FROM
DAMAGE.
*** MODIFYING YOUR VEHICLE WITH AFTERMARKET PRODUCTS FOR POWER ENHANCEMENT
HAS INHERENT RISKS WHICH THE CONSUMER ASSUMES UPON INSTALLATION OF THIS
PRODUCT. IF YOU CHOOSE NOT PROCEED TO INSTALL THIS PRODUCT PLEASE CONSULT YOUR
RETAILER TO ARRANGE FOR PRODUCT RETURN.
*** Optional Extras available to help reduce hydrolock: K&N water repellant (water resistant only)
sock cover for air filter element. VF-Engineering air box to reduce air filter exposure to road water.
Please consult VF for these accessories.
*** This installation guide serves as an outline of the steps needed to install your cold air intake
system and is not intended to guide a novice through the installation. If you do not have the proper
tools, knowledge and experience to carry out the installation, please seek help from a professional.
*** The pictures in this manual are for reference only, and may not match the exact appearance of
your vehicle or parts provided.
*** VF-Engineering strongly recommends Bentley Publishers® service manual # VG05 (Golf/Jetta)
for this install**
1) THE USER AND INSTALLER ASSUME ALL RISKS ARISING FROM THE USE OF THIS
PRODUCT. VF-ENGINEERING OR ITS EMPLOYEES ARE NOT RESPONSIBLE FOR ANY
CONSEQUENTIAL LOSSES. THIS COLD AIR INTAKE SYSTEM IS INTENDED FOR USE ON
HEALTHY, WELL MAINTAINED ENGINES. VF ENGINEERING IS NOT RESPONSIBLE FOR
ENGINE DAMAGE.
2) BE SURE TO READ INSTUCTIONS COMPLETELY, INCLUDING ALL WARNINGS AND NOTES,
PRIOR TO INSTALLATION.
3) PLEASE SEE ADDITIONAL PRE-INSTALLATION NOTES ON NEXT PAGE
*****VF Engineering is not responsible for engine damage due to an improperly installed or shipped
COLD AIR INTAKE*****
PAGE 2 of 14
P/N: VF-010-39
© 2007 VF Engineering
All rights reserved
Rev 2.7..25.07
www.vf-engineering.com
VW MKV Rabbit 2.5 CAI
For full performance and continued reliability, please heed the following recommendations:
•
•
•
•
•
Use only premium grade fuel rated at 91 octane or higher (R+M/2) if being used in
conjunction with GIAC software.
The compression ratio of the vehicle must be unaltered prior to the installation of this kit
If your engine has been modified in any way, please contact VF Engineering prior to the
installation of this product
Always listen for detonation (pinging) and discontinue hard use (full throttle) until problem is
resolved
Perform a regular oil, filter and sparkplug change.
THIS MANUAL PROVIDES INFORMATION ON THE INSTALLATION OF THE VF
ENGINEERING COLD AIR INTAKE KIT SPECIFICALLY DESIGNED FOR THE SPECIFICATION
MKV 2.5L 06-07 RABBIT (150hp model)
AN UNDERSTANDING OF THE INFORMATION CONTAINED IN THIS MANUAL WILL HELP
YOU. IF YOU BEGIN INSTALLING THIS PRODUCT, IT IS ASSUMED THAT YOU HAVE READ
THE ACCOMPANYING TERMS AND CONDITIONS OF USE DOCUMENT AND PRODUCT
WARRANTY DOCUMENT. ALL INFORMATION, ILLUSTRATIONS AND SPECIFICATIONS
CONTAINED HERIN ARE BASED ON THE LATEST INFORMATION AVAILBALE AT THE TIME
OF THIS PUBLICATION. ALL RIGHTS RESERVED TO MAKE CHANGES AT ANY TIME
WITHOUT NOTICE.
PAGE 3 of 14
P/N: VF-010-39
© 2007 VF Engineering
All rights reserved
Rev 2.7..25.07
Addendum
Revision to MAF extension harness.
Instead of using a separate extension harness, the stock MAF harness loom
covering can be opened up to unravel the MAF harness. Take care not to cut
into any of the harness wires and that the MAF cable is slackened enough to
easily plug into the MAF sensor.(battery may be removed for better access
to harness if required)
www.vf-engineering.com
VW MKV Rabbit 2.5 CAI
Cover the wire harness using the provided sheath and zip tie ends to prevent sheath from sliding off.
2.
Remove the air duct by removing 2 retainer screws.
PAGE 5 of 14
P/N: VF-010-39
© 2007 VF Engineering
All rights reserved
Rev 2.7..25.07
www.vf-engineering.com
VW MKV Rabbit 2.5 CAI
3. Carefully remove the secondary air injection and crank case vent “quick connectors” from the MAF flex
duct by squeezing the outer ring between your index finger and thumb. Unclip the large spring clamps
around the flexi duct that secure it to the throttle body and the MAF. (***Note: Take caution as this
hose is very brittle and can crack easily if it is flexed excessively!) (WEAR EYE PROTECTION
WHEN REMOVING SPRING CLIP)
Unclip ambient temperature sensor and remove the spring clamp then pull off engine cover.
PAGE 6 of 14
P/N: VF-010-39
© 2007 VF Engineering
All rights reserved
Rev 2.7..25.07
www.vf-engineering.com
VW MKV Rabbit 2.5 CAI
Disconnect the second spring clamp and remove plastic flexi duct from MAF housing.
Unscrew and CAREFULLY REMOVE MAF HOUSING. (***If the MAF is dropped or damaged, your car may
not start.) The MAF housing will be used later on in these instructions
PAGE 7 of 14
P/N: VF-010-39
© 2007 VF Engineering
All rights reserved
Rev 2.7..25.07
www.vf-engineering.com
VW MKV Rabbit 2.5 CAI
Apply silicone lubricant to coupler at the end of shorter pipe and place over MAF housing (the side without a
protective mesh).
Slide the other side of the MAF into the swedged end of the bracketed pipe. The arrow on the MAF must be
pointing towards intake manifold (direction of air flow).
PAGE 8 of 14
P/N: VF-010-39
© 2007 VF Engineering
All rights reserved
Rev 2.7..25.07
www.vf-engineering.com
VW MKV Rabbit 2.5 CAI
Clamp the provided K&N filter to the end of the bracketed pipe. Making sure the coupler is completely covered.
Without fully tightening any hose clamps (apart from K&N filter), wiggle the filter end of the bracketed pipe through
the gap between the right headlight and the chassis. Do not bolt the bracket down until the intake pipe is fully
connected.
PAGE 9 of 14
P/N: VF-010-39
© 2007 VF Engineering
All rights reserved
Rev 2.7..25.07
www.vf-engineering.com
VW MKV Rabbit 2.5 CAI
Now slide the pipe that attaches onto the intake manifold as shown. Do not connect the crank case vent or
the secondary air injection until the intake is in the desired position.
Once the desired position and headlight clearance is acquired, gently tighten the bracket to the chassis
making sure there is a washer on either side of the chassis hole. This will avoid damage to the grommet.
PAGE 10 of 14
P/N: VF-010-39
© 2007 VF Engineering
All rights reserved
Rev 2.7..25.07
www.vf-engineering.com
VW MKV Rabbit 2.5 CAI
Connect the secondary air injection and crank case vent connectors to the intake pipe and adjust till there
are no gaps as shown:
Tighten all hose clamps making sure nothing is loose. Remember do not tighten the bracket to the chassis
too much otherwise engine movement will be restricted.
Push the ambient air temperature sensor into the provided air hole. You should hear it click into position.
PAGE 11 of 14
P/N: VF-010-39
© 2007 VF Engineering
All rights reserved
Rev 2.7..25.07
www.vf-engineering.com
VW MKV Rabbit 2.5 CAI
Remove the final spring clamp from the rear side of the engine cover which allows you to pull the air duct
off.
Now you can put your engine cover back on.
PAGE 12 of 14
P/N: VF-010-39
© 2007 VF Engineering
All rights reserved
Rev 2.7..25.07
www.vf-engineering.com
VW MKV Rabbit 2.5 CAI
Heat shield installation:
The installation procedure of the heat shield requires that the car be lifted or jacked up. (**Remember if
jacking the car up always use a support, do not work under the car with a jack. YOU MUST USE
PROPER SUPPORTS SUCH AS JACK-STANDS)
Remove the under tray using a T20 torque driver. There are eight screws. There are two bolts that emerge
from the chassis on the driver’s side. Push the heat shield into position shown. The plastic trims and shield
may need to be twisted slightly to allow the VF shield to get into postion.
Using the M8 nyloc nuts provided bolt down the heat shield with a 13mm socket.
PAGE 13 of 14
P/N: VF-010-39
© 2007 VF Engineering
All rights reserved
Rev 2.7..25.07
www.vf-engineering.com
VW MKV Rabbit 2.5 CAI
PREVENTITIVE MEASURES
•
Do not drive your car through large puddles. This can cause hydrolock which may lead to
extensive damage to your car. VF- Engineering will not be responsible for any events of
hydrolock. You have been made aware of this risk at the beginning of these instructions
prior to installation. VF is not responsible for any consequential costs of removal or use of
this kit.
TROUBLE SHOOTING & MAINTENANCE TIPS AFTER INSTALLATION
• Loose crankcase vent tube is considered a vacuum leak and will cause poor fuel trimming which
may lead to a CEL.
• Loose crankcase vent tube to oil separator is a common cause of vacuum leak.
• Vacuum leak at hoses around silicon couplers may not be visible but is a simple mistake.
• Weak OEM crankcase vent tube (Melts with age) will cause vacuum leak.
• OEM Bosch MAF sensors have a lifespan and you can expect them to fail eventually. Failed or
partly failed MAFs will cause driveability issues and increase emissions.
SYMPTOMS AND POSSIBLE CAUSES
• Air leaks from connectors can cause a CEL.
• Damaging the MAF sensor may prevent your car from starting
• Very erratic idle – verify Mass Air Flow sensor may be fitted oriented in incorrect direction
• MAF signal CEL – check wiring harness extension and electrical continuity in extension harness
**Please read VF product warranty and maintenance/terms of use documents before using this
product.**
PAGE 14 of 14
P/N: VF-010-39
© 2007 VF Engineering
All rights reserved
Rev 2.7..25.07