1
Microsoft Windows Preinstallation Environment User's Guide
Page 1 of 27
Microsoft Windows Preinstallation Environment User's Guide
The Microsoft Windows Preinstallation Environment (Windows PE) is a minimal Win32 subsystem with limited services, based on the
Windows kernel running in protected mode. It contains the minimal functionality that you need to run Windows Setup, install an
operating system from a network share, automate basic processes, and perform hardware validation.
This user's guide provides information to corporate administrators about using Windows PE to deploy Microsoft Windows to computers
within your organization.
© 1985-2002 Microsoft Corporation. All rights reserved. Terms of Use.
Printing the Documentation
Using the Print command of the HTML Help viewer, you can print a single topic or all subtopics of a heading.
To print topics from this documentation
1.
2.
Select a topic or heading (book) in the Contents tab.
Click the Print button in the toolbar and follow the messages.
—OR—
Right-click the selected book, click Print, and follow the messages.
Windows Preinstallation Environment (Windows PE) Features
Microsoft Windows Preinstallation Environment (Windows PE) is a minimal Win32 subsystem with limited services, based on the
Windows XP Professional kernel running in protected mode. It contains the minimal functionality that you need to run Windows Setup,
install an operating system from a network share, automate basic processes, and perform hardware validation.
The Windows OPK CD is a bootable copy of the Windows Preinstallation Environment (Windows PE) (32-bit version) that supports all
mass-storage and networking drivers contained on the Windows XP Professional CD.
Note
l The Windows OPK CD is only available to OEMs. Corporate users must build a custom Windows PE CD.
Windows PE provides these features:
l
l
l
l
l
l
l
A hardware-independent Windows environment for both x86-based and Itanium-based architectures, with a small footprint on both
the bootable media and in memory.
A subset of the Win32 application programming interfaces (APIs), a command-line interface (Cmd.exe) capable of running batch files,
and support for Windows Script Host (WSH), HTML Applications (HTA), and ActiveX Data Objects (ADO) used to create custom OEM
tools or scripts.
Network access and support for standard in-box network drivers that may be required for copying images and test suites from a
network using TCP/IP. You can easily add or remove network drivers from a customized version of Windows PE.
Support for all mass-storage devices that use Windows 2000 or Windows XP drivers. As new devices become available, you can easily
remove unneeded drivers or incorporate additional drivers into a customized version of Windows PE.
Native support to create, delete, format, and manage NTFS file system partitions.
Hardware diagnostics can load and test specific hardware drivers.
Support for PXE protocol. If the computer supports PXE-booting, then the computer can automatically boot from a Windows PE image
located on a Remote Installation Server (RIS). The Windows PE image is not automatically installed onto the hard disk of the
computer.
Incorporating Windows PE into your factory preinstallation process allows you to port your existing MS-DOS-based tools to a subset of
the 32-bit Windows APIs, so you can more easily maintain these applications in a standard development environment, such as Microsoft
Visual Studio®. These hardware diagnostics and other preinstallation utilities can then use the same signed Windows XP drivers in the
computers that you manufacture, and you will no longer need to request 16-bit drivers from independent hardware vendors (IHVs).
You can use Windows PE on both x86- and Itanium-based computers. For Itanium-based computers, you must build a 64-bit version of
Windows PE from the Windows XP 64-Bit Edition CD. For more information, see Creating a Customized Version of Windows PE.
Important
l At the time of release, none of the third-party disk-imaging products currently support the new disk-partitioning scheme, GUID
Partition Table (GPT), used in Itanium-based computers. The only methods of preinstalling 64-bit editions of Windows are either to
use Windows PE or perform a CD-based unattended installation. The recommended method is to use Windows PE.
file://C:\Documents%20and%20Settings\alessandrot\Local%20Settings\Temp\~hh9F54.htm
15/07/2004
Microsoft Windows Preinstallation Environment User's Guide
Page 2 of 27
For more information on using Windows PE, see these topics:
l
Using Windows PE in Your Manufacturing Process
Booting Windows PE from Remote Installation Services (RIS) Servers
Order of Operations in Windows PE
Creating a Customized Version of Windows PE
Placing a Bootable Version of Windows PE on a Hard Disk
Reducing the Size of Windows PE
l
Limitations of Windows PE
l
l
l
l
l
Using Windows PE in Your Manufacturing Process
A basic method for using the Windows Preinstallation Environment (Windows PE) is:
1.
2.
3.
4.
Start the newly-assembled computer with Windows PE.
Run any relevant hardware diagnostic applications.
Configure the hard disk.
Deploy the operating system to the computer using one of these methods:
l
Copying an image from the network.
–OR–
Running Winnt32 from the command prompt in Windows PE and installing the operating system.
Restart into the installed operating system by using Sysprep in Factory mode, or seal the operating system by using Sysprep and
shut down the computer.
l
5.
For more information, see Windows Preinstallation Environment (Windows PE) Features.
Starting the computer by using Windows PE
The Windows OPK CD is a bootable copy of Windows PE (32-bit edition). This default version of Windows PE on the Windows OPK CD
starts and runs the command factory -winpe.
Note
l The Windows OPK CD is only available to OEMs. Corporate users must build a custom Windows PE CD.
The default version of Startnet.cmd is located in the \Winpe folder on the Windows OPK CD. If you build a custom version of
Windows PE, you can modify Startnet.cmd to contain commands specific to your manufacturing environment.
To start a computer by using Windows PE on a CD
1.
2.
3.
Insert the Windows PE CD into the computer.
Configure the computer's basic input/output system (BIOS) to start from the CD before starting from the local hard disk.
Start the computer, pressing any key to start from the CD if the computer contains a formatted local hard disk.
When the Factory tool starts, it first locates a Winbom.ini file by searching these locations in this order:
1.
2.
3.
4.
5.
The
The
The
The
The
path and file name specified by the registry key HKEY_LOCAL_MACHINE\SOFTWARE\Microsoft\Factory\Winbom.
root of all removable media drives that are not CD-ROM drives, such as a floppy disk drive.
root of all CD-ROM drives.
location of Factory.exe, usually the %SYSTEMDRIVE%\Sysprep folder.
root of %SYSTEMDRIVE%.
After locating a Winbom.ini file, the Factory tool reads the value of the WinbomType entry in the [Factory] section.
If the value of WinbomType is not appropriate in this context, the Winbom.ini file is ignored and the Factory tool continues searching
for a Winbom.ini file. If the value of WinbomType is appropriate in this context, the Factory tool reads the value of the NewWinbom
entry in the [Factory] section. If a value is specified for NewWinbom, and a Winbom.ini file is located at that location, the Factory tool
examines that Winbom.ini file for a NewWinbom entry.
This cycle continues for a maximum of 10 times or until the Factory tool locates a Winbom.ini file that does not contain a NewWinbom
entry, whichever occurs first. The Factory tool then continues to run, using the settings in the last identified Winbom.ini file.
After locating the intended Winbom.ini file, the computer connects to the network as specified in the [WinPE.Net] section. Plug and Play
installs only the network adapter, and then the Factory tool installs networking services and binds the network protocols.
Note
l Instead of using the Windows OPK CD, you can also create a custom version of Windows PE for your factory preinstallation
requirements, as described in Creating a Customized Version of Windows PE.
Running Hardware Diagnostic Applications
Because the Windows XP kernel can dynamically load and unload device drivers when Windows PE is running, the Windows NT driver for
a particular device can be loaded. After the driver loads and initializes, it scans the hardware to find its device. With the driver loaded
successfully, you can usually assume that the corresponding hardware is working correctly.
Your test suite can use the drivers provided by the hardware manufacturer; you do not need to use a different version of the drivers in
your manufacturing environment.
Configuring the Hard Disk and Other Preparatory Tasks
You can format and partition the hard disk in these ways:
file://C:\Documents%20and%20Settings\alessandrot\Local%20Settings\Temp\~hh9F54.htm
15/07/2004
Microsoft Windows Preinstallation Environment User's Guide
Page 3 of 27
When the command factory -winpe runs, you can use Windows PE to configure the hard disk of the computer as specified in the
[DiskConfig] section of the Winbom.ini file.
l Run Diskpart commands from the command prompt to configure the disk.
l Run a Diskpart script.
l Use the Format command-line tool contained in Windows XP.
l
To ensure that the newly formatted partition is active, use WipeDisk in the Winbom.ini:
[Disk1.config]
WipeDisk = yes
Size1 = *
PartitionType1 = primary
SetActive1 = Yes
FileSystem1 = NTFS
QuickFormat1 = yes
This wipes the existing partition, creates a new partition, and sets it as active. You can change the NTFS line to be FAT32, but Setup will
create only a 32 GB bootable FAT32 partition.
Important
l The drive letters assigned during Windows PE are not saved to any registry that persists when you restart. The drive letter
assignment when you create partitions is in the order of creation, but the drive letter assignments when you restart are in the default
order.
After processing the [DiskConfig] section of Winbom.ini, Windows PE processes the [OEMRunOnce] and [OEMRun] section, where you
can specify any series of tasks to run.
Preinstalling Windows
After processing the [OEMRunOnce] and [OEMRun] sections, Windows PE then installs a configuration set as specified by the [WinPE]
section.
Notes
l Installing a configuration set from Windows PE may require a long time because Setup copies the i386 directory as part of the
installation. The OEM License Agreement requires that you include a complete copy of the i386 directory on destination computers.
l The files are copied to the C:\i386 directory by default. If you include the SourcePath entry in the [ComputerSettings] section of
Winbom.ini, then the i386 directory is placed in the location specified by SourcePath. For example:
[ComputerSettings]
SourcePath = %WINDIR%
Finally, Windows PE processes the [UpdateSystem] section of the Winbom.ini file, and restarts or shuts down the computer based on the
value of the Restart entry in the [WinPE] section.
file://C:\Documents%20and%20Settings\alessandrot\Local%20Settings\Temp\~hh9F54.htm
15/07/2004
Microsoft Windows Preinstallation Environment User's Guide
Page 4 of 27
Usage Scenarios
The Windows Preinstallation Environment (Windows PE) is commonly used for two scenarios:
l
l
Desktop and server deployment
Diagnostics and disaster recovery
Desktop and Server Deployment
Windows PE was developed specifically to address desktop and server deployment scenarios. In the past, MS-DOS boot disks were used
to handle system configuration and operating system installation. With support for MS-DOS becoming harder to find, Windows PE brings
a lightweight 32-bit environment that leverages the drivers and basic features as the Windows operating system.
Usage Example: Standalone Deployment
In a standalone deployment scenario, you create a CD or DVD that contains both Windows PE and the operating system to install. You
can distribute this removable media to users or to technicians who install or upgrade machines at the remote site.
The following is a typical standalone deployment scenario:
1.
2.
3.
4.
Boot from the CD or DVD into Windows PE.
STARTNET.CMD loads the appropriate network services, and then passes control to a custom batch file.
The custom batch file inspects the computer to ensure it is the proper make/model to deploy to.
If the computer is a valid target, a process backs up user data from the system. Because Windows PE has full NTFS access to the
file://C:\Documents%20and%20Settings\alessandrot\Local%20Settings\Temp\~hh9F54.htm
15/07/2004
Microsoft Windows Preinstallation Environment User's Guide
5.
6.
Page 5 of 27
hard disk, the data can be moved to a remote location or to another location in the computer.
If necessary, use DISKPART to create the partitions of the hard drive.
After creating the partitions, use Windows Setup or a third-party disk-imaging utility to restore an image to the destination drive.
Usage Example: Network Deployment
Network deployment scenarios are similar to standalone deployment scenarios, but can include more options.
1.
Boot from the CD or DVD, or start Remote Installation Services (RIS) into Windows PE.
2.
3.
4.
5.
Map a drive to a local deployment server.
On the local deployment server, launch a custom batch file to drive the setup process.
The custom batch file inspects the computer to ensure it is the proper make/model to deploy to.
If the computer is a valid target, a process backs up user data from the system. Because Windows PE has full NTFS access to the
hard disk, move the data to a remote location or to another location in the computer.
If necessary, use DISKPART to create the partitions of the hard drive.
After creating the partitions, use Windows Setup or a third-party disk-imaging utility to restore an image to the destination drive.
The STARTNET.CMD loads the appropriate network services.
6.
7.
Diagnostics and Disaster Recovery
You can also use Windows PE to:
Replace corrupted files from original installation media.
Run 32-bit diagnostic tools.
l Back up data of a corrupted installation before reinstalling.
l
l
Booting Windows PE from Remote Installation Services (RIS) Servers
To speed production, OEMs can boot destination computers with the Windows Preinstallation Environment (Windows PE) by using
Remote Installation Services (RIS) servers. RIS is an optional component of Windows 2000 Server and Windows Server 2003 operating
systems. By booting Windows PE remotely, the destination computers do not have to be manually booted.
This method is only available for the 32-bit version of Windows PE. The 64-bit version of Windows PE does not support this method.
Using Windows PE over any other Preboot eXecution Environment (PXE) server or network boot medium is untested. RIS is the
supported method of launching Windows PE over the network.
Prerequisites
The following items are required:
A Windows XP product CD and a Windows PE CD of the same build number.
A properly configured Windows 2000 (SP2) or Windows RIS server.
l Your destination computers must have a PXE-enabled network interface card (NIC), or have a NIC that is supported by the RIS boot
disk.
l
l
Windows 2000 RIS Server
To install on a Windows 2000 RIS server, deploy the hotfix referenced in KB article Q287546. Contact your technical account manager
(TAM) or Product Support Services (PSS) to obtain this hotfix.
To fully automate the installation on a Windows 2000 RIS server,use Startrom.n12 and Oschoice.exe from Windows Server 2003. Add
the tag <META ACTION=AUTOENTER> at the beginning of Startrom.n12 to simulate the pressing of the ENTER key on the client
running the Installation Wizard.
Creating a RIS image and booting from it
1.
2.
3.
On the RIS server, open a command prompt and run RISetup.exe –add.
When prompted for a source, point RISetup to your Windows XP product CD.
Browse to the location where RISetup installed the image.
4.
5.
6.
Open the I386 folder in the folder of the image you just created.
Browse to the CD or network share containing your Windows PE files, and open its I386 folder.
Copy the contents of the Windows PE I386 folder into the Remote Install I386 folder you just opened, overwriting all files if
prompted.
Open the Templates folder in the I386 folder you just copied Windows PE into.
Open the RIStndrd.sif file in a text editor, and on the line that starts with OSLoadOptions, add the switch /minint.
Start a RIS client, and select the operating system image you created in Step 1. Windows PE starts.
For example, \\Server_name\Share_name\REMINST\Setup\Language\Images.
7.
8.
9.
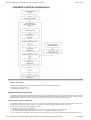
Order of Operations in Windows PE
The boot process of Windows PE is as follows:
1.
2.
3.
The boot sector on the particular media is loaded. Control is passed to Setupldr.
Setupldr runs Ntdetect.com, which extracts basic system configuration information and stores it in
HKLM\HARDWARE\DESCRIPTION.
Setupldr then loads the appropriate HAL, loads the System registry hive, and loads necessary boot drivers using Winpeoem.sif. After
file://C:\Documents%20and%20Settings\alessandrot\Local%20Settings\Temp\~hh9F54.htm
15/07/2004
Microsoft Windows Preinstallation Environment User's Guide
Page 6 of 27
it finishes loading, it prepares the environment to execute the kernel, Ntoskrnl.exe.
4.
5.
6.
7.
Note
l If you start Windows PE from read-only media such as a CD, Windows PE stores the registry hives in memory so that
applications can write to the registry. Any changes made to the registry by the applications do not persist across different
Windows PE sessions.
Ntoskrnl.exe is executed and finishes the environment setup. Control is passed to the Session Manager (SMSS).
SMSS loads the rest of the registry, configures the environment to run the Win32 subsystem (Win32k.sys) and its various processes.
SMSS then loads the Winlogon process to create the user session and starts the services and the rest of the non-essential device
drivers and the security subsystem (LSASS).
Windows PE loads the Command Prompt (Cmd.exe) process and executes Startnet.cmd.
When Startnet.cmd finishes, the command prompt is displayed. Windows PE boot is complete.
Interactive Shell Components
The Startnet.cmd batch file launches the networking processes and any custom routines that you might include. The commands in the
default Startnet.cmd file are:
regsvr32 /s netcfgx.dll
factory -minint
netcfg -v -winpe
net start dhcp
net start nla
a:\floppy.cmd
Command descriptions:
l Regsvr32 /s netcfgx.dll: Registers the necessary helper function DLL to allow the networking components to be installed. Without
this command, Factory mode will be unable to install the network card and Netcfg will fail to load the networking components.
l Factory -minint: Starts factory.exe in -minint mode. Factory.exe locates the Winbom.ini file, creates a computername for the
Windows PE session if the name is not specified in the Winbom.ini, use Plug and Play to detect and install the network card drivers,
and processes the Winbom.ini file.
l Netcfg -v -winpe: Installs Tcpip, Netbios and the Msclient for the Windows PE session.
l Net start dhcp: Starts the DHCP client.
l Net start nla: Starts the Network Location Awareness service.
l a:\floppy.cmd: Floppy.cmd is an optional sample file which you can remove from Startnet.cmd. It can contain any commands
normally run at a command prompt, such as starting applications or opening additional command windows that run scripts.
For more information on the specific functionality of these commands, see Factory Command-Line Options and Netcfg Command-Line
Options.
When you start a computer using Windows PE, you run the command factory -winpe, which processes these sections in Winbom.ini in
this order:
l
l
l
l
l
l
l
[WinPE.Net]
[DiskConfig]
[OEMRunOnce]
[OEMRun]
[WinPE], except for the Restart entry
[UpdateSystem]
Restart entry in [WinPE]
The settings in Winbom.ini provide a wide range of preinstallation tasks. To perform tasks beyond the scope of Winbom.ini, create batch
files either to replace or supplement Winbom.ini.
With Windows PE running, you can use Winbom.ini or your own batch files in order to:
Copy a test harness to the destination computer and run hardware diagnostics.
Run programs, such as a utility to partition and format the drives.
l Establish network connectivity with the NET USE command, and change directories to the location of the preinstalled images.
l Start the unattended Setup from a network source.
l
l
Creating a Customized Version of Windows PE
The Windows OPK CD is a bootable copy of the basic 32-bit version of Windows Preinstallation Environment (Windows PE). However,
you may want to create a version of Windows PE for 64-bit computers, or configure Windows PE to use a different set of drivers. To
support these needs, the OPK includes a collection of scripts and utilities that enable you to build a version of Windows PE customized
for your factory environment.
Important
l The Windows OPK CD is only available to OEMs. Corporate users must build a custom Windows PE CD.
l You can build a custom version of Windows PE from any version of Windows XP except Windows XP Home Edition, Windows
Server 2003, Datacenter Edition, and Windows Server 2003, Web Edition.
l A custom version of Windows PE is still subject to the conditions listed on Limitations of Windows PE.
l Windows XP 64-Bit Edition and the 64-bit versions of the Windows Server 2003 family are available only in English, French, German,
and Japanese.
Basic Process: Building a Custom Version of Windows PE
Building a custom version of Windows PE requires several minutes. This process creates a directory structure of the Windows PE files
file://C:\Documents%20and%20Settings\alessandrot\Local%20Settings\Temp\~hh9F54.htm
15/07/2004
Microsoft Windows Preinstallation Environment User's Guide
Page 7 of 27
and optionally creates an image file that you can burn to a CD-ROM.
Note
l You must have backup and restore privileges to use the Windows PE build tools.
To create a custom version of Windows PE
1.
2.
3.
4.
Create and name a directory on your hard disk, specified by build_location.
Place the Windows OPK CD into the CD-ROM drive, denoted as cd_drive.
Copy cd_drive\Winpe\*.* to build_location.
Copy Factory.exe and Netcfg.exe from the cd_drive\Tools\platform directory into the build_location directory.
To build a 32-bit version of Windows PE, the value of platform is x86.
To build a 64-bit version of Windows PE, the value of platform is ia64, and you also must copy Efinvr.exe into the build_location
directory.
5.
6.
Remove the Windows OPK CD from the CD-ROM drive.
To build a 32-bit version of Windows PE:
Place the 32-bit Windows product CD in the CD-ROM drive.
–OR–
To build a 64-bit version of Windows PE:
Place the 64-bit Windows product CD in the CD-ROM drive.
7.
8.
9.
To build a 64-bit version of Windows PE, place a floppy disk in the A:\ drive of the computer. This disk is used for temporary storage
during the build process of the 64-bit Windows PE.
Navigate to build_location.
Run this command:
Mkimg.cmd source_directory destination_directory [image_name]
source_directory
Specifies the location of the Windows product CD. If source_directory is a CD-ROM drive, you need only to specify the drive
letter. If source_directory is a network path, the path must be to the parent directory of the \i386 directory.
Note
l Do not include a trailing slash in source_directory.
destination_directory
Specifies the path where the files necessary to create the image are temporarily stored. If this directory does not already exist,
Mkimg.cmd creates it.
10.
image_name
Optional. Specifies the path and file name of the ISO image file that contains this customized version of Windows PE, if you place
this version of Windows PE onto a CD-ROM.
If you are creating a CD-ROM, use CD creation software to burn the ISO image file directly to the CD media.
Important
l You must have read/write permissions for build_location. You cannot run the mkimg command from a read-only device such as a
CD-ROM drive.
For more information, see Mkimg Command.
Example
For example, if build_location is C:\Build.x86, this command-line creates an ISO image called x86winpe.iso by using C:\Winpe.tmp as a
temporary storage area.
C:\Build.x86\Mkimg.cmd E: C:\Winpe.tmp C:\x86winpe.iso
Note
l Instead of using the Mkimg tool, you can also use Oscdimg to create an .iso file. Oscdimg requires an existing Windows PE fileset to
build the .iso from.
If you create an .iso image file, you can burn this version of Windows PE to a CD. You can also place the customized version of
Windows PE on a hard disk, as described in Placing a Bootable Version of Windows PE on a Hard Disk, or on a Remote Installation Server
(RIS). Although not explicitly discussed in this guide, you can also place Windows PE on bootable media other than a CD or a hard disk.
Important
l To configure the Windows PE CD so that it starts from the CD every time, if the Windows PE CD is present in the CD-ROM drive,
remove the \i386\Bootfix.bin file from the Windows PE directory structure before you create an .iso file. Bootfix.bin is the file that
provides the "Press any key to boot from CD-ROM" message.
Building a Bootable 64-Bit Windows PE CD
You can create a bootable 64-bit Windows PE CD that starts automatically without user interaction. This method assumes that the
computer you are booting has been configured to boot from CD-ROM.
This process creates a directory structure of the Windows PE files which is used to create an ISO file that can be burned to CD-ROM.
To create a custom 64-bit version of Windows PE
1.
2.
3.
4.
On an x86 machine running a 32-bit version of Windows 2000 or Windows XP, open a command prompt. This can be done by
clicking the Start menu, selecting Run, and typing CMD.EXE.
Create a directory on your hard disk to hold the tools required to create a Windows PE CD. For example: MD C:\WINPE.
Place the Windows OPK CD into the CD-ROM drive, denoted as cd_drive.
Type Copy cd_drive\Winpe\*.* C:\WinPE.
file://C:\Documents%20and%20Settings\alessandrot\Local%20Settings\Temp\~hh9F54.htm
15/07/2004
Microsoft Windows Preinstallation Environment User's Guide
5.
6.
7.
8.
9.
10.
11.
Page 8 of 27
Type Copy cd_drive\Tools\IA64\FACTORY.EXE C:\WINPE.
Type Copy cd_drive\Tools\IA64\NETCFG.EXE C:\WINPE.
Type Copy cd_drive\Tools\IA64\EFINVR.EXE C:\WINPE.
Remove the Windows OPK CD from the CD-ROM drive.
Place the Windows XP 64-Bit Edition CD in the CD-ROM drive.
Navigate to the Windows PE directory by typing CD \WINPE.
Run this command:
Mkimg.cmd source_directory destination_directory
source_directory specifies the location of the CD for the 64-bit Edition of Windows XP and destination_directory specifies the path
where the files necessary to create the image are temporarily stored. If this directory does not already exist, Mkimg.cmd creates
it.
If source_directory is a CD-ROM drive, you need to specify only the drive letter. If source_directory is a network path, the path
must be to the parent directory of the \i386 directory. Do not include a trailing slash in source_directory.
To build the bootable 64-bit Windows PE CD ISO file
1.
Create this directory structure on a blank formatted floppy diskette:
A:\
|_EFI
|_BOOT
Type:
MD A:\EFI
MD A:\EFI\BOOT
2.
Copy SETUPLDR.EFI to the A:\EFI\BOOT directory and rename it as BOOTIA64.EFI. For example:
3.
4.
Type CD \WINPE.
Type DSKIMAGE A: .\EFISYS.BIN.
COPY C:\IA64PE\IA64\SETUPLDR.EFI A:\EFI\BOOT\BOOTIA64.EFI.
To create the bootable ISO image file that can be burned to CD, use this syntax:
OSCDIMG -b.\efisys.bin -n -h destination_directory iso_filename
For example:
OSCDIMG -b.\efisys.bin -n -h C:\IA64PE C:\IA64PE.ISO
The ISO file that is generated can be burned to CD using the CD-burning software of your choice. After burning the ISO file to CD,
ensure that the target IA64 computer has been configured so that the CD-ROM drive is the primary boot device. This can be done by
using the EFI Shell Boot Menu Editor.
See the documentation that came with your computer for specific details on modifying the EFI Shell Boot Menu.
Extensions of the Basic Process: More Customizations of Windows PE
You can make additional customizations of this version of Windows PE before burning it to a CD or copying it to a hard disk.
Adding Support for Other Languages
By default, multi-language Windows PE builds are not supported. Use the [RegionalSettings] section to add support for multiple
languages.
There are two reasons for using multi-language support in Windows PE:
1.
2.
To use one set of preinstallation tools to build multiple localized Windows PE images.
To use preinstallation tools in multiple languages to build Windows PE in one language.
To use one set of tools, the key is to use [RegionalSettings] to always match the Language value to the language of the source
Windows product CD. You then use LanguageGroup to specify the languages of both the Windows PE tools and the source CD.
In this example, the goal is to create a Japanese Windows PE image from a Japanese Windows product CD that will support using
English preinstallation tools:
[RegionalSettings]
LanguageGroup = 1, 7
Language = 0x0411
1 is the LanguageGroup ID for Western Europe and United States, and 7 is the Japanese LanguageGroup ID. 0x0411 is the locale ID
(LCID) for Japanese, which matches the locale of the source CD. By adding 1 to the LanguageGroup entry, you add English support so
that you can use the English preinstallation tools.
To use the preinstallation tools in multiple languages, match the Language value to the source CD, and specify the additional languages
in LanguageGroup. In this example, Japanese language support is added to an English Windows PE image.
[RegionalSettings]
LanguageGroup = 1, 7
Language = 0x0409
0x0409 is the LCID for English, which matches the locale of the source CD. By including 7 in the LanguageGroup entry, you add
Japanese support so that you can use both the English and Japanese preinstallation tools.
file://C:\Documents%20and%20Settings\alessandrot\Local%20Settings\Temp\~hh9F54.htm
15/07/2004
Microsoft Windows Preinstallation Environment User's Guide
Page 9 of 27
If you create a custom version of Windows PE from an East Asian language version of Windows, you must ensure that the file
Bootfont.bin is located in the <buildlocation>\i386 folder (for 32-bit versions of Windows PE) or in the <buildlocation>\ia64 folder (for
64-bit versions of Windows PE). Without Bootfont.bin, the loader prompt displays invalid characters instead of double-byte character
sets.
Including a specific Winbom.ini file or Startnet.cmd file
You can include a generic Winbom.ini file in a custom Windows PE installation that specifies basic information about connecting to your
network, formatting the hard disk, and running basic hardware diagnostics.
You can include a generic Winbom.ini file in a custom Windows PE installation. Factory uses this file if another Winbom.ini is not located
in the floppy drive. After using the settings in [WinPE.Net] to establish network connectivity, the Factory tool can use the NewWinbom
entry to point to another Winbom.ini file located on the network.
You can also create your own version of Startnet.cmd to run a specific set of commands, batch files, or scripts.
To gain access to Windows Networking APIs, run the command netcfg -winpe from the Windows PE command line, if this command is
not already part of your Startnet.cmd. For more information, see Netcfg Command-Line Options.
Including Hardware Diagnostics or Other Basic Tools
If you have created any custom tools that are a core part of your validation process, you may want to include these tools in your custom
Windows PE installation before preinstalling the operating system.
Adding or Removing Network Drivers
By default, all network drivers on the Windows XP Professional CD or Windows XP 64-Bit Edition are supported. When you create your
own Windows PE image, you can add or remove the network drivers or replace the network driver list. By keeping the set of drivers to a
minimum, you reduce the time required for Plug and Play detection.
To add network drivers to a custom Windows PE CD, copy these files as specified:
All network driver *.inf files to the \%WINDIR%\inf directory.
All *.sys files to the \%WINDIR%\system32\drivers directory.
l Any related *.dll, .exe, or other files to the \%WINDIR%\system32 directory.
l
l
Catalog files are unnecessary, as they are not processed by the Windows PE environment.
Adding or Removing Mass-Storage Drivers
To reduce boot time, you may configure a custom version of Windows PE to load a limited set of mass-storage drivers, instead of
loading the entire set of mass-storage drivers that are natively supported in Windows XP. You may also configure Windows PE to load
additional third-party drivers.
To control which mass-storage drivers are loaded in Windows PE, customize the Winpeoem.sif file. Modifying this file changes the list of
drivers that Windows PE loads when it boots, which affects the boot time of Windows PE.
Changing the Winpeoem.sif file does not remove or add any files into the customized version of Windows PE. If, in addition to reducing
the boot time, you also want to reduce the size of your Windows PE image, you must separately remove the unnecessary driver files
from your custom version of Windows PE. If you include any third-party drivers in the Winpeoem.sif file, you must manually add any
required driver files to your custom version of Windows PE.
For more information, see Winpeoem.sif.
In most cases you will add mass storage drivers to the Windows PE image rather than replace them. If you want to reduce the size or
boot time of the Windows PE image, you can use the [MassStorageDrivers.Replace] section to remove the drivers from the \system32
directory.
Notes
l When files are added or removed from Windows PE, the image will have to be recreated using Oscdimg.exe unless your are booting
Windows PE from a RIS server. You can use the F6 option to add mass storage devices when booting Windows PE.
To add support for mass storage controllers using Windows PE
1.
Copy your driver package to a directory under %WINPEROOT%\system32. For example:
%WINPEROOT%\system32\Driver1
2.
Edit the %WINPEROOT%\system32\Winpeoem.sif to remove the semicolons from the [OemDriverParams] section and add the
name of the directory into which you copied your driver package to the OemDriverDirs line. For example:
[OemDriverParams]
OemDriverRoot=""
OemDriverDirs=Driver1
3.
4.
Optional: If you are using the [MassStorageDrivers.Append] or [MassStorageDrivers.Replace] sections of Winpeoem.sif, copy
the mass storage driver *.sys file to the \system32\drivers subdirectory.
Optional: If the mass storage device requires any supporting *.dll files, copy those to the appropriate directory. You can determine if
these files are required by examining the Txtsetup.oem file.
With these changes made, your Windows PE image will now attempt to start the driver specified in the [Defaults] section of the
Txtsetup.oem in the driver package in the \Driver1 subdirectory. When the system is loaded, the Winpeoem.sif file will be opened and
any mass storage drivers listed will be loaded before any of the inbox-provided drivers.
However, in some cases the Txtsetup.oem file provided by the manufacturer may have to be edited. Many driver packages today
support a variety of mass storage devices, and only those listed in the [Defaults] section will be loaded. Read the [SCSI] section in the
file://C:\Documents%20and%20Settings\alessandrot\Local%20Settings\Temp\~hh9F54.htm
15/07/2004
Microsoft Windows Preinstallation Environment User's Guide
Page 10 of 27
Txtsetup.oem file to determine which driver entry corresponds to the one you wish to load. In the following example, only Driver1 will
be loaded. To load Driver2, change the "scsi=" line under the [Defaults] section to "scsi = driver2".
[Disks]
driver1 = "generic driver for device 1", \generic.sys, \
driver2 = "generic driver for device 2", \generic2.sys, \
[Defaults]
scsi = driver1
[scsi]
driver1 = "generic driver for device 1", generic.sys
driver2 = "generic driver for device 2", generic2.sys
Notes
l If loading more than one mass storage driver, this must be done for each txtsetup.oem file if the Winpeoem.sif supports multiple
adapters. If multiple mass storage drivers are required, you can do so by appending additional directory names to the
OemDriverDirs entry in Winpeoem.sif. For example:
[OemDriverParams]
OemDriverRoot=""
OemDriverDirs=Driver1, Driver2, Driver3
Adding Optional Component Packages to Windows PE
BuildOptionalComponents.vbs is a script for adding support for optional component packages to Windows PE. The packages include
Windows Script Host (WSH), HTML Applications (HTA), and ActiveX Data Objects (ADO) to allow database connectivity from Windows PE
to a Microsoft SQL Server.
The script uses these command-line options:
Option
/S:location
/D:location
/ADO
/HTA
/WSH
/64
/Q
/E
Function
Alternate source location other than the Windows product CD
Alternate destination for the WinPE Optional Component Files (I386). If not specified, the files are saved
to the desktop
Builds ADO (ActiveX Database Objects) for Microsoft SQL Server connectivity
Builds HTA (HTML applications)
Builds WSH (Windows Script Host)
Builds and checks 64-bit version of Windows PE; requires Windows XP 64-Bit Edition
Runs the script with prompts suppressed. Notifies only on failure.
Explores the resulting folder automatically when complete
To add optional components to Windows PE
1.
2.
If you are building Windows PE 1.0, then set /S to the path of the Windows XP Professional CD-ROM. If you are building Windows PE
1.1, then set /S to the path of a directory that has Windows XP SP1 integrated into a I386 directory.
In your \WinPE directory, run this command:
buildoptionalcomponents.vbs /S:d:\sourcefiles
You should have the following directory on your desktop:
WinPE Optional Component Files (I386)
+---I386
|
+---Registration
|
\---System32
+---Program Files
|
\---Common Files
|
\---System
|
+---ado
|
+---msadc
|
\---Ole db
\---Samples
The \Registration directory is created onlf if you add support for ADO, and it must be there for ADO to function.
3.
4.
5.
6.
If you built Windows PE to C:\bin, then copy the \Program Files directory to C:\bin\i386
Copy the \Samples directory to C:\bin\i386
Copy the \i386\system32\*.* to C:\bin\i386\system32
Make sure that your Startnet.cmd file has the following line:
oc.bat
If you do not specify components, or you do not run this script from the command prompt, all optional components are installed. If you
include HTA, WSH is included automatically, and cannot be removed.
Notes
l ADO access to Active Directory and Active Directory Service Interface are not supported in Windows PE.
l BuildOptionalComponents.vbs is not supported in the following language versions of Windows PE:
l Brazilian
l Danish
l German
l Italian
l Norwegian
file://C:\Documents%20and%20Settings\alessandrot\Local%20Settings\Temp\~hh9F54.htm
15/07/2004
Microsoft Windows Preinstallation Environment User's Guide
Page 11 of 27
Portuguese
Spanish
l Swedish
l
l
Placing Bootable Windows PE on Hard Disks
You can place a customized version of the Windows Preinstallation Environment (Windows PE) on a hard disk, which can be useful for
either preinstalling Windows or creating a hard disk-based recovery solution.
This procedure assumes that you have created a custom version of Windows PE, as detailed in Creating a Customized Version of
Windows PE. After you complete this procedure, the customized Windows PE files will be in build_location on your technician computer
or other network share.
Note
l If you create a bootable Windows PE hard disk from an East Asian language version of Windows, copy Bootfont.bin from the
build_location\i386 folder (for 32-bit versions of Windows PE) or the build_location\ia64 folder (for 64-bit versions of Windows PE) to
the root of the destination hard disk. Without Bootfont.bin, the loader prompt displays invalid characters instead of double-byte
characters.
To create a bootable Windows PE disk (32-bit versions of Windows PE)
1.
2.
3.
4.
Boot the destination computer into Windows PE by using a Windows PE CD.
Create a formatted and active partition labeled C.
On the active partition, create a directory called C:\Minint. You must name the directory "Minint".
Copy the contents of build_location\i386 to C:\Minint.
xcopy "C:\Build.x86\i386\*.*" C:\Minint /S
5.
Copy Ntdetect.com from build_location\I386 to drive C.
xcopy "C:\Build.x86\I386\ntdetect.com" C:\
6.
On the destination hard disk, copy C:\Minint\setupldr.bin to C:\ntldr.
xcopy "C:\Minint\setupldr.bin" C:\ntldr
7.
Restart the destination computer.
The computer starts using Windows PE.
To create a bootable Windows PE disk (64-bit versions of Windows PE)
This procedure assumes that the destination computer has a clean hard disk and that you have created a custom version of Windows PE
stored in build_location on your technician computer or other network share, as detailed in Creating a Customized Version of
Windows PE.
1.
2.
Boot the destination computer into Windows PE by using a Windows PE CD.
Create EFI and primary data partitions by running Diskpart.exe with the following commands:
select disk 0
clean
convert gpt
create partition efi size=100
assign letter=g
create partition msr size=32
create partition pri
assign letter=c
exit
The EFI partition is assigned the letter G and the data partition is letter C.
3.
Format the new partitions by running Format.exe with the following commands:
format G: /fs:fat32 /q /y
format C: /fs:ntfs /q /y
4.
On drive C, create a directory called \Winpe.
mkdir C:\Winpe
5.
Copy the contents of build_location\ia64 to C:\Winpe.
xcopy "C:\Build.ia64\ia64\*.*" C:\Winpe /hide
6.
Copy build_location\ia64\Setupldr.efi to drive G.
xcopy \\server\share\ia64\Setupldr.efi G:\
7.
Create an empty file named $WinPE$.$$$ on drive G.
file://C:\Documents%20and%20Settings\alessandrot\Local%20Settings\Temp\~hh9F54.htm
15/07/2004
Microsoft Windows Preinstallation Environment User's Guide
Page 12 of 27
echo empty file > G:\$Winpe$.$$$
8.
Add a boot entry for this version of Windows PE that you have placed on drive C by running the Efinvr command.
efinvr /add G:\Setupldr.efi C:\Winpe\ia64 /setactive
9.
Restart the destination computer.
There is now a new option in NVRAM to boot Windows PE.
Note
l You can follow a similar procedure if you start the computer from an operating system located on the hard disk, instead of initially
starting the computer with a Windows PE CD. When you run Diskpart from a full Windows operating system, Diskpart cannot assign a
drive letter to an EFI partition. Instead, in step 2 of this procedure, use the Mountvol command.
mountvol /s g:
For more information on using Diskpart to format and partition the hard disk, see DiskPart Commands.
Reducing the Size of Windows PE
Windows Preinstallation Environment (Windows PE) is a minimal operating system based on the Windows kernel. Windows PE replaces
MS-DOS as a means for starting a computer in order to install operating systems and applications. It contains the minimum functionality
needed to run Windows Setup, scripts, or custom applications.
The non-customized size of Windows PE can range from 120 to 220 megabytes (MB). By removing non-essential files, you can reduce
the 32-bit version of Windows PE to an on-disk image size of 81 MB.
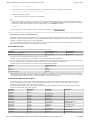
Size of Windows PE
The approximate size of a non-customized version of Windows PE is as follows:
Platform
32-bit versions of Windows PE
64-bit versions Windows PE
On-disk image size
About 120 MB
About 220 MB
In-memory size
About 40 MB
About 42 MB
In-memory sizes are computed when networking services are running.
Localized versions of Windows PE vary in size between 300-370 MB, depending upon the language.
The size of a custom version of Windows PE will vary, depending on the set of drivers that you choose to include or exclude. The on-disk
size of the default Windows PE configuration includes all in-box drivers, many of which are uncompressed.
The approximate size of each directory on the 32-bit version of Windows PE is as follows:
Directory
\fonts
\inf
\System32
\System32\Drivers
Approximate size
9 MB
4 MB
66 MB
29 MB
While Windows PE is too large to fit on a floppy disk, you can place your customized version of Windows PE on many types of bootable
media including CD-ROM, DVD, hard disk, or a Remote Installation Services (RIS) Server. If you use a CD-R or CD-RW, the system that
you start must support starting from a CD, as well as the ability to read CD-R or CD-RW media.
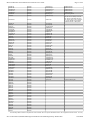
Reducing the Windows PE Footprint
The following files can be removed from a Windows PE image. Removing certain files listed may affect your ability to connect to a
network, but otherwise will not interfere with the functionality of the image. If you remove all of these files, the 32-bit version of
Windows PE can be reduced to an on-disk image size of 81 MB.
The following table includes a list of fonts that can be safely removed without reducing Windows PE functionality, as well as a list of
drivers and other files that can be safely removed.
File name
Angsaz.ttf
Artrbdo.ttf
Artro.ttf
Browa.ttf
Browab.ttf
Browai.ttf
Browau.ttf
Browaub.ttf
Browaui.ttf
Browauz.ttf
Browaz.ttf
Comic.ttf
Comicbd.ttf
Cordia.ttf
Cordiab.ttf
Description
Font file
Font file
Font
Font
Font
Font
Font
Font
Font
Font
Font
Font
Font
Font
file
file
file
file
file
file
file
file
file
file
file
file
File name
Rasacd.sys
Raspppoe.sys
Raspptp.sys
Rawwan.sys
Rlnet5.sys
Rocket.sys
Rootmdm.sys
Sonydcam.sys
Speed.sys
Stlnata.sys
Sx.sys
Tbatm155.sys
Tos4mo.sys
Tpro4.sys
file://C:\Documents%20and%20Settings\alessandrot\Local%20Settings\Temp\~hh9F54.htm
Description
Modem device driver
Multimedia file
Serial Device driver
Multimedia file
Multimedia file
Multimedia file
15/07/2004
Microsoft Windows Preinstallation Environment User's Guide
Page 13 of 27
Cordiai.ttf
Cordiau.ttf
Font file
Font file
Tsbvcap.sys
Usbcamd.sys
Multimedia file
Multimedia file
Cordiaub.ttf
Cordiaui.ttf
Cordiauz.ttf
Cordiaz.ttf
David.ttf
Font
Font
Font
Font
Font
Usbcamd2.sys
Usbintel.sys
Vdmindvd.sys
Wanarp.sys
Wlandrv2.sys
Multimedia file
Multimedia file
Multimedia file
Networking driver
file
file
file
file
file
Davidbd.ttf
Font file
Sfcfiles.dll
Davidtr.ttf
Estre.ttf
Frank.ttf
Font file
Font file
Font file
Avmc20.dll
Avmcapi.dll
Avmenum.dll
Gautami.ttf
Georgia.ttf
Georgiab.ttf
Georgiai.ttf
Georgiaz.ttf
Impact.ttf
Font
Font
Font
Font
Font
Font
file
file
file
file
file
file
Dgclass.dll
Dgconfig.dll
Dgrpsetu.dll
Diapi2.dll
Diapi232.dll
Diapi2nt.dll
Latha.ttf
Mriam.ttf
Mriamc.ttf
Mriamfx.ttf
Mriamtr.ttf
Mvboli.ttf
Font
Font
Font
Font
Font
Font
file
file
file
file
file
file
Digirlpt.dll
Disrvci.dll
Disrvpp.dll
Disrvsu.dll
Ditrace.exe
Divaci.dll
Nrkis.ttf
Pala.ttf
Palab.ttf
Palabi.ttf
Palai.ttf
Raavi.ttf
Rod.ttf
Rodtr.ttf
Shruti.ttf
Simpbdo.ttf
Simpfxo.ttf
Simpo.ttf
Trebuc.ttf
Trebucbd.ttf
Trebucbi.ttf
Trebucit.ttf
Tunga.ttf
Upcdb.ttf
Upcdbi.ttf
Upcdi.ttf
Upcdl.ttf
Upceb.ttf
Upcebi.ttf
Upcei.ttf
Upcel.ttf
Upcfb.ttf
Upcfbi.ttf
Upcfi.ttf
Upcfl.ttf
Upcib.ttf
Upcibi.ttf
Upcii.ttf
Upcil.ttf
Upcjb.ttf
Upcjbi.ttf
Upcji.ttf
Upcjl.ttf
Upckb.ttf
Upckbi.ttf
Upcki.ttf
Upckl.ttf
Upclb.ttf
Upclbi.ttf
Upcli.ttf
Upcll.ttf
Font
Font
Font
Font
Font
Font
Font
Font
Font
Font
Font
Font
Font
Font
Font
Font
Font
Font
Font
Font
Font
Font
Font
Font
Font
Font
Font
Font
Font
Font
Font
Font
Font
Font
Font
Font
Font
Font
Font
Font
Font
Font
Font
Font
Font
file
file
file
file
file
file
file
file
file
file
file
file
file
file
file
file
file
file
file
file
file
file
file
file
file
file
file
file
file
file
file
file
file
file
file
file
file
file
file
file
file
file
file
file
file
Divaprop.dll
Divasu.dll
Elsa20.dll
Elsa2032.dll
Eqnclass.dll
Eqndiag.exe
Eqnlogr.exe
Eqnloop.exe
Fpnpbase.sys
Fpnpbase.usa
Fus2base.sys
Io8ports.dll
Mxicfg.dll
Mxport.dll
Peer.exe
Snmpapi.dll
Spdports.dll
Spxcoins.dll
Spxports.dll
Spxupchk.dll
Stlncoin.dll
Stlnprop.dll
Sxports.dll
Query.dll
This file can be safely removed,
but without it Windows PE does
not support 800 x 600 resolution;
it is only capable of the default
resolution of 640 x 480 pixels.
Network
Content indexing dll
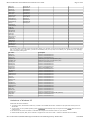
The following table includes a complete list of the included .inf and .sys files associated with in-box supported network drivers. You may
file://C:\Documents%20and%20Settings\alessandrot\Local%20Settings\Temp\~hh9F54.htm
15/07/2004
Microsoft Windows Preinstallation Environment User's Guide
Page 14 of 27
remove these files, but without them Windows PE will be unable to connect to the network.
Driver files
Ac300nd5.sys
Adm8511.sys
Adptsf50.sys
Inf files
Net10.inf
Net1394.inf
Net21x4.inf
Exe files
Ditrace.exe
Ipconfig.exe
Net.exe
Additional
Netshell.dll
Nwprovau.dll
Rasdlg.dll
Ali5261.sys
Net3c556.inf
Net1.exe
Te_protm.pm
Amb8002.sys
Net3c589.inf
Netcfg.exe
Te_protm.pm2
An983.sys
Net3c985.inf
Ping.exe
Te_protu.qm
Arp1394.sys
Net3sr.inf
Rundll32.exe
Te_protu.sm
Aspndis3.sys
Net5515n.inf
Wzcsapi.dll
Asyncmac.sys
Net557.inf
Wzcsvc.dll
Atmarpc.sys
Atmepvc.sys
Atmlane.sys
Net559ib.inf
Net575nt.inf
Net650d.inf
Atmuni.sys
B57xp32.sys
B57xp64.sys
Bcm42u.sys
Bcm42xx5.sys
Net656c5.inf
Net656n5.inf
Net713.inf
Net83820.inf
Net8511.inf
Bcm4e5.sys
Bridge.sys
Brzwlan.sys
Cb102.sys
Cb325.sys
Cben5.sys
Ce2n5.sys
Ce3n5.sys
Cem28n5.sys
Cem33n5.sys
Cem56n5.sys
Cicap.sys
Cnxt1803.sys
Cpqndis5.sys
Cpqtrnd5.sys
D100ib5.sys
Dc21x4.sys
Defpa.sys
Dfe650.sys
Dfe650d.sys
Digidxb.sys
Dlh5xnd5.sys
Dm9pci5.sys
Dp83820.sys
E1000645.sys
E1000nt5.sys
E100b325.sys
E100b645.sys
E100isa4.sys
El515.sys
El556nd5.sys
El574nd4.sys
El575nd5.sys
El589nd5.sys
El656cd5.sys
El656ct5.sys
El656se5.sys
El656nd5.sys
El90xbc5.sys
El90xnd5.sys
El985n51.sys
El98xn5.sys
El99xn51.sys
El99xrun.out
Elnk3.sys
Em556n4a.sys
Em556n4b.sys
Em556n4i.sys
Netac300.inf
Netali.inf
Netambi.inf
Netamd.inf
Netamd2.inf
Netamdhl.inf
Netan983.inf
Netana.inf
Netasp2k.inf
Netauni.inf
Netb57xp.inf
Netbcm4e.inf
Netbcm4p.inf
Netbcm4u.inf
Netbrdgm.inf
Netbrdgs.inf
Netbrzw.inf
Netcb102.inf
Netcb325.inf
Netcbe.inf
Netce2.inf
Netce3.inf
Netcem28.inf
Netcem33.inf
Netcem56.inf
Netcicap.inf
Netcis.inf
Netclass.inf
Netcpqc.inf
Netcpqg.inf
Netcpqi.inf
Netcpqmt.inf
Netctmrk.inf
Netdav.inf
Netdefxa.inf
Netdf650.inf
Netdgdxb.inf
Netdlh5x.inf
Netdm.inf
Nete1000.inf
Nete100i.inf
Netejxmp.inf
Netel515.inf
Netel574.inf
Netel5x9.inf
Netel90a.inf
Netel90b.inf
Netel980.inf
file://C:\Documents%20and%20Settings\alessandrot\Local%20Settings\Temp\~hh9F54.htm
Description
Network connections shell
Networking dll file
Remote access library
Not present in SP1
versions of Windows PE.
Not present in SP1
versions of Windows PE.
Not present in SP1
versions of Windows PE.
Not present in SP1
versions of Windows PE.
Wireless networking
configuration file
Wireless configuration
manager
15/07/2004
Microsoft Windows Preinstallation Environment User's Guide
Epro4.sys
Ex10.sys
Netel99x.inf
Netepicn.inf
F3ab18xi.sys
F3ab18xj.sys
Fa312nd5.sys
Fa410nd5.sys
Fem556na.sys
Netepro.inf
Netepvcm.inf
Netepvcp.inf
Netex10.inf
Netf56n5.inf
Fem556nb.sys
Fem556ni.sys
Fem556n5.sys
Fetnd5.sys
Forehe.sys
Ibmexmp.sys
Netfa312.inf
Netfa410.inf
Netfjvi.inf
Netfjvj.inf
Netfore.inf
Netforeh.inf
Iologmsg.dll
Ip5515.sys
Ipfltdrv.sys
Ipinip.sys
Ipnat.sys
Ipsec.sys
Netgpc.inf
Netias.inf
Netibm.inf
Netibm2.inf
Netip6.inf
Netiprip.inf
Irda.sys
Irenum.sys
Irsir.sys
Ktc111.sys
Lanepic5.sys
Lmndis3.sys
Netirda.inf
Netirsir.inf
Netklsi.inf
Netktc.inf
Netlanem.inf
Netlanep.inf
Lne100.sys
Lne100tx.sys
Loop.sys
Mdgndis5.sys
Mrxdav.sys
Mrxsmb.sys
Msgpc.sys
Mxnic.sys
N1000645.sys
N1000nt5.sys
N100325.sys
N100645.sys
Ndistapi.sys
Ndiswan.sys
Ne2000.sys
Netbios.sys
Netbt.sys
Netevent.dll
Netflx3.sys
Netwlan5.sys
Ngrpci.sys
Nic1394.sys
Nmnt.sys
Nwlnkflt.sys
Nwlnkfwd.sys
Nwlnkipx.sys
Nwlnknb.sys
Nwlnkspx.sys
Nwrdr.sys
Otc06x5.sys
Otceth5.sys
Pc100nds.sys
Pca200e.sys
Pcmlm56.sys
Pcntn5hl.sys
Pcntn5m.sys
Pcntpci5.sys
Pcx500.sys
Psched.sys
Ptilink.sys
Rasacd.sys
Rasirda.sys
Rasl2tp.sys
Raspppoe.sys
Raspptp.sys
Raspti.sys
Rawwan.sys
Netlm.inf
Netlm56.inf
Netlnev2.inf
Netloop.inf
Netlpd.inf
Netmadge.inf
Netmhzn5.inf
Netmscli.inf
Netnb.inf
Netnf3.inf
Netngr.inf
Netnm.inf
Netnovel.inf
Netnwcli.inf
Netnwlnk.inf
Netoc.inf
Netosi2c.inf
Netosi5.inf
Netpc100.inf
Netpnic.inf
Netpsa.inf
Netpschd.inf
Netpwr2.inf
Netrasa.inf
Netrass.inf
Netrast.inf
Netrlw2k.inf
Netrsvp.inf
Netrtpnt.inf
Netrtsnt.inf
Netrwan.inf
Netsap.inf
Netserv.inf
Netsis.inf
Netsk98.inf
Netsk_fp.inf
Netsla30.inf
Netsmc.inf
Netsnip.inf
Netsnmp.inf
Nettb155.inf
Nettcpip.inf
Nettdkb.inf
Nettiger.inf
Nettpro.inf
Nettpsmp.inf
Netupnp.inf
file://C:\Documents%20and%20Settings\alessandrot\Local%20Settings\Temp\~hh9F54.htm
Page 15 of 27
15/07/2004
Microsoft Windows Preinstallation Environment User's Guide
Rdbss.sys
Rlnet5.sys
Netupnph.inf
Netvt86.inf
Rocket.sys
Rtl8029.sys
Rtl8139.sys
Sisnic.sys
Sk98xwin.sys
Netw840.inf
Netw926.inf
Netw940.inf
Netwlan.inf
Netwlan2.inf
Skfpwin.sys
Sla30nd5.sys
Smc8000n.sys
Smcpwr2n.sys
Srv.sys
Srwlnd5.sys
Netwv48.inf
Netwzc.inf
Netx500.inf
Netx56n5.inf
Netxcpq.inf
Page 16 of 27
Tbatm155.sys
Tcpip.sys
Tcpip6.sys
Tdk100b.sys
Tdkcd31.sys
Tjisdn.sys
Tpro4.sys
Usb101et.sys
Vinwm.sys
W926nd.sys
W940nd.sys
Wanarp.sys
Wlandrv2.sys
Wlluc48.sys
Xem336n5.sys
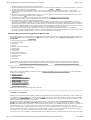
The following table includes file names of tools and a bitmap. You can safely remove these files without affecting core functionality. Note
that if you remove some of these files, you will lose functionality that you may need, such as Factory.exe, partitioning tools, debugging
tools, and registry editing tools.
File name
Attrib.exe
Chkdsk.exe
Clipsrv.exe
Diskpart.exe
Dmadmin.exe
Eqndiag.exe
Eqnlogr.exe
Eqnloop.exe
Expand.exe
Factory.exe
Locator.exe
Notepad.exe
Ntsd.exe
Odbcad32.exe
Odbcconf.exe
Peer.exe
Pentnt.exe
Portmon.exe
Reg.exe
Regedit.exe
Regedt32.exe
Regsvr32.exe
Rsvp.exe
Setup.exe
Spoolsv.exe
Taskmgr.exe
Winpe.bmp
Xcopy.exe
Xlog.exe
Description
Common command-line tool
Common command-line tool
Common command-line tool
Partitioning tool (also used by Factory.exe)
Partitioning tool (also used by Factory.exe)
Common command-line tool
Common command-line tool
Common command-line tool
Common command-line tool
Factory preinstallation tool
Common command-line tool
Common command-line tool
Common command-line tool
Common command-line tool
Common command-line tool
Common command-line tool
Common command-line tool
Common command-line tool
Common command-line tool
Common command-line tool
Common command-line tool
Common command-line tool
Common command-line tool
Common command-line tool
Common command-line tool
Common command-line tool
Background bitmap for Windows PE (optional)
Common command-line tool
Common command-line tool
Limitations of Windows PE
Windows PE has these limitations:
To reduce its size, Windows PE includes only a subset of the available Win32 APIs. Included are I/O (disk and network) and core
Win32 APIs.
l To prevent its use as a pirated operating system, Windows PE automatically stops running the shell and reboots after 24 hours of
continuous use.
l No network access to files or folders on a Windows PE computer from another location on your network.
l Distributed File System (DFS) name resolution is supported as of the Service Pack 1 releases of Windows XP Home Edition,
l
file://C:\Documents%20and%20Settings\alessandrot\Local%20Settings\Temp\~hh9F54.htm
15/07/2004
Microsoft Windows Preinstallation Environment User's Guide
Page 17 of 27
Windows XP Professional, and Windows XP 64-Bit Edition.
The tested methods of gaining network connectivity to file servers are TCP/IP and NetBIOS over TCP/IP. Other methods, such as the
IPX/SPX network protocol, are not supported.
l The drive letters assigned during Windows PE are not saved to any registry that persists when you reboot. The drive letter
assignment when you create partitions is in the order of creation, but the drive letter assignments when you reboot will be in the
default order.
l Windows PE requires a VGA-compatible device and uses a screen resolution of 800 x 600 pixels. If Windows PE cannot detect video
settings, the default screen resolution is 640 x 480 pixels.
l Windows PE is too large to fit on a floppy disk. For more information, see Reducing the Size of Windows PE.
l
You cannot build a custom version of Windows PE from Windows XP Home Edition.
Windows PE does not support the Microsoft .NET framework.
l The "Windows on Windows 32" (WOW32) subsystem was introduced into Windows NT to allow 16-bit applications to run on the
Windows NT 32-bit platform. Similarly, a new 32-bit subsystem called "Windows on Windows 64" (WOW64) has been introduced into
Windows XP 64-bit versions. This subsystem provides all the 32-bit Windows services needed for 32-bit applications to run properly.
However, the WOW32 subsystem is not included in 32-bit versions of Windows PE, so 16-bit applications will not function. And in 64bit versions of Windows PE, there is no WOW64 subsystem, so 32-bit applications will also not function.
l Windows PE can be used to configure and partition a computer's disks before starting Windows Setup. If any hard disks are
converted to dynamic disks with Diskpart.exe before you start Windows Setup, then those hard disks are recognized as foreign when
the operating system is installed, and any volumes on those hard disks will not be accessible.
l
l
Windows APIs That Are Not Supported on Windows PE
The following categories of functions of the Win32 API set are not present in Windows PE. For more information on these categories, see
the Microsoft Platform SDK in the MSDN Library (http://msdn.microsoft.com/library/): Select Windows Development, and then select
Platform SDK.
l
l
l
l
l
l
l
l
l
l
l
l
l
Windows Management Instrumentation (WMI)
Windows Multimedia
Still Image
OpenGL
NetShow Theater Administration
Windows Shell
Access Control
Power Options
Printing and Print Spooler
Window Station and Desktop
Terminal Services
User Profile
Tape Backup
For information on adding support for Windows Script Host (WSH), HTML Applications (HTA), and ActiveX Data Objects (ADO) to
Windows PE, see Adding Optional Component Packages to Windows PE in the topic Creating a Customized Version of Windows PE.
Helpful Command-Line Tools
These tools are used when building a customized version of Windows Preinstallation Environment (Windows PE) or when preinstalling
Windows using Windows PE.
l
l
l
l
l
l
l
l
DiskPart Commands
DiskPart Scripting
Dskimage Command-Line Options
Factory Command-Line Options
Mkimg Command
Netcfg Command-Line Options
Oscdimg Command-Line Options
Sys Command-Line Options
DiskPark is contained in the Windows operating system CD.
DiskPart Commands
DiskPart is a text-mode command interpreter contained in the Windows XP and the Windows Server 2003 family. This tool enables you
to manage objects (disks, partitions, or volumes) by using scripts or direct input from a command prompt. Before you can use DiskPart
commands on a disk, partition, or volume, you must first list and then select the object to give it focus. When an object has focus, any
DiskPart commands that you type act on that object.
You can list the available objects and determine an object's number or drive letter by using the list disk, list volume, and list
partition commands. The list disk and list volume commands display all disks and volumes on the computer. However, the list
partition command displays only partitions on the disk that have focus. When you use the list commands, an asterisk (*) appears next
to the object with focus. You select an object by its number or drive letter, such as disk 0, partition 1, volume 3, or volume C.
When you select an object, the focus remains on that object until you select a different object. For example, if the focus is set on disk 0,
and you select volume 8 on disk 2, the focus shifts from disk 0 to disk 2, volume 8. Some commands automatically change the focus.
For example, when you create a new partition, the focus automatically changes to the new partition.
You can give focus only to a partition on the selected disk. When a partition has focus, the related volume (if any) also has focus. When
file://C:\Documents%20and%20Settings\alessandrot\Local%20Settings\Temp\~hh9F54.htm
15/07/2004
Microsoft Windows Preinstallation Environment User's Guide
Page 18 of 27
a volume has focus, the related disk and partition also have focus if the volume maps to a single specific partition. If this is not the case,
then focus on the disk and partition is lost.
Important
l When using the DiskPart command as a part of a script, it is recommended that you complete all of the DiskPart operations together
as part of a single DiskPart script. You can run consecutive DiskPart scripts, but you must allow at least 15 seconds between each
script for a complete shutdown of the previous execution before running the DiskPart command again in successive scripts.
Otherwise, the successive scripts might fail. You can add a pause between consecutive DiskPart scripts by adding the timeout /t 15
command to your batch file along with your DiskPart scripts.
For more information about DiskPart, see Disk Management at the Microsoft Windows Resource Kits Web site.
(http://www.microsoft.com/)
DiskPart Commands
This table identifies the syntax and parameters of the DiskPart commands.
Command Syntax
Description
On basic disks, marks the partition with focus as active. This informs the basic input/output
system (BIOS) or Extensible Firmware Interface (EFI) that the partition or volume is a valid
system partition or system volume.
Only partitions can be marked as active.
active
active
Important
l DiskPart verifies that only the partition is capable of containing an operating system's
startup files. DiskPart does not check the contents of the partition. If you mistakenly
mark a partition as "active" and it does not contain the operating system's startup files,
your computer might not start.
Mirrors the simple volume with focus to the specified disk.
n
add disk
Specifies the disk to contain the mirror. You can mirror only simple volumes. The specified
disk must have unallocated space at least as large as the size of the simple volume that you
want to mirror.
add disk=n [noerr]
noerr
For scripting only. When an error is encountered, specifies that DiskPart continues to
process commands as if the error did not occur. Without the noerr parameter, an error
causes DiskPart to exit with an error code.
Assigns a drive letter or mount point to the volume with focus. If no drive letter or mount point
is specified, then the next available drive letter is assigned. If the assigned drive letter or
mount point is already in use, an error is generated.
Using the assign command, you can change the drive letter associated with a removable
drive.
assign
assign
[{letter=d|mount=path}]
[noerr]
You cannot assign drive letters to system volumes, boot volumes, or volumes that contain
the paging file. In addition, you cannot assign a drive letter to an original equipment
manufacturer (OEM) partition or any GPT partition other than a basic data partition.
letter=d
Specifies the drive letter that you want to assign to the volume.
mount=path
Specifies the mount point path that you want to assign to the volume.
noerr
For scripting only. When an error is encountered, specifies that DiskPart continues to
process commands as if the error did not occur. Without the noerr parameter, an error
causes DiskPart to exit with an error code.
Applies to dynamic disks only. Breaks the mirrored volume with focus into two simple volumes.
One simple volume retains the drive letter and any mount points of the mirrored volume, while
the other simple volume receives the focus so that you can assign it a drive letter.
By default, the contents of both halves of the mirror are retained; each half becomes a
simple volume. Using the nokeep parameter, only one-half of the mirror is retained as a
simple volume, while the other half is deleted and converted to free space. Neither volume
receives the focus.
break disk
break disk=n [nokeep]
[noerr]
n
Specifies the disk that contains the mirrored volume.
nokeep
Specifies that only one of the mirrored volumes is retained; the other simple volume is
deleted and converted to free space. Neither volume receives the focus.
noerr
For scripting only. When an error is encountered, specifies that DiskPart continues to
process commands as if the error did not occur. Without the noerr parameter, an error
causes DiskPart to exit with an error code.
clean
clean [all]
Removes any and all partition or volume formatting from the disk with focus. On master boot
record (MBR) disks, only the MBR partitioning information and hidden sector information are
overwritten. On GUID partition table (GPT) disks, the GPT partitioning information, including
the Protective MBR, is overwritten; there is no hidden sector information.
all
Specifies that each and every sector on the disk is zeroed, which completely deletes all data
file://C:\Documents%20and%20Settings\alessandrot\Local%20Settings\Temp\~hh9F54.htm
15/07/2004
Microsoft Windows Preinstallation Environment User's Guide
Page 19 of 27
contained on the disk.
Converts an empty dynamic disk into a basic disk.
convert
basic
convert basic [noerr]
Important
l The disk must be empty to convert it to a dynamic disk. Back up your data, and then
delete all partitions or volumes before converting the disk.
noerr
For scripting only. When an error is encountered, specifies that DiskPart continues to
process commands as if the error did not occur. Without the noerr parameter, an error
causes DiskPart to exit with an error code.
Converts a basic disk into a dynamic disk. Any existing partitions on the disk become simple
volumes.
convert
dynamic
convert dynamic [noerr]
convert gpt convert gpt [noerr]
noerr
For scripting only. When an error is encountered, specifies that DiskPart continues to
process commands as if the error did not occur. Without the noerr parameter, an error
causes DiskPart to exit with an error code.
On Itanium-based computers, converts an empty basic disk with the master boot record (MBR)
partition style into a basic disk with the GUID partition table (GPT) partition style.
Important
l The disk must be empty to convert it to a GPT disk. Back up your data and then delete
all partitions or volumes before converting the disk.
noerr
For scripting only. When an error is encountered, specifies that DiskPart continues to
process commands as if the error did not occur. Without the noerr parameter, an error
causes DiskPart to exit with an error code.
On Itanium-based computers, converts an empty basic disk with the GUID Partition Table
(GPT) partition style to a basic disk with the master boot record (MBR) partition style.
convert
mbr
convert mbr [noerr]
Important
l The disk must be empty to convert it to an MBR disk. Back up your data and then delete
all partitions or volumes before converting the disk.
noerr
For scripting only. When an error is encountered, specifies that DiskPart continues to
process commands as if the error did not occur. Without the noerr parameter, an error
causes DiskPart to exit with an error code.
On Itanium-based computers, creates an Extensible Firmware Interface (EFI) system partition
on a GUID Partition Table (GPT) disk. After the partition has been created, the focus is given to
the new partition.
size=n
Specifies the size of the partition in megabytes (MB). If no size is given, the partition
continues until there is no more free space in the current region.
create
create partition efi [size=n]
partition efi [offset=n] [noerr]
offset=n
Specifies the byte offset at which to create the partition. If no offset is given, the partition is
placed in the first disk extent that is large enough to hold it.
noerr
For scripting only. When an error is encountered, specifies that DiskPart continues to
process commands as if the error did not occur. Without the noerr parameter, an error
causes DiskPart to exit with an error code.
Creates an extended partition on the current drive. After the partition has been created, the
focus automatically shifts to the new partition. Only one extended partition can be created per
disk. This command fails if you attempt to create an extended partition within another
extended partition. You must create an extended partition before you can create logical drives.
create
partition
extended
size=n
Specifies the size of the extended partition in megabytes (MB). If no size is given, then the
partition continues until there is no more free space in the region. The size is cylinder
snapped; that is, the size is rounded to the closest cylinder boundary. For example, if you
specify a size of 500 MB, the partition size rounds up to 504 MB.
create partition extended
[size=n] [offset=n] [noerr] offset=n
Applies to master boot record (MBR) disks only. Specifies the byte offset at which to create
the extended partition. If no offset is given, the partition starts at the beginning of the first
free space on the disk. The offset is cylinder snapped; that is, the offset is rounded to the
closest cylinder boundary. For example, if you specify an offset that is 27 MB and the
cylinder size is 8 MB, the offset is rounded to the 24-MB boundary.
noerr
For scripting only. When an error is encountered, specifies that DiskPart continues to
process commands as if the error did not occur. Without the noerr parameter, an error
causes DiskPart to exit with an error code.
Creates a logical drive in the extended partition. After the partition has been created, the focus
automatically shifts to the new logical drive.
size=n
The size of the logical drive in megabytes (MB). If no size is given, then the partition
continues until there is no more free space in the current region.
offset=n
file://C:\Documents%20and%20Settings\alessandrot\Local%20Settings\Temp\~hh9F54.htm
15/07/2004
Microsoft Windows Preinstallation Environment User's Guide
create
partition
logical
create partition logical
[size=n] [offset=n] [noerr]
Page 20 of 27
Applies to master boot record (MBR) disks only. Specifies the byte offset at which to create
the logical drive. The offset is cylinder snapped; that is, the offset rounds up to completely
fill whatever cylinder size is used. If no offset is given, then the partition is placed in the
first disk extent that is large enough to hold it. The partition is at least as long in bytes as
the number specified by size=n. If you specify a size for the logical drive, it must be smaller
than the extended partition.
noerr
For scripting only. When an error is encountered, specifies that DiskPart continues to
process commands as if the error did not occur. Without the noerr parameter, an error
causes DiskPart to exit with an error code.
On Itanium-based computers, creates a Microsoft reserved (MSR) partition on a GUID Partition
Table (GPT) disk.
Caution
l Be very careful when using the create partition msr command. GPT disks require a
specific partition layout, and so creating Microsoft Reserved Partitions can cause the disk
to become unreadable. On GPT disks that are used to start Windows XP 64-Bit Edition or
the 64-bit versions of the Windows Server 2003 family, the EFI system partition is the
first partition on the disk, followed by the Microsoft Reserved Partition. GPT disks used
only for data storage do not have an EFI system partition; the Microsoft Reserved
Partition is the first partition.
create
partition
msr
Windows XP and the Windows Server 2003 family do not mount Microsoft Reserved
Partitions. You cannot store data on them and you cannot delete them.
create partition msr
[size=n] [offset=n] [noerr] size=n
Specifies the size of the partition in megabytes (MB). The partition is at least as long in
bytes as the number specified by size=n. If no size is given, the partition continues until
there is no more free space in the current region.
offset=n
Specifies the byte offset at which to create the partition. The partition starts at the byte
offset specified by offset=n. It is sector snapped; that is, the offset rounds up to
completely fill whatever sector size is used. If no offset is given, then the partition is placed
in the first disk extent that is large enough to hold it.
noerr
For scripting only. When an error is encountered, specifies that DiskPart continues to
process commands as if the error did not occur. Without the noerr parameter, an error
causes DiskPart to exit with an error code.
Creates a primary partition on the current basic disk. After you create the partition, the focus
automatically shifts to the new partition. The partition does not receive a drive letter; you must
use the assign command to assign a drive letter to the partition.
size=n
Specifies the size of the partition in megabytes (MB). If no size is given, the partition
continues until there is no more unallocated space in the current region. The size is cylinder
snapped; that is, the size rounds to the closest cylinder boundary. For example, if you
specify a size of 500 MB, the partition size rounds up to 504 MB.
offset=n
Specifies the byte offset at which to create the partition. If no offset is given, the partition
starts at the beginning of the first free space on the disk. For master boot record (MBR)
disks, the offset is cylinder snapped; that is, the offset rounds to the closest cylinder
boundary. For example, if you specify an offset that is 27 MB and the cylinder size is 8 MB,
the offset rounds to the 24-MB boundary.
ID={byte|GUID}
Intended for original equipment manufacturer (OEM) use only.
create
partition
primary
Caution
l Creating partitions with this parameter might cause your computer to crash or be
unable to start. Unless you are an OEM or an IT professional experienced with GPT
disks, do not create partitions on GPT disks using the ID=byte | GUID parameter.
Instead, always use the create partition efi command to create EFI System
partitions, the create partition msr command to create Microsoft Reserved
Partitions, and the create partition primary command (without the ID=byte |
GUID parameter) to create primary partitions on GPT disks.
create partition primary
[size=n] [offset=n] [ID=
{byte|GUID}] [noerr]
noerr
For scripting only. When an error is encountered, specifies that DiskPart continues to
process commands as if the error did not occur. Without the noerr parameter, an error
causes DiskPart to exit with an error code.
Comments
To partition a GPT disk with an OEM partition
1.
2.
Generate an OEM-GUID.
Use this command to create an EFI partition:
Create partition efi size=n
3.
Use this command to create a primary partition:
Create partition primary size=n ID={byte|GUID}
file://C:\Documents%20and%20Settings\alessandrot\Local%20Settings\Temp\~hh9F54.htm
15/07/2004
Microsoft Windows Preinstallation Environment User's Guide
4.
Page 21 of 27
Use this command to create an MSR partition:
Create partition MSR size=n
Important
l You must create the OEM partition between the EFI and MSR partitions.
l Never create the LDM metadata or LDM data partitions explicitly as partitions. Instead,
convert the disk to dynamic.
For master boot record (MBR) disks, you can specify a partition type byte, in hexadecimal
form, for the partition. If you do not specify a partition type byte on an MBR disk, the
create partition primary command creates a partition of type 0x6. Any partition type
byte can be specified with the ID=byte | GUID parameter. DiskPart does not check the
partition type byte for validity, nor does it perform any other checking of the ID parameter.
For GPT disks, you can specify a partition type GUID for the partition that you want to
create:
EFI System partition: c12a7328-f81f-11d2-ba4b-00a0c93ec93b
Microsoft reserved partition: e3c9e316-0b5c-4db8-817d-f92df00215ae
l Basic data partition: ebd0a0a2-b9e5-4433-87c0-68b6b72699c7
l LDM metadata partition on a dynamic disk: 5808c8aa-7e8f-42e0-85d2-e1e90434cfb3
l LDM data partition on a dynamic disk: af9b60a0-1431-4f62-bc68-3311714a69ad
l
l
If you do not specify a partition type GUID, the create partition primary command
creates a basic data partition. Any partition type can be specified with the ID=byte | GUID
parameter. DiskPart does not check the partition GUID for validity, nor does it perform any
other checking of the ID parameter.
Creates a RAID-5 volume on three or more specified dynamic disks. After you create the
volume, the focus automatically shifts to the new volume.
size=n
Specifies the amount of disk space, in megabytes (MB), that the volume occupies on each
disk. If no size is given, the largest possible RAID-5 volume is created. The disk with the
smallest available contiguous free space determines the size for the RAID-5 volume and the
same amount of space is allocated from each disk. The actual amount of usable disk space
in the RAID-5 volume is less than the combined amount of disk space because some of the
create
create volume raid [size=n]
disk space is required for parity.
volume raid [disk=n,n,n[,n,…]] [noerr]
disk=n,n,n[,n,…]
Specifies the dynamic disks on which to create the volume. You need at least three dynamic
disks in order to create a RAID-5 volume. An amount of space equal to size=n is allocated
on each disk.
noerr
For scripting only. When an error is encountered, specifies that DiskPart continues to
process commands as if the error did not occur. Without the noerr parameter, an error
causes DiskPart to exit with an error code.
Creates a simple volume. After you create the volume, the focus automatically shifts to the
new volume.
create
volume
simple
size=n
Specifies the size of the volume in megabytes (MB). If no size is given, the new volume
takes up the remaining free space on the disk.
create volume simple
[size=n] [disk=n] [noerr]
disk=n
Specifies the dynamic disk on which to create the volume. If no disk is given, the current
disk is used.
noerr
For scripting only. When an error is encountered, specifies that DiskPart continues to
process commands as if the error did not occur. Without the noerr parameter, an error
causes DiskPart to exit with an error code.
Creates a striped volume using two or more specified dynamic disks. After you create the
volume, the focus automatically shifts to the new volume.
create
volume
stripe
create volume stripe
[size=n] [disk=n,n[,n,…]]
[noerr]
size=n
Specifies the amount of disk space, in megabytes (MB), that the volume occupies on each
disk. If no size is given, the new volume takes up the remaining free space on the smallest
disk and an equal amount of space on each subsequent disk.
disk=n,n[,n,…]
Specifies the dynamic disks on which to create the volume. You need at least two dynamic
disks to create a striped volume. An amount of space equal to size=n is allocated on each
disk.
noerr
For scripting only. When an error is encountered, specifies that DiskPart continues to
process commands as if the error did not occur. Without the noerr parameter, an error
causes DiskPart to exit with an error code.
Deletes a missing dynamic disk from the disk list.
delete disk [noerr]
noerr
For scripting only. When an error is encountered, specifies that DiskPart continues to
process commands as if the error did not occur. Without the noerr parameter, an error
file://C:\Documents%20and%20Settings\alessandrot\Local%20Settings\Temp\~hh9F54.htm
15/07/2004
Microsoft Windows Preinstallation Environment User's Guide
[override]
Page 22 of 27
causes DiskPart to exit with an error code.
override
Enables DiskPart to delete all simple volumes on the disk. If the disk contains half of a
mirrored volume, the half of the mirror on the disk is deleted. The delete disk override
command fails if the disk is a member of a RAID-5 volume.
On a basic disk, deletes the partition with focus. You cannot delete the system partition, boot
partition, or any partition that contains the active paging file or crash dump (memory dump).
delete disk
Caution
l Deleting a partition on a dynamic disk can delete all dynamic volumes on the disk, thus
destroying any data and leaving the disk in a corrupted state. To delete a dynamic
volume, always use the delete volume command instead.
delete
partition
delete partition [noerr]
[override]
You can delete partitions from dynamic disks, but you must not create them. For example,
it is possible to delete an unrecognized GUID Partition Table (GPT) partition on a dynamic
GPT disk. However, deleting such a partition does not cause the resulting free space to
become available. This command is intended to enable space reclamation on a corrupted
offline dynamic disk in an emergency situation where the clean command cannot be used.
noerr
For scripting only. When an error occurs, specifies that DiskPart continues to process
commands as if the error did not occur. Without the noerr parameter, an error causes
DiskPart to exit with an error code.
override
Enables DiskPart to delete any partition regardless of type. Normally, DiskPart only enables
you to delete known data partitions.
Deletes the selected volume. You cannot delete the system volume, boot volume, or any
volume that contains the active paging file or crash dump (memory dump).
delete
volume
detail disk
detail
volume
exit
delete volume [noerr]
detail disk
noerr
For scripting only. When an error occurs, specifies that DiskPart continues to process
commands as if the error did not occur. Without the noerr parameter, an error causes
DiskPart to exit with an error code.
Displays the properties of the selected disk and the volumes on that disk.
detail volume
Displays the disks on which the current volume resides.
exit
Exits the DiskPart command interpreter.
Extends the volume with focus into the next contiguous unallocated space. For basic volumes,
the unallocated space must be on the same disk as, and must follow (have a higher sector
offset number than) the partition with focus. A dynamic simple or spanned volume can be
extended to any empty space on any dynamic disk. Using this command, you can extend an
existing volume into newly created space.
If the partition was previously formatted with the NTFS file system, the file system is
automatically extended to occupy the larger partition. No data loss occurs. If the partition
was previously formatted with any file system format other than NTFS, the command fails
with no change to the partition.
You cannot extend the current system or boot partitions.
extend
extend [size=n] [disk=n]
[noerr]
size=n
Specifies the amount of space, in megabytes (MB), to add to the current partition. If you do
not specify a size, the disk is extended to take up all of the next contiguous unallocated
space.
disk=n
Specifies the dynamic disk on which to extend the volume. An amount of space equal to
size=n is allocated on the disk. If no disk is specified, the volume is extended on the
current disk.
help
help
import
import [noerr]
inactive
inactive
noerr
For scripting only. When an error occurs, specifies that DiskPart continues to process
commands as if the error did not occur. Without the noerr parameter, an error causes
DiskPart to exit with an error code.
Displays a list of the available commands.
Imports a foreign disk group into the local computer's disk group. The import command
imports every disk that is in the same group as the disk that has focus.
noerr
For scripting only. When an error occurs, specifies that DiskPart continues to process
commands as if the error did not occur. Without the noerr parameter, an error causes
DiskPart to exit with an error code.
On basic master boot record (MBR) disks, marks the system partition or boot partition with
focus as inactive. The computer starts from the next option specified in the BIOS such as the
CD-ROM drive or a Pre-Boot eXecution Environment (PXE)-based boot environment (such as
Remote Installation Services (RIS)) when you restart the computer.
Caution
l Your computer might not start without an active partition. Do not mark a system or boot
partition as inactive unless you are an experienced user with a thorough understanding
of the Windows Server 2003 family.
If you are unable to start your computer after marking the system or boot partition
as inactive, try repairing the partition using the Fixmbr and Fixboot commands in
the Recovery Console.
file://C:\Documents%20and%20Settings\alessandrot\Local%20Settings\Temp\~hh9F54.htm
15/07/2004
Microsoft Windows Preinstallation Environment User's Guide
list disk
list disk
list partition list partition
list volume list volume
online
rem
online [noerr]
rem
Page 23 of 27
Displays a list of disks and information about them, such as their size, amount of available free
space, whether the disk is a basic or dynamic disk, and whether the disk uses the master boot
record (MBR) or GUID partition table (GPT) partition style. The disk marked with an asterisk
(*) has focus.
Displays the partitions listed in the partition table of the current disk. On dynamic disks, these
partitions may not correspond to the dynamic volumes on the disk. This discrepancy occurs
because dynamic disks contain entries in the partition table for the system volume or boot
volume (if present on the disk). Dynamic disks also contain a partition that occupies the
remainder of the disk in order to reserve the space for use by dynamic volumes.
Displays a list of basic and dynamic volumes on all disks.
Brings an offline disk or volume with focus online.
noerr
For scripting only. When an error occurs, specifies that DiskPart continues to process
commands as if the error did not occur. Without the noerr parameter, an error causes
DiskPart to exit with an error code.
Provides a way to add comments to a script. For example:
rem These commands set up 3 drives.
create partition primary size=2048
assign d:
create partition extend
create partition logical size=2048
assign e:
create partition logical
assign f:
Removes a drive letter or mount point from the volume with focus. If the all parameter is
used, all current drive letters and mount points are removed. If you do not specify a drive
letter or mount point, then DiskPart removes the first drive letter or mount point that it
encounters.
You can use the remove command to change the drive letter associated with a removable
drive. You cannot remove the drive letters on system, boot, or paging volumes. In addition,
you cannot remove the drive letter for an OEM partition, any GPT partition with an
unrecognized GUID, or any of the special, non-data, GPT partitions such as the EFI system
partition.
remove
remove
[{letter=d|mount=path
[all]}] [noerr]
letter=d
Specifies the drive letter to remove.
mount=path
Specifies the mount point path to remove.
all
Removes all current drive letters and mount points.
noerr
For scripting only. When an error occurs, specifies that DiskPart continues to process
commands as if the error did not occur. Without the noerr parameter, an error causes
DiskPart to exit with an error code.
Repairs the RAID-5 volume with focus by replacing the failed RAID-5 member with the
specified dynamic disk. The specified dynamic disk must have free space greater than or equal
to the total size of the failed RAID-5 member.
n
repair disk
rescan
retain
repair disk=n [noerr]
rescan
Specifies the dynamic disk that replaces the failed RAID-5 member. The specified disk must
have free space equal to or larger than the total size of the failed RAID-5 member.
noerr
For scripting only. When an error occurs, DiskPart continues to process commands as if the
error did not occur. Without the noerr parameter, an error causes DiskPart to exit with an
error code.
Locates new disks that may have been added to the computer.
Prepares an existing dynamic simple volume to use as a boot or system volume.
On an x86-based computer, creates a partition entry in the master boot record (MBR) on
the dynamic simple volume with focus. To create an MBR partition, the dynamic simple
volume must start at a cylinder aligned offset and be an integral number of cylinders in
size.
retain
On an Itanium-based computer, creates a partition entry in the GUID partition table (GPT)
on the dynamic simple volume with focus.
Note
l The retain command is intended for use only during unattended Setup or by original
equipment manufacturers (OEMs).
Selects the specified disk and shifts the focus to it.
select disk
select
select disk=[n]
n
select partition=[{n|d}]
Selects the specified partition and gives it focus. If If you do not specify a partition, the select
command lists the current partition with focus. You can view the numbers of all partitions on
the current disk by using the list partition command.
Specifies the disk number of the disk to receive focus. If you do not specify a disk number,
the select command lists the disk that currently has the focus. You can view the numbers
for all disks on the computer by using the list disk command.
n
file://C:\Documents%20and%20Settings\alessandrot\Local%20Settings\Temp\~hh9F54.htm
15/07/2004
Microsoft Windows Preinstallation Environment User's Guide
partition
Page 24 of 27
Specifies the number of the partition to receive the focus.
d
select
volume
Specifies the drive letter or mount point path of the partition to receive the focus.
Selects the specified volume and shifts the focus to it. If you do not specify a volume, the
select command lists the current volume with focus. You can specify the volume by number,
drive letter, or mount point path. On a basic disk, selecting a volume also gives the
corresponding partition focus. You can view the numbers of all volumes on the computer by
using the list volume command.
select volume=[{n|d}]
n
Specifies the number of the volume to receive the focus.
d
Specifies the drive letter or mount point path of the volume to receive the focus.
For more information, see DiskPart Scripting.
DiskPart Scripting
By using the DiskPart command-line tool, you can create scripts to automate disk-related tasks, such as creating volumes or converting
disks to dynamic disks. Scripting these tasks is useful if you deploy Windows by using unattended Setup or Sysprep, which do not
support creating volumes other than the boot volume.
For more information about DiskPart scripts, see "Disk Management" in the Microsoft Windows XP Professional Resource Kit.
To start a DiskPart script, at the command prompt, type:
DiskPart /S scriptname.txt
where scriptname.txt is the name of the text file that contains your script.
To redirect DiskPart's scripting output to a file, type:
DiskPart /S scriptname.txt > logfile.txt
where logfile.txt is the name of the text file where DiskPart writes its output.
When DiskPart starts, the DiskPart version and computer name display at the command prompt. By default, if DiskPart encounters an
error while attempting to perform a scripted task, DiskPart stops processing the script and displays an error code (unless you specified
the noerr parameter). However, DiskPart always returns errors when it encounters syntax errors, regardless of whether you used the
noerr parameter. The noerr parameter enables you to perform useful tasks such as using a single script to delete all partitions on all
disks regardless of the total number of disks.
This table lists the DiskPart error codes:
Error Description
0
No errors occurred. The entire script ran without failure.
1
A fatal exception occurred. There may be a serious problem.
2
The parameters specified for a DiskPart command are incorrect.
3
DiskPart was unable to open the specified script or output file.
4
One of the services that DiskPart uses returned a failure.
A command syntax error occurred. The script failed because an object was improperly selected or was invalid for use with that
5
command.
Dskimage Command-Line Options
You can build a 64-bit version of Windows PE from a computer running a 32-bit operating system. However, building a 64-bit
Windows PE CD requires one additional step. You must copy the file Setupldr.efi to a floppy disk, then use the Dskimage tool to make an
image of the floppy disk. After you create an image of the 1.44-MB floppy disk, pass that image file into Oscdimg as an argument, in the
same way you pass Etfsboot.com.
For example:
copy C:\Build.ia64\ia64\Setupldr.efi A:
dskimage A: .\Efisys.bin
oscdimg -b.\Efisys.bin -n C:\Build.ia64 C:\64_winpe.iso
The syntax of the Dskimage tool:
dskimage drive_letter image_file
Option
drive_letter
image_file
Description
The letter name of the floppy drive containing Setupild.efi.
The name of the image file to pass to Oscdimg.
Factory Command-Line Options
You can use the Factory tool in two ways: from the command-line tool in the Windows Preinstallation Environment (Windows PE), and
from within Sysprep.
file://C:\Documents%20and%20Settings\alessandrot\Local%20Settings\Temp\~hh9F54.htm
15/07/2004
Microsoft Windows Preinstallation Environment User's Guide
Page 25 of 27
Use the Factory tool to update drivers, run Plug and Play enumeration, install applications, test, configure the computer with customer
data, or make other configuration changes in your factory environment. For companies that use disk imaging (or cloning) software,
efficient use of Factory.exe can reduce the number of images you require.
Running the Factory Tool in Sysprep
To run the Factory tool from within Sysprep, use this syntax:
sysprep -factory
This command restarts in a network-enabled state without displaying Windows Welcome or Mini-Setup.
When you have finished your set of tasks in Factory mode, run Sysprep with the -reseal option to prepare the computer for delivery to
the end user.
Running the Factory Tool in Windows PE
The syntax of the Factory tool:
factory {-minint | -winpe}
Option
-minint
Action
Uses Plug and Play to install the network interface card (NIC).
Locates a Winbom.ini file and processes these sections in this order:
l [WinPE.Net]
l [DiskConfig]
l [OEMRunOnce]
l [OEMRun]
l [WinPE], except for the Restart entry
l [UpdateSystem]
l Restart entry in [WinPE]
-winpe
Locating a Winbom.ini File
Factory.exe searches for a Winbom.ini file in these locations in this order:
1.
2.
3.
4.
The
The
The
The
root of all removable media drives that are not CD-ROM drives, such as a floppy disk drive.
root of all CD-ROM drives.
location of Factory.exe, usually the %SYSTEMDRIVE%\Sysprep folder.
root of %SYSTEMDRIVE%.
Notes
l If Factory.exe is running in the Windows Preinstallation Environment (Windows PE), the computer does not have network access until
it processes a Winbom.ini file that contains a [WinPE.Net] section.
l Windows PE is licensed to original equipment manufacturers (OEMs) and corporations with Enterprise Agreements or Select
Agreements with Software Assurance Membership in the Systems Pool.
l The last path and file name used by Factory.exe is stored in the registry key
HKEY_LOCAL_MACHINE\SOFTWARE\Microsoft\Factory\Winbom.
After locating a Winbom.ini file, the Factory tool reads the value of the WinbomType entry in the [Factory] section.
If the value of WinbomType does not match the current mode of Factory.exe (Factory, Windows PE, or OOBE), then the Winbom.ini file
is ignored and the Factory tool continues searching for a Winbom.ini file. If the value of WinbomType does match the current mode,
the Factory tool reads the value of the NewWinbom entry in the [Factory] section. If a value is specified for NewWinbom, and a
Winbom.ini file is located at the location specified by NewWinBom, then the Factory tool examines that Winbom.ini file for a
NewWinbom entry.
This cycle continues for a maximum of 10 times or until the Factory tool locates a Winbom.ini file that does not contain a NewWinbom
entry, whichever occurs first. The Factory tool then continues to run, using the settings in the last identified Winbom.ini file.
When you run Sysprep in Factory mode, NewWinbom is processed only once at each boot.
After locating the intended Winbom.ini file, the computer connects to the network as specified in the [WinPE.Net] section. Plug and Play
installs only the network adapter, and the Factory tool installs network services and binds the network protocols.
Mkimg Command
This command builds the file set for the Windows Preinstallation Environment (Windows PE) from any Windows XP or Windows
Server 2003, Standard Edition product CD except Windows XP Home Edition, Windows Server 2003, Datacenter Edition, and Windows
Server 2003, Web Edition, and optionally creates an .iso image of the files. You can then burn that .iso file to a CD-ROM. The CD image
creation process takes several minutes. The files are placed in the same location as where you run the mkimg command.
The syntax of the Mkimg command:
Mkimg.cmd [/nover] source_directory destination_directory [image_name]
Option
/nover
source_directory
Action
Disables version checking that would normally prevent the creation of unsupported Windows PE images.
Specifies the location of the CD-ROM containing the Windows product CD. Do not use Windows XP Home Edition. If
source_directory is a CD-ROM drive, you need to specify only the drive letter. If source_directory is a network path,
the path must be to the parent directory of the \i386 directory.
Note
file://C:\Documents%20and%20Settings\alessandrot\Local%20Settings\Temp\~hh9F54.htm
15/07/2004
Microsoft Windows Preinstallation Environment User's Guide
Page 26 of 27
l Do not include a trailing slash in source_directory.
Specifies the path where the files necessary to create the image are temporarily stored. If this directory does not
destination_directory
already exist, Mkimg creates it.
Specifies the path and file name of an ISO image file (.iso) that contains your customized version of Windows PE.
image_name
You can burn this .iso file to a CD-ROM to create a bootable Windows PE CD.
Alternatively, you can make more customizations of this version of Windows PE by using Oscdimg to create
an .iso file of a 64-bit version of Windows PE.
Important
l You must run the mkimg command from a location where you have read/write permissions, such as a local directory. You cannot run
the mkimg command from a read-only device such as a CD-ROM drive.
Example
This example creates an ISO image called ia64winpe.iso by using C:\Winpe.tmp and the floppy disk as temporary storage areas.
C:\Build.ia64\Mkimg.cmd E: C:\Winpe.tmp C:\ia64winpe.iso
Netcfg Command-Line Options
The network configuration tool (Netcfg) configures network access. When preinstalling Windows, it is most commonly used in a script
that runs during Windows PE.
Note
l The tested methods for Windows PE to gain network connectivity to file servers are TCP/IP and NetBIOS over TCP/IP. Other methods,
such as the IPX/SPX network protocol, are not supported.
For greater flexibility, the default version of Startnet.cmd includes a netcfg command instead of factory -winpe. For more information
on Startnet.cmd, see Creating a Customized Version of Windows PE.
The syntax of the Netcfg tool relevant to OEMs:
netcfg [-v] [-winpe] [-l path_to_component_inf] [-c {c | p | s}] [-i component_id]
Option
-v
-winpe
-l path_to_component_inf
Action
Specifies verbose mode.
Installs TCP/IP, NetBIOS, and the Client for Microsoft Networks (MSClient) when running in the
Windows Preinstallation Environment (Windows PE).
Specifies the complete path of the .inf file.
Specifies the class of the component to install. Valid options are c, p, and s.
c
Client
-c
p
Protocol
s
component_id
Service
Specifies the component ID of the networking component to install from the .inf file.
Examples
This command line installs the protocol MyProtocol from C:\Oemdir\file.inf:
netcfg -l c:\oemdir\file.inf -c p -i MyProtocol
This command line installs the MS_Server service:
netcfg -c s -i MS_Server
This command line installs TCP/IP, NetBIOS, and MSClient in Windows PE:
netcfg -v -winpe
Additional Netcfg Command-Line Options
The syntax of additional Netcfg options:
netcfg [-s {a | n}] [{-b | -q | -u} component_id]
Option
Action
Specifies the type of the component to display; valid options are a and n.
-s
a
Displays network adapters.
n
file://C:\Documents%20and%20Settings\alessandrot\Local%20Settings\Temp\~hh9F54.htm
15/07/2004
Microsoft Windows Preinstallation Environment User's Guide
-b
Displays network components.
Displays the binding paths that contain the specified component_id.
-q
-u
component_id
Queries if a particular component, specified by component_id, is installed.
Uninstalls a particular component, specified by component_id.
Specifies the component ID of the relevant component.
Page 27 of 27
Oscdimg Command-Line Options
This is a command-line tool in the OPK that creates an image (.iso) file of a customized 32-bit or 64-bit version of Windows PE. You can
then burn that .iso file to a CD-ROM.
The syntax of the Oscdimg tool:
oscdimg [-blocation] [-d] [-h] [image_file] [-j1] [-j2] [-llabelname] [-n] [-nt] [-o[i][s]] sourceroot [-tmm/dd/yyyy,hh:mm:ss [-g]]
[-x]
Option
Action
Specifies the location of the El Torito boot sector file. Do not use any spaces.
-blocation
For example: -bc:\directory\Etfsboot.com
-d
Does not force lowercase file names to uppercase.
-g
-h
image_file
Uses the Universal Coordinated Time for all files rather than the local time.
Includes hidden files and directories.
Specifies the name of the .iso image file you want to create from the Windows PE files.
Encodes Joliet Unicode file names and generates DOS-compatible 8.3 file names in the ISO-9660 name space.
These file names can be read by either Joliet systems or conventional ISO-9660 systems, but Oscdimg may
change some of the file names in the ISO-9660 name space to comply with DOS 8.3 and/or ISO-9660 naming
restrictions.
-j1
When using the -j1 or -j2 options, the -d, -n, and -nt options do not apply and cannot be used.
Encodes Joliet Unicode file names without standard ISO-9660 names (requires a Joliet operating system to read
files from the CD-ROM).
-j2
When using the -j1 or -j2 options, the -d, -n, and -nt options do not apply and cannot be used.
Specifies the volume label. Do not use spaces between the l and the labelname.
-llabelname
For example: -lMYLABEL
-n
-nt
-o
Allows long file names.
Allows long file names that are compatible with Windows NT 3.51.
Optimizes storage by encoding duplicate files only once.
Optimizes storage by encoding duplicate files only once. When comparing files, ignores diamond compression
-oi
time stamps.
-os
Optimizes storage by encoding duplicate files only once. Shows duplicate files when creating the image.
Optimizes storage by encoding duplicate files only once. When comparing files, ignores diamond compression
-ois
time stamps. Shows duplicate files when creating the image.
sourceroot
Required. Specifies the location of the Windows PE files that you want to build into an .iso image.
Specifies the time stamp for all files and directories. Do not use any spaces. Use the United States date format
-tmm/dd/yyyy,hh:mm:ss and a 24-hour clock. You can use any delimiter between the items.
For example: -t12/31/2000,15:01:00
-x
Computes and encodes the AutoCRC value in the image.
Sys Command-Line Options
You can use Windows PE to preinstall Windows 95, Windows 98, and Windows Millennium Edition. In these cases, the hard disk needs
the boot sector common to these operating systems. Use the Sys.exe utility to write the boot sectors for these operating systems.
By default, Sys writes a Windows 95, Windows 98, and Windows Millennium Edition boot sector. Use the /xp option to write a
Windows XP boot sector.
The syntax of the Sys tool:
sys [/xp] drive_letter
Option
/xp
drive_letter
Action
Optional. Writes the Windows XP boot sector.
Specifies the letter name of the drive to write the boot sector to.
file://C:\Documents%20and%20Settings\alessandrot\Local%20Settings\Temp\~hh9F54.htm
15/07/2004