1
Agro-Start Web Constructor
User Guide
1
AGRO-START PROJECT
Agro-Start Web Constructor
User Guide
This publication was prepared under the
“Transnational network for SME support in the animal breeding and horticulture sector – AGRO-START Project”
Priority: Facilitation of Innovation and Entrepreneurship
Area of intervention: Develop the enabling environment for innovative entrepreneurship
South East Europe Transnational Cooperation Programme
2
Table of contents
Table of contents ....................................................................................................................... 3
Overview .................................................................................................................................... 5
Project goals........................................................................................................................... 5
Technical notes ...................................................................................................................... 5
Types of users ........................................................................................................................... 7
Administrator (also referred as Admin) ................................................................................... 7
Network Administrator (also referred as NetAdmin) ................................................................ 7
Site Administrator (also referred as SiteAdmin) ...................................................................... 8
Guest ..................................................................................................................................... 8
Access to the system.............................................................................................................. 9
Network Administration .............................................................................................................11
Network administration ..........................................................................................................11
Sites management.................................................................................................................12
New site creation ...............................................................................................................12
Activities on existing sites ..................................................................................................13
User management .................................................................................................................14
Themes management............................................................................................................15
Site Administration ....................................................................................................................18
Account request ....................................................................................................................18
Site administration .................................................................................................................18
General settings .................................................................................................................19
User profile ........................................................................................................................21
Graphic themes .....................................................................................................................21
Media library ..........................................................................................................................23
Pages management ..............................................................................................................24
Creating and editing a page...................................................................................................25
Inserting a youtube video on a page ..................................................................................26
Inserting a media element in a page ..................................................................................27
A study case .............................................................................................................................28
Access to the system (Network Administrator user) ...............................................................28
3
Site and user activation .........................................................................................................29
Access to the system (Site Administrator user)......................................................................31
Selecting a graphic theme .....................................................................................................32
Deleting sample pages ..........................................................................................................34
Creating a new page .............................................................................................................35
Navigation menu management ..............................................................................................36
Visit the website ....................................................................................................................38
4
Overview
Project goals
The computer system described here (after also platform, or Web contructor) allows an
unlimited number of users (of type Site administrator) to create and publish online a website
consisting of a navigation menu and a set of html pages.
The task of the websites creation is made in full autonomy and freedom, including the ability to
insert media components in html pages and allows unlimited changes later.
System allows site administrators to choose between different graphic themes preloaded to be
applied to the site contents.
A new website is instantiated on the platform by a user of type Network administrator, who has
the ability and responsibility to manage the sites and their Site administrator.
The platform is a Web application, which is installed on a web server and is accessible to users
through the Internet using a standard web browser.
The use of the functionality offered is made very easy by a simple and intuitive graphical
interface.
The system has been designed to be easily usable by anyone, thanks to a simple and intuitive
graphical interface: design has aimed to provide to the users only the strictly necessary
functionality, while allowing the possibility to incorporate new features in the future.
In this guide, the topics are presented in a modular way and with increasing complexity, rising
gradually from the description of the basic concepts to the sections where all the available
operations are accompanied with detailed examples and screenshots.
Such users Site administrator can read the chapter "Network Administrator Features" in order to
have a complete knowledge of the platform, but this chapter is not necessary for the
management tasks that these users have to perform.
In the last chapter is presented a real case study, describing the sequence of all operations that
users need to accomplish for the creation of a new website from scratch.
Technical notes
System is based on the popular and proven platform CMS (Content Management System)
WordPress v3.9.1, an open source software can be freely used and distributed also in
commercial and professional environments.
5
This CMS is suitable for use in many fields of application and an accurate configuration and
customization allows to achieve the results described in this document, hiding to the user any
unnecessary complexity.
On the platform there is a unique user of type Administrator, who has the necessary
permissions to modify the configuration of the system down to the smallest detail. For normal
activities described in this guide is not never need to use this user.
The design and implementation of the system, with the goals described here, it was very
complex, requiring accurate configurations and also the development of components that do not
exist before. The platform, as we said in the previous paragraph, allows implementation of any
new functionality: the user Admnistrator be used for this purpose, but only by qualified
personnel because of the potential danger of the authorizations held on the whole system.
6
Types of users
This chapter describes the types of available users on the platform; keep in mind that users are
presented here in descending order of authorization, in the sense that, for example, the
Administrator has, in addition to their own, even all the authorizations held by the Network
administrator, but not vice versa.
Administrator (also referred as Admin)
There is only one user on the system of this type and has all the permissions that allow you to
change the platform in every detail.
This user during normal use of the platform, it is never necessary because to other users are
already exposed all the functionality needed to fulfill their job of site management and
publication.
All the information needed to carry out the management of the Wordpress platform beyond the
scope of this guide and are readily available online, for example, by referring to the official
documentation, starting from the following link: WordPress Codex.
Network Administrator (also referred as NetAdmin)
●
There is only one user on the system of this type and has permissions to manage the
platform in the normal workflow.
●
This user can create, edit and delete web sites. Concurrently with the creation of a new
website is created on the user type Site administrator.
●
The NetAdmin have the rights to the manage themes that a Site administrator can
choose for the creation of websites; he can insert, delete, and set "not available" an
unlimited number of themes.
●
As indicated in the general concept shown in the head of this chapter, the user
NetAdmin, in case of necessity, it can also perform editing operations on all web sites
present on the platform, assuming the capacity of a Site administrator.
●
Brief list of permissions:
●
Site management
●
User management
●
Graphic themes management
7
Site Administrator (also referred as SiteAdmin)
On the system there may be an unlimited number of users of this type and have permissions to
manage your own website.
This type of user can create, modify, and delete an unlimited number of html pages that,
graphically positioned in the central part of the site, represent the content to publish. In these
pages may be present multimedia content. Each page is made accessible via a menu item.
For his website, SiteAdmin can create, edit and delete an unlimited number of menu items on
the left, right or on the top bar of the site, depending on the theme graphic set. These entries
represent the links through which can reach the individual html pages created, as well as any
links leading to external sites.
Finally, for his site, a SiteAdmin can create, modify (in the name and description) and delete an
unlimited number of multimedia content (eg, images, graphics, sounds, videos) that can be
included in one or more html pages.
Brief list of permissions:
●
Page management
●
Navigation menu management
●
Media library management
●
Selecting a graphic theme
Guest
This user can view all websites on the platform, in addition to the public pages of the platform.
On a page of the Web constructor there is a complete list of online sites.
8
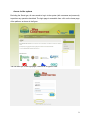
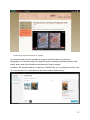
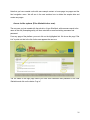
Access to the system
Excluding the Guest type, all users needs to log in to the system (with username and password)
to perform any operation described. The login page is accessible from a link on the home page
of the platform, as shown in the figure:
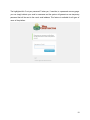
The link takes you to the login page, common for all types of user:
9
The highlighted link "Lost your password?" takes you, if need be, to a password recovery page:
you can simply indicate your email or username and the system will generate a new temporary
password that will be sent to the user's email address. This feature is available for all types of
users of the platform:
10
Network Administration
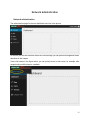
Network administration
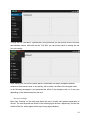
The administration page for the user NetAdmin looks like in the picture:
On the left you can see the three main menu items through you can perform management tasks
described in this chapter.
Via the link shown in the figure below, you can quickly return to this screen, for example, after
exceptionally modified page to a website:
11
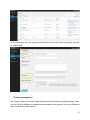
Sites management
The "Sites" menu item on the administration page takes the user to the site management page,
where you can find the full list of sites on the platform:
The first item in the list is the Web constructor site, the second is a model from which platform
derive new sites created. Of these two items the NetAdmin should not be cured. The third item
in the picture is a sample site, created by the function "Add New" button, visible on the left in the
menu and at the top of the page, as described in the next section.
New site creation
The creation of a new site begins by clicking on the menu item "Add New"; the link leads to the
creation page shown here:
12
As you can see from the example screen, you simply provide the following information:
●
Site Address
The address of the new site, which is appended to the main address of Web constructor.
In the example, specifying "examplesite", the full address will be
www.confagricolturapuglia.it/webconstructor/examplesite;
●
Site Title
The name of the site, which will appear at the top of each page and it will be changed
later by SiteAdmin;
●
Admin Email
The email address of the new user type SiteAdmin, which will be the site administrator.
At this address will be sent, after clicking on the "Add Site" on the bottom left, an email
containing a temporary password to access the platform. The new SiteAdmin, once had
access to the administration panel, can change the password;
●
Template
Of this item, as preset in the figure, the NetAdmin will not heal: it is the "model" that
will be copied to create the new site.
Activities on existing sites
In the admin sites page, hovering close to the name of each site you can make out of it some
management tasks.
13
Some of these (Dashboard and Edit) compete directly with SiteAdmin but, as mentioned above,
even the NetAdmin can have access to for security reasons. The other activities are specific to
a NetAdmin as these are closely linked to the management of any situation you do not want, for
example, to disable or completely remove a site from the platform (Deactivate, and Delete).
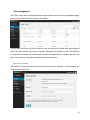
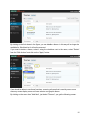
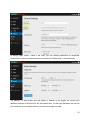
User management
The "Users" option on the main page takes the user to the user management page, where you
can find the full list of users on the platform:
This screen is of marginal importance as users on the platform coincide with sites created, then
there is no activity that NetAdmin should do, except for the change password and email
described below.
Although any user can change their email and password in autonomy and the platform provides
the procedure for recovering passwords directly from the login panel, you may need to
accomplish this task by the NetAdmin, for example, if a user SiteAdmin no longer has access to
his email.
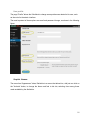
It should click on "Edit" under the user to modify:
14
On the next screen you must enter the new data to the user, in the bottom of the page, and click
on "Update User":
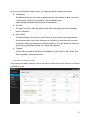
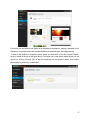
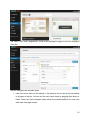
Themes management
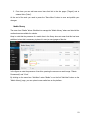
The "Themes" option on the main page takes the user to the themes management page, where
you can find the complete list of graphic themes available on the platform, from which SiteAdmin
users can choose for their website:
15
By clicking on the link shown in the figure, you can disable a theme: in this way will no longer be
available for SiteAdmin but it will not be removed.
If you want to delete a theme, select it using the checkbox next to the name, select "Delete"
from the "Bulk Actions" and click on the "Apply" button:
Care should be taken to use these functions: removing a theme that is used by one or more
sites may cause display errors until user select a new graphic theme.
By clicking on the menu item "Add New", just below "Themes", you get the following screen:
16
From here you can select a new theme to be installed on the platform, making it available to the
SiteAdmin. In the figure there are themes available for download from the Wordpress site.
To load on the platform a complete custom theme you must click on the link "Upload Theme",
which is visible at the top of the figure above. This takes you to the screen below where you can
upload, by clicking "Choose File", a zip file containing the new graphic theme, and install it
permanently by clicking on "Install Now".
17
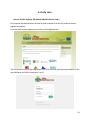
Site Administration
Account request
Users not yet registered that want to publish their own website, the platform provides a form to
request the activation of a new account. By clicking on the link "Request Access" on the main
site, you go to a screen that allows you to send a request to NetAdmin, which receives it by
mail:
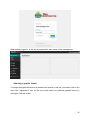
Site administration
The administration page for the user SiteAdmin looks like the following figure.
On the left you can see the main menu with five items which perform management operations
described below.
18
Through the link "Site admin", represented in the figure below you can quickly return to the main
administration screen, while with the link "Visit Site" you can quickly switch to viewing the site
you are creating:
While editing your site from the admin panel it is advisable to maintain a separate browser
window on the actual site view, to see quickly, with a refresh, the effect of the changes made.
In the following paragraphs is not presented the effect of the changes made, as it may vary
depending on the theme selected by the user.
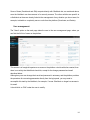
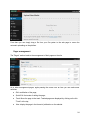
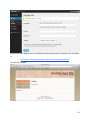
General settings
Menu item "Settings" on the main page allows the user to modify some general parameters of
the site. The most important are shown in the following figure and are, respectively, the title and
subtitle of the site, which appear at the top of every page published:
19
In settings page "Media", visible in the menu, you can change parameters for multimedia
content that the user can upload and which constitute the "Media Library" (described later).
The platform, for each media item was added, in addition to the original file, stores three
additional versions of the same file, but with smaller size. On this page SiteAdmin can set this
size, that'll end up as an option when try to include the image in a page.
20
User profile
The page "Profile" allows the SiteAdmin to change some preferences related to his user, such
as the color for the admin interface.
The most important of these options are email and password change, as shown in the following
figure:
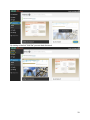
Graphic themes
The menu item "Appearance" takes SiteAdmin to a screen that allows him, with just one click on
the "Activate" button, to change the theme and feel to his site, selecting from among those
made available by the NetAdmin:
21
The "Menu" item, under "Appearance", leads to the management page of the menu navigation
of the site:
We can distinguish two important areas:
1. Here is the menu shown on the website; in the example, this is made up by links leading
to all pages of the site. You can sort the menu items simply by dragging them above or
below. Finally, the "Auto add pages" option allows the automatic addition of a menu item
when each new page created.
22
2. From here you can add new menu items that link to the site pages ("Pages") and to
external links ("links").
At the end of the work you need to press the "Save Menu" button to save and publish your
changes.
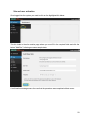
Media library
The menu item “'Media” allows SiteAdmin to manage the "Media Library" where are listed all the
media elements available for website.
Keep in mind that the presence of a media item in the library does not mean that this has been
published, since this is necessary to place it in one (or more) pages of the site.
In the figure we note the presence of two links, passing the mouse over each image: "Delete
Permanently" and "View".
By clicking on the menu item "Add New" under "Media" or on the link "Add New" button on the
"Media Library" page, you can upload a new media item on the platform:
23
From here you can simply drag a file from your file system to the web page to cause the
automatic uploading on the platform.
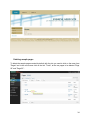
Pages management
The "Pages" section leads to the management of html pages on the site:
As in other management pages, again passing the mouse over an item you can make some
activities:
●
Edit: modifcation of the page;
●
Quick Edit: fast mode of editing the page;
●
Trash: Move the page to the trash. Trashed pages are displayed by clicking on the link
"Trash" at the top;
●
View: display the page in the format of publication on the website.
24
Creating and editing a page
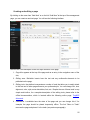
By clicking on the menu item "Add New" or on the link "Add New" at the top of the management
page, you can create a new html page. You will see the following interface:
Below there is the description of the five major sections of the page.
1. Page title: appears at the top of the page and as an entry in the navigation menu of the
site;
2. Editing area: SiteAdmin inserts here the text and any multimedia elements to be
published on the page;
3. Editing tools: the platform incorporates a number of tools that allow you to easily attach
to the text and to other page elements your preferred style; You can change font, size,
alignment, color, style, enter data tables, lists, etc.. Despite the use of these tools is very
simple and intuitive, for a complete description of the editing tools, please refer to the
official documentation, which is located within the following online page: TinyMCE
Advanced.
4. Publication: is available here the state of the page and you can change this if, for
example, the page should be placed temporarily offline. The link "Move to Trash"
removes the page and places it in the trash (see previous paragraph).
25
5. Page Attributes: here you can determine the hierarchy of the page you are editing,
positioning it such as "child" of another page, indicating the page "parent" via the dropdown menu "Parent": in this way, in navigation menu, the current page is located at a
sub-level compared to the "parent".
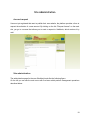
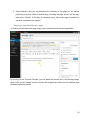
Inserting a youtube video on a page
To insert a youtube video on a page simply copy and paste the link like the image below:
By clicking on the "Preview Changes" you can watch the preview as in the following image,
while a click on the "Update" button will make the changes take effect and the modified page
becomes publicly accessible.
26
Inserting a media element in a page
Let us assume that you have uploaded an image in the Media Library (see previous
paragraphs). To insert this image in the page that you are creating, just press the button "Add
Media" button, select the desired item and press the "Insert into page".
In addition, the selection window, by clicking on "Upload Files" you can upload a new file on the
fly: in this way there is no need before to access the feature "Media Library".
27
A study case
Access to the system (Network Administrator user)
Let’s Assume that NetAdmin has received by mail a request for a new site, and then want to
prepare the platform.
From the platform home page you must click on the highlighted link:
The link takes you to the login page where you must enter the username and password of the
user NetAdmin and click on the button "Log In":
28
Site and user activation
Once logged into the system you need to click on the highlighted link below:
This link leads to the site creation page where you must fill in the required fields and click the
button "Add Site"; following are some sample data:
A confirmation message warns the user that the procedure was completed without errors:
29
At this point, new website will be immediately activated and public; accessing it with a browser
at
http://www.confagricolturapuglia.it/webconstructor/exampleagrosite/
you can see the result:
30
Note that you have created a site with some sample content: a home page, two pages and the
html navigation menu. We will see in the next sections how to delete the sample data and
create new pages.
Access to the system (Site Administrator user)
The new user you just created with the web site, of type SiteAdmin, with username equal to the
name of the site (exampleagrosite), will have received an email containing username and
password.
From any page of the platform you must click on the highlighted link. We chose the page "Site
List" to point out that in the list of sites now appears the new one:
The link leads to the login page where you must enter username and password of the user
SiteAdmin and click on the button "Log In":
31
When properly logged in, to the user is presented the main screen of site management:
Selecting a graphic theme
To change the graphical theme set by default at the creation of the site, you need to click on the
menu item "Appearance" and, on the next screen select the preferred graphical theme by
clicking the "Activate" button:
32
By clicking on the link "Visit Site" you can check the result:
33
Deleting sample pages
To delete the sample pages created by default with the site you need to click on the menu item
"Pages" and in the next screen click on the link "Trash", at the two pages to be deleted "Page
02" and "Page 03 ":
34
After performing the two operations, the pages management screen will look like this (note the
delete confirmation message and a link to cancel the operation):
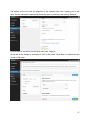
Creating a new page
To create a new page you must click on the menu item "Add New" under "Pages", place in
designated areas the title and the content, and then click the button "Publish":
After the creation process, we can verify by clicking on "All Pages" that the page appear in the
full list:
35
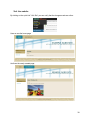
Navigation menu management
Now we access the menu management section, clicking on the menu item "Menus", under
"Appearance". On the next screen we can see that they are still present the menu items for the
two deleted sample pages, "Page 02" and "Page 03": we must eliminate these. Let's click on
"Page" as shown below:
36
The system show to the user the properties of the selected menu item, enabling you to edit
them. We are interested to permanently delete the item, by clicking on the red link "Remove":
It should also do this action with the other menu item "Page 03".
At the end of the changes is necessary to click on the button "Save Menu" to publish the new
version of the menu:
37
Visit the website
By clicking on the quick link "Visit Site" you can verify that the changes made are online:
Here we see the home page:
And here the newly created page:
38
This publication is edited by Confagricoltura Puglia under the
“Transnational network for SME support in the animal breeding and horticulture sector – AGRO-START Project”
Priority: Facilitation of Innovation and Entrepreneurship
Area of intervention: Develop the enabling environment for innovative entrepreneurship
South East Europe Transnational Cooperation Programme
www.agro-start-see.eu
___________________________________________________________________________
39