1
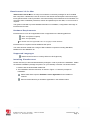
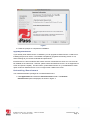
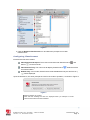
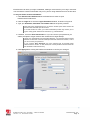
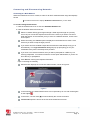
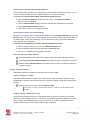
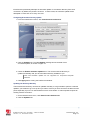
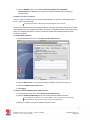
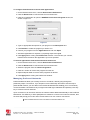
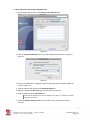
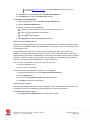
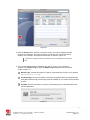
iPassConnect 3.2 for Mac User's Guide Version 1.3, 14 December 2009 Corporate Headquarters iPass Inc. 3800 Bridge Parkway Redwood Shores, CA 94065 USA www.ipass.com +1 650-232-4100 +1 650-232-4111 fx CO NT E NT S iPassConnect 3.2 for Mac ______________________________________________ 3 Hardware Requirements ...........................................................................................................................3 Supported Languages ..............................................................................................................................3 Installing iPassConnect ............................................................................................................................3 Uninstalling iPassConnect ........................................................................................................................4 Configuring iPassConnect ........................................................................................................................5 Connecting and Disconnecting Networks .................................................................................................9 Using iPassConnect _________________________________________________ 10 Online Hotspot Finder .............................................................................................................................10 Updating the iPass Directory ..................................................................................................................10 Enabling Auto-Connect ...........................................................................................................................12 Configuring Status Messages .................................................................................................................13 Post-Connect Actions .............................................................................................................................13 Managing Preferred Networks ................................................................................................................14 Switching Configuration ..........................................................................................................................16 Connection History .................................................................................................................................16 iPassConnect Help .................................................................................................................................18 Troubleshooting ____________________________________________________ 18 Cop yr igh t © 2 00 9. Al l r ight s r e se rv e d. T rad em a rk s iPass, iPassConnect and the iPass logo are trademarks of iPass Inc. All other brand or product names are trademarks or registered trademarks of their respective companies. W ar r ant y No part of this document may be reproduced, disclosed, electronically distributed, or used without the prior consent of the copyright holder. Use of the software and documentation is governed by the terms and conditions of the iPass Corporate Remote Access Agreement, or Channel Partner Reseller Agreement. Information in this guide is subject to change without notice. Every effort has been made to use fictional companies and locations in this manual. Any actual company names or locations are strictly coincidental and do not constitute endorsement. i P a s s C o n n e c t 3 . 2 f o r Ma c - U s e r ' s G u i d e Version 1.3, December 2009 2009 iPass Inc. Page 2 2 iPassConnect 3. 2 for Mac iPassConnect 3.2 for Mac is an easy-to-use network connectivity manager for Wi-Fi enabled Mac computers. It allows Mac users to connect to the Internet and enterprise resources through iPass' global network of Wi-Fi providers. Users who already have iPassConnect for Windows can re-use the same credentials (username, domain and password) for their Mac; no new account is required. This guide is intended to provide detailed information on installation, configuration and usage of iPassConnect for Mac. Hardw are Requirements iPassConnect 3.2 is a 32-bit application which is supported on the following platforms: OS X 10.6 (Snow Leopard) OS X 10.5 (Leopard) This release does not support Mac OS X 10.4 (Tiger) or earlier releases. iPassConnect 3.2 requires at least 8 MB free disk space The client has been tested with a range of Mac notebook computers including: MacBook; MacBook Pro and MacBook Air. Supported Languages iPassConnect for Mac is currently offered in US English only Installing iPassConnect Please note that you will need administrative privileges in order to perform the installation. Obtain the software installation package and place it on your Desktop or another convenient location. 1. Double-click the downloaded installer file. 2. The installation wizard is launched, as shown in Figure 1. Follow the prompts for installation. Please read and accept the Software License Agreement for the installer to continue. iPass recommends that you install the application in the default location. i P a s s C o n n e c t 3 . 2 f o r Ma c - U s e r ' s G u i d e Version 1.3, December 2009 2009 iPass Inc. Page 3 3 Figure 1 3. Follow the prompts to complete the installation. Upgrading iPassConnect If you already have iPassConnect 3.0 installed, you can upgrade to iPassConnect 3.2 without uninstalling the previous version. The installer transparently upgrades the existing version to 3.2, while retaining all your saved credentials and preferences. iPassConnect 3.2 will not interfere with earlier versions of iPassConnect such as 2.3.9: both can be installed on the same host. However, please note that iPassConnect 2.3.9 is not supported on OS X 10.6 (Snow Leopard). For this reason, (unlike iPassConnect v3.1), the dial/ethernet menu option to launch iPassConnect 2.3.9 is no longer shown visible in the menu. Uninst alling iPassConnect You need administrative privileges to un-install iPassConnect. 1. Click Applications and select the iPassConnect-3.2 folder. The Remove iPassConnect option is displayed, as shown in Figure 2. i P a s s C o n n e c t 3 . 2 f o r Ma c - U s e r ' s G u i d e Version 1.3, December 2009 2009 iPass Inc. Page 4 4 Figure 2 2. Click the Remove iPassConnect icon and follow the prompts to un-install iPassConnect. Configuring iPassConnect iPassConnect has three modes: iPassConnect and Airport: The menu bar will show both iPassConnect ( AirPort ( ) on the menu bar. iPassConnect Only: The menu bar will display iPassConnect ( icon will be hidden. ) and ) while the AirPort AirPort Only: In this mode, iPassConnect will be disabled and only the AirPort icon ( ) will be displayed. Upon the first launch, the client prompts the user for the mode to operate in, as shown in Figure 3. Figure 3 Make a selection to proceed. Note that this message will also be displayed when you attempt to launch iPassConnect after it has been disabled. i P a s s C o n n e c t 3 . 2 f o r Ma c - U s e r ' s G u i d e Version 1.3, December 2009 2009 iPass Inc. Page 5 5 You can also change the mode of the client from iPassConnect Preferences, which can be accessed either through System Preferences, or from the iPassConnect menu. To configure the iPassConnect status on the menu bar: 1. Click the iPassConnect icon in System Preferences to open iPassConnect Preferences. 2. Click the Show Status on Menu bar list box to view the options shown in Figure 4. Figure 4 3. Click Apply before closing the Preferences window. Launching iPassConnect iPassConnect runs automatically at boot time. If iPassConnect was previously disabled then it can also be launched manually from the Applications folder. 1. Click the iPassConnect icon from the Applications list to launch it. iPassConnect displays the following message (Figure 5) upon successful launch. Figure 5 Once launched, the iPassConnect icon ( ) is displayed on the menu bar. You can hide the iPassConnect icon (and menu) if you wish, although iPass does not recommend it. If you attempt to launch iPassConnect when it is already enabled, then the message shown in Figure 6 will be displayed. i P a s s C o n n e c t 3 . 2 f o r Ma c - U s e r ' s G u i d e Version 1.3, December 2009 2009 iPass Inc. Page 6 6 Figure 6 Click Disable iPassConnect if you wish to disable the client. 2. Click the iPassConnect icon to view the iPassConnect menu and Available Networks. Available Networks iPassConnect can automatically detect Wi-Fi networks and display them in the Available Networks list, making it easy for you to connect to them. iPassConnect extends the regular AirPort view of these networks to display not just a list of networks detected, but also whether they are iPass-enabled, their signal strength and their auto-connect status. You can also disable the iPassConnect menu if you so prefer, although we do not recommend this. Status Icons in the iPassConnect Menu The following icons are used to distinguish the various networks. Icon Name Description iPass enabled Network This icon represents an iPass enabled network. Signal Strength Meter This icon indicates the strength of the wireless signal using blue colored arcs. Secure A lock icon indicates that the network has been secured by a WEP, WPA or WPA2 encryption. A key or passphrase will be required to associate to these networks. Auto-Connect Indicates a network preferred for AutoConnect. This icon is not displayed in the menu if Auto-Connect has been disabled. Figure 7 Setting iPass Credentials Before logging into a network, you must provide the login credentials (username, password and domain name) obtained from your IT department or assigned to you when you subscribed to the account. i P a s s C o n n e c t 3 . 2 f o r Ma c - U s e r ' s G u i d e Version 1.3, December 2009 2009 iPass Inc. Page 7 7 iPassConnect can store your login credentials, making it convenient for you to log in next time. You will need to enter this information only once, prior to using iPassConnect for the first time. To set your iPass account information: 1. Click iPassConnect Preferences in the iPassConnect menu to open iPassConnect Preferences. 2. Click the Login tab to view the Login information window, as shown in Figure 8. 3. Type your Username, Password and Domain name in the space provided. Note that some configurations may not have a Domain option which means the domain name has been pre-set for them. In a small number of cases, your iPass credentials provider may instruct you to type a routing prefix ahead of the username, e.g., MYISP/Sriram. 4. If desired, check the Save Password box. If you do not save your password, you will be prompted to retype it before each iPassConnect login attempt. Unless your administrator has requested otherwise, your password will be cached between consecutive connection attempts within the same iPass session, even if you do not save your password. If you uncheck Save Password, any prior password will be forgotten when iPassConnect is closed. In other words, the current password will be cached for the remainder of this session only. 5. Click Apply before closing the Preferences window to confirm your changes. Figure 8 i P a s s C o n n e c t 3 . 2 f o r Ma c - U s e r ' s G u i d e Version 1.3, December 2009 2009 iPass Inc. Page 8 8 Connecting and Disconnecting Netw orks Connecting to a Wi-Fi Network When the iPassConnect icon is clicked, it scans for all Wi-Fi networks within range and displays the list. The iPassConnect menu displays No Network Selected when you are offline. To connect using iPassConnect: 1. Click the iPassConnect icon to view the Available Networks list. 2. Click the desired network from the list. Select a network offering good signal strength. Weak signal strength is a primary source of poor connection experiences and so if the service you wish to use has a weak signal then we recommend you try to move to a different location, closer to the access point. While connecting, the Cancel option is displayed in the iPassConnect menu. Click Cancel if you wish to stop the login process. If you select an iPass-enabled hotspot then iPassConnect will attempt to log you in automatically. The Login Information dialog will pop-up prompting you for your credentials if they have not already been provided. If you click a new secured network, then you will be prompted for a WEP key or a security paraphrase. You should contact the access point administrator, if you do not know the key or passphrase. Click OK after entering the requisite information. Upon connecting successfully, iPassConnect displays the connection status window, shown in Figure 9. Figure 9 In the menu bar, the static iPassConnect icon is replaced by an icon with a white glow on the edges( ) . In the menu, a check mark () is used to identify the current connection. A Disconnect option is shown at the foot of the iPassConnect menu. i P a s s C o n n e c t 3 . 2 f o r Ma c - U s e r ' s G u i d e Version 1.3, December 2009 2009 iPass Inc. Page 9 9 Connecting to a Non-Broadcast (Hidden) Network Non-broadcast Wi-Fi networks are not displayed in the Available Networks list, but you can still connect to them provided you are in range and have the requisite information. To connect to a non-broadcast Wi-Fi network using iPassConnect: 1. Click Join Other Network in the iPassConnect menu. The Preferred Network dialog box will be displayed. 2. Type the Network Name (SSID), Security mode and other information as required. 3. Check Enable Auto-Connect if desired. 4. Click Join to connect to the specified network. Connecting to a Device (an ad-hocnetwork) Computer-to-computer (ad-hoc) networks are displayed in the Available Networks list under the Devices label. You can connect to these networks if you have the requiste information and they are within range. Using these networks, you can share files or play your favorite multiplayer network game over the airwaves. To connect to a computer-to-computer network using iPassConnect: 5. Click the iPassConnect icon to view the Available Networks list. 6. Click the desired network from the list under the Devices label. 7. Key in the the password if prompted for the same. Disconnecting from a Wi-Fi Network Click Disconnect in the iPassConnect menu to disconnect from the Wi-Fi network. Click Disconnect from <Network Name> to disconnect from a Computer-to-computer Network where <Network Name> is the name of the currently connected computer-tocomputer network. Using iPassConnect Additional iPassConnect features are described here in this chapter. Online Hotspot Finder The Online Hotspot Finder provides a convenient way to help users search online for iPassenabled Wi-Fi networks using the web browser. Choose this option to open the network finder website. On the iPassConnect menu, choose Hotspot Finder. Note that you need to have Internet access in order to use the hotspot finder function. Updating the iPass Director y iPassConnect maintains a directory of supported networks which is necessary for accurate detection of iPass-enabled services. This directory is updated frequently (typically every week) and it is highly recommended that you keep the directory up-to-date to guarantee the best experience and access to the widest possible range of hotspots. i P a s s C o n n e c t 3 . 2 f o r Ma c - U s e r ' s G u i d e Version 1.3, December 2009 2009 iPass Inc. Page 10 1 iPassConnect periodically attempts an automatic update of the network directory from when connected. By default, the period is 24 hours. In other words, an automatic update will be attempted no more than once every 24 hours. Configuring Automatic Directory Update 1. From the iPassConnect menu, click iPassConnect Preferences. Figure 10 2. Click the Updates tab. The Last Update message shows the date of last successful update, as shown in Figure 10. 3. Check the Enable automatic updates box. This ensures that the directory is updated periodically and you have the latest directory available to you. Note that automatic updates are not supported for Computer-to-computer networks. 4. Click Apply before closing the Preferences window. Updating the Directory Manually The iPassConnect directory can also be updated manually. It is a good idea to perform a manual update if you're about to go on a trip and you want to ensure you have access to the latest access points especially if you've not used iPassConnect for a few weeks. A manual update requires an existing Internet connection. 1. On the iPassConnect menu, click iPassConnect Preferences. 2. Click the Updates tab. i P a s s C o n n e c t 3 . 2 f o r Ma c - U s e r ' s G u i d e Version 1.3, December 2009 2009 iPass Inc. Page 11 1 3. Click the Update button. The message Directory update has completed successfully will be displayed, to confirm successful download and processing of a new directory. Enabling Aut o-Connect You can configure iPassConnect to connect automatically to a network – both iPass and noniPass – when it is within range. Note that some iPass hotspots may not be eligible for Auto-Connect. Upon launch, iPassConnect checks whether AirPort is already associated. Auto-Connect will be suspended if there is an existing association. If an auto-connectable hotspot is discovered and if there is no existing association, then the connection will proceed automatically when AutoConnect is enabled. To enable Auto-Connect: 1. On the iPassConnect menu, click iPassConnect Preferences. Figure 11 2. Click the General tab to view the Auto-Connect settings, as shown in Figure 11. 3. Check the Enable Auto-Connect box. 4. Click Apply. To select a Preferred Network for Auto-Connect: 1. On the iPassConnect menu, click iPassConnect Preferences. 2. Click the Preferred Networks tab to view all the networks added to this list. If the network you wish to use is not available in the list, then you can manually add the network. See Preferred Networks for more information. 3. Select the network you wish to enable for Auto-Connect. i P a s s C o n n e c t 3 . 2 f o r Ma c - U s e r ' s G u i d e Version 1.3, December 2009 2009 iPass Inc. Page 12 1 4. Click the Figure 12. (edit) button to open the Preferred Network dialog box, as shown in Figure 12 5. Check the Enable Auto Connect box. 6. Click Add. 7. Click Apply before closing the Preferences window. Configuring Stat us Messages iPassConnect is configured to display various status messages while connecting and disconnecting from Wi-Fi networks. These messages are displayed in translucent dialog boxes that close automatically after being displayed for a few seconds. The messages can be disabled if desired. To configure iPassConnect status messages: 1. On the iPassConnect menu, click iPassConnect Preferences. 2. Click the General tab to view the status message settings, as shown in Figure 11. Show status message for iPass networks: Clear this check box to disable status messages for iPass-enabled networks. Show status message for Personal networks: Clear this check box to disable status message for Personal networks. 3. Click Apply before closing the Preferences window. Post-Connect Acti ons The Post-Connect Actions feature allows you to configure applications to run automatically after you establish a connection. You may use this feature to launch a web browser, establish a VPN connection, or to launch your favorite applications. To automatically launch your default Web browser after connecting: 1. On the iPassConnect menu, choose iPassConnect Preferences. 2. Click the General tab. 3. Check the Default Web Browser box. 4. Click Apply. The next time you connect to the Internet, iPassConnect will launch your browser. i P a s s C o n n e c t 3 . 2 f o r Ma c - U s e r ' s G u i d e Version 1.3, December 2009 2009 iPass Inc. Page 13 1 To configure iPassConnect to launch other applications: 1. On the iPassConnect menu, choose iPassConnect Preferences. 2. Click the General tab to view the Post-Connect Actions list. 3. Click the + (add) button to open the Add/Edit Post-Connect Program window, as shown in Figure 13. Figure 13 4. Type an appropriate description for your program in the Description box. 5. Click Browse to locate the program you wish to run. 6. Choose your program from the Applications list and click Open. 7. Add other applications if required, by repeating steps 3 through 6. 8. Click Apply before closing the Preferences windows. The next time you connect, iPassConnect will launch the applications you have specified. To remove applications from the Post-Connect Actions list: 1. On the iPassConnect menu, choose iPassConnect Preferences. 2. Click the General tab to view the Post-Connect Actions list. 3. Select the program from the Launch Program list. 4. Click the – button to remove the program from the list. 5. Repeat steps 3 and 4 to remove other programs as desired. 6. Click Apply before closing the Preferences window. Managing Preferred Netw orks Preferred Networks allow you to easily connect to a network, without going through the preliminary steps. For instance, if you frequent a local coffee shop and wish to use the shop's public WLAN network, you can add it to the Preferred Networks list enabling you to conveniently connect thereafter. Remember that you might need valid login credentials and possibly a security key to connect to these networks. Upon connection to an unknown network, the network will be added automatically to the Preferred Network list. If a WEP key or WPA passphrase is needed to connect to an unknown network, then the client will prompt you for this and it will remember it for use in future connections. iPass-enabled networks cannot be added to Preferred Network list. i P a s s C o n n e c t 3 . 2 f o r Ma c - U s e r ' s G u i d e Version 1.3, December 2009 2009 iPass Inc. Page 14 1 To add a network to the Preferred Network list: 1. On the iPassConnect menu, click iPassConnect Preferences. Figure 14 2. Click the Preferred Networks tab to view the Preferred Networks list, as shown in Figure 14. Figure 15 3. Click the + (add) button. A dialog box pops-up prompting for the network details, as shown in Figure 15. 4. Type the name of the network in the Network Name box. 5. Select the appropriate Security type from the drop down list box. 6. Type the password in the Password box. Note that the password box will be displayed only when you select the security type from the list box. 7. Check the Enable Auto Connect box if you wish to use this network for AutoConnect. i P a s s C o n n e c t 3 . 2 f o r Ma c - U s e r ' s G u i d e Version 1.3, December 2009 2009 iPass Inc. Page 15 1 You have to enable Auto-Connect on the General Preferences tab for this option to be available. 8. Click Add. The network appears in the Preferred Networks list. 9. Click Apply before closing the Preferences window. To manage Preferred Networks: 1. On the iPassConnect menu, click iPassConnect Preferences. 2. Click the Preferred Networks tab. 3. Select the network in the list displayed. Click the – (remove) button to remove the network from the list. Click the (edit) button to edit settings. Click Add to save changes. 4. Click Apply before closing the Preferences window. Sw itching Configuration iPassConnect has the capability to acquire a new configuration (i.e., a different profile ID) without the need for un-installation followed by reinstallation of a new client. This is done with the help of a configuration code. During normal use you will have no need to switch configuration, but in some cases, your helpdesk or system administrator may supply you with a new configuration code: A valid code informs iPassConnect that it should attempt to contact the iPass update servers to seek a specific profile ID. A different profile ID might provide new configurations, new features, and a different directory of services or different settings for your login credentials. You can switch configurations at any time as long as you have: 1. A valid configuration code 2. A connection to the Internet. Follow the instructions given below to switch your configuration. 1. On the iPassConnect menu, choose iPassConnect Preferences. 2. Click the Updates tab. 3. Enter the new Configuration Code in the space provided. 4. Click Apply to download a new profile. Connection History The History tab displays your past connection attempts - both successful and unsuccessful. This information can be a useful starting point when diagnosing connectivity problems. To view the connection history: 1. Click iPassConnect Preferences in the iPassConnect menu. i P a s s C o n n e c t 3 . 2 f o r Ma c - U s e r ' s G u i d e Version 1.3, December 2009 2009 iPass Inc. Page 16 1 Figure 16 2. Click the History tab to view the connection history. The history displays the date and time of connection, the network used for connecting, the connection Result, duration of the session, and bytes sent/received, as shown in Figure 16. Computer-to-computer network connections will not be displayed in the history Tab. 3. Your System Administrator or helpdesk may ask for a copy of your log file for analysis. Click Export Logs to open the Export Logs dialog box with the options shown in Figure 17. Extract Logs: Choose this option to export a compressed set of logs to your desktop (iPassLogFiles.tar.gz). Use Entourage: Choose this option to send the compressed logs as mail attachment using Microsoft Entourage. Entourage must be installed on your system for this feature to work. Use Mail: Choose this option to send the compressed logs as mail attachment using the Mail application. Figure 17 i P a s s C o n n e c t 3 . 2 f o r Ma c - U s e r ' s G u i d e Version 1.3, December 2009 2009 iPass Inc. Page 17 1 iPassConnect Help The iPassConnect help explains basic iPassConnect options, procedures and other features. It also contains a troubleshooting section with a basic discussion of the most common issues that could arise when using iPassConnect. To get help in iPassConnect: 1. Click iPassConnect Help in the iPassConnect menu. Alternately, click the ‘?’ button on the iPassConnect Preferences dialog box to display the help page corresponding to the displayed tab. Troubleshooting This section addresses some of the common user issues which may arise during normal operation. Further support questions should be directed to your local helpdesk in the first instance. Difficulty Connecting to the Access Point Make sure you have good signal strength. Weak or intermittent signals are a primary source of connection failure. If the signal strength is less than 4 bars then try to move closer to the access point, if possible. Your preferred access point may be offline or otherwise temporarily unavailable, even though the SSID is still being broadcast. Try another access point in the area if you experience repeated login errors. Verify whether the venue is actually an iPass hotspot - sometimes an Internet provider will use a network name that is the same as one of the providers that is part of the iPass network, but is not iPass enabled. Use a browser to check whether you are being redirected to a provider login page. Authentication Issues Ensure your username, domain and password are correct. Note that these fields are normally case-sensitive. The authentication server may be down or offline or your iPass user account may have been disabled by your corporate helpdesk. Check with your IT Help Desk if you see repeated login failures at different venues, particularly if you are sure your username and password are correct. If you save your corporate credentials in iPassConnect, remember to update your login information following a change in your Windows or email password. iPass login usually takes only a few seconds but in some circumstances, login can take over a minute. — E N D O F D O C U M E N T — i P a s s C o n n e c t 3 . 2 f o r Ma c - U s e r ' s G u i d e Version 1.3, December 2009 2009 iPass Inc. Page 18 1