1
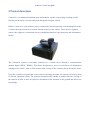
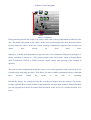
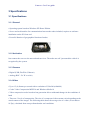
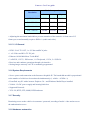
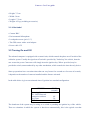
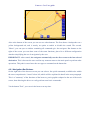
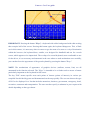
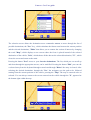
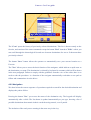
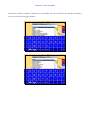
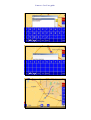
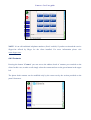
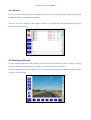
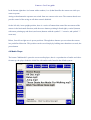
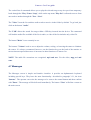
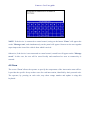
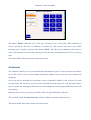
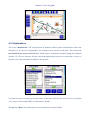
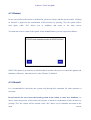
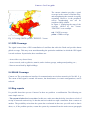
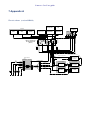
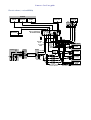
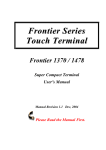
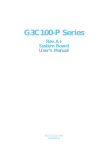
Camera - Car User guide
CAMERACAR
MOBILE OFFICE
ver. 2.6
User guide
Camera - Car User guide
1 Index
1 Content
2 Description of product
3 Specifications
3.1 Technical specifications
3.2 Turning On and Off
3.3 Connectivity
4 Features CameraCar
4.1 Cameras
4.2 Navigator
4.2.1 Navigation Bar Buttons
4.2.2 Navigation
4.2.3 Using the Keyboard
4.2.4 Menu key
4.3 Statement
4.4 VOIP / Skype
4.4.1 Compose
4.4.2 Field
4.4.3 Register
4.5 Messages
4.6 Crew
4.7 Internet
4.8 Destinations
4.9 Day / Night
4.10 assistance
4.11 Restart
4.12 Switching off
5 Warnings
5.1 Background
5.2 Coverage UMTS
5.3 GPS Coverage
5.4 WLAN Coverage
Camera - Car User guide
5.5 Troubleshooting
6 Maintenance
6.1 external enclosure
6.2 Touch screen
7 Appendix A
8 References
Read this manual carefully before installing and using the system Cameracar. Keep the manual for
future.
Camera - Car User guide
2 Product description
CameraCar is a multimedia platform open and modular, capable of providing a package of info
focusing on the safety of people and goods during the transport vehicle.
Etheria CameraCar system allows you to record locally and continuously in all that happens inside
a vehicle, through a network of cameras located properly in the vehicle. These devices regularly
send a video signal to a central unit (device embedded automotive type) that stores this information
locally.
The CameraCar system is constantly connected to a central server through a communication
channel digital UMTS / HDSPA. This allows an operator to access in real time to all information
relating to the vehicle, such as GPS location and viewing of the cameras placed aboard the same.
Upon the occurrence of particular events, such as activating an alarm, the system will convey them
to alert the operations center. The operator can then decide whether to enable real-time viewing of
the cameras in order to have an objective assessment of the situation on the ground and able to act
accordingly.
56K
PCMCIA
Camera - Car User guide
INS ERT T HIS E ND
Camera car architecture
During normal operation the system is in passive mode, that is run by independent operations by the
user. The mobile unit placed in the vehicle, in fact, receives the digital video from network cameras
located inside the vehicle, hence the system develops continuously captured video streams and
ensure
their
storage
on
local
hard
drive.
Otherwise, if during the transportation of special events occur (situations of danger to passengers or
goods, activation of alarms, etc..) The system switches into active mode, which will immediately
open a connection (UMTS or GPRS) with the central control and reporting of the incident in
question.
The system can be programmed so that the center receives the registration of the cameras for a few
seconds before activating the alarm. This allows for more complete information on the events that
have
occurred
within
the
means
at
the
time
of
reporting.
Besides the display, the system provides the recording of images from the cameras. For privacy
reasons, typically those records remain on the mobile for not more than 24 hours. Where provided,
you can program the transfer of records from the mobile to the server via a wireless network wi-fi
802.11.
Camera - Car User guide
3 Specifications
3.1 Specifications
3.1.1 General
• Operating system based on Windows XP Home Edition.
• Server and web interface for communication between the nodes included, requires no software
installation on the PC front-end.
• Powerful function of geographical location of nodes.
3.1.2 Activation
Just connect the server to the network and turn it on. The nodes are self: just turned the vehicle is
recognized by the system.
3.1.3 Camera
• Digital (USB, FireWire, Ethernet)
• Analog (BNC - B / W or color)
3.1.4 Video
• Up to 15 (6) frames per second with a resolution of 320x240 (640x480)
• Codec Video Compression MPEG-4 and Windows Media 10
• Video compression codec based on last generation able to withstand changes in the conditions of
band
• There are 3 levels of compression. The size of a compressed video stream varies depending on the
actual content of the images. The following table shows the average size of a video (10 seconds to
10 Fps), calculated from tests performed under real conditions
Camera - Car User guide
Livel of compression
Resolution
Low
Medium
High
QCIF 320x240
175 Kb
110 Kb
50 Kb
PAL 352x288
205 Kb
130 Kb
65 Kb
VGA 640x480
340 Kb
225 Kb
105 Kb
PAL 720x576
390 Kb
255 Kb
120 Kb
• Adjusting the maximum bandwidth to prevent saturation of the network. A frame rate of 15
frames per second normally requires 45Kbit / s (audio and video).
3.1.5 I / O General
• NTSC / PAL TV OUT, 1 x S-Video and RCA jacks
• 1 x S-Video and RCA TV-IN jack
• Ethernet 10/100 Mbit Base-T with RJ45
• 2 x RS232, 1 LPT, 1 PS2 mouse, 1 AT keyboard, 1 VGA, 2 x USB 2.0
• Receives and conducts operations through web interface
• Storing images remotely via FTP or manually programmed
3.1.6 System Requirements
• Server: power and connection to the Internet with public IP. The bandwidth needed is proportional
to the number of vehicles to be monitored simultaneously (1 vehicle = 45 Kbit / s)
• Front-End: any PC with a browser Explorer 5.0 + and Windows Media Player installed
• Vehicle: 12v DC power supply and housing black box
• Supported Protocols
• TCP / IP, HTTP, FTP, MMS, RTSP and more
3.1.7 Security
Restricting access to the vehicle via username / password, encoding of audio / video and access to
the authentication server.
3.1.8 Hardware automotive
Camera - Car User guide
• Chassis made of aluminum, with fins for passive facilitated dissipation of heat produced
• Mini Flex ATX Motherboard with VIA CLE266 Chip Set, with PCI Riser Card for PCI
• CPU VIA C3 1 GHz, Technology "LowPower" a passive dissipation
• RAM 1 DIMM DDR 128MB, PC2100
• Graphic Chip VIA VT8623, 4x AGP, 128bit, 3D Graphics Engine
• AC97 2.2 compliant
• Minimum 6GB Hard Disk, 2.5 "slim
• PCMCIA Card UMTS / GPRS
3.1.9 Software
Support for auto-update software remotely. The system updates wherever the vehicle is positioned.
3.1.10 Portal
• Management and Authentication vehicles
• Automatic vehicle
• Local and remote recording
• Access via cell phone video
• Sending information to the vehicle
• Mapping and localization
• Access video archive
3.1.11 Power Automotive
• On board power DC 12V + - 5% input / adapter east. 220Vac / 12Vdc, 60W
3.1.12 Operating conditions
• Requires a waterproof housing suitable for outdoor use
• Temperature: 5-50 ° C (40-122 ° F) (depending on the camera)
• Humidity: 20-80% RHG, non-condensing
• The aim in the direct control should be used and configured correctly when used in environments
where lighting conditions are extreme
3.1.13 Dimensions / Weight
Camera - Car User guide
• Height: 7.5 cm
• Width: 30 cm
• Length: 17.2 cm
• Weight: 4.5 kg (excluding accessories)
3.1.14 Included
• Camera BNC
• Environmental Microphone
• Loudspeaker mono (jack 3.5 ")
• The GPS sensor with a serial adapter
• Power cable 12V
3.2 Turning On and Off
The onboard computer is equipped with a control unit, which controls the phase on-off switch of the
vehicular system. Usually the signal on-off switch is provided by "locked up" the vehicle, then the
user to turn the power Cameracar will simply insert the ignition key. Where provided, may be
provided a switch, unencumbered by any other mechanism, which controls the time the only device.
Start-up operations have execution times that can vary from a few seconds to a few tens of seconds,
it depends on the number of cameras installed and the feature activated.
In the table below is given an estimated time of ignition in a standard configuration.
ACTIVITY
Operating System
Sw UMTS network
connection software
Sw Client
TOTAL
TIME
(second)
60
60
30
150
The shutdown of the system may be acting on a switch or parading the ignition key of the vehicle.
There are situations in which the system is shut down automatically, this is the typical case that
Camera - Car User guide
occurs when the battery, which is connected to the onboard computer, is about to download. Before
proceeding when the onboard computer is necessary to recharge or replace accumulator.
3.3 Connectivity
The system provides CameraCar at least three different types of connection: UMTS / HSDPA, GPS,
WI-FI (or WLAN).
UMTS/HSDPA
GPS
WLAN
Descriptio
Description digital
Receive signal from the
802.11bg wireless
n
mobile radio network
GPS satellite network for
network allows the
with national coverage,
the location of the vehicle
transfer of mobile data to
allowing the device to be
and the onboard navigator
the central server on local
constantly connected to
network
the operations center at
any point in the territory
Bandwidth 384 kbit/s – 7.2 Mbit/s
Coverage
Global
-
11 Mbit/s - 54 Mbit/s
Global
Local
The status of each connection is displayed in a text box, placed in the bottom left in the main menu
(see picture). In the table below are the description corresponding to the color of each LED.
Gray
Red
Yellow
Green
UMTS/HSDPA
Functionality not planned
Not connected
Conn. The secondary
server
Linked to UMTS
network
GPS
Functionality not planned
GPS signal not found
-
WLAN
Functionality not planned
Absent Network
-
-
Connected to the network
VLAN
3.4Configuration
The products of Etheria S.R.L. with server-side functionality available through the web browser
Internet Explorer, on Windows operating systems. The correct delivery of these services is linked to
the use of browser versions and operating system specified in the documentation in support of
Camera - Car User guide
individual products. Ether assumes no responsibility for any malfunctions associated with the use of
incorrect versions of the web browser, operating system, due to the presence on the customer's
computer programs that interfere with the normal operation of the Internet Explorer (such programs
blocking pop-ups, Fast shipping, etc.), incorrect configuration of the network firewall, antivirus,
presence of Trojans, worms or incorrect configuration of the navigation tools provided.
web services provided along with Etheria’s products are available, except with the express different
mode ASP (Application Service Provider) without any guarantee on the SLA (Service Level
Agreement). The aim of Ether is to provide its customers services in ASP mode "best effort".
Etheria assumes no responsibility for any lack of signal, discontinuity of service, lack of bandwidth
or connectivity problems of any kind, related to mobile phone carriers use in their products, even if
reflected in a partial or total lack of operation of same products. This lack of responsibility extends
to all types of transmission channels (ex. GSM, GPRS, UMTS, HSDPA, Wi-Fi) and any mobile
operator (ex. Vodafone, TIM, H3G, Wind), used by products Etheria. Etheria disclaims any
responsibility for any delays, errors or problems of service, related to instant messaging systems
(SMS, MMS), used in the apparatus to be provided due to the level of service quality provided by
third party providers.
Camera - Car User guide
4 Features CameraCar
CameraCar comes with various functions, which are made available through an initial screen menus
very simple and straightforward. Below each of them individually is shown.
Note that the lower left corner is always possible to monitor the status of connections in use (GPS,
UMTS and WLAN) and space for the messages coming from Central Asia.
4.1 Cameras
The first button in the top left of the main menu, provides access to the vision of the cameras
mounted on the vehicle. It’s possible that the button is temporarily disabled, which may happen if
the installation does not provide for the use of cameras, or during the activation and loading of
video streams. In the latter case, waiting a few seconds to obtain the approval of the buttons.
Pressing a button in the menu "Preview" you can see the preview of what the camera is filming at
the time. You can switch from one room to another without special arrangements, always bearing in
mind that a slight delay because the system is able to make the change of the screen.
Camera - Car User guide
At any time you can return to the initial menu by pressing the button "Exit."
The bottom text field called "Messages" key with "Ok" is currently used by the user.
4.2 Navigator
By choosing the option "Navigator" displays the road map, focused in the area where the satellite
receiver is locating the vehicle. The position of the vehicle is marked with a shaded arrow is placed
at the center of the screen, indicating the required direction. The arrow is green if the current GPS
position is valid, otherwise red. The red arrow at top right indicates the direction of North.
The map shows the names of the main streets, colored in orange, the secondary roads are shown in
white with no words. In the bottom of the screen shows the name of the street where there is
moving, and on the right side is a box that displays various information (speed, time required to
reach a destination, time of arrival, distance to destination). Clicking on this you can see all the
information cycle.
The buttons marked with the symbols "+" and "-" respectively, allowing the magnification (zoomin) or reduce (zoom out) the map below, keeping fixed the center of the image, coincident with the
icon vehicle. Note that between the two buttons shows the scale factor used in the map.
The maps can be changed with a drag, or pointing a finger on the touch screen and dragging on the
screen in any direction. Even in this case acting on the buttons "+" and "-" you can zoom. In some
cases, for example when you are near a point where the user communicates a change of direction,
you can not use the zoom.
Camera - Car User guide
Also at the bottom of the screen you can see two other buttons. The first shows a loudspeaker on a
yellow background red, and is merely an option to enable or disable the sound. The second,
"Menu", you can open a window containing all commands give the navigator. Bar buttons to the
right of the screen you can draw some of the same functions, placed in a different configuration
aimed at simplifying the use of navigation by the user.
IMPORTANT: when started, the navigator automatically sets the direct route to the last selected
destination. This is because the user could at any moment return to the main panel to perform other
operations. This path is erased once the user types a command on the button bar.
4.2.1 Navigation Bar Buttons
On the right side of the browser screen you can select a few quick commands, available also within
the more comprehensive "menu" below left, which will be explained in detail in the next paragraph.
This is a "summary" of the functions of the browser, put in graphics adapted to the use of the touch
screen, thus allowing the driver to easily perform some basic commands.
Via the button "Exit", you can exit the browser at any time.
Camera - Car User guide
IMPORTANT: Pressing the button "Keys", a keyboard with a blue background with white writing
that occupies half of the screen. Pressing this button again, the keyboard disappears. This, of little
use in this context, it is necessary when it comes to type the name of a street or a city of destination
within the browser, the keyboard base, smaller, was designed for handheld and not for a touch
screen, which appears to be impractical. The overlap of a second keyboard, more comfortable to use
for the driver, it is so necessary and automatic in the case where no such mechanism were carefully,
you can then force the appearance of the great keyboard by pressing the button "Keys."
NOTE: The mechanisms of appearance of graphics devices (toolbars, menus, lists) are all
automated in the function selected. The "Keys" is intended to be a further tool to ensure a feature
particularly important as the keyboard in full screen.
The key "POI" means specific areas such points of interest (points of interest), in various pre
compiled lists divided by genre and demonstrated on the map quickly. The user can choose the type
of POI to be displayed in a list that includes attractions, business, government, emergency, hotel,
recreation, restaurant and transportation. The user can then specify a submenu in your request with
details depending on the type chosen.
Camera - Car User guide
The selection screen allows the destination more commands: arrows to move through the list of
possible destinations, the "Nav" key , which calculates the fastest route between the current position
and the selected destination, "Edita" that allows you to rename the section of interest by changing
the word "Map", which displays a new screen where the focus is placed instead of the selected
destination of the vehicle, "Info", which shows all the data on the selected destination, "X” , which
closes the screen and return to the main.
Pressing the button "Pref" access to your favorite destinations. The list, which you can scroll up
and down through the appropriate arrows, can be modified: Pressing the button "Edit" you can edit
a selected entry from the keyboard through research and through "Delete" the entry is cleared. After
selecting the desired destination, through the "Nav" the navigator sets the path to be followed
starting from the current position of the vehicle, pressing the "Map" The map is centered code on
selected. You can always return to the screen centered on the vehicle through the "X", appeared at
the bottom right within the map.
Camera - Car User guide
The "Cron" opens the history of previously selected destinations. This list is shown exactly as the
favorite, and consists of the same commands except the button "Pref" instead of "Edit": with it you
can scroll through the chronological list and save between destinations for one to fit between those
previously released.
The button "Save" button allows the operator to automatically save your current location as a
Favorite.
The "Nav" allows you to access the basic function of the navigator, which indicate a rapid route to
the destination you want. This destination is selected by keyboard in a manner which will be shown
in the next paragraph. Failure to comply with the guidelines from the voice of the sailor, there is no
need to redo the procedure: is a function of the navigator automatically recalculate a new path to
follow and communicate it to the driver.
4.2.2 Navigation
We show below the correct sequence of operations required to search for the desired destination and
displays the path to follow.
Pressing the button "Nav" you access the menu of the destination city. The keypad will display
automatically after a while. The list shown is updated automatically as you type, showing a list of
possible destinations that contain in their words the string entered, even if partial.
The inclusion of the road you are running in the same way in the city.
Camera - Car User guide
In the case of house number is incorrect or unavailable, the user will notice the mistake and return
to the screen for entering the number.
Camera - Car User guide
Camera - Car User guide
4.2.3 Using the Keyboard
The keyboard includes the usual alphabet keys, plus a narrow amount of transactions: "Delete" to
delete the last character typed, "Space", to create a space in the string input, "Num", to go through
the numeric keys; the arrow keys to navigate within the result list temporary, "Enter" to confirm
the selection. Once past the numeric keypad, you can return to the alphabet by pressing "Num”.
Please note that in a search screen of the destination is possible, in addition to typing the name of
the city or address you want, any time and view a list of possible results for a partial string included:
the list is updated automatically every time you typed in the text is modified, thus being a help to
the user, who can scroll up or down temporarily by their yellow arrows, to select the destination as
quickly as desired. The outcome selected is highlighted with a blue bar with white text. At any time
you can exit the keyboard by pressing the "x" at the bottom right corner.
4.2.4 Key Menu
Pressing the button "Menu" in the bottom left of the screen of the Navigator, you can view a
window containing all the operations available to it in full mode. Please see the discussion of the
duties of navigator to the appropriate manual.
4.3 Intervention
The right of the "Navigator" is the "State Intervention", through which you access a screen
composed of several buttons bearing a serial number and a statement below. Each button is
associated with a particular state or event. The operator can update in real time the status of your
comment by pressing the appropriate button to associate achieved. A message containing time and
object of the command is sent instantly to the operations center, which receives real-time so the
situation of the individual intervention. The same message appears in the current state bar at the
bottom of the screen and simultaneously press the button changes color, thus allowing the operator
to receive immediate feedback on the message sent.
Pressing the button "Exit", you can return to the main screen.
Camera - Car User guide
4.4 VOIP / Skype
From the main menu, pressing the button "Skype" you can access the Voice Over IP (VOIP) that
allows you to make phone calls via the data network such as the Internet. With this feature, you can
contact either numbers or mobile phones, both users of the Skype network.
Skype panel is divided into three sections which give a brief description below.
NOTE: It’s possible make VOIP calls only if there is a connection-quality data type UMTS or
HSDPA.
4.4.1 Compose
Represents the opening of the interface module Skype. The user must simply enter the phone
number, including area code, and pressing the green button at top left to start the call.
To end the call is sufficient to act on the red button in the top left, which indicates re.
The "Compose" is always available within the module VOIP simply on the same button.
Camera - Car User guide
NOTE: It 'can call traditional telephone numbers (fixed / mobile) if you have activated the service
Skype-Out offered by Skype for the client installed. For more information please visit
www.skype.com .
4.4.2 Contacts
Pressing the button "Contact" you can access the address book of contacts pre-recorded on the
client. In this case, to make a call simply select the contact and act on the green button in the upper
left.
The phone book contacts can be modified only by the center out by the section provided on the
portal Cameracar.
Camera - Car User guide
4.4.3 Register
See "Log" shows all the previous calls made and received, with date and time. Symbology specify
whether the call was incoming or outgoing.
The user can call a contact in the registry, simply by selecting the item and pressing the green
button to initiate the call.
4.5 Slewing (optional)
It is the section dedicated to the control of the movement of motorized cameras (PTZ or swing).
From the main panel by clicking on "swing", you can access the control panel.
If the installation does not provide for the use of cameras or slewing the system is being started, the
"swing" can be disabled.
Camera - Car User guide
In the bottom right there is a button with a number (1 to 4) that identifies the camera on witch you
want to operate.
Acting on that button the operator can switch from one camera to the next. The cameras that do not
provide control of the swing are all other controls disabled.
On the left side, in an upright position, there is a series of buttons that control the movement of the
camera in the horizontal direction (with the arrow buttons pointing left and right), vertical (buttons
with arrow pointing up and down) and zoom (buttons with the symbol "+" zoom in, and symbol "-"
zoom out).
Below, from left to right are six preset positions. Through these buttons you can orient the camera
in a predefined direction. This position can be saved simply by holding more than three seconds, the
preset button.
4.6 Media Player
The button "Multimedia" opens the screen media player, that is a reproduction of audio and video.
On start up, the player loads the initial list with audio tracks found in the default system.
Camera - Car User guide
The vertical bar of commands allows you to play the selected song to stop it or put it into temporary
break through the "Play / Pause / Stop", while on the top menu "Play-list" is allowed to move from
one track to another through the "Prev / Next".
The "Video" from the list switches audio tracks to movies in the folder by default. To go back just
click on the button "Audio".
The "USB" allows the search for songs within a USB key inserted into the device. The command
will load the audio files available if the list is audio, or video if the list includes only video file.
The button "Mode" is not currently in use.
The buttons "Volume" need to act to adjust the volume, raising, or lowering the same to eliminate
the source. It’s always recommend, however, use the function keys on the back of the monitor to
not run into unexpected decreases or increases in other functions of Camera-Car.
NOTE: The audio file extensions are recognized: mp3 and wav. For the video, mpg, avi and
wmv.
4.7 Messages
The Messages screen is simple and intuitive interface: it provides an alphanumeric keyboard
including special keys. They have the same functionality described in paragraph 3.2.1, the item
"buttons". The operator can write the message to be sent to the central button and then confirm
with "Enter." The message will be delivered immediately. The button "Close" will allow a return to
the main screen.
Camera - Car User guide
NOTE: If the device is connected to central control, acting on the button "Enter" will appear the
words "Message sent", and simultaneously on the portal will appear Camera-car the text together
supra-impress the icon of the vehicle from which it arrived.
Otherwise, if the device is not connected to central control, central bar will appear on the "Message
saved." In this case, the text will be stored locally and transferred as soon as connectivity is
restored.
4.8 Crew
The screen "Crew" allows the operator to specify the components of the intervention team officer.
It provides the specific for up to three users for each intervention, identified by their personal code.
The operator, by pressing on each code, may show orange number and update it using this
keyboard.
Camera - Car User guide
The button "Delete" undo the code in the box, inserting a zero in the field, which indicates no
carrier selected for that role. In addition, to confirm the code entered and sent to the central
reporting crew on board is just press the button "Mem." This data can be updated in the course of
work, each message was sent to the central go below the current composition of the crew in a given
time.
The button “Exit” allows the return to the main screen.
4.9 Internet
The "Internet" allows you to access the Web through Internet Explorer. Next to the browser window
on the left of the screen are four buttons bearing the address reset to the four sites visited most
frequently.
On the top bar are included for convenience some recognizable symbols in the context of a usual
web browsing: the arrows let you move back and forth between pages you visit, the house allows
you to return to the main page, the arrows in a circle update the current page and the Red Cross will
stop loading.
Inside the center box, you can move around on the web page through the sidebars.
The text field called "Country Current" with key "Ok" is currently used by the user.
The button "Exit" allows the return to the main screen.
Camera - Car User guide
4.10 Destinations
The screen "Destinations" will save the place of departure and the place of destination of the route
affected by. I see two lists of geography, one relating to same and one on the back. This selection is
not related in any way to your browser, which must be configured separately using the command
(section 3.2). The two lists may be past vertical through the green arrows or vertical bar, a choice of
the place you want from those available to the operator.
You must be sure to correctly specify the nature of the route selected: the case of a one-way (button
"A"), only to return (button "R") or both (button "A / R").
Through the "Mem" the selected route is saved and sent to central control.
Camera - Car User guide
The button "Exit" allows the return to the main screen.
4.11 Day / Night
The bottom "Day" allows you to set the screen mode during the day, while its corresponding
"Night" set the graphics in an alternative way to allow proper display of Camera-Car even in low
light situations.
Selecting this command does not open other screens, unlike the other buttons, but it reverses the
state so invisible to the user.
4.12 Service
The "Help" is dedicated only to the personnel in this task. Contact your supplier if necessary.
NOTE: This feature does not perform any call or send a message to a request for central assistance.
Camera - Car User guide
4.13 Restart
In case you needed a reboot after a malfunction, please use always and the special control. Clicking
on "Restart" is applied to the confirmation of this decision: by pressing "Yes" the system will be
used again, while "No" allows you to withdraw and return to the main screen.
You must not cause a restart of the system via the manual button, you may experience failures.
NOTE: This button is present only in facilities that do not have the power to control the ignition and
shutdown. Otherwise, when this device is the "Restart" is disabled.
4.14 Shutoff
It is recommended to shut down the system only through this command. No other operation is
necessary.
Do not touch it for any reason, the housing system in the vehicle to cause it to shutdown. As
above, under the pressure of the button, the operator is asked for confirmation of this decision: by
pressing "Yes" the system will be arrested, while "No" allows you to withdraw and return to the
main
screen.
Camera - Car User guide
You must not cause a restart of the system via the manual button, you may experience failures.
NOTE: This button is present only in facilities that do not have the power to control the ignition
and shutdown. Otherwise, when on this device is present the bottom "Off" it is disabled.
Camera - Car User guide
5 Warnings
5.1 Background
This system is designed to provide information support to the driver. However, some information
used in this system, are not always updated and therefore can not be guaranteed as secure, accurate.
For safety while driving NOT make settings or manoeuvring ! Before preparing to use this system,
the vehicle must be stationary and parked in an appropriate place. The manufacturer of this system
is not responsible for any accident resulting in the use of this system while the vehicle is in motion.
While driving, observe the traffic signs and the real state of the road to ensure safe driving and
proper. Please do not drive relying solely on voice commands given by the navigation system, to
avoid any accident.
Do not disassemble and do not change this system to avoid damage to it, short circuits and
principles of fire.
If any abnormality is noted on the system, such as a spill of liquid, smoke or smell, immediately
stop the use of disconnecting the power. Get in touch with the manufacturer's representative for a
closer inspection.
5.2 UMTS Coverage
The function of broadcasting depends on the coverage offered by the UMTS network operators
(Three, Vodafone, Tim): you can not perform real-time monitoring in cases where the service is
absent. Additional restrictions caused by the lack of connectivity to the UMTS network concern the
possibility of failure to send remote commands to boot the local registration. However in the case of
weak signal to send remote commands (via web) to the device is possible.
Camera - Car User guide
The current situation provides a good
coverage in the centers of Italian cities,
and strengthening the network is rapidly
expanding. However, in the peripheral
service broadcasting can not be
considered fully reliable.
In Figure 1, displaying the map of the
coverage offered by the Veneto
"TRE/H3G" as an example:
red: UMTS coverage
yellow: GPRS coverage
Fig. 1: Coverage UMTS operator TRE/H3G - Veneto
5.3 GPS Coverage
The signal comes from a GPS constellation of satellites that orbit the Earth and provide almost
global coverage. This may occur notwithstanding the particular conditions in which the GPS signal
is weak or absent. In particular, these conditions are:
- Areas with a very dense forest;
- Areas covered, such as galleries, tunnels, under viaducts, garage, underground parking, etc..;
- Narrow streets lined by high buildings.
5.4 WLAN Coverage
Camera-car The system has an interface for communication on wireless network wi-fi be 802.11 g.
The extent of this signal is around 100 meters, but that distance, in certain configurations, can be
reduced.
5.5 Bug reports
It’s possible that when you use Camera-Car there are problem or malfunction. The following are
some simple case on.
- The system is locked, or is very slow. In this case, make sure that the delay is not due to a lack of
receipt of network connectivity, or that has not been asked too rapid a transition from a camera to
another. The possibility exists that the system has overheated in that case you will need to shut it
down, or, if the problem persists, restart the system by command from the main screen (paragraph
Camera - Car User guide
3.10). If the system is permanently locked, press the power button manually. This will reboot the
system.
- The greatest keyboard does not overlap with that small. Press the "Keys" in the top bar of the
"Navigator". This will force the appearance of the keyboard bigger.
- The current screen is locked. Press the button to return to the screen and repeat the operation.
Camera - Car User guide
6 Maintenance
6.1 External enclosure
Cleaning and maintenance of the outer:
1. Use a soft, dry cloth to remove dirt.
2. If the dirt is not removed, dampen the cloth and apply a mild detergent to clean the unit. Then use
a dry cloth to remove moisture.
3. Do not use solvents, cleaning products for the automobile, or organic products to clean the unit.
These substances damage the housing of the system.
6.2 Touch screen
Cleaning and maintenance of the LCD:
1. Use a soft cloth and dry.
2. Turn off the system while it cleans up the display to prevent the static electricity damage.
3. The surface of the display can easily scratches, do not use a hard object to scrape the surface.
4. Do not use a pointed object, such as a pencil, to touch the surface of the display.
Notes:
1. The LCD operates normally between 0 and 60 ° C.
2. A high temperature can damage the display, thus avoiding exposing the LCD display to direct
sunlight.
3. Do not drink or spill liquid into the shipping. Excess moisture can damage the electronic circuit.
4. Do not open or modify the unit, damaging the internal circuitry.
5. Do not let a cigarette or other hot objects come in contact with the LCD display. This might be
damaged.
6. Do not insert foreign objects in the cavities of the connectors.
7 .If you have problems during the operation, contact your dealer.
8. If the temperature is too high and prevents the normal operation of the LCD display, stop feeding
momentarily and wait for the unit to cool. Once the temperature has returned to acceptable levels,
the unit will operate normally.
Camera - Car User guide
9. Occasionally you can see more dark pixels or bright pixels on the LCD screen. This is normal
consequence of the production process of the display and does not compromise the use of the
navigation.
Camera - Car User guide
7 Appendix A
Electric scheme (version MB890)
TASTIERA
RF
MICROFONO
MONITOR
TOUCH
ANTENNE
GPS
WIFI
UMTS
Ricetrasmettitore
RF per microfono
INPUT/OUTPUT
Ricetrasmettitore
RF per tastiera
X
cavo
monitor
Y
F
E
mic.
p. parallela
keyboard
mouse
AUDIO
IN
C
B
A
wi-fi
I/O
123
I/O (vedi a lato)
UNITA’ CENTRALE
ELABORAZIONE
(INTEL)
D
GPS
touch
VGA
3
UMTS
4
CAM1
5
CAM2
6
keyboard
lan
com1
1
2
com2
ACPI
CAM1
TOUCH
VGA
AUDIO IN
+12 GND
Cavo USB
Cavo seriale RS485 a 9 poli schermato
Cavo seriale RS232 a 9 poli schermato
X
CAVO DOPPIA Y
cavo
alimentatore
5A
Cavo bipolare
alimentazione 12 V
GND B nero
J1 J2
12V
12V
5V
X
+12 GND ACPI
VIDEO GRABBER
ACPI C verde
SHL E
CONVERTITORE
RS232 PELCO-D
(opzionale)
cavo ad Y
+12V A giallo
+5V D
Y Z
C
+12V GND
E
+12 GND
F
+12 GND
GRAB 1
USB
G
+12 GND
+5V GND
H
+12 GND
X
A
RCA
giallo
blu
D
TELECAMERE
X
giallo/verde
I
GRAB 2
USB
Y Z
A
RCA
giallo
Y Z
CAM1
brandeggiabile
CAM2
K
Camera - Car User guide
Electric scheme ( version SV823)
Camera - Car User guide
8 References
ETHERIA Srl
SCE Group Company
e-mail: [email protected]
web: www.etheria.it
Modena:
Via Giardini, 1271/A
41100 MODENA
Tel: (+39) 059.519 058
Fax: (+39) 059.515 242
Parma:
Parco Area delle Scienze, 181/A
43100 - PARMA
Tel: (+39) 0521.906 121
Fax: (+39) 0521.406 9915