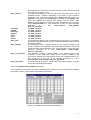
1
Evorobot 1.1 User Manual
Stefano Nolfi
Institute of Psychology, National Research Council (CNR)
Viale Marx, 15, 00137, Rome, Italy
[email protected]
http://gral.ip.rm.cnr.it/nolfi/
1. Introduction
Evorobot (http://gral.ip.rm.cnr.it/evorobot/simulator.html) is a software for running evolutionary robotics
experiments. It allows to replicate many of the experiments described in (Nolfi S. and Floreano D.
[2000]. Evolutionary Robotics: The Biology, Intelligence, and Technology of Self-Organizing
Machines. Cambridge, MA: MIT Press/Bradford Books) and to run your own experiments.
Evorobot runs on Windows95/98 and Windows NT. Source files are written in C and C++ and can
be re-compiled with Microsoft Visual C 4.0 or higher.
Evorobot allows you to run evolutionary experiments in simulation or on a real robot. To run
evolutionary experiments on the real robot or to test individuals evolved in simulation on the real robot
you need a Khepera robot. Khepera was designed and built at the Laboratory of Microprocessors and
Interfaces, Swiss Federal Institute of Technology in Lausanne (Mondada et al., 1993) and is currently
distributed and supported by K-Team S.A. (www.k-team.com).
Evorobot has been developed by Stefano Nolfi and is copyrighted (or "copylefted", to use the term
introduced by the Free Software Foundation) and is covered by the GNU General Public License.
This means that it may be used, copied, modified, or redistributed for free. However, any redistribution
(of the original or modified code) should adhere to the General Public Licence terms, and copies
should acknowledge the original author and be subject to the terms of the GNU General Public
License. Sources, binaries and documentation files of Evorobot are freely available at
http://gral.ip.rm.cnr.it/evorobot. The evorobot package consist of a zipped file evorobot.zip that
contains the executable (evorobot.exe), the user manual in postscript (manual10.ps), the source files
(*.c, *.h, *.rc files), and a set of sample files (*.cf, *.env, *.sam) that will allow you to easily replicate the
experiments described in section 2 and to familiarize with the program.
My ability to support Evorobot is limited, and I cannot guarantee that all bugs will be promptly fixed
(although obviously it is in my interest to fix serious bugs which limit the software's usefulness). Bugs
should be reported by sending email to: [email protected].
2. How to use the sample files
In this section I will describe the sample files that should allow you to easily replicate many of the
experiments described in [Nolfi and Floreano, 2000]. From here on simply the book. These files are
also very useful to familiarize yourself with the software before running your own experiments. This is
not the software used to conduct the original experiments. For this reason some of the parameters
may be different from the original experiments. Despite of that, you should observe similar results
most of the times.
In this section I will provide guidelines for each experiment. Notice that I will assume that the
program and the sample files are located in the same directory. Also, notice that I will provide more
details in the first examples and less and less later on, so please follow the order of presentation.
2.1 Sampling the environment through the real robot sensors
If you want to run evolution on simulation and you own a Khepera robot you should first sample the
real environment of the robot through the robot real sensors. In this section we will describe how to
sample an environment with your own robot (see also Nolfi et al. [1994], Miglino et al. [1995] and
section 3.3 of the book).
1
The package contains a set of files: wall.sam, round.sam, small.sam, light.sam that have been
obtained by sampling a wooden wall covered with white paper, a cylindrical object with a radius of
12.5 mm, a cylindrical object with a radius of 27 mm, and a 2watt light bulb with one of my own
Khepera. You can visualize the content of these files by executing the command Display>Sample_Object and by selecting the object that you want to display.
You can use these files and skip this part (at least until you familiarize with the software). In this
case however, if you try to test the robot evolved in simulation on your own Khepera robot, you might
observe significant differences between the behavior of the robot in simulation and in the real
environment due to a mismatch between the files provided with the sample package and your own
robot.
To start the sampling procedure you should: (1) connect your Khepera robot to the serial port of
your computer possibly using a cable with rotating contacts; (2) place the robot in an environment
similar to that used in simulation; (3) execute the command Parameters->Evolution, select the
appropriate serial port and communication speed and then turn on the parameter real_ robot; (4)
execute the command Run->Sample_Object.
The command Run->Sample_Object opens a dialog box that contains a set of parameters that
you should set properly. On the right side of the box you should select the type of object you are
going to sample. On the left side you should specify the following parameters: the number of different
distances from which you want to sample the object (N._Turns, default value is 20, maximum allowed
value is 30); the current turn you are going to perform (current_turn, default value is 0); the initial
distance between the robot and the object (init_dist, default value is 5mm); the interval distance
between each sampled distance (inter_dist, default value is 2mm); the pause in milliseconds
between each time the state of the robot sensors are stored in memory (pause, default value is 0)..
You should set: init_dist to the minimum distance that allows the robot to turn in place without
hitting the object to be sampled; N._Turns and inter_dist so to cover the whole range of distance in
o
which the sensors are activated by the object; pause so to allow the robot to turn exactly 360 with
181 actions (i.e. about 2 degrees for each action). In addition you should select the type of object that
you want to sample.
Once you have set the parameters above, set current_turn to 0 (i.e. first distance) and pause to
0, place the robot at the initial distance with the object in front, and press the GO button. The robot will
o
turn on the spot for about 20 and probably will stop too early. At this point increase pause and repeat
o
the procedure until the robot turn exactly 360 . Once you succeed, set current_turn to 1, place the
robot at the right distance (init_dist + (inter_dist * current_turn)) and press the GO button again.
Once you sampled the object from all the required distances you may save the result with the SAVE
button. Once you sampled and saved all objects you may leave the procedure by pressing the EXIT
button. It is a rather boring task, but you have do it only once.
2.2 Obstacle avoidance
In this section I will describe how to replicate the experiments described in section 4.2 and 4.4 of the
book. In doing so, we will also illustrate: (1) the basic commands that allow you to evolve individuals
in simulation and in the real environment; (2) how to test selected individuals; (3) how to test
individuals evolved in simulation in the real environment; (4) how to evolve individuals in simulations
and then continue the evolutionary process in the real environment.
To start this experiment you should run the program and then load the obst-av.cf and obst-av1.env
1
files that contains the parameters and the environmental structure respectively .
To check the content of the two files you just loaded you can use the Parameters-> menu
commands. With Parameters->Population you can check or change the architecture of the evolving
controllers, the number of individuals in the population, and other features. In the case of this
experiment in particular, the .cf file name is that we just loaded (cf._filename = …\obst-av.cf), we
have a single population (N._Populations = 1), the current population is 0, i.e. we are looking at the
parameters of the first population (Current_Pop = 0), the current individual is the first individual of the
population (Current_Ind = 0), there are 20 reproducing individuals (N._Reprod._Ind. = 20), each
selected individual produces 5 offspring (N._Offspring = 5).
From the sensory point of view, individuals have 8 infrared sensors (8-infrared) plus two additional
sensors that store the previous activation values of the two motors controlling the wheels
(motmemory). From the motor point of view, they have two motors controlling the two wheels
1
To load a .cf file use the file->load command, select the file, and press the OK button. To load a .env file, use
the file->load command, select "configuration" as file type, select the file, and press the OK button.
2
(wheels). The architecture is a simple perceptron with two layers and no hidden units (N._hiddens =
0). Connection weights are normalized -1.0 to 1.0 (Weights_Range = 1.0). Finally the Fitness
Function is 1. This function is based on three variables directly measurable on the robot platform:
(
)
Φ = V 1 − ∆ v (1 − i)
0 ≤ V ≤1
0 ≤ ∆v ≤ 1
0 ≤i≤1
where V is the sum of rotation speeds of the two wheels, ∆v is the absolute value of the algebraic
difference between the signed speed values of the wheels (positive is one direction, negative the
other), and i is the normalized activation value of the infrared sensor with the highest activity. This
function is evaluated whenever a new sensory motor cycle is executed and the resulting values are
summed up and divided by the total number of sensory motor loops during which the individual is
tested. The higher the value, the better is the performance of the individual. These three components
encourage --respectively-- motion, straight displacement, and obstacle avoidance, but do not say in
what direction the robot should move. Please notice that in simulation V is based on the output of the
neural controller while in the real environment it is based on the actual speed of the two wheels
computed by the robot through the PID controllers.
With Parameters->Evolution you can check additional parameters that control the evolutionary
algorithm. In this case the evolutionary process last 100 generations (N._generations = 100), initial
generation is 0 (Initial_generation = 0), mutation probability is 3% (Mutation_Prob. = 3), the seed of
the first replication is 1 (Seed = 1), only the first best individual of each generation is saved
(Save_Best_N. = 1), 10 replications of the experiment will be run (N._Replications = 10). On the
right side of the box you see the parameters that control the real robot. In this case the program is set
in the simulation mode (Real_Robot is off), the selected serial port for the communication with the
robot is 2, and the selected speed is 38400 bauds (this two last parameters do not have any effect in
simulation but should be properly set before switching the Real_Robot parameter on).
With Parameters->Lifetime you can check additional parameters that control individuals lifetime.
In the case of this experiment individuals "live" for 10 epochs (N._Epochs = 10) consisting of 500
cycles each (N._Sweeps = 500). Each lifecycle last 300 ms of real time (Timelaps_x_100ms = 3).
Noise level is 0.05 (Noise = 0.05). Finally, if the robot crashes into obstacle the corresponding epoch
of lifetime is stopped (Stop_when_crash is on). Unless anything else is specified about the starting
position, the robot will be placed in a randomly selected position of the environment at the beginning
of each epoch.
With Parameters->Display you can check the parameters that control what you see on the screen
while the program is running. In the case of this example, you will see the individual robot and the
environment only when you will test an individual but not during the evolutionary process
(drawindividual is off). During the test of an individual the program will display the trajectory and the
infrared sensors of the robot in the left side of the window (drawtrace and infrared are on). Given
that the draw_sensors option is on, the program will also display the state of the sensors and motors
through time on the right part of the window. In particular the program will display the type of object
currently perceived by the robot (perceived is on), the input and the output layer of the neural
controller (inputs and outputs are on), and the fitness gathered each cycle (fitness is on). The
program will also display additional data at the bottom of the window (drawdata is on). Finally the
program will wait 50 ms after each cycle (to reduce the speed of the robot on the display) and the
scale of the robot and of the environment will be automatically computed by the program (scale =
999).
You can modify any of these parameters and eventually save the new parameters set with the
Parameters->Save_Parameter command. If you want to create a new file of parameters you should
modify the filename indicated in the Parameters->Populations dialog box before saving the new
parameters. Please notice that by modifying some of the parameters contained in the Parameters>Populations dialog box you need to save the parameters, exit and re-enter the program. The
program will display a warning message to you when this is necessary.
With the Parameters->Environment command you can check and modify the structure of the
environment. You can have up to 5 different environments. In the case of this experiment we have
only one environment (N._Environments = 1) and the current environment is the first (current_env.
= 0). This environment contains 4 walls (walls = 4) and 7 small cylindrical obstacles (srounds = 7)
3
with a radius of 12.5 mm. (srounds = 7, 12.5) The x1,y1,x2,y2 coordinates of the walls indicate the x
and y positions of the beginning and end of each wall in mm. The x and y coordinates of the
cylindrical obstacles indicate the center of each obstacle. You can modify any of these parameters
and save the new parameters set with the SAVE button. If you want to create a new file or a new set
of files you should modify the filename parameter first.
At this point you might test an individual of the first generation with the command Run->Test Ind.
and you should see the robot and the environment on the left side of the window and the state of the
sensors and motors of the robot through time in the right side of the window. If you want to see the
behavior of another individual you should modify the parameter Current_Ind. with the Parameters>Populations command (given that each population consists of 20x5=100 individuals you might
select an individual id number between 0 and 99).
You might now run the evolutionary process with the Run->Evolution command. The program will
conduct 10 evolutionary processes lasting 100 generations each. During each evolutionary process
the program will graph the average fitness of the population (in blue) and the fitness of the best
individual (in magenta). In addition the program will display at the bottom side of the window the seed
of the current replication, generation, population, individual, and the total fitness accumulated by each
individual. You might stop the program at any time by pressing the right bottom of the mouse or with
the Run->Stop command. While the evolution is running in simulation, you might also display the
behavior of each individual by turning on the parameter drawindividual of the Parameters->Display
menu (if you want to display all populations turn display_all_popul. before turning on
drawindividual, if you want to display also the state of sensors and motor turn graphsensors on
before drawindividual but you cannot use both at the same time).
At the end of the evolutionary process you might test the individuals of the last generation with the
Run->Test Ind. command. Or you might want to test the best individuals of each generation. To do
that, load the genome of the best individuals (for example the file b1p0s1.gen that contains the best
2
individuals of 100 generations for the replication seed 1) with the File->Load command . At this point
you should set the parameter Current_Ind. of the dialog box Parameters->Populations with the
number of the corresponding generation. For example, by setting Current_Ind. = 99 and by executing
the command Run->Test Ind. you will see the behavior of the best individual of the last generation.
To test individuals evolved in simulation in the real environment you should: (1) connect your
Khepera robot the serial port of your computer possibly using a cable with rotating contacts; (2) place
the robot in an environment similar to that used in simulation; (3) select the appropriate serial port and
communication speed with the command Parameters->Evolution; (4) turn on the parameter real_
robot in the dialog box of the command Parameters->Evolution; (5) execute the command Run>Test Ind. (i.e. the same command that is used to test an individual in simulation). Please check that
each cycle last the right amount of time. One simple way to check this is to set the lifetime of the
individual to 100 cycles and test the individual by measuring how much time the robot moves. In the
case of this example the total time should be 30 seconds (100x300ms). If the lifetime of the robot is
shorter or longer you should respectively increase or decrease the Pause parameter of the
Parameters->Display dialog box.
To run the evolutionary process on the real robot just: (1) connect your Khepera robot to the serial
port of your computer with a cable with rotating contacts; (2) place the robot in an environment; (3)
select the appropriate serial port and communication speed with the command Parameters>Evolution; (4) turn on the parameter real_robot in the dialog box of the command Parameters>Evolution; (5) execute the command Run->Evolution (i.e. the same command that is used to
evolve an individual in simulation). In the real robot mode it might be useful to turn the
drawindividual parameter on to better monitor the sensory-motor states of the robot. Also, given that
the evolutionary process with the real robot is much slower than in simulation, before running the
evolutionary process you may want to reduce the number of replications and the lifetime of the
individuals.
To run the evolutionary process in simulation and then continue it on the real robot: (1) first run
the evolutionary process in simulation as described above; (2) set to the parameter Initial_
Generation of the dialog box of the command Parameters->Evolution with the number of the last
generation (please notice that if you ran 100 generations the last generation is 99); (3) increase
N._Generations up to the number of generations that you want to reach; (4) turn the real_robot
parameter on; (5) execute the command Run-Evolution.
2
To load a .env file, use the file->load command, select "genotype" as file type, select the file, and press the OK
button.
4
To run the evolutionary process in simulation and then continue it in simulation you just have to
follow the same procedure but, obviously, you do not have to turn the real_robot parameter on.
2.3 Discriminating object with different shapes
In this section I will describe how to replicate the experiments described in section 5.4 of the book. In
doing so, we will also illustrate: (1) how to generate graphic representations of the relative positions of
the robot with respect to the obstacles such as those included in Figure 5.10 of the book; (2) how to
deal with target areas; (3) how to increase or decrease the scale of the graphic objects on the screen;
(4) how to display the average results of several replications.
To start this experiment you should run the program and then load the discrim.cf and discrim1.env
files.
As you may check with the Parameters->Populations command, also in this case we have a
single population of 100 individuals (20 reproducing individuals that produce 5 offspring). Each
individual is provided with 6 frontal infrared sensors (6-infrared is on) and two motor units controlling
the two wheels (wheels is on). Weights range is 10.0 (i.e. connection weights and biases are
normalized between -10.0 and +10.0). Fitness Function is 2. This fitness function rewards with 1.0
each lifecycle that the robot spend on a target areas. Target areas are circular areas in which the floor
is painted in black rather than in white. In the simulated environment target areas are represented as
green circles. The total fitness of the individuals is normalized by the number of lifecycles of the
individuals themselves. Notice that to run the evolutionary process in the real environment, the
Khepera robot should be provided with an additional infrared sensor placed on its bottom side and
connected to the analog input port n. 5. In the case of this experiment the state of this sensor is not
given in input to the neural controller but it is used to compute the fitness of individuals.
As you may check with the Parameters->Evolution command, mutation probability is 3%
(Mutation_prob = 3) and the program is asked to produce 10 replications of the evolutionary process.
As you may check with the Parameters->Lifetime command, lifetime consists of 10 epochs
(N._Epochs = 10) of 500 cycles each (N._Sweeps = 500) and each lifecycle last 100 ms
(Timelaps_x_100ms = 1). Noise level is 0.05 (Noise = 0.05). If the robot crashes into obstacles the
corresponding epoch of lifetime is stopped (Stop_when_crash is on). Individuals are placed in a
randomly selected position each epoch but far from obstacles and target areas (Start_far_from is
on). Finally, the position of target areas and small cylindrical obstacles are randomized each time step
(Randomize_sround is on). More precisely the target area is placed at the bottom of the round
cylindrical obstacle (so to assure that individuals are rewarded if they stay close to these object) and
the position of the obstacle and of the corresponding target area is randomized each epoch.
As you may check with the Parameters->Environment command, the environment consists of an
arena of 60x35cm that contains small cylindrical object placed on top of a target area with a radius of
8 cm.
If you test an individual of the initial generation you will see that in this case only the robot and the
environment are shown and in addition only the frontal direction of the robot is shown. This is because
the parameters drawsensors and infrared are off in this case.
At this point you might run the evolutionary process with the Run->Evolution command and then
test selected individuals with the Run->Test_Ind. command as explained in the previous section.
While testing one individual you might display the map of the relative positions of the robot with
respect to walls and cylindrical obstacles by executing the Parameters->Display command and
setting the draw_rel._position parameter on.
If you ran all replications you can also see the performance of a single replication by loading the
3
file statSx.fit (where x is the seed of the replication) and the average result of all replications by
loading the file stat.fit. To re-display the last loaded file use the command Display->Fitness.
Also notice that if you increase or decrease the size of the window before running the Run>Test_Ind. command the program increases or decreases the scale of the graphic accordingly. If you
want to increase or reduce the scale of the environment only you can manually set the scale
parameter of the Parameters->Display dialog box (100 means a scale of 100% with 1mm equal to 1
pixel).
3
To load a .fit file, use the file->load command, select "fitness" as file type, select the file, and press the OK
button.
5
If you want to run the evolutionary process on the real robot or to test an evolved individual on the
real robot you just have to turn the parameter real_robot of the dialog box of the command
Parameters->Evolution (as explained in section 2.2).
2.4 Navigating toward a target area.
In this section I will describe how to replicate the experiments described in section 5.5 of the book.
To start this set of experiments you should run the program and then load rat-a.cf and rat-a1.env
files.
As you may check with the Parameters->Populations command, each individual is provided with
8 infrared sensors (8-infrared is on) and two motors units controlling the two wheels (wheels is on).
Weights range is 10.0. Fitness Function is 3. This fitness function rewards with 1.0 each time a
robot spends the last cycle of an epoch on a target areas. The total fitness is normalize by the number
of epochs of the lifetime of the individual. Notice that, as in the case of the experiment described in
section 3.3, to run the evolutionary process in the real environment, the Khepera robot should be
provided with an additional infrared sensor placed on its bottom side and connected to the analog
input port n. 5.
As you may check with the Parameters->Evolution command, mutation probability is 4%
(Mutation_prob = 4).
As you may check with the Parameters->Lifetime command, lifetime consists of 24 epochs
(N._Epochs = 24) of 500 cycles each (N._Sweeps = 500) and each lifecycle last 100 ms
(Timelaps_x_100ms = 1). Noise level is 0.05 (Noise = 0.05). If the robot crashes into obstacles, the
corresponding epoch of lifetime is stopped (Stop_when_crash is on).
As you may check with the Parameters->Environments command, the environment consists of
an arena of 60x30cm and a target area with a radius of 7.5cm placed in the top-left corner of the
environment. There are 8 predefined initial positions and orientations. This means that each epoch
the robot is placed in one of the 8 specified positions and not in a randomly selected position of the
environment although its direction is randomly varied of 10 degrees each time.
The file rat-b.cf and rat-b1.env allow you to run a variation of this experiment in which the starting
position of the robot are randomly varied each epoch. The only difference with respect to the files
described above are: (1) the environment does not specify fixed initial positions (i.e. the parameter
starting_positions of the dialog box Parameters->Environment is 0); (2) the startfarfrom
parameter in the dialog box of Parameters->Lifetime command is on (i.e. individuals do not start
from the target area), and (3) fitness function is 4. Fitness function 4 is identical to fitness function 3.
The only difference is that in this case the program randomly vary the scale of the environment each
epoch.
The file rat-c.cf and rat-c1.env allow you to run a third variation of this experiment. The only
difference with respect to the file rat-c.cf and rat-b1.env is that the fitness function is 5. Fitness
function 5 is identical to fitness function 3 aside from the fact that the program randomly vary the
absolute dimensions of the walls and the proportion of long versus short walls each epoch. You can
easily see the effect of fitness functions 4 and 5 on the environment by testing an individual with the
Run->Test_Ind. command and by observing how the shape of the environment changes each epoch.
2.5 Cleaning the arena by collecting "garbage" objects
In this section I will describe how to replicate the experiments described in section 6.2 of the book. In
doing so, we will also illustrate: (1) how to generate graphic representations of the input-output maps;
(2) how to allocate memory space for a number of individuals greater than the number of the evolving
individuals, and (3) how to easily select and test the best individual throughout generations that is not
necessarily the best individual of the last generation.
To start this experiment you should run the program and then load the grip-e.cf and grip-e1.env
files.
As you may check with the Parameters->Populations command, each individual is provided with
6 frontal infrared sensors (6-infrared is on), a light barrier sensor on the gripper (light-barrier is on),
two motors units controlling the two wheels (wheels is on), and two motors controlling the pick-up and
release procedure (gripper is on). The neural controller consists of an the emergent modularity
architecture (e-modularity is on). Also notice how the parameter Opp._from_N._Generations is 900.
In the case of competitive co-evolutionary experiments, this parameter is used to keep in memory the
best individuals of previous generations that should be used as competitors of the current evolving
individuals (see section 2.9). In this case however, it is just a trick to allocate more memory space so
6
to allow the program to load into memory the best individuals of 1000 generations (100 individuals of
the current population + 900 additional individuals). Fitness Function is 6. This fitness function
rewards with 1.0 each lifecycle in which the robot holds an object with its gripper and with 10000.0
each time the robot releases an object outside the arena. Notice that, to run the evolutionary process
on the real environment, some additional device able to automatically check if the robot released an
object outside the arena and able to eventually replace the "garbage" objects inside the arena after
each individual lifetime is required.
As you may check with the Parameters->Evolution command, the number of generations is
rather high in this case (N._generations = 1000). This is due to the fact that, as you may easily
observe by running the evolutionary process, performance continue to increase up to 500 generations
and, in some replication, up to 1000 generations.
As you may check with the Parameters->Lifetime command, when the robot crashes into
obstacles both with its body or with its gripper the corresponding epoch of lifetime is stopped
(Stop_when_crash is on), small cylindrical objects are randomly displaced in the environment at the
beginning of each epoch (Randomize_Sround is one), and an additional cylindrical object is
positioned in front of the robot at a random distance and orientation each time the robot pick-up an
object (Target_reappears is on). Given that no other special parameters are turned on, the robot is
initially placed in a randomly selected position within the arena at the beginning of each epoch of
lifetime.
As you may check with the Parameters->Environment command, the environment consists of an
arena of 60x35cm with 6 small cylindrical objects randomly displaced within it.
You may run the evolutionary process in simulation, load the best individuals of each generation,
and test the best individual of the last generation with the commands Run->Evolution, File->Load,
and Run->Test_Ind. respectively as described above. You may also test the best individual of all
generations with the command Run->Test_Best_Ind. In this case the program will set the parameter
Current_Ind. of the dialog box of the command Parameters->Populations with the number of the
individual that collected more fitness during all the evolutionary process. However, notice that before
4
executing this command, you should load the B1G0Sx.gen and statSx.gen files (where x is the seed
of the replication) that contains respectively the genome of the best individuals of each generation
and the best and mean fitness of each generation of a single replication of the experiment.
When you test an individual you will notice that in the right part of the screen the state of the
motors sometimes is represented in blue and sometimes is represented in green. The two colors
indicate which of the two corresponding neural modules is currently active.
You can generate graphic representations of the input-output mapping of an individual (like figures
6-8 and 6-9 of the book) with the command Display->Input/Outputs_Maps. This command displays
with different colors the state of the four motors and the current combination of neural modules when
the robot is placed in front of a wall or in front of a cylindrical object with and without an object in the
gripper (see also section 3.43). By turning the parameters draw_sensors off and the parameter
draw_rel_positions on, you might also obtain graphic representations similar to that reported in
figure 6.10 of the book that show the positions and orientations relative to wall and small cylindrical
objects experienced by an individual (notice that the two columns represent the positions and
orientation experienced with the gripper empty and full respectively and he two rows the positions
relative to walls and cylinders respectively).
You might also run the experiment or test an individual without stopping the lifetime of individuals
each time the robot correctly releases an object outside the arena by turning on the parameter nobreak of the dialog box of the command Parameters->Lifetime.
To run this experiment with simple perceptrons as neural controllers, just turn off the parameter emodularity in the dialog box of the command Parameters->Populations.
To run this experiment with a three layer neural network with 4 hidden units, turn off the parameter
e-modularity and set the parameter N._Hiddens to 4 in the dialog box of the command Parameters>Populations.
To run this experiment with a two layer architecture with two recurrent units, turn off the parameter
e-modularity and set the parameter input_output to 2 in the dialog box of the command
Parameters->Populations.
To test an individual evolved in simulation in the real environment, just turn on the parameter
real_robot in the dialog box of the command Parameters->Evolution as described above.
4
To load a .fit file, use the file->load command, select "fitness" as file type, select the file, and press the OK
button.
7
2.6 Exploring an environment by periodically returning to a charging station.
In this section I will describe how to replicate the experiments described in section 6.3 of the book.
To start this experiment you should run the program and then load the homing.cf and homing1.env
files.
As you may check with the Parameters->Populations command, each individual is provided with
8 infrared sensors (8-infrared is on), two light sensors on the front and back side of the robot (lightfb
is on), a simulated sensor of the battery level (battery is on), an additional infrared sensor placed on
the bottom side of the robot (groundsensor is on), and two motors units controlling the two wheels
(wheels is on). The neural controller is a three layers network with 5 hidden units (N._Hiddens = 5)
with recurrent connection on the hidden units (elman_net is on). Weights range is 5.0
(Weights_range = 5.0). Fitness Function is 7. This fitness function is similar to the fitness function
n.1 described in section 2.2 but consists of only the two components that encourage motion and
obstacle avoidance (i.e. the second component has been eliminated). Individuals receive an initial
energy of 1.0 that decreases by 0.01 each lifecycle the individual is out of the re-charging area (see
below) and is fully restored as soon as the individual enters into the re-charging area. Finally,
individuals gather fitness only outside of the re-charging area.
As you may check with the Parameters->Lifetime command, a lifetime consists of only 1 epoch of
1000 lifecycles. Lifetime ends when individuals exhaust their energy, crash into walls
(Stop_when_crash is on), or reach 1000 lifecycles.
As you may check with the Parameters->Environments command, the environment consists of
an arena of 45x40cm with a target area with a radius of 12cm and a 2 watt light-bulb placed on the
top-left corner. In this experiment the target area represents the re-charging station.
When you test an individual with the Run-Test_Ind. command, you will see on the right side of the
screen the state of the sensors (including the battery sensor that reports the current level of energy
and the copy of the hidden units state at time t-1) and of the motors. Given that the hidden parameter
of the Parameters->Display dialog box is on, you will also see the state of the hidden units.
2.7 Obstacle avoidance in plastic individuals
In this section I will describe how to replicate the experiments described in section 7.5 of the book. In
doing so we will also learn: (1) how to evolve plastic individuals; (2) how to display the connection
weights of a neural controller.
To start this experiment you should run the program and then load the hebbian.cf and
hebbian1.env files.
As you may check with the Parameters->Populations command, each individual is provided with
8 infrared sensors (8-infrared is on), two motors units controlling the two wheels (wheels is on), and
1 additional output unit that is copied-back into an additional input unit. The neural controller is a two
layer network with 9x3 connection weights. In this experiment, instead of evolving the connection
weights themselves, evolving individuals inherit for each connection the learning rule (that can be
hebbian, pre-synaptic, post-synaptic, or covariance), the learning rate (that can be 0.0, 0.33, 0.66, or
0.99) and the sign of the synapsis. Connection weights are randomly assigned between (0.0 and +0.1
or between 0.0 and -0.1). However, they may change during lifetime and vary between -1.0 and +1.0
(Weights_range is 1.0). Fitness Function is 1. This is the three components fitness function
described in section 2.2.
As you may check with the Parameters->Display command, the program is requested to display
the state of the weights (draw_weights is on).
When you test an individual with the Run-Test_Ind. command, please notice how the connection
weights change while the robot is moving. Each connection weight is identified by the number of the
sending unit of the sensory layer and the number of the receiving unit of the motor layer. In the case
of experiments like this in which the hebbian_learning parameter is on, the program also displays
the learning rule (0=hebbian, 1=pre-synaptic, 2=post-synaptic, and 3=covariance) and the learning
rate (0=0.0; 3=0.33; 6=0.66; 9=0.99). The height of the graph represents the value of the
corresponding weight (negative and positive connection weights are represented in blue and in red
respectively).
2.8 Learning to adapt to changing environments
In this section I will describe how to replicate the experiments described in section 7.6 of the book.
8
To start this experiment you should run the program and then load the changin.cf and
changin1.env files.
As you may check with the Parameters->Populations command, each individual is provided with
4 infrared sensors that encode the average of sensors 0-1, 2-3, 4-5, 6-7 respectively (4-infrared is
on), and two motors units controlling the two wheels (wheels is on). The neural controller also
includes a second sub-network (auto-teaching network) with two additional output units whose value
is used as teaching input for the two motor units (auto-teaching is on). Fitness Function is 8. This
fitness function rewards each epoch in which individuals step on a target area (the lifetime of
individuals is stopped as soon as they do so, given that they cannot gather additional fitness during
the remaining part of the epoch). The reward consists of the number of lifecycles in which the robot is
allowed to look for the target area minus the number of lifecycles actually spent to find the target area
(i.e. individuals are rewarded for their ability to find the target area as soon as possible). Total fitness
is normalized by the number of epochs.
As you may check with the Parameters->Lifetime command, individual's lifetime ends when
individuals crash into walls (Stop_when_crash is on), the position of target areas is randomly set at
the beginning of each epoch (Randomize_T._Areas is on), and different type of wall samples are
loaded in different generations (Alternate_walls is on). Wall1.sam is used in even generations and
wall2.sam is used in odd generations (wall2.sam include samples of a wall that reflects six time more
that wall1.sam). In the real environment this can be obtained by using high reflective paper.
As you may check with the Parameters->Lifetime command, the learning rate is 0.2
(Learning_rate = 0.2).
As you may check with the Parameters->Display command, the program is requested to display
the state of the auto-teaching units (teaching is on).
As you may check with the Parameters->Environment command, the environment consists of an
arena of 60x20cm and includes a target area with a radius of 1cm.
To test evolved individuals in one of the two environments, you should load wall1.sam or
5
wall2.sam sample files and run the command Run->Test._Ind. Please notice that on the right part of
your screen, in addition to the state of the sensors and motors, the program displays the state of the
auto-teaching units and the error (i.e. the squared root discrepancy between the state of the two
output units and the state of the two auto-teaching units).
If you want to see how the connection weights change on line, turn the parameter draw_sensors
off and the parameter draw_weights on.
2.9 Co-evolving predator and prey robots
In this section I will describe how to replicate the experiments described in section 8.4, 8.5 and 8.6 of
the book. In doing so we will also learn: (1) how deal with two co-evolving populations; (2) how to run
co-evolutionary experiments; (3) how to run master tournament analysis.
To replicate the basic experiment described in section 8.4 you should run the program and then
load the ppa.cf and ppa1.env files.
As you may check with the Parameters->Populations command, in this case we have two
populations of evolving individuals (N._Populations = 2). The dialog box of the command display the
parameters of the current population that is the first (Current_Pop = 0). If you want to see the
parameters of the second population you should set Current_Pop to 1 (the program allows you to set
up to 2 populations). The individuals of the first population (the predators) have 8 infrared sensors (8infrared is on), 5 simulated photoreceptors that can detect the black protuberance of the prey
(camera5 is on), and two motors that control the two wheels (wheels is on). Fitness function is 10.
This fitness function reward individuals with 1.0 point for each epoch in which predators are able to
catch the prey by simply touching it. In additions predators can move with a maximum speed that is
half of the normal speed. The individuals of the second population (the prey) have 8 infrared sensors
(8-infrared is on) and two motors that control the two wheels (wheels is on). Fitness function is 11.
This fitness function rewards individuals with 1.0 point for each epoch in which they are able to
escape predators (i.e. reach the end of the epoch without being touched by predators). Both
predators and prey are tested against 10 different individuals taken from the best competitors of the
previous 10 generations (Opp_from_prev = 10).
As you may check with the Parameters->Lifetime command, predator and prey start facing each
other from the left and right side of the environment respectively.
5
To load a .sam file, use the file->load command, select "sample" as file type, select the file, press the OK
button, finally select the type of object (wall, round, small round, or light).
9
As you may check with the Parameters->Environments command, the environment consists of
an arena of 47x47cms.
When you run the evolutionary process, the program will display four curves that represent best
and average performance of the predators (red and blue curves respectively) and prey (brown and
green curves respectively).
Please notice that to test the best individuals of a run you should load the two corresponding files
(B1P0Sx.gen and B1P1Sx.gen where x is the seed of the replication). Moreover, to select the
corresponding individuals you should set the Current_Ind parameter of the dialog box of the
command Parameters->Populations for both population 0 and 1.
At the end of the evolutionary process you might test the best individuals of each population
against the best individuals of the competing population. This can be accomplished with the Run>Master_Tournament command. This command will automatically run the master tournament test for
each replication of the experiment. The command will display the result of the test online (with red and
brown curves) but will also save the result of each replication in a MasterSx.fit file (where x is the
seed of the corresponding replication) and the average result of all replications in a Master.fit file.
Moreover, the result of each individual tournament will be saved in a MasterPxSy.map (where x is the
number of the population and y is the seed of the replication). Master tournament maps are
6
automatically displayed when are loaded . If you want to test the best individual of a single run on the
basis of the master tournament test, load the file MasterSx.fit (where x is the seed of the replication)
and then use the command Run->Test_Best_Ind.
The files ppb.cf and ppb1.env can be used to replicate the experiments described in section 8.5 of
the book. The only difference is that in this case the parameter all_of_fame of the dialog box of the
command Parameters-Evolution is on and the parameter Opp_from_N._Gen. of the dialog box of
the command Parameters->Populations is set to 100. This means that competitors are taken from
the best individuals of all previous generations and not only for those of the 10 previous generations.
The files ppc.cf and ppc1.env can be used to replicate the experiments described in section 8.6 of
the book. They are similar to ppa.cf and ppa1.env. The only difference is that both predators and prey
are provided with a camera with 240 degrees of view angle (camera5b is on in both population).
Please notice that the current version of the program only supports one serial port. As a
consequence, you cannot test predator and prey robot in the real environment at the same time. To
solve this problem you might download the evolved neural controller on the real robots (to know more
about how to do that, please visit the K-Team web server).
6
To load a .sam file, use the file->load command, select "map" as file type, select the file, and press the OK
button.
10
3. Menu and dialogue reference
3.1 The File menu
Figure 1. The File menu
The File menu contains 2 commands which are described below.
3.1.1 The File->Load command
The File->load command can be used to load:
(a) A configuration file (.cf) that contains all the parameters that have been set with the Parameters>menu command with the exception of the parameters that define the environmental structure.
Please notice that you can load a configuration file only once. If you want to load another
configuration file or if you loaded a file and later you changed some critical parameters you
should exit and re-enter the program. Configuration files are generated by the user with the
Parameters->menu command.
(b) A genotype file (.gen) that contains the genotype of one or more individuals. This file may
contains the genotype of a population or the genotype of the best individuals of each generation.
Before loading a genotype file you should load a configuration file. In addition, you can only load
files that are compatible with the parameters contained in the configuration file currently loaded.
You can load up to ((N._Offspring * N. Reprod._Ind) + opp_from_prev) individuals. If the file
contains more individuals than the maximum allowed, the program will load only the first
individuals. Genotype files are automatically generated by the program during the execution of
the Run->Evolution command. Evorobot assign the filenames GxPySz.gen (where x is the
number of generation, y is the number of the population, and z is the seed of the replication) to
files that contains the genome of a population and the filename B1PySy (where y is the number
of the population, and z is the seed of the replication) to the files that contain the best individuals
of each generation).
(c) A fitness file (.fit) that contains the average fitness of the population throughout generations and
the fitness of the best individual of each generation. Fitness files are automatically generated by
the program during the execution of the Run->Evolution or Run->MasterTournament
commands. Evorobot assigns the filename statSx.fit (where x is the seed of the replication) to the
files that contain the performance of each replication and stat.fit to a file that contains the
average performance of all replications. Evorobot assign the filename masterSx.fit (where x is
the seed of the replication) to the files that contain the result of a master tournament of a single
replication and the filename master.fit to the file that contains the average result of the master
tournaments of all replications.
(d) A set of environmental files (.env) that describe one of more environment (the root of the
filenames end with a number in the range [1-5]. These files are generated by the user through
the Parameters->Environments command. If only a single environment has been defined just
select that file. If more than an environment has been defined, just select one of the files and the
program will automatically load all the file set.
(e) A sample file (.sam) that contains the sampling of an object. This files can be created by the user
with the Run->Sample_Object command. The files wall.sam, round.sam, small.sam, and
11
(f)
light.sam are automatically loaded when you run Evorobot and should be available in the current
directory at runtime. However, you might want to load a other sample file later on.
A map file (.map) that contains a matrix of value between 0.0 and 1.0 to be displayed with
grayscale colors. These files are automatically generated by the program during the execution of
the Run->MasterTournament command. Evorobot assigns the filename masterPxSy.map
(where x is the number of the population and y is the seed of the replication). The map is
automatically displayed by the program when the corresponding file is loaded.
3.1.2 The File->Exit command
The File->Exit command can be used to exit the program.
3.2 The Parameters menu command
Figure 2. The Parameters menu
The File menu contains 6 commands which are described below.
3.2.1 The Parameters->Populations command
This command can be used to set, check, or modify the parameters that define the control system of
the evolving populations. This command opens the dialog box shown in Figure 3 that contains the
following parameters:
Figure 3. The Parameters->Populations dialog Box
12
.cf_filename
N._Populations
Current_Pop.
Current_Ind.
N._Reprod._Ind.
N._Offsprings
Opp._from_N._Gen
4-infrared
6-infrared
8-infrared
light
lightfb
ground
camera5
camera5b
opponent
light-barrier
battery
elman_net
motmemory
N._Hiddens
Input-output
E-Modularity
Indicates the filename of the configuration files that includes all parameters
with the exception of the environmental structure. This filename will be used
when you save the parameters with the Parameters->Save_Parameters
command.
Indicates the number of evolving populations and can be 1 or 2.
Indicates the number of the current population (0 indicates the first
population, 1 indicates the second population, if present). This parameter
determines the parameters that are displayed in the current dialog box (that
may belong to the first or to second population) and the data that are
visualized with the drawsensors parameter that may belong to the first or to
the second population.
Indicates the current individual of the population (0 indicate the first
individual of the population, ((N._Offspring * N. Reprod._Ind) - 1) indicates
the last individual of the population. If you previously loaded the best
individuals of each generation, 0 represent the best individual of generation
0, 1 the best individual of generation 1 etc. This parameter determines
which individual or individuals (in the case of two populations) will be tested
when you execute the Run->Test_Ind. command.
Indicates the number of reproducing individuals.
Indicates the number of offspring produced by each reproducing individual.
In the case of co-evolutionary experiments indicates the number of
individuals of previous generations that are used as competitors of current
evolving individuals. If the parameter all_of_fame is off, competitors are
taken from the previous 10 generations, otherwise from all previous
generations. This parameters can be also used in experiments without coevolution to allocate more space in order to be allowed to load more
individuals from a .gen file.
Individuals are provided with four simulated infrared sensors that are
obtained by averaging infrared sensors 0-1, 2-3, 4-5, 6-7.
Individuals are provided with the 6 frontal infrared sensors.
Individuals are provided with 8 infrared sensors.
Individuals are provided with 8 ambient light sensors.
Individuals are provided with 2 ambient light sensors, one on the front side
and one on the back side.
Individuals are provided with an infrared sensor placed on the bottom side
of the robot and connected to extension bus n.5.
Individuals are provided with 5 simulated photoreceptors that report the
sector of a linear camera array with a view angle of 36 degrees that include
the less activated pixel.
Individuals are provided with 5 simulated photoreceptors that report the
sector of a linear camera array with a view angle of 240 degrees that
include the less activated pixel.
Individuals are provided with a 20wt light on their top that can be perceived
by competitors through ambient-light sensors.
Individuals are provided with a binary light-barrier sensor on their gripper
that can detect the presence of an object within the gripper
Individuals are provided with a simulated battery-level sensor. Energy lasts
100 cycles.
Individuals' neural controllers have additional input units that store the state
of the hidden units of the previous cycle.
Individuals' neural controllers have additional input units that store the state
of the two motor units controlling the two wheels of the previous cycle.
Number of hidden units. If 0, the neural controller consists of only two
layers.
Number of additional output units whose activation values are copied into
additional input units.
The neural controller is provided with two self-organizing competing neural
modules for each motor. You cannot use this option together with
autoteaching.
13
Weights_range
Random_weights
Auto-teaching
Fitness Function
Fixed
Range of the connection weights. Connection weights are binarily
represented in the genotype with a string of 8 bits and then normalized on
the basis of this parameter. If hebbian_learning is on, connection weights
are randomly initialized between -0.1 and +0.1 (however they might vary
during lifetime between -1.0 and 1.0). The genotype in this case, uses two
bits to represent the learning rule, two bits to represent the learning rate,
and 1 bit to represents the sign of the corresponding synapsis.
If autoteaching is on, weights might vary during lifetime without any bound.
Not yet implemented.
Individuals' controller includes an additional teaching network with the same
number of input, hidden, and output units of the standard network whose
output is used to self-teach the standard network through back-propagation
learning. You cannot use this option together with E-modularity.
The type of fitness function. See section 2 for an explanation of the different
pre-defined types.
Not yet implemented.
3.2.2 The Parameters->Evolution command
This command can be used to set, check, or modify the parameters that define the parameters of the
evolutionary algorithm. This command opens the dialog box shown in Figure 4 that contains the
following parameters:
Figure 4. The Parameters->Evolution dialog Box
N._generations
Initial_generation
Mutation_Prob.
Seed
Save_best_N.
N. replications.
Hall_of_fame_coevol.
Real_robot
Determines for how many generations will be the evolutionary process
conduced (i.e. evolution will start from Initial_generation and will continue
until N._generations will be reached).
Set the initial generation. If Initial_generation=0, the program will generate
the genotype of the initial generation randomly. If Initial_generation>0, the
program will first load the initial generation from previously saved files.
The probability that each bit of the genotype will be replaced with a new
randomly selected binary value.
The random seed of the first replication. If more than one replication are run,
the seed will be incremented of 1 each successive replication.
How many best individuals will be saved in a BxPySz.gen file (where x is
the ranking order 1=best, 2=second best etc., y is the population number,
and z the seed of the replication).
How many replications of the experiment will be run.
In co-evolutionary experiments, competitors are taken from all previous
generations.
Simulation/Real robot mode. If on, individuals will be embodied in the real
physical robot and environment (through the serial connection) otherwise
they will be embodied in the simulated robot and environment. Please set
14
Serial_Port
Comm._Speed
the Serial_Port and Comm_Speed parameters properly before turning this
parameter on. If the connection is not properly set the program might get
stuck and you have to turn it down with the CTRL-ALT-DEL command.
The serial port used to connect the physical robot.
The communication speed set on the real robot.
3.2.3 The Parameters->Lifetime command
This command can be used to set, check, or modify the parameters that control the lifetime of
individuals. This command open the dialog box shown in Figure 5 that contains the following
parameters:
Figure 5. The Parameters->Lifetime dialog Box
N.Epochs
N.Sweeps
Timelap_X_100ms
Noise
Nobreak
Stop_when_crash
Fixed_starting_pos
Start_far_from
Start_frontal
Start_on_Food
Randomize_Sround
Randomize_round
Randomize_T._Area
The number of epochs last the lifetime of an individual. At the beginning of
each epoch the robot is replaces in a new randomly selected or otherwise
specified position. In the real_robot mode, the robot moves by doing
obstacle avoidance for few seconds in order to start from a new randomly
selected position.
How many cycles lasts each epoch.
How many milliseconds lasts each cycle (1=100ms, 2=200ms etc.). In
simulation mode the time to accomplish a cycle might be shorter or longer
than the real time (see pause parameter in the dialog box of the command
Parameters->Display). In the real robot mode, this parameter does not
have any effect and the current length of each cycle should be properly set
by modifying the pause parameter.
The range of white random noise added to infrared and ambient light
sensors. It affect both the simulation and the real robot mode.
In the case of Fitness_Function=6, do not end an epoch when the robot
successfully release an object outside the arena
Epochs end also before the max number of lifecycles are reached if the
robot crash into obstacles.
If fixed starting positions are specified in the environmental structure, the
initial orientation of the robot is not randomly varied of 10 degrees as usual.
The starting position of the robot is chosen randomly but far from obstacles
and target areas.
In the case of two co-evolving populations, the two individuals start from the
two opposite side of the environment facing each other.
Individuals start from the first target area.
The position of small cylindrical objects is randomized at the beginning of
each epoch.
The position of cylindrical objects is randomized at the beginning of each
epoch.
The position of targer areas is randomized at the beginning of each epoch.
15
Target_reappeas
Alternate_Walls
In the case of Fitness Function = 6, the program place another obstacle in
front of the robot as soon as an object has been successfully gripped by the
robot.
Instead of using the wall.sam file samples, the program use the wall1.sam
and wall2.sam files during the evolutionary process in even and odd
generations respectively.
3.2.4 The Parameters->Display command
This command can be used to set, check, or modify the parameters that control the graphic display
during the execution of Run->Evoution, Run->Test._Ind., and Run->Mastertournament
commands. This command opens the dialog box shown in Figure 6 that contains the following
parameters:
Figure 6. The Parameters->Display dialog Box
drawindividual
trace
infrared
light
camera
display_all_epochs
display_all_populat.
Pause
Scale
If this parameter is on, the Run->Evolution and Run->Mastertournament
command wills display the environment and the behavior of the robot in the
simulation mode. If also the display_all_epochs parameter is on, all
epochs of the lifetime of the individual will be displayed in different areas of
the graphic window. If display_all_population is on, all individuals of a
population will be displayed in different areas of the graphic window (you
cannot use both options at the same time). The commands Run>Test._Ind.
and
Run->Test._Best_Ind.
will
automatically
turn
drawindividual on. In addition, when this parameter is on, the trace of the
robot, the infrared sensors, the ambient light sensors, and the vision camera
can be displayed by turning on the parameters trace, infrared, light, and
camera respectively.
see drawindividual.
see drawindividual.
see drawindividual.
see drawindividual.
see drawindividual.
see drawindividual.
Pause in millisecond between after each cycle of lifetime. In simulation
mode this parameter can be increased to reduce the speed of the display on
the computer screen during the execution of the Run->Test._Ind. and Run>Test._Best_Ind. commands. In the real robot mode this parameter should
be set so that each lifecycle last the desired number of milliseconds (please
notice that each cycle will last at least the time needed to read the sensors
and set the motor states through the serial cable and to spread activation
through the neural controller).
The scale which will be used to display the robot and the environment on
the computer screen. If this parameter is set to 999, the program will
16
draw_sensors
perceived
outputs
teachings
hiddens
inputs
error
fitness
draw_data
draw_weights
draw_rel._positions
black_and_white
automatically set it by trying to maximize the size. Scale=100 means 100%
scale with 1mm equal to 1 pixel.
The program will display on the right side of the computer screen a set of
variables through a lifetime. Depending on the state of the successive
parameters, the currently perceived object (perceived), the output units
(outputs), the teaching units (teachings), the hidden units (hiddens), the
input units (inputs), the learning error (error), and the fitness value
(fitness) will be displayed. Notice that these parameters will have effect
only if drawindividual is on. You should turn on only one of the following
parameters
at
a
time:
draw_sensors,
draw_weights,
draw_rel._positions.
see draw_sensors.
see draw_sensors.
see draw_sensors.
see draw_sensors.
see draw_sensors.
see draw_sensors.
see draw_sensors.
The program will display a set of variables (the current epoch, cycle, fitness
and total accumulated fitness) during the individuals lifetime at the bottom of
the graphic window.
This parameter produce a graphic display of the connection weights of the
neural controller on the right part of the graphic window (please notice that it
has an effect only if drawindividual is on). You should turn on only one of the
following parameters at a time: draw_sensors, draw_weights,
draw_rel._positions.
This parameter produce a graphic display of the relative positions and
orientation of the robot with respect to the objects included in the
environment. (please notice that it has an effect only if drawindividual is on).
You should turn on only one of the following parameters at a time:
draw_sensors, draw_weights, draw_rel._positions.
Force the program to produce a black and white graphic display. All colors
except white are displayed as black.
3.2.5 The Parameters->Environment command
This command can be used to set, check, or modify the environment. This command opens the dialog
box shown in Figure 7 that contains the following parameters:
Figure 7. The Parameters->Environment dialog Box
17
Files_name
N._env
current_env.
walls
rounds
rounds
starting_pos
target areas
n.lights
SAVE
The name of one of the files that contains an environment definition. This
parameter will determine on which file the current parameters will be saved
by selecting the SAVE button. Please notice that you might have up to 5
environments whose filenames should end with 1.env, 2.env .., 5.env. If you
define more than one environment the program will automatically save the
corresponding number of files.
The number of defined environments.
The current environment (it should be a number between 0 and (N._env. 1). This parameter affect the other parameters that are displayed in the
dialog box.
The number of walls. Please notice that the environment should always
consists of an arena of 4 walls that might include inside cylindrical objects,
lights, and target areas. The following x1, y1, x2, and y2 parameters
determine the staring and ending coordinate of each wall. Also notice that
the program actually only support orthogonal walls. Coordinates are in
millimeters.
The number and the radius of cylindrical objects. The following x and y
coordinates indicate the center of each object. Coordinate are in millimeters.
The number and the radius of small cylindrical objects. The following x and
y coordinate indicate the center of each object. Coordinate are in
millimeters.
The number of predefined starting positions for the robot. The following x, y,
and a coordinates indicate the x and y position of the robot and its
orientation in degrees. If starting positions are defined, the robot will be
placed in the position of the corresponding epoch of lifetime. Coordinates
are in millimeters.
The number of target areas. The following x, y, and r coordinates indicate
the center and the radius of each area. Coordinate are in millimeters.
The number of lights present in the environment. The following x and y
coordinate indicate the position of each light. Coordinate are in millimeters.
Save the environments. See also Files_name.
3.2.6 The Parameters->Save_parameters command
This command save all the parameters contained in the Parameters->Populations, Parameters>Evolution, Parameters->Lifetime, and Parameters->Display dialog boxes on the file name
indicated in the cf._filename parameter contained in the dialog box of the Parameters->Populations
command.
3.3 The Run menu
Figure 8. The Run menu
The File menu contains 7 commands which are described below.
18
3.3.1 The Run->Evolution command
This command runs the evolutionary process or a set of replications of the evolutionary process
starting from different randomly generated initial populations or previously evolved start generations.
The evolutionary process might occur in simulation or in the real robot depending on the state of the
real_robot parameter (see section 3.2.2).
This command is grayed (i.e. you cannot execute it) until you load a configuration file. In addition, if
you plan to run evolution in simulation, you should first load an environmental file or you should define
an environment through the Parameters->Environments command.
While evolution is running the program will display at the bottom of the window the random seed,
the current population, the current individual, and the total fitness gathered by the current individual.
In addition, after the first generation, the program will display the best and average fitness of the
evolving populations throughout generations (the best and average fitness of the first population are
displayed in red and blue, the fitness of the second population is displayed in magenta and green).
The program will display this graph each generation but you can re-display it with the command
Display->Fitness. You might also display the robot and the environment and eventually the state of
selected variables throughout time by turning on the parameter drawindividual in the dialog box of
the command Parameters->Display (see also section 3.2.4).
You can stop the evolutionary process by pressing the right button of the mouse of with the Run>Stop command.
This command will automatically generate a set of files containing the genotype of the first and last
population of each replication and the genotype of the best individuals of each generation (by using
the following file names: GxPySz.gen and BqPySz.gen where x is the generation number, y is the
population number, z is the seed of the replication, and q is the 1 for the best individual, 2 for the
second best individual etc.). The command will generate a statSz.fit file (where z is the seed of the
replication) that contains the best and average performance of each population throughout
generations and a stat.fit file that contains the average results of all replications. Finally, for each
replication, the command will create a fitPySz.txt file (where y is the population number and z is the
seed of the replication) that contains the fitness gathered by each individual of each generation.
If the parameter Initial_generat. of the dialog box of the command Parameters->Evolution is on,
the program will automatically load the starting generation of each replication from the file/s
GxPySz.gen (where x is the Initial_generat., y is population, and z is the seed of the replication).
3.3.2 The Run->Test_Ind. command
This command tests a selected individual or two selected individuals in the case of co-evolutionary
experiments. The individuals that will be tested depend from the genotype currently loaded in memory
and from the current._ind parameter of the dialog box of the command Parameters->Populations.
This command is grayed (i.e. you cannot execute it) until you load a configuration file. In addition, if
you plan to run evolution in simulation, you should first load an environmental file or you should define
an environment through the Parameters->Environments command.
During the execution of the command the program will display the robot and the environment (in
the simulation mode) and eventually the state of selected variables throughout time (see section
3.2.4). In addition, if the parameter drawdata of the dialog box of the command Parameters>Display is on, the command will display at the bottom of the window the current epoch, the current
lifecycle, the current gathered fitness, and the total fitness gathered by the individual.
If you want to test the best individual/s of the last generation of an evolutionary run, load the
B1PxSz.gen file/s (where x is the number of the population and z is the seed of the replication) and
run the command (you do not have to set the current_ind parameter given that it is automatically set
with the id of the last loaded individual/s).
You can stop the command by pressing the right button of the mouse or with the Run->Stop
command.
3.3.3 The Run->Test_Best_Ind. command
This command is identical the Run->Test_Ind. command. The only difference is that the current_ind
parameters are automatically set by computing the Population->Current_Ind of the best individual/s
on the basis of the fitness data that can be displayed with the Display->Fitness command.
19
If you want to test the best individual/s of an evolutionary run, load the B1PxSz.gen file/s (where x
is the number of the population and z is the seed of the replication) and the file statSz.fit file (where z
is the seed of the replication) before executing the command. If you want to test the best individuals of
a master tournament, load the B1PxSz.gen file/s (where x is the number of the population and z is the
seed of the replication) and the masterSz.fit file (where z is the seed of the replication) before
executing the command.
3.3.4 The Run->Master_Tourn. command
This command can be used to test all the best individuals of each generation of a population against
all the best individuals of each generation of the competing co-evolving population.
The command will automatically load the genome of the best individuals from the files B1PySz.gen
(y is population, and z is the seed of the replication).
During the execution the command will display the average fitness of each individual of each
population (the performance of the first and second population will be displayed in red and magenta
respectively). These data will be saved in a masterSx.fit file (where x is the seed of the replication)
and in a master.fit file that will contains the average results of all replications. This file can loaded and
displayed later on with the File->Load and Display->Fitness commands. For each replication the
command will also save masterPxSz.map files (where P is the number of the population and z the
seed of the replication) that contains the performance of each individual against each competitor. This
data can be loaded with the File->Load command and are automatically displayed after the loading.
3.3.5 The Run->Sample_Object command
This command can be used to sample an object of the environment through the real robot sensors.
To run this command you should first connect the robot to your computer through a serial cable, set
the right serial port and communication speed and turn on the parameter real_robot with the
Parameters->Evolution command.
The command will open the dialog box shown in Figure 9 that contains the following parameters
and buttons:
Figure 9. The Run->Sample_Object dialog box
n._turns
current_turn
init_dist
interval
pause
wall
round
sround
light
GO
SAVE
The number of different distances from which you want to sample the
object.
The current distance in mm from which you are going to sample the object.
The initial distance in mm from which you are going to sample the object.
The interval in mm from each sampled distance
The pause in milliseconds between each time the state of the sensors is
stored in memory.
The object you are going to sample is a wall.
The object you are going to sample is a cylindrical object
The object you are going to sample is a small cylindrical object.
The object you are going to sample is a light.
Let the robot turn on the spot 181 times and stores the state of the sensors
each time. Pause should be set so to allow the robot to turn exactly 360
degrees.
Save the result of the sample in the corresponding .sam file.
20
END
Exit the sample procedure. You might use this button also to exit the dialog
box without performing any sample.
Coordinates are in millimeters.
On the left side you should specify the following parameters: the number of different distances
from which you want to sample the object (N._Turns, default value is 20, maximun allowed number is
30); the current turn you are going to perform (current_turn, default value is 0); the initial distance
between the robot and the object (init_dist, default value is 5mm); the interval distance between each
sampled distance (inter_dist, default value is 2mm); the pause in milliseconds between each time the
state of the robot sensors are stored in memory (pause, default value is 0)..
You should set: init_dist to the minimum distance that allows the robot to turn in place without
hitting the object to be sampled; N._Turns and inter_dist so to cover the whole range of distance in
o
which the sensors are activated by the object; pause so to allow the robot to turn exactly 360 with
181 actions (i.e. about 2 degrees for each action). In addition you should select the type of object that
you want to sample.
3.3.6 The Run->Test_Serial_Conn. command
This command can be used to test the robot and the serial connection. To run this command you
should first connect the robot to your computer through a serial cable, set the right serial port and
communication speed and turn on the parameter real_robot with the Parameters->Evolution
command.
The command will display graphically the shape of the robot, the state of the infrared and ambient
light sensors, the state of the infrared sensors placed on the bottom side of the robot (if present), the
state of 32 photoreceptors of the linear camera (if present), the state of the light-barrier sensor of the
gripper (if present).
Just below, the command will also display in a text format the state of the infrared and ambient
light sensors (see the "if:" and "al:"), the state of the two wheels ("we:)", the state of the infrared
sensor placed on the bottom side of the robot, if present ("bs:"); the state of the light barrier sensor of
the gripper if present ("lb:").
During the test the speed of the two wheels is set to 0.
3.3.7 The Run->Stop command
This command stops the Run->Evolution, Run->Test_Ind., Run->Test_Best_Ind., and Run>Master_Tourn. commands. It is equivalent to press the right button of the mouse.
3.4 The Display menu
Figure 10. The Display menu
The File menu contains 4 commands which are described below.
21
3.4.1 The Display->Sampled_Object command
This command display the samples of environmental objects currently loaded into the program
(please notice that the files wall.sam, round.sam, small.sam, and light.sam are automatically loaded
at runtime).
The command will ask you to select the object that you want to display and the will display a set of
grayscale maps for each sensor of the robot (i.e. for the 8 ambient light sensors in the case of light
and for the 8 infrared sensors in all other cases). White corresponds to the maximum activation and
black to null activation. Each map displays the activation state of the corresponding sensor for
different distances (y axis) and orientations (x axis). The command also displays at the bottom of the
window the n. distances actually sampled (n._turns), the initial distance of the samples in millimeters
(init_dist), and the distance between each sample distance in millimeters (inter_dist).
3.4.2 The Display->Fitness command
This command display the average and best fitness throughout generations or master tournament
between the best individuals of successive generations. This data is automatically generated by the
program with the execution of the Run->Evolution command or can be loaded from .fit files.
The fitness of the best individuals is displayed in red in the case of the first population and in
magenta in the case of the second population. The average fitness of the population is displayed in
blue in the case of the first population and in green in the case of the second population.
3.4.3 The Display->Input/Output_Maps command
This command place a individual at all different distances and orientation with respect to a wall and a
small round object (in simulation), set the state of the sensors, spread the activation through the
network, and display the activation state of the motors. In the case of individuals provided with the
gripper module and with the emergent modularity architecture, the command displays 4 sets of 5
maps. The first four maps of each set show the activation state of the left wheel, the right wheel, the
pick-up motor unit, the release motor unit respectively (the activation state is shown with blue, cyan,
magenta, and red for range between 0-0.25, 0.25-0.5, 0.5-0.75, 0.75-1.0 respectively). The fifth map
shows the combination of neural modules that is currently active (each of the 16 different possible
combination is shown with a different color). The first and the second column show the activation
corresponding the case in which the robot do not have or has an object in the gripper respectively.
The first and the second row correspond to the case in which the robot is placed in front of a wall or a
small cylindrical object. For each map, the x axis indicates different orientations and the y axis
indicates different distances.
In the case of individuals that do not have the gripper module, that do not rely on emergent
modularity architectures, or that are placed in environment that does not include small cylindrical
objects, only a subset of the data are displayed.
3.4.4 The Display->Clear_Window
This command cleans the window of the program
3.5 The Help menu
The Help menu includes a single command (Help->About) that gives general information about
Evorobot.
4 Compiling the software
Evorobot can be compiled with Microsoft Visual C 4.0 or higher. I did not include a project file or a
makefile into Evorobot packages because different versions of the compiler require different files
format. To create a project file you should (1) Issue the command File->New from your compiler,
select project workspace and standard application, (2) Insert files into the project workspace with the
22
command Insert->Files. You should insert all .c files and the box1.rc file, (3) Compile the program
with the Build->Filename command.
Acknowledgments
I thank Daniele Denaro who develop the low-level routines for the serial connection with the robot and
who helped me to develop the graphic interface and Davide Marocco.
References
Miglino O., Lund H. & Nolfi, S. (1995) Evolving mobile robots in simulated and real environments.
Artificial Life, 2:417-434.
Mondada R., Franzi E. & Ienne P. (1993). Mobile robot miniaturization: A tool for investigation in
control algorithms. In T.Y. Yoshikawa & F. Miyazaki (Eds.), Proceedings of the Third International
Symposium on Experimental Robots. Berlin, Springer-Verlag.
Nolfi S. and Floreano D. (2000). Evolutionary Robotics: The Biology, Intelligence, and Technology of
Self-Organizing Machines. Cambridge, MA: MIT Press/Bradford Books
Nolfi S., Floreano D., Miglino O. & Mondada F. (1994) How to evolve autonomous robots: different
approaches in evolutionary robotics. In R.A. Brooks & P. Maes (Eds.), Proceedings of the Fourth
International Conference on Artificial Life. Cambridge, MA: MIT Press.
23