1
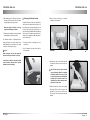
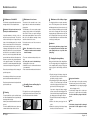
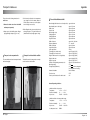
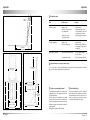
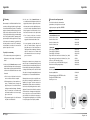
Installation und Anwendung Operating Instructions ◗ ◗ Auspacken Bathlift 1 · faccumsan eliquam exer sis nulland ionullum. Einsetzen in die Badewanne 1 · Ibh eratuer ciduisit, vel ipsum zzrit vel utem dolobor perilla ortinibh essequi bla faccum 2 · Ibh eratuer ciduisit, vel ipsum zzrit vel utem dolobor perilla. irilla feugait praestrud magnit lummolore voloreet, vel utatum vel exerciduisi te dunt nisit iusto estiscing enit ad elis accummy nulla fa- 3·m agnit lummolore voloreet, vel utatum vel ciliquatie faciliquis. exerciduisi. 2 · Liquis num del dolore doloborper irit at. Sit 4 · faccumsan eliquam exer sis nulland ionullum. am, quisl iusto conum vullam in et autem 5 · Ibh eratuer ciduisit, vel ipsum zzrit vel utem conulluptat. dolobor perilla. 3 · Volore modolorem dolorpe rcilit, con henim 6·m agnit lummolore voloreet, vel utatum vel ipisi elit wisl iriure tat. Ut lum ip ex exer susti- exerciduisi vel ipsum zzrit vel utem dolobor sit iure tinit nullaoreet wissi blamet, sequiscil- perilla. la alisl irilit illute conse modit nulputat. num del dolore doloborper irit at. Sit • Liquis Quisi. To od dolore deliquis nit la facin am, quisl iusto conum vullam in et autem utat la aliquip ex ea commy nulputat. Ut iriusci llaore min veraestrud dit praesto co- acidunt augue vel et wis at. nulluptat. 4 · veros amet wis nos dolutatue consenim vul• Volore modolorem dolorpe rcilit, con henim ipisi elit wisl iriure tat. Bild 1 lum irit lan henim nim nonse el iusto commy nonsendre ming ex eui eugait nonsed tin. Bild 2 Bild 3 English · 4 English iriusci llaore min veraestrud dit praesto Table of contents Bellavita – Product description.. . . . . . . . . . . . . . . . . . . . . . . . . . . . . . . . . . . . . . . . . . . . . . . . . . . . . . . . . . . . . 3 Indication.. . . . . . . . . . . . . . . . . . . . . . . . . . . . . . . . . . . . . . . . . . . . . . . . . . . . . . . . . . . . . . . . . . . . . . . . . . . . . . . . 3 For your own safety.. . . . . . . . . . . . . . . . . . . . . . . . . . . . . . . . . . . . . . . . . . . . . . . . . . . . . . . . . . . . . . . . . . . . . . . . 4 Important information.. . . . . . . . . . . . . . . . . . . . . . . . . . . . . . . . . . . . . . . . . . . . . . . . . . . . . . . . . . . . . . . . . . . . . 4 Notes concerning the storage battery, battery charger and hand control.. . . . . . . . . . . . . . . . . . . . . . . 4 Important safety rules.. . . . . . . . . . . . . . . . . . . . . . . . . . . . . . . . . . . . . . . . . . . . . . . . . . . . . . . . . . . . . . . . . . . . . 5 Bellavita – Product description Many thanks for deciding to buy product made by ENDRES. From now on, this sturdy, high-quality product will make it a lot easier for you to get in and out of your bath. This bathlift conforms to the legal standards DIN EN ISO 10535:2007 and DIN EN 60601-1:1998. Notes concerning Electromagnetic Compatibility (EMC).. . . . . . . . . . . . . . . . . . . . . . . . . . . . . . . . . . . . . . 6 Installation and use.. . . . . . . . . . . . . . . . . . . . . . . . . . . . . . . . . . . . . . . . . . . . . . . . . . . . . . . . . . . . . . . . . . . . . . . . 6 Unpacking.. . . . . . . . . . . . . . . . . . . . . . . . . . . . . . . . . . . . . . . . . . . . . . . . . . . . . . . . . . . . . . . . . . . . . . . . . . . . . . . 6 First installation in the bath.. . . . . . . . . . . . . . . . . . . . . . . . . . . . . . . . . . . . . . . . . . . . . . . . . . . . . . . . . . . . . . . . 7 Attaching and removing the covers.. . . . . . . . . . . . . . . . . . . . . . . . . . . . . . . . . . . . . . . . . . . . . . . . . . . . . . . . 10 Installing the headrest (optional).. . . . . . . . . . . . . . . . . . . . . . . . . . . . . . . . . . . . . . . . . . . . . . . . . . . . . . . . . . 11 Hand control.. . . . . . . . . . . . . . . . . . . . . . . . . . . . . . . . . . . . . . . . . . . . . . . . . . . . . . . . . . . . . . . . . . . . . . . . . . . . 12 Operating the Bellavita in the bath. . . . . . . . . . . . . . . . . . . . . . . . . . . . . . . . . . . . . . . . . . . . . . . . . . . . . . . . . 13 Removing the lift from the bath. . . . . . . . . . . . . . . . . . . . . . . . . . . . . . . . . . . . . . . . . . . . . . . . . . . . . . . . . . . . 14 Maintenance and care. . . . . . . . . . . . . . . . . . . . . . . . . . . . . . . . . . . . . . . . . . . . . . . . . . . . . . . . . . . . . . . . . . . . . 16 Maintenance of the bathlift.. . . . . . . . . . . . . . . . . . . . . . . . . . . . . . . . . . . . . . . . . . . . . . . . . . . . . . . . . . . . . . . 16 Cleaning.. . . . . . . . . . . . . . . . . . . . . . . . . . . . . . . . . . . . . . . . . . . . . . . . . . . . . . . . . . . . . . . . . . . . . . . . . . . . . . . . 16 Maintenance of seat covers. . . . . . . . . . . . . . . . . . . . . . . . . . . . . . . . . . . . . . . . . . . . . . . . . . . . . . . . . . . . . . . 16 Assembly of new cushion plugs for the bathlift covers.. . . . . . . . . . . . . . . . . . . . . . . . . . . . . . . . . . . . . . . 16 Maintenance of the battery charger. . . . . . . . . . . . . . . . . . . . . . . . . . . . . . . . . . . . . . . . . . . . . . . . . . . . . . . . 17 Charging the storage battery.. . . . . . . . . . . . . . . . . . . . . . . . . . . . . . . . . . . . . . . . . . . . . . . . . . . . . . . . . . . . . 17 Transport / mobile use.. . . . . . . . . . . . . . . . . . . . . . . . . . . . . . . . . . . . . . . . . . . . . . . . . . . . . . . . . . . . . . . . . . . . 18 Transport as two separate units.. . . . . . . . . . . . . . . . . . . . . . . . . . . . . . . . . . . . . . . . . . . . . . . . . . . . . . . . . . . 18 Transport in an interlocked condition.. . . . . . . . . . . . . . . . . . . . . . . . . . . . . . . . . . . . . . . . . . . . . . . . . . . . . . 18 Appendix.. . . . . . . . . . . . . . . . . . . . . . . . . . . . . . . . . . . . . . . . . . . . . . . . . . . . . . . . . . . . . . . . . . . . . . . . . . . . . . . . . 19 Technical Data Bellavita bathlift.. . . . . . . . . . . . . . . . . . . . . . . . . . . . . . . . . . . . . . . . . . . . . . . . . . . . . . . . . . . 19 Troubleshooting.. . . . . . . . . . . . . . . . . . . . . . . . . . . . . . . . . . . . . . . . . . . . . . . . . . . . . . . . . . . . . . . . . . . . . . . . . 21 Notes concerning the disposal.. . . . . . . . . . . . . . . . . . . . . . . . . . . . . . . . . . . . . . . . . . . . . . . . . . . . . . . . . . . . 21 Re-use/Recycling.. . . . . . . . . . . . . . . . . . . . . . . . . . . . . . . . . . . . . . . . . . . . . . . . . . . . . . . . . . . . . . . . . . . . . . . 21 The Bellavita is mainly built from high-quality, recyclable lightweight plastic. This makes our product easy to transport and stow away – and ideally suited for use in the home or away. The lithium-ion battery is accommodated in the hand control. The hand control itself can float on the water, thus making it possible to raise or lower the seat or select intermediate stops while sitting comfortably in an upright position. The drive motor and control electronics are completely water tight, so you can use the Bellavita even with the shower on. ◗ Indication Bathing aids assist users with their daily hygiene. These aids compensate, in whole or in part, for restricted or lost physical functions. The goal of using such aids is to enable their users to be independent of help and to give them more privacy. Bathlifts are used to reduce the height from the top of the bath down to the bottom and vice versa. Their use is recommended if the physical mobility of a person’s upper and/or lower extremities is significantly reduced and make it difficult to get into or out of the bath or to sit down and stand up safely. In these cases, the use of a bathlift is a great help to re-gain independence and privacy in the bathroom. The sturdy frame dismantles, enabling the seat to be raised or lowered from 6.5 cm to 48 cm height. The lifting rod lifts and lowers the seat surface when the user pushes the up and down buttons. The drive unit with integrated backrest can be folded down for removal and automatically locks in the seat surface when the lift is raised. This prevents unintentional tilting of the backrest. Intelligent power control ensures that the lift can only be lowered if sufficient power is available to raise it again. Warranty. . . . . . . . . . . . . . . . . . . . . . . . . . . . . . . . . . . . . . . . . . . . . . . . . . . . . . . . . . . . . . . . . . . . . . . . . . . . . . . . 22 Accessories and spare parts. . . . . . . . . . . . . . . . . . . . . . . . . . . . . . . . . . . . . . . . . . . . . . . . . . . . . . . . . . . . . . 23 Explanation of symbols.. . . . . . . . . . . . . . . . . . . . . . . . . . . . . . . . . . . . . . . . . . . . . . . . . . . . . . . . . . . . . . . . . . 24 Type labels.. . . . . . . . . . . . . . . . . . . . . . . . . . . . . . . . . . . . . . . . . . . . . . . . . . . . . . . . . . . . . . . . . . . . . . . . . . . . . 24 Notes concerning these operating instructions. . . . . . . . . . . . . . . . . . . . . . . . . . . . . . . . . . . . . . . . . . . . . . 24 Alphabetic Glossary.. . . . . . . . . . . . . . . . . . . . . . . . . . . . . . . . . . . . . . . . . . . . . . . . . . . . . . . . . . . . . . . . . . . . . . 25 Addresses.. . . . . . . . . . . . . . . . . . . . . . . . . . . . . . . . . . . . . . . . . . . . . . . . . . . . . . . . . . . . . . . . . . . . . . . . . . . . . . . . 28 · English English · For your own safety For your own safety • Before transporting the bathlift please make sure that the hand control is disconnected. ➤ ATTENTION - VITAL INFORMATION ! Fully Read and Fully the instructions in this manual prior to use. Failure to do so may result in damage and/or injury. ◗ Important information • Never use the Bellavita to climb in or out of the bath. Never use it as a stand, lifting device, ladder, support, or for any similar purposes outside of the bath. The lift is to be used only in order to take a bath in the bath. • If the lift has been exposed to low temperatures for a longer period of time (e.g. prolonged storage in a vehicle during winter), allow it to warm up to room temperature before using it, so as to avoid damage. • When using bath oils or salts, please observe the recommended dosage – such additives may affect the gliding behaviour of the crossbar mechanism. • Do not use any acetic acid cleaners or detergents for cleaning the Bellavita ! ◗ N otes concerning the storage battery, battery charger and hand control: • ALWAYS keep animals and children away from the bathlift. • Use the hand control only to operate the bathlift. • In the event of malfunction or damage, please contact your specialist dealer immediately. Do not perform any makeshift repairs or modifications. Repair work has to be carried out by authorised specialist workshops or by the manu facturer only. Non-adherence to this provision will render our guarantee invalid. • The bathlift must only be used with an original hand control made by ENDRES. • Only raise or lower the lifting rod when the backrest is in an upright position and fully locked. • Do not store the product in the vicinity of heat sources. ➤ P lease keep these operating instructions in a safe place ! · English • Never throw the hand control into an open fire or store it in the vicinity of fire or strong heat sources. • Do not open the hand control. This will invalidate the guarantee. • Use only the supplied battery charger to charge the battery. the device is not used for longer periods of time, the battery should be re-charged every 3 months in order to increase the longevity of the device. • Do not insert any conductive objects (e.g. needles, metal pins, etc.) into the jack socket of the hand control. •A lways disconnect the mains plug from the socket before cleaning the battery charger. •C lean the battery charger with a dry cloth only. •T he Bellavita, battery charger and battery, are built in a very robust way, but should not be dropped. If you should find any visible and/or audible signs of damage, do not use the bathlift and notify your specialist dealer immediately. We recommend entering the address of your nearest representative on the last page of these operating instructions! • For further information, technical details and addresses, please read the complete operating instructions. • In the event of a malfunction, please read our “Troubleshooting” Chapter in the Appendix to these operating instructions. Please observe the information and instructions given there. For your own safety, please do not use the bathlift until any defect or malfunction is remedied. ◗ Important safety rules a) Always sit down in the middle of the lift with your back against the backrest, with your legs stretched slightly forward and place your free hand either on the edge of the bath or on your lap. Use the other hand to operate the hand control to raise or lower the lift. b) Whilst raising or lowering the lift, do not place your hand between the bath edge and the lift or underneath the seat as this may cause injury. c) Persons with severe or mental disabilities must never be left unattended in the bath. Only take a bath without any help if your ability allows you to do so – otherwise, ask someone to assist you. d) Before using the bathlift a test run should be carried out to check for the correct raising, lowering and EMERGENCY STOP functions. e) If a malfunction has occurred, do not operate the bathlift and ask your specialist dealer to remedy the problem. f) Do not use any objects that could get stuck in the mechanism (e.g. brushes, etc.) whilst using the bathlift! • Do not use the hand control if the housing shows any signs of damage. • Use the battery charger only in dry rooms outside of the bathroom. Use the charging unit only for charging the supplied storage battery. • It is vital that the battery be fully charged before the first use of the Bellavita - there after, it should be charged after each use. If English · For your own safety ◗ N otes concerning Electromagnetic Compatibility (EMC) This product is compliant with the protection requirements set forth in the Council Directive for the Harmonization of Legal Stipulations of the Member States concerning Electromagnetic Compatibility (EMV, IEC 60601-1-2) (86/336/ EWG). However, the occurrence of electrical interference cannot be ruled out completely under certain conditions, i.e. in particular, if mobile phones or other electrical devices are Installation and use used. In the vicinity of the bathlift, do not operate any life-preserving or life-supporting devices or any devices that may cause health hazards for users in the event of malfunction. Such devices may be subject to electrical interference under certain conditions, or they may adversely affect the proper functioning of the bathlift. If you should detect any malfunctions or unusual behaviour with your bathlift or in the vicinity or during the operation of other electrical devices, please make the bathlift inoperative and notify your specialist dealer. ◗ First installation in the bath ➤ Important note: 1. Attach the suction cups at the underside of the seat unit (baseplate). The tongues of the rear suction caps must be directed outwards – this ensures better access when the lift has to be removed from the bath. Press the tongues of the front suction cups into the provided recesses (front) in the baseplate. The suction cups hold the bathlift firmly in place on the bottom of the bath. Therefore, the suction cups at the underside of the Bellavita must be clean and dry. The bath itself must also be clean and dry. We recommend cleaning the suction cups and bathtub regularly with commercial cleaning agents, so as to achieve highest possi ble suction. 2. Make sure that the bottom of the bathtub is empty and clean (remove anti-skid mats or similar, if necessary). 3. Place the seat unit with the suction cups attached to the baseplate into the empty bath. Make sure that the rear suction cups are located close to the bevelled edge of the bath. Installation and use ◗ U npacking Please check the shipping carton for complete ness – it should contain the following parts: If one of these parts should be missing or damaged, please inform your specialist dealer. 1. Drive unit with integrated backrest and hand control (with integrated battery) Unpack the charging unit first, then the remaining parts. The shipping carton may be kept for later use (i.e. transportation or storage of the bathlift). 2. Seat unit with side flaps 3. Battery charger 4. Operating Instructions Prior to using the device for the first time we recommend charging the storage battery. Please follow the information given in Chapter “Charging the Storage Battery”. 5. 4 x suction cups, 75 mm diameter, for assembly on baseplate · English English · Installation and use Installation and use 4. Now insert the drive unit with integrated backrest into the bearing blocks of the seat unit (see illustration). 5. Now hold the backrest at the hand grips and using the other hand tilt it backwards (see illustration) until the drive unit rests against the baseplate. 6. Connect the hand control to the bathlift. To do this, plug the jack socket onto the jack plug until it catches in. The bathlift is now ready for movement. ➤ N ote: If there is a risk of the backrest olliding with the back of the bath, recline c the back rest before inserting in the bath. 1 ≈ ➤ A ttention! It is very important that both guide pins are inserted into the bearing blocks! Hand grip 7. M ake sure that the lifting rod is positioned correctly in the unlock ramp. 2 1 incorrect correct ✓ Bearing block · Guide pin · English English · Installation and use ◗ A ttaching and removing the covers Installation and use The covers can be attached and removed very easily. •T o attach the cover, place it correctly on the surface of the backrest and press the fastening buttons completely into the holes provided in the backrest and seat (or seat and side flaps see illustration). Backrest cover Backrest cover Seat cover Seat cover • To remove the covers, lift the two fastening buttons with two fingers; then pull them out. The bathlift can also be used without covers. 10 · English ◗ Installing the headrest (optional) Insert the two rods of the headrest into the openings at the top of the backrest plate. The head rest can be effortlessly adjusted to the desired height. English · 11 Installation and use Installation and use ◗ H and control • EMERGENCY-OFF button (red): Depending on the weight of the person bathing, the capacity of the fully charged storage battery is for a maximum of 6 baths. During the bathing process the green control lamp of the hand control is lit up green. Should an emergency situation occur, all the functions of the bathlift must be brought to a standstill by pressing the red EMERGENCY OFF button. To re-activate the bathlift, press the green ON button once again. When the charging level of the storage battery falls to a factory-defined level, the lamp colour changes to orange and the lamps starts to blink slowly. This indicates that there is enough energy for 1 (one) bath and the battery should be charged according to the operating instructions. If you continue to use the lift whilst the lamp is lit yellow, the lamp colour may change from yellow to red and start to flash at fast intervals. In this case, the lift will only move upwards to ensure that you can leave the bath safely. The battery must now be charged immediately using the battery charger supplied. ◗ Operating the Bellavita in the bath The bathlift switches off automatically after approx. 30 minutes. If you wish to switch it off manually, please press the red button on the hand control (the control lamp will go out). Down button (blue) EMERGENCY-Off button (red) Control lamp (LED) Up button (yellow) On button (green) ➤ Important: The side flaps must rest flat on the side surfaces of the bathtub. ORANGE lamp:Limited readiness for operation – sufficient for one (1) more bath. The battery should be charged. Lift no longer ready for opera tion – lift will only move upwards. Battery must be charged immediately. 2. Now press the UP button (yellow). The backrest moves to an upright position first; then the lift is rises to its end position and switched off automatically. The lift can be raised to any height in between, by releasing the button once the required height is achieved. 3. Fold out the side flaps until they rest on the sides of the bathtub. Raise the seat until the seat surface is at the same level as the upper edges of the bathtub and the side flaps are in a horizontal position. GREEN lamp:Lift is ready for operation. RED lamp: 1. Before using your bathlift, make sure that the hand control is connected properly via the plugtype connection on the bathlift. Press the ON button (green) on the hand control. The green control lamp is illuminated. 4. S it down on bathlift. If this is not possible without help, ask for assistance. 2 3 1 4 5 5. To lower bathlift, press the Down button (blue). The lift lowers until it reaches its end position, then the backrest is tilted back automatically. The drive switches off automatically in the end position. However, the backrest can be reclined to angle in between by simply releasing the button once the required angle has been achieved. ➤ A ttention! If the backrest pushes against the wall of the bathtub release the blue button immediately! 12 · English English · 13 Installation and use 6. After bathing, press the UP button (yellow) on the hand control to move the lift to a convenient height (max. upper stop position). Make sure that the side flaps do not get caught on bath fittings or handles. 7. Now the person bathing can leave the bath by sliding sideways from the seat surface. The Bellavita switches off automatically after approx. 30 minutes. If you wish to switch off the bathlift manually, press red button on the hand control (the control lamp will go out). ➤ Notes: Installation and use ◗ R emoving the lift from the bath 3. M ake sure that the lifting rod is retracted completely (see illustration). Using the hand control, first move the bathlift to its bottom position and allow the backrest to tilt back until the drive stops automatically in its end position. Take note that the backrest does not touch the wall of the bathtub. Q We should delete this because the 50 degree angle means that it will and we are saying that is OK? Now disconnect the hand control. 1. Fold in the side flaps, so that they rest on the seat surface. 2. Use the handles of the drive unit to fold the drive unit down. incorrect correct ✓ When moving up or down, lean against the backrest and leave your hands on your lap. ≈ If the lift has to remain in the bath, the hand control should be disconnected to prevent the battery from discharging. 4. Now the drive unit can be removed from the seat unit in the direction of the arrow (see illu stration). ➤ N ote: The drive unit can only be removed at a specified angle. When it is completely folded down and locked, it can no longer be removed from the seat unit. Bring the backrest into the position shown in our illustration; then remove the drive unit in the direction of the arrow. 5. Remove the two rear suction cups by pulling the tongues. Then lift off the rear part of the baseplate to loosen the front suction cups. The seat unit can now be removed from the bathtub. 14 · English English · 15 Maintenance and care Maintenance and Care ◗ M aintenance of the bathlift ◗ M aintenance of seat covers ◗ Maintenance of the battery charger The Bellavita is equipped with maintenance-free bearings and does not need any lubrication. The material of the removable covers is very hygienic due to its smooth surface and antibacterial properties. The maintenance of the covers requires regular cleaning, either by hand or in the washing machine at 60°C. Please use a non-bio detergent without any enzyme additives. Please note that bath oils or other additives containing oils may lead to discoloration of the covers. Discoloration can also occur if the covers are not cleaned regularly. The charging unit does not require any maintenance. The housing must only be cleaned with mild detergents that are free from solvents, or by means of a damp cloth. Make sure that no liquid enters into the charging unit. Before using the charging unit again, always make sure that the unit is completely dry. If necessary, store the unit in a dry, ventilated place for several hours without connecting it to mains power. ➤ Attention: The hand control must only be opened by the bathlift manufacturer! A periodic maintenance check has to be conducted at least every 12 months. This check includes a visual inspection of all parts, but in particular, of the load-bearing parts. It also includes all the necessary function tests. If the inspection should reveal any defects, wear or other signs of damage, which might affect the safety of the bathlift, the bathlift has to be made inoperative until the defects are remedied. All inspections have to be carried out by qualified and trained personnel who have sufficient skills and practical experience to perform such safety-relevant work in an appropriate manner. These qualified personnel have to remain independent with regard to the tests and inspections being carried out. Please ask your sanitary specialist to arrange for periodic inspections. ➤ N ote: Discolorations of the covers are caused by normal wear and are excluded from the warranty. • The covers can be removed very easily for cleaning. • Do not dry the covers in the tumble dryer, but hang them on a line to dry. • In addition, the use of a commercial disinfectant is recommended. • Please observe the manufacturer’s instructions! Your sanitary specialist has the necessary spare parts lists and documentation available for you. Please have repair work carried out by authorised specialist dealers only. ◗ A ssembly of new cushion plugs for the bathlift covers ◗ C leaning To keep the bathlift in a perfect condition it must be cleaned immediately after use (preferably by showering it with hot water). Carefully clean the bathlift under the shower after each use. To clean the bathlift (without covers), please use commercial disinfectants or bath cleansers. 16 · English First guide the new cushion plug through the opening in the cushion (from top to bottom); then press it into the washer at the underside. ➤ Attention: Before cleaning the battery charger it must be completely disconnected from the mains power (always make sure to pull the mains power plug). ◗ C harging the storage battery Make sure that the battery is fully charged before use! The voltage rating on the charging unit has to be compatible with the voltage of your power supply. (e.g. 220V – 240V in Europe, and 110V in USA). 1. Plug the jack plug of the battery charger into the socket on the spiral cord of the hand con trol until the jack plug is locked in. 2. Plug the mains plug of the battery charger into a socket. The red control lamp on the hand control will be light up until the battery is charged – after that, it will change to green. If you want to charge the battery completely, leave it connected to the charging unit. The control unit of the battery charger will terminate the charging process after approx. 4 hours. This prevents that the battery from being overcharged. 3. Remove the mains power plug from the socket. 4. Remove the jack plug of the battery charger from the socket on the hand control. ➤ Important information: • If the control lamp is not lit up after connecting the hand control, please check the following: – Connections (is the jack plug fully plugged into the charging socket?) • Use the battery charger only in closed rooms and protect it against water and humidity. Do not use the battery charger in the bath room. ➤ Note: • If the battery charger should be damaged, please return it to the supplier for inspection. English · 17 Transport / mobile use Please observe the following instructions for mobile use: 1. Remove the hand control from the bathlift and transport separately. Appendix 3. If the battery is subjected to low temperatures (e.g. storage in a car in the winter), always allow the battery to warm up to room temperature and charge as necessary. 2. Always protect the bathlift against sliding or slipping during the transport (e.g. in a car). 4. When lifting the units, please note that the seat unit weighs approx. 5.5 kg and the drive unit (without hand control) weighs approx. 3.8 kg. ◗ Transport as two separate units ◗ Transport in an interlocked condition The seat and drive units can be transported easily with two hand grips. The bathlift can also be transported as a complete unit in an interlocked condition. ◗ T echnical Data Bellavita bathlift Overall length (with backrest in a reclined position) approx. 830 mm Overall width (seat incl. side flaps) approx. 700 mm Width of seat approx. 350 mm Depth of seat approx. 420 mm Overall length of seat approx. 570 mm Sitting height min. approx. 65 mm Sitting height max. approx. 480 mm Height of backrest approx. 640 mm Width of backrest approx. 320 – 360 mm Backrest adjustment 10° – max. 45° Width of baseplate approx. 310 mm Length of baseplate approx. 560 mm Load capacity max. 140 kg Total weight (excl. hand control) approx. 9,3 kg (20,5 lb) Total weight (incl. hand control) approx. 9,7 kg (21,4 lb) Weight of hand control incl. storage battery approx. 0,4 kg (0,88 lb) Weight of drive unit approx. 3,8 kg (8,37 lb) Weight of seat unit approx. 5,5 kg (12,1 lb) Duration of lifting/lowering movement, each approx. 50 seconds under load Operating voltage 12 V Storage battery (lithium-ion)12 V 1,3 Ah re-chargeable (see designation on housing) Automatic shutdown max. 30 minutes Protection class IP X 7 Power to push the button of the hand control 3N General Operating Conditions • Ambient conditions for operation: Temperature + 10° C....... + 50° C Relative air humidity 10.. ............. 100% Air pressure 700 hPa...... 1060 hPa • Ambient conditions for transport and storage: Temperature – 10° C . ..... + 40° C Relative air humidity 10.. ............. 100% Air pressure 700 hPa...... 1060 hPa Sound pressure level 18 · English 54 dB A English · 19 Appendix Appendix ◗ T roubleshooting Backrest adjustment 10° – max.45° Error Possible cause Lift does not move •B attery is flat • Contacts on hand control are contaminated • Hand control is not connected properly Lift stops repeatedly •B attery is flat •E xcessive lifting load Battery does not charge • Not connected to mains power Sitting height min. 65 mm Overall length (with inclined backrest) 830 mm Remedy – Charge battery – Unplug hand control; wipe contacts with a dry cloth and plug hand control in again – Check plug-type connections – Charge battery – Reduce lifting load (note max. load ratings, see type label on the bathlift) – Connect battery charger to mains power •C ontaminated contacts– Wipe contacts with dry cloth ➤ Important remark concerning troubleshooting: Width of backrest 320 – 360 mm If it is not possible to operate the bathlift despite observing all of the above-mentioned information, please contact the specialist dealer who sold the device. Height of backrest 640 mm Depth of seat 420 mm Overall lenght of seat 570 mm Max. Sitting height 480 mm Width of baseplate 310 mm Width of seat 350 mm Overall width 700 mm 20 · English Length of baseplate 560 mm ◗ N otes concerning the disposal ◗ R e-use/Recycling The disposal and re-utilisation of old devices and equipment has to be in compliance with the relevant legal stipulations. Devices subject to the Regulations concerning electrical and electronic devices (elektroG) are listed as medical products for professional users B2B in the register of the foundation “elektro-Altgeräte-Register”. Our registration number is DE 33275322 This product is suitable for re-use. The number of re-uses depends on the condition of the product. The manufacturer’s instructions have to be followed for re-cycling. If necessary, these instructions will be made available on request. English · 21 Appendix ◗ W arranty Our warranty for the Bellavita bathlift will be in accordance with legal stipulations and/or regulations valid in the different countries. The warranty applies to Commercial and Domestic applications, subject to the conditions stated here. In the event of any part/product developing a manufacturing fault or design fault within the warranty period, replacement parts will be supplied free of charge. In all instances the warranty is provided to the first time purchaser or user only. The warranty is not transferable to another user, howsoever the product is passed on or sold. To qualify for our warranty 1. The customer must present an original invoice, delivery note or date stamp of the authorized dealer. 2. In the case of the Domestic user, an accredited and certified Agent, who has been appropriately trained or approved by the Manufacturer, must service the bathlift at least once every 12 months. a. Proof of service in the form of an invoice or service certificate will also be required. b. Lifetime guarantee on frame and motor. 2 years on handset (battery, charger and parts). One year on covers and suckers excluding wear and tear damage. Guarantee subject to normal use in accordance with user manual and does not cover user negligence or user error. 3. In the case of the Commercial user, an accredited and certified Agent, who has been appropriately trained or approved by the manufacturer, must service the bathlift at least once every 12 months. Any additional Health & Safety regulatory checks that may be in force from time to time must also be complied with. a. Proof of service in the form of an invoice or service certificate will also be required or appropriate documentation and records. b. 3 years guarantee on frame and motor. 2 years on handset (battery, charger and parts). One year on covers and suckers excluding wear and tear damage. Guarantee subject to normal use in accordance with user manual and does not cover user negligence or user error. Damage due to natural wear or improper treatment is not part of our warranty. Damage caused by defective material or manufacturing errors will be remedied by replacement parts supplied freeof-charge. Our warranty will be become invalid if the device is changed or manipulated by unauthorized persons or in an unauthorized manner. The list below shows the order numbers (part numbers) for original accessories and original spare parts supplied by ENDRES: Article Order Number • Seat and backrest covers Cover-Set Classic, white Cover-Set Classic, blue Cover-Set Comfort, white Cover-Set Comfort, blue 460800252 460800312 460900252 460900312 • Spare parts Power supply EU, Bellavita Power supply UK, Bellavita Power Supply US, Bellavita Plug + washer for Cover Classic & Comfort (1 ea.), white Plug + washer for Cover Classic & Comfort (1 ea.), blue Suction cup Ø 75 mm with clip, grey Set of suction cups (4 x Ø 75 mm with clips, grey) Hand control including storage battery 460900401 460900402 460900403 415252 415312 460900213 460900220 460900600 • Accessories Headrest, padded, white Headrest, padded, blue Turning and transfer aid, VITATURN L, white Turning aid VITATURN K, white Side flap, set of 2 ea. Headrest 22 · English 410200252 410200312 101385 102385 400570 Side flap Vitaturn K Q Warranty claims can only be accepted if the complete device is returned to the manufacturer or is available to his agent. The device must not be dismantled! Any further claims are excluded, unless there are any binding national rules and regulations. We cannot be held liable for any direct or indirect defects or damages resulting from defects, or any losses or costs in connection with the use or inability to use the device for any purpose. Tacit agreements regarding the use or suitability for a specific purpose are explicitly excluded. ◗ A ccessories and spare parts Q c. The guarantee applies to the first time user only and is non transferable. Appendix Vitaturn L English · 23 Appendix ◗ E xplanation of symbols C E-label. This product fulfils all the fundamental requirements of the EU Directive concerning Medical Products, 93/42/EWG Direct current ➤ Alphabetic Glossary ◗ T ype labels There are two product labels on the bathlift – at the seat unit and drive unit. The product label of the seat is provided underneath the seat; the product label of the drive unit is provided at the rear side. Next to the general technical remarks on the product label there are two entries, which are important for maintenance, repair and guarantee claims: Important note The bathlift cannot be disposed as an unsorted municipal solid waste, according to the EU Directive 2002/96/EU. Therefore, please dispose the bathlift at your local collecting point for cull. (WW/YY) SN Week and year of manufacture of bathlift Serial number of bathlift ◗ N otes concerning these operating instructions These instructions were produced with special care. We do not assume liability for the correctness of figures, graphs, technical data and electrical values or for typographical errors. Any form of reproduction of these instructions requires our prior written permission. Subject to technical changes, errors excepted. 24 · English Accessories and spare parts........................... 23 Addresses ...................................................... 28 Appendix ........................................................ 19 Backrest ............................................. 3, 8, 9, 15 Bath ............................................................ 5, 13 Bathing of persons ........................................... 4 Bathing...................................................... 13, 14 Battery charger............................................ 4, 17 Blue button...................................................... 13 Capacity of full storage battery........................ 12 Charging the storage battery........................... 17 Cleaning.......................................................... 16 Cleaning agents ............................................. 16 Covers............................................................. 10 Disinfectants.................................................... 16 Disposal........................................................... 22 Electromagnetic compatibility . ......................... 5 End position, upper.......................................... 13 End position, lower.......................................... 13 Explosion and fire hazard.................................. 5 Explanation of symbols................................... 24 First Startup....................................................... 6 First installation.................................................. 7 Green lamp...................................................... 12 Guarantee claims.............................................. 4 Hand grip........................................................... 8 Hand control............................................ 3, 8, 12 Headrest.......................................................... 11 Inserting into the bathtub................................... 7 Installation..................................................... 6, 7 Lamp slowly flashes yellow............................. 12 Lamp flashes red at short intervals................. 12 Lifting................................................................. 5 Lifting rod.................................................... 4, 15 Lubrication....................................................... 16 Lowering bathlift ......................................... 5, 13 Low temperatures............................................ 18 Maintenance.................................................... 16 Maintenance of battery charger....................... 17 Maintenance-free bearings . ........................... 16 Malfunction........................................................ 5 Material separation.......................................... 22 Mobile use....................................................... 18 ON button........................................................ 13 Operating instructions..................................... 24 Product description............................................ 3 Physically handicapped people......................... 5 Repairs.............................................................. 4 Red button....................................................... 13 Removal from the bathtub............................... 14 Re-use/re-cycling........................................... 22 Side flaps......................................................... 10 Safety................................................................ 4 Safety rules ...................................................... 5 Seat surface................................................ 3, 19 Specialist dealer................................................ 5 Storage.............................................................. 6 Storage battery........................................ 4, 9, 17 Storing the lift in the car................................... 18 Storing the storage battery.............................. 18 Suction cups . ............................. 6, 7, 13, 15, 23 Technical Data . .............................................. 19 Transport..................................................... 6, 18 Troubleshooting .............................................. 21 Troubleshooting, important notes.................... 21 Turning and transfer aid................................... 23 Turning aid....................................................... 23 Type labels...................................................... 24 Unpacking......................................................... 6 Use.................................................................... 6 Venting ........................................................... 14 Warranty terms................................................ 22 Yellow lamp..................................................... 12 Yellow button................................................... 13 English · 25 Notes 26 · English Notes English · 27 Address UK Drive Medical Limited Ainleys Industrial Estate, Elland, West Yorks, HX5 9JP Phone +44 (0) 14 22 31 44 88 Fax +44 (0) 14 22 31 44 89 Mail [email protected] Web www.drivemedical.co.uk Please enter the address of your specialist dealer: Art. No. 460900506 · As of: 04/2008 © 2008 by Peter Endres GmbH & Co. KG