1
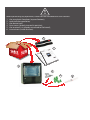
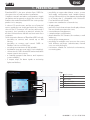
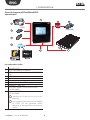
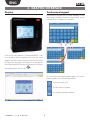
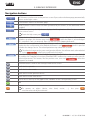
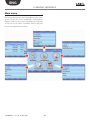
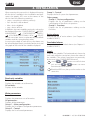
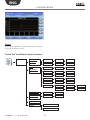
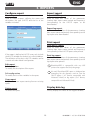
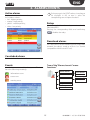
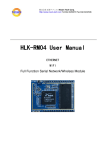
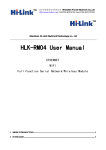
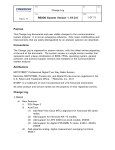
PlantWatchPRO supervisor for small-medium installations 30/06/2006 i 30/06/2006 i i 30/06/2006 i 06 X X i i 06 06 30/06/20 06 30/06/20 006 30/06/20 06 i 30/06/20 30/06/20 30/06/2 i 30/06/2006 30/06/2006 X 16:36:16 16:36:16 16:36:16 16:36:16 16:36:16 16:36:16 16:36:16 16:36:16 16:36:16 16:36:1 6 16:36:1 6 i i 30/06 /2006 30/06/20 06 30/06 /2006 X i /2006 X 16:36:16 16:36:1 6 16:36:1 6 16:36:1 6 16:36:16 16:36:16 16:36:16 16:36 :16 16:36 :16 16:36:16 16:36:16 30/06/2006 i 30/06/200 6 30/06/200 6 30/06/20 06 30/06/20 06 30/06/2 006 30/06/2 006 30/06/2 006 30/06/2 006 30/06/ 2006 30/06/2 006 i i X X i i /2006 30/06 i X i i i i 2006 2006 /2006 i 006 006 30/06/ i 06 30/06/2 30/06 30/06 i 30/06/20 30/06/2 30/06/ X 16:36:16 16:36:16 16:36:16 16:36:16 16:36:16 16:36:16 16:36:16 16:36:1 6 16:36:1 6 16:36: 16 16:36: 16 30/06/200 6 i 30/06/20 30/06 30/06/20 06 /2006 30/06/ 2006 i 16:36:16 i 16:36:1 30/06/2 2006 2006 30/06 /2006 30/06 /2006 30/06 /2006 30/06 /2006 i X X i i 006 006 30/06/ 30/06/ i 30/06/2 30/06/2 i 006 i 006 30/06/2 X i i X X i i 006 006 2006 2006 i 006 006 30/06/ 30/06/ i 06 30/06/2 30/06/2 30/06/2 i 06 30/06/20 30/06/2 X 16:36:16 16:36:16 16:36:16 16:36:16 16:36:16 16:36:1 6 16:36:1 6 16:36: 16 16:36: 16 16:36 :16 16:36 :16 6 16:36:1 6 16:36:1 6 16:36:1 6 16:36:1 6 16:36:1 6 16:36 :16 16:36 :16 16:36 :16 16:36 :16 User manual LEGGI E CONSERVA QUESTE ISTRUZIONI READ AND SAVE THESE INSTRUCTIONS Integrated Control Solutions & Energy Savings ENG Content 1. presentation 5 2. KEY 7 3. GRAPHIC INTERFACE 8 Display..................................................................................8 Touchscreen keypad..........................................................8 Navigation buttons............................................................9 Main menu........................................................................10 4. installation 11 5. reports 13 Configure report...............................................................13 Export report.....................................................................13 Print report........................................................................13 Display data log................................................................13 6. alarms/eventS 15 Active alarms.....................................................................15 Concluded alarms............................................................15 Events..................................................................................15 Relays..................................................................................15 Download alarms.............................................................15 How to respond to alarm signals from PlantWatchPRO........................................................................16 7. use of the usb memory key 18 How to download an HACCP report from PlantWatchPRO ............................................................20 How to update the PlantWatchPRO software using a USB memory key ............................................21 8. NAVIGATION VIA WEB FROM A REMOTE PC 22 PlantWatchPRO from a remote PC via a telephone connection.........................................................................22 9. function tree 24 3 +040000021 - rel. 3.0 - 07.06.2010 Before performing any operations, check that the PlantWatchPRO box contains: 1. the two plastic faceplates (top and bottom); 2. technical documentation; 3. the device itself; 4. four screws (already inserted in position); 5. the terminals (six, already connected to the board); 6. two resistors (inside the case). 1 2 3 4 5 6 ENG 1. presentation • possibility to export data (alarms, events, system PlantWatchPRO is the new solution from CAREL for the supervision of small-medium installations. Complete network and alarm configuration, simple navigation and an attractive design are some of the features that make PlantWatchPRO the cutting edge product in its category. A colour LCD touchscreen, and the use of practical menus, guide the user simply and intuitively, without the use of a PC (however a PC can be connected if necessary), thus providing a practical solution for all those environments that do not have room for a computer. Other innovative features of PlantWatchPRO include: • possibility to connect and control up to 100 devices; • possibility to connect and control CAREL or Modbus® devices on RS485 bus; • record up to a maximum of 100 variables; • log data for up to one year (with 15 min sampling). • connection to CAREL remotePRO and remoteValue remote supervision systems; • a Guardian program that boosts and improves system reliability; • 3 output relays, for alarm signals or activating lights and defrosts; • • • • • • • • • and model configurations and variable reports) using a USB memory key (the data are downloaded in a format that is compatible with Microsoft® Excel and Microsoft® Word); import new standard or custom devices; display graphs; proximity sensor that activates the display without the user needing to open the cover; external buzzer management; complete alarm configuration; phone book for SMS contacts, fax numbers, e-mail addresses; active defrost management; possibility for multiple users to access the system, with different privileges (administrator, normal user, user with privileges); instrument suitable for technical environments, no moving parts. Key: 1 touch screen 2 proximity sensor 3 alarm light 4 device on light 5 USB port 6 transparent cover 1 2 3 4 5 6 5 +040000021 - rel. 3.0 - 07.06.2010 ENG 1. presentation General diagram of PlantWatchPRO connections 1 10 9 2 PSTN GSM/GPRS 3 4 5 LAN 7 8 6 Remote - Internet Explorer 7.0 Key and product codes: 1 2 3 PlantWatchPRO PostScript-enabled USB printer PSTN analogue modem (version PWPROM0000 only) 4 USB memory key 5 PC (via LAN) 6 3 relay outputs 7 Installation: Modbus® RTU line 8 Installation: CAREL line 9 GSM/GPRS modem connection kit(code PWOPMD0000) 10 optional GSM/GPRS modem (code PLWOPGSM00) required to be able to use all the SMS functions; using modems other than the one supplied by CAREL will not guarantee correct operation of the appliance and technical service +040000021 - rel. 3.0 - 07.06.2010 6 ENG 2. KEY note highlights an important point; in particular as regards the practical use of the various product functions warning warns the user of critical areas for the use and safety of PlantWatchPRO USB key indicates that the function can only be accessed directly from PlantWatchPRO (not via web) and using a USB memory key tutorial offers the user some simple configuration examples of the most common settings for the supervision of an installation 7 +040000021 - rel. 3.0 - 07.06.2010 ENG 3. GRAPHIC INTERFACE Display Touchscreen keypad The following keypad will be made available on the touchscreen display whenever data needs to be entered (letters, numbers or symbols): One of the main features of PlantWatchPRO is the user interface. Web navigation also uses the same graphic interface, identical to the touchscreen except for some functions that can only be accessed directly from PlantWatchPRO using a USB memory key (these are highlighted in the text by ). USB To switch from the main keypad (upper case) to the other keypads, use the following buttons: USB to shift to lower case for the numeric keypad for symbols and punctuation +040000021 - rel. 3.0 - 07.06.2010 8 ENG 3. GRAPHIC INTERFACE Navigation buttons BACK button: used to return to the previous screen. If pressed on the home page, automatically returns to the login screen HOME button: returns to the home page SILENCE button: used to mute the alarm generated by the buzzer (or the additional siren, if installed) HELP button: pressing the Help button displays a brief explanation of the functions available in the current screen To exit the Help screen, press displays the list of the devices in the installation and the corresponding alarms. When a device generates an alarm, this button turns red ( ) until the alarm is acknowledged -PV-, cancelled -Canc.- or removed -Rem.- by the user (see chapter dedicated). restarts the system software, loading the changes made to the configuration; if the changes require the new configuration to be loaded, the button is red ( ) until it is pressed to make the changes active. The reload operation may take a few seconds. To make the changes to the system configuration effective, the software needs to be reloaded (using ), after having confirmed the changes opens the window for setting the “Guardian” program; the notification channels specified will be used by the “Guardian” to send any PlantWatchPRO malfunction warnings to the specific technical personnel. This button, like the previous two, turns red ( ) when the program is activated CONFIRM button: confirms the changes made to the screen scrolls the list upwards scrolls the list downwards scrolls the list to the previous device scrolls the list to the next device used to access the key to the graph of the variables on the corresponding screen add remove To remove an object (device, time band, action, …), first press and then select the object to remove 9 +040000021 - rel. 3.0 - 07.06.2010 ENG 3. GRAPHIC INTERFACE Main menu The PlantWatchPRO main menu features the clock, the navigation buttons, the information on the name of the site, and five icons: Installation, Configuration, Reports, Alarms/Events and Scheduler; pressing each of these accesses other secondary menus with the lists of corresponding functions. +040000021 - rel. 3.0 - 07.06.2010 10 ENG 4. installation Group 3 - Control When entering this menu a list is displayed showing all the devices available in the installation and their status: the graphic LEDs next to the names of the devices have the following meanings: • green - everything is working correctly. • red - the device has an alarm. • blue - device disabled. • grey - device off-line. In addition, the main variables previously selected to be displayed (from the CONFIGURATION MODEL MANAGEMENT CONFIGURATION MODELS LOG/GRAPH/HACCP/MAIN VIEW DEVICE DETAIL menu) are shown, or alternatively the default variables and the corresponding values. Accessing the detail of each device, the alarms can be acknowledged (both concluded and active) and the graph of the trend of the variables displayed. Displays the list of system clock parameters. Other groups Group 4 – Device configuration Displays the list of parameters relating to the configuration of the device in question. Group 5 - Functions Displays the list of parameters relating to the functions. Active alarms Goes to the list of active alarms (see Chapter 11 ALARMS/EVENTS). Concluded alarms Goes to the list of concluded alarms (see Chapter 11 ALARMS/EVENTS). Graph Graph of the variables. The horizontal axis shows the time scale, while the vertical axis shows the values of the variable. (The colours have been set previously by the user in the CONFIGURATION menu). use the & buttons to scroll the time & buttons to move axis and the from one device to another. PlantWatchPRO can plot up to five values at the same time. Read-only variables Favourites Displays the variables set as favourites. All variables Displays all the variables. Write parameters Favourites Displays the parameters set as favourites. All parameters Displays all the parameters. Group 1 – Alarm configuration Displays the list of alarm configuration parameters. Group 2 – Control Displays the list of control parameters. 11 +040000021 - rel. 3.0 - 07.06.2010 ENG 4. installation Search To search for variables or parameters based on parts of the description or code. Tree of the “Installation” menu functions Device list Read-only variables Favourites List Details All List Details Write parameters Favourites List Details All List Details GR1 List Details GR2 List Details GR3 List Details Other grps GR4 List Details GR5 List Details Active alarms List Details Concluded alarms List Details Graph Search Read-only variables Write par. +040000021 - rel. 3.0 - 07.06.2010 12 ENG 5. reports Configure report Export report Create report Export HACCP report Used to create a report, defining the name and description, the type (HACCP) and the list of the variables included. Used to enter the values of the parameters (starting date, report name, period and frequency) corresponding to the HACCP report to be downloaded. Export log report Used to enter the values of the parameters (starting date, report name and period) corresponding to the log report to be downloaded. Print report Print HACCP report Used to enter the values of the parameters (starting date, report name, period and frequency) corresponding to the HACCP report to be printed. If the report is defined as HACCP, it may only include the HACCP variables for the devices in the installation. The definition of the device HACCP variables can be customised under Model configuration. Print log report Used to enter the values of the parameters (starting date, report name and period) corresponding to the log report to be printed. Edit report Edit description PlantWatchPRO is compatible with any USB printer that supports PostScript language. To modify the description of the report. Via web, PlantWatchPRO opens a dialogue box prompting for the directory used to save the HACCP report ( “.rtf” format, compatible with Microsoft® Word) or log report (“.csv” format, compatible with Microsoft® Excel). Edit configuration To modify the list of the variables in the report. Copy report To generate a new report starting from an existing report. Display data log Delete report Directly displays the values of the logged variables. To delete the report. 13 +040000021 - rel. 3.0 - 07.06.2010 ENG 5. REPORTs Tree of the “Reports” menu functions Configure report Create report Edit report Copy report Delete report Export report List of reports Export HACCP report Export log report Print report Print HACCP report Print log report Display data log +040000021 - rel. 3.0 - 07.06.2010 14 ENG 6. alarms/eventS Active alarms If the message in the EVENT column is too long to be displayed in full, to read it select the corresponding row and open the details Displays the active alarms on the system; key to alarm colours: • red - highest priority; • orange - high priority; • yellow - medium priority; • white - low priority. Relays Used to disable the relays activated by PlantWatchPRO. Pressing the corresponding fields and confirming ) disables the relays. ( Download alarms This saves the list of active alarms from a certain date onwards; the data is saved to a file in “.csv” format (compatible with Microsoft® Excel). Concluded alarms Shows the list of concluded alarms. Events Tree of the “Alarms/events” menu functions” List of the events saved by the system. The icons have the following meanings: Active alarms information event Conc. alarms error event Events warning event Alarm details Event details Relays Down. alarms 15 +040000021 - rel. 3.0 - 07.06.2010 ENG 6. ALARMS/EVENTs How to respond to alarm signals from PlantWatchPRO Below is a description of how alarms are shown on the PlantWatchPRO display and how to respond. If the ALARM button turns red ( ) an alarm is active on one of the field devices. Enter ALARMS/EVENTS ACTIVE ALARMS to display the list of active alarms in the entire installation, highlighted in four different colours depending on the level of priority: • red - highest; • orange - high; • yellow - medium; • white - low. In the example, a low priority alarm called “Al. timeout defrost evap2” is activated on the device called “IR33 #1”. From the list of active alarms, pressing the row showing the alarm in question accesses the page with the details of the alarm. This highlights the date and the time when the alarm was activated, plus three fields (PV, CANC. and REM.) that are empty if the page is being accessed for the first time. Abbreviations: PV - PV - acknowledge alarm; Canc. - cancel alarm, that is, all the actions relating to the alarm are cancelled (e.g. send SMS, fax,…) before being undertaken by PlantWatchPRO; Rem. - remove alarm from the list of active alarms. Pressing the button PlantWatchPRO records the user who performed the operation as the person acknowledging the alarm; in addition, the date and the time when the operation was performed are also recorded. +040000021 - rel. 3.0 - 07.06.2010 16 ENG 6. ALLARMI/EVENTI Pressing the button again records the time and date the alarm was cancelled and who performed the operation; this may be a different user from the one who previously acknowledged the alarm. Pressing a third time records the identity of the user who removed the alarm on PlantWatchPRO. Once the alarm has been removed, it no longer appears in the list of ACTIVE ALARMS, but rather can be seen in another screen with the list of CONCLUDED ALARMS. Once the alarm has been cancelled, the button turns blue again. Pressing the row with the desired alarm again opens the detail screen, showing the date, time and name of the user who acknowledged, cancelled and removed the alarm. 17 +040000021 - rel. 3.0 - 07.06.2010 ENG 7. use of the usb memory key PlantWatchPRO can transfer data to/from a USB memory key; specifically, some functions are not accessible via web, but only using PlantWatchPRO. In fact, the user can download the logged values of the selected variables, the HACCP report, the configuration of the complete site, the changes made to various models (to be then exported to others sites for reuse) and the list of alarms activated in the installation. Function File path DOWNLOAD HACCP REPORT BACKUP SITE CONFIGURATION DOWNLOAD ALARMS EXPORT MODEL G:\export\site_name\ report G:\export\site_name\ config G:\export\site_name\ alarms G:\export\site_name\ models File format .rtf --.csv .xml The USB key must be formatted with the FAT32 file system. The USB memory key can also be used to load new data to the PlantWatchPRO memory; this is useful, for example, for importing the configuration of a previously configured site, models created based on the default models or those available in the standard libraries, or those created using the special Device Creator (IDE package). A USB memory key can also be used to install new updated versions of the PlantWatchPRO software. “G:\” is the name that usually denotes the removable memory drive on the PC, in this case, the USB memory key; “site_name” is the name that assigned to the directory where the files will be saved and is the name that the user has assigned to the site under CONFIGURATION SITE INFORMATION. The following functions are only accessible directly on PlantWatchPRO and only using the USB memory key (highlighted in the manual by • IMPORT MODEL; USB • RESTORE SITE CONFIGURATION; • UPDATE SOFTWARE. ): USB Other functions that require the USB memory key, if using PlantWatchPRO, yet are also accessible via web, are: • EXPORT LOG REPORT; • EXPORT HACCP REPORT; • BACKUP SITE CONFIGURATION; • EXPORT MODEL; • DOWNLOAD ALARMS. Multi key The table below shows a list of the functions that use the USB memory key to save data; the names of the directories (created automatically by the software) where the data are saved are listed (with the corresponding addresses), as well as the format the file is downloaded in. +040000021 - rel. 3.0 - 07.06.2010 The USB ports are logically identified by a number: 1 external top 2 external bottom 3 internal Once having confirmed the insert USB key request screen, a list is shown to select the desired USB key from the options available. The description is shown as follows: # USB port - Key model – Manufacturer Example: USB 1 – DataTraveler G2 – Kingston USB 2 - Transcend 2GB - JetFlash 18 ENG 7. use of the usb memory key The USB key used to perform the required operation can therefore be selected with precision. 19 +040000021 - rel. 3.0 - 07.06.2010 ENG 7. use of the usb memory key How to download an HACCP report from PlantWatchPRO Below is a description of the operations to be performed by the user to download a HACCP report from PlantWatchPRO using the USB memory key, and then transfer the data to a PC. For example, download the daily report, with the data shown every 30 minutes, relating to 19 July 2007. From the home page, enter the REPORT EXPORT REPORT EXPORT HACCP REPORT menu. As the START DATE enter the day the report should start, therefore “2007/07/19”. Select “1 day” as the PERIOD. Insert the USB pendrive in the port. Choose “30 minutes” as the FREQUENCY (the other option for displaying the values of the HACCP variables is “12 hours”). Finally press the button and the OK button on the Warning message that appears to start the data transfer from PlantWatchPRO to the memory key. After a short while a message box is shown confirming the operation, or alternatively an error message if the memory key does not have enough space or has not been inserted correctly. +040000021 - rel. 3.0 - 07.06.2010 20 ENG www.carel.com 7. use of the usb memory key How to update the PlantWatchPRO software using a USB memory key How to update the PlantWatchPRO software with new versions released by CAREL. Check the software version currently installed. The file downloaded will be a compressed file such as “Uxxxyyy.zip”. Unzip the file to the USB memory key. Download the software update from the http://ksa.carel.com website to the PC USB From the PlantWatchPRO home page access CONFIGURATION SYSTEM PAGES UPDATE SOFTWARE. Insert the memory key and press the and the OK button on the Warning message that appears. From the list that will be displayed on the new screen, select the “patch” directory as the source for updating the software version. Press the button and the OK button on the Warning message that appears to start the software update operation.. Uxxxyyy.zip After this operation, as highlighted by the Warning message, PlantWatchPRO will be rebooted to make the software update effective. This operation may take a few minutes. Warning: • never remove the USB memory key until the software update has been completed and the system has been rebooted, as both PlantWatchPRO and the key may be seriously damaged; • power must be available throughout the entire software update operation. 21 +040000021 - rel. 3.0 - 07.06.2010 ENG 8. NAVIGATION VIA WEB FROM A REMOTE PC PlantWatchPRO installed in any location can be monitored via an internet or telephone connection. This function can be used to display on the PC’s screen the exact same data that appears on the PlantWatchPRO touchscreen display and access almost all the PlantWatchPRO functions. PlantWatchPRO from a remote PC via a telephone connection Once the PC is running, in Microsoft Windows (any version), from the Control panel create a new Internet connection, as follows: Access CONTROL PANEL INTERNET CONNECTIONS. NETWORK AND Then choose CREATE A NEW CONNECTION CONNECT TO THE INTERNET SET UP MY CONNECTION MANUALLY CONNECT USING DIAL-UP MODEM. Enter the name of the connection. Choose from the options that allow the connection to be available to all users or only this specific user. Enter “PVRemote” as the USER NAME and “PD35010” as the PASSWORD. The connection has been created; now open a web browser - Windows Internet Explorer® - version 7 or higher with the zoom window function available) and enter following IP address: http://192.1.1.1 (if PlantWatchPRO is connected to the PSTN telephone system) or http://192.1.1.3 (if PlantWatchPRO is connected to the GSM telephone system). The window of the browser will automatically show the PlantWatchPRO screen, allowing access in the same way as for the touchscreen version Enter the telephone number of the telephone line that PlantWatchPRO is connected to. +040000021 - rel. 3.0 - 07.06.2010 22 ENG 23 +040000021 - rel. 3.0 - 07.06.2010 Support +040000021 - rel. 3.0 - 07.06.2010 24 Language selection Download service log Restore point ENG 9. function tree ENG 25 +040000021 - rel. 3.0 - 07.06.2010 Note: CAREL INDUSTRIES Hqs Via dell’Industria, 11 - 35020 Brugine - Padova (Italy) Tel. (+39) 049.9716611 - Fax (+39) 049.9716600 e-mail: [email protected] - www.CAREL.com +040000021 - rel. 3.0 - 07.06.2010 Agenzia / Agency: