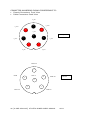
1
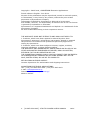
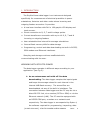
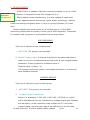
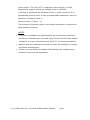
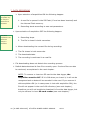
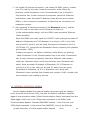
STYLITIS-POWER USER’S MANUAL 0614 Copyright 2008-2014, SYMMETRON Electronic Applications. Fourth edition in English. June 2014. No part of this publication may be reproduced, stored in retrieval system, or transmitted, in any form by any means, without the prior written permission of Symmetron Company. Information furnished by Symmetron is believed to be accurate and reliable; however, no responsibility is assumed for its use. No license is granted by implication or otherwise. Symmetronis a registered trademark and Stylitisis a trademark of the Symmetron Company. All other trademarks belong to their respective owners. THE WARRANTY DOES NOT EXTEND TO AND SHALL NOT APPLY TO: 1. Products, which have been repaired or altered by other than Symmetron's personnel, unless Buyer has properly altered or repaired the products in accordance with procedures previously approved in writing by Symmetron. 2. Products, which have been subject to misuse, neglect, accident, improper installation, or direct lightning strikes. THE WARRANTY AND REMEDIES SET FORTH ABOVE ARE IN LIEU OF ALL OTHER WARRANTIES EXPRESSED OR IMPLIED, ORAL OR WRITTEN, EITHER IN FACT OR BY OPERATION OF LAW. THE SYMMETRON COMPANY SHALL HAVE NO LIABILITY FOR INCIDENTAL OR CONSEQUENTIAL DAMAGES OF ANY KIND ARISING OUT OF THE SALE, INSTALLATION, OR USE OF ITS PRODUCTS. RETURN FROM OUTSIDE GREECE: Contact Symmetron for authorization and shipping instructions. SYMMETRON ELECTRONIC APPLICATIONS TEL: (+30)-210-603-4002 FAX: (+30)-210-603-4003 e-mail: [email protected] Internet: http://www.symmetron.gr/ Made in Greece. 2 [S-UME-S200-003] STYLITIS-POWER USER’S MANUAL 0614 CONVENTIONS USED IN THIS MANUAL Symbol Meaning To avoid injury of personnel and/or damage to the instrument, the operator must refer to the user’s manual. CAUTION Calls attention to a procedure or condition which, if not correctly performed could result in damage to the instrument. [S-UME-S200-003] STYLITIS-POWER USER’S MANUAL 0614 3 CONTENTS 1. INTRODUCTION ............................................................................. 5 2. OPERATION AND SAFETY ........................................................... 9 3. USER INTERFACE AND OPERATIONS REVIEW....................... 11 4. POWER SUPPLY.......................................................................... 12 5. MEASUREMENTS ........................................................................ 13 6. DATA PROCESSING AND STORAGE ........................................ 15 7. DATA RECORDING ...................................................................... 16 8. DATA RETRIEVAL ....................................................................... 17 9. DATA SAFETY ............................................................................. 17 10. SERIAL PORT ............................................................................ 18 11. INTERNAL ETHERNET .............................................................. 18 12. INTERNAL GSM/GPRS MODEM ............................................... 19 13. SOFTWARE ................................................................................ 21 14. TECHNICAL CHARACTERISTICS ............................................. 23 APPENDIX A 4 CONNECTORS .................................................. 25 [S-UME-S200-003] STYLITIS-POWER USER’S MANUAL 0614 1. INTRODUCTION The Stylitis-Power data logger is an instrument designed specifically for measurement of electrical quantities in power substations, factories and other nodes where incoming and outgoing feeders are active. It provides: A local user interface with 240 x 128 graphic LCD display and touch screen. Direct connection to R, S, T and N voltage points. Current transformer connection with up to 10 R, S, T and N incoming or outgoing feeders. User selectable time interval for average calculations. Internal flash memory 4Mb for data storage Programming, control and data downloading via built-in RS232, GSM modem and Ethernet interfaces. Sampling and storage continues unaffected while communicating with the user. WORKING WITH STYLITIS-POWER The data logger operates in different ways according to your application. (see Fig.2): 1. As an autonomous unit with off-line data downloading. The data logger samples the input signals and keeps the average values for each interval in the internal 4MB flash memory. The stored files are downloadable via any of the built-in interfaces. The connection between data logger and the PC may be via a direct RS-232 link, via a modem (PSTN or GSM) or via the Ethernet network (LAN). The PC must be equipped with an RS232 COM port, a modem or a network card respectively. The data logger is accompanied by Opton 4, the software required for programming, inspecting, data [S-UME-S200-003] STYLITIS-POWER USER’S MANUAL 0614 5 downloading, and decompression. Data files are arranged in ASCII text files. 2. Real Time Measurements. On line data reading with appropriate user software, for storing and manipulation in a PC. The connection between data logger and the PC is as described above. This manual includes detailed operation description. Technical support is available by phone: +30- 210-6034002, or email: [email protected] And at: www.symmetron.gr 6 [S-UME-S200-003] STYLITIS-POWER USER’S MANUAL 0614 Fig 1: General Diagram GLCD / touch Display C.T. input 1 R, S, T, N Flash memory 4MB C.T. input 2 R, S, T, N Li Bat Ultra capacitors CPU Real Time Clock Internal Supplies C.T. input 10 R, S, T, N AC~DC converter Voltage input R, S, T, N 85~264VAC Power Switch C.T. input 3 R, S, T, N Input Protection RS232 & Ethernet Isolated section RCB Each input module contains CPU, memory and 4-channel analog to digital converter. 7 STYLITIS-10 USER’S MANUAL Stylitis-Power PC Fig. 2: Operation C.T. 1 R, S, T, N Use wire (up to 15 m) for setup and data downloading. Voltage R, S, T, N 8 Internal flash Memory C.T. 10 R, S, T, N GSM MODEM / RS-232 Port C.T. 2 R, S, T, N RS-232 port Use a modem for setup and data downloading. Wired modem Modem Wireless (GSM) modem Base station Use local network for setup and data downloading. Network card 10BaseT Ethernet [S-UME-S200-003] STYLITIS-POWER USER’S MANUAL 0614 2. OPERATION AND SAFETY EXTERNAL DESCRIPTION. Front View Graphic LCD RCD POWER SWITCH FUSE REPLACEMENT. CAUTION The fuse used must of the specified rating. Never shortcircuit the fuse holder. The instrument uses a 1 A power supply fuse, which must be replaced if blown (supply voltage out of limits). It is located in the front panel. Make sure you have removed all external power supplies before attempting replacement. [S-UME-S200-003] STYLITIS-POWER USER’S MANUAL 0614 9 CONNECTORS On the two sides and on the rear part of the datalogger, you can see the special polypolar (circular) connectors (which need the appropriate cables-adaptors), which correspond to the descriptions on the upper part, as you can see them, in the image above (RS232, VOLTAGE, EXTERNAL SUPPLY, CURRENT 1, etc). On the right and left part of the instrument, there are the input connectors (of the voltage and the 10 current groups) On the rear side, there are: the Ethernet connector, for connection of the instrument to the local network, the RS232 connector, for connection of the instrument to a computer RS-232 serial COM port, and the external power supply connector. UPPER PART On the instrument’s upper part (see the image above), besides the fuse, there is also the graphic LCD touch screen, the description and operation of which will be mentioned in detail, in the next chapter. Moreover, there is an earth leakage relay (RCD), which must be switched to ON for the instrument to operate. It will automatically switch to OFF in case there is a considerable difference between a live wire (phase) and the return wire (neutral), therefore there is a considerable leakage current to the earth, which is dangerous for the user. If you press the Test button, this process will be simulated, therefore the relay must switch to OFF, for the circuit to operate correctly. Finally, there is a switch (POWER SWITCH in the image above) with which you can select the datalogger’s power supply. It may be external (switch to EXTERNAL), therefore you must apply a supply of 85-264 VAC in the corresponding connector on the rear part, as it was mentioned before. If you switch to INTERNAL, the datalogger will be supplied by the voltage input, if one has been connected in the corresponding connector. It must be noted that in this case, the input voltage must not be higher than 264 VAC (upper limit of the power supply voltage). Generally (if the power supply is external), the measured input can be up to 280 VAC. 10 [S-UME-S200-003] STYLITIS-POWER USER’S MANUAL 0614 3. USER INTERFACE AND OPERATIONS REVIEW The touch screen GLCD display may be used to: To see the datalogger’s current status and time, ie if the Acquisition is ON, the recording interval and the memory status (No option- Starting menu). To display the voltage, current, power and power factor input data values for all channels in tabular or bar graph form. (Display option). Select R, S, T or N to select the phase to be displayed and Val or Bar for display of the values in tabular or bar graph form respectively. To enable or disable the internal GSM modem. (Select: Modem and then select: Int/Ext) To check the modem signal and operator (Select: Modem and then select: Check) To display instruction pages, concerning general information about user safety and the connectors’ pinout. To display genereal information of the instrument, such as manufacturer and version (About option) [S-UME-S200-003] STYLITIS-POWER USER’S MANUAL 0614 11 4. POWER SUPPLY There are 3 modes of operation: NORMAL OPERATION MODE The instrument samples inputs at 0,5 second intervals and records averages of data from 0,5 second to 1 hour. All functions are active. DROPOUT MODE When voltage is lost the data logger records the date/time of the event along with voltage and frequency values. When voltage is restored the logger records the date/time of the event end along with voltage values, in a text file (dropouts), while a new data file opens. When you download the data file, the dropouts file is also downloaded. The logger is capable to record dropouts even when its power supply is lost for up to 15 seconds (display and communications are disabled for as long as there is no power supply). SLEEP MODE If power supply is removed the logger keeps its real time clock running by supplying it by its internal Lithium battery. All other activities are disabled. 12 [S-UME-S200-003] STYLITIS-POWER USER’S MANUAL 0614 5. MEASUREMENTS Stylitis-Power is capable of directly measuring voltage on up to 4 lines. Connection Examples: Frequency is measured on the first voltage line (L1). See Appendix A. With suitable current transformers, it is also capable of measuring current, apparent power and energy, active power and energy, reactive power and energy and power factor in up to 10 groups (feeders) of 4 lines each. Current transformers must output an AC voltage (up to 1,4 Volt RMS maximum) proportional to primary current (up to 6000 Amperes). Conversion to physical units (amperes) is accomplished via the slope factor. VOLTAGE GROUP There are 2 options for the voltage group: 1. NOT USED. The group is not recorded. 2. 280VAC Voltage Input. A formula is applied to the measured value in order to convert it to appropriate physical units. A user-programmable parameter, Slope is applied to measured value x: Physical value = [Slope * x]. The average of physical values is calculated and stored in memory for each statistical interval. CURRENT GROUPS There are 2 options for each current group: 1. NOT USED. The group is not recorded. 2. Y output Current Transformer. Where Y is selectable: 1.000 VAC, 0.500 VAC, 0.333VAC or 1mV/A and it indicates the Current Transformer’s voltage output type. Besides the last option, all the remaining ones indicate the CT’s full scale output voltage, and they also require the definition of the full scale [S-UME-S200-003] STYLITIS-POWER USER’S MANUAL 0614 13 input current. The 1mV/A CT’s maximum input current is 1400A, because the logger’s maximum voltage input is 1.4VRMS. A formula is applied to the measured value in order to convert it to appropriate physical units. A user-programmable parameter, Slope is applied to measured value x: Physical value = [Slope * x]. The average of physical values is calculated and stored in memory for each statistical interval. NOTES: The Opton 4 software can automatically set the Slope by specifying the Current Transformer’s full scale input current and full scale output voltage (if you have not selected a 1mV/A CT, as mentioned before). Opton 4 may also calibrate all inputs (current and voltage) by setting the Slopes automatically. Finally, you may define the phase shift between the voltage group and each current group separately. 14 [S-UME-S200-003] STYLITIS-POWER USER’S MANUAL 0614 6. DATA PROCESSING AND STORAGE All inputs are sampled simultaneously at 2kHz rate and their values are placed in temporary storage. True RMS values are calculated in 0.5-second intervals. For precise results, the calculations are based on the number of full cycles completed within a 0.5 second interval. Cycles not completed within the averaging interval are accounted for in the next. The averaging interval is selectable from 0.5 seconds to 1 hour in steps of 0.5 seconds. At the end of the time interval, the average values are calculated and stored stored simultaneously in the internal 4MB FLASH Memory and in the removable 2GB SD Flash card (if one has been inserted) , along with a time mark corresponding to the end of statistical interval time. NOTE: For Stylitis-Power F/W versions that support SD cards, the internal Flash memory is cyclic, ie instead of getting full, it continues recording from the beginning, overwriting older files. All files are be stored in the SD card. Stored data in the FLASH memory is organized in files, which are kept even without supply power. For enhanced data safety each individual record is marked with its own time stamp. [S-UME-S200-003] STYLITIS-POWER USER’S MANUAL 0614 15 7. DATA RECORDING During recording Upon selection of acquisition ON the following happen: (acquisition on): no change of parameters is permitted. 1. A new file is opened in the SD Flash (if one has been inserted) and the internal Flash memory. 2. Recording starts according to user set parameters. Upon selection of acquisition OFF the following happen: Only when acquisition is off 1. Recording stops. parameter 2. The file is closed in both memories. change is permitted. When downloading the current file during recording: 1. The file closes in both memories. 2. The download starts. 3. The recording is continued in a new file. File downloading does not disturb the recording process Default data download is from file currently open. Previous files can also be retrieved, as explained in the next chapter. NOTE: To remove or insert an SD card to the data logger, the acquisition must be OFF! If it is ON when you insert it, it will not be recognized and no data will be recorded in the card. If you remove it with acquisition ON (or in case power is lost with acquisition ON), the file will not appear in the card's file directory (see next chapter), therefore you will not be able to download it from the data logger, but only to retrieve it via an SD card reader (see next chapter). 16 [S-UME-S200-003] STYLITIS-POWER USER’S MANUAL 0614 8. DATA RETRIEVAL File downloading and memory erasure are done via serial commands (direct link, modem, etc.), using the accompanying Opton 4 software in the host PC (See CHAPTER 13). Files downloaded to a PC are compressed to save memory space and speed up data transfer. The data are retrieved using the Opton 4 software. Data are decompressed to ASCII text files, suitable for further manipulation using available programs like Excel, etc. Via the ‘Download logger memory data’ from Opton 4’s ‘Home’ tab or from the ‘Data logger’ bar of the ‘Files’ tab, the following file downloading options appear: A. If there is no SD card inserted in the data logger, the data you will download are recorded in the internal Flash memory. You may download: 1. The most recent file. The file closes before it is downloaded, and a new file begins (see previous chapter). 2. One single previous file or more previous files. You can type the number of a single file or a range of files (e.g. 1-4) B. If there is an SD Card inserted in the data logger, the data you will download are recorded in the internal Flash memory and in the SD card simultaneously. You may download: 1. The directory of the card's files which appears in the 'Home' tab, in the 'SD Card directory' bar. The directory shows each file's number, Start date, size and start page, so that you will know which file(s) to download. 2. The most recent file. The file closes before it is downloaded, and a new file begins(see previous chapter). 3. One single previous file or more previous files. You can type the number of a single file or select specific file numbers from the SD Card's directory, by CTRL-clicking them, SHIFT-clicking them, etc, in the 'Home' tab, in the 'SD Card directory' bar. Alternatively, you may retrieve the SD card's files, via an SD card reader. In the 'Files' tab, in the 'Memory Card' bar, click 'SD Card -> VIEW'. From the appearing list, select the SD Card drive you wish. 9. DATA SAFETY Stored data in the internal FLASH memory and the SD card is organized in files, which are kept even without supply power. Data files are individually accessible. Each record has its own time stamp. [S-UME-S200-003] STYLITIS-POWER USER’S MANUAL 0614 17 10. SERIAL PORT The Opton 4 software is used for communicating with the datalogger via COMMUNICATION port DB9M: PIN 2 Receive PIN 3 Transmit PIN 5 Ground PIN 7 RTS PIN 8 CTS your PC. The RS-232 port is a DTE type, i.e. Stylitis-Power appears as a PC. In order to use the DB9 serial cables, you must firstly connect the corresponding polypolic adaptor to the datalogger’s RS-232 connector, Communication in order to connect the cables to its serial end. A ‘straight’ cable (DB9M settings: 9600 baud, male to DB9F female) is required for connection to an external modem. 8 data bits, 1 stop A ‘null modem’ cable (DB9F female to DB9F female) is required for bit, no parity bit. connection to a PC. The ‘RS-232’ port is enabled only when an internal modem is not used. You can find more information about enabling and disabling the internal modem in chapter: 3. USER INTERFACE AND OPERATIONS REVIEW 11. INTERNAL ETHERNET The internal Ethernet module of Stylitis-Power is permanently activated. To setup, follow these steps: 1. Power-up the logger and connect the RJ-11 connector to the LAN. Wait 30 seconds to allow LAN setup. 1. There are 3 communication options: i. Via your LAN, for local network connections. In order to communicate via your LAN, do the following: - In Opton 4 software, in the ‘Communication’ bar in the site’s ‘Connections’ tab, click the ‘Find Logger in LAN’ command. The ‘Digi Device Discovery’ window will open, where you can see the IP address of the logger you are interested in. - Create a connection, by selecting ‘+New Connection’ in the ‘Communication’ bar in the site’s ‘Connections’ tab. In the connection’s properties, select the ‘Ethernet’ radio button, enter this IP address, along with the port number 50001, while leave the ‘Diameson client’ check box unchecked. Double-click the connection you created to connect. 18 [S-UME-S200-003] STYLITIS-POWER USER’S MANUAL 0614 ii. Via a static IP internet connection, (via a static IP ADSL router), outside your PC’s LAN. In this case, create a connection, while offline, by selecting ‘+New Connection’ in the ‘Communication’ bar in the site’s ‘Connections’ tab. In the connection’s properties, select the ‘Ethernet’ radio button, enter this static IP address, along with the port number 50001, in the connection’s properties. Double-click the connection you created to connect. iii. Via a dynamic IP internet connection (via Diameson server), outside your PC’s LAN. In this case, do the following via Opton 4: - In the communication setup, click the COM2 node and select ‘Ethernet Client operation’ - Open the COM2 tree node, open the ‘CLIENT’ node, and type the static IP address of Diameson’s PC (if Diameson is running in a PC in your LAN, use its local IP, while if you are using Symmetron’s Diameson, its IP is ’62.38.244.17’), along with the Diameson’s Device Listening Port (default port number: 1023). - Create a connection, via Opton 4 software, while offline, by selecting ‘+New Connection’ in the ‘Communication’ bar in the site’s ‘Connections’ tab. In the connection properties, select the ‘Ethernet’ radio button, check the ‘Diameson client’ check box and enter your Diameson user name. Enter the static IP address of Diameson’s PC (if Diameson is running in a PC in your LAN, use its local IP, while if you are using Symmetron’s Diameson, its IP is ‘1.diameson.net’), along with Diameson’s User Listening Port (default port number: 8100 . Double-click the connection you created to connect. 12. INTERNAL GSM/GPRS MODEM You can enable/ disable the internal modem using the using the ‘Modem’ menu from the touch-screen LCD), but also via Opton 4 software: Read the logger’s communication setup (‘Read Communication Setup’ command from the ‘Data logger online’ bar in the ‘Setup’ tab) and select in the COM1 node: ‘Communication Module: Internal GSM/GPRS modem’ in the first line, and ‘GSM (data) operation’ in the second line (REMOTE), via e.g. an Ethernet [S-UME-S200-003] STYLITIS-POWER USER’S MANUAL 0614 19 connection (see previous chapter). Select ‘Write Setup’ to save the changes. To setup, follow these steps: 1. Disconnect all power supplies and remove the 4 screws on the front panel of the logger. Raise the front panel and insert a Data SIM card in the modem (the direction is shown on modem), which, according to the modem operation (see below) must support data or GPRS service. Remember to permanently unlock the SIM card using any available cell phone before putting it in the modem. Replace the 4 screws on the front panel of the logger. 2. Power-up the logger. The GSM indicator on the logger has the following states: Flashing quickly – Searching for Network; Flashing slowly – registered to the network (idle); continuously ON – connected via data call. 3. Wait until the INTERNAL MODEM indicator starts flashing slowly (registered). If the modem is set to GSM data mode (see right below) Select ‘Modem’ and then ‘Check’ from the menu of the datalogger’s LCD touch screen to display the GSM network operator name and received signal strength (see chapter 3). 4. i. GSM data call connection. In Opton 4, create a connection, by selecting ‘+New Connection’ in the ‘Communication’ bar in the site’s ‘Connections’ tab. In the connection’s properties, select the ‘Serial/RS-232’ radio button, select the COM port to which the PC modem is connected and enter the SIM data call number. Double-click the connection you created to connect. - Ii. GPRS Connection via a dynamic IP SIM card In this case, a cheap, dynamic IP SIM card which supports GPRS connections is required. The connection is possible via Diameson Gateway, the Symmetron’s server software. For a GPRS connection, connect to the data logger via an Ethernet connection via Opton 4 (see previous chapter). Check its setup (‘Read Communication Setup’ command from the ‘Data logger online’ bar in the ‘Setup’ tab) and select in the COM1 node: ‘Communication Module: Internal GSM/GPRS modem’ in the first line, and ‘GPRS Client operation’ in the second line (REMOTE). Open the ‘REMOTE’ tree node, open the ‘NETWORK’ node and type the settings of the SIM Card’s provider (APN, USERNAME, PASSWORD). In the ‘CLIENT’ node, type the IP address of the host computer (the one in which Diameson is running). If this computer is in the same LAN with your computer (even if it is your 20 [S-UME-S200-003] STYLITIS-POWER USER’S MANUAL 0614 computer), type the local IP address. Otherwise, type the external one. In the ‘IP PORT’ field, type Diameson’s ‘Device Listening Port’ (the default value is ‘1023’). In order to save the settings, select ‘Write Setup’. The data logger will be connected to Diameson within the next minute. The next step is to connect via the GPRS network to the data logger from your PC (any PC connected to the internet), which will be also connected as a client to Diameson, via a dynamic IP address. Create the GPRS connection via Opton 4 by selecting ‘+New Connection’ in the ‘Communication’ bar in the site’s ‘Connections’ tab. In the connection properties, select the ‘Ethernet’ radio button, check the ‘Diameson client’ check box and enter your Diameson user name. Enter the static IP address of Diameson’s PC (if Diameson is running in a PC in your LAN, use its local IP, while if you are using Symmetron’s Diameson, its IP is ‘1.diameson.net’), along with Diameson’s User Listening Port (default port number: 8100). Double-click the connection you created to connect. 13. SOFTWARE Install Opton 4 from the accompanying CD or download it from the Symmetron site. Software upgrades are free to download. Following the first installation, go to the ‘Sites’ bar in the center of the ‘Start’ tab and click SHOW ALL. The ‘Sites’ tab will open. In the ‘Site Folder’ bar on the left, select ‘+ New Site Folder’ and choose a Windows folder to use as data storage for this specific data logger. If you use several data loggers it is recommended to repeat this procedure choosing a separate folder for each one of them. To work with the site folder you wish, select it with a double click from the tree structure on the center part of the ‘Sites’ tab. The site will open in a separate tab, which has the site’s name. SERIAL (RS-232) CONNECTION AND OTHER CONNECTIONS In the next step, determine how the PC will get connected to the data logger. In order to create a serial (RS-232) connection in Opton 4, select ‘+New Connection’ in the ‘Communication’ bar in the site’s ‘Connections’ tab. In the connection’s properties, select the ‘Serial/RS-232’ radio button, and select the [S-UME-S200-003] STYLITIS-POWER USER’S MANUAL 0614 21 PC COM port to which you will connect the data logger’s serial port (see CHAPTER 10). The serial port is not always active. Either the serial port is active or the GSM/GPRS modem. You can enable/ disable the serial port using the using the ‘Modem’ menu from the touch-screen LCD). After setting ‘External’, you may connect a NULL MODEM serial cable to the PC COM port and double-click the connection you created to connect. You can create as many connections as you wish in a specific site folder. For other connection types, see the corresponding chapter: For an Ethernet connection, either via a dynamic IP or a static IP internet connection, see CHAPTER 11. For a GPRS connection, via a dynamic IP SIM card, or for a GSM data call connection, see CHAPTER 12. After connecting, you can try some of the Opton 4 commands, eg ‘Get Status from Logger’, in the ‘Home’ tab, in the ’Status’ bar or ‘Read Input Data’ in the ‘Real Time’ tab, etc. To change logger channel settings, go to the ‘Setup’ tab and select ‘Read Inputs Setup’. Then change settings in the tree structure and click Write Setup. The same applies for the ‘Read Communication Setup’ command. (see CHAPTERS 11-12 for communication options).The settings can be changed only when data recording is stopped (Acquisition Off). Select Acquisition On to start recording. To get stored data, select ‘Download logger memory data’ either from the center part of the ‘Home’ tab or from the ‘Data logger online’ bar of the ‘Files’ tab. To avoid missing data you can download files while Acquisition On. For downloading options, see CHAPTER 8. If you want to automate data downloading, check the Enable Scheduled Automatic Connection box in the connection’s properties and set the download time. In the Automatic tab select the action for each weekday. The automatic downloading is possible only after downloading and installing the AutoConnect software. 22 [S-UME-S200-003] STYLITIS-POWER USER’S MANUAL 0614 14. TECHNICAL CHARACTERISTICS All accuracies stated are the mean of 5 measurements. VOLTAGE INPUTS. Input Voltage range (RMS): 0~280 VAC. Accuracy: +/-0.25% of reading + 0.1% of full scale. Resolution 0.1 V. Input Frequency range: 47~63 Hz. Accuracy +/-0.25% of reading + 0.1% of full scale. Resolution 0.01 Hz. Frequency measured from first voltage channel. Differential input resistance: 700 kohms. Maximum continuous over Voltage: 350VAC. C.T. INPUTS (CH1~CH10) individually selectable in groups of 4. Input Voltage range (RMS) from current transformer: 0.29~1.45 VAC. Accuracy: +/-0.25% of reading + 0.1% of full scale. Resolution 0.01 A. Differential input resistance: 20 kohms. Power Factor (Measured for each phase). Accuracy: +/-0.5% of reading + 0.2% of full scale. Power: Active, Reactive and Apparent for each phase. Accuracy: +/-0.5% of reading + 0.2% of full scale. INPUT PROTECTION All inputs/outputs are 4kV transient protected. DATA PROCESSING AND STORAGE RECORDED DATA: TRMS Voltage, TRMS Current, Power Factor, Frequency INTERNAL MEMORY: 4 Mbytes FLASH. No battery backup required. Operation mode is First-In-First-Out. Capacity (all inputs at 15 minute averaging): more than 100 days. REAL TIME CLOCK: With automatic leap year correction. Accuracy: 7.5ppm (4 minutes/year). Backed-up by internal, long-life Lithium battery. COMMUNICATION PROGRAMMING AND DOWNLOADING: Built-in RS232C port, 9600 baud, 8 bits, no parity, 1 stop bit. Connector DB9M (DTE). When used, internal modem is disabled. Built-in GSM/GPRS Quad-band modem. Connector SMA female. When used, RS232C port is disabled. Built-in 10Mbit Ethernet server. Connector RJ-45. Always enabled. SAFETY Double insulated. Complies with IEC60950 Built-in Earth Leakage Circuit Breaker. POWER SUPPLY Built-in universal power supply (85 to 264 VAC, 47 to 63 Hz). Input power source switch-selectable: internal or external. INTERNAL: via voltage measurement channel L1. EXTERNAL: via 3-prong wall socket POWER OUTAGES: operates for at least 15 seconds without power and records time/date of outage. Energy storage medium: Ultra capacitors. 23 [S-UME-S200-003] STYLITIS-POWER USER’S MANUAL 0614 POWER CONSUMPTION: 5VA MAX VARIOUS ENCLOSURE: ΙΡ67 sealed with carrying handle. DIMENSIONS: 27 x 24.6 x 17,4 cm (11275 cm3). WEIGHT: 3kg. CONNECTORS: Removable circular connectors on left and right side. OPERATING TEMPERATURE: 0~ +65 OPERATING HUMIDITY: 5~ 95% WARRANTY: 1 Year. 24 [S-UME-S200-003] STYLITIS-POWER USER’S MANUAL 0614 APPENDIX A CONNECTORS CONNECTOR NUMBERING SHOWN CORRESPONDS TO: Chassis Connectors: Front View Cable Connectors: Back View U_L2+ U_L1- 3 U_L2- 2 U_L1+ 8 4 U_NU input 1 5 7 U_L3+ 6 U_N+ U_L3- EARTH 3 NEUTRAL POWER SUPPLY input 1 6 LIVE [S-UME-S200-003] STYLITIS-POWER USER’S MANUAL 0614 25 CONNECTOR NUMBERING SHOWN CORRESPONDS TO: Chassis Connectors: Front View Cable Connectors: Back View I_L2- I_L2+ 4 I_L3+ 3 5 I_N- C.T. input 8 I_L3- 2 6 7 I_L1- 1 I_N+ I_L1+ DTR out 3 CTS in GND 2 4 TXD out RS-232 6 5 RTS out 1 RXD in 26 [S-UME-S200-003] STYLITIS-POWER USER’S MANUAL 0614