1
TUT/NOKIA
Laika project:
http://www.cs.tut.fi/~laika/
LAIKA USER GUIDE
1 (26)
26.10.2005
v. 1.5
User Guide to the Laika Plugin for Eclipse
Change History Issue
Date Handled by
Comments 0.1 0.2 April 28, 2005 April 29, 2005 Matti Sillanpää Matti Sillanpää 0.3 June 3, 2005 Matti Sillanpää 0.4
June 9, 2005 Matti Sillanpää 0.5
0.6
0.7
0.8
0.9
1.0
1.1
1.2
1.3
1.4
1.5
July 27, 2005 July 29, 2005
August 2, 2005
August 8, 2005
August 9, 2005
August 17, 2005
September 8, 2005
September 15, 2005
Sebtember 16, 2005
Sebtember 28, 2005
October 26, 2005
Matti Kosola, Pekka Reijula
Kosola, Reijula, Kuusipalo
Pekka Reijula
Kosola, Kuusipalo, Reijula
Reijula
Reijula
Reijula, Kosola
Kuusipalo
Kosola, Reijula
Kosola
Kosola
Document created.
Finalized for preview release of the plugins.
Finalized for a release of the plugins.
Changed the comment in the “known issues” section about error parsers.
Modified for Laika project.
Added tutorial for Debian package
1.1, 4.8, corrections
Typographic update
In brief, corrections, references
4.9, correcions, improvements
Updated to Laika v1.0
Wrote chapter 5 for automake
Typographic update
Added info about SBRSH
Updated to Laika v1.1
TUT/NOKIA
Laika project:
http://www.cs.tut.fi/~laika/
LAIKA USER GUIDE
2 (26)
26.10.2005
v. 1.5
Table of Contents
1 INTRODUCTION.............................................................................................................................4
1.1 In Brief.......................................................................................................................................4
1.1.1 Chapter I: Introduction........................................................................................................4
1.1.2 Chapter II: Requirements....................................................................................................4
1.1.3 Chapter III: Installation.......................................................................................................4
1.1.4 Chapter IV: Using the Plugin..............................................................................................4
1.1.5 Chapter V: Behid the Scenes..............................................................................................5
1.1.6 Chapter VI: Known Issues..................................................................................................5
1.1.7 Chapter VII: References ....................................................................................................5
1.2 Declarations...............................................................................................................................5
1.2.1 Autogen..............................................................................................................................5
1.2.2 Bourne Shell.......................................................................................................................5
1.2.3 CDT....................................................................................................................................5
1.2.4 CPUTransparency..............................................................................................................5
1.2.5 GDB Server........................................................................................................................6
1.2.6 GTK....................................................................................................................................6
1.2.7 Hildon.................................................................................................................................6
1.2.8 Maemo................................................................................................................................6
1.2.9 QEMUARM......................................................................................................................6
1.2.10 SBRSH..............................................................................................................................6
1.2.11 Scratchbox.........................................................................................................................6
2 REQUIREMENTS............................................................................................................................7
3 INSTALLATION..............................................................................................................................8
4 USING THE PLUGIN.......................................................................................................................9
4.1 Setting preferences.....................................................................................................................9
4.2 Creating a project ....................................................................................................................10
4.2.1 Overview..........................................................................................................................10
4.2.2 Automake Hildon Project inside Scratchbox...................................................................12
4.2.3 Standard Make C/C++ Project inside Scratchbox............................................................13
4.3 Import existing automake project to Eclipse............................................................................14
4.4 Modifying project properties ..................................................................................................15
4.5 Compilation..............................................................................................................................16
4.6 Running....................................................................................................................................17
4.6.1 Running when using SBRSH as CPUtransparency.........................................................18
4.7 Debugging................................................................................................................................18
4.7.1 GDB server inside Scratchbox..........................................................................................19
4.7.2 GDB server in real device.................................................................................................19
4.7.3 Debugging when using SBRSH as CPUtransparency.....................................................19
4.8 Making Debian package...........................................................................................................20
4.8.1 Make rules for project's Debian package..........................................................................20
4.8.2 Make Debian package......................................................................................................20
4.9 Installing Debian package to real device..................................................................................21
4.10 Toolbar buttons.......................................................................................................................21
4.10.1 XWindowing..................................................................................................................21
4.10.1.1 Start X......................................................................................................................21
TUT/NOKIA
Laika project:
http://www.cs.tut.fi/~laika/
LAIKA USER GUIDE
3 (26)
26.10.2005
v. 1.5
4.10.1.2 Stop X......................................................................................................................22
4.10.2 Maemo............................................................................................................................22
4.10.3 Scratchbox......................................................................................................................22
4.10.3.1 Adding own templates.............................................................................................22
4.10.3.2 Running commands inside Scratchbox...................................................................22
5 BEHIND THE SCENES.................................................................................................................23
5.1 Automake.................................................................................................................................23
5.2 Generating debian packaging rules..........................................................................................23
5.3 Building the debian package....................................................................................................23
6 KNOWN ISSUES............................................................................................................................24
6.1 General.....................................................................................................................................24
6.2 Eclipse......................................................................................................................................24
6.3 Maemo.....................................................................................................................................24
6.4 Debugging................................................................................................................................25
7 REFERENCES................................................................................................................................26
TUT/NOKIA
LAIKA USER GUIDE
4 (26)
26.10.2005
v. 1.5
Laika project:
http://www.cs.tut.fi/~laika/
1 INTRODUCTION
This guide introduces the features that our plugin provides for Scratchbox development, and describes how to apply them. The Scratchbox development tool is plugin Laika that is based on the C/C++ development tools (CDT) (http://www.eclipse.org/cdt/) plugin for Eclipse. Our aim is to reuse and extend their features to provide the possibility to build, run and debug C/C++ programs inside Scratchbox using the Eclipse IDE. In the plugin there are connected methods that help using Maemo (http://www.maemo.org) via Eclipse. The main difficulty so far in development has been the lack of developer documentation of the CDT project. Therefore, the development work has been based solely on the CDT source code. 1.1
In Brief
All the chapters described briefly.
1.1.1
Chapter I: Introduction
This chapter gives a firsthand information about the Laika plugin and how to use it.
1.1.2
Chapter II: Requirements
All the needed programs and addings are specified here. Requirements include links / adresses to the required programs webpages.
1.1.3
Chapter III: Installation
Installation chapter specifies, what has to be done before running Laika for the first time. When installing new templates to Laika plugin, user should use Add new template to Laika plugin method in Scratchbox toolbar icon.
1.1.4
Chapter IV: Using the Plugin
Using the plugin is by far the largest chapter in this guide. It tells how to use the plugin properly. All the settings are explained briefly. The creation of project is detailed very carefully. The guide explains differences between project types, the selections available in current project and how to modify the project. The usage of compile, run, debug and the differences from CDT are all introduced in their own sections. The main difference between typical C/C++ project and Scratchbox project is the target, where the project will be built. For example ARM target creates an ARM binary and X86 target creates a X86 binary, whereas the typical C/C+ creates always the binary corresponding the processor where the binary is built. The next section of using the plugin is about creating Debian packages. The section introduces the use of creating rules for creating Debian package and how to create them. Also tips for installing Debian packages to Nokia 770 are located in the end of this chapter.
TUT/NOKIA
LAIKA USER GUIDE
5 (26)
26.10.2005
v. 1.5
Laika project:
http://www.cs.tut.fi/~laika/
1.1.5
Chapter V: Behid the Scenes
This chapter describes the features, that need to be detailed more specific. Most of this chapter includes information about how automake is used in our plugin.
1.1.6
Chapter VI: Known Issues
Known issues chapter is all about the problems we have encountered during the creation of Laika plugin. It has issues from environment, software, real device and general category.
1.1.7
Chapter VII: References
This chapter includes the references.
1.2
1.2.1
Declarations
Autogen
Autogen is a script, which we use in automake projects. It will execute the following scripts, so user does not need to pay attention to these: aclocal, autoconf, automake and configure.
1.2.2
Bourne Shell
Steve Bourne, wrote the Bourne shell which appeared in the Seventh Edition Bell Labs Research version of Unix. Other shells include the Korn Shell (ksh), the C Shell (csh), and variations such as tcsh.
1.2.3
CDT
The CDT (C/C++ Development Tools) Project is working towards providing a fully functional C and C++ Integrated Development Environment (IDE) for the Eclipse platform.
1.2.4
CPU-Transparency
A feature of the Scratchbox where a programs and scripts can run their crosscompiled installation or build environment test binaries like they were native. Scratchbox has told the desktop kernel to run foreign binaries with one of the cpu transparency methods. All this is transparent to the software which thinks it's doing native compilation when it's actually crosscompiling software on a much faster x86 machine.
Currently there are two supported cpu tranparency methods in Scratchbox : QEMU and SBRSH.
TUT/NOKIA
Laika project:
http://www.cs.tut.fi/~laika/
1.2.5
LAIKA USER GUIDE
6 (26)
26.10.2005
v. 1.5
GDB Server
GDBServer is a control program for Unixlike systems, which allows you to connect your program with a remote GDB via target remote, but without linking in the usual debugging stub.
1.2.6
GTK
GTK+ is a multiplatform toolkit for creating graphical user interfaces. Offering a complete set of widgets, GTK+ is suitable for projects ranging from small oneoff projects to complete application suites. 1.2.7
Hildon
Hildon is a set of graphical libraries, that are built inside GTK. Hildon is actually a user interface framework, which is on use in Nokia 770 Portable Internet Tablet.
1.2.8
Maemo
Maemo is composed of popular open source software components which are widely deployed in the leading Linux desktop distributions today. Maemo adapts these components to the handheld environment and contributes new technology like easy tools for nonx86 development, Hildon user interface framework, and some useful applications for Hildon.
Maemo rootstrap is Maemo environment under Scratchbox.
1.2.9
QEMU-ARM
QEMU is a generic and open source processor emulator which achieves a good emulation speed by using dynamic translation. QEMUARM is ARM emulator which based on QEMU. That is also Scratchbox target's CPUtransparency method.
1.2.10
SBRSH
Scratchbox Remote Shell is an rsh/sshlike utility for Linux that supports terminal emulation, automated mounting of network shares, chroot, etc. Foreign binaries are run by 'sbrsh' client which will tell a 'sbrshd' daemon on an ARM device in the network to NFS mount relevant directories from the Scratchbox (desktop machine), execute the binary and redirect all the I/O back to the desktop machine. SBRSH is also Scratchbox target's CPU
transparency method.
1.2.11
Scratchbox
Scratchbox is a crosscompilation toolkit designed to make embedded Linux application development easier. It also provides a full set of tools to integrate and crosscompile an entire Linux distribution.
TUT/NOKIA
Laika project:
http://www.cs.tut.fi/~laika/
LAIKA USER GUIDE
7 (26)
26.10.2005
v. 1.5
2 REQUIREMENTS
To use our plugin, the user needs the Eclipse IDE and the C/C++ Development Tools plug
ins in addition to the Scratchbox environment. Also, the underlying operating system needs to have the Bourne Shell available at “/bin/sh”. This is because of the mechanism that is used to run the commands inside the Scratchbox (using the “login” script). The tested and thus supported versions are as follows, and there is also a brief installation tutorial. These versions are recommendations, but Eclipse needs to hava a working CDT, so don't use Eclipse versions under 3.0. Also using Scratchbox versions under 0.9.8.5 are not recommended, since they are not tested. Eclipse v.3.1
●
Download and extract Eclipse package:
http://www.eclipse.org/downloads/ ●
Remember that Eclipse requires Java virtual machine ●
We are using Java(TM) 2 Runtime Environment, Standard Edition 1.4.2_08 CDT v.3.0
●
Please note that there are separate update sites for the 2.x versions of the CDT and the 1.x versions. The reason for keeping them separate is because the CDT 1.x series will NOT run on Eclipse 3.x, and the CDT 3.0 series MUST run on Eclipse 3.1.
●
Eclipse plugin, which allows you to generate C/C++ code with Eclipse ●
Download and extract CDT package:
http://www.eclipse.org/cdt/ Scratchbox v.0.9.8.5 (or 1.0.1, not supported by Maemo)
●
Download and install Scratchbox packages:
http://www.scratchbox.org/download/files/sboxreleases/0.9.8/ ●
The Debian packages can be installed from this APT source: deb http://scratchbox.org/download/files/sboxreleases/0.9.8/deb/ ./ ●
More information about installation of Scratchbox: http://scratchbox.org/documentation/docbook/0.9.8/installdoc.html Maemo v.1.1 (or v1.0)
●
Download Maemo rootstrap packages for ARM and I386: http://maemo.org/downloads/downloadsdk.html
●
Put packages into /scratchbox/packages directory ●
Create new target into Scratchbox and install Maemo rootstrap there ●
More information about using Maemo:
http://maemo.org/platform/docs/tutorials/Maemo_tutorial.html TUT/NOKIA
Laika project:
http://www.cs.tut.fi/~laika/
LAIKA USER GUIDE
8 (26)
26.10.2005
v. 1.5
3 INSTALLATION
The plugin should be installed by unpacking the files inside the user’s eclipse IDE root directory. This is often the directory “~/eclipse”. They will be unpacked under the “plugins” directory, and Eclipse will find them there the next time it is run. The latest version of Laika plugin can be downloaded from our web site at:
http://kooditakomo.cs.tut.fi/projects/laika/ or
http://www.cs.tut.fi/~laika/downloads.shtml
After installing all necessary programs mentioned in previous chapter (2. References), user will have to create a user and target to Scratchbox, before using Laika plugin. Instructions are found at http://www.scratchbox.org/documentation/docbook/0.9.8/installdoc.html chapters 2.3 & 2.4.
Before creating first Scratchbox project with Laika, Scratchbox version and other perferences must be set from preferences page (detailed in 4.1).
When installing new templates to Laika plugin, user should use Add new template to Laika plugin method in Scratchbox toolbar icon. More details in section 4.9.1 Adding own templates. TUT/NOKIA
LAIKA USER GUIDE
9 (26)
26.10.2005
v. 1.5
Laika project:
http://www.cs.tut.fi/~laika/
4 USING THE PLUGIN
4.1
Setting preferences
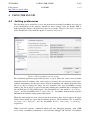
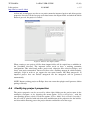
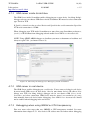
The first thing a user should do is to set the preferences for using Scratchbox, since the rest of the functionality of the plugins depends on these settings. Once the Eclipse IDE is running with the plugins, the preferences may be set via the “Window>Preferences” menu, under which there is a list with the option “Scratchbox Preferences”.
Figure 1. The Scratchbox preferences page
The Scratchbox preference page offers the user a way to define the syntax used to invoke commands inside Scratchbox (this varies between versions), the root directory of the user’s sandbox environment, and the target that is chosen for building and running programs. Note that to be able to change the target, the user shouldn’t have open Scratchbox sessions running. The list of targets is parsed at runtime utilizing the command that is configured in the text field titled “Listing build targets”. For Scratchbox 1.0.1, this would be “sbconf list –
targets”, and for Scratchbox 0.9.8.5, “sboxconfig lt”. Scratchbox documentation provides information on initially setting up the build targets. When the build target has been selected and the preferences have been accepted, the target will be chosen using the syntax that Scratchbox provides. For Scratchbox 1.0.1 it would be “sbconfig select ${target}” and for Scratchbox 0.9.8.5 “sboxconfig –st ${target}”, respectively.
GDB server field contains a command which will start debugging program with GDB server inside scratchbox if checkbox is selected from debugger tab. In 0.9.8.5 Scratchbox TUT/NOKIA
Laika project:
http://www.cs.tut.fi/~laika/
LAIKA USER GUIDE
26.10.2005
10 (26)
v. 1.5
command is ”qemuarm g ${binary}” when using ARM target and QEMUARM as CPU
transparency method. When using SBRSH, the command could be example ”gdbserver localhost:10000 ${binary}”
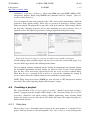
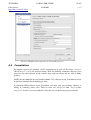
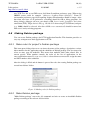
User can import his own made preference files. This can be useful when having a different preferences from default settings. These files are located in preferences directory under Laika core plugin. The plugin only accepts files with .pref extension. When using Laika for the first time, changing preference file or after importing user own perference file it is required to close and reopen the preferences dialog to update the dialog and settings. Figure 2a,b. Preference page for selecting Scratchbox target and Xenvironment
Second subpage shows available targets and lets user to select the current build target. User can also check target details when clicking details button.
The last subpage contains commands for the starting Xenvironment and exporting display for Scratchbox applications. Default settings are made for Xvnc. If your viewer program does not have server and viewer separated just leave the server or viewer textfield empty. When Run Xserver command inside Scratcbox is selected the command for starting X server is runned inside the sandbox. Otherwise the command is runned locally.
NOTE: When using target where SBRSH has been selected as CPUtransparency method leave field ”The syntax exporting display's IP and numer” empty.
4.2
Creating a project
The “Standard Make C/C++ Project inside Scratchbox” should be used when creating a normal C program with for example GTK+ libraries. The “Automake Hildon Project inside Scratchbox” should be used when creating a Hildon applications. After selecting which project user wishes to create, all he has to do is follow the wizard. The couple first pages are similar in both wizards.
4.2.1
Overview
The user may create a Scratchbox project largely in the same manner as a standard C/C++ project. This may be done via the menu options “File>New>Project” or by clicking on the TUT/NOKIA
Laika project:
http://www.cs.tut.fi/~laika/
LAIKA USER GUIDE
26.10.2005
11 (26)
v. 1.5
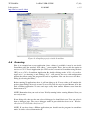
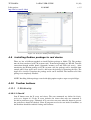
shortcut icon on the top left corner of the screen. The user may choose either a “Standard Make C/C++ Project inside Scratchbox” or the “Automake Hildon Project inside Scratchbox”. The CDT help functionality in Eclipse provides more information on the differences of the standard and the managed make project types. If the user does not want to start from the beginning every time he creates a new project, he can create his own template and add it to New Project Wizard or use one of the ready templates. Figure 3. Settings for a new project
After proceeding by clicking on the “Next” button, the user may enter the project location. The default location is constructed on the basis of the Scratchbox root directory that was entered in the preferences. The wizard will not allow a project to be set outside this directory, since then it would be impossible to access it from within Scratchbox.
The following pages provide the same options that are available for a standard C/C++ project. The user may change e.g. the commands used for different kinds of builds, as well as select the error parsers and binary parsers that should be used.
To modify the settings that are used for building, the user may use project property pages. Their use is described in the following section (section 4.3). TUT/NOKIA
Laika project:
http://www.cs.tut.fi/~laika/
4.2.2
LAIKA USER GUIDE
26.10.2005
12 (26)
v. 1.5
Automake Hildon Project inside Scratchbox
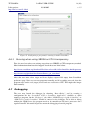
In Automake Hildon projects user will be able to create empty project, which will create a empty structure (but lots of files). Just click Finish and empty project will be created. User will not need to make makefiles himself and his application can easily be compiled and made for Nokia 770 Application installer.
Figure 4. Wizard for selecting custom addings
A user of Laika can also customize his projects. He can edit title, create modifiable menu and toolbar. Title page in wizard allows user to create a two part title for program. With menu page user can create a menu with submenus, normal menuitems, separators, radio, and checkbuttons. Toolbar page allows user to create different kind of buttons, separators and comboboxes. TUT/NOKIA
Laika project:
http://www.cs.tut.fi/~laika/
LAIKA USER GUIDE
26.10.2005
13 (26)
v. 1.5
Figure 5a,b. Wizard for customizing menu and toolbar
If user does not want to customize his empty project or create a new one, automake project will let him to select a fully functioning Hildon application from few templates. These templates are very handy, when you are taking a first look to the world of Hildon applications. After creating a template user is ready to run clean/make, because ./autogen.sh is automatically run. When Finish is clicked structure of project is created inside Scratchbox and ./autogen.sh is run. Now user has a ready project and he can build it with Build or Clean, from Project menu. NOTE: Remember to check that all your settings are correct.
4.2.3
Standard Make C/C++ Project inside Scratchbox
In Standard Make C projects user can select a ready template or begin with empty project. He will have to handle all makefiles himself and he is not able to create Debian packages automatically. In C++ projects there are no ready templates.
Standard Make C project templates are simple GTK examples. They will help user to create simple programs when he is familiarizing himself with GTK. TUT/NOKIA
Laika project:
http://www.cs.tut.fi/~laika/
LAIKA USER GUIDE
26.10.2005
14 (26)
v. 1.5
Figure 6. Wizard for selecting templates
4.3
Import existing automake project to Eclipse
User can easily import non Eclipse projects by choosing menu option ”File>Import”. After that pops up a normal import dialog (Figure 7.) and by selecting ”Existing Hildon Automake C Projects inside Scratchbox” starts wizard for importing project to Eclipse. Figure 7. Import existing project to Eclipse
TUT/NOKIA
Laika project:
http://www.cs.tut.fi/~laika/
LAIKA USER GUIDE
26.10.2005
15 (26)
v. 1.5
At first and second pages user has to set project name for imported project and adjust project properties if needed. At the last page user must browse the import folder and when the finish button is pressed, the project is created. Figure 8. Browse the import folder
When creating a new project all files from import folder will be copied into a subfolder in the Scrachbox directory. The imported folder needs to have a working automake configuration. This wizard only makes .project and .cdtproject files related to Eclipse, and leaves your project untouched. You need to have also a working autogen.sh, which includes configure script in order to get support for our menu features like 'Run autogen.sh'. If imported project does not include autogen.sh file the autogen.sh will be generated automatically.
NOTE: Import existing project to Eclipse does not ensure that plugin could generate debian package correctly. 4.4
Modifying project properties
The project properties can be accessed by either rightclicking on the project name in the workspace navigator, or by choosing the menu option “Project>Properties” with the corresponding project selected. Under the option “C/C++ Make Project Inside Scratchbox” the user will be provided with tabs that offer modification of the properties for the builder, and also enable choosing parsers for project binaries and builder error messages. TUT/NOKIA
LAIKA USER GUIDE
Laika project:
http://www.cs.tut.fi/~laika/
26.10.2005
16 (26)
v. 1.5
Figure 9. Modifying the properties of a Scratchbox project
4.5
Compilation
To compile a project, the standard “build” command can be used via the menus (“Project
>Build Project”), or by the shortcut button. Then, the building commands that have been issued are run and displayed on the console along with any output that the shell or Make produce. NOTE: that the Makefile for each Standard Make C/C++ Project inside Scratchbox needs to be provided manually for the building to work.
In Automake Hildon Project inside Scratchbox user must only pay attention, when he is adding or removing source files. Then he must run autogen.sh from ”Project>Run autogen.sh” in order to recreate makefile. After this you can build your project normally.
TUT/NOKIA
LAIKA USER GUIDE
Laika project:
http://www.cs.tut.fi/~laika/
4.6
26.10.2005
17 (26)
v. 1.5
Figure 10. Compiling a project inside Scratchbox
Running
Here is an example how to run application: Once a binary is available, it may be run inside Scratchbox using the standard “Run>Run...” menu option. There, the user has the option to run it as a C/C++ Local Application (the CDT version, external to Scratchbox using the host CPU) or as a C/C++ Scratchbox Application. By doubleclicking on the “C/C++ Scratchbox Application”, or choosing it and clicking “New”, will provide the user with configuration options that allow setting the program file and its arguments. You can also access the Run... dialog by selecting the binary.
Before running Xapplications there is still one thing to do. If user wishes to Xemulate his projects from Eclipse he needs to start X server. He will also need to start Maemo, if he has done a Hildon application. X starts and stops easily from toolbar. Maemo starts from the button next to X. NOTE: Remember that you need to have X fully running before starting Maemo. Now you are ready to run.. If run dialog tells, that user has not selected debugger, he should do it next. User can select it from a debugger page. The server debugger works in port which has been set in ”Window
>Preferences>Scratchbox Preferences”. NOTE: If you have done a Hildon application you should run the program in standalone mode. It can be selected from main tab. TUT/NOKIA
LAIKA USER GUIDE
Laika project:
http://www.cs.tut.fi/~laika/
26.10.2005
18 (26)
v. 1.5
Figure 11. Configuring a program for running it inside Scratchbox
4.6.1
Running when using SBRSH as CPU-transparency
First, the user has to have an existing target that uses SBRSH as CPUtransparency method. More information about how this happens check these two links below:
http://www.scratchbox.org/download/files/sboxreleases/0.9.8/doc/installdoc.html#cputransp
http://maemo.org/platform/docs/howtos/howto_cpu_trans.html
After that user must select target and leave displays export field empty from Scratchbox preference page. Now user can run programs normally and if everything succeeds, then the program starts on the real (target) device and uses real devices CPU. This might take longer than normally.
4.7
Debugging
The user may launch the debugger by choosing “Run>Debug”, and by creating a configuration for the “Scratchbox C/C++ Scratchbox Application” similarly as when running a program. On the “Debugger” tab, either “GDB Debugger inside Scratchbox” or “GDB Server inside Scratchbox” should be entered as the debugger. To be able to debug without the GDB Server, the program needs to be runnable on the host’s processor. On a regular Linux PC this would in practice mean the debugging of an x86 program. TUT/NOKIA
LAIKA USER GUIDE
Laika project:
http://www.cs.tut.fi/~laika/
4.7.1
26.10.2005
19 (26)
v. 1.5
GDB server inside Scratchbox
The GDB Server inside Scratchbox enables debugging on a target device. On debug dialog's debugger tab user can choose GDB Server inside Scratchbox. He must also select connection type: Serial or TCP.
If Serial is selected user has to select Device and Speed for the serial connection. Speed for N770 serial connection is 115200. When debugging over TCP inside Scratchbox user must first setup Scratchbox preferences, (see 4.1) set IP and Port from debugging tab and enable Start GDBServer Automatically.
NOTE: Using QEMUARM debugger on localhost you must set hostname to localhost and always use port 1234. (see known issues 6.4)
Figure 12. Choosing the debugger for debugging inside Scratchbox
4.7.2
GDB server in real device
The GDB Server enables debugging on a real device. If user wants to debug in real device he must install GDB server on that device. Also he must know device's IP address if he debugs over TCP. On debug dialog's debugger tab he can choose GDB Server inside Scratchbox and select connection. GDB Server must be started (runstandalone.sh) every time manually from real device before debugging. Start GDB Server Automatically should not be enabled when debugging in the real device.
4.7.3
Debugging when using SBRSH as CPU-transparency
First user must select target that uses SBRSH as CPUtransparency method. See more information from chapter 4.5.1. Also device's IP address must be known when debugging TUT/NOKIA
LAIKA USER GUIDE
Laika project:
http://www.cs.tut.fi/~laika/
26.10.2005
20 (26)
v. 1.5
over TCP. User has to set GDB server field from Scratchbox preference page. When using SBRSH syntax could be example ”gdbserver localhost:10000 ${binary}”. From X
environment preference page field exporting displays IP and number should be empty. After that when user have set all preferences everything should be OK to debug programs. On debug dialog's debugger tab user can choose GDB Server inside Scratchbox and select connection (TCP). Target device's IP (e.g. 192.168.2.15 when using N770 USBnet) and port (e.g. 10000) should be selected. Also Start GDB server automatically should be turned on. Now user is ready to debug programs.
4.8
Making Debian package
User can create Debian packages for N770 Application Installer. This function provides an easy way to import user made applications to N770. 4.8.1
Make rules for project's Debian package
This item opens dialog where user can insert the name of the package, description, version, index numbers for the application and the subfolder of Debian package. The user must also select an entry page for makefile. This means that makefile finds other related files in current project. Index number controls the order of the list of applications in the extra_applications menu. If create new folder is selected then user must also assign the name and index number of the subfolder.
After the dialog is filled and ok button is pressed the rules for creating Debian package are created into debian/ folder.
Figure 13. Making rules for Debian package 4.8.2
Make Debian package
”Make Debian package” runs make deb command and tries to create an installable Debian package according to the rules on /debian folder.
TUT/NOKIA
LAIKA USER GUIDE
Laika project:
http://www.cs.tut.fi/~laika/
26.10.2005
21 (26)
v. 1.5
Figure 14. Items for making Debian package
4.9
Installing Debian package to real device
There are lots of different methods to install Debian package to Nokia 770. The package must be first transferred to N770 (or mem card). Transferring methods are WLAN, Internet connection through mobile phone, bluetooth, memory card and USB (adv users). After transferring the Debian package to N770 (or mem card) the package can be installed from control panel. Start Application installer and locate the package by browsing the files. The Application installer recognizes the package and it can be installed. The installer tells if the package was completely installed.
NOTE: Installing debian package created with dpkg option requires super user privilidges. 4.10
Toolbar buttons
4.10.1
X-Windowing
4.10.1.1 Start X
Start X button starts the X server and viewer. The start commands are defined in Setting preferences chapter 4.1. If the X server includes the viewer then only one command is needed in preferences page. Ultimately if X server does not start when the button is pressed the preferences should be checked. Some X programs need to be run inside Scratchbox, so the checkbox should be enabled if using such software.
TUT/NOKIA
LAIKA USER GUIDE
Laika project:
http://www.cs.tut.fi/~laika/
26.10.2005
22 (26)
v. 1.5
4.10.1.2 Stop X
Stop X is implemented with rough method. The X server is killed with killall command.
4.10.2
Maemo
Handling Maemo is done by running scripts inside Scratchbox target. The commands used for starting, restartin and stopping Maemo are: afsb init (start/restart/stop).
4.10.3
Scratchbox
4.10.3.1 Adding own templates
User can customize his plugin by adding new templates to New Project Wizard. This makes it possible to add for example basic architechtural structure of project in every project the user / company creates. The template installer can be started from Scratchbox toolbar menu. The user is asked to tell the directory he wants to copy inside plugin, so the new template will be always found from plugin. Pay special attention when selecting folder you are adding. The installer will warn every time the template is about to be added, but serious trouble will follow when for example / (root) folder is selected.
4.10.3.2 Running commands inside Scratchbox
If some special commands are not supported by our plugin, there is no need to start terminal necessarily. You can run console command form Scratchbox toolbar icon. The output is written to eclipse console. The command is runned in the folder the user has selected. The default folder is users home directory in Scratchbox.
TUT/NOKIA
LAIKA USER GUIDE
Laika project:
http://www.cs.tut.fi/~laika/
26.10.2005
23 (26)
v. 1.5
5 BEHIND THE SCENES
5.1
Automake
Automake is a tool that helps building the application and relieves the user from the task of creating a makefile. In this version of the plugin the automake is quite stupid and requires some definitions to be in the same files. Automake requires (in order to maintain compability with debian package creation) that the main file (should be the file that makes the actual osso_initialization) contains at least definitions APP_NAME and APP_VER to register the application to DBUS. Others needed in the main file APP_SERVICE and APP_METHOD, they are needed in setting up the rpc callback. When a automake project is created the default files are read and reconfigured properly to create working files to enable automaking feature.
Other things needed in our automake are the properly configured Makefile.am and configure.ac. The configure.ac must contain variables PACKAGE=<application_name> and VERSION=<application_version> and the correct paths for .desktop and .service files. Libraries can be modified quite freely, at this stage default includes are all Hildon libraries and GTK. Makefile.am requires that when the BIN_PROGRAM, _SOURCES or _LDADD is defined the definition must begin with eg. # Binary and end with # /Binary. When the package name is changed (eg. renaming in the debian packaging rules) the Makefile.am is patched using the commentlines and the package name will be changed in the correct places.
Running autogen.sh through menus patches the sources (_SOURCES) of the root Makefile.am or src/Makefile.am to include all .c files in the src/ folder and subfolders. So C++ isn't working very well, yet. 5.2
Generating debian packaging rules
Generating debian package modifies the Makefile.am, configure.ac and the main() file like discussed in the previous chapter (5.1). It also creates a new files to debian/ folder. These files control how the debian package is built, version numbers and such. One of the files is the <application_name>.links file that controls where the symbolic link is created in the install process. Depending on the installation style (application installer vs. dpkg i (as root) from the console) and the installation subfolder the file looks different. Rerunning the package creation rules should NOT break the files, but since it based on just a stupid find&replace method, it is possible (however unlikely) that some files may break! 5.3
Building the debian package
The command for building the debian package can (and must) in the Makefile in the root section of the application. The makefile must contain rules to run make deb, since the plugin builds the package via the makefile. The rule for make deb can simply be the dpkg
buildpackage rfakeroot, that is covered in the tutorial pages of maemo [Maemo].
TUT/NOKIA
LAIKA USER GUIDE
Laika project:
http://www.cs.tut.fi/~laika/
26.10.2005
24 (26)
v. 1.5
6 KNOWN ISSUES
This is an open source project, so we hope help also from all the users of Laika. We kindly ask you to report found bugs to our developers [email protected]. The latest bug reports are found in:
http://kooditakomo.cs.tut.fi/projects/laika/
(http://www.cs.tut.fi/~laika/bugs.shtml)
6.1
6.2
6.3
General
●
The “login” script that is used to run commands will output an error in the end of each command that is run, because it attempts to kill a process that is already dead. If this disturbs the user, the last two lines of the script /scratchbox/login may be commented out. Their effect is to attempt to kill the process group of the script. ●
This plugin is tested only on GNU/Linux Debian distribution.
●
You may face problems when versions differ from our supported versions. (see requirements 2)
Eclipse
●
When selecting the error parsers in project creation, the settings will actually only take effect for the next project created. They may be set for a project via the project property settings (see Section 4.3). This is a bug (or a feature) in CDT, not in the Scratchbox Development Tools. ●
Xserver is killed from toolbar with killall command.
●
In "Standard Make C Project inside Scratchbox" and "Automake Hildon Project inside Scratchbox", when you choose a template and click "Next" nothing happens. Clicking ”Finish" the project is created.
●
"Build Automatically" should be enabled from ”Project>Build automatically”. When creating new project Eclipse try build project before autogen.sh hasn't yet created makefile. So you could disable "Build Automatically" from project menu or clean project.
Maemo
●
Hildon applications must be run in standalone mode.
●
Osso initialization will fail when using SBRSH as CPUtransparency method
TUT/NOKIA
Laika project:
http://www.cs.tut.fi/~laika/
6.4
LAIKA USER GUIDE
26.10.2005
25 (26)
v. 1.5
Debugging
●
Using GDB server inside Scratchbox with QEMUARM emulation fails to connect GDB server sometimes when using Maemo 1.0 rootstrap. After successful launch of QEMU
ARM server, the server will mostly work fine. If you receive an error message, try again.
TUT/NOKIA
Laika project:
http://www.cs.tut.fi/~laika/
LAIKA USER GUIDE
26.10.2005
7 REFERENCES
CDT
http://www.eclipse.org/cdt/ Eclipse
http://www.eclipse.org
Maemo
http://www.maemo.org
Nokia
http://www.nokia.com
Scratchbox
http://www.scratchbox.org
TUT
http://www.tut.fi
26 (26)
v. 1.5