1
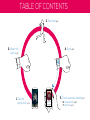
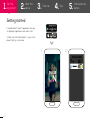
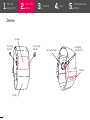
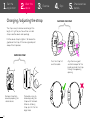
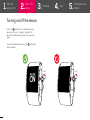
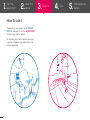
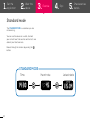
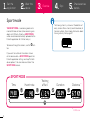
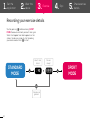
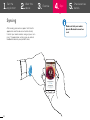
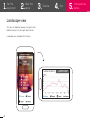
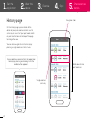
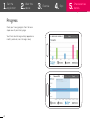
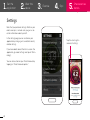
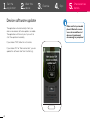
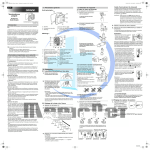
Extended user guide
1
TABLE OF CONTENTS
3. Exercise! p.9
2. Wear the
device p.5
1. Get the
application p.3
4. Sync p.16
5. Check exercise details p.17
6. Troubleshoot p.30
7. Warranty p.31
1.
Get the
application
2.
Wear the
device
3.
Exercise
4.
5.
Sync
Getting started
1. Download the “PulseOn” application from your
smartphone’s application store and install it.
2. Make sure that the Bluetooth® in your smartphone’s Settings is activated.
1.
3
2.
Check exercise
details
1.
Get the
application
2.
Wear the
device
3.
Exercise
4.
Sync
5.
Check exercise
details
Device
Screen
Scrolling
button
Start/stop
button
Optical sensor
Charging
connectors
Buckle
Strap
4
1.
Get the
application
2.
Wear the
device
How to wear it
The easiest and quickest way to put on the
device on is to first fasten the strap through the
buckle, then pull the device over your hand.
To measure heart rate (HR) reliably it is essential that you wear the device correctly. Place it
roughly a finger length away from the bone on
the side of your wrist (ulna) and tighten it firmly
against your skin.
The strap should be tight enough to keep the
device firmly on its place throughout your exercise.
A loosely attached device may lead to unreliable
HR readings.
5
3.
Exercise
4.
Sync
5.
Check exercise
details
1.
Get the
application
2.
Wear the
device
3.
Changing /adjusting the strap
Exercise
4.
Sync
5.
Check exercise
details
FASTENING THE STRAP
The strap is easy to remove and change if the
length isn’t right for you. You will find a smaller
strap inside the device sales package.
Pull the device strap to tighten it. To release the
grip/loosen the strap, lift the moving buckle part
and pull the strap base.
REMOVING STRAP
Pass the strap first
over the buckle
Remove strap from
device by opening the
velcro closure.
6
The buckle is easy to
remove by pulling the
strap out of the hooks.
When re-attaching
strap, slip it first to the
longer hook.
Align the moving part
and the fixed part of the
buckle and slide the strap
through the appearing
opening.
1.
Get the
application
2.
Wear the
device
3.
Exercise
4.
Sync
5.
Check exercise
details
Turning on/off the device
Press the a button for five seconds and the
device will turn on. If it doesn’t, connect the
device to the device charger for 1 hour and try
again.
Turn off the device by pressing the a button for
seven seconds.
5 sec
7
7 sec
1.
Get the
application
2.
3.
Wear the
device
4.
Exercise
Sync
Charging your device
A charging indicator will appear
on the screen when the device
is charging.
To charge the device, connect the charger clip
with the device. Both the device and the clip
have a pair of connector tabs that need to be
joined (marked by arrows in the picture).
The charger clip comes with a USB cable that
can be connected to your computer’s USB slot
or any USB charger head to get the needed
energy to charge the device.
Checking your device battery level
Check your device battery level by pressing
Press any button to return.
Full
8
2/3 left
5.
Check exercise
details
a for 3 seconds.
Low (1h left)
Critical
(10 min left)
1.
Get the
application
2.
Wear the
device
How to use it
The device has two modes, the STANDARD
MODE for everyday life and the SPORT MODE
to record your exercise details.
By recording your exercise details, you will get
meaningful feedback and coaching from the
PulseOn application.
9
3.
Exercise
4.
Sync
5.
Check exercise
details
1.
Get the
application
2.
Wear the
device
3.
Exercise
4.
Sync
5.
Standard mode
The STANDARD MODE is used when you are
not exercising.
You can use the device as a watch, to check
your current heart rate and to see the stats and
date of your latest exercise.
Browse through the screens by pushing the a
button.
STANDARD MODE
Time
10
Heart rate
Latest stats
Check exercise
details
1.
Get the
application
2.
Wear the
device
3.
Exercise
4.
Sync
5.
Check exercise
details
Sport mode
The training intensity is shown at the bottom of
every screen. When intensity level 6 reached, all
five bars will blink. Check more information about
training intensity from page 27.
THE SPORT MODE is used during exercise to
monitor HR and distance (when exercising outdoors with GPS on). All data in SPORT MODE
will be saved and automatically uploaded to the
PulseOn application for further analysis.
To browse through the screens, use the
ton.
a but-
If you want to customize the screens shown
on the device when in SPORT MODE, open the
PulseOn application settings and tap “PulseOn
device options”. You can choose a total of five
SPORT MODE screens.
SPORT MODE
Time
Heart rate
Training
effect
Duration
Distance *
* if GPS is on
11
1.
Get the
application
2.
3.
Wear the
device
Exercise
4.
Sync
5.
Check exercise
details
Recording your exercise details
Start by pressing p. Before entering SPORT
MODE the device will check you heart rate signal.
When the stopped timer clock appears on the
screen, the device is ready to start recording
your exercise data. Press p to start.
STANDARD
MODE
Heart rate
check
Cancel and
go back
12
Device
ready!
SPORT
MODE
1.
Get the
application
2.
Wear the
device
3.
Exercise
4.
Sync
5.
Check exercise
details
Pause/Finish exercise session
You can pause the recording of your exercise
data by pressing p.
You can then choose to return to the exercise
with the same button or end it by pressing a.
Pause
/ return to
exercise
SPORT
MODE
13
Finish exercise
session
STANDARD
MODE
1.
Get the
application
2.
Wear the
device
3.
Exercise
4.
Using GPS to get
speed/distance data
14
5.
Check exercise
details
Your personal exercise
feedback gets more
accurate when you
record it with GPS data
To get speed/distance data, follow these easy
steps:
1. Open the PulseOn application and put your phone
in your pocket
Sync
2. Record your exercise
details with the wrist device
3. The GPS data of your
exercise will be integrated
in the application feedback
and summaries.
1.
Get the
application
2.
3.
Wear the
device
Exercise
4.
5.
Sync
Check exercise
details
Additional screens
To find more about how
to use these screens, refer
to Troubleshooting at p.30.
Here are some of the other screens and use
cases you might need using the PulseOn device:
You will see this screen if the device can’t detect your heart
rate. See “Troubleshooting” (p.30) for possible reasons.
Check your device battery level by pressing
Press any button to return.
Full
2/3 left
a for 3 seconds.
Low (1h left)
Critical
(10 min left)
If you need to pair your device with a new phone, press both buttons for 3 seconds.
NOTICE! When you see this screen, stop pressing the buttons.
If you keep on pressing, the device will return to factory settings
You will see this progress bar when the device SW is being updated
Turn off the device by pressing
a for 7 seconds.
If the device stops responding, long press both buttons until
device resets itself. In this case, you will need to pair the device
again.
15
1.
Get the
application
2.
Wear the
device
3.
Exercise
4.
Sync
5.
Check exercise
details
Syncing
After ending your exercise, open the PulseOn
application and the device will automatically
transfer your exercise data and give you a summary. The application will also give you verbal
feedback based on your performance.
16
Make sure that your mobile
phone’s Bluetooth connection
is on!
1.
Get the
application
2.
Wear the
device
3.
Exercise
4.
Sync
5.
Check exercise
details
PulseOn Application
The application consists of 3 basic screens, the
home page in the middle, the latest event page
on the left and the history page on the right.
You can navigate through these pages by
swiping left and right.
Latest event page
17
Home page
History page
1.
Get the
application
2.
Wear the
device
3.
Exercise
4.
Sync
5.
Check exercise
details
The home page
This page always shows the date, duration,
training effect, recovery time and fitness level of
your latest event.
Once you open the application after using the
device during training, the home page will be updated automatically to show your latest event.
18
Settings button
Latest event duration
Latest event date
1.
Get the
application
2.
3.
Wear the
device
Exercise
4.
Sync
5.
Check exercise
details
Latest event page
This page gives you more details about your
sport event, for example verbal coaching based
on the training effect of your sport event.
Verbal coaching based
on training effect
Change the information focus by pressing the
buttons on the bottom of the page.
Duration
Heart rate
Training intensity
Calories burned
Distance
Event detail
focus buttons
19
Distance visible
after exercises that
have GPS data.
1.
Get the
application
2.
Wear the
device
Landscape view
Turn your smartphone sideways and get a more
profound analysis of your sport event details.
Landscape view available for all screens.
20
3.
Exercise
4.
Sync
5.
Check exercise
details
1.
Get the
application
2.
Wear the
device
3.
Exercise
History page
4.
Sync
5.
Check exercise
details
Navigation tabs
On the history page you can check all the
details of your past exercises either as a full
summary or as a list of your past week, month
or year. Use the tabs on the top of the page
to change the view.
You can also navigate to a full summary by
pressing a single exercise in the list view.
You can delete an exercise from the application
memory by pressing and holding it until the
delete button appears.
Scroll down to find
past exercises
Single exercise
summary
21
1.
Get the
application
2.
Wear the
device
Progress
Check your training progress from the landscape view of your history page.
Your fitness level change will only appear on a
month/year level, since it changes slowly.
22
3.
Exercise
4.
Sync
5.
Check exercise
details
1.
Get the
application
2.
Wear the
device
3.
Exercise
4.
Sync
5.
Check exercise
details
Settings
Note that your personal settings affect on your
exercise analysis, so make sure you give us accurate information about yourself.
In the settings page you can customize your
application by changing units and other country
related settings.
If you have doubts about the terms used in the
application, go under settings and tap on “Terminology”.
You can also customize your PulseOn device by
tapping on “PulseOn device options”.
23
Tap this icon to get in
and out of settings
1.
Get the
application
2.
Wear the
device
3.
Exercise
4.
Sync
5.
Check exercise
details
Device software update
The application will automatically inform you
when a new device software update is available.
The application will then ask you if you wish to
start the update immediately.
If you choose “YES”, follow the instructions.
If you choose “NO” or “Remind me later”, you can
update the software later from the Settings.
24
Make sure that your mobile
phone’s Bluetooth connection is active and the wrist
device is turned on and
close enough to your phone!
1.
Get the
application
2.
Wear the
device
3.
Exercise
4.
Sync
5.
Terminology
You can find brief explanations of all terms used
in the application under the settings button.
This section of the extended guide is going to
explain them more thoroughly and give some
insights to training.
25
Training effect?
Training intensity?
Recovery time?
Fitness level?
Check exercise
details
1.
Get the
application
2.
3.
Wear the
device
Exercise
4.
Sync
5.
Check exercise
details
o What is Training Effect?
Training Effect allows you to discover how effective your exercise actually is, i.e. what is the
effect on your fitness level. Training Effect is
personalized to your fitness level, therefore
performing the same workout, less fit will end
up with higher value as the workout’s impact to
body has been greater compared with more fit.
Training Effect measures workout’s impact on
aerobic fitness at a scale of 1.0-5.0. Low intensity makes Training Effect accumulate slower and
higher intensity faster.
While you use the device, personalization is done
automatically on the background based on your
observed fitness level and workout data.
TRAINING DESCRIPTION
EFFECT
c 6 km
d 45 min
Person with
low fitness level
TRAINING
EFFECT
3.9
26
Person with
high fitness level
TRAINING
EFFECT
2.2
1.0-1.9
Helps recovery (short activities).
Improves endurance with longer
activities (more than 40 minutes).
2.0-2.9
Maintains your aerobic fitness
3.0-3.9
Improves your aerobic fitness if
repeated as part of your weekly
program.
4.0-4.9
Highly improves your aerobic fitness if repeated 1-2 times per
week with adequate recovery time
5.0
Causes temporary overload with
high improvement. Train up to this
number with extreme care. Requires additional recovery days.
1.
Get the
application
2.
Wear the
device
3.
Exercise
4.
Sync
5.
Check exercise
details
f What is Training Intensity?
It describes the relative training intensity of your
exercise scaled to your maximal performance.
The chart below will tell you how the different
intensity levels feel like and who they are recommended to.
Intensity
1
2
3
4
5
6
27
Recommended
Feels like
All from beginners to very fit
Very light, slow walking
All from beginners to very fit
Light, can be kept on for hour(s)
All from beginners to very fit
Starts to feel in breathing but still able to talk, can be
well sustained up to an hour
For moderately fit
Already winded but can be sustained for a longer time
Only for fit
Heavy breathing, can be sustained only for few minutes
Only for very fit
Extremely heavy breathing, can be sustained only for
short period
1.
Get the
application
2.
3.
Wear the
device
Exercise
4.
Sync
5.
Check exercise
details
Recovery time
Recovery time tells you when your body is fully
recovered from the previous effort. This helps
you plan the timing of your workouts optimally
and ensure sufficient balance for training and
recovery.
Recovery
time
48H
12H
HARD
EXERCISE
LIGHT
EXERCISE
Recovery in progress.
maybe take it easy, for
example Training Effect
< 3.0
Completely ready for next
exercise, for example
Training Effect > 3.0
Completely ready for next
exercise, for example
Training Effect
> 3.0
0H
TODAY
28
TOMORROW
DAY AFTER TOMORROW
1.
Get the
application
2.
Wear the
device
h What is fitness level?
Fitness level shows if you are keeping fit or even
getting fitter as a result of your exercises. When
you exercise successfully and your fitness increases, as a reward you’ll see the number also
improving across weeks and months.
3.
Exercise
4.
Sync
5.
Check exercise
details
Low intensity
exercise
oxygen
consumption
The fitness level result is shown to you as compared to the average of people of your age and
gender.
VO2max
Fitness level is based on a measure called
VO2max (maximal oxygen consumption).
It indicates your body’s capacity to deliver oxygen to muscles and the level of your body’s
capability for aerobic exercise, such as jogging,
running or cycling.
It is a golden standard measure for fitness level.
29
High intensity
exercise
oxygen
consumption
Troubleshooting
I can’t pair my device
Possible solutions:
Check that your smartphone’s Bluetooth is
turned on. You can find it under your phone’s
Settings > Network connections.
Your wrist device might be turned off. If your
device has run out of battery, connect it to the
charger clip and try again.
My device doesn’t detect my heart rate or
it shows a wrong heart rate
Possible solutions:
Check the position and tightness of the device.
Try tightening the device strap. The device
needs to be pressed firmly against your skin to
get a continuous heart rate signal.
If your skin is cold it is possible that the blood
flow close to skin is too small to be measured.
Try warming up and see if it helps.
30
I went running with the device but the application
doesn’t show my exercise details
Possible solutions:
Check the instruction to creating a sport event
from the beginning of this guide. (p.12)
You can also try to create a test event before
going running to make sure the device and the
application are working. You can delete the test
event from the week view with a long press.
Try closing and re-opening the application.
Check that your device hasn’t run out of battery.
Check that your phone’s Bluetooth connection is
turned on
My device doesn’t react to pressing buttons
Possible solutions:
If the device stops responding, long press both buttons until device resets itself. In this case, you will
need to pair the device again.
Safety, Warranty and Regulations
PRODUCT USE AND
SAFETY
Please read this section carefully. Failure to follow these instructions
may void the product warranty.
• Consult your physician or healthcare provider before starting an exercise program or weight reduction
• PulseOn provides very accurate heart rate measurements. However,
it is not a medical device. All the information provided by PulseOn are
indicative and include margin of error.
• This product is intended to measure HR during exercises such as running, walking, cycling and other daily activities. In racket sports such as
tennis and badminton the measurement accuracy is affected by hand
movements.
• Clean sensor area regularly with water to maintain optimal performance
• The product is waterproof (IPx7) until one meter. Therefore do not
use product when diving.
• Keep product out of the reach of small children.
• Do not attempt to remove the battery from the device.
• Do not use a damaged USB cable
• Do not use or store the device in dusty, dirty areas. Its moving parts
and electronic components can be damaged.
• Do not store the device in hot areas (over 45˚ C or 113˚ F).
• Do not store the device in cold areas (Under 5˚ C or 41˚ F) .
• Do not open the device
• Do not drop, knock, or shake the device. Rough handling can break
internal circuit boards and fine mechanics.
• Do not use harsh chemicals, cleaning solvents, or strong detergents to
clean the device.
• Use and standby times are estimates only. Actual times are affected
by, for example, device settings, features being used, battery condition,
and temperature.
LIMITED WARRANTY
PulseOn Inc. (“PulseOn”) warrants that this product is free from defects
in material and workmanship that result in Product failure during normal
usage, according to the following terms and conditions:
31
1. The limited warranty for the Product extends for ONE (1) year beginning on the date of the sale of the Product to the original purchaser
(“Consumer”) of the Product.
2. During the limited warranty period, PulseOn will repair, or replace,
at PulseOn sole option, defective parts, or parts that will not properly
operate for their intended use, with new or refurbished parts if needed
because of product malfunction or failure during normal usage. The limited warranty does not cover defects in appearance, cosmetics, decorative or structural items including framing and non-operative parts,
and expenses related to removing or reinstalling the Product. PulseOn
does not warrant uninterrupted or error-free operation of the Product.
3. Consumer shall have no coverage or benefits under this limited warranty if any of the following conditions are applicable:
1. The Product has been subjected to physical abuse, exposure to water
over 1m depth, abnormal use, abnormal conditions, improper storage,
unauthorized modifications, unauthorized connections, unauthorized
repair, misuse, neglect, improper installation, shipping damage or other
acts which are not the fault of PulseOn.
2. The product has been damaged from external causes such as collision with an object, or from fire, flooding, sand, dirt, windstorm, lightning,
earthquake or damage from exposure to weather conditions, theft, or
improper use of any electrical source, or damage caused by software
viruses, bugs, worms, Trojan Horses, or by connection to products not
recommended for interconnection by PulseOn.
3. PulseOn was not advised in writing by Consumer of the alleged defect or malfunction of the Product within fourteen (14) days after the
expiration of the applicable limited warranty period.
4. If warranty repair is needed, Consumer should contact PulseOn for
instructions for returning the Product (See www.pulseon.com/support).
PulseOn will repair or replace the Product within thirty (30) days after
receipt of the item and a copy of an itemized receipt showing the date
of purchase.. PulseOn may, at its sole option, refund the price paid by
Consumer less a reasonable amount for usage. PulseOn is not responsible for any loss of data during repair.
Safety, Warranty and Regulations
5. ANY IMPLIED WARRANTY OF MERCHANTABILITY, OR FITNESS FOR
A PARTICULAR PURPOSE OR USE, SHALL BE LIMITED TO THE DURATION OF THE FOREGOING LIMITED WRITTEN WARRANTY. OTHERWISE, THE FOREGOING LIMITED WARRANTY IS CONSUMER’S SOLE
AND EXCLUSIVE REMEDY AND IS IN LIEU OF ALL OTHER WARRANTIES,
EXPRESS OR IMPLIED. PULSEON SHALL NOT BE LIABLE FOR SPECIAL,
INCIDENTAL OR CONSEQUENTIAL DAMAGES, INCLUDING BUT NOT
LIMITED TO LOSS OF ANTICIPATED BENEFITS OR PROFITS, LOSS OF
SAVINGS OR REVENUE, LOSS OF DATA, PUNITIVE DAMAGES, LOSS
OF USE OF THE PRODUCT OR ANY ASSOCIATED EQUIPMENT, COST
OF CAPITAL, COST OF ANY SUBSTITUTE EQUIPMENT OR FACILITIES,
DOWNTIME, THE CLAIMS OF ANY THIRD PARTIES, INCLUDING CUSTOMERS, AND INJURY TO PROPERTY, RESULTING FROM THE PURCHASE OR USE OF THE PRODUCT OR ARISING FROM BREACH OF THE
WARRANTY, BREACH OF CONTRACT, NEGLIGENCE, STRICT TORT, OR
ANY OTHER LEGAL OR EQUITABLE THEORY, EVEN IF PULSEON KNEW
OF THE LIKELIHOOD OF SUCH DAMAGES. PULSEON SHALL NOT BE
LIABLE FOR DELAY IN RENDERING SERVICE UNDER THE LIMITED WARRANTY, OR LOSS OF USE DURING THE PERIOD THAT THE PRODUCT IS
BEING REPAIRED.
6. Under no circumstances shall PulseOn liability under this limited
warranty exceed the actual cash value of the Product at the time Consumer returns the Product for repair, determined by the price paid by
Consumer for the Product less a reasonable amount for usage.
7. PulseOn neither assumes nor authorizes any authorized service
center or any other person or entity to assume for it any other obligation or liability beyond that which is expressly provided for in this limited
warranty. This is the entire warranty between PulseOn and Consumer, and supersedes all prior and contemporaneous agreements or
understandings, oral or written, relating to the Product, and no representation, promise or condition not contained herein shall modify these
terms. This limited warranty allocates the risk of failure of the Product
between Consumer and PulseOn. The allocation is recognized by Consumer and is reflected in the purchase price.
* PulseOn is a registered trademark of PulseOn Inc.
REGULATORY INFORMATION
We, PulseOn declare under our sole responsibility that the product
is in conformity with the provisions of the following Council Directive:
1999/5/EC. A copy of the Declaration of Conformity can be found at
http://PulseOn.com/declaration_of_conformity/.
32
FCC regulatory information
This equipment has been tested and found to comply with the limits
for a Class B digital device, pursuant to part 15 of the FCC Rules. These
limits are designed to provide reasonable protection against harmful
interference in a residential installation. This equipment generates, uses
and can radiate radio frequency energy and, if not installed and used
in accordance with the instructions, may cause harmful interference
to radio communications. However, there is no guarantee that interference will not occur in a particular installation. If this equipment does
cause harmful interference to radio or television reception, which can
be determined by turning the equipment off and on, the user is encouraged to try to correct the interference by one or more of the following
measures:
• Reorient or relocate the receiving antenna.
• Increase the separation between the equipment and receiver.
• Connect the equipment into an outlet on a circuit different from that
to which the receiver is connected.
• Consult the dealer or an experienced radio/TV technician for help.
Modifications not expressly approved by the manufacturer could void
the user’s authority to operated the equipment under FCC rules.
© PulseOn. All rights reserved.
PulseOn is registered trademarks of PulseOn Inc.
Bluetooth™ Smart is a registered trademark of Bluetooth SIG, Inc.
The crossed-out wheeled bin means that within the European Union
the product must be taken to separate collection at the product endof-life. Do not dispose of these products as unsorted municipal waste.