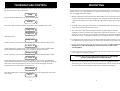
1
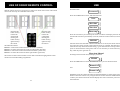
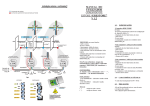
ODSIF
USER GUIDE
DIGITAL CURTAIN RAIL
WITH REMOTE CONTROL AND
BUILT-IN TEMPERATURE CONTROL
Model: de Luxe
ODSIF - Topstykket 31 - 3460 Birkerød - Denmark
Tel: + 45 45 81 22 11
www.odsif.dk - E-mail: [email protected]
11
TECHNICAL DATA
Tecnical data
Material - curtain rail
Material - brackets
Aluminium
Stainless steel
Finish
Anodized and polished
Rail diameter
Ø36 mm
Length wall bracket
length ceiling bracket
Standard 70mm or according to customer request
Standard 70mm or according to customer request
Display
OLED
Batteries
Built-in backup
Backup time for battery
The battery works as backup in case of power
failure.
Maximum curtain
weight
2,5 kg per meter
Remote control
Remote control with radio technology - can
control up to 4 curtain rails or groups. Can also be
operated with IR remote control e.g. B&O.
Features
Programs
Standard, Individual, Manual, Holiday, Temperature,
ODSIF remote control, IR remote control.
Information
Present time, times for curtains drawn back/forth
Actual temperature. Screensaver, if set ON.
Safety
The system disconnects in case of malfunction
Summer/winter time
Automatic switch
18
INTRODUCTION
Congratulations with your new digital curtain rail from ODSIF. Please, read this user
guide prior to using the curtain rail to obtain the best possible benefits out of the
curtain rail. The curtain rail has been set to the standard program by the producer (See
the chapter: Standard setting), but there are various other programming possibilities
to adapt the function to individual life patterns (See the chapter: Menu system). The
next chapters will give you an overview of the curtain rail as well as accessories,
instructions for mounting and dismounting of the curtain rail, description of the day-today use, explanation of the menu system, use of ODSIF remote control as well as IR
remote controletc.
WE HOPE THAT THE INTELLIGENT CURTAIN RAIL
WILL BRING YOU A LOT OF PLEASURE
SAFETY
This curtain rail is delivered with power supply 4V DC and does not expose the user to
any danger if it is used according to this user guide. Please, observe all safety instructions marked with CAUTION in this user guide. Non-observance may lead to damage
of the curtain rail.
Please, also have in mind that this is an automatic curtain rail drawing curtains back
and forth automatically - so keep this in mind, if you light candles in the windows,
where the automatic rail is used.
WARRANTY AND LIABILITY
ODSIF grants 2 years warranty on material and production defects. Our liability for
damages cannot exceed the invoice amount of the defective goods. Under no circumstances ODSIF is responsible for operational loss, loss of profit or other economic
consequential loss.
3
TEMPERATURE CONTROL
Model de Luxe has built-in temperature control, which can draw the curtains forth, if it
gets too hot in a room. Go to menu item:
Temp.
By pressing the middle button, you get to the menu item:
Activate
Press enter again to choose, whether temperature control should be On or Off:
Temp. Off
MOUNTING
Unpack the curtain rail and check that all parts have been delivered: 1 curtain rail, 1
remote control, 2 or 3 wall brackets, 2 or 3 stop screws for brackets, 2 or 3 screws, and
2 or 3 rawlplugs and power supply.
1. Measure and mark on the wall where the wall brackets are to be placed. On concrete
or plaster walls, drill out holes for rawlplugs. Use rawlplugs suited for the wall on
which the wall brackets are to be mounted. The delivered rawlplugs are for concrete
walls.
2. Insert the screw in the pipe of the bracket and fasten the bracket into the wall with a
screw driver suited for the delivered screws.
Temp. On
3. The curtain rail is delivered including the number of gliders that according to
standard procedure are used for the length of the curtain rail in question. I.e. one
glider per 5 cm. To remove or insert gliders, do as follows. Loosen the end glider
and simple remove or add gliders, and then put the end glider back into its place.
Temp. back
4. Carefully hang the curtain rail on to the wall brackets. Screw the small stop screws
into the holes on top of the brackets to ensure proper fastening of the curtain rail.
Next menu item is
:
In this menu item, you set at which temperature the curtains should be drawn back:
°C back: 21
Set the temperature with the upper or lower button and press enter (middle button),
when the desired temperature is shown on the display. Next menu item is:
Temp. forth
In this menu item, you set at which temperature the curtains should be drawn forth:
5 Now, you can hang the curtains on the curtain hooks of the rail. The curtain rail is
intended for curtains with heading tape and conventional curtain hooks for
standard gliders.
6. Connect the power supply into the socket at the rear of the curtain rail. Connect the
power supply into wall socket (220V).
°C forth: 28
CAUTION: DO NOT PULLTHE CURTAIN MANUALLY, THIS MIGHT
DAMAGE THE MECHANICS INSIDE THE RAIL.
Set the temperature with the upper or lower button and press enter (middle button),
when the desired temperature is shown on the display. In this case, the curtains will be
drawn forth, when the temperature is 28°C in the room and back again, when the
temperature is 21°C in the room. Last menu item is:
7. The curtain rail can also be ceiling-mounted - in this case angled brackets are
delivered (figure 4) Screw the screw from beneath and up into the ceiling and hang
the curtain rail on to the brackets the same way as with the wall brackets.
Show temp.
Press the middle button, and the display will show the actual temperature in the room.
For example:
23,0°C
16
5
USE OF ODSIF REMOTE CONTROL
Grouping of the curtain rails
With the remote control it is possible to divide the curtain rails into groups. E.g. 2
windoas, 1 door, 1 window and all windows at once.
BRUG
5.If you wish to draw the curtain manually at other times of the day - simply push the
lower button. The curtains will be drawn in the opposite direction of what they did the
last time. I.e. if they were drawn forth and you press the lower button, they will be
drawn back and vice verse. If you press the upper button, the display will show the
present time and when the curtains will be drawn back (top) and forth (bottom) that
particular day. You can also use the remote control to draw the curtains at other times.
The curtain rail will still remember to draw back or forth according to set times.
Menu system
It is possible to program the curtain rails to suit different life patterns. The following
chapter will describe the whole menu system. If you press the middle button, the
display will turn on and show the text INFO. Above and below the previous and next
menu item will be shown in a smaller font size. You can go forward and back in the
menu by using the upper and lower button. The main menu contains the following
menu items: Info, Holiday, Individual, Standard, Settings, Temperature, ODSIF
Remote, IR remote, Manual.
The menu items Remote control and Info will be explained in the section about the
remotore control. Temperature control will be explained on page 16.
Menu item Standard
When time and date have been set, the curtain rail will be set to standard. If you press
the middle button, the display will show:
Standard
The illustration shows:
l Button 1 on the remote control controls the curtain rail in window 1 and 2 at once
(red circle).
l Button 2 controls the curtain rail above the door (blue circle).
l Button 3 controls the curtain rail in the window at the right side (yellow circle)
l Button 4 controls all 4 curtain rails at once (green circle)
The curtain in each of the 4 groupings can be drawn with the belonging buttons. I.e.
button 1 draws the curtain back and forth in the two windows at the left side. Button 2
draws the curtain above the door. Button 3 draws the curtain in the window at the right
side. Button 4 draws all curtains at once.
If you press the middle button again, the display shows:
Std. set
to confirm that the standard setting HAS been set.
Menu item Settings
If you go forward to the next menu item, the display will show:
Settings
Press the middle button to get into the menu item. Then you can select:
Time
14
7
USE OF ODSIF REMOTE CONTROL
With the remote control you can choose to control one curtain rail at a time. The remote
control can control up to 4 individual curtain rails.
USE
Next menu item:
Screensaver
Press the middle button to enter, and select between:
None
Show time
Show date
Press the left
button shortly
to draw the
curtain forth.
Pressing the
button shortly
again will stop
the curtain.
Press the right
button shortly
to draw the
curtain back.
Pressing the
button shortly
again will stop
the curtain.
The illustration shows:
l Button 1 controls the curtain rail in the left window (red line).
l Button 2 controls the curtain rail in the second window (blue line)
l Button 3 controls the curtain rail in the third window (yellow line)
l Button 4 controls the curtain rail in the right window (green line)
The curtain in each of the 4 windows can be drawn with the belonging buttons. Each
curtain rail can be individually programmed.
Show temp.
Press the screensaver you wish end press enter to confirm. The display will now show
the selected screensaver permanently (turns off, while the curtain is drawn). Last menu
item:
Autostart
Autostart can be activated ON or deactivated OFF. If it is set ON, the curtain rail will
not require any setting of time or date when the power is conneted. This function is
suited for rail only used with manual setting, i.g. for demonstration in shops, where the
power is disconnected at closing time. Then it is not necessary to set the time every
day, when the power gets back on.
Menu item Manual
Scrolling to the next menu item, the display will show:
Manual
Press the middle button to enter the menu item. Here you can choose between:
Manual: On
and
Manual: Off
12
If Manual is ON; the curtain rails must be operated manually by means of the lower
button to draw the curtains or by using the remote control. Press the middle button to
confirm your selection and wait until the display turns off or choose the previous or
next menu item.
9