1
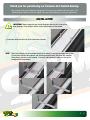
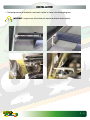
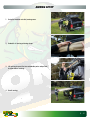
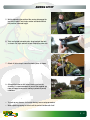
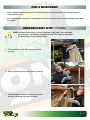
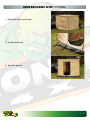
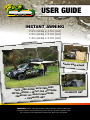
USER GUIDE
INSTANT AWNING
2.0m (wide) x 2.5m (out)
2.5m (wide) x 2.0m (out)
1.4m (wide) x 2.0m (out)
ROOM EN
CLOSUR
E
O INCLUDES
S
L
A
E
D
I
U
G
L
THIS USER
OR OPTIONA
F
P
U
T
E
S
&
ON
INSTALLATI
NCLOSURE
E
M
O
O
R
4
X
IRONMAN 4
NET
& MOSQUITO
MOSQUITO NET
IMPORTANT: Please read all procedures and precautions before installing and
using the Ironman 4x4 Instant Awning. If you have any questions please contact
our customer service department listed on the back of the user guide.
Thank you for purchasing an Ironman 4x4 Instant Awning.
Your Ironman 4x4 Instant Awning is designed to fit a variety of different roof rack styles. The
following User Guide will help you adapt your new Instant Awning to suit your application.
INSTALLATION
IMPORTANT: Before mounting your Instant Awning make sure that it clears the
door openings, lift up tailgate, aerials or other obstructions on the vehicle.
• Insert bolt heads into the slots in the aluminium extrusion.
NOTE:
Your Instant Awning can be mounted directly to the side of a roof cage by simply drilling four
6.5mm holes into the side supports and attaching using the bolts and nyloc nuts supplied.
Alternatively, you can use the supplied ‘L’ brackets and mounting hardware in the various
configurations shown below.
2-9
INSTALLATION
• The awning can now be attached to a roof rack or roof bar as shown in the following diagrams.
IMPORTANT: In some cases, 6.5mm holes will need to be drilled to attach brackets.
3-9
AWNING SETUP
1. Unzip the weather resistant awning cover.
2. Unbuckle all awning retaining straps.
3.Lift awning to reveal the two extendable poles and pull out
to either side of awning.
4. Unroll awning.
4-9
AWNING SETUP
5.Whilst supporting the centre of the awning, disengage the
two vertical poles. Twist lower section to extend and lock
into position at desired height.
6.Twist and extend horizontal poles. Insert end pin into hole
as shown. Pull tight and twist to lock. Repeat for other side.
7.Attach all Velcro straps around horizontal poles as shown.
8.Although the Ironman 4x4 Instant Awning can be freestanding, it is recommended that you use the supplied guy
ropes and pegs to secure the awning in potentially windy
conditions.
• To pack up your Ironman 4x4 Instant Awning, reverse setup procedure.
• When repacking awning, be sure to roll the material underneath itself.
5-9
CARE & MAINTENANCE
• If your awning has been packed up wet or has become damp, we recommend that it be aired out to prevent
staining of the material.
• If your awning requires cleaning, we recommend to use luke warm soapy water and a clean sponge to wipe down
the material.
ROOM ENCLOSURE SETUP (OPTIONAL)
NOTE:The Room Enclosure has a sail track attachment at both ends. One is detachable
by zip, the other is permenantly attached to the walls. We recommend to remove
the detatchable sail track before you begin.
1.Slide attached sail track into aluminium extrusion
as shown.
2.Attach all plastic clips to horizontal poles on awning.
3.Slide detachable sail track into the outer aluminium
extrusion and engage zip to room enclosure.
6-9
ROOM ENCLOSURE SETUP (OPTIONAL)
4.Attach plastic clips to vertical poles.
5.Zip floor into the room.
6. Peg walls if required.
7-9
MOSQUITO NET SETUP (OPTIONAL)
NOTE:The Mosquito Net has a sail track attachment at both ends. One is detachable by
zip, the other is permenantly attached to the netting. We recommend to remove
the detatchable sail track before you begin.
1.Slide attached sail track into aluminium extrusion as shown.
2.Attach all plastic clips to horizontal poles on awning.
3.Slide detachable sail track into the outer aluminium
extrusion and engage zip to mosquito net.
4.Attach plastic clips to vertical poles and peg corners to
ground if required.
8-9
WARRANTY TERMS & CONDITIONS
Ironman 4x4 will provide warranty to the original purchaser and only the original
purchaser of the Ironman product under the following conditions;
Ironman 4x4 will warrant against manufacturing faults and defects in material and
workmanship for a period of 12 months from original purchase date.
To obtain warranty, Ironman 4x4 or an authorised agent there of must be provided with
proof of purchase. This warranty does not cover the removal or re-installation of the
product.
Ironman 4x4 reserves the right, at its option, to repair, replace or refund the purchase
price of a faulty or defective product or its components if returned to the place of
purchase during the warranty period.
When returning a product for warranty assessment it must be accompanied with the
customers name, address, contact phone number, a clear description of the fault and a
copy of the original sales receipt detailing the date of purchase.
This warranty does not apply to damage due to accident, misuse, abuse, misapplication,
collision, modification, improper installation or lack of improper maintenance.
THE WARRANTY SET FORTH ABOVE IS THE ONLY WARRANTY. THERE ARE NO OTHER
WARRANTIES, INCLUDING BUT NOT LIMITED TO IMPLIED WARRANTIES OR MERCHANT
ABILITY OR FITNESS FOR A PARTICULAR PURPOSE.
ANY IMPLIED WARRANTY WHICH BY LAW MAY NOT BE EXCLUDED IS LIMITED IN
DURATION TO TWELVE (12) MONTHS FROM THE DATE OF THE ORIGINAL RETAIL
PURCHASE OF THE PRODUCT.
NO IRONMAN 4X4 DEALER, AGENT OR EMPLOYEE IS AUTHORISED TO MAKE ANY
MODIFICATION, EXTENSION OR ADDITION TO THIS WARRANTY.
IRONMAN 4X4 SHALL NOT BE LIABLE FOR SPECIAL, INDIRECT, INCIDENTAL OR
CONSEQUENTIAL DAMAGES (INCLUDING, BUT NOT LIMITED TO, LOST PROFITS, DOWN
TIME OR LOSS OF USE) UNDER ANY LEGAL THEORY, EVEN IF IRONMAN 4X4 WAS
ADVISED OF THE POSSIBILITY OF SUCH DAMAGES.
IRONMAN 4X4 RESERVES THE RIGHT TO CHANGE PRODUCT DESIGN WITHOUT NOTICE.
IN SITUATIONS IN WHICH IRONMAN 4X4 HAS CHANGED A PRODUCT DESIGN, IRONMAN
4X4 SHALL HAVE NO OBLIGATION TO UPGRADE OR OTHERWISE MODIFY PREVIOUS
MANUFACTURED PRODUCTS.
Sales & service world wide
www.ironman4x4.com
LOCAL CALL 1300 731 137
9-9