1
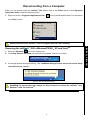
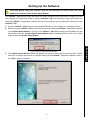
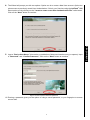
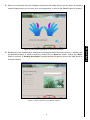
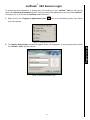
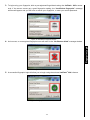
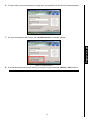
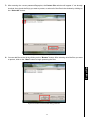
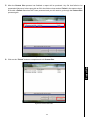
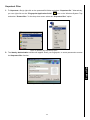
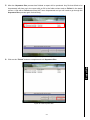
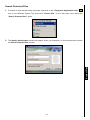
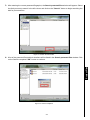
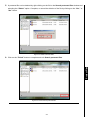
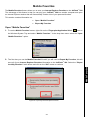
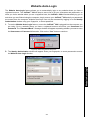
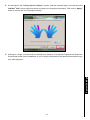
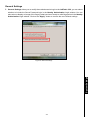
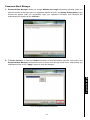
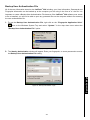
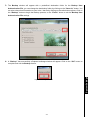
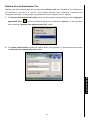
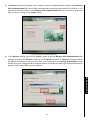
JetFlash™ 220
Software User’s Manual
(Version:1.0)
0
Table of Contents
Table of ContentsIntroduction ..............................................................................................1
Introduction ............................................................................................................................2
Features.............................................................................................................................................2
System Requirements........................................................................................................................2
Usage Considerations............................................................................................................3
General Use.......................................................................................................................................3
Backing Up Data ................................................................................................................................3
Reminders..........................................................................................................................................3
Connecting to a Computer ....................................................................................................4
Disconnecting from a Computer ...........................................................................................5
Removing the JetFlash™ 220 in Windows® 2000﹐XP and VistaTM ...................................................5
Setting Up the Software .........................................................................................................6
JetFlash™ 220 Secure Login................................................................................................11
Password Bank Manager .....................................................................................................14
Protect Files..........................................................................................................................16
Protect Files .....................................................................................................................................16
Unprotect Files.................................................................................................................................19
Search Protected Files.....................................................................................................................22
Mobile Favorites ...................................................................................................................25
Open “Mobile Favorites” ..................................................................................................................25
Export My Favorites .........................................................................................................................26
Website Auto-Login..............................................................................................................28
System Settings ...................................................................................................................30
System Settings ...............................................................................................................................30
Fingerprint Manager.........................................................................................................................31
General Settings ..............................................................................................................................33
Rescue Password ............................................................................................................................34
Password Bank Manager.................................................................................................................35
Backup User Authentication File......................................................................................................36
Restore User Authentication File .....................................................................................................38
Repartition Tool ....................................................................................................................41
Troubleshooting ...................................................................................................................45
Specifications .......................................................................................................................47
Ordering Information............................................................................................................47
Transcend Limited Warranty ...............................................................................................48
Terminology..........................................................................................................................49
1
Congratulations on purchasing Transcend’s JetFlash™ 220. This tiny, Ultra-portable, Hi-Speed USB2.0
storage device is the perfect data management system for uploading, downloading, storing and
transferring your vital data and information to any desktop, or notebook computer. The JetFlash™ 220 is a
unique Hi-Speed USB 2.0 Flash Drive that plugs directly into your desktop, or notebook computer and
incorporates the latest Fingerprint Recognition Technology, so now you can securely store your files,
folders, documents, photos, music and e-work with the utmost confidence. In addition, the JetFlash™ 220
comes bundled with very useful software that can (used in Windows® 2000/XP/VistaTM) increase your
productivity. The JetFlash™ Software Pack includes Protect Files, Mobile Favorites, Website
Auto-Login and Repartition Tool. This Software User’s Manual will help you get the most from your new
device, please read it in detail before using the JetFlash™ 220.
Features
•
Fully compatible with Hi-Speed USB 2.0
•
Advanced Fingerprint Recognition Technology
•
Easy Plug and Play installation
•
Additional software pack (helps you manage your data)
•
Protect Files: Protect files stored on your computer using fingerprint security
•
Mobile Favorites: Access your Internet Explorer Favorites on another computer
•
Website Auto-Login: Automatically login to websites where you are a registered user
•
Repartition Tool: Adjust the size of the Private and Public partition areas for storing data
•
USB powered. No external power, or battery needed
•
LED indicates data transfer activity
•
Driverless (for Windows® 2000/XP/VistaTM)
System Requirements
Desktop or notebook computer with a working USB port.
The JetFlash™ 220 can only be used in a computer running the following Operating Systems (OS):
•
Windows® 2000, Microsoft® Internet Explorer (IE)
•
Windows® XP, Microsoft® Internet Explorer (IE)
•
Windows® VistaTM, Microsoft® Internet Explorer (IE)
2
Introduction
Introduction
Introduction
Usage Considerations
Figure 1. JetFlash 220
WARNING! The sensor strip on the JetFlash™ 220 is sensitive to physical damage, avoid
squeezing, or scratching your JetFlash™ 220 with any hard or sharp object. When not in use, or
during transportation always ensure that the devices’ protective cover is on.
General Use
•
The JetFlash™ 220 comes with bundled software and can only be used with a computer
that is running Windows® 2000, XP or VistaTM.
•
Each time you plug the JetFlash™ 220 into your computer it will install a new Local Disk
containing setup information. Do NOT attempt to edit, delete, or modify any of the
information on this disk.
•
Ensure that you make and save a Backup User Authentication File of your JetFlash™
220 Fingerprint user information to your computer.
Backing Up Data
•
Transcend does NOT take any responsibility for data loss, or damage during
operation. If you decide to store data on your JetFlash™ we strongly advise that you
regularly backup the data to a computer, or other storage medium.
•
To ensure High-Speed USB 2.0 data transfer rates when using your JetFlash™ 220 with a
computer, please check the computer has the relevant USB drivers. If you are unsure on
how to check this, please consult the computer or motherboard User’s Manual for USB
driver information.
Reminders
Always follow the procedures in the “Disconnecting from a Computer” section to remove your
JetFlash™ from a computer.
3
Usage Considerations
These usage and safety guidelines are IMPORTANT! Please follow them carefully.
Connecting to a Computer
1. Plug the JetFlash™ 220 directly into an available USB port on your desktop, or notebook computer.
Figure 2. Connecting to a computer
2. When the JetFlash™ 220 is successfully connected to a computer the unit’s LED will light up. A new
Removable Disk drive with a newly assigned drive letter representing the JetFlash™ and a new Local
icon and Fingerprint Application Suite
icon will appear on the Windows System Tray.
Figure 3. **F & G: are example drive letters, the letters in your "My Computer" window may differ
3. Once you are successfully logged in to Identity Authorization window you can download data to the
JetFlash™ 220 simply by dragging and dropping files, or folders onto the Removable Disk drive letter
that represents the JetFlash™ 220.
Do NOT attempt to edit, delete, or modify any of the information on this disk.
4
U
Use with a Computer
Disk* containing setup information will appear in the My Computer window. In addition, a Hardware
Disconnecting from a Computer
When you are finished using the JetFlash™ 220 always click on the Finish option in the Fingerprint
Application Suite to end the session properly.
1. Right click on the “Fingerprint Application Suite”
icon on the Windows System Tray and select
the “Finish” option.
Figure 4. Finish
Removing the JetFlash™ 220 in Windows® 2000﹐XP and VistaTM
1. Select the Hardware
icon on the system tray.
2. The Safely Remove Hardware pop-up window will appear. Select it to continue.
Figure 5. Safely Remove Hardware
3. A message window will appear stating, “The ‘USB Mass Storage Device’ device can now be safely
removed from the system.”
Figure 6. Safe to Remove Hardware
WARNING! To prevent data loss, always use this procedure to remove the JetFlash™ from
Windows® 2000, XP and VistaTM.
5
Use with a Computer
NEVER disconnect the JetFlash™ from a Computer when its LED is flashing.
Setting Up the Software
CAUTION! Before using the JetFlash™ 220 for the first time you must setup the units’
application software in the System Setup Wizard.
The JetFlash™ 220 comes bundled with some very useful software that can be used to manage your data
and increase your productivity. Before using the JetFlash™ 220 for the first time, please ensure that you
setup the JetFlash™’s application software; this will ensure that you get the maximum benefit from your
JetFlash™ 220.
1. Plug the JetFlash™ 220 directly into an available USB port on your desktop, or notebook computer.
2. Before using the JetFlash™ 220 for the first time you must setup the JetFlash™’s application software
Figure 7. Run the System Setup Wizard first
3. The System Setup Wizard window will appear and guide you through the setup process. Please
follow the on-screen instructions to complete setting up the JetFlash™ application software. Click on
the “Next” button to continue.
Figure 8. System Setup Wizard
6
Software Setup
in the System Setup Wizard. If you try to use JetFlash™ 220 without setting up the software you will
be prompted with the “run the System Setup Wizard now?” message window. Click on the “Yes”
button to start the System Setup Wizard.
4. The Wizard will prompt you with two options. Option one is to create a New User account. Option two
Figure 9. Create a New User Account
5. Input a “Device User Name,” this can be a combination of letters and numbers only (no spaces). Input
a “Password” and “Confirm Password.” Click on the “Next” button to continue.
Figure 10. Enter a device name and password
Entering a password gives you the option of using a secret password, or your fingerprint to access
secure data.
7
Software Setup
gives access to previously saved User Authentication. If this is your first time using the JetFlash™ 220
select option one by clicking on the “I want to create a new User Authentication File” radio button.
Click on the “Next” button to continue.
6. Click on the finger, or thumb you want to use to setup the fingerprint software. To view a flash tutorial on
how to properly slide your finger, or thumb along the JetFlash™ 220’s sensor strip click on the
Figure 11. Select a finger, or thumb to setup the fingerprint software
7. Setting up the fingerprint software involves sliding the selected finger, or thumb along the JetFlash™
220’s sensor strip three times to register your fingerprint information. Please be patient when you are
performing this procedure, as it may take a few attempts to register your fingerprint profile. A properly
registered fingerprint will display the
icon; a retry will be signaled by the
Figure 12. Fingerprint registration requires 3 successful scans
8
icon.
Software Setup
icon.
8. After you successfully scan your fingerprint three times the wizard will give you the option of choosing
Figure 13. Select another finger/thumb, or click on the next button
9. Backup your User Authentication, Password and Fingerprint information in the form of a *.dat file to the
pre-specified location, or select a location by clicking on the “Save As” button. Click on the “Next”
button to continue. A “Backup Successful” message window will appear, click on the “OK” button to
close the window.
Figure 14. Select a location for your Backup *dat file
9
Software Setup
another finger/thumb (you can save all of your fingerprints), or click on the “Next” button to continue.
10. A “Congratulations!” message window will appear to signify the end of the setup process. Click on
Figure 15. Congratulations, click on Finish to exit the setup
10
Software Setup
the “Finish ” button to complete the setup process and exit the System Setup Wizard.
JetFlash™ 220 Secure Login
To access data and information, or change any of the settings on your JetFlash™ 220 you will need to
login to the Identity Authorization window. The login window will appear when you plug in the JetFlash™,
or anytime you try to access the JetFlash™ 220’s functions.
1. Right click on the “Fingerprint Application Suite”
icon on the Windows System Tray. Select
any of the options.
Figure 16. JetFlash 220's Functions
2. The Identity Authorization window will appear. Enter your fingerprint, or secret password to access
Fingerprint Login
the JetFlash™ 220’s specific function.
Figure 17. Identity Authorization Login
11
3. To login using your fingerprint; slide a pre-registered finger/thumb along the JetFlash™ 220’s sensor
strip. If the sensor cannot get a good fingerprint reading, the “Insufficient fingerprint” message
window will appear and you will have to rescan your fingerprint, or enter your secret password.
Figure 18. Insufficient Fingerprint window
Fingerprint Login
4. An incorrect, or unrecognized fingerprint scan will result in the “Verification failed” message window.
Figure 19. Verification Failed
5. A successful fingerprint login will allow you to begin using the selected JetFlash™ 220’s feature.
Figure 20. Fingerprint verification successful
12
6. To login using your secret password; simply input your password in the Rescue Password space.
Figure 21. Input Secret Password
Fingerprint Login
7. An incorrect password will result in the “Invalid Password” message window.
Figure 22. Invalid Password
8. A successful password login will allow you to begin using the selected JetFlash™ 220’s feature.
13
Password Bank Manager
The Password Bank Manager provides a shortcut to the database, which contains your Username and
Password profiles for any registered website accounts you have selected to save to the JetFlash™ 220.
You can Delete, Rename and view information about the websites’ content. The Password Bank Manager
can only be accessed by logging in to the Identity Authorization window using your fingerprint, or secret
password.
1. To open the Password Bank Manager, right click on the “Fingerprint Application Suite”
icon
on the Windows System Tray and select the “Password Bank Manager” option.
Figure 23. Fingerprint Application Suite
2. The Identity Authorization window will appear. Enter your fingerprint, or secret password to access
Figure 24. Identity Authorization Login
14
Password Bank Manager
the Password Bank function.
3. Password Bank Manager allows you change Website Auto-Login information including, when you
point the mouse at the login area of a registered website account, the Identity Authorization Login
window will appear. After you successfully login your registered Username and Password will
automatically be inserted by the JetFlash™.
Figure 25. Password Bank Manager
4. To Delete, Rename, or view the Content information of a saved website right click on the site in the
Password Bank Manager
Password Bank Manager window and select an option from the drop down menu. After making any
modifications click on the “Apply” button to save the changes.
Figure 26. Registered website management
15
Protect Files
The JetFlash™ 220’s Protect Files feature allows you to securely protect files that are stored on your
computer. Protected files can only be accessed by logging in to the Identity Authorization window using
your fingerprint, or secret password.
This section contains information on;
•
Protect Files
•
Unprotect Files
•
Search Protected Files
Protect Files
1. To Protect a file(s) right click on the file/folder you want to protect, or right click on the “Fingerprint
Application Suite”
icon on the Windows System Tray and select “Protect files.” In the drop
Figure 27. Selecting the Protect file option
2. The Identity Authorization window will appear. Enter your fingerprint, or secret password to access
the Protect files function.
Figure 28. Identity Authorization Login
16
Protect Files
down menu select the “Protect files” option.
3. After entering the correct password/fingerprint, the Protect files window will appear. If not already
checked, then check the file(s) you want to protect, or select all of the files in the window by clicking on
the “Select All” button.
Figure 29. Selecting files for protection
4. You can add files to the list by clicking on the “Browse” button. After selecting all of the files you want
Protect Files
to protect, click on the “Start” button to begin protecting the files.
Figure 30. Browse for files and Start file(s) protection
17
5. After the Protect files process has finished a report will be produced. Any file that failed to be
protected will show up in the report with an ‘X’ in the folder column and as ‘Failed’ in the status column.
A file with a Failed status has NOT been protected and you will need to go through the Protect files
process again.
Figure 31. Protect files report
Protect Files
6. Click on the “Finish” button to complete and exit Protect files.
Figure 32. Finish Protect files
18
Unprotect Files
1. To Unprotect a file(s) right click on the protected file/folder and select “Unprotect file.” Alternatively,
you can right click on the “Fingerprint Application Suite”
icon on the Windows System Tray
and select “Protect files.” In the drop down menu select the “Unprotect files” option.
Figure 33. Selecting the Unprotect file option
2. The Identity Authorization window will appear. Enter your fingerprint, or secret password to access
Protect Files
the Unprotect files function.
Figure 34. Identity Authorization Login
19
3. After entering the correct password/fingerprint, the Unprotect files window will appear. If not already
checked, then check the file(s) you want to protect, or select all of the files in the window by clicking on
the “Select All” button.
Figure 35. Selecting files to Unprotect
4. You can add files to the list by clicking on the “Browse” button. After selecting all of the files you want
Protect Files
to unprotect, click on the “Start” button to begin to unprotect the files.
Figure 36. Browse for files and Start to unprotect a file(s)
20
5. After the Unprotect files process has finished a report will be produced. Any file that failed to be
Unprotected will show up in the report with an ‘X’ in the folder column and as ‘Failed’ in the status
column. A file with a Failed status has NOT been Unprotected and you will need to go through the
Unprotect files process again for that file(s).
Figure 37. Unprotect files report
Protect Files
6. Click on the “Finish” button to complete and exit Unprotect files.
Figure 38. Finish Unprotect files
21
Search Protected Files
1. To search for files that have been protected, right click on the “Fingerprint Application Suite”
icon on the Windows System Tray and select “Protect files.” In the drop down menu select the
“Search Protected files” option.
Figure 39. Fingerprint Application Suite
2. The Identity Authorization window will appear. Enter your fingerprint, or secret password to access
Figure 40. Identity Authorization Login
22
Protect Files
the Search Protected files function.
3. After entering the correct password/fingerprint, the Search protected files window will appear. Select
the disk you want to search in the left column and click on the “Search” button to begin searching the
disk for protected files.
Figure 41. Search Protected Files
4. A list of the protected files and their locations will be listed in the Search protected files window. Click
Protect Files
on the Search completed “OK” button to continue.
Figure 42. Search Completed
23
5. A protected file can be deleted by right clicking on the file in the Search protected files window and
selecting the “Delete” option. Complete, or cancel the deletion of the file by clicking on the “Yes,” or
“No” button.
Figure 43. Delete Protected Files
Protect Files
6. Click on the “Finish” button to complete and exit Search protected files.
Figure 44. Finish Search protected files
24
Mobile Favorites
The Mobile Favorites feature allows you to save your Internet Explorer Favorites to the JetFlash™ 220.
The advantage of this feature is that you can plug your JetFlash™ 220 into another computer and open
an Internet Explorer session that will automatically contain a list of your personal favorites.
This section contains information on;
•
Open “Mobile Favorites”
•
Export My Favorites
Open “Mobile Favorites”
1. To use the Mobile Favorites feature, right click on the “Fingerprint Application Suite”
icon on
the Windows System Tray and select “Mobile Favorites.” In the drop down menu select the “Open
‘Mobile Favorites’” option.
Figure 45. Fingerprint Application Suite
2. The first time you use the Mobile Favorites function you will need to Export My Favorites; this will
Mobile Favorites
save all of your Internet Explorer Favorites information to the JetFlash™ 220. Select the “Export
local My Favorites” radio button and click on the “OK” button to continue.
Figure 46. Export My Internet Explorer Favorites
25
3. After exporting your local Internet Explorer Favorites, each subsequent time you access the Open
“Mobile Favorites” function on the JetFlash™ 220, the Internet Explorer Mobile Favorites program
will open with your favorites preinstalled.
Figure 47. Internet Explorer Mobile Favorites
Export My Favorites
4. Use the Export My Favorites to update your Internet Explorer favorites information to the JetFlash™
220. Right click on the “Fingerprint Application Suite”
icon on the Windows System Tray and
Mobile Favorites
select “Mobile Favorites.” In the drop down menu select the “Export My Favorites” option.
Figure 48. Fingerprint Application Suite
26
5. If Internet Favorites information files are already on the JetFlash™, you will be prompted to Confirm
File Replace. Select the appropriate options and after the copying process has completed, the
“Export My Favorites” has successfully completed message window will appear. Click on the “OK”
button to complete and exit Mobile Favorites.
Mobile Favorites
Figure 49. Exported successfully
27
Website Auto-Login
The Website Auto-Login feature allows you to automatically login to any website where you have a
registered account. The JetFlash™ 220 will keep a secure list of all your usernames and passwords, so
when you visit a website where you are a registered user, the JetFlash™ 220 will automatically log you in
and when you are finished using the computer, simply remove your JetFlash™ 220 and all you passwords
are erased from the computer. Website Auto-Login can only be accessed by logging in to the Identity
Authorization window using your fingerprint, or secret password.
1. To use the Website Auto-Login feature, ensure the JetFlash™ 220 is plugged into the computer you
are using. Go to a website where you have a registered account and enter your Username and
Password. The “Password Bank” message window will appear requesting whether you want to save
the Username and Password information. Click on the “Yes” button to continue.
Figure 50. Save Username & Password?
2. The Identity Authorization window will appear. Enter your fingerprint, or secret password to access
Figure 51. Identity Authorization Login
28
Website Auto-Login
the Website Auto-Login function.
3. The Password Bank window will appear containing information about the website name and
registration information. Click on the “Enroll” button to save the registration information to the
JetFlash™.
Figure 52. Save website registration information to the JetFlash
successfully” message window will appear. Click on the “OK” button to complete and exit the
Website Auto-Login.
Figure 53. Saved successfully
29
Website Auto-Login
4. After the website Username and Password have been saved to the JetFlash™, the “Saved
System Settings
You can change the JetFlash™ 220’s settings by entering the System Settings in the Fingerprint
Application Suite. System Settings can only be accessed by logging in to the Identity Authorization
window using your fingerprint, or secret password.
This section contains information on;
•
System Settings
•
Backup User Authentication File
•
Restore User Authentication File
System Settings
System Settings allows you to change operational information on the JetFlash™ 220 using;
•
Fingerprint Manager
•
General Settings
•
Rescue Password
•
Password Bank Manager
1. To modify the System Settings, right click on the “Fingerprint Application Suite”
icon on the
Windows System Tray and select “System.” In the drop down menu select the “System Settings”
option.
2. The Identity Authorization window will appear. Enter your fingerprint, or secret password to access
the System Settings.
Figure 55. Identity Authorization Login
30
System Settings
Figure 54. Fingerprint Application Suite
3. The System Settings menu window will appear. Select the setting that you want to change by clicking
on the tabs marked, Fingerprint Manager, General Settings, Rescue Password and Password
Bank Manager.
Figure 56. System Settings Menu
Fingerprint Manager
1. Click on the finger, or thumb you want to add as a recognized fingerprint. To view a flash tutorial on how
icon.
System Settings
to properly slide your finger, or thumb along the JetFlash™ 220’s sensor strip click on the
Figure 57. Add a finger, or thumb for fingerprint recognition
31
2. As described in the “Setting Up the Software” section, slide the selected finger, or thumb along the
JetFlash™ 220’s sensor strip three times to register your fingerprint information. Click on the “Apply”
button to confirm the new Fingerprint settings.
Figure 58. Apply new Fingerprint settings
3. Clicking on a finger, or thumb that has already been setup as a recognized Fingerprint will delete the
System Settings
finger/thumb profile from the database, so it is no longer recognized by the Identity Authorization Login
as a valid fingerprint.
32
General Settings
1. General Settings allows you to modify the methods used to login to the JetFlash™ 220, you can select
whether to include the Secret Password login in the Identity Authorization Login window. You can
also select to display an image of the finger(s) that have been saved as valid fingerprints in the Identity
Authorization Login window. Click on the “Apply” button to confirm the new General settings.
System Settings
Figure 59. General Settings
33
Rescue Password
1. Rescue Password allows you to change the Backup Account name and Password. Click on the
“Apply” button to confirm the new Rescue Password settings.
System Settings
Figure 60. Rescue Password
34
Password Bank Manager
1. Password Bank Manager allows you change Website Auto-Login information including, when you
point the mouse at the login area of a registered website account, the Identity Authorization Login
window will appear. After you successfully login your registered Username and Password will
automatically be inserted by the JetFlash™.
Figure 61. Password Bank Manager
2. To Delete, Rename, or view the Content information of a saved website right click on the site in the
System Settings
Password Bank Manager window and select an option from the drop down menu. After making any
modifications click on the “Apply” button to save the changes.
Figure 62. Registered website management
35
Backup User Authentication File
All of the user information stored on the JetFlash™ 220 including, your User Information, Passwords and
Fingerprint information can be backed up to the computer you are using in the form of a *.dat file. It is
important to create a Backup User Authentication File because if the JetFlash™ 220 software ever needs
to be re-installed, you will not be able to open any protected files on the computer without first restoring
the user authentication file.
1. To use the Backup User Authentication File, right click on the “Fingerprint Application Suite”
icon on the Windows System Tray and select “System.” In the drop down menu select the
“Backup User Authentication File” option.
Figure 63. Fingerprint Application Suite
2. The Identity Authorization window will appear. Enter your fingerprint, or secret password to access
Figure 64. Identity Authorization Login
36
System Settings
the Backup User Authentication File setting.
3. The Backup window will appear with a predefined destination folder for the Backup User
Authentication File, you can change the destination folder by clicking on the “Save As” button. You
can also select what information to save in the *.dat file by clicking on the radio button options. Click on
the “Backup” button to begin the Backup process, or the “Finish” button to exit the Backup User
Authentication File settings.
Figure 65. Backup User Authentication File
4. A “Backup” has successfully completed message window will appear. Click on the “OK” button to
Figure 66. Backup Successful
37
System Settings
complete and exit the Backup feature.
Restore User Authentication File
Restoring the User Authentication file will restore the JetFlash™ 220 User Information you backed up to
the computer in the form of a *.dat file. This includes restoring, User Information, Passwords and
Fingerprint information, so any previously protected files on the computer can be opened.
1. The Restore User Authentication File feature can be accessed, by right clicking on the “Fingerprint
Application Suite”
icon on the Windows System Tray and select “System.” In the drop down
menu select the “Restore User Authentication File” option.
Figure 67. Fingerprint Application Suite
2. The Identity Authorization window will appear. Enter your fingerprint, or secret password to access
Figure 68. Identity Authorization Login
38
System Settings
the Restore User Authentication File setting.
3. The Restore window will appear. If you selected to use the predefined folder location for the Backup
User Authentication File, the file will be automatically selected as the Restore file. However, if you
specified a different location for the Backup User Authentication File you will have to locate and
open the file by clicking on the “Open” button.
Figure 69. Restore User Authentication File
4. In the Restore window, click on the “Finish” button to exit the Restore User Authentication File
System Settings
settings, or click on the “Restore” button to run the Restore process. A “Restore” message window
will appear informing you that you must scan your Fingerprint in the Identity Authorization Login
window (only your Fingerprint will be accepted, there is no facility for entering your Secret Password) to
proceed. Click on the “OK” button to continue.
Figure 70. Restore Fingerprint scan
39
5. After your Fingerprint is authorized the “Restore” successful message window will appear. Click on
the “OK” button to complete and exit the Restore feature.
System Settings
Figure 71. Restore Successful
40
Repartition Tool
The Repartition feature allows you to adjust the size of the two partitions on the JetFlash™ 220. The
advantage of this feature is that you can customize the size of the Private and Public areas on the
JetFlash™ 220 to suit your requirements. Any information saved to the Private Disk is securely protected
and can only be accessed by logging in to the Identity Authorization window, the other area will remain
a Public Disk, which is freely accessible.
WARNING! Partitioning the JetFlash™ will erase any information on the disk. Please
backup any information that you have on the drive before repartitioning the JetFlash™
1. To use the Repartition Tool feature, plug the JetFlash™ 220 into an available USB port on your
desktop, or notebook computer.
2. The Identity Authorization window will appear. Enter your fingerprint, or secret password to access
the Repartition Tool function.
Figure 72.Identity Authorization Login
3. Put the Software CD into the CD-ROM (Auto-Run supported). Click on the “Repartition Tool” button
Repartition Tool
to launch the Repartition application.
Figure 73. Repartition Tool
41
4. The Partition Tool window will appear. You can customize the size of the Private and Public areas on
the JetFlash™ 220 by sliding the adjustment bar to the left, or right until the Private and Public areas
are the required memory size.
Figure 74. Partition Tool
™
5. After you have divided the JetFlash 220’s Private and Public areas into the required sizes, click on
Repartition Tool
the “Format” button to begin repartitioning the drive.
Figure 75. Start Repartition
42
6. The restore confirmation window will appear after format complete. You can click “Yes” button and
follow its procedures to restore User Data File (User Authentication / Password / Fingerprint
information) or click “No” button to skip the restore process.
Figure 76. Confirm Restore User Data
7. A “Format Complete” message window will appear confirming that the disk has been successfully
Repartition Tool
partitioned. Click on the “Finish” button to complete and exit the Partition Tool. Unplug and Re-plug
the JetFlash™ 220 into your computer to activate the new settings.
Figure 77. Partition complete
43
8. After you repartition the JetFlash™ 220’s drive, the Private partition and its contents will remain
Repartition Tool
invisible until you log into the Identity Authorization window. After you login any information you save
to the JetFlash™ will be saved to the Private area and securely protected. If you do not log into the
Identity Authorization any information you save will be saved to the Public area and freely
accessible.
44
Troubleshooting
If a problem occurs with your JetFlash™ 220, please first check the information listed below before taking
your JetFlash™ 220 for repair. If you are unable to remedy a problem from the following hints, please
consult your dealer, service center, or local Transcend branch office. We also have FAQ and Support
services on our websites.
Manual CD cannot auto-run in Windows®
Go to the Device Manager in the Control Panel and enable the Auto-Insert function of the CD-ROM
drive. Alternatively, you can manually run the “JetFlash.EXE” file on the CD.
Operating System cannot detect the JetFlash™ 220
Check the following:
1. The JetFlash™ 220’s can only be used with computers that are running Windows® 2000/XP/VistaTM.
2. Is your JetFlash™ 220 properly connected to the USB port? If not, unplug it and plug it in again. If it is
properly connected, try using another available USB port.
3. Is the USB port enabled? If not, refer to the user’s manual of your computer (or motherboard) to
enable it.
Why is my Fingerprint not being recognized by the JetFlash™ 220
The sensor strip for reading your fingerprint is very sensitive and it requires a good fingerprint scan in
order to compare the scanned print with that of saved fingerprint profile. Therefore, you need to slide your
finger/thumb slowly and deliberately along the strip to register a good fingerprint image.
1. Has the finger/thumb you are sliding along the strip been setup as a recognized fingerprint? If not,
then set it up.
2. Are you sliding the finger/thumb too quickly across the sensor strip?
Why can’t I protect System files, or “*.exe, *.ini and *.dll” files?
These files cannot be protected because they are critical to the operation of your computer and must
therefore always be accessible.
Why can’t I use my Secret Password to Restore a User Authentication File?
Why does a “Restart Computer” message window appear when I plug in my
JetFlash™ 220?
Sometimes the computer will mistakenly interpret the JetFlash™ 220 as a new piece of hardware that
needs to be installed. You can disregard this message and click on the “Cancel” button to continue.
45
Troubleshooting
The restoration of the backed up user authentication file is a critical procedure, which can allow your
personal login and user authentication to be compromised. Passwords can be guessed, or stolen and that
is why restoring the user authentication file will only accept your fingerprint as a valid form of recognition.
Cannot find the file that was just copied to the JetFlash™
You should always open a transferred file in its new location to ensure it has transferred successfully.
Re-copy the file and refer to the “Disconnecting from a Computer” section to remove the JetFlash™
220 after the copy process is completed.
A File that was just deleted still appears
Troubleshooting
Re-delete the file and refer to the “Disconnecting from a Computer” section to remove the JetFlash™
220 after the delete process is completed.
46
Specifications
• Size (L x W x H):
70 mm × 20.5 mm × 11 mm
• Weight:
13g
• Certificates:
CE, FCC, BSMI
• Warranty:
2-years
Ordering Information
Memory Capacity
Lens Color
TS2GJF220
2GB
Orange
TS4GJF220
4GB
Blue
TS8GJF220
8GB
Red
Specifications
Transcend P/N
47
Transcend Limited Warranty
“Above and Beyond” is the standard we set ourselves for customer service at Transcend. We
consistently position ourselves to be significantly above the industry norm, which is all part of
our commitment to Customer Satisfaction.
All Transcend information, Inc. (Transcend) products are warranted and tested to be free from defects
in material and workmanship and to conform to the published specifications. During the warranty period
should your Transcend JetFlash™ 220 fail under normal use in the recommended environment due to
improper workmanship or materials, Transcend will repair the product or replace it with a comparable one.
This warranty is subject to the conditions and limitations set forth herein.
Duration of Warranty: The Transcend JetFlash™ 220 is covered by this warranty for a period of two (2)
years from the date of purchase. Proof of purchase including the date of purchase is required to collect on
the warranty. Transcend will inspect the product and decide whether to repair or replace it. Transcend
reserves the right to provide a functional equivalent product, or a refurbished replacement product.
Limitations: This warranty does not apply to product failure caused by accidents, abuse, mishandling,
improper installation, alteration, acts of nature, improper usage, or problems with electrical power. In
addition, opening or tampering with the product casing, or any physical damage, abuse or alteration to the
product’s surface, including all warranty or quality stickers, product serial or electronic numbers will also
void the product warranty. Transcend is not responsible for recovering any data lost due to the failure of a
flash device. Transcend’s JetFlash™ 220 must be used with devices that conform to the recommended
industry standards. Transcend will not be liable for damages resulting from a third party device that
causes the Transcend JetFlash™ 220 to fail. Transcend shall in no event be liable for any consequential,
indirect, or incidental damages, lost profits, lost business investments, lost goodwill, or interference with
business relationships as a result of lost data. Transcend is also not responsible for damage or failure of
any third party equipment, even if Transcend has been advised of the possibility. This limitation does not
apply to the extent that it is illegal or unenforceable under applicable law.
Disclaimer: The foregoing limited warranty is exclusive. There are no other warranties, including any
implied warranty of merchantability or fitness for a particular purpose. This warranty is not affected in any
part by Transcend providing technical support or advice.
Online Registration: To expedite the warranty service, please register your Transcend Product within 30
days of purchase.
Register online at http://www.transcendusa.com/productregister
Transcend Information, Inc.
www.transcendusa.com
*The Transcend logo is a registered trademark of Transcend Information, Inc.
*All logos and marks are trademarks of their respective companies.
48
Warranty
* The specifications mentioned above are subject to change without notice.
Terminology
*.dat ............................................................................................................................................8, 35, 36, 37
File extension that denotes a file, which contains data.
.dll..............................................................................................................................................................45
A dynamic link library file extension allows an executable file communicate with a specific device.
.exe ...........................................................................................................................................................45
An executable file contains a program.
.ini..............................................................................................................................................................45
An initialization file type is used to set parameters for the OS and some programs.
CD...............................................................................................................................................................45
Compact Disk.
CD-ROM .....................................................................................................................................................45
Compact Disk-Read Only Memory is a compact disk format that can store music, text and graphics.
database ....................................................................................................................................................13
A collection of organized information.
desktop ..........................................................................................................................................1, 3, 5, 40
This is a single user stationary computer running the Window®, Mac™, or Linux™ Operating System.
e-work ..........................................................................................................................................................1
Electronic Work is any data resulting from work performed on a computer, or similar system.
FAQ ............................................................................................................................................................44
Frequently Asked Question.
Flash Drive ..................................................................................................................................................1
A rewritable type of solid-state memory storage device.
flash tutorial ..........................................................................................................................................7, 30
Animated instruction set providing information on how to use a product, or service.
hotkey ..................................................................................................................................................14, 35
A button, or combination of buttons that performs a task more quickly.
icon ....................................................................................3, 4, 7, 10, 13, 15, 18, 21, 24, 25, 29, 30, 36, 38
Is a small picture that represents a function, file, folder, disk drive, or some other element of a device.
Internet Explorer .............................................................................................................................1, 24, 25
World wide web browser.
LED.......................................................................................................................................................1, 3, 4
Light emitting diode produces light when an electric current is passed through it.
notebook..............................................................................................................................................1, 3, 5
Partition ...............................................................................................................................................42, 43
A logical division of a disk giving the appearance of separating one disk into more than one memory area.
radio button.....................................................................................................................................6, 24, 37
Allows a user to make a selection by clicking in the circle, or square that is provided.
49
Terminology
Portable lightweight computer capable of running off of battery power.
sensor strip .................................................................................................................................................7
A device that detects and responds to a stimulus i.e. touch, light, heat etc.
System Tray.................................................................................3, 4, 10, 13, 15, 18, 21, 24, 25, 29, 36, 38
Provides a location on the taskbar to display icons for programs and devices.
tabs ............................................................................................................................................................30
Distinguishes a user interface option, or preference.
USB ............................................................................................................................................1, 2, 3, 4, 44
Universal Serial Bus is a hardware interface found on all modern computers for connecting peripherals.
USB 2.0 ........................................................................................................................................................1
Hi-Speed version of the USB interface, capable of data transfer speeds up to 480Mbits per second.
USB port ................................................................................................................................................5, 44
This is the interface on a computer to which a USB device is connected.
Windows® ....................................................................................................................................................1
Computer Operating System developed by Microsoft.
Wizard ..................................................................................................................................................5, 6, 9
50
Terminology
A computer program that guides a user through a procedure for setting up a new application, or device.