1
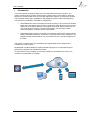
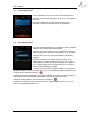
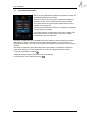
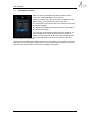
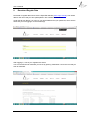
User’s Manual User’s Manual SuperSail System Side 1 af 20 User’s Manual Table of Contents 1 INTRODUCTION .......................................................................................................................... 3 2 LOGIN MENU................................................................................................................................ 4 3 MAIN MENU .................................................................................................................................. 5 3.1 FULL SCREEN MAP .................................................................................................................... 5 4 TRACKER INFO MENU .............................................................................................................. 6 5 SURVEILLANCE MENU ............................................................................................................. 7 6 ALARM MENU .............................................................................................................................. 9 6.1 6.2 6.3 6.4 6.5 6.6 6.7 6.8 6.9 7 FUNCTIONS ................................................................................................................................ 9 OUTPUTS ................................................................................................................................... 9 INPUTS ..................................................................................................................................... 10 MAXIMUM MOVEMENT ........................................................................................................... 10 12V ......................................................................................................................................... 10 MAXIMUM DISTANCE .............................................................................................................. 10 MAXIMUM SPEED .................................................................................................................... 10 CHOCK SENSOR ....................................................................................................................... 11 WIRELESS SENSORS................................................................................................................. 11 REGATTA MENU ....................................................................................................................... 12 7.1 7.2 7.3 7.4 7.5 7.6 7.7 REGISTER FOR REGATTA MENU .............................................................................................. 12 REGISTER/CANCEL RACE MENU ............................................................................................. 13 PARTICIPANTS LIST MENU ...................................................................................................... 13 CANCEL REGATTA MENU ........................................................................................................ 14 CREATE REGATTA MENU ........................................................................................................ 14 CREATE/EDIT REGATTA MENU ............................................................................................... 15 CREATE/EDIT RACE MENU ...................................................................................................... 16 8 DOWNLOAD REGATTA DATA ............................................................................................... 17 9 REGATTA TRACKERS ............................................................................................................. 19 9.1 9.2 9.3 9.4 10 10.1 10.2 10.3 CHARGING ............................................................................................................................... 19 OPERATION ............................................................................................................................. 19 POINT OF INTEREST REMOTE CONTROL................................................................................... 19 LED’S INSIDE UNIT ................................................................................................................. 19 MARINE ALARM TRACKERS ............................................................................................ 20 CHARGING ............................................................................................................................... 20 OPERATION ............................................................................................................................. 20 LED’S IN UNIT ........................................................................................................................ 20 Side 2 af 20 User’s Manual 1 Introduction This User’s Manual is about the daily use of the SuperSail Performance System. The system consist of GPS Trackers used for alarm systems and for data collection. Data are stored on a central hosted server and a mobile application (App) for accessing the trackers. The SuperSail mobile App is available for iOS (AppStore) and for Android (Google Play). The trackers are available in 2 hardware configurations: SuperSail Marine Alarm is developed for fixed mounting in dry environment inside a larger boat. The Marine Alarm must be connected to external power supply and the antenne must be placed where the best signal is achieved. Alarm sensors can be connected wired or wireless. A small internal battery ensures that the alarm continues operation if external power is interrupted. SuperSail Regatta Tracker is enclosed in a waterproof cabinet with a large internal battery and internal antennas. Connection of external sensors are not possible. The Regatta Tracker is developed for use as a mobile unit which is float if dropped into the water. The system is operated via your Smartphone and regatta data can be analyzed and presented on a PC or tablet. Regatta data is made available for external standard programs or to special developed performance programs via standard file formats. An extra feature is the possibility of sourcing live data to a presentation tool, which can create a live presentation of a regatta. Side 3 af 20 User’s Manual 2 Login Menu As a user you are setup with your email address as your user login and a personal password. Your email and password gives you access to the relevant features in the mobile app. If you have bought subscription for regatta data, your email and password will furthermore give access to your regatta data via the SuperSail website: www.super-sail.dk, under the menu “My Races”. Key in your email address in the Email field. Touch the field to have the keyboard displayed. When the email is typed in, press Ok or Enter on the Keyboard and the focus is moved to the Password field. Type in your personal password and press Ok or Enter on the Keyboard, which then disappears. If you have typed something wrong, you only touch the field and start over again. If you are using your own mobile phone or tablet, it is recommended to mark the field “Remember Me”. Next time the app is started you don’t have to type in the login information. This feature should only be used on a personal mobile phone or tablet, as it gives direct access to your system. After having typed in the correct data, press ”Log in”, and the application will collect your data and start the application. Side 4 af 20 User’s Manual 3 Main Menu In the main menu you have access to all relevant functions. At the top your name and your boats name are displayed. Your boats name is used in regatta data to identify the boat, and in alarm SMS’s, where it is included in the text. Next the ID of the tracker is displayed. The “Log out” button should only be used if you want to leave the application and type in your email address and password again. The four buttons gives access to the functions in the system. Your subscriptions defines which functions are available. If the alarm or surveillance is turned on, this will be indicated by green text and green icon on the button. At the bottom a map is shown, showing the latest position of the tracker. Pushing the map shows the Full Screen Map as shown below. 3.1 Full Screen Map The latest position of the tracker is shown by at pin in the location. If dates are specified and “Show” is marked, the tracking for the period between the dates are shown. If a period of several dates are selected, a pin is set in the first registered position for each day. The Sail Period is the time from first to last registration within the selected dates. If Start and End is set to the same day, the tracking’s for this day is shown. The Sail Period will show the sailing time including stops. The tracker will only register tracks when the boat is actually moving. If the boat is not moving for a day or more, no tracks will be registered. It is possible to zoom and rotate the map, using your fingers. Side 5 af 20 User’s Manual 4 Tracker Info Menu From the main menu it’s possible to edit your tracker settings, by selecting the ”Tracker” button. Pushing the “Back” button returns to the main menu without changing tracker settings. At the top you find the ”Reset Tracker” button, which executes a reset of the tracker. This is done by sending a SMS to the tracker forcing it to reset and restart. The boat name can be changed by selecting the field. When the field is selected, the keyboard is automatically displayed. The boat name is used to identify the tracker in SMS’s and regatta data. Selecting the Tracker ID field, shows a list of all trackers for which you are allowed as user. If the tracker you search for is not found, contact your System Administrator or [email protected], who can help to create you as user for a specific tracker. The color of the Tracker ID field identifies the status of the tracker: Grey – inactive Yellow – Alarm or Surveillance turned on Green – GPS communication active (e.g. Tracking active Regatta or checking GPS position) In the POI ID field you can key in the ID of the ”Points of Interest” (POI) Remote Control, which you are using. If you are not using a POI just leave the field empty. If the field cannot be selected, connecting of POI to your tracker is not possible. The Battery bars shows the level of the internal battery in the tracker and in the POI (if available). The tracker battery level is divided into steps of 20%, where the level of the internal battery is considered critical if it drops below 20%. If the POI battery level is not shown, this indicates that the information is not available or a POI is not connected. The POI battery level has only 2 steps – Ok/critical. If any Tracker data has been changed press “SAVE” to save the new data in the database. When the tracker is active tracking a regatta, it will update its position every 5 seconds or if the sailing direction is changed by more than 25 degrees. If a Regatta last for longer than 12 hours, the update time is changed to 5 minutes or if the sailing direction is changed by more than 45 degrees. Side 6 af 20 User’s Manual 5 Surveillance Menu From the main menu it’s possible to activate surveillance of yourself during your sailing, by pushing the button “Surveillance”. This function is primary intended for dinghy sailors with a SuperSail Regatta Tracker, who are sailing/training alone. Via the button on the Regatta Tracker Surveillance, the tracker can send an SMS to up to 4 mobile numbers by a single press on the push button. Furthermore automatically surveillance can be activated as described below. Pushing the “Back” button returns to the main menu without changing settings. The surveillance function is turned on/off independent of Regattas, which enables you to use the function without being registered for a Regatta. Surveillance is an extra safety for you during your sailing, where you have the possibility to send messages to up to 4 predefined mobile numbers, or you can leave it to the tracker to monitor if something unexpected occurs during your sailing and let it automatically send a message to your predefined mobile numbers. Surveillance contains the following functions: - Call Button on the tracker, for manual sending messages to your predefined mobile numbers. The Call Button is not available on all tracker types. - Automatic monitoring if the tracker has not been moving outside a specified radius for a specified time. If this occurs an automatic message is sent to your predefined mobile numbers. - Automatic monitoring if the tracker has moved outside a given distance from the starting point. If this occurs an automatic message is sent to your predefined mobile numbers. The Call Button is always active, if present on the tracker, when the surveillance function is active, but the automatic monitoring functions can be activated individually. Radius/time function is activated by marking the check box. Max Distance function is activated by marking the check box. Deactivating the functions are done by removing the mark in the check box. Up to 4 predefined mobile numbers can be specified, who will receive the same message. Mobile numbers must always contain the country code (e.g. +45 for Denmark). Data are automatically saved when keyed in. The below button indicates status of the Surveillance function. If the button is red with the text “Off”, surveillance is not active. Pushing the button change the color to green containing the text “On” – surveillance is activated. When the Surveillance function is turned on, all predefined mobile numbers will receive an SMS containing the information that they are now monitoring you. If your tracker contains a Call Button the light around the button will turn on as long as the Surveillance function is turned on. When a message is sent manual or automatic the lamp around the Call Button starts blinking to indicate that a message is sent to your predefined mobile numbers. When your message receivers has received the SMS message, they can return an empty SMS to the sender. When this message is received by the tracker, the lamp around the Call Button stops blinking, indicating to you that you message has been read by one of the message receivers. Side 7 af 20 User’s Manual If a message is sent by a mistake you can hold the Call Button in for at least 5 seconds, and the tracker will send a message to your predefined mobile numbers that the message is cancelled. The lamp around the Call Button stops blinking. Turning the Surveillance function off, initiates a message to your predefined mobile numbers telling that they are no longer monitoring you. All messages sent contains a link to Google Maps, with the actual position of the tracker. This makes it possible for the receivers to locate you. The messages furthermore contains the Boat Name which identifies you. You should test the Surveillance function regularly, to be sure that is works if an accident occurs. A tracker with faults or with a not full charged battery must never be used at sea. As long as the Surveillance is turned on, the tracker will update its position every 10 minutes. Side 8 af 20 User’s Manual 6 Alarm Menu From the main menu it’s possible to activate alarms that monitor your boat even during your sailing or when you leave your boat, by pushing the button “Alarm”. This function is intended for sailors who wants to ensure that their boat is not been robbed or stolen. Furthermore water intrusion or fire can be monitored by connected sensors. It’s also possible to turn on/off external units like e.g. the heater. Pushing the “Back” button returns to the main menu without activating the alarm. The alarm function is turned on/off independent of other functions, which enables you to use the alarm even if you are sailing. The alarm functions are a safety for you and your boat, where up to 4 mobile numbers can receive messages in case of alarms. The mobile numbers to receive the alarms can be defined in your subscription data, which can be edited using the SuperSail website. When your subscription is created a login to your subscription data is created with a personal password independent of the password used for the mobile app. Editing your subscription data can be done via the “Login” button on top of the SuperSail website www.super-sail.dk. 6.1 Functions The Alarm Menu contains the following functions: Outputs that can be activated independent of the alarm Inputs that can be activated individually Monitoring of maximum movement – e.g. theft or anchor guard Monitoring of 12V Monitoring of maximum speed Monitoring of maximum distance Chock Sensor which monitor e.g. grounding, hitting the jetty while moored or collision Wireless Sensors which can be activated individually 6.2 Outputs SuperSail Marine Alarm Wireless has 2 configurable outputs, where e.g. switches to activate external units can be connected. The units can be activated independent and individually. In the text field you can write a text that identifies the unit connected. If the “Activate on Alarm” check box is marked for Output #1, this indicates to the alarm system that e.g. a siren is connected to Output #1. The alarm system will automatically activate Output #1 if a theft alarm is activated. The Output #1 remains activated as long as a theft alarm is active and 5 minutes after the last theft alarm is activated. Turning off the alarm also turns off the Output #1. Output #1 is activated by the following alarms: Max. Movement Alarm, which indicates that the boat is being stolen Movement Sensor which indicates break in to the boat Door Sensor which indicates break in to the boat Input #1 activation – Input #1 can e.g. be used to monitor an outboard engine. Side 9 af 20 User’s Manual 6.3 Inputs SuperSail Marine Alarm Wireless has 2 configurable inputs, where SuperSail Marine Alarm has only 1. To the inputs external sensors like e.g. a smoke alarm or float switch can be connected, or a wire to an outboard engine can be connected for monitoring this. In the text field you can write a text that identifies the connected units. Same text is included in the SMS alarm text. 6.4 Maximum Movement Maximum Movement Alarm with configurable alarm distance. The function can be used as a theft monitoring or as an anchor guard. The figure shows the principal in the maximum movement alarm, where the boat are in the center of a circle indicating the maximum movement before the alarm is activated. A GPS which is steady will register some movement in all directions, caused by reflected signals from the satellites. Reflections occur when the signal from the satellite hits something in the way to the tracker. Even that the GPS in the tracker is very precise, reflected signals will be received from time to time, which gives the tracker a wrong position for the boat. To prevent wrong positions from activating a false alarm, it is recommended to set the Maximum Movement distance to minimum 25 meters. Our experience is that this value prevents most false alarms in most harbors. If the boat is placed near buildings or other constructions creating reflections, it might be necessary to set a higher value for the Maximum Movement alarm. It is recommended to test the value for some days to ensure that no false alarm are sent due to reflections form the surrounding environment. 6.5 12V Monitors if external 12V supply is interrupted or drops below 10,5V. 6.6 Maximum Distance Same function as described for Maximum Movement paragraph 6.4. Typically used by charter boat companies or if your boat is being used by others than yourself. You can receive an alarm if the boat comes too far from the starting point. 6.7 Maximum Speed Maximum speed with a configurable maximum speed in the unit of knots. Typically used by charter boat companies or if your boat is being used by others than yourself. If the speed indicates that the boat are transported over land, you will be noticed by an alarm. Side 10 af 20 User’s Manual 6.8 Chock Sensor Maximum chock effects with a configurable alarm limit in unit 1/1000 g (g=gravity). The Marine Alarm must be fixed mounted in the boat, to register the chock effect correct. Experience has shown that a value of 500 (500/1000 g ~ ½ of gravity) is normally suitable. This value will normally not activate the alarm when the boat is moored, but will activate the alarm if the boat hits the jetty. The setting can be tested by activating the alarm and then bouncing on the deck. A strong bounce corresponds that the boat hits the jetty and will force the alarm to be set. If the chock sensor is used for e.g. charter boats, the value can be set higher if you only want alarms in case of grounding. 6.9 Wireless Sensors Up to 10 wireless sensors can be connected to the alarm system as needed. The following wireless sensors can be connected: Movement Sensor, which monitor the temperature difference in the environment. If a living creature enters the boat an alarm will be set. Water Sensor, which monitor water or moisture in the boat. Door Sensor, which monitor if a door/window is opened. Remote Control, which can turn the alarm on/off without using the mobile app. The wireless sensors are connected to the alarm system by entering their ID, choosing the sensor type and giving them a descriptive text. The text will be included in the alarm SMS’s, why it’s important that it identifies the individual sensors. The alarms are connected individually, by setting Activating the individual alarms is not done before the alarm is turned on, by pressing the red button, which change to green with the text “On”. Hereby all connected alarms are activated. The alarm is turned off, by pressing the green button, which change to red with the text “Off”. When the alarm is turned on/off, an SMS message is sent to the alarm receivers, telling the status of the alarm – this normally takes a few seconds. If external 12V power supply is lost while the alarm is active, the alarm system automatically enters energy mode to save the internal battery power. In this condition the alarm will continue at least 12 hours without external power supply. In energy mode, the alarm will monitor the alarm sensors every 15 minutes and sleep in-between. The alarm system automatically enters normal operation when external power is restored. Side 11 af 20 User’s Manual 7 Regatta Menu The Regatta menu is activated if you have subscribed to the Regatta data. When a regatta is active the position of the boat is registered every 5 seconds. Data is collected for all boats registered for the same race in the regatta, and data for the complete race can be downloaded via the SuperSail website www.super-sail.dk. The tracking is automatically started 15 minutes before the race start and will automatically stop when the race ends. In the Regatta menu is listed the regattas which are registered for in the future. If a regatta is currently active this is shown as green in the list. Regattas not started are shown in grey. Furthermore you can choose to register to new races. If you have the administrator rights, you will be able to create regattas and races, which others can register for. Pushing the icon displays details about the registered regatta. Pushing the icon shows the Unregister menu. If an administrator is registered for the same regatta with different trackers, all registrations will be canceled at the same time. In the list is shown the name of the regatta and the start date for the regatta. Furthermore is shown the ID of the tracker(s) registered for the race. 7.1 Register for Regatta Menu In the Register for Regatta menu, the first list shows the regattas for which the user is invited, which means regattas from own club. The lower list shows the regattas which are open for all users to register for – open regattas independent of clubs. Pushing the icon shows the register menu, where you can register for one or more races in the regatta. Side 12 af 20 User’s Manual 7.2 Register/Cancel Race Menu In the Register/Cancel menu is shown the races contained in the selected regatta. From this menu it’s possible to register or cancel individual races in a regatta. Registration is done by setting the check box for the relevant race. Cancel registration is done by removing the check box setting. Pushing the “Participants” button shows the participants list including status for the trackers registered for the race. 7.3 Participants List Menu In the Participants List is shown the registered boats for a race, including status of the trackers. If the boat name is shown with black text, the tracker is still not started. If the boat name is shown with yellow text, the tracker is started but has no GPS signal. If the boat name is shown with green text, the tracker is started and it is sending GPS positions, The Wind instrument column shows if the boat has a wind instrument connected to the tracker. If the button in the column shows “Yes”, this means that a wind instrument is connected to the tracker. Between all the boats with a wind instrument connected to the tracker it is possible to define which one should deliver wind data for the race. This is done by pushing the “Yes” button in the Wind instrument column. Wind data will be collected from all boats with a wind instrument connected to the tracker, but if TracTracker is used for presentation after the race, wind data from the selected boat will be the source for wind data for the TracTracker program. The trackers will automatically be started 15 minutes before the first race start. In the Participants List you can follow the status as the trackers start up. Wind data will be collected from the trackers, with a wind instrument connected, every 2 minutes. The tracker calculates the average wind direction within the period of 2 minutes and if the average wind direction change more than 10 degrees it is reported. Side 13 af 20 User’s Manual 7.4 Cancel Regatta Menu Cancel registration can be done in the Cancel Regatta menu. Push the red button and registration for all races in the regatta is canceled. Before the registrations are canceled a warning must be accepted, to prevent unintended cancel of registrations. 7.5 Create Regatta Menu From the Create Regatta menu it’s possible to create and delete regattas if you have the administrator rights. Access to the Create regatta menu is controlled via user rights, which is assigned by your system administrator or by SuperSail. From this menu you can create new regattas or edit existing regattas. Note that a regatta can be edited until it has ended, so be careful editing an active regatta. The reason for this is that it must always be possible to change the settings for a regatta if it is e.g. postponed just a few seconds before start or if the end time is postponed during the regatta. In the list you will find all the regattas created by you and all the regattas created by someone else from your club. You are allowed to edit these regattas only. A regatta can be deleted by pushing A warning must be accepted before the regatta is deleted. If you delete an active regatta, all data registered for this regatta will be deleted and the trackers will be shut down. Editing an existing regatta or race can be done by pushing Creating a new regatta can be down by pushing the ”Create Regatta” button, and you will enter the ”Create/Edit Regatta” menu. Side 14 af 20 User’s Manual 7.6 Create/Edit Regatta Menu When you have defined the regatta to be edited or created, the Create/Edit regatta menu is shown. At the top is shown the name of the regatta to be edited or if the field is empty, you can define the name of the regatta. The system will not accept the same regatta name for more regattas for the same day. The start and end dates and hours for the regatta are specified via the relevant input fields. The regatta must be created before races can be added. This means that you have to push “SAVE” to have the regatta created before you can add races. The button “Create Race” is not available before the regatta is created. Saving the regatta automatically creates 1 race with the same name as the regatta. In many cases this is sufficient for a regatta, but the race can be edited afterwards and more races can be added if needed. The button ”Participants” opens the Participants menu where it is possible to monitor the status of the trackers up to the regatta start, to verify if all registered boats are ready. A race can be deleted by pushing A warning must be accepted before the race will be deleted. An existing race can be edited by pushing Side 15 af 20 User’s Manual 7.7 Create/Edit Race Menu When you have specified the race that you want to edit or create, the ”Create/Edit Race” menu is shown. At the top is shown the name of the race to be edited or if the field is empty, you can define the name of the race. The system will not accept the same race name for more races for the same regatta. The start and end dates and hours for the race is specified via the relevant input fields. The race type must be defined. Open races are visible for all sailors independent of club. Club races are only visible for sailors from the same club as the user which creates the race. This means that sailors who are not a member of the club cannot register for a Club race. Races must be created in the regatta before anyone can register for the regatta. This means that when you have defined the name of the race, the start/end times and the race type you must push the “SAVE” button to have the race added to the regatta. Side 16 af 20 User’s Manual 8 Download Regatta Data Download of regatta data is done via the SuperSail website (www.super-sail.dk), from where data for the races that you have participated in are available for download. Under the tab “My Races” you can key your email address and your password, which are the same that you use logging in to the mobile app. After logging in, a list of your regattas are shown. You are now allowed to download your races by pushing “Download” next to the race that you wish to download. Side 17 af 20 User’s Manual All data for the chosen regatta will be downloaded including all tracker files for the participating boats and wind data files for the boats having a wind instrument connected to the tracker. The following files are downloaded: 1. 2. 3. 4. Comma separated position data files: ”Boat name”.csv XML regatta data file: event.xml GPX position file: ”Boat name”.gpx Comma separated wind data file: Vinddata-”Boat name”.csv If data must be made available for the TackTracker presentation program, data must be downloaded and unpacked into the right folders as specified on the website. Other presentation programs typically uses the .csv or .gpx files, which can be imported into the program. Side 18 af 20 User’s Manual 9 Regatta Trackers SuperSail SuperSail Regatta Tracker Regatta Tracker Surveillance 9.1 Charging The Regatta Trackers are available in a number of versions intended for dingys. They contains an internal battery for several hors of operation. When the tracker is not active in a race it reduces it power consumption. It is recommended always to have the trackers connected to the charger, to be sure to start with a fully charged tracker. As the tracker never turns completely off, it will always have a minimal power consumption. 9.2 Operation The tracker is started by the SuperSail server, which means that the GSM network connection is always active. When the Regatta Tracker is removed from the charger it enters an energy mode to reduce power consumption. When it is started to register positions for a race it wakes up and becomes active. If you have registered for more races during a day, the tracker will enter energy mode in between, to save energy. The tracker is automatically started 15 minutes before start of next race. 9.3 Point of Interest Remote Control The Point of Interest (POI) Remote Control must be configured to the tracker via the SuperSail mobile app’en. The POI Remote Control can be connected to SuperSail Regatta Tracker Surveillance units only. The number of the POI Remote Control is unique for each POI and if the number is defined in more trackers, pushing the POI buttons will be registered in all trackers configured with the POI number.It is therefore important to verify that the POI number in the tracker is correct and delete it from trackers not using the POI. When the tracker is active in a race, pushing the PIO button will be indicated by fast blinking by the lamp around the Call button on the tracker. In this way you can berify if the POI and the tracker are connected correct. 9.4 LED’s inside Unit Inside the cabinet of the tracker 2 diodes can be seen blinking. One of them indicates communication on the GSM network and the other one indicates that the software is running correct. These are only to be used in case of service and troubleshooting. Side 19 af 20 User’s Manual 10 Marine Alarm Trackers SuperSail SuperSail Marine Alarm Marine Alarm Wireless 10.1 Charging The alarm system is available in a number of versions with different accessories used for larger boats. The alarm system must be connected to the power from the boat and is active as soon as it is connected. Charging of the internal battery is performed automatically to ensure full capacity. An intelligent internal charger ensures maximum life time for the internal battery. 10.2 Operation The tracker is started by the SuperSail server, which means that the GSM network connection is always active. If the external 12V supply for the alarm system is removed while the alarm is active it enters energy mode and reduces the monitoring of theft to 15 minutes intervals. When the 12V supply is reestablished the alarm system automatically enters normal operation. In energy mode the alarm can operate on internal battery for at least 12 hours, where the position of the boat is monitored every 15 minutes and reported if changed. 10.3 LED’s in Unit On the front of the alarm system 2 blinking diodes are seen. One indicates communication on the GSM network and the otherone indicates that the software is running correct. These are only to be used in case of service and troubleshooting. The third diode under the GPS antenna connector, lights green when the alarm system has a reliable GPS signal. If it changes to red, this means that the GPS signal is poor og´r disappeared. After connecting the alarm system the diode will be updated after a few minutes when the GPS signal has stabilized. If the diode lights red it is recommended to move the GPS antenna to a place with more optimal reception. Never place the antenna under a metal surface and make sure that it is mounted with the top side up (please refer to the installation manual for correct installation). Side 20 af 20