1
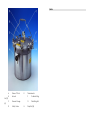
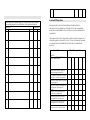
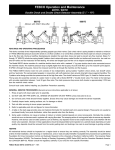
DIXONS SURGICAL INSTRUMENTS LTD, 1 ROMAN COURT
HURRICANE WAY, WICKFORD BUSINESS PARK
WICKFORD, ESSEX, SS11 8YB, UK
TEL: +44 (0)1268 764614 - FAX: +44 (0)1268 764615
EMAIL: [email protected] - WEB: http://www.dixons-uk.com
ST 18
Aluminium
Gas Model
Operators Manual
Issue 5
For correct operation of this autoclave it is essential that the
chamber be filled with water up to the height of the studs before
every use.
Warning - All external body and lid surfaces are hot during and
immediately after sterilisation. Lift or move the autoclave by the top
handle only.
7. Illustration
Notes
Nut (2)
(6)
A
B
Draw-off Cock
Aircock
C
Pressure Gauge
D
Safety Valve
E
Thermometer
F
Collared Wing
G
H
Plain Wing Nut
Drop Bolt (8)
Foreword
Before using this Dixons Portable Autoclave please read this booklet
carefully. Please ensure that all persons likely to use this product are
correctly trained in its use in accordance with these instructions.
Your Dixons Portable Autoclave, operated in accordance with the
manufacturers instructions, will give years of trouble free service
without the need for any major servicing.
1. Installation Procedure
1.1
On receiving the autoclave remove all the cardboard
protective covers. Unscrew the six Wing Nuts, which are
holding the lid on, and remove the lid. Remove all other
packaging materials from inside the autoclave.
1.2
Ensure that the following parts are included:
Every Dixons Portable Autoclave has been manufactured to the
highest quality standards by a company complying with BS EN ISO
9000 and is fully tested and ready for immediate use.
·
·
·
·
·
·
·
Dixons Portable Autoclaves are suitable for sterilisation of:
·
·
·
·
·
Laboratory equipment (glass and metal)
Culture media
Pharmaceutical preparations in sealed containers
Surgical and Veterinary instruments
Dressings and drapes
For the sterilisation of dressings and drapes it is recommended that a
Dressing Drum or Wire Mesh Basket be used. These are available as a
part of the range of accessories.
All Dixons Portable Autoclaves are particularly suitable for destructive
sterilisation, as the operator is not restricted to a set cycle time. This
can be adjusted to suit the application.
This users manual consists of seven sections:
1.
2.
3.
4.
5.
6.
7.
Installation Procedure
Operation
Sterilising Periods
Maintenance
Specification
Record of Inspection
Illustration
Autoclave body and lid complete with all fittings as per
the illustration in section 7.
Inner liner.
Pair of liner Carrying Handles.
White silicone gasket in lid.
Operators manual.
Test certificate.
Pack of TST indicator strips.
1.3
Ensure that no damage has occurred to any of the fittings
paying special attention to the Pressure Gauge and
Thermometer.
1.4
The autoclave is now ready for use.
If the inspection revealed defects in the autoclave, specify below
the necessary repairs or modifications which may be required:
Inspection
Completed
Date Action Required
Sign Date Sign
6. Record Of Inspection
An annual safety check will normally be sufficient unless the
autoclave is in very regular use. The date of the next examination
should be clearly marked on the autoclave once the examination is
completed.
The purpose of this form is to provide a written record of inspection. It
is merely a guide as to what to look for. It does not remove the need
to routinely inspect and maintain the autoclave as described in
section 4.
Model Type: ST 18
Serial No: ___________________
Date of Examination
Is the autoclave free from all signs of
physical damage and distortion?
Are the internal surfaces free from major
'pitting' (up to 1.5mm is acceptable)?
Is the Silicone Gasket flexible, unperished
and undamaged?
Is the Pressure Gauge undamaged and
does it read zero at atmospheric
pressure?
Is the Safety Valve undamaged, free
moving and in working order?
Are all the Wing Nuts and Drop Bolts
undamaged and in working order?
Are the Aircock and Draw-off Cock
undamaged and in working order?
Is a written set of instructions available for
reference by users of the autoclave?
Insert þ or ý as applicable
position. The remaining 6 Plain Wing Nuts should now be
lightly tightened in opposite pairs. This should be done as with
the Collared Wing Nuts - one in each hand - until the slack is
taken up. Now tighten up all the Wing Nuts in opposite pairs Collared Wing Nuts first. Normal finger tightness is adequate.
Inspectors Signature
2.4
Close the Draw-off Cock and open the Aircock
approximately 6 turns.
2.5
Turn on the gas or hotplate to a high power setting.
2.6
When the water begins to boil, steam will start to emit from
the Aircock. It will splutter at first. Close the Aircock once it
has stopped spluttering and a clean jet of steam is visible. It
is imperative that a clean jet of steam is visible before closing
the Aircock as this ensures all the air in the autoclave is
expelled. Air pockets in the autoclave will cause sterilisation
to be incomplete. It is advisable to use some form of
sterilisation test e.g. the TST indicator strips supplied.
2.7
The pressure and therefore temperature will now continue to
rise until it reaches the preset level and the Safety Valve
releases the excess pressure.
2.8
The gas or hotplate should now be turned down to a low
power setting.
2.9
It is at this time that the sterilisation period begins. Section 3
deals with sterilisation periods.
2.10
When the sterilisation period is complete, turn off the gas or
hotplate. Depending on the materials being sterilised, see
section 2.11 or 2.12.
2.11
Bottles or other sealed vessels containing liquid - do not,
under any circumstances, open the Draw-off Cock or the
Aircock or release pressure from the autoclave in any
manner. To release pressure from the autoclave at this point
2. Operation
Please read these operating instructions before using the autoclave
to avoid any chance of misuse.
The autoclave is factory set to run at 121ºC. This is the maximum
setting, which is suitable for most purposes. A lower setting can be
used if required.
Many materials can be autoclaved at 121ºC. These include most
metals, glass, silicone rubber and many plastics. If in doubt, consult
the manufacturer of the instrument or equipment concerned as the
manufacturer of the autoclave does not accept liability for damage
of this nature.
2.1
Remove the Inner Liner. Fill the chamber of the autoclave
with water up to the height of the studs.
2.2
Articles to be sterilised should be placed into the Inner Liner, a
Wire Mesh Basket or a Bottle Rack. To sterilise porous loads
(i.e. dressings and drapes) it is recommended that a Dressing
Drum be used. The container should not be packed tightly,
especially when dressings are being sterilised. It is important
that steam can circulate freely. Place the Inner Liner / Wire
Mesh Basket / Bottle Rack / Dressing Drum inside the
autoclave.
2.3
Locate the two Drop Bolts without Wing Nuts and move these
to the upright position. Check that the Lid Gasket is correctly
seated in its groove on the underside of the lid. Place the lid
on the autoclave so that the 2 Collared Wing Nuts are over
the upright Drop Bolts. Lightly tighten down the 2 Collared
Wing Nuts as a pair - one with each hand - until the slack is
taken up in them. Swing up the remaining 6 Drop Bolts into
could cause the containers to explode. Allow the autoclave
to cool until the Thermometer shows 80ºC or less.
5. Specifications
Model Type:
ST 18
Capacity:
14 litres
Internal Diameter:
Internal Height:
280mm
230mm
Overall Width:
Overall Depth:
Overall Height:
420mm
400mm
410mm
Net Weight:
11.5Kg
Chamber Material:
Die Cast Aluminium LM25
Heat Source:
External Heat Source
Bottled Gas Burner
Mains Gas Burner
Kerosene Stove
Electric Hot Plate
Design Pressure:
H T Pressure:
S W Pressure:
1.3 bar (18 psi)
2.0 bar (30 psi)
1.3 bar (18 psi)
Complies With:
H&SE PM73 (Lid Locking)
PED - 97/23/EC
adjuster clockwise, and to lower the pressure (and therefore
the temperature) turn it anti-clockwise. The autoclave should
be left to settle for about 1 minute after each adjustment.
When the desired pressure (and therefore temperature)
setting is reached, tighten the locking grub screw back up to
prevent the slotted adjuster moving and replace the top cap.
The maximum setting allowed is 121ºC - 1.0 bar (15 psi).
Maintenance - Remove the top cap, undo the locking grub
screw and unscrew the Slotted Adjuster as above. Remove
the spring and spindle to expose the Silicone Seal. Clean all
parts and check the Silicone Seal for wear. Replace if
necessary. Reassemble using a small smear of Autoclave
Grease on the spindle and threads. Set the Safety Valve to
the desired setting as described in the relevant section
above.
2.14
2.12
2.13
Dressings, instruments and apparatus - (providing the
apparatus does not have sealed glass containers holding
liquid). Warning - The water and steam that is released from
the autoclave at this stage is extremely hot. Wear suitable
protective equipment at this stage. Place a suitable
receptacle beneath the Draw-off Cock and open the Drawoff Cock to release water and steam under pressure from the
autoclave. When steam ceases to emit, close the Draw-off
Cock and allow the autoclave to cool until the Thermometer
shows 80ºC or less. During the cooling period a partial
vacuum will form inside the autoclave. This will help in drying
the contents.
When the autoclave is cooled, the Aircock should be
opened approximately 6 turns. Check that the Pressure
Gauge is reading zero. Unscrew the 6 Plain Wing Nuts in
opposite pairs - one in each hand - 2 full turns. Now unscrew
the 2 Collared Wing Nuts as a pair - one in each hand - 2 full
turns. This will allow the lid to rise to a safe position, where it is
still held captive, but has enough clearance to release any
residual pressure still in the autoclave. Unscrew the 6 Plain
Wing Nuts fully in opposite pairs - one in each hand - and
swing down the Drop Bolts. Unscrew the 2 Collared Wing Nuts
completely as a pair - one in each hand - and remove the lid.
Do not attempt to remove the lid until all the Wing Nuts are
released.
Remove the sterilised contents.
3. Sterilising Periods
The following times apply to a loosely packed load. Dressings in
particular should not be packed tightly as steam will not penetrate.
Wire Mesh Baskets or Dressing Drums are recommended for this
application.
When large packs of dressings or large volumes of liquid are being
sterilised, it is advisable to allow a further 10 minutes sterilisation time.
This ensures adequate penetration of the materials by steam and
heat.
Use these times as a general guide only - always use a sterilisation
test e.g. the TST indicator strips supplied.
Instruments and Equipment
Dressings and Drapes
Liquid in Sealed Containers (0ml - 50ml)
Liquid in Sealed Containers (50ml - 100ml)
Liquid in Sealed Containers (100ml - 200ml)
Culture Media (up to 1 litre)
121ºC
121ºC
121ºC
121ºC
121ºC
121ºC
Notes on sterilisation of Culture Media:
1. Always follow the manufacturer's instructions.
15 minutes
30 minutes
20 minutes
20 minutes
20 minutes
15 minutes
2.
3.
4.
5.
Use volumes up to 1 litre.
Use similar volumes in the same load.
After cycle test for sterility.
Check microbiological performance before use.
4. Maintenance
UK users - this autoclave comes within the scope of 'The Pressure
Systems and Transportable Gas Containers Regulations 1989' and
should be inspected and maintained accordingly. General
maintenance should be carried out by a competent person only, as
and when deemed necessary.
4.1
Lid Gasket - Check the white silicone Lid Gasket for distortion
or wear and tear. The Lid Gasket is located in the groove on
the underside of the lid. Check that it has not become brittle.
Replace the Lid Gasket with a new one if necessary.
4.2
Body Rim - Check the rim of the body where the Lid Gasket
seats for damage to the metal casting which would cause
the lid seal to leak. If the damage is only minor, then the rim
can be repaired by filing and smoothing with emery cloth.
Major damage should be referred to the manufacturer or a
qualified service engineer.
4.3
Draw-off Cock - Check the Draw-off Cock for signs of leaking
around the seals and from the valve. Replace the seals or
complete Draw-off Cock with a new one if necessary.
4.4
Cleaning - The use of alkalis (e.g. sodium bicarbonate) may
cause corrosion of the pot and lid and should therefore be
avoided. Use normal household detergent to clean the
interior of the autoclave.
4.5
Safety Valve Adjustment and Maintenance - The Safety Valve
is factory set to hold a temperature of 121ºC. This is a
maximum, but can be adjusted if required to a lower setting
by a competent person only.
Adjustment - Unscrew the top cap and loosen the locking
grub screw. Set a gap of about 4mm between the slotted
adjuster and the top of the body. Bring the autoclave up to
working pressure. Turn the gas or hotplate down to a low
power setting. Warning - The Safety Valve will be hot at this
point. The pressure at which the Safety Valve releases steam
can now be adjusted by turning the slotted adjuster. To raise
the pressure (and therefore the temperature) turn the slotted