1
CN/DCI/ 164
Version 2.2
August 1st, 1996
CERN UNIX User Guide
Editor: Alan Silverman
ACKNOWLEDGEMENTS
Much of the information in this Guide is not original; we are indebted to the authors of the "UNIX at Fermilab
Guide" and the authors of the "GSI UNIX Primer" for permitting us to include information lifted from those two
excellent publications. We also thank other CERN colleagues for helping us with particular sections and with the
numerous edits which were necessary to correct our initial drafts. Information in this Guide is not copyright but
any use in other documents should include not only acknowledgement to this source but also to the FNAL and
GSI guides as well.
This Guide is by no means guaranteed free from error, especially considering the range of UNIX architectures and
environments it is intended to cover. Readers are encouraged to send comments and error reports to Alan Silverman at the e-mail address [email protected].
Copies of this Guide can be found as follows:
AFS
Anonymous ftp
WWW - postscript
WWW - html
Paper copies
File /afs/cern.ch/asis/share/usr.local/doc/unixguide.ps
file asisftp.cern.ch:pub/doc/unixguide.ps
The full postscript file can be found under the Documents Section of the UNIX
Workstation Support Page, URL - http://wsspinfo.cern.ch/file/documents
The HTML version is also available at the URL http://wsspinfo.cern.ch/
file/documents and has options for selecting by contents pages or Index entries.
You will also find symbols defined to show footnotes and forward and backward references.
Document CN/DCI/164 at the self service shelves at the UCO, Building 513
CHANGE RECORD
Version 1.00
1 July 1994
First general release: prepared by Harry Renshall,
Judy Richards and Alan Silverman; edited by Tracey Appleby
Version 1.01
11 July 1994
HTML address of Guide added
Version 1.02
14 July 1994
UCO Book List and purchase scheme updated.
AFS address of Guide modified
Version 1.10
14 November 1994
Various minor mods including more options on the ftp, lpq and
lprmcommands and information on symbolic links
Version 1.11
27 March 1995
Some corrections made for documentation sources for elm,
pine and gnu
Additions to index
Additions to the list of special chars in Appendix A
Several minor errors and typing errors corrected
Clearer explanation of Internet addressing
Newer book recommendation for gnu emacs
Version 2.0
1 February1996
Translated to FrameMaker by Luc Goidadin
Version 2.1
8 March 1996
Reference to local disc copy of guide removed
Version 2.2
1 August 1996
Mostly small error corrections and minor additions (thanks to
Dietrich Wiegandt for pointing them out)
Removal of sections on elm and connecting to CERNVM
Note about CN recommendations for mail agent (pine) and
newsreaders (trn and xrn)
Table of contents
1.
Introduction ..................................................................................... 7
1.1
1.2
Getting a UNIX Account ...............................................................................7
Login, Logout, Setting Passwords ...................................................................8
1.2.1 Login .................................................................................................................................. 8
1.2.2 Logout ................................................................................................................................ 8
1.2.3 Setting Passwords ............................................................................................................... 9
2.
UNIX Shells ...................................................................................... 10
2.1
2.2
2.3
2.4
2.5
2.6
2.7
2.8
3.
Entering Commands ........................................................................................11
Path ..................................................................................................................12
Processes .........................................................................................................12
Standard Input, Output and Redirection ..........................................................13
Pipes ................................................................................................................14
Shell Scripts .....................................................................................................15
Filters ...............................................................................................................15
Regular Expressions ........................................................................................16
Working Environment .................................................................... 18
3.1
Environment Variables ....................................................................................18
3.1.1
3.1.2
3.1.3
3.1.4
3.2
3.3
Setting Environment Variables .......................................................................................... 18
Getting Values of Environment Variables ......................................................................... 19
A Summary of Some Useful Environment Variables ........................................................ 19
Changing Your Command Prompt ..................................................................................... 20
The Profile Files ..............................................................................................21
Terminal Characteristics ..................................................................................23
3.3.1 Keyboards .......................................................................................................................... 23
3.4
3.5
Alias .................................................................................................................24
Recalling Commands: history .........................................................................25
3.5.1 C Shell ................................................................................................................................ 25
3.5.2 Korn Shell Command Line Editing .................................................................................... 26
3.5.3 Command Line Editing in Other Shells ............................................................................. 26
4.
File System ....................................................................................... 27
4.1
File Structure ...................................................................................................27
4.1.1 Naming Directories and Files ............................................................................................. 27
4.1.2 Rules for Naming and Accessing Files .............................................................................. 27
4.2
List of Simple File System Commands ...........................................................28
4.2.1
4.2.2
4.2.3
4.2.4
4.2.5
4.2.6
4.2.7
4.2.8
Displaying the contents of a directory: ls ........................................................................... 28
Changing the Working Directory: cd ................................................................................. 28
Determining Your Working Directory: pwd ...................................................................... 28
Creating a New Directory: mkdir ....................................................................................... 29
Removing an Existing Directory: rmdir ............................................................................. 29
Renaming a Directory: mv ................................................................................................. 29
Displaying the Contents of a File: cat,more, etc ................................................................ 29
Renaming a File: mv .......................................................................................................... 30
Table of contents
3
4.2.9
4.2.10
4.2.11
4.2.12
4.2.13
4.2.14
4.3
4.4
5.
Copying a File: cp ..............................................................................................................30
Creating Links ln ................................................................................................................30
Deleting a File: rm ..............................................................................................................31
File and Directory Permissions ..........................................................................................31
Determining Permission: ls -l .............................................................................................31
Changing Permission: chmod .............................................................................................32
File Backup ..................................................................................................... 33
AFS Overview ................................................................................................ 34
Communications .............................................................................. 36
5.1
Internet Overview ........................................................................................... 36
5.1.1 Internet addresses ...............................................................................................................36
5.1.2 Internet Services .................................................................................................................36
5.2
Remote Login ................................................................................................. 36
5.2.1 Remote Processing .............................................................................................................36
5.2.2 telnet ...................................................................................................................................37
5.2.3 rlogin ...................................................................................................................................38
5.3
Remote File Access ........................................................................................ 38
5.3.1 ftp .......................................................................................................................................39
5.3.2 rcp .......................................................................................................................................41
5.4
Remote Shell ................................................................................................... 42
5.4.1 rsh .......................................................................................................................................42
5.4.2 remsh ..................................................................................................................................42
5.4.3 rexec ...................................................................................................................................43
5.5
Mail ................................................................................................................. 44
5.5.1
5.5.2
5.5.3
5.5.4
5.5.5
5.6
Getting Started with mail (mailx) .......................................................................................44
mail (mailx) Command Set ................................................................................................45
Useful facilities ...................................................................................................................46
The pine mail system ..........................................................................................................46
How to get help with problems ..........................................................................................46
Printing ............................................................................................................ 47
5.6.1 Printing with lpr .................................................................................................................47
5.6.2 Some Useful Unix Print Functions .....................................................................................48
5.6.3 Printing with lp ...................................................................................................................49
5.6.4 Printing with LATEX .........................................................................................................49
6.
File Editing ....................................................................................... 50
6.1
vi ..................................................................................................................... 50
6.1.1
6.1.2
6.1.3
6.1.4
6.1.5
6.1.6
6.1.7
6.1.8
6.2
GNU emacs ..................................................................................................... 55
6.2.1
6.2.2
6.2.3
6.2.4
6.2.5
6.2.6
6.2.7
4
Operating Modes ................................................................................................................50
Starting vi ...........................................................................................................................50
Exiting vi ............................................................................................................................50
vi Command Mode .............................................................................................................51
ex Command Mode ............................................................................................................51
Basic vi Keystrokes ............................................................................................................52
The .exrc File ......................................................................................................................54
More about vi .....................................................................................................................55
Emacs Commands ..............................................................................................................55
Starting emacs ....................................................................................................................55
Exiting emacs .....................................................................................................................55
Emacs Screen ......................................................................................................................56
Emacs modes ......................................................................................................................56
Basic emacs Keystrokes .....................................................................................................58
More information about emacs ...........................................................................................59
Table of contents
7.
Software Development .................................................................... 60
7.1
7.2
7.3
7.4
Compiling and Linking Programs in Unix ......................................................60
Compile, Link, Run .........................................................................................60
Important Platform Dependent Differences ....................................................61
Libraries ...........................................................................................................61
7.4.1 The cernlib command ......................................................................................................... 62
7.5
Compiling and Linking Options ......................................................................62
7.5.1 man page for Fortran .......................................................................................................... 64
7.6
8.
Creating and maintaining your own libraries ..................................................64
Applications ...................................................................................... 65
8.1
8.2
ASIS ................................................................................................................65
CORE (CSF,SHIFT,PIAF) ..............................................................................66
8.2.1 CSF ..................................................................................................................................... 66
8.2.2 SHIFT ................................................................................................................................. 66
8.2.3 PIAF ................................................................................................................................... 66
8.3
8.4
9.
PaRC ................................................................................................................66
NQS, NQS++ ..................................................................................................66
Getting Help ..................................................................................... 67
9.1
9.2
man pages ........................................................................................................67
Vendor Online Help .......................................................................................68
9.2.1
9.2.2
9.2.3
9.2.4
9.3
IBM .................................................................................................................................... 68
HP ....................................................................................................................................... 68
DEC .................................................................................................................................... 68
SUN .................................................................................................................................... 68
Information Servers .........................................................................................68
9.3.1 World Wide Web (WWW) ................................................................................................ 68
9.3.2 phone .................................................................................................................................. 70
9.3.3 emdir .................................................................................................................................. 70
9.4
News ................................................................................................................71
9.4.1 NetNews ............................................................................................................................. 71
9.4.2 Newsreaders ....................................................................................................................... 72
Appendix A. Bibliography .................................................................... 75
A.1 CERN documents ............................................................................................75
A.1.1 Recommended manuals ..................................................................................................... 75
A.1.2 Other reading ...................................................................................................................... 75
A.2
General Unix Bibliography ...........................................................................77
Appendix B. Commonly Used Unix Commands ................................. 78
B.1
B.2
B.3
B.4
B.5
B.6
B.7
B.8
Managing Directories ......................................................................................78
Managing Files ................................................................................................78
Managing Jobs .................................................................................................78
On-line Help ....................................................................................................78
System Information .........................................................................................79
Utility Programs ..............................................................................................79
Directory Identifiers ........................................................................................79
Special Characters ...........................................................................................79
Table of contents
5
Appendix C. Glossary ............................................................................ 81
6
Table of contents
1.
Introduction
The objective of this guide is not to teach you basic UNIX, but to tell you about the aspects
that are specific to CERN. Nevertheless, Chapter 2 gives a brief overview of the main features
of UNIX giving some examples from the Ultrix Operating System while Chapter 3 goes into
more detail about file handling. If you have little or no experience with UNIX we recommend
you get the book, "A Practical Guide to the UNIX System" by Mark G. Sobell [17], available
from the User Consultancy office in building 513, sold at 60 CHFs. Another book which might
be of interest is "UNIX for VMS Users" published by Digital Press and available from the UCO
for 55 CHF [32]. For users wishing to do some C programming, also available is "A Book on
C" by Al Kelley and Ira Pohl for 50 CHFs [18] and the "C++ Primer" by Stanley Lippman.
For Fortran 90, the book "Fortran 90 Explained" by Metcalf and Reed [19] is also available
there for 30 CHF. Anyone wishing to purchase any of these should send a mail to UCOBOOKS@CERNVM stating which book they wish to purchase and on which budget code; an
electronic internal budget transfer (EDH) form will be generated and sent for approval. Alternatively, you may make out a paper request, the so-called TID form, and take this to the UCO.
We have tried to maintain some consistency in the fonts used in this manual according to the
following rules: characters displayed in bold indicate characters to be typed as is; bold
italic indicates arguments to be substituted; the output of examples are shown in typewriter font. We apologise here if some inconsistent formats have slipped in; readers are
encouraged to contact the author if they spot any errors. Note that some examples are specific
to certain architectures and may not work across all platforms; consult the man pages of your
local system for full details.
Some UNIX commands consist of the so-called Control modifier <Ctrl> followed by one
or more characters. The following notation is used to describe the keystrokes.
<Ctrl-g>
Hold down the <Ctrl> key and press g.
We should also point out that work is currently in progress to define a default UNIX environment for new users. This Guide tries to illustrate some of the implications of this work by giving examples of recommended utilities. However, for more details on this work, the reader
should consult the system manager of his or her local system in order to determine which parts
of that environment are implemented and hence which further documentation it may be necessary to read.
1.1
Getting a UNIX Account
In order to obtain an account on any central system you must first contact your Group Administrator who will register you on the necessary systems once you have read the Computer Rules
and signed the registration form. This form must then be sent or taken to the UCO - Registation form in building 513 where your account(s) will be validated. For UNIX accounts a User
Identification Number (UID) will be given. This is a unique number that is given to your
account-name and should be valid over all the centrally-maintained UNIX-type platforms at
CERN.
Even for those who have private workstations only, it is advisable to see your Group Administrator and be granted a UID number, even without being registered on the central services, so
that this number is reserved for your use.
7
1.2
Login, Logout, Setting Passwords
1.2.1
Login
Once you have an account on a central machine you may login from any connected terminal. If
you have to buy a terminal for your office first refer to the "CN Terminal Co-ordination Service
- A User Guide" available at the UCO. This will help you choose the type of terminal you
might wish to purchase. Note that at the present time, the use of X terminals is recommended
rather than simple dumb ASCII terminals.
The following are some ways that you can access a UNIX system:
• Log into the workstation console directly (in other words, it is on or under your own desk).
Consult the instructions for your workstation.
• Connect to it from another UNIX platform or from a VMS platform with Multinet or similar
TCP/IP support installed:
telnet host or
rlogin host
• Access the system from a terminal server server that supports IP or LAT; at CERN it will
almost certainly be a DECserver. This means when you power up your terminal you have a
prompt of some sort, for example Local>. Enter SHOW SERVICES to tell if the system
you want to connect to is known by that terminal server. By simply typing
c dxcern
you will be connected and be able to login (to node dxcern in this example).
• Access a UNIX system from an X terminal: for this discussion, it is assumed that you have
successfully initialised and booted your X terminal. For help in this, see the CERN X Terminal Admnistrators Guide available at the UCO Self Service or via WWW (see entry
UNIX Workstation Support on the CERN Computing Home Page). From an NCD X Terminal as normally installed at CERN, call up a Telnet window (Option Terminals on the
Option Menu) and enter the name of the desired UNIX system and then select Connect.
The system will prompt for your login name and password.
Remember that UNIX is a case sensitive environment and so MYFILE, Myfile and myfile are
three different filenames and FRED, Fred and fred are three different login names. Note, if you
do use upper case to log in, UNIX may assume you have an upper case only terminal and you
will have very limited capability. If you do so, either logout and log back in again or enter the
command "stty -lcase".
1.2.2
Logout
The logout procedure is both shell - as well as system - (eg: DXCERN, ULTRIX, SUN etc..)
dependent.
You can logout of the C shell (see Chapter 2 “UNIX Shells” on page 10) within DXCERN
with:
8
logout
To logout of the Bourne shell use:
exit
If you have any other processes (which may have been created by mistake) you will be
informed that you have stopped jobs. You can continue to enter logout repeatedly until each of
these processes is terminated.
1.2.3
Setting Passwords
A CERN pre-requisite is a password that prevents others using your account and should thus
be regularly changed. For the Computer Centre services, users who forget their passwords Resetting passwords should contact the UCO (tel 4952), otherwise contact your system administrator. In order to change your password on UNIX use the command
passwd
This will prompt for your current password and then ask for two copies of your new password
(the second just for verification in order to avoid typing errors). If your node has NIS (previously called Yellow Pages, NIS is a method of sharing access among a cluster of nodes to some
central files, such as the password file), the command is yppasswd. If AFS (see “AFS Overview” on page 34) is installed, the command is kpasswd.
Your password must be at least 6 characters long and should not be your login name or any
simple permutation of it. It is advisable to mix letters and digits in your password. See the article in the CERN Computer Newsletter number 210 (available from the UCO or via WWW) on
tips for choosing good passwords.
9
2.
UNIX Shells
Once you have successfully logged in, you are in an environment called a shell. This is a process which has been started (spawned) at the end of the login process. A new shell is also started
for each invocation of a terminal window. A shell is the interface between the operating system
and the user. It interprets the commands you type and the keys you press in order to direct the
operating system to take an appropriate action.
There are two families of shell: one is based on the Bourne shell (sh) and includes also the
Korn shell (ksh), the Bourne Again Shell (bash) and the superKorn Shell (zsh); the other family is based on the Berkeley/C Shell (csh) and includes also tcsh which is an enhanced csh.
This Guide will not try to distinguish the different features of these shells; if you are interested
in deciding which shell has the features you prefer, we recommend reading the document "A
Shell Comparison" by Arnaud Taddei, reference CN/DCI/162, available from the Self Service
shelves of the UCO in Building 513; this presents an excellent comparison of features between
the shells. Also you might wish to get a copy of "tcsh and zsh for Pedestrians", CN/DCI/163,
also from the UCO which presents an introduction to these two shells.
On most platforms, you will find that the Bourne, C and Korn shells are provided with the system while you will have to install the others yourself.1 The choice of which shell to use will
depend on what type of work is being carried out. It has been found that the Bourne flavour is
often better-suited for shell script programming whereas one of the more modern shells is better for interactive use. However, often the use of a particular shell is a highly personal choice.
Not all UNIX systems offer the same shell for their default. You can determine which shell you
are in with the echo $SHELL command. Under the C shell this will give you the following
lines:
echo $SHELL
/bin/csh
The env and printenv commands will also give you this information, along with many
other environment variables (See “Environment Variables” on page 18.).
However, all these commands will show you only your login shell. If you have invoked
another shell and you use one of these commands, you will be informed about your login shell,
not the new shell you invoked. The C shell is designated as csh, the tcsh shell by tcsh, the
Bourne shell sh, the Bourne Again shell bash and the Korn shell by ksh.
It is possible to invoke a new shell (subshell) on top of your current shell by simply typing its
name. If you wish to change your default shell you can do this with the command chsh
(change shell); not supported in Solaris 2 or SGI systems.
Once you enter a subshell, you can exit again by typing
exit
If you repeat the exit command once more, your terminal emulation is closed, and the terminal
1. These so-called moden shells, usually freely-available in the public domain, are normally available on
CERN’s Public Domain server ASIS (See “ASIS” on page 65.).
10
window disappears. Instead of exit, you may need to enter <Ctrl-D>.
2.1
Entering Commands
When you see the command prompt you can enter a command by typing the command name
and any options and arguments, followed by a carriage return.1 The default prompts are as follows - % for the C shell, $ for the Korn shell and bash$ for the Bourne Again shell; however,
all these may be changed and frequently are.
The basic format of UNIX commands is:
command [-option(s)] [argument(s)]
command
option(s)
argument(s)
[...]
is the UNIX command name of a utility or tool
modify how the command runs and are listed one after another preceded by a dash
specifies data on which the command is to operate, and are separated
by blanks (“white space”)
options or arguments within square brackets are optional
Remember, UNIX is case-sensitive and therefore most UNIX commands must be entered in
lower case.
The components are separated by at least one blank space. If an argument contains a blank,
enclose the argument in double quote marks. Normally, options can be grouped (e.g., the -lw in
the example below). Some options can have arguments, and unfortunately there isn’t consistency on whether there should be a blank space between the option and its argument.
Examples:
wc -lw file1 file2
wc -l -w file1 file2
f77 -o outputfile program.f
In the third example outputfile is the argument of the option -o.
You should be aware that UNIX commands are not noted for their consistency of format. Furthermore, commands, formats, arguments, and options vary somewhat from one UNIX platform to another. In this Guide, we attempt to be generic and describe options that are widely
available; for exact details on any command, including a full list of allowable options and
arguments, see the man pages for that command (the man command is described in “man
pages” on page 67). Various options are possible to print man pages on a printer but unfortunately there is no universal formula. You may try one of the following but we cannot guarantee
which will work best for you.
man pwd | col -b | lp -ddest
or
1. Note, usually a UNIX command is actually the name of a file, which the operating system will load and
execute (see “Path” on page 12).Other commands are built-in in the sense that they are included in the
UNIX shell program.
11
groff -man file | lp -ddest
The first command pipes the output of the pwd man pages as an example to be printed on a
printer dest. The second command gives a better-formatted output but you require know
where the input man pages for the command in question are stored. This will be somewhere in
the /usr/man directory hierarchy. You can guess where by looking at the output of man command: the first line will contain the string command(i) and then the file in question should
be in /usr/man/mani/command.i Note that on some systems, HP-UX for example, the
files may only be in /usr/man/mani.Z and need to be uncompressed before used in this
way.
To correct typing errors you can use the erase key to erase character-by-character, or the kill
key to kill an entire line. Recalling and editing previously-executed commands (command history) depends on the shell you are in and is discussed briefly in a later section.
More than one command can be entered on a line if the commands are separated by semicolons. Such commands will be executed sequentially.
If you need to continue a command to a new line, you can either keep on typing or enter a
backslash character ‘\’ followed by a carriage return and then continue on the next line.
You can use parentheses to group commands. Since a subshell is created for each group, this
can be used to prevent changing the current environment. It can also be used to redirect all output from a set of commands considered as a group (see below).
Type ahead is permitted, even if the characters get interspersed with output.
UNIX commands are described online via the man command (see “man pages” on page 67
for more information).
2.2
Path
When you issue a command, the shell program parses the command line and either processes it
directly or searches for a file with that name in any of the directories specified in your search
path , which is controlled by the shell variable PATH. If the file is not found in any of the
directories in your search path, the shell reports that the command was not found. The file may
well be on the disk somewhere, but it is “not in your path.”
We will attempt to provide an appropriate default path in a future CERN UNIX Environment,
but you can always modify the value of PATH in your ’startup’ file (normally .cshrc or
.login for the C shell family or .profile for the Bourne shell family, see “The Profile
Files” on page 21).
If you are using the C, tcsh or zsh shells, for example, and you add a command to one of the
directories in your search path, it may be necessary for you to either log out and log back in or
to recreate the internal tables used by the C shell with the rehash command.
2.3
Processes
When you begin a terminal session, the operating system starts a single parent process. Creating a new process from an existing process is called forking. This new process is called a child
process and has its own unique process identifier. A child process can fork another process and
become a parent. A process is said to be a background process when the controlling shell
does not wait for its termination but has given control back to the user. Such a process cannot
12
receive any input from the terminal, but can still produce output on the terminal it was started
on.
When you issue a command to the shell, except for built-in commands such as cd,exec or
set, the shell forks a child process for the command to run in. The parent process remains
dormant until the child process completes or is stopped, then control returns to the parent. 1
The ps command can be used to print the status of active processes.
ps [options]
This forking of a child process when you run a script can be confusing because the parent process is not affected by the child process. For example, if you change the value of a shell variable
in a script, this change will not be seen by the parent shell. If you are using the C shell you can
use the source command to cause the current shell process to execute a script. If you are
using the Bourne shell, type
. filename
Note the space between the . and the filename.
2.4
Standard Input, Output and Redirection
The shell and many UNIX commands take their input from standard input (stdin), write output to standard output (stdout), and write error output to standard error (stderr). By
default, standard input is connected to the terminal keyboard and standard output and error to
the terminal screen.
The way of indicating an end-of-file on the default standard input, a terminal, is <ctrl-d>.
Redirection of I/O is accomplished by specifying the destination on the command line using a
redirection metacharacter followed by the desired destination. Using the C shell as an example, some of the forms are:
Character
>
>&
<
|
>>
>>&
Action
Redirect standard output
Redirect standard output and standard error
Redirect standard input
Redirect standard output to another command (pipe)
Append standard output
Append standard output and standard error
The first three redirect to files. These characters are easy to remember if you think of them as
the head of an arrow. The fourth is called a pipe and is described in “Pipes” on page 9.
The form of a command with input and output redirection is:
command
file
[options]
[arguments]
<
input-file
>
output
1. Unless the child process runs in the background.
13
Unless you are using the C shell and you have noclobber(see the man pages for csh), using
> and >& to redirect output will overwrite any existing file of that name. You can use >> and
>>& to append to existing files.
Examples:
who > names
(pwd; ls -l) > out
pwd; ls -l > out
# Direct standard output to a file named names
# Direct output of both commands
# Direct output of ls command only
Input redirection can be useful if you have written a FORTRAN or C (or other language) program which normally expects input from the terminal and you want to provide it from a file. In
the following example myprog, which was written to read standard input and write standard
output, is redirected to read the file myin and to write file myout. (All these examples use the C
shell; syntax may vary slightly for other shells.)
myprog <myin >myout
You can suppress redirected output by sending it to the null device , /dev/null:
who >& /dev/null
To redirect standard error and output to different files, you can use grouping:
(cat myfile > myout) >& myerror
2.5
Pipes
UNIX uses the concept of a pipe to connect the standard output of one program directly into
the standard input of another program. This is specified by separating the two commands with
the pipe operator, the vertical bar (|). The general format is:
command1|command2|...
For example, to sort the output of the who command:
who|sort
Of course, each command can have options and arguments.
The tee command can be used to send output to a file as well as to another command.
who|tee whoout|sort
This is the same as the previous example except that a file named whoout is created containing
the original who output. The sorted output goes to standard output, the terminal screen.
It is possible to set up multiple pipes. Commands that appear in pipe statements may include
all the usual options and file designations.
ls -l|lp
14
This command pipes the output of the ls command to the printer via the lp command.
2.6
Shell Scripts
A shell script script is the UNIX equivalent of the VM/CMS EXEC file or the VMS DCL procedure although you should be aware that individual shell commands have limits in the size of
their argument strings.
The UNIX shell can be used as an interpretive programming language. Within the shell you
can, besides executing shell commands, create and use variables; process (read) arguments;
test, branch, and loop; do I/O; etc.
A shell script is a file containing a sequence of commands which can be executed by the shell.
The easiest way to execute a script is by typing in the filename on the command line. The shell
then interprets and executes the commands in the file one by one.
Although you can write complex programs using the shell language, you can also use simple
shell scripts for running complex commands or a series of commands that you use frequently.
The most commonly-used shells in our environment are the C shell and the Bourne shell, or
derivatives of these. Many people believe that although the C shell is better for interactive use,
the Bourne shell is better for scripts, so you may see many scripts written in the Bourne shell.
C shell scripts should begin with a comment line (a line which begins with the character #).
Scripts to be executed by other shells should contain a first line beginning with the character
string #! followed by the path name of the shell.
Note that in order to execute a script, the file containing it must have execute permission (see
“List of Simple File System Commands” on page 22 and following) and the C shell may need
to rebuild its table of commands.
chmod a+x mycommand
./mycommand
It is important to remember that, like all UNIX commands that are not built-in to the shell, a
script file executes in a child shell forked by the parent shell. The shell running the script file
retains environment variables of the parent shell as well as those variables defined in the shell
startup file for that shell (e.g. .cshrc1 for the C shell) which is executed before the script.
However, at the end of the script, control returns to the parent script and any definitions made
by the child process are not passed back to the parent process. If you want to execute commands that affect the current shell process, you must use the source command (C shell):
source script
(For the Bourne shell, use the . command instead.)
Refer to a good UNIX reference manual to learn about shell programming; see the Bibliography at the end of this Guide for references([17], [26]).
2.7
Filters
A filter is a command or program which gets its input from standard input, sends its output to
1. See “The Profile Files” on page 21.
15
standard output and may be used anywhere in a pipeline. The combination of UNIX filters
(grep, sort, awk, cut, paste) and the use of pipes is very powerful.
The grep filter searches files for a pattern and prints only those lines matching that pattern.
sort can sort or merge files.
sort [options] [field-specifier] [filename]
Sort is straightforward to use - read man sort to see what the options are and how to specify
the sort fields. If a field is not specified, the sort key is the entire line. The sorted output goes to
standard output.
awk is a powerful pattern scanning and processing language. Although you will need to spend
a little time learning how to use awk, it is very well suited to data-manipulation tasks. It handles internally what you would have to handle laboriously in a language like C or FORTRAN.
For example, you can declare a field separator (spaces, colons, commas, tabs) and it will properly align and interpret the contents of a field according to the way you use it. Thus you can do
in a few lines what would take many lines of FORTRAN.
A widely-available book on awk is The awk Programming Language [31]. There are several
versions of awk, an old version and a new version which is not completely backwards compatible. The book mentioned above describes the new version, and you should use the new version unless you get a program that is explicitly for the old version. However, vendors are not
consistent in what they call the two versions of awk: on Silicon Graphics and Sun, you must
use nawk to get the new awk and awk is the old awk, but on RS/6000, awk is the new awk.
2.8
Regular Expressions
A regular expression is a string composed of letters, numbers and special symbols that defines
one or more strings. They are used to specify text patterns for searching. A regular expression
is said to match any string it defines. The major capabilities include:
1.
2.
3.
4.
5.
match single characters or strings of characters
match any arbitrary character
match classes of characters
match specified patterns only at the start or end of a line
match alternative patterns
Regular expressions are used by the UNIX commands vi,ed,grep,awk, and sed. grep
in fact stands for global regular expression printer.
For a complete discussion of regular expressions refer to a UNIX reference manual but, to get
you started, we include a table of special characters that can be used in expressions. Note that
regular expression special characters are similar to but not identical to those used in filename
expansion.
.
$
"
\t
*
[ ]
^
?
16
Any single character
End of line
Delimits operator characters to prevent interpretation
Turns off special meaning of a single character following
Represents 0 or more occurrences of the preceding character
Specifies character classes
Match only if string is at the beginning of a line
Matches any one character
[...]
[^..]
Matches any one of the characters enclosed in square brackets
Matches any character other than one of the characters that follow the
uparrow mark within square brackets.
The string .* represents 0 or more characters, since . is any character and * is 0 or more occurrences.
17
3.
Working Environment
3.1
Environment Variables
There are many parameters in the shell that define parts of your working environment and
which can be set interactively at the command prompt, in shell scripts, or in user-specific profile files (see “The Profile Files” on page 21"). Each shell has one or more startup files. Work is
currently in progress developing a set of standard startup files (for further information contact
Alan Silverman or Tony Cass).
• Shell parameters that are local to your current shell and not passed to any subshell or subprocess are called shell variables.
• Shell parameters that are global are called environment variables. They are valid in the current shell, where they are set, and in all subshells. They are not valid however in ’higher’
shells, from where the current shell is invoked as subshell. The way in which a parameter is
declared to be global depends on which family of shell you are using (see below).
There is one restriction if you define environment variables in a shell script. If the environment
variables are to be valid also in the current shell you must invoke the script in a special way
without spawning a new process:
. myscript for the Bourne Shell
source myscript for the C shell
Otherwise the environment variables are valid only within the script in which they are declared
and all subprocesses invoked from there.
A set of environment variables is already defined by the operating system and can be changed
by each user for his personal working environment. In addition, he can of course also define
new environment variables. The profile files which serve as an interface for initialisation of
these variables at login are described later. By convention, environment variable names are
upper case.
A list of the currently-valid environment variables may be obtained with the command
env
also printenv in the C shell
In the following examples, for the reasons of simplicity and shortness, the command prompt is
assumed to be $.
3.1.1
Setting Environment Variables
Your default printer, for example, is defined by the environment variable PRINTER (for information on the available printers and their names and characteristics, see the WWW entry for
printing; from the CERN Computing Home Page (URL - http://www.cern.ch/CERN/Computing.html), select in turn – UNIX Workstation Support –> Springer –> List of Registered Printers; WWW is described in “World Wide Web (WWW)” on page 68). To change the default
value of PRINTER, enter the command
18
setenv PRINTER printer-name C shell family
PRINTER=printername; export PRINTER Bourne shell family
If the value you wish to assign to a variable contains blanks, enclose the string in quotes (“).
3.1.2
Getting Values of Environment Variables
The contents of environment variables can be made visible with the echo command. To get the
value, the name of the environment variable must be preceeded by a $-sign:
echo $PRINTER
513-pub
The value for PRINTER is shown. If you forget the $-sign, the character string is printed and
not its value:
echo PRINTER
PRINTER
Again you should keep in mind that Unix is case sensitive. This means that environment variables such as printer, Printer and PRINTER are all different.
A More Advanced Example
For example, if you want to have your current host name and current working directory named
MyEnv, using the Bourne Shell you can proceed as follows:
NODE=‘hostname‘; export NODE
MyEnv=$NODE:$PWD; export MyEnv
echo ’My Environment: $MyEnv’
My environment: rzri6f:/u/goeri
With the first statement, a new global variable NODE is defined. NODE gets the output of the
command hostname as value, which is achieved by enclosing the command name in single
backquotes. Then the values of NODE and of the environment variable PWD, which is already
provided by the system and contains always the current working directory, are put together in
MyEnv. Finally, to control the success of this action, the contents of MyEnv is printed to your
terminal window, prefixed by some text.
3.1.3
A Summary of Some Useful Environment Variables
In the following, some useful environment variables provided by the system are listed in alphabetical order:
EDITOR
The default editor as used by a number of utilities such as mail;the
default is vi
ENV
For the Korn shell, the name of a shell script that is executed each time
19
a new shell is invoked. This shell script is used for example, to define
common alias names, which should be available through the whole
environment. A common default in the Korn shell is $HOME/.kshrc
(where $HOME specifies your home directory; this can also be represented by (tilde)). This $ENV file is for your private shell customisation.
HOME
The default directory after login. You switch to the home directory
when you specify the command cd (change directory) without options.
PRINTER
The default printer (example default: 513-pub).
PATH
Defines the search path for the shell when looking for commands in the
system file structure, which is different in different Unix flavors. For
example, in HP-UX using the Bourne Shell, the PATH variable has by
default the value /bin:/usr/bin:/usr/contrib/bin: /
usr/local/bin:/usr/bin/X11:/etc:$HOME/bin:. In the
Bourne Shell the directories in the path are separated by colons (:).The
search order is from left to right. The environment variable HOME
contains the value of the home directory, the default directory after
login (see above). The last directory in our example of the PATH variable, indicated by ’.’, specifies the current working directory. In the C
Shell, the directories in the path are separated by spaces. A typical
value on a Sun could be set with the command
set path = (/usr/local/bin /usr/ucb /usr/bin /
usr/bin/x11 /bin)
PS1
In the Bourne shell the default command prompt in your shell. In the C
shell, this environment variable is called prompt
TERM
The terminal type for which output should be prepared. Depending on
the Unix flavour, aixterm, hpterm, or dxterm are assumed as default for
AIX, HPUX, or ULTRIX systems, respectively. If necessary, you
should overwrite it with vt100, vt200, 3270, and so on, depending on
your terminal type.
3.1.4
Changing Your Command Prompt
As noted previously, the default command prompt in the Bourne shell family is the $ (dollar
sign) and in the C shell family is the % (percent sign). You can change these by setting new
values to PS1 (Bourne) or prompt (C shell). For example to change from the $ symbol as
the command line prompt to the machine name as the new prompt in a Bourne shell –
$ PS1 = "Bravo:"
Bravo: echo test
test
Bravo:
20
Other constructs commonly found in command prompts are all or part of the current working
directory and the command sequence number. Using the C shell, examples of these would look
like –
set prompt="$cwd%"
set prompt="<bf!"
3.2
The Profile Files
Different shells have different profile files, also referred to sometimes as startup files. We show
here those for the Korn shell. There are usually four files for the customisation of the environment:
/etc/profile
$HOME/.profile
/etc/.kshrc
$HOME/.kshrc
Not all these files are used on all systems, some depend on the setting of the ENV variable. See
local documentation for the system being used.
If using HP VUE, there is a file $HOME/.vueprofile which is called instead of $HOME/.profile
or $HOME/.login when a user logs in.
The files in the user’s home directory are available for private customisation. The two other
files are available for common customisation by the system manager to be used by all users on
particular systems and can only be modified by the corresponding system manager. The file /
etc/.kshrc will only be utilised if the ENV environment variable is set appropriately (see
description above).
All Shells execute one or more (hidden) files from the $HOME directory at various times in
your session. For example, the C Shell executes three (hidden) files: they are
.login, .cshrc, and .logout.
They are "hidden" in that their names often start with a period character (.) so that they do not
normally appear in a listing of the files in your home directory.
When you log on, the .login file located in your home directory is executed. You can specify the type of terminal you are using and otherwise customize your environment. It should
include commands that you want to execute once, at the beginning of each session, specifying
such things as terminal settings and environment variables. You can change the default values,
or create your own environment variables using the set command to set C-shell variables.
Also, the C Shell executes the .cshrc file that is located in your home directory each time
you invoke a new C Shell, as when you log on or execute a C Shell script or otherwise fork a
new process. At login, it is executed before .login. It can be used to set variables and parameters that are local to a shell.
21
The C Shell executes the .logout file in your home directory when you log off the system.
The following (.logout) file simply clears the screen:
clear
If you modify your .chsrc or .login commands and you want them to take effect in the
current session, you must execute them with the source command:
source .cshrc
source .login
The following table summarises the profile files associated with each shell at login, logout and
when a new shell is invoked (although it may not completely describe the actions taken when
you run a shell script).
Shell
csh (1)
tcsh
sh (2)
ksh (3)
bash
zsh
22
Conditions
always
Executed scripts
$HOME/.cshrc
login
$HOME/.login
logout
always
$HOME/.logout
/etc/csh.cshrc
login
/etc/csh.login or $HOME/.login
interactive
$HOME/.tcshrc or $HOME/.cshrc
logout
login
always
/etc/logout or $HOME/.logout
/etc/profile or $HOME/.profile
ENV (4) variable if set
login
/etc/profile or $HOME/.profile $HOME/.kshrc
interactive
always
not possible
login
/etc/profile
$HOME/.bash_profile or $HOME/.profile
interactive
$HOME/.bashrc
non-interactive
ENV variable if set
logout
always
$HOME/.bash_logout
/etc/zshenv
$HOME/.zshenv
login
/etc/zprofile
$HOME/.zprofile
$HOME/.zlogin
interactive
/etc/zshrc
$HOME/.zshrc
logout
/etc/zlogout or $HOME/.zlogout
(1) System-wide startup scripts are not available in most cases:
- csh on Sun and DEC platforms starts no file under /etc (according to the manpages)
- csh on HP platforms starts the file /etc/csh.login at login time.
- csh on SGI platforms starts the file /etc/cshrc then /etc/.login then /etc/csh.cshrc then $HOME/.cshrc
at interactive time and all those files plus $HOME/.login at login time.
- csh on IBM platforms starts the files /etc/csh.cshrc and /etc/csh.login at login time and /etc/csh.cshrc
at interactive time.
(2) Again there are some differences between platforms. Not all Bourne shells are starting the system
level /etc/profile and non-interactive login Bourne shells do not start any profile at all.
(3) ksh is not available on SunOS IV. Thus a link to zsh is provided.
(4) $ENV is the file pointed to by the value of the environment variable $ENV if it is set. It is usually set
to .kshrc in the HOME directory.
3.3
Terminal Characteristics
You can specify your terminal type to Unix if the default is not suitable. To do so in the C shell,
enter the command:
set term=(termtype)
where termtype is the name of a terminal type supported on the system. vt100 and vt200 are
acceptable terminal types for example. If you always use the same kind of terminal, you may
want to put this command in your .login.
Terminal control functions settings can be displayed with the stty command, for example:
stty -a
The format on each machine is different but should indicate approximately the same information.
You can display a description of all of the options reported by stty with the command:
man stty
3.3.1
Keyboards
There are a large number of terminal types from which Unix can be used. With the terminal
type you describe the terminal hardware or the emulation program you use when communicating with Unix. The most important terminal types used are
vt100
vt200
vt300
xterm
aixterm
hpterm
dxterm
DEC
DEC
DEC
standard x-window terminal
AIX terminal emulation
HP-UX terminal emulation
ULTRIX or DEC OSF/1 terminal emulation
If you work in a Unix environment with the wrong terminal type set, you should keep in
mind that not all keys on your keyboard will be available in the expected way. If this is the case
23
you should reset your terminal type. For example if you want to correct your terminal type to
dxterm, you have to enter
TERM=dxterm; export TERM - Bourne Shell
setenv TERM dxterm - C Shell
On dumb terminals, there may be applications that cannot work correctly because they require
hardware features not available. However, many Unix commands can nevertheless be used in
such an environment: e.g. to compile and run user programs, or to look into the file system.
If you have changed the size of your window or changed your terminal type, this change may
not be recognised by some applications unless you execute the resize command, usually via
the command eval ‘resize‘.
Resize
The resize utility prints a shell command for setting the TERM and
TERMCAP environment variables to indicate the current size of the xterm window from which the command is run. For this output to take
effect, resize must either be evaluated as part of the command line
(usually done with a shell alias or function) or else redirected to a file
which can then be read in. From the C shell (usually known as /bin/
csh), the following alias could be defined in the user’s .cshrc: alias rs
’set noglob; ‘eval resize‘’
The reset command is used to reset the terminal mode. It is most
useful after a program ’dies’ leaving a terminal in an unknown state.
Youmay need to type”<LF>reset<LF>” to get the terminal to work
as <CR> often does not work.
Reset
There are also a number of ’special’ keys that can be used, but their use can be restricted by
shell and/or keyboard:
<ctrl-c>
<ctrl-d>
<ctrl-z>
3.4
Interrupts a process.
Logout - but in C shell you need to type logout if the shell variable
ignoreeof is set.
In the C shell, process will be suspended and can then be run in ’background’ with the bg command.
Alias
In all shells apart from the Bourne shell you can use the alias command to create your own
names or abbreviations for commands by performing string substitution on the command line
according to your specifications. However the format of the alias command is shell dependent.
alias new [old] C Shell
alias -x new=old Korn Shell
alias new=old zsh Shell
When you enter new the shell substitutes old. In the Korn Shell the -x option causes the alias
to be exported to child processes.
The following example causes ls -l to be executed when the command ll is entered:
24
alias ll ls -l - C Shell
alias -x ll=’ls -l’ - Korn Shell
The following example creates the command dir to list directory files only:
alias dir ’ls -l | grep ^d’ - C Shell
alias dir=’ls -l | grep ^d’- Korn Shell
grep in this case searches for a d in the first column of each line of the output of the ls -l command.
You can also show one or all of the current alias settings:
alias string
alias
3.5
shows what string is aliased to
lists all current aliases
Recalling Commands: history
Apart from the Bourne Shell, each shell provides a history mechanism which maintains a list
of commands that have been entered and allows them to be reexecuted. The history (C
Shell) or the HISTSIZE (Korn Shell) variable, usually set at login, determines the number of
commands that are saved in the list.
The (history) command is used to print the list of saved commands:
history
3.5.1
C Shell
Recalling a command to execute exactly as it did last time is fairly easy, but recalling a command to modify it is difficult and only a few of the many ways to recall pieces of commands or
modify pieces of commands are mentioned here.
You can specify commands or parts of commands to reexecute by number, relative number,
or by the text it contains:
command
!!
!n
!text
!?text?
what to reexecute
Reexecute the previous command
Reexecute command n
Reexecute the most recent command beginning with text
Reexecute the most recent command containing text
For example, to reexecute the 4th command from the history list and to reexecute the last command starting with (ls):
!4
!ls
25
The dollar sign ($) can be used to recall the last parameter of a command. For example, (!$)
causes substitution of the last parameter of the last command. For example, to check if
(myfile.f) is the correct file and then compile it:
more myfile.f
f77 !$
The following table shows several ways to substitute text in recalled commands. The first form
allows you to substitute text in the previous command. In the second form (xx) stands for any
of the ways described above to recall a command.
form
old new
!xx:s/old/new
!xx:p:s/old/new
3.5.2
action
Substitute text in the previous command
Substitute text in a recalled command
Substitute text in a recalled command, display but do not execute
Korn Shell Command Line Editing
Command line editing can be enabled with emacs syntax (usually via a command set -o
emacs in the .profile or .kshrc file. Available functions are as follows (note that you must
issue the command set -o emacs to enable the editing commands):
<Ctrl-p>
<Ctrl-n>
<Ctrl-b>
<Ctrl-f>
<Ctrl-d>
<Ctrl-a>
<Ctrl-e>
get previous command from history file
get next command from history file(requires at least one)
move cursor backwards in command line
move cursor forwards in command line
delete under cursor
jump to begin of command line
jump to end of command line
A mask for the next command to be executed can be obtained with <Ctrl-p> or <Ctrln>. The cursor is moved within the command line with <Ctrl-b> or <Ctrl-f>. At any
position, characters can be inserted, or be deleted with the <delete> key, <Ctrl-d>. The
command history is accessed from the file $HOME/.sh_history.
You can program the keyboard arrow keys for command line editing as follows:
Key
↑
↓
→
←
3.5.3
Function
<Ctrl-p>
<Ctrl-n>
<Ctrl-f>
<Ctrl-b>
Alias command
alias -x __A=\ <Ctrl-p>
alias -x __B=\ <Ctrl-n>
alias -x __C=\ <Ctrl-f>
alias -x __D=\ <Ctrl-b>
Action
previous command
next command
move cursor right
move cursor left
Command Line Editing in Other Shells
Shells such as ksh, tcsh and zsh use the arrow keys for command line editing, see “man pages”
on page 67 for these shells for more details. In addition, tcsh supports csh command recall and
zsh supports both csh and ksh command recall options.
26
4.
File System
4.1
File Structure
Unix has a structured file system that contains three kinds of files:
directories
ordinary file
special file
symbolic links
4.1.1
which store the names of other files including other directories;
which store text, source programs, and object code; and
which correspond to peripheral devices, sockets and a UNIX construction called named pipes which we will not treat in this Guide.
are text files containing the path name to the real placement of the file
referred to by the name of the symbolic link
Naming Directories and Files
The root directory is identified by a single character: slash (/). To name one of the major
directories directly under root, type slash (/) to represent root, followed by the directory’s own
name, as in /bin. The slash in front of bin tells you that usr is a subdirectory of root.
/u or /user
/bin
/dev
/etc
/tmp
user directory
binary directory
device directory
miscellaneous directory (usually system files)
temporary directory
The home directory on the central Unix Service (DXCERN) is: /u/gg/userid/ where gg refers to
the user’s computing group code and userid is the login name and for AFS it is /afs/cern.ch/
user/X/userid where X is the first letter of the login-name.
4.1.2
Rules for Naming and Accessing Files
The rules for naming and accessing files and directories are closely related to the structure of
the Unix file system:
• The root directory is identified by a slash (/).
• A simple filename can be any combination of 1 - 255 characters other than slashes (/),
asterisks (*), question marks (?), quotation marks (“ ) or (’), square brackets ([) or (]),
dollar sign ($) or control characters.
• A path name is a sequence of directory names, possibly followed by a simple filename,
with each name separated by a slash (/).
To avoid misinterpretation, the safest characters to use for simple filenames are letters of the
alphabet, numbers, periods (.), hyphens (-), and underline (_). A word of warning: do not
start file names with a leading hyphen (-) as it will cause great trouble when you try to refer to
it in many cases. Note: in Unix, upper and lower case are not the same. Examples could
include –
/usr/local/bin
long-description-name
mydoc.ps
myfile.f
27
/afs/cern.ch/user/f/fred/public/shared.info
The directory permanently assigned to you is called your home directory; this is the directory
in which you are placed when you log on. Any directory to which you move after logging on
(including your home directory) will be called your current directory, or working directory
or cwd, for as long as you remain in that directory. The directory which is one level above your
current directory in the file system is called your parent directory. Unix provides shorthand
symbols to indicate your current directory (.) and your parent directory (..). If a path name
used to access a file begins with a slash (/), then the search for the file begins at the root directory. Such a path name is called an absolute path name or full path name. If a path name
begins with a simple filename, then the search for the file begins at your current directory. Such
a path name is called a relative path name.
4.2
List of Simple File System Commands
4.2.1
Displaying the contents of a directory: ls
To sort and display the names of all the directories and files that reside in your current directory, use the ls command:
ls
file1
file2
file.3
Mail
Note that this will not list the hidden files such as .login. For that issue the command
ls -a
4.2.2
Changing the Working Directory: cd
To change your working directory, that is to move to another directory, use the cd command:
cd /u/otto/Mail
Use the cd command without any arguments to return to the $HOME directory.
4.2.3
Determining Your Working Directory: pwd
To find out the name of your working directory at any moment, use the pwd command:
pwd
/u/robin
28
4.2.4
Creating a New Directory: mkdir
To create a new subdirectory within your current working directory, use the mkdir command:
mkdir personal
This command will create a new subdirectory called personal.
4.2.5
Removing an Existing Directory: rmdir
To remove an existing directory from your working directory, move to the target directory,
delete all its files, move back to the parent directory, and then use the rmdir command:
cd /u/useless
pwd
/u/useless
rm -i *
cd ..
rmdir useless
The -i switch forces rm to prompt for confirmation before removing a file. If you try to
remove a directory that is not empty, you will see an error message. You may use the following
shorter method instead of the above:
rm /u/useless/*
rmdir /u/useless
or:
rm -r /u/useless
The -r switch removes all files recursively from the directory tree.
Note that these do not delete the hidden files such as .login. For that issue the command
rm /u/useless/.??*
4.2.6
Renaming a Directory: mv
To change the name of a directory, use the mv command:
mv old.name new.name
4.2.7
Displaying the Contents of a File: cat,more, etc
To display the contents of a file, use the cat command. It simply displays the contents of a file
or several files on the screen (standard output):
29
cat file.3 file.1
However, if a file has more lines than the screen, it will scroll off the screen faster than you can
read it. In this case one of use the commands more, less, page or pg.
Combining Files
Another function of the cat command is to combine files, or concatenate files with the result
stored in another file, e.g.:
cat file.1 file.2 > file.3
Avoid storing the result in one of the original files, as this will cause the original file to be overwritten.
4.2.8
Renaming a File: mv
You can use the mv command to rename a file or to move it from one directory to another. To
change the name of a file, enter a pair of commands like this:
cat new.file
cat: cannot open new.file
mv old.file new.file
or simply
mv -i old.file new.file
The -i switch will warn you if the command would overwrite an existing file.
The mv command will change the file’s name whether the new filename exists or not. The cat
command makes sure that a file will not be replaced or lost.
4.2.9
Copying a File: cp
To make a duplicate copy of a file, use the cp command:
cp file.one FILE.ONE
This command will make a copy of file.one. As a reminder lower and capital letters are different filenames.
4.2.10 Creating Links ln
To make a duplicate directory entry to a file, use the ln command:
ln file.one FILE.ONE
This command will create FILE.ONE as a second name for the file file.one. The two names
have equal weight when referring to the file. If one of the names is deleted with the rm com-
30
mand, the file will remain until all names referring to the file are removed. Links such as these
(hard links) cannot cross file systems and cannot refer to directories.
Use of the -s option creates soft links, also known as symbolic links which can cross file system boundaries and can refer to directories. However, if the original file is deleted, a soft link
may still exist which then will point to a non-existent file.
4.2.11 Deleting a File: rm
To delete a file, use the rm command:
rm file.1
This form of the command will delete the file file.1 immediately. To confirm before proceeding
to delete the file, add the -i option:
rm -i file.1
In fact, you might like to define an alias to perform this delete operation. In C shell notation:
alias del rm -i
4.2.12 File and Directory Permissions
This section deals with UNIX file protections only. Files under the AFS file system (see
page 34) use a different protection scheme which is described fully in the CERN AFS User
Guide (see “AFS Overview” on page 34 for reference).
UNIX allows you to access other files and directories in the system, but only if you have permission from the owner of those directories and files.
4.2.13 Determining Permission: ls -l
To determine the permission associated with a given file or directory, use the ls -l command to display the contents of the directory:
ls -l
total 501
-rw-r—– 1 user group 108 Oct 15 19:10 file.1
-rwxr-x— 1 user group 6452 Oct 15 17:15 program.1
drwxr-xrw- 1 user group 512 Oct 15 19:13 letters
The first character indicates the type of the file
d
l
ordinary files
directory
symbolic links
The remaining nine characters represent three sets of three characters: one set for the owner,
one set for the group field (in BSD this is the group of the directory in which the file was created; in System V it is the group under which the process was running when the file was cre-
31
ated), and one for all other users. Spread out the characters of the display above to explain the
groupings:
Type
d
User
rwx
rwx
Group
r-x
r-x
Others
—
rw-
program.1
letters
For each entry, the permissions given are for reading, writing, and executing. They have different meanings for ordinary files and directories. For an ordinary file, permissions are
defined as follows:
read
write
execute
permission means you may look at the contents of the file
permission means you may change the contents of the file or delete it
permission means you may execute the file as if it were a Unix command.
For a directory, permissions are defined as follows:
read
write
permission means you may see the names of the files in the directory
permission means you may add files to and remove files from the
directory
permission means you may change to the directory, search the directory, and copy files from it.
execute
The characters used to represent these permissions are:
r
w
x
-
read permission
write permission
execute permission
permission denied
4.2.14 Changing Permission: chmod
You can make changes to permissions by entering a chmod command. It allows the owner of
the file to add to (+) or remove from (-) existing permissions. It also allows the owner to clear
existing permission and assign all permission from scratch; this is known as assigning permissions absolutely (=). The chmod command affects any of the three types of access for any of
the three categories of Unix users, using one-letter symbols in the following order (left to
right):
32
u
g
o
a
owner (user)
File’s group
all others
all (default)
+
=
add permission
remove permission
absolute permission
r
to read
to write
to execute
w
x
Caution: It is possible for you to lock yourself out of one of your own files with chmod. Be
careful when you type it.
Example:
ls -l psab
-rwxr-xr-x 1 otto rz 487 Jul 30 10:21 psab
chmod o-x psab
ls -l psab
-rwxr-xr– 1 otto rz 487 Jul 30 10:21 psab
In the above example, the first ls -l shows the default permissions for a script, which is executable and readable by everyone, but writable only by the owner. After the chmod o-x command, the execution permission for others is removed. The file permissions can also be
expressed in octal numeric form; see the man pages of chmod for details.
4.3
File Backup
There are now over 1000 Unix Workstations on the CERN site and the number grows almost
daily. Some of these are grouped into well-organised clusters where system administration
tasks are well understood and handled by assigned individuals. Others are less well catered for
and many end-users now find themselves having to become part-time system administrators
and having to care about such things as user account creation, network configuration and file
backups.
The UNIX Workstation Support Section in CN’s DCI Group provides advice and help in several of these areas, including specially-written Guides for most of the supported workstations
at CERN. (See the latest edition of your favourite CERN computing newsletter for full details
of these services or go to the UCO for a copy of the Guide most interesting for you.)
This section describes a suggested file backup policy covering systems at CERN. We emphasise (a) the following is only a suggestion – if you already have file backup under control or
prefer a different scheme, we will in no way try to change your methods; (b) we have not surveyed the whole market, it is too broad; these tools may or may not be the best, we have
assured ourselves that they work correctly and do the job required.
The bases of our policy are: to encourage clustering where possible, to select tools with some
reasonable user interface, to select tools which use network resources as efficiently as possible,
and to select tools which either support multiple platforms already or are expected to do so in a
future release.
Local Backup - “Do it Yourself”
If you wish to perform local backups, especially if you can cluster some systems together, then
we recommend one of the following tools:
• Standard Unix tools such as dump/restore, tar, cpio and so on; however, these do not have a
friendly interface and few advanced features (little or no support for rebooting from tape, no
compression, etc) although they are free. Unless you fully understand them and/or have a
small number of systems to administer, we urge you to at least consider one of the following
33
commercial products, depending on the architecture of your system(s).
• DEC ULTRIX and OSF/1 systems – obtain licences for DECnsr.Like several other tools,
DECnsr supports other platforms as clients.
• HP systems (Apollo/Domain and Series 700) - obtain license for OMNIBACK; this tool can
write to tapes or cartridges on Apollo or Series 700 and has Apollo, Series 700 and SUN clients. Series 700 licenses are immediately available via Alan Silverman, CN Division (see
cern.hp news).
• Other systems and mixed-architectures groups – there are many tools, some propriety tool
such as SUN’s CoPilot, and some general such as Legato Networker which is available for
most platforms. Contact Unix Workstation Support for more information.
Central Backup – “Do it for Me”
The tool we have chosen to use is IBM’s ADSM, a development from WDSF (Workstation
Data Save Facility). Here the data is transferred to a VM system, CERNVM in our case, and
the files are written to robot cartridges with a file index remaining on real disc. At the workstation end, the user installs a small client package and a run script whose contents include some
filtering (see below). (There is a small licensing charge per client but for the moment at least
that will be covered by CN Division.) Clients are available for all major workstations present
on site. ADSM is still relatively new to CERN and production systems still rely on WDSF but
tests are continuing with ADSM. Also, a version of ADSM running as a master on an RS/6000
is under test so that it should soon become independent of CERNVM while still storing the
saved files on robot cartridges.
ADSM works in several modes. Because of the potential for network traffic from up to 1000
workstations today plus the demand for disc catalogue space on CERNVM, we offer a service
to backup USER files only (files in the $HOME directory tree) and we normally exclude files
which are relatively simple to recreate (.o files, .lis files, .dvi files, etc). There are other restrictions which will apply (no core dump files, no very large data files) and all of these will be
reviewed from time to time in the light of experience in real use. Further, this service is effectively an incremental backup from the previous backup since the IBM keeps a current ’map’ of
the disc in its catalogue space. At the moment of the first backup of a station, we will consider
performing a full archive backup and users performing major system upgrades may request
this at such times.
ADSM backups will be performed within time limits mutually agreed by the users of the station(s) and CN; it will usually be overnight and/or at weekends.
Disc/file/directory recovery is simple and initiated by the user himself although retrieving
entire discs involves many (automatic) mounts of robot cartridges and hence takes a finite
amount of real time.
Users interested in this scheme should contact Lio Frost-Ainley for licensing details and to
obtain the client installation procedure.
Requests for further information about any aspect of this policy should be addressed to Alan
Silverman at [email protected].
4.4
AFS Overview
AFS is an acronym for the Andrew File System, developed at Carnegie-Mellon University,
Pittsburgh, under a sponsorship from IBM. Today AFS is marketed by Transarc Corporation
34
and has been chosen by the Open Software Foundation as the basis of its Distributed File System DFS.
AFS is a network-distributed file system comparable to Sun’s NFS but with some more
advanced features than all but the most recent version of NFS. AFS distinguishes between client machines and server machines. An AFS client enables users to access data residing on AFS
servers transparently as if they were stored on a local disk. AFS servers in turn provide disk
storage for files and directories.
CERN has purchased licenses for AFS for all the common UNIX platforms on site and currently offers a limited public service, including some central AFS file servers.
For more information on AFS please refer to: /afs/cern.ch/project/afs/
afsug.ps which should be accessed via World Wide Web in the CERN Computing UNIX
Workstation Support entry under ’Guides’.
35
5.
Communications
5.1
Internet Overview
The Internet is a global network of networks that provides access to hundreds of thousands of
computers around the world. As the reach of the network has grown, so has the number of
services accessible. The main tools that allow the user to navigate through the Internet, are:
telnet
ftp
mail
WWW
news
5.1.1
to access remote hosts
to retrieve data files
to send mail
to browse World Wide Web (This facility is further described in
“World Wide Web (WWW)” on page 68)
to scan the numerous Usenet news groups (This facility is further
described in “News” on page 71)
Internet addresses
There are two ways to reference an Internet host: an alphabetic name and a series of numbers.
The alphabetic version is called the “host name“ and the numeric the “IP address”. At CERN,
all host names end with ’cern.ch’, and this suffix is called the “domain name”. Since hosts may
change their addresses, it is good practice to always use the host name. Normally if your system is configured correctly it should refer to the central CERN name servers and you should
always be able to use host names. However, if, for some reason, the IP address cannot be found
in the nameservers, you can try the IP address directly if you happen to know it.
5.1.2
Internet Services
With a little practice, the above-mentioned functions (ftp, telnet) will be simple and open the
electronic door to the global reach of the Internet. An introduction to the Internet services can
be found in [Table 23 on page 77]. A comprehensive listing of services is given in that document. Its table of contents is listed below:
1.
2.
3.
4.
5.
6.
7.
8.
9.
10.
Library Catalogs & Campus Information Systems
Databases
Electronic Discussion Groups/Forums
Directories
Information Resources
FTP Archives
Fee-Based Information Services
Software/Freeware
Bulletin Board Services
Miscellaneous
5.2
Remote Login
5.2.1
Remote Processing
There are several ways to perform some work on a remote host without ending the local session. With the commands
36
telnet and rlogin
you can establish a session on a remote host from within your local session. Whereas commands such as
rsh, remsh and rexec
do not perform a login on a remote host but execute commands there for you.
Associated with the remote commands, eg: rlogin, rsh, remsh, rexec and rcp, is the special file
known as a $HOME/.rhosts file. In this file you can place the names of users and their
machines which may contact your machine and use your account without needing to give a
password. The format of the $HOME/.rhosts file is as follows:
host1 userid
host2 userid
.
.
For security, make sure that you set the protections on this file so that only you can read it. Otherwise, an outside user can hack this file to gain access to your account. The protection should
be rw for owner and no other access (mode 600). The command to set this is
chmod 600 .rhosts
In some (old) Unix documentation you may find an explanation of the use of the /etc/
hosts.equiv file to achieve a similar result. For security reasons, you are strongly discouraged from using this mechanism.
5.2.2
telnet
To enter the telnet environment simply issue the command
telnet
and after telling you the escape character (usually <Ctrl-]>) telnet will show its prompt
telnet>
Now you can enter telnet subcommands.
For a complete list of subcommands and flags for the telnet command consult the appropriate man page. Here are some frequently used subcommands:
quit
open
close
ends the telnet command
establishes a connection to a remote host
ends that connection
37
lists the subcommands with a brief explanation
help
So the first subcommand will probably be:
telnet> open hostname
This connects your terminal or X-window to the specified host and displays the logon logo for
that node. Then you can log on there and work as normal. After logging out of the remote host
you will get the
telnet>
prompt so that you can open the next host or quit from the telnet program and resume
the local session.
Alternatively you can specify the remote host on the invocation of the telnet program:
telnet hostname
This automatically connects to the remote host and you see immediately the logon logo. Logging out of the remote host will now end the telnet program. You don’t get the telnet>
prompt and you are back in your local session.
5.2.3
rlogin
The “remote login” command
rlogin hostname
connects your terminal or X-window to a login session on the specified host. Since your local
host should be equivalenced to the remote host via the rhosts mechanism described above, you
should not need to authenticate yourself to the remote system. You will get the command line
prompt of the remote system. Logging out of the remote system resumes your current local
session.
Usage Notes:
You must not omit the hostname parameter when using rlogin.
If you use flags on this command, you have to place them after hostname.
5.3
Remote File Access
File transfer
Let us focus on the two commands
rcp and ftp
38
which allow file transfer between the nodes of a network.
5.3.1
ftp
ftp stands for “file transfer protocol” and is the principal method used to transfer files over the
Internet.
ftp allows you to connect to a remote node and execute ftp subcommands there without
leaving your current session on the local host. The ftp command works between various platforms, not only between Unix systems. Simply invoke ftp by typing
ftp
to get the prompt
ftp>
Select the remote host by
ftp> open hostname
and you will be prompted for login information. If you invoke ftp by typing
ftp hostname
the open hostname is implicitly executed and you will be prompted directly for login information. Please consult the man page for the various flags that can be set on the command line
when invoking ftp.
After a successful login you will get the ftp> prompt again and you can now issue the ftp
subcommands which allow you to navigate through the remote file system, display a remote
directory and transfer files between the remote and the local host in both directions. Some frequently used ftp subcommands are:
quit
cd
ls
lcd
mkdir
pwd
put
get
mput
mget
binary
ascii
help
ends the ftp command
changes directory on remote host
list contents of remote directory (some "normal" ls switches allowed)
changes directory on local host
creates a new directory on the remote host
prints the path that is current on the remote host
transfers a file from local to remote
transfers a file from remote to local
send multiple files
get multiple files
transfers data without conversion (the usual case)
converts data according to different character representation on the
sending and receiving host (text files)
displays all available subcommands and gives a short description of
them.
39
You can find more information on further ftp commands in the man pages.
Examples:
Imagine you have to be up to date on remote files which change frequently. You will have to
perform the same file transfer quite often. A shell script similar to the following would be very
useful:
# getfiles: get a few files regularly from DXCERN
#
# customize the next lines:
user=XY12
# replace this with your id
locpath=...
# specifies where to put
rempath=...
# from where to get
#
echo " "
echo "Opening FTP connection to DXCERN"
echo "for user" $user
echo " "
ftp -n dxcern <<EOF # invoke FTP with next lines as input
user $user
# specifies remote user id
lcd $locpath
# set the local path
cd $rempath
# set the remote path
get file1
# get the file
binary
# and transfer it
get file2
# without conversion
quit
# terminate FTP
EOF
# terminate input to FTP
You will be prompted for your password on the remote host.
“Anonymous” ftp means that one can login to the remote system using the userid of “anonymous” and password of either “guest” or more usually your own userid and internet address.
Ftp is like telnet in that the “open” command and access to the remote host is similar, except
that you can only access files in the subdirectory tree belonging the remote anonymous ftp
account.
A typical session might go as follows:
ftp any.host.i.know
login: anonymous
guest login ok...send user id as password
ftp> ls -al (list all files)
ftp> cd pub (change to the “pub” directory)
ftp> get my.file
transfer complete
ftp> quit
Large files are usually “tared” and compressed. You have to use binary FTP to get such files.
The file extension shows how to uncompress it:
40
tar
Z
tar.Z
5.3.2
tar -xvf myfile.tar
uncompress myfile.Z
uncompress myfile.tar.Z
tar -xvf myfile.tar
rcp
The rcp (remote copy) command copies a file or directory from one host in the network into a
directory or as a file on another host of that network:
rcp [-rp] source destination
Remember that the hosts have to be authorised using the rhosts mechanism described earlier in
this Chapter. The -r flag means source is a directory and is to be copied with all the files
and subdirectories it contains. The -p flag preserves the modification time and access modes.
The source and destination specifications not only contain the name of the file but also
optionally the host where it resides. You can specify source and destination in one of
the following three forms:
filename
relative or absolute name of local file
host:filename relative or absolute name of file residing on host
user@host:filename name of file relative to the home directory of user on host.
If the filename is specified with a leading / then it is taken as absolute.
Examples:
To copy the file some.data from the current directory of the local host to the directory /u/
hugo/archive on host rzri6f enter:
rcp some.data
rzri6f:/u/hugo/archive
Suppose you want to choose a different name for the destination:
rcp some.data
rzri6f:/u/hugo/archive/x.y
You could have specified the destination relative to hugo’s home directory:
rcp some.data
hugo@rzri6f:archive
This is absolutely equivalent to the first example.
A last example
rcp -rp fred@rzhp9a:mess/data
rzhp9b:/exp/march
Here both rzhp9a and rzhp9b are remote nodes. The source is given relative to the home
directory of fred on rzhp9a whereas the destination is an absolute pathname on
rzhp9b. The flags say, that the source is a directory and is to be copied recursively (-r);
this implies that the destination also has to be a directory.
Moreover the file permissions and the modification times are preserved (-p).
41
5.4
Remote Shell
There are two remote shell commands rsh & remsh, the one to apply depends on the system
from which you are working:
Ultrix
Aix
Sun
HP
OSF
SGI
5.4.1
rsh only
either
rsh
remsh
rsh
rsh
rsh
rsh You can execute commands on a remote system and have the output displayed on your terminal with rsh which stands for remote shell. In order for this to work, there must be an
appropriate .rhosts file on the remote machine.
The format is:
rsh rhost [-l username] [command]
where
rhost
username
command
is the name of the remote host on which the command is to execute.
is the username if different on the remote system than the originating
system.
is the command to be executed on the remote system.
The command might be just a simple command, or it might execute a shell script on the remote
system. Metacharacters in the command should be quoted if they are to be interpreted on the
remote machine.
5.4.2
remsh
To execute a command on a remote host enter:
remsh hostname command
This command runs a “remote shell” which executes a command for you. I/O redirection
works as usual using the >, >>, <, << operators to redirect input and output to and from the
remotely executed command to local(!) files.
If you want to redirect the input and output to remote files use double quotes " " around the
redirection operators.
Usage Notes:
Both remsh and rsh commands will not process the login profiles, but will process the
$ENV file if that variable is set (usually .kshrc). If you omit the command parameter on the
remsh command then rlogin will be executed instead, which will process the login profiles.
42
If you use flags on this command, you must place them between hostname and command.
Examples:
All the examples below assume that the remote host that you are communicating with is called
rzri6f and that you have to set your DISPLAY variable to refer to the window at which you
are working. (DISPLAY is discussed in detail in documentation and man pages referring to the
X11 window system.)
To get a window with a terminal emulation on your X-server:
remsh rzri6f term -display $DISPLAY &
To get a window that emulates a mainframe terminal (3270) on your X-server enter:
remsh rzri6f x3270 -display $DISPLAY cernvm &
or
remsh rzri6f 3270 -display $DISPLAY cernvm &
or
remsh rzri6f tn3270 -display $DISPLAY cernvm &
The next examples illustrate the I/O redirection mechanism with the remsh command. They
are not examples for efficient file transfer.
remsh rzri6f cat .profile >> .profile
appends the profile you have on the rzri6f to your local profile.
Find the difference:
remsh rzri6f cat .profile ">" .profile.old
Right! Your remote profile will be copied to a remote file named .profile.old.
5.4.3
rexec
With the rexec command you can execute a command on every remote UNIX host you have
an account on, regardless if they are made equivalent or not with the rhosts mechanism. The
rexec command works in the same way as remsh does, the only difference is that you will
be prompted for your name and password on the remote host.
rexec hostname command
You can try the examples from the last section on remsh with one disadvantage: If you use
unquoted I/O redirection the authentification prompts do not work properly; you will not see
the prompts but you can type in your username and password “blindly”.
43
5.5
Mail
This section appears as well in the document ’The CERN Electronic Mail User Guide’.
A sophisticated mail program comes bundled with most flavors of Unix operating systems
(e.g. Mail on Berkeley Unix or mailx on System V). It interfaces to sendmail, a Unix facility for mail routing.
Some Unix users prefer to use the elm or pine user interface to Unix mail. Elm (with the
underlying metamail) and pine are public domain mail reading programs with multimedia
capabilities; however, for various reasons, including security, elm is NOT recommended at
CERN. Pine is the recommended mail agent and it is available on dxcern and on asis for workstation users. Information on release changes and documentation will be published in the
newsgroup cern.mail.
In order to try pine type pine from the shell prompt. The most common mail(x),
pine commands are listed in the relevant ’Getting Started’ sections below.
5.5.1
Getting Started with mail (mailx)
• To send a message, type mail recipient-address.
mailx is, to all intents and purposes, simply a System V recompilation of BSD mail and
the commands are similar. For example: mailx [email protected] or
mailx aliasname
• To read waiting messages, type mail.
• To list a summary of saved messages in a folder, type mail -f folder.
• To print on the screen one of the listed messages, type p message-number
or t message-number.
• To reply to the current message, type R.
• To list the message headers in the current folder, type h. If the list exceeds one page, z.
• To delete the current message, type d.
• To undelete the current message, type u.
• To extract the current message into a file, type s filename.
• To send a file as a message, type mail -s " subject-text" recipient-address
< filename.
• For information on other mail commands, type help or ?.
• To quit from mail , type q.
Address examples from Unix mail are shown below:
Destination
local user
others at CERN
others outside CERN
Syntax
username
user@host
[email protected]
Example
bloggs
pretty@vxcern
[email protected]
For further information on addressing ’others’ see the section ’Addressing Mail from within
CERN’.
44
5.5.2
mail (mailx) Command Set
For example, to send mail from the terminal:
mail [email protected]
Type the message text, terminate and send your message with <Ctrl-d> or with a last line
containing a single . (period) in column one.
To mail a file:
mail -s "subject"recipient-address <filename
Reading, forwarding, replying, filing, sorting and editing mail are done inside the mail (mailx)
utility using any of the following subcommands:
m user@host
h
?
d
e
[n]
[-]
s
s file
s [n] file
c [n][file]
r
a
a hd
q
x
~
send mail
header displays list of messages in your mailbox
help
delete current message
edit the current message
read message number [n]
read previous message
save current message in personal mailbox
save current message to file
save message number [n] to file
same as s but do not delete message from incoming mailbox
reply to current message
display aliases
display alias hd
quit mail, discard deleted messages
quit mail, do not discard deleted messages
"escape", to permit you to issue a command while inputting a
mail, for example ~? to see this list of subcommands
Note: Ultrix, HP-UX and AIX use r to reply to all the people contained within the To and
CC: lists and R to reply to the sender only. In SunOs the reverse occurs. However, the man
pages on the different systems correctly describe the behaviour on the different systems.
By default mail uses the vi editor. Insert a line
set EDITOR=/usr/local/bin/emacs
into your $HOME/.mailrc file to change the default editor to emacs.
If you want to work with your personal mailbox instead of the system mailbox, type mailx f.
Work with an arbitrary mail folder is started as
mail -f filename
45
5.5.3
Useful facilities
From some Unix machines it is possible to check if a destination address within CERN is correct, by typing the command mverify recipient-address from the shell prompt,
where recipient-address must be of the form user@host.
The command mverify for CERNVM users must be entered as: mverify
userid@crnvmb.
Alias names of your frequent correspondants can be entered in the .mailrc file in your home
directory in the format:
alias name address (e.g. alias dear you@cernapo).
Example of $HOME/.mailrc contents:
alias
alias
alias
alias
alias
hd
um
rb
he
body
[email protected]
[email protected]
[email protected]
[email protected]
[email protected]
Aliases may contain lists of addresses but not lists of aliases.
5.5.4
The pine mail system
pine is a mail user agent designed primarily for novice users, but it is full featured enough for
processing large amounts of mail.
Like elm the main header index and mini-menu of commands are displayed upon initialisation
and at any point when awaiting input. The help screens in pine constitute the main documentation, but if more information is required refer to the man pages.
pine can be invoked by typing pine at the shell prompt.
The major features of pine include: view, save, export, delete, print, reply and forwarding of
incoming mail, as well as the composition and sending of mail. Use of the control keys as
described on the bottom line of the main menu and following the instructions on the bottom of
the screen, will enable easy use of pine.
It is possible to read elm folders through pine if you enter: mail-directory=Mail in your .pinerc file.
pine supports MIME, The Multipart Internet Mail Extensions, which enables pine to send
and receive multimedia Email.
Optional features include sorting, address book and spelling checker.
For more information on pine refer to the man pages and to the file /usr/local/lib/
pine3.07.info on dxcern. Also on ASIS refer to the directory /afs/cern.ch/
asis/share/usr.local/doc/pine or via anonymous ftp at asisftp:/pub/doc/
pine.
5.5.5
How to get help with problems
For online help, use the relevant man pages. For general problems contact the User Consul-
46
tancy Office, [email protected] or phone 4952. For pine specific questions write to
[email protected].
5.6
Printing
5.6.1
Printing with lpr
Printer output is sent to the device specified in the environment variable PRINTER or by the
device given with the -P option in the print command. If neither of these are defined, output
will be either printed on the system default printer, disappear down a ’black hole’, or generate
an error message depending on the system setup. Set up your printer using the command:
PRINTER = printername; export PRINTER
for Bourne & korn shells
setenv PRINTER printername
for csh
Should you wish to change the printer momentarily simply use a command like the following
to print your file:
lpr -Pprintername filename
Text files printed through the ’springer’ central print server must be converted to PostScript
for printing on a PostScript printer such as an Apple LaserWriter. For printers connected to the
AppleTalk (the vast majority of printers at CERN), this formatting is normally done automatically on ’springer’.
What follows currently applies ONLY to AppleTalk-connected PostScript printers!
For the formatting process, some decisions have been taken as to how the text should appear
on the page. These decisions concern the text-formatting program, the text’s layout on the
physical page and the size of characters used. In the absence of any formatting specification by
the user or in the printer description entry on the print server, a paper-saving default has been
chosen as described below.
Formats can be controlled –
1.
2.
3.
4.
For DEC/Sun/IBM users: through the ’-w’ switch on the ’lpr’ command, for example:
lpr -P513-pub -w80 /.profile or through the ’:pw#...:’ in your local /
etc/printcap (yes, this is not ’:pw=...:’! it is a numeric parameter, see ’man
printcap’) entry file. The use of /etc/printcap is normally confined to DEC and
Sun only but can also exist for SGI.
For HP-UX users: the ’-oBSDw’ switch on the ’lp’ command, for example: lp d513_pub -oBSDw80 myfile
For VM users: all the parameters to ’a2ps’ must be specified by the user, as described in
’HELP A2PS’, ’HELP LWPRINT’, etc...
In the ’pw’ printer description entry on the print server ’springer’ on a per printer basis.
47
Send mail to ’printer.support@springer’ mentioning the printer and the
desired default. (Make sure you agree with other people using the same printer!)
Normally, text is typeset in ’courier’ typeface. The formatter ’a2ps’ surrounds text by a
frame and prints a header specifying the print date, file name (if available) and page
number.
5.
Throughout the following ’w’ means the argument to the ’-w’ option on the ’lpr’ command, to
the ’-oBSDw’ option on the ’lp’ (SysV) command or the ’pw#.." value assigned in your local /
etc/printcap file if you are printing from a DEC or Sun Unix workstation.
Standard default (plus all ’-w’ not falling into the ranges below plus the special value ’w=2’:
text formatter ’a2ps’, two logical ’portrait’ pages printed on a physical ’landscape’ oriented
page including a frame, header and line numbers, font size 6.8 pt (rather small, paper saving
mode).
39 < w <= 85:
85 < w <= 200:
formatter a2ps, portrait orientation, font size chosen so that either
w or w+1 columns fit on a line. Lines longer than w (or w+1) are
folded.
formatter a2ps, landscape orientation, font size chosen so that
either w or w+1 columns fit on a line. Lines longer than w (or
w+1) are folded.
Some values of ’w’ less than 40 are used for special purposes:
w=2:
w=4:
w=5:
default, see above
formatter ascii2ps, a4 portrait orientation, 11 pt. font with long
lines folded, no frames, headers, or page numbers, just plain text.
formatter a2ps, a4 portrait orientation, 6.8 pt. font, supporting lines
up to 122 characters.
Some options that are available using lpr are listed below but remember that most of these are
not available when listing postscript files, see the later section on LATEX for more information
about this.
-l
-f
-s
-x
-#num
-wnum
-znum
5.6.2
for control characters and suppressing page breaks.
this option interprets the first character of a line as a standard Fortran control character.
for printing large files, (these files are softlinked to the spool and
not written there. Do not modify files sent via this method until
printing is complete).
No filtering, file printed verbatim.
Number of copies required.
Maximum page width
Maximum page length
Some Useful Unix Print Functions
Unix has a number of associated print functions which you may find useful. For a more comprehensive list and explanation of these functions the appropriate man page should be consulted. lpq and lprm are both Unix BSD commands, their equivalent in Unix System V are
48
lpstat and cancel respectively. The commands to apply depend on the system in use:
OSF
AIX
Ultrix
HP/UX
Typing this command at the prompt will initiate an examination of the
spooling areas used by lpd for printing files on the printer, and report
on the status of jobs in the queue.
The print queue can be examined in its entirity, or by individual users
or by printer (-P option) or jobs - see “man pages” on page 67 for more
details.
This command can be used to remove a job or jobs from the printer’s
spool queue. As the spooling directory is protected from users, using
lprm is normally the only method of removing a job.
You can remove jobs currently active, by job number or all jobs owned
by a specific user or you can specify a given printer queue with the -P
option- see “man pages” on page 67 for more details.
lpq
lprm
5.6.3
BSD and System V
BSD and System V
BSD
System V
Printing with lp
The lp command is the normal print command on UNIX systems based on System V, such as
HP-UX and Sun/Solaris 2. The differences include the fact that the environment variable
PRINTER is replaced by the variable LPDEST; that the switch to print to a remote printer
other than the default is
lp -dprintername
and the commands to examine the printer status and cancel a print job are lpstat and cancel respectively. Consult the man pages for lp on the system for further details.
5.6.4
Printing with LATEX
Files created in LATEX may be processed using the command LATEX filename and then
dvips to print or file the output. For file previewing there is an xdvi preview facility but
those with workstations will undoubtedly have local facilities for this operation. Once you
have obtained your DVI type files there are several ways to proceed:
dvips xx
dvips -o xx
dvips -o yy xx
converts to postscript and prints filename xx on default lpr
printer.
creates a file called xx.ps, no printing. Subsequently the xx.ps
post script filecan be printed with lpr.
creates a file in postscript format called yy, no printing.
For further information in this area you should refer to the CERN guide called ’TEX at CERN’
by Michel Goossens, available on self-service in the UCO.
49
6.
File Editing
6.1
vi
The editor vi is a standard full-screen text editor available on all UNIX systems and bundled
with the operating system.
The great advantage of vi is that it is included in the vendor-independent international standard
POSIX.2 (IEEE 1003.2). On all POSIX.2 conforming systems vi is available. This allows
users to move from one POSIX system to another without needing to learn a new editor.
The disadvantage of vi is that it is very cryptic and so not easy to learn. However there are people who, having mastered it, claim to like it. In addition, if you are likely to use multiple UNIX
systems and to connect to them using different keyboards from different locations, then you
may find it worthwhile to learn a "survival kit" of basic editing commands.
6.1.1
Operating Modes
vi has three operating modes:
• vi command mode.
• text input (or insert) mode.
• ex command (or line edit) mode.
In the vi command mode, each key initiates an instruction. In the text input mode the keyboard
functions like a typewriter. And in the ex command mode you can use the ’old’ ex line editor to
invoke ex commands.
As elsewhere in UNIX, all commands in vi are case-sensitive.
6.1.2
Starting vi
To start vi, simply type vi followed by the name of the file you want to edit.
vi myfile
If myfile is a new file, the buffer is empty and the screen appears as follows:
~
~
~
"myfile" [New file]
The tilde (~) down the left-hand column of the screen indicates that there is no text in the file,
not even blank lines. The prompt line (also called status line) at the bottom of the screen echoes the name and status of the file.
6.1.3
Exiting vi
The vi command to exit and save edits is ZZ. You can also use the ex command :wq to exit
and save the edits. Unlike vi commands, the ex commands, introduced by a ’:’, require a
50
<Return> after the command. To exit vi without saving your changes, use the ex command
:q!.
6.1.4
vi Command Mode
As soon as you enter a file, you are in vi command mode, and the editor is waiting for you to
enter a command. Commands enable you to move anywhere in the file, to perform edits, or to
enter insert mode to add new text. Commands can also be given to exit the file in order to
return to the UNIX prompt.
One of the most used vi commands is ’i’ (for ’insert’). The "i" doesn’t appear on the screen,
but after you press it whatever you type will appear on the screen and will be entered into the
buffer. The cursor marks the current insertion point. To tell vi that you want to stop inserting
text, press <Esc>. Pressing <Esc> moves the cursor back one space and returns vi to command mode.
If you have opened a new file and want to insert the words this is a new file type the
keystrokes: i this is a new file
What appears on the screen is:
this is a new file
To break a line press <Return>.
If you don’t know whether you are in vi command mode or text input mode press <Esc> once
or twice to enter vi command mode. When you hear a beep, you are in vi command mode.
6.1.5
ex Command Mode
A Q in vi command mode invokes ex command mode. At the command line (bottom of the
screen) the prompt ’:’ appears. The command vi returns you back to vi command mode.
In vi command mode you can issue a single ex command and immediately return to vi mode
by prefacing an ex command with a ’:’.
51
6.1.6
Basic vi Keystrokes
Moving around
→
←
↑
↓
w
b
0
<Return> or +
$
<Ctrl-f>
<Ctrl-b>
G
:1
:n
<Ctrl-g>
<Ctrl-l>
/pattern
?pattern
n
N
Move forward one character (right). Also the l key.
Move backward one character (left). Also the h key.
Move to previous line (up). Also the k key.
Move to next line (down). Also the j key.
Move one word forward.
Move one word backward.
Move to beginning of line.
Move to beginning of next line.
Move to beginning of previous line.
Move to end of line.
Move forward one screen.
Move backward one screen.
Move to end of buffer.
Move to beginning of buffer.
Move to line number n.
Display current line number.
Redraw screen.
Search forward for pattern.
Search backwards for pattern.
Repeat last search in same direction.
Repeat last search in opposite direction.
If you precede the move commands by a number, the command is repeated that number of
times. Thus 5w will move forwards 5 words.
52
Inserting Text
i
a
I
A
o
O
<esc>
Inserting text before cursor.
Inserting text after cursor.
Inserting text at beginning of line.
Inserting text at end of line.
Open new line for text below cursor.
Open new line for text above cursor.
End text insertion.
Deleting Text
X
x
d
D
d
p
P
Delete previous character.
Delete character under cursor.
Delete the word the cursor is on.
Delete from cursor to end of line.
Delete current line.
Put deleted text after cursor.
Put deleted text before cursor.
Once again, the deletion characters may be preceded by a number to perform multiple deletions; thus 5dd will delete the next 5 lines starting with the current line.
Yank1
yw
yy
“ayy
p
P
aP
Yank (copy) word.
Yank (copy) current line.
Yank (copy) current line into named buffer a.
Put yanked text after cursor.
Put yanked text before cursor.
Put text from buffer a before cursor.
1. Yanking means copying text into a buffer
53
Undoing and other vi Commands
Repeat last edit command.
Undo last edit.
Restore current line.
Join two lines.
.
u
U
J
Exiting Commands
Z
:x
:wq
:w
:w filename
:q
:q!
Q
:e file
Save (write) and quit file.
Save (write) and quit file.
Save (write) and quit file.
Save (write) file.
Write current buffer to filename.
Quit file.
Quit file with no save.
Quit vi and invoke ex.
Edit file without leaving vi.
Some ex Commands
:set
:set all
:set number
:set showmode
:set option
:set
option=value
:set option?
:set nooption
:sh
<Ctrl-d>
!command
:r newfile
:r !command
6.1.7
Display options set by user.
Display list of all current options, both default and those set by
the
user.
Display line numbers.
Displays in insert mode a message on the promptline indicating
the type of insert you are making.
Activate option.
Assign value to option.
Display value of option.
Deactivate option.
Invoke shell.
Return to editor from shell.
Execute UNIX command.
Read contents of newfile into current file.
Read output of UNIX command into current file.
The .exrc File
Your can control your vi environment with the $HOME/.exrc file in your home directory. A
sample .exrc file looks like this:
set number
set showmode
The file is read by ex before it enters the vi mode; commands in .exrc should not have a preceding colon.
54
6.1.8
More about vi
More about vi may be available in the man page on your workstation.
Recommendable books about vi are ’Learning the vi Editor’ by Linda Lamb and ’The Ultimate
Guide to the vi and ex text editors’ from the Hewlett-Packard Company.
6.2
GNU emacs
GNU emacs is a powerful editor in the UNIX world. Emacs belongs to the GNU project of the
Free Software Foundation and is available on all UNIX platforms.
Unlike most other editors, emacs is a complete working environment; you can start emacs in
the morning, work all day and night and never leave it. It can be used to compile programs; for
interactive work with the UNIX shell; and so on. Before windowing systems like X became
popular emacs often served as a complete windowing environment.
6.2.1
Emacs Commands
Emacs commands consist of a modifier, such as <Ctrl> (CONTROL), <Esc> (ESCAPE),
or <META> (META), followed by one or more characters. In this text the following notation is
used to describe the keystrokes.
<Ctrl-g>
<Esc-x>
Hold down the <Ctrl> key and press g.
Press <Esc>, release it, and then press x.
Most emacs manuals refer to the <META> key instead of the <Esc> key. But most keyboards don’t have a <META> key, so we will refer to <Esc>. If you have a <META> key, you
will probably prefer to use it instead of <Esc>. The <META> key works like the <Ctrl> key
described above. <Esc-x> is then equivalent to:
<META-x>
Hold down the <META> key and press x.
To complete a command you may need to press a carriage return:
<Return>
Press the RETURN key. This key may be labelled ENTER on your keyboard.
All emacs commands, even the simplest ones, have a ’full name’: for example forwardword is equivalent to the keystrokes <Esc-f> and forward-char is equivalent to
<Ctrl-f>. Many commands only have ’full names’, there are no corresponding keystrokes.
6.2.2
Starting emacs
To start emacs, simply type emacs followed by the name of the file(s) you want to edit.
emacs [myfile...]
6.2.3
Exiting emacs
To exit emacs, type
<Ctrl-x> <Ctrl-c>
55
6.2.4
Emacs Screen
When you enter emacs, you are in a workspace. A cursor marks the position in the file, you
don’t have to do anything special before you start typing.
Just above the bottom of the screen, emacs prints information about what it is doing. This line
is called the ’mode line’ and may look like this:
--**-Emacs: myfile (Text Fill)---5%---At the left edge of the mode line, you may see two asterisks (**). This means that whatever
you’re editing has been modified since the last time you saved it. If you haven’t made any
changes, the asterisks won’t be there. Next, emacs prints ’Emacs:’ followed by the name of the
buffer or file you are editing (myfile in our example). In parentheses following this emacs
shows the major (Text mode) and minor modes (Fill mode). Following this emacs prints where
you are in the buffer or file (5%). If the entire file is visible on the screen, emacs prints the
word ALL.
6.2.5
Emacs modes
Emacs has various editing modes in each of which it behaves slightly differently. When you
often want features like word wrap so you don’t have to press <Return> at the end of the
line, you can set text mode. When you are programming, your code must be formatted; for
example, for programming in C set C mode.
Text mode and C mode are major modes. A buffer can be in only one major mode at a
time; to exit a major mode, you have to enter another one.
Whenever you edit a file, emacs attempts to put you into the correct major mode for what
you are going to edit. If you are editing a file with the ending .c, it puts you in the C mode. If
the file has the ending .tex, it puts you in the TEX mode. If emacs can’t determine a special
mode, it puts you in the fundamental mode, the most general of all modes.
You can also change the mode manually with the command:
<Esc-x>
startup-command <Return>.
The important major modes and their startup-commands are in the following table:
56
Mode
Fundamental
Text
Directory
Indented text
Picture
C
FORTRAN
nroff
TEX
Description
Startup-command
The default mode; no special behavior. fundamental-mode
For writing text.
text-mode
For editing directory contents.
dired-mode
Indents all the text you type.
indented-text-mod
For creating simple drawings.
picture-mode
For writing C programs.
c-mode
For writing FORTRAN programs.
fortran-mode
For formatting file for nroff.
nroff-mode
For formatting file for TEX.
tex-mode
LATEX
For formatting file for LATEX.
latex-mode
Outline
For writing outlines.
outline-mode
Mode
View
Mail
Read Mail
Description
For viewing files but not editing.
For sending mail.
For reading mail.
Startup-command
view-file
mail
rmail
In addition to the major modes there are also minor modes. These define a practical aspect
of emacs and can be turned on and off within a major mode.
Mode
Abbrev
Fill
Overwrite
Auto-save
Description
Allows you to use word abbreviations.
Enable word wrap.
Replaces characters as you type
instead of inserting them.
Saves your file automatically.
Startup-command
abbrev-mode
auto-fill-mode
overwrite-mode
auto-save-mode
In your $HOME/.emacs file, the startup file of emacs, you can set your favourite modes to
be turned on automatically every time you start emacs.
57
6.2.6
Basic emacs Keystrokes
Moving around
→
←
↑
↓
<Esc>-f
<Esc>-b
<Ctrl-a>
<Ctrl-e>
<Ctrl-v>
<Esc>-v
<Esc>->
<Esc>-<
<Ctrl-l>
Move forward one character (right).
Move backward one character (left).
Move to previous line (up).
Move to next line (down).
Move word forward.
Move word backward.
Move to beginning of line.
Move to end of line.
Move forward one screen.
Move backward one screen.
Move to end of buffer.
Move to beginning of buffer.
Redraw screen with current line in the center.
Deleting Text
<Del>
<Ctrl-d>
<Esc>-<Del>
<Esc>-d
<Ctrl-k>
<Ctrl-w>
<Esc>-w
<Ctrl-y>
<Ctrl-@> or
<Ctrl-<Space>>
Delete previous character.
Delete character under cursor.
Delete previous word.
Delete the word the cursor is on.
Delete from cursor to end of line.
Delete region (area between mark and cursor).
Copy region into kill ring.
Restore what you have deleted.
Mark the beginning (or end) of a region.
Stopping and Undoing Commands
<Ctrl-g>
<Ctrl-u>
Abort current command.
Undo last edit (can be done repeatedly).
File-handling and exiting
<Ctrl-i>
<Ctrl-x> <Ctrl-s>
<Ctrl-x> <Ctrl-w>
<Ctrl-x> <Ctrl-c>
Insert file at cursor position.
Save file (this may hang terminal; use <Ctrl-q> to
restart).
Write buffer contents to file.
Exit emacs.
Tutorial and Getting Help
<Ctrl-h> <Ctrl-h> <Ctrl-h>
<Ctrl-h> t
58
Menu of help options.
Starts emacs tutorial.
6.2.7
More information about emacs
There is a man page available with:
man emacs
A Postscript file of the reference manual is available. If your UNIX system has been installed
with AFS and has links pointing to ASIS (see details in “ASIS” on page 65), then you should
find this postscript file (nearly 300 pages) in the directory /afs/cern.ch/asis/share/
usr.local/doc/gnu or by anonymous ftp at asisftp:/pub/doc/gnu.
A very good book about emacs is ’The GNU Emacs Manual’ by R.M.Stallman (August
1993)[21]. It covers the first basics and the more advanced features of emacs. It is available
from the UCO; there is also a good emacs reference card, also available at the UCO.
59
7.
Software Development
7.1
Compiling and Linking Programs in Unix
Compiling and linking FORTRAN programs in UNIX differs a bit from what you may be used
to in VM/CMS or VMS. There are three methods you can use to compile and link your programs:
1.
2.
3.
7.2
linking as a second phase of the compilation command. This is the method most commonly used in the Unix world.
compiling and linking with separate commands.
Although a specific command for linking exists (ld), in practice it is very little used.
Since the compilation command (normally f77) doesn’t require you to actually compile
anything and takes care of providing the correct language specific and system libraries, it
is usually used for linking in preference to ld.
use of the make command
The make command is not described here because it involves a completely different philosophy which will only confuse new UNIX users. If you are interested in this powerful
tool, you are encouraged to read the man pages for make and the references given there.
See also the book by Talbott [ 25 ].
Compile, Link, Run
Although the name of the compiler and recommended options may differ from platform to
platform, all Unix compilers function in essentially the same way as illustrated in the simple
examples below.
To create an executable program, you compile a source file containing a main program. For
example, to compile a Fortran program named hello.f1 use:
f77 hello.f
If no errors occur, the compiler creates an executable file named a.out in the current working directory. Similarly, to compile and then run a C program use:
cc hello.c
a.out
If your source is divided among separate files, simply specify all files in the compile command:
f77 main.f func1.f ... funcn.f
The -o name option causes the compiler to name the output file name instead of a.out.For
example, to compile a Fortran program hello.f and name the resulting executable hello
1. .f is default file extention for Fortran code in UNIX just as .FOR on VAX/VMS or FORTRAN on
VM/CMS.
60
use:
f77 -o hello hello.f
The -c option suppresses the link-edit phase. The compiler generates an object file with the
extension .o for each input file and not the a.out file. This is useful when compiling source
files that contain only subprograms, which can be linked later with other object files. The
resulting object files can then be specified on the compiler command line:
f77 -c func.f
f77 main.f func.o
7.3
Important Platform Dependent Differences
On most platforms at CERN the recommended Fortran compiler is called f77. The exception
is HP/UX where you are recommended to use fort77 rather than f77 since it allows you to
specify libraries in a way which is compatible with all the other platforms. For AIX on the RS/
6000 the Fortran compiler is called xlf, but in more recent versions of AIX the name f77 can
also be used. On DEC Ultrix systems the supported compiler is the DEC Fortran compiler
rather than the MIPS Fortran.
The table below shows the minimum command that should be used for compiling and linking
in the CERN environment.
Machine
IBM/AIX
HP/UX
Others
Compilation only
xlf -c -qextname
fort77 -c +ppu
f77 -c
Compiling and/or Linking
xlf -qextname
fort77 +ppu
f77
As we saw in the section above, by default Unix compilers generate an executable module.
The option “-c” (compile only) generates an object file but causes the linking phase to be surpressed.
The options -qextname on AIX and +ppu on HP/UX are explained in “Compiling and Linking
Options” on page 62 and are ESSENTIAL for compatibility with the CERN Program Library.
7.4
Libraries
Libraries in Unix are the same as libraries in other operating systems. They usually contain a
collection of pre-compiled routines which you can link to your routines when creating an executable. On all Unix systems, libraries can be created with the command ar(short for
archive). See “Creating and maintaining your own libraries” on page 64. Once again, it is
not necessary for a new Unix user to know this command but you can find more information in
the man pages.
Libraries in Unix follow a naming convention such that names begin with the letters lib and
have the extension .a ( for archive ) or .sl ( for shared library ). This was not a
whim of the creators of Unix but actually serves a useful purpose.
When specifying libraries to be used in linking you can use a shorthand notation. If you wish,
61
you can specify the full pathname of the library just as you would with your object files .o
files. For example;f77 mprog.f mysub.o /cern/pro/lib/libpacklib.a
Or you can specify the library with a combination of the -L and -l options, e.g. -L/cern/
pro/lib -lpacklib which refers to the CERNLIB library packlib. What this actually is
instructing the link editor to do is to search the directory (search path) /cern/pro/lib
for the library libpacklib.a which will then be replaced on the command line with /
cern/pro/lib/libpacklib.a which you could type in yourself.
fort77 +ppu -O -o my_program my_program.f\
-L/usr/local/delphi/dpadev/lib -ltanag3xx\
-L/cern/pro/lib -lgraflib -lgrafX11 -lpacklib
NOTE that the placement of a library on the command line is important (as it also is for the
VAX/VMS LINK command); the libraries are searched once only, in the order they appear on
the command line.
7.4.1
The cernlib command
The cernlib command has been designed to ease access to the CERN program library software, while allowing access to user libraries. It is platform-independent and accepts the
POSIX syntax. Note that you must have the directory /cern/pro/bin in your path in
order to use this command.
cernlib
grants access to packlib
cernlib mathlib
grants access to mathlib and packlib
cernlib -L $DELPHI_LIBS -l dstanaxx -l ux26xx
grants access to libraries dstanaxx and ux26xx in the directory
defined by the environment variable DELPHI_LIBS
The cernlib command is used in combination with the link command by enclosing it in
back-quotes on the link command line. For example if you use the f77 command for linking:
f77 -o
...‘
7.5
myprog
myprog.o
‘cernlib
mathlib
graflib/X11
Compiling and Linking Options
The compiling and linking options are given together on the same command line.
• Executable program:
-c Instructs the compiler to suppress the link edit phase and produce only a file containing
the object code that results from the compilation. This file can then be linked into another
program or placed in a library.
-o filename Sets the name of the output file containing the executable program to
filename.
• Optimization:
62
As with all systems, when debugging a program compilation should be done with optimization switched off. Once the program is ready for production it should be recompiled (and retested) with optimization on. As you will probably have guessed there is no consistency
between the optimization options of compilers from different vendors! Some have it on by
default, others have it off and they all have different ways of specifying different optimization levels.
Machine
IBM/AIX
HP/UX
Sun OS and Solaris
DEC Ultrix and OSF
SGI
Apollo
Default
noopt
noopt
noopt
-O4
-O1
-opt
Optimization off
-O0
-O0
-opt 0
Maximum
-O3
+O3
-O4
-O4
-O3
-opt 4
’Value’ of -O
-O2
+O2
-O3
-O4
-O2
-opt 3
• Static Code:
Most of the compilers foresee an option to force the static storage of local variables, which
means that local variables in a subroutine or function retain their value between calls. This
option may be particularly important with older programs that don’t use the Fortran SAVE
statement. On HP/UX and SGI this option also ensures that all uninitialized variables are
initialized to zero. On Sun no compile time option exists. The source code statements
AUTOMATIC, SAVE, STATIC must be used. See the Sun Fortran Reference Manual. Use
of static mode may reduce the optimization the compiler attempts to provide for your code.
System
Ultrix and OSF
RS6000
Sun OS and Solaris
HP/UX
SGI
Apollo
Default
static
static
static
dynamic
dynamic
dynamic
Static mode
-static
Dynamic mode
-automatic
-q nosave
not available
-K
-static
-save
• Debug Information:
-g Saves debug information on the output file. You may later debug your program with the
symbolic debugger, dbx, (called xdb on HP/UX!). Note, this option may significantly
increase the size and execution time of your program. It often disables the optimizer,
although we are beginning to see systems where this is no longer the case.
• Binding Fortran and C:
Postpend an underscore to external names such as subroutines, functions and common
blocks. This is done by default on all systems apart from AIX/6000 and HP/UX. This seemingly senseless option has the functionality of allowing C programmers to access FORTRAN routines and data according to BSD programming convention. Though this may not
be of interest to a new user, this option is nearly a standard in the computing world. ( the
CERNLIB routines are compiled with it, which in turn means that you if wish to call
VZERO or LENOCC, you must compile your own program with the +ppu option ).
System
AIX/6000
Option
-q extname
63
System
HP/UX
Option
+ppu
• Link editor options:
-L dir Library path. Defines the search path for libraries. It instructs the linker to look in
the directory dir for libraries before looking in the standard places (/lib and /usr/
lib) for the libraries specified by the -l option. This option is effective only for the
libraries following it.
-l name Library name. Search the library libname.a or libxx.sl for unresolved references
in the search paths defined by a preceding -L option or in the default search path.
7.5.1
man page for Fortran
The above section lists only a few of the more common Fortran options. You should, at least
once in your life, look at the Fortran man page on the system which you use.
7.6
Creating and maintaining your own libraries
If you have a lot of different object files you can create an archive library to store them. The
command ar is used to create and manage archive libraries. Its syntax is:
ar keys archive [obj_files]
The most important keys are r to replace or add modules to the archive and t to display a
table of contents. The archive is a name composed of libname.a. For example the command sequence:
cc
cc
cc
ar
-c func1.c
-c func2.c
-c func3.c
r libmy.a func1.o func2.o func3.o
compiles func1.c,func2.c,func3.c and adds the object files into the libmy.a.
64
8.
Applications
8.1
ASIS
ASIS stands for Application Software Installation Service but is more generally used to refer
to the collection of commonly used CERN and public-domain applications software which is
made available in both source and ready-to-use form on central servers. The master copy of all
the software is stored under AFS1in the ’ASIS tree’ of the CERN cell. A copy of the binaries
and libraries (but not the sources) is made each night onto an NFS server.
The recommended way to access these applications at CERN is to use AFS. When you install
the AFS client software on your workstation or local server, you will normally also install a
script called ’make_asis’ which will be run each night to create links in your /usr/local/bin
directory to the applications available on ASIS.
If for some reason you can’t install the AFS client software, you can access ASIS via NFS. For
more information refer to “ASIS: The Installer’s Guide” available from the UCO, or alternatively contact P. Defert ([email protected]).
The list below is a selection of some of the most commonly used applications. It is far from
complete.
CERN Program Library
cernlib
- access standard libraries such as PACKLIB, MATHLIB, GRAFLIB
paw
- visualisation of experimental data
fatmen
- distributed file and tape management system
CERN-Specific Utilities
phone
- display phone book entries from central server
mosaic
- World Wide Web hypertext browser for workstations
emdir
- electronic mail address directory
Public Domain and GNU Software
The list of available public domain and GNU software is very long. Below we list some of
those most commonly used at CERN.
emacs
pine
ghostview
perl
tcsh
- GNU project Emacs
- an electronic mail processing system
- View PostScript documents using ghostscript
- Practical Extraction and Report Language
- C shell with file name completion and command line editing
TeX Software
A lot of TeX/LaTeX related software is available. Information about TeX can be found in “TeX
at CERN - The Local Guide”, available at the UCO [16]. The most commonly used programs
are listed below.
latex
dvips
- text formatting and typesetting
- convert a TeX DVI file to PostScript
1. See “AFS Overview” on page 28 for more information on AFS.
65
xdvi
makeindex
- DVI Previewer for the X Window System
- a general purpose, formatter-independent index processor
X11 Software
A full distribution of X11 (Release 4 & 5) software from MIT.
x3270
xlock
8.2
- IBM remote host access tool
- Locks the local X display until a password is entered.
CORE (CSF,SHIFT,PIAF)
CORE, the Centrally Operated RISC Environment, is a set of integrated physics data analysis
services located in the CERN Computer Centre. These services include CSF, SHIFT and PIAF.
The “CORE Physics Services - User Guide” provides an overview of CORE and describes the
common aspects of the services provided.
8.2.1
CSF
The Central Simulation Facility, CSF, is aimed at providing a facility for compute-intensive
applications with low I/O requirements. Information on CSF can be found in the “ CSF User
Guide”, available from the UCO.
8.2.2
SHIFT
SHIFT, the ’Scalable Heterogenous Integrated Computing Facility’, provides a data analysis
facility for more I/O intensive applications. Unlike CSF, the individual machines in SHIFT
’belong’ to the specific experiments that contribute finacially and help with the system administration to best suit their individual needs. For information about SHIFT refer to the “SHIFT
User Guide” or the “SHIFT Reference Manual”, both available from the UCO.
8.2.3
PIAF
PIAF, the ’Parallel Interactive Analysis Facility’, is an extension of the PAW program. It
allows users to analyse interactively their Ntuples in parallel on a set of 5 high performance HP
workstations. The usage of PIAF is quite transparent for the PAW user. The PAW on-line help
explains how to access PIAF. There is currently no formal documentation about PIAF.
8.3
PaRC
PaRC (Parallel Risc Cluster) is intended for numerically-intensive work carried out by the
engineering and accelerator design community. Information on PaRC and its utilities can be
found in the “PaRC Users Guide”, available from the UCO.
8.4
NQS, NQS++
The Network Queuing System (NQS), is a batch system which has been installed on CSF and
SHIFT systems and is used for batch job submission. Further information on NQS and NQS++
can be found in chapters 6 & 7 of the “CSF User Guide”.
66
9.
Getting Help
9.1
man pages
Online help in Unix is in the form of man pages which consist of an online version of the Unix
documentation set (often called the Unix Programmer’s Reference Manual). You get access to
the man pages with the man command (man stands for manual). The format is:
man [part] topic
where topic is the name of the topic described in the manual (a command name or a
filename) and part specifies the section of the manual (1 through to 8). If no part is specified, man searches all reference sections (giving preference to commands over functions) and
prints the first manual page it finds for the topic given. Usually, ordinary users are interested in
part 1, commands and utilities. Part 2 is system calls, part 3 library routines, part 8 is the System Administration Reference Manual.
Man pages are normally displayed using the more command. more displays one page at a
time and allows you after each page the option to enter commands to control what it does next.
For example, you page forward with the space bar and exit from man with q (for quit). You
can search for patterns by entering /pattern. Enter simply / to find additional instances of
the pattern in the text. If there is more than one entry for the selected topic, man will prompt
for a second q to quit, or space to continue with the first page of the next entry.
man includes Unix system commands and utilities, but may not include shell commands. Help
for shell commands can be obtained with man csh or man sh then /pattern where pattern is the shell command you want information on.
You can often get the format of a command by entering the command with an illegal option
(try / or ? or .).
For example,
ls -/
ls: illegal option - - /
usage: ls -Rad CLHxmnlogrtucpFbqisf [files]
You can display information about man with:
man man
The man command can also be used to locate commands by keyword lookup:
man -k keyword
will display the man page name, section number in the Unix documentation and a short
description, for each man page whose NAME line contains keyword. On some systems this
facility is also available via the command:
67
apropos keyword
9.2
Vendor Online Help
9.2.1
IBM
The complete manual information available on a CD-ROM can be obtained in a very comfortable environment with several screens using the info command. Like almost all such vendorprovided information systems it provides extensive help menus on functionality and usage and
are self explanatory. The info database has been copied to the AFS file hierarchy and if your
workstation has been installed according to the scheme recommended by CN’s UNIX Workstation Support team, then the info command will point to that database which is permanently mounted.
9.2.2
HP
Online documentation for the HP-UX is available through a central server known as hp-osf1.
The documentation can be invoked by typing lrom, if the HP Laserrom/UX software has been
installed. The software and the documentation is on a CD ROM which is usually (but not
always) mounted.
For further information about mounting the software refer to the “CERN HP-UX Installation
Guide”. In case of problems check with [email protected].
9.2.3
DEC
For ULTRIX and OSF the man pages will have been added to your system during the system
installation. If this has not been done, for example to save disk space, or if you require additional documentation, the CD library may be accessed from the server dxsoft using the
Bookreader application.
For further information about setting the environment variable and mounting the documentation library, please refer to the “CERN Guide to Installing ULTRIX”.
9.2.4
SUN
The SUN documentation is the answerbook, which is the SUN software to access the online manuals.
For information about installing answerbook, please refer to “The CERN Sun workstation
cookbook”.
9.3
Information Servers
9.3.1
World Wide Web (WWW)
The World Wide Web is a way of viewing online information available on the Internet.The
user can navigate and browse through information which has been hand-authored or partly
computer-generated from existing databases and information systems.
The Web today incorporates information from systems such as Gopher and WAIS as well as
68
sophisticated multimedia and hypertext information from many organisations.
There are two different commands which can be used to access the Web: mosaic for Xbased screens or www for line mode terminals.
The reader may find the CERN home page within these two browsers of particular interest
because they can find information on the Unix Workstation Support (UWS) group. By looking
at the UWS pages the reader may also find a link to the man pages of various systems. The
URL1 for the CERN Home Page is http://www.cern.ch/
mosaic
For X-windows based workstations use mosaic.2 mosaic is a hypertext browser. Hypertext is
text which contains highlighted links, called hyperlinks, to other texts. To activate a mosaic
hyperlink, click with your left mouse button on any highlighted text; this will take you to the
document at the other end of the hyperlink. The referenced document can be located anywhere
on the World Wide Web, accessible via any network protocol and in any format; mosaic will
allow you to discover, retrieve, and display it almost as if it were stored on your own hard disk.
If you have a colour screen, mosaic’s hyperlinks are initially blue and turn purple after you
have accessed the corresponding document. On a monochrome screen, hyperlinks are initially
underlined text and become dotted-underlined text. For information on the many options
offerred by mosaic, consult the Help pages within mosaic itself.
WWW
On terminals which can not run mosaic, www should be used. www is a line mode browser,
which allows you to access a wealth of information on the global internet. WWW can be
invoked by typing www at the shell prompt.
You can find information by following references and/or by using keywords. References are
numbers in [brackets] after particular phrases. Type the number and <RETURN> for more
information on the phrase.
There are a number of commands which are available at the prompt within www. Some are
disabled when not applicable. All commands may be abbreviated and case is not significant.
Some of the more useful commands are:
Find <keywords> Queries the current index with the supplied keywords. The interpretation of the keywords depends on the particular information server
you are looking at. In most cases, it will search a database for entries
matching the keywords, and will display the results with possible links
to further details. For more complex queries, instructions should be
present in the cover page. The “find” command can be omitted if the
first keyword does not conflict with another www command.
Source
Followed by another command, causes raw source to be generated for
that command. Useful for printing postscript files without formatting
with SOURCE PRINT.
1. A URL, or Universal Resource Locator, can be thought of as an address of an object which exists in the
Web and which can be accessed.A more precise definition is given in the help pages of the mosaic and
www browsers.
2. Previous versions of this utility were called xmosaic but users are advised to invoke mosaic as the new
versions,starting with version 2, have many more interesting features.
69
Prints the current document, without the numbered document references. A background www is launched to do that, and its output is piped
to the command defined by the environment variable
WWW_PRINT_COMMAND (“lpr” by default).
Print
>file, >>file Saves or appends the current document to the given file, without the
numbered document references. A background www is launched to do
that.
|command
Pipes the current document to the given command, without the numbered document references. A background www is launched to do that.
CD(or LCD) directory Changes the local working directory.
9.3.2
phone
To display information on a particular user the phone command can be used. Information can
be obtained by using phone together with: name, userid, phone number, bleeper number or
division, for example
phone mickey
This will display the relevant information for the entries where the name contains mickey. The
required entry can be interrogated further to display electronic mail and account information
for the user in question. For further information on phone refer to the relevant man page.
9.3.3
emdir
The emdir command is an electronic mail directory service which allows you to interrogate a
central directory for the addresses of CERN personnel and update your own entry on it. (For
various reasons, the binary file for emdir has the name EMDIR_L as currently stored on
ASIS.)
The emdir command can be used on its own or with the following parameters: name, first
name, division, phone, experiment, institute, institute phone and mail address.
If parameters are given the database will be accessed in order to retrieve an entry corresponding to the parameters. A %, *, _ or ? may be used to replace any missing parameters, or as a
wild card at either end of or within any of the parameters. For further information on how to
use the emdir command please refer to the relevant man pages.
Nearly all new entries on emdir are created automatically upon registration for an account
on any of the central computers at CERN. However, if this is not the case, send an email message to [email protected] asking for the creation of your emdir entry. Thereafter,
you will be responsible for its update.
Example
To update the mail address of Denys Smithers:
emdir
70
Emdir> Query
;;; information for Smithers is displayed
Emdir> Update
Update> 8 [email protected]
Update> Go
Emdir> Exit
After the Go command you will be prompted for a password which will be requested before all
future updates. If you have forgotten this password from a previous update, contact
[email protected]. For more information use the online help.
9.4
News
Besides the local CERN newsgroups with which most people are familiar, Unix gives access to
a vast amount of news in the Usenet newsgroups. It also allows sites to exchange their ’private’
newsgroups by mutual agreement and CERN currently exchanges news with DESY, Fermilab
and SLAC.
9.4.1
NetNews
Usenet is the set of people who exchange articles tagged with one or more universally recognised labels, called “newsgroups”. The groups distributed worldwide are divided into a
number of broad classifications such as: “comp”, “sci”, “news”, “soc”, “talk”, “rec”, “misc”
and “alt”. Each of these classifications is organised into groups and subgroups according to
topic.
comp
Topics of interest to both computer professionals and hobbyists,
including topics in computer science, software source, and information
on hardware and software systems.
sci
Discussions marked by special and usually practical knowledge, relating to research in or application of the established sciences.
news
Groups concerned with the news network and software themselves.
soc
Groups primarily addressing social issues and socializing.
talk
Groups largely debate-orientated and tending to feature long discussions without resolution and without appreciable amounts of generally
useful information.
rec
Groups orientated towards hobbies and recreational activities.
misc
Groups addressing themes not easily classified under any of the other
headings or which incorporate themes from multiple categories.
alt
Groups which are subject to less strict rules for creation of groups and
content of articles.
71
9.4.2
Newsreaders
All newsreaders use a file in your home directory called ’.newsrc’. This file is used to register
the newsgroups to which you subscribe and the news articles you have already seen. Unless
you have a system manager who has created a ’.defaultnewsrc’ file for your machine, before
using the newsreader ’nn’ for the first time it is essential to create a ’.newsrc’ file in your home
directory. It should contain the initial list of newsgroups, one per line, to which you want to
subscribe. For example
cern.cern
cern.computing
cern.unix
cern.hp
If you don’t create such a file you will be overwhelmed by interactive requests from every
existing newsgroup (all 3000 of them!). You may also find it convenient to create such a
’.newsrc’ file before using mxrn but it is not so essential.
Three tools for reading news are proposed;xrn
This is an X11 interface to the ’old fashioned’ rn newsreader. It is relatively easy to
use since all the options are made available via the X11 windows interface.When you
execute xrn for the first time you will be presented with the complete list of newsgroups from which to select the ones to which you wish to subscribe. Luckily the list
is presented in alphabetic order and a scroll bar is provided to help you get to the ones
you want. As new newsgroups become available you will automatically be offered the
chance to subscribe the next time you execute xrn.
trn
This calls itself ’an efficient’ news reader and although it is more difficult for a new
user to learn, offers an enormous variety of options and functions for someone who
wants to scan, if not read, a large amount of news. Since it is not an X application it
can be used from any type of terminal. Don’t forget to create a ’.newsrc’ file before
using trn for the first time. Subsequently, each time you execute it you will first be
given the chance to examine newly created groups. If you are not interested in them
type U to unsubscribe.
For each newsgroup to which you subscribe, you are first presented with a list of all
new news articles from which you select the ones you want to look at by typing in the
letter or number appearing to the left of the subject line. When you have finished
selecting items, hitting the space bar will put you into ’reading mode’ where the text
of the selected articles will be presented one after the other.
trn commands are normally just one letter and are mostly CASE SENSITIVE.
+
h or ?
a-z,0-9
Q
space
72
present the list of active news items in the current groupt
help, summary of the commands that you can use at this moment
the letter or number corresponding to new item you want to look at
quit - note upper case!
advance to the next page, next mode, next newsgroup,..
U
unsubscribe
www/Netscape
You can also access news via the World Wide Web (www) using Netscape (other
browsers are NOT recommended for reading news).
73
74
Appendix A.
Bibliography
A.1 CERN documents
A.1.1 Recommended manuals
[1]
The CERN UNIX guide
(UCO/164 http://consult.cern.ch/writeup/unixguide)
[2]
The AFS user’s guide
This contains a lot of important information on AFS.
(UCO 167, http://consult.cern.ch/writeup/afsguide)
[3]
“The HEPiX scripts at CERN”
(UCO/174)
[4]
“Shell Support - tcsh and zsh for pedestrians”
(UCO/163, http://consult.cern.ch/writeup/shellsintro)
[5]
Guide for the Usage of X Window at CERN (X Window System and X Terminals)
(UCO/173, http://consult.cern.ch/writeup/xusage)
A.1.2 Other reading
[6]
The CERN security Handbook
This explains how and why you should keep your account secure.
(Available from UCO, http://wsspinfo.cern.ch/file/security)
[7]
The Shift USER guide
Introduction to the CERN batch -staging -diskpool systems.
(UCO/157)
[8]
The Shift reference guide
Details on CERN batch -staging -diskpool systems.
(UCO/156, http://consult.cern.ch/writeup/shiftref)
[9]
The CSF USER guides
Introduction to the CSF MonteCarlo facility.
(/UCO/153, http://consult.cern.ch/writeup/csfuser)
[10] Should I have a dot (‘.’) in my PATH
(UCO/162, http://consult.cern.ch/writeup/unixpath)
[11] The Cern Electronic Mail User Guide
A general guide to electronic mail at CERN.
(/UCO/6, http://consult.cern.ch/writeup/mailguide)
[12] “The proposal for a common script environment“
(UCO/168, http://consult.cern.ch/writeup/hepscripts).
[13] Pine Information Center.
(http://www.washington.edu/pine)
[14] The CERN Zephyr manual.
A system to send interactive messages to other users.
(UCO/165, http://consult.cern.ch/writeup/zephyr)
75
[15] CERN XTerminal Guide
(UCO/158, http://consult.cern.ch/writeup/xterminal)
[16] M. Goossens, A.Samarin, “TeX at CERN - Local Guide”
(CN/US/136, (1992))
76
A.2
General Unix Bibliography
[17] Mark G. Sobell, A Practical Guide to the UNIX System, available at the UCO (Building 513) for CHF 60.
[18] Al Kelley and Ira Pohl, A Book on C, available at the UCO (Building 513) for CHF 50.
[19] Metcalf and Reed, Fortran 90 Explained, available at the UCO (Building 513) for CHF 30.
[20] D. Cameron and B. Rosenblatt, Learning GNU Emacs, O’Reilly & Associates,Inc, Sebastopol, USA, (1991)
[21] R.M.Stallman, GNU Emacs Manual, available from the UCO for CHF 24.
[22] D.E. Knuth, The TeXbook, Addison-Wesley, Reading, (1990); available from the UCO for CHF 46.
[23] E. Krol, The Whole INTERNET, User’s Guide and Catlog, O’Reilly, (1992),ISBN 1-56592-025-2
[24] L. Lamport, LaTeX, A Document Preparation System, Addison-Wesley, Reading, (1986); available from the
UCO for CHF 45.
[25] St. Talbott, Managing Projects with make, O’Reilly & Associates,Inc
[26] D. Gilly et al., Unix in a Nutshell: System V Edition; Revised and Expanded for SVR4 and Solaris 2.0,
O’Reilly & Associates
[27] W. Joy, An Introduction to the C Shell, available on dxcern in /usr/local/doc/postscript/cshellintro
[28] B. Rosenberg, Korn Shell Programming Tutorial, Hewlett Packard
[29] L. Wall & R. Schwartz, Programming Perl, O’Reilly, (1991), will be available from the UCO for CHF 50.
[30] S. Garfinkel & G. Spafford, Practical Unix Security, O’Reilly, (1990)
[31] Aho, Kernighan, and Weinberger, The awk Programming Language, Addison-Wesley
[32] Philip Bourne, UNIX for VMS Users, Digital Press, available from the UCO for CHF 55. Addison-Wesley
77
Appendix B.
Commonly Used Unix
Commands
This appendix summarises frequently used Unix commands, special characters used to identify
directories, and special characters used on the command line. More detailed information on
each command, including a complete list of options, can be obtained with the man command.
B.1 Managing Directories
pwd
cd dir
mkdir dir
rmdir dir
display the path name of the working directory
change working directory to dir
create directory called dir
remove (delete) directory called dir. dir must be empty
B.2 Managing Files
ls
ls file
ls dir
ls -l
ls -a
cp file1 file2
cp file dir
mv file dir
mv file1 file2
rm file
rm -i file
more file
cat file
chmod arg file
chmod arg dir
list contents of working directory
list file if it exists in working directory
list contents of the directory dir
list additional information on directory contents
list all files including hidden files (. files)
copy file1 to file2 (overwrites file2)
copy file into directory dir
move file into directory dir
move file1 to file2 (overwrites file2)
remove (delete) file
ask for confirmation before removing (deleting) file
displays contents of file, one screen at a time
displays contents of file
change read/write/execute permission of file
change read/write/execute permission of dir
B.3 Managing Jobs
<Ctrl-c>
<Ctrl-z>
ps
kill PID
jobs
kill current job
suspend current job; can then be run in background with bg command
list process by process identifier
stop process with process identifier PID
list your jobs by job number
B.4 On-line Help
man command
man-k keyword
learn
info
78
display manual entry for command
list manual pages that pertain to keyword
on-line tutorial (AIX only)
on-line tutorial, help pages and manuals, stored on CD-ROM.
answerbook
insight
lrom
dxbook
Can only be used with X-Windows Terminals. (AIX only)
on-line help (SUN only)
on-line help (SGI only)
on-line help (HP only)
on-line help (ULTRIX and DEC OSF/1 only)
B.5 System Information
who
who am i
passwd
list users logged onto system
displays your logon ID
change password
B.6 Utility Programs
sort file
grep pattern
file
uniq file1
file2
wc file
echo string
sort contents of file, send result to standard output
look for pattern in file, send result to standard output
delete repeated lines in file1, write new version to file2
displays the number of lines, words, and characters in file
write the parameter string to standard output, translate special characters
find path
search the directory tree path (see man page for more details)
tar file
write to or retrieve files from an archival storage media
compress file compresses the file and writes file.Z
uncompress
file.Z
restores file from compressed file
B.7 Directory Identifiers
~(tilde)
. (dot)
..(dot)(dot)
/
your home directory
the working directory
the parent directory (one level up within hierarchy)
root directory
B.8 Special Characters
*
<
>
>&
1>&2
|
&
!
;
\
. file
match any character
redirect standard input
redirect standard output
redirect standard output and standard error (C shell)
redirect standard output to same place as standard error (Bourne shell)
send standard output of first command to standard input of second
command
put job in background
repeat command (C shell)
concatanate several commands on one line
continuation character; command continues on next line
execute "file" (Bourne shell; equivalent is "source" in C shell)
79
#
#!
80
start of a comment
should be the first two characters of the first line of a shell script
and should be followed by the path of the shell to be executed (on
most systems)
Appendix C.
Glossary
. (dot)
The current directory.
.. (dotdot)
The parent directory of the current directory.
absolute pathname
A pathname which starts with the root directory (/). An absolute pathname locates a
file without regard to the working directory. Pathnames that are not absolute are called
relative.
access
Frequently used to mean use, read from, or write to.
alias
The mechanism for providing a different name for a Unix command string.
alphanumeric character
One of the characters from a-z and 0-9, inclusive, either uppercase or lowercase.
append
To add to the end of something else.
argument
Any word (string of characters delimited by spaces or tabs) occuring after the command on a command line.
argv
The variable in which the list of arguments to a command is stored.
argc
Number of variables in the list of arguments to a command; only on some systems,
more usually referred to as $#argv
arithmetic operator
Symbol used to indicate and execute addition (+), subtraction (-), multiplication (*),
or division (/).
a.out
Binary executable file.
background job
A job which is not receiving input from the terminal. A job not in the background is
said to be in the foreground.
bin directory
A directory containing binaries of programs and shell scripts.
bit bucket
Name for the file /dev/null. Characters written to this file are thrown away; characters
read from this file cause immediate EOF.
boot
The loading of the kernel into memory.
81
BSD
Berkeley Software Distribution, a version of Unix originating at the University of
California at Berkeley.
built-in command
A command executed directly by the shell, as opposed to forking a process to execute
a file in a directory.
case sensitive
Treating lower and upper case characters as two kinds of characters with separate
meanings.
child directory
The directory below another directory in the file system tree structure.
child process
A process created when a parent process forks a new process.
command
A function performed by the system either by the shell or by a program residing in a
file in the directory.
command editing
Modifying a previously entered command for reuse as a new command.
command prompt
A string of characters that the system outputs to tell you it is ready to accept the next
command.
concatenate
To link together in a series.
console
The terminal with which you communicate to the system.
csh
Shorthand for /bin/csh/, the C shell program.
current directory
The directory to which commands refer by default, the directory you are currently in.
Same as working directory.
cwd
Variable in the shell which holds the absolute pathname of the current working directory.
daemon
A continuously-running program which monitors and manages a system resource
such as printers, working sets, etc.
detached job
A job that continues processing after the user has logged out.
device
See physical device.
device file
A file that represents a device. Also called a special file.
82
directory
A Unix file that contains names of other files or directories. More technically, a system-managed file containing the associations between path components and inodes.
Each directory entry contains an inode number and a path component.
directory hierarchy
The arrangement of directories in a Unix file system, consisting of a root directory at
the top of the directory hierarchy containing pointers to all file systems, and hence to
all directories on the system.
disk partition
Part of a disk onto which a file system is mounted.
driver
The device dependent code for a particular device class; eg: a specific type of printer
or terminal.
environment
The set of characteristics describing a user’s sessions, including open files, user and
group identification, process identification and environment variables.
environment variable
A variable exported automatically to subsequent programs.
EOF
End-of-file generated by <ctrl-d> or the end of a file used as input.
escape
A special character (0x1b) initiating command sequences for terminals and programs.
A metacharacter is said to be ’escaped’ when preceded by the character ’\’ to make
the metacharacter lose its special meaning.
ethernet
A packetised asynchronous protocol using coaxial or optical fiber cable with multiple
senders and receivers. Each node listens for packets which are addressed to it. When a
node wants to send, it waits for the ethernet to be idle and then sends. If two or more
nodes attempt to send at the same time, they detect this condition by checking their
own signals as they come back to the node and if the signals are damaged each node
waits for a short random amount of time and then tries again.
event
Past command stored in the history list.
exec
A family of system calls that replace one program executing in a process with another.
The system calls differ in format of the arguments and not in the purpose of the system call.
expansion
The replacement of strings in the shell input which contain metacharacters by other
strings.
file
A collection of data known to the operating system. In most operating systems a file is
associated with a specific name or names. In Unix a file need not have a name but
most files do at least have one.
83
file descriptor
The number Unix assigns to an open file.
filename
The set of characters used to reference a file.
file system
a) the component of the kernel that manages data resources into files
b) a disk data structure used to manage a tree of files.
filter
A program that reads form standard input, does something and writes to standard output.
foreground job
A job that must be completed or interupted before the shell will accept more commands; a job receiving input from the terminal. See background job.
flag option
Option used to modify the action of a command, consisting of one or more letters preceded by the character -.
fork
The system routine that creates a new process by duplicating the calling (parent) process. One is called the parent and the other the child. The parent process receives the
process identification (pid) of the child as a result of the fork system call. The child
receives from its copy of the same system call a pid of 0.
full-duplex
the communications path is bi-directional and both ends may be sending at the same
time.
getty
The terminal line monitoring program.
globbing
Filename expansion using metacharacters.
group ID
A numeric identification designating the group to which a user belongs.
half-duplex
The communications path sends signals in one direction at a time. The path may be
capable of communicating in one direction only. Otherwise, there is some agreed signal to allow the other end to become the sender.
hidden file
A file which begins with a period and often has special meaning to the system.
history list
The list of previously issued commands.
home directory
Your default working directory; the location in the file system that Unix automatically
puts you when you log in. Same as the login directory.
84
host
A computer in a network. Also known as a node.
ignoreeof
A variable in some shells to prevent <ctrl-d> from logging you out.
inode
Pointer used to locate data on a physical device.
interrupt
A signal to a program to change its instruction flow (e.g. to stop the execution of the
program, often set to <ctrl-c>).
job
One or more commands typed on the same input line. Jobs are classified as foreground, background, or suspended.
job number
A unique number assigned to a job when it starts.
kernel
The operating system control program.
ksh
Shorthand for /bin/ksh, the Korn shell program.
link
An entry in a directory that points to an existing file. There are hard links and symbolic links (or soft links).
link
the operation of linking object files and libraries together to form an executable binary
file.
.login
A file in your home directory which is executed each time you login.
login directory
Your default working directory; the location in the file system that Unix automatically
puts you when you log in. Same as the home directory.
login name
The unique name assigned to a user which is used at the login prompt to login to the
system.
login shell
The shell that is started when you login.
.logout
A file in your home directory which is executed when you log out.
metacharacter
Character with special meaning to the shell or to Unix.
NFS
Network File System, a protocol developed by Sun Microsystems, Inc, to permit
access to files on remote computers.
85
noclobber
A variable in some shells which can be set to prevent accidental destruction of files by
output redirection.
noglob
A variable in some shells which can be set to suppress the filename expansion of arguments containing certain metacharacters.
ordinary file
Collection of characters stored on disk. Contrast with special (device) file or directory
file.
output
Information that a program sends to the terminal or other file.
panic
The kernel has detected a fatal error and is terminating a system crash. A panic dump
results.
parent directory
The directory one level closer to the root than the current directory.
parent process
The process that forked to create a child process.
path
A directory specification. An absolute path starts with slash and is relative to a process’s definition of the system’s root directory. A relative path does not have an initial
slash and is relative to a process’s definition of its current working directory.
pathname
A list of directories, separated by / characters. It is used to trace a path through a file
structure to locate a file. The types are simple, absolute and relative.
path component
A field of a path delimited by the beginning, a slash, and the end of the path.
physical device
A piece of hardware attached to the computer eg: disk drive, printer.
physical device name
The name given to a physical device.
PID
Process IDentification. The PID number is a unique number assigned to each process
when it is initiated.
pipe
A connection between two programs such that the standard output of one is connected
to the standard input of the other.
pipeline
A group of programs connected by pipes.
plain file
A file used to store a program, text or other data, as contrasted with directory file or
device file.
86
port
The part of a computer system to which a terminal is connected.
prompt
A cue from a program, usually displayed on the terminal, indicating that it is waiting
for input.
process
The unit of work, or the means by which Unix executes a program.
process id
An integer that uniquely identifies a process within the system.
quotation
The process by which metacharacters are prevented from using their special meaning,
usually by using the character ’ in pairs or by using the character .
redirection
The routing of input or output from or to a file, rather than a terminal.
relative pathname
A pathname which does not begin with a / is interpreted relative to the current working directory. Contrast with absolute pathname.
RISC
Reduced Instruction Set Computer.
root
Another name for the superuser; the source directory of the file system.
root directory
The directory which is at the top of the entire directory structure and the start of an
absolute pathname. Represented by a /
script
A sequence of shell commands placed in a file/program.
sh
Shorthand for the file /bin/sh, the Bourne shell program.
shell
A command language interpreter.
shell script
See script.
signal
A short message sent to a running program which causes something to happen to that
process.
socket
Defines an endpoint for network communication (BSD only).
special character
See metacharacters.
special file
A file that represents a physical device. Also called a device file.
87
spooler
A program or system of programs that accepts files to be delivered to a system
resource that needs to be used serially, eg: printers or communications equipment.
standard error output
A file that a program can receive output to, usually reserved for error messages. By
default it is directed to the terminal.
standard input
A file that a program can receive input from. By default, it comes from its terminal.
standard output
A file to which a program can send output. By default, it is to the terminal.
stream
Same function as socket (System V).
superuser
A priviledged user who can perform administrative tasks.
suspended job
A job which has received a stop signal, either via <ctrl-z> or the stop command.
symbolic link
A method to associate a file with two or more file names.
system call
A request for services from the operating system control program or kernel.
TCP/IP
A communication protocol that may be embedded within a physical communications
protocol such as Ethernet that supports methods of communications that are sending
letters called datagrams or establishing two-ways links called virtual circuits. Datagrams may arrive out of order or be lost. Virtual circuits protect against packets arriving out of order but may lose packets. Higher order protocols may provide either
order services or replacements for lost or damaged packets.
trusted host
A host that permits access without a password.
tty
An abbreviation for teletype, frequently used to indicate the port to which a given terminal is connected.
user ID
A number associated with each login name.
white space
A name for spaces and/or tabs.
wild card character
A character with a special meaning in a file specification.
working directory
The directory you are currently in. Relative pathnames are built upon the working
directory. Also called current directory.
88
Index
Symbols
Combining files ................................... 30
Command recall .................................. 25
Commands,built-in.............................. 11
Commands,format of........................... 11
Comment line ...................................... 15
Compiler.............................................. 60
Compiler!option .................................. 60
Computer Newsletter............................. 9
CoPilot................................................. 34
CORE .................................................. 66
cp ......................................................... 30
cpio ...................................................... 33
CSF...................................................... 66
csh........................................................ 10
.cshrc.................................................... 21
.emacs .................................................. 57
.exrc ..................................................... 54
.kshrc ................................................... 21
.login .................................................... 21
.profile ................................................. 21
.rhosts................................................... 37
A
Absolute path....................................... 28
Account.................................................. 7
ADSM.................................................. 34
AFS...................................................... 34
Alias..................................................... 24
Andrew File System ............................ 34
Anonymous ftp .................................... 40
Answerbook......................................... 68
apropos ................................................ 68
ar .................................................... 61, 64
archive ................................................. 64
ASIS .................................................... 65
Awk ..................................................... 16
D
dbx....................................................... 63
Debugging ........................................... 63
DECnsr ................................................ 34
DFS...................................................... 35
Distributed File System....................... 35
dump.................................................... 33
dvips .................................................... 49
E
B
EDITOR .............................................. 19
Electronic mail .................................... 44
emacs................................................... 55
emdir.................................................... 70
End-of-file ........................................... 13
ENV..................................................... 19
Environment variables......................... 18
Backup ................................................. 33
bash...................................................... 10
Binding ................................................ 63
Bookreader .......................................... 68
Bourne shell................................... 10, 15
C
F
C .......................................................... 60
C shell ............................................ 10, 15
cancel ................................................... 49
cat ........................................................ 29
cd ......................................................... 28
cernlib .................................................. 62
chmod .................................................. 32
CNL ....................................................... 9
f77........................................................ 60
File backup .......................................... 33
File permissions................................... 31
Filter .................................................... 15
Forking ................................................ 12
fort77 ................................................... 61
FORTRAN .......................................... 60
Index
89
ftp .........................................................39
M
G
Mail......................................................44
make.....................................................60
man pages ............................................67
Man, printing man pages .....................11
Merging files........................................30
mkdir....................................................29
more ...............................................29, 67
mosaic ..................................................69
mv ..................................................29, 30
mxrn.....................................................72
Gnu emacs............................................55
Gnu software ........................................65
Gopher..................................................68
grep ......................................................16
H
Hard Links ...........................................31
History..................................................25
HOME..................................................20
Home directory ....................................27
hypertext ..............................................69
N
Networker ............................................34
News ....................................................71
nn .........................................................72
Noclobber ............................................14
NQS .....................................................66
Null device...........................................14
I
Ignoreeof ..............................................24
info .......................................................68
Internet ...........................................36, 68
O
K
Object file ............................................61
OMNIBACK........................................34
Optimisation ........................................62
Keyboard..............................................23
Korn shell.............................................10
ksh ........................................................10
P
L
PaRC ....................................................66
Password ................................................9
PATH...................................................20
Path ......................................................12
phone....................................................70
PIAF.....................................................66
pid ........................................................12
Pine ......................................................46
Pipes.....................................................14
Postscript..............................................47
PRINTER.............................................20
Printing ................................................47
Printing man pages ..............................11
Process, active......................................13
Process, background ............................12
Process, child .................................12, 15
Process, dormant..................................13
Process, identifier ................................12
Process, login.......................................10
Process, parent ...............................12, 15
LaTeX ............................................49, 65
ld ..........................................................60
Legato Networker ................................34
Libraries ...............................................61
Link editor options ...............................64
Linker ...................................................60
Links ....................................................31
ln ..........................................................30
Login ......................................................8
Logout ....................................................8
lp ..........................................................49
lpq ........................................................48
lpr .........................................................47
lprm ......................................................48
lpstat .....................................................49
lrom ......................................................68
ls ...........................................................28
90
Index
T
Profile files .......................................... 21
Promp .................................................. 11
Prompt ................................................. 20
PS1....................................................... 20
pwd ...................................................... 28
tar......................................................... 33
tcsh ...................................................... 10
tee ........................................................ 14
telnet .................................................... 37
TERM.................................................. 20
Terminal server ..................................... 8
Terminal type ...................................... 20
TeX...................................................... 65
R
rcp ........................................................ 41
Redirection .......................................... 13
Registration form................................... 7
Regular expressions............................. 16
Relative path ........................................ 28
remsh ................................................... 42
Reset .................................................... 24
Resize .................................................. 24
restore .................................................. 33
rexec .................................................... 43
rhosts.................................................... 37
rlogin.................................................... 38
rm......................................................... 31
rmdir .................................................... 29
Root directory ...................................... 27
rsh ........................................................ 42
U
UCO .................................................. 7, 9
UID........................................................ 7
Usenet.................................................. 71
V
variables, environment ........................ 18
Variables, shell .................................... 18
vi.......................................................... 50
W
WAIS................................................... 68
WDSF.................................................. 34
World Wide Web ................................ 68
WWW.................................................. 68
S
Scripts .................................................. 15
Search path .......................................... 12
sh.......................................................... 10
Shared library ...................................... 61
Shell scripts ......................................... 15
Shell, bash............................................ 10
Shell, Bourne ....................................... 10
Shell, C ................................................ 10
Shell, korn............................................ 10
Shell, login........................................... 10
Shell, tcsh ............................................ 10
Shell, zsh.............................................. 10
SHIFT .................................................. 66
Soft links.............................................. 31
Sort ...................................................... 16
Source ...................................... 13, 15, 18
Standard error ...................................... 13
Standard input...................................... 13
Standard output.................................... 13
Startup files.......................................... 21
Static code ........................................... 63
Symbolic links ..................................... 31
X
X Terminal ............................................ 8
xdb....................................................... 63
xdvi...................................................... 49
xlf ........................................................ 61
xmosaic................................................ 69
Z
zsh........................................................ 10
Index
91


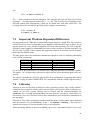
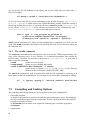
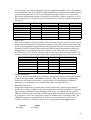
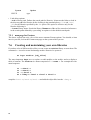


![arXiv:1306.3436v1 [hep-ph] 14 Jun 2013](http://vs1.manualzilla.com/store/data/005779061_1-09962217330e865ae44dd3cb323f6311-150x150.png)