
1
I/O
User Guide
This manual is revision C
Copyright © Quantel Ltd 2001-2014
Quantel

Contents
Using I/O...........................................................................1-1
Overview.........................................................................................1-2
Access Media and Settings........................................................................... 1-2
Bins.................................................................................................................... 1-2
‘Desktop’ Bin......................................................................................................1-3
AAF Bin...............................................................................................................1-3
Archive Bin.........................................................................................................1-3
Settings Bin.......................................................................................................1-4
Access Files from the Windows Browser......................................................1-4
Record and Play-out.........................................................2-1
Record Material............................................................................. 2-2
Device Set-up and Selection......................................................................... 2-2
Edit Set-ups.................................................................................................... 2-2
Device Settings................................................................................................. 2-2
Video Input Selection........................................................................................2-3
SDI or AES/EBU Audio Selection......................................................................2-3
VITC and LTC Selection......................................................................................2-4
Select the VTR Comm Port................................................................................2-4
VTR Characteristics...........................................................................................2-4
Video Standard Selection.................................................................................2-5
Record Menu.................................................................................................. 2-5
Automatic Name, Owner and Category............................................................2-5
Input Audio Channel to Track Assignments......................................................2-6
Input Audio Level Indication.............................................................................2-6
Control a VTR................................................................................................. 2-6
Set In and Out Timecode............................................................................... 2-7
Control Record Start and Stop...................................................................... 2-7
Record Using Scene Select........................................................................... 2-8
Record Directly to the Timeline..................................................................... 2-9
Batch Record................................................................................................. 2-9
Record Directly into the Bank..................................................................... 2-10
Grab Stills.................................................................................................... 2-10
Record 3-2 Pull-down Material.................................................................... 2-10
Set up the A-frame Offset................................................................................2-11
ii
copyright © Quantel Ltd 2001-2014
July 2014
ref 2140-57-012 C

Play-out Material..........................................................................2-11
Play Menu.....................................................................................................2-11
Output Video Standard.....................................................................................2-11
Player Settings..................................................................................................2-11
Output Crop Settings...................................................................................... 2-12
Load Material................................................................................................2-12
Audio Track Output Mapping....................................................................... 2-13
Play-out to VTR............................................................................................ 2-16
Recreate 3-2 Pull-Down Material .................................................................2-17
Conform and AAF Out.......................................................3-1
Conform Offline Material..............................................................3-2
Conform Menu............................................................................................... 3-2
Advanced Authoring Format (AAF)................................................................ 3-2
Select an AAF File..........................................................................................3-3
Name, Owner, Category and Seg Name...........................................................3-4
Interlaced or Progressive Material...................................................................3-4
Tail Length.........................................................................................................3-4
M2 Command Stretch Method..........................................................................3-4
Blank Format (Text Effects)...............................................................................3-4
Video Track Control...........................................................................................3-5
Assign Audio Channels to Tracks......................................................................3-5
Tape Name and Limit........................................................................................3-5
Offset Timecode.................................................................................................3-6
Conform Date and Time Filter...........................................................................3-6
AAF List Display Modes..................................................................................... 3-7
Modify AAF Metadata........................................................................................ 3-7
Set Tape, File or Network Conform...................................................................3-8
Start the Conform (tape media)....................................................................3-8
Select Tape.........................................................................................................3-9
Variable Frame Rate..........................................................................................3-9
Eject Tape...........................................................................................................3-9
Rush Prefix........................................................................................................3-9
Rush Name........................................................................................................3-9
Load Material.....................................................................................................3-9
Start the Conform (file media).................................................................... 3-10
Start the Conform (network media).............................................................3-11
Select Media.................................................................................................... 3-11
Merge Sequences............................................................................................ 3-11
Select Image Size............................................................................................ 3-12
Timecode From................................................................................................ 3-12
www.quantel.com
support–downloads–login–manuals
iii
Quantel

Originator From............................................................................................... 3-12
Rush Prefix...................................................................................................... 3-12
Rush Name...................................................................................................... 3-13
Exclude Folders............................................................................................... 3-13
Display Options............................................................................................... 3-13
Keycode Conform (NCL).................................................................................. 3-14
Stretched Clips............................................................................................ 3-14
Conform Using a Reference Clip................................................................. 3-14
Use a Reference Clip/Project for Versioning.................................................. 3-15
Use Destination Timecode.............................................................................. 3-16
EDL to AAF Conversion................................................................................ 3-16
CDL Information............................................................................................... 3-17
STL to AAF Conversion with Subtitles......................................................... 3-19
RED Conform................................................................................................3-20
Set <F1> Options.............................................................................................3-20
Select the AAF file........................................................................................... 3-21
Set the Conform Type...................................................................................... 3-21
Set Tape/File Name Extraction....................................................................... 3-21
Set up the Conform......................................................................................... 3-21
Set General and Colour Options..................................................................... 3-22
Set Resize Options..........................................................................................3-23
Start the Conform...........................................................................................3-23
Soft Mount Option....................................................................................... 3-24
RED Timeline Functions...................................................................................3-25
RED Soft Mount Preview.................................................................................3-25
SI-2K and Phantom Conform....................................................................... 3-26
Stereo 3D Conform...................................................................................... 3-26
Stereo Reference Clip Options....................................................................... 3-27
Save Decode Parameters............................................................................ 3-27
Settings Bin Functions.................................................................................... 3-27
Output AAF Files..........................................................................3-28
Project Transfer Using AAF.......................................................................... 3-28
AAF to EDL Conversion.................................................................................... 3-29
Audio Post....................................................................................................... 3-30
Archive...............................................................................4-1
Overview.........................................................................................4-2
Archive Out................................................................................... 4-3
Prepare an Archive Out.................................................................................4-3
Archive Destination.......................................................................................... 4-3
iv
copyright © Quantel Ltd 2001-2014
July 2014
ref 2140-57-012 C

Archive Content................................................................................................ 4-4
Perform an Archive Out.................................................................................4-5
Archive In...................................................................................... 4-6
Prepare for an Archive In...............................................................................4-6
Location of Archive...........................................................................................4-6
Content to Restore............................................................................................4-7
Perform an Archive In.................................................................................... 4-7
Soft Mounted Archives..................................................................................4-8
DCP.....................................................................................5-1
Description.....................................................................................5-2
DCP In..............................................................................................5-2
Import/Soft-mount a DCP File...................................................................... 5-2
DCP Out...........................................................................................5-3
Create a DCP Package...................................................................................5-3
Set the Composition..........................................................................................5-4
Set Encryption...................................................................................................5-4
Add Clips............................................................................................................5-4
Define the PreProcess Settings........................................................................5-5
Generate DCP....................................................................................................5-6
Automatic Licensing...................................................................................... 5-6
Easy DCP............................................................................................................5-6
Import and Export.............................................................6-1
Import Material..............................................................................6-2
Import Clips from Files.................................................................................. 6-2
Ignore Matte Option..........................................................................................6-3
Batch Import..................................................................................................6-4
Group Stills into Sequences..............................................................................6-4
Video Attributes Menu..................................................................................6-4
Format, Size and Pixel Aspect...........................................................................6-4
Convert to..........................................................................................................6-4
Aspect Ratio Conversion...................................................................................6-5
Flip.....................................................................................................................6-5
Colour.................................................................................................................6-5
Black Level and White Level.............................................................................6-5
Look-up Table.....................................................................................................6-5
www.quantel.com
support–downloads–login–manuals
v
Quantel

Audio Attributes Menu.................................................................................. 6-6
Timecode Menu............................................................................................. 6-6
Originator...........................................................................................................6-6
Source TC...........................................................................................................6-6
Keycode.............................................................................................................6-6
<F1> Options.................................................................................................. 6-7
Underscores...................................................................................................... 6-7
Import Format.................................................................................................... 6-7
Import Max Bits................................................................................................. 6-7
Import Keycode................................................................................................. 6-7
Import Clip Name Level....................................................................................6-8
Import Clip Name Without Number..................................................................6-8
Allow Non-server Sized Import (Qube and sQ Edit Plus HD)...........................6-8
Red Timecode....................................................................................................6-8
Save Decode Parameters.............................................................................. 6-9
Settings Bin Functions......................................................................................6-9
Supported Import Formats........................................................6-10
AIFF.............................................................................................................. 6-10
ARRIRAW...................................................................................................... 6-10
AVI................................................................................................................ 6-10
BMP...............................................................................................................6-11
CDA...............................................................................................................6-11
CIN................................................................................................................6-11
CINE (Phantom Camera)...............................................................................6-11
DPX................................................................................................................6-11
DV..................................................................................................................6-11
EXR................................................................................................................6-11
GIF.................................................................................................................6-12
Go-Pro...........................................................................................................6-12
JPEG...............................................................................................................6-12
M2V (Blu-ray)................................................................................................6-12
MCF...............................................................................................................6-12
MOV (QuickTime)..........................................................................................6-12
MPEG-1, MPEG-2, VOB (option).................................................................... 6-13
MP3.............................................................................................................. 6-13
MP4, M4V, MP4V, M4A, M4P....................................................................... 6-13
MXF ............................................................................................................. 6-13
P2, XDCAM, DNxHD, SonyF65, Sony SStP and Quantel................................. 6-13
Sony F65 MXF.................................................................................................. 6-14
Sony SStP........................................................................................................ 6-14
PIC................................................................................................................ 6-14
vi
copyright © Quantel Ltd 2001-2014
July 2014
ref 2140-57-012 C

PNG.............................................................................................................. 6-14
RED (r3d)...................................................................................................... 6-15
SGI................................................................................................................ 6-15
Silicon Imaging (SI-2K) Camera................................................................... 6-15
TARGA........................................................................................................... 6-15
TIFF............................................................................................................... 6-15
VPB............................................................................................................... 6-15
WAV.............................................................................................................. 6-15
Windows Media (ASF, WMA, WMV)............................................................. 6-15
Export Material............................................................................ 6-17
Export Clips as Files.....................................................................................6-17
Render On Export............................................................................................ 6-18
Batch Export.................................................................................................... 6-18
Name with Timecode, Frame or Original Suffix.............................................. 6-18
Deinterlace...................................................................................................... 6-18
Sizing............................................................................................................... 6-19
Export Files with Pan & Scan..........................................................................6-20
Colour...............................................................................................................6-20
Key...................................................................................................................6-20
<F1> Options................................................................................................6-20
Underscores....................................................................................................6-20
Export Always Overwrite................................................................................. 6-21
Export Project Folders..................................................................................... 6-21
Export Make Clip Folder.................................................................................. 6-21
Export Naming................................................................................................. 6-21
Save Export Parameters.............................................................................. 6-21
Settings Bin Functions.................................................................................... 6-21
Stereo3D Export.......................................................................................... 6-22
Supported Export Formats.........................................................6-23
AVI................................................................................................................ 6-23
CIN............................................................................................................... 6-23
DPX............................................................................................................... 6-23
JPEG.............................................................................................................. 6-23
MOV.............................................................................................................. 6-23
MOV Menu.......................................................................................................6-23
MPEG-2 (option)........................................................................................... 6-25
MPEG-2 Menu..................................................................................................6-26
General Program Stream................................................................................6-26
DVD Compatible Program Stream..................................................................6-26
DVB Compatible Transport Stream.................................................................6-26
Blu-ray Compatible Transport Stream (M2V+MPA, MPG).............................. 6-27
www.quantel.com
support–downloads–login–manuals
vii
Quantel

MXF.............................................................................................................. 6-27
MXF wrapped DNxHD files.......................................................................... 6-27
PNG.............................................................................................................. 6-27
SGI................................................................................................................ 6-27
TARGA........................................................................................................... 6-27
TIFF............................................................................................................... 6-27
VPB............................................................................................................... 6-28
VPB/WAV/INFO........................................................................................... 6-28
WAV.............................................................................................................. 6-28
Windows Media (WMA, WMV)..................................................................... 6-28
WMV/WMA Menu........................................................................................... 6-29
Appendix.......................................................................... A–1
About This Manual........................................................................A–2
Notices...........................................................................................A–3
Maintenance.................................................................................................A–3
Conventions Used.........................................................................................A–3
Symbols............................................................................................................A–3
Text...................................................................................................................A–3
Trademarks.......................................................................................................A–4
Disclaimer..................................................................................................... A–5
Helpdesk and Web Support.......................................................................... A–5
24 Hour Helpdesk............................................................................................. A–5
Website and Downloads (manuals, drivers, plugins and software)........... A–5
viii
copyright © Quantel Ltd 2001-2014
July 2014
ref 2140-57-012 C
Using I/O
ref 2140-57-012 C
www.quantel.com
support–downloads–login–manuals
1-1
Using I/O
Overview
The I/O application is used to transfer material in and out of Quantel workspace. To
access the application, launch the Quantel kernel via the shortcut on the desktop and
then press I/O on the Application Bar at the bottom of the screen.
The menu area above the Application Bar provides Record, Play, Conform (see screen
shot), AAF Out, Archive In, Archive Out, DCP In, DCP Out, Import and Export process
menus.
The desktop (main window) provides an image area that is used to view clips and to
display information about the current I/O process. The menu area below the desktop
provides set-up options applicable to the current I/O process (eg size and format etc).
Access Media and Settings
Bins
When working within I/O, media and settings are accessed
by opening and viewing ‘bins’. Drag and drop files from bins
onto the main window or menu area.
To open a bin, press on the corresponding tab on the
Application Bar, for example press clips to open the Clips
Bin. Open bins display blue on the Application Bar.
The bins available depend on the current process and are described throughout this User
Guide where applicable.
1-2
copyright © Quantel Ltd 2001-2014
July 2014
ref 2140-57-012 C
The ‘Desktop’ Bin can be used to access media that is not held in Quantel workspace via
the platform’s network directories.
The ‘Desktop’ bin is automatically given the
name of the current directory path selected, eg
‘desktop’. When the bin is not showing the
complete path, use the yellow arrow on the bar
at the top of the bin to move up a level. To see
previously accessed paths, select the Bin name,
and press on the down arrow on the top-right of
the soft keyboard.
Using I/O
‘Desktop’ Bin
Files from the ‘Desktop’ Bin can be imported by
dragging and dropping them onto the desktop
which displays a pop-up (see screen shot).
From the pop-up, add a name, configure the
frame rate, scan, repeat, size, and pixel aspect.
Set the options required, then press import. A
Floating Clip now displays on the desktop.
See ‘Desktop Editing User Guide’ for more details about the Desktop
Bin.
AAF Bin
The AAF Bin supports AAF, EDL, NCL and TXT files. Drag and drop a file from this bin to
convert it to AAF.
See “Conform Offline Material” on page 3-2.
Archive Bin
The Archive Bin displays any archived material that can be restored into Quantel
workspace.
See “Archive In” on page 4-6.
www.quantel.com
support–downloads–login–manuals
1-3
Quantel
Using I/O
Settings Bin
lthough the Settings Bin does not manage media itself, it is used to transfer, import and
A
export parameters between projects.
T he settings that can be saved depend on
the current application and menu, eg MLT
FX has different Settings Bin options to Edit
or Scribe.
A saved setting has a bin icon that is blue
with a white cross.
A saved setting is also saved into the Clips
Bin.
See MLT FX User Guide and Editing User Guides for more details of
using settings.
Access Files from the Windows Browser
As well as being able to drag and drop files and sequences from Quantel bins onto the
Quantel desktop or menu area, files can also be dragged directly from the Windows
directory browser.
Open the Windows browser in either of two ways:
• Press the Windows <Start> key on the keyboard.
• Where there is a folder icon in the Quantel menu area, hold down <Ctrl> and press
the folder icon.
Select a file or directory, press OK and it transfers to the directory field in the Quantel
menu area.
For details of how to use bins including P2, XDCAM and QShare
Bins, see Media Bins User Guide.
1-4
copyright © Quantel Ltd 2001-2014
July 2014
ref 2140-57-012 C
Record and Play-out
ref 2140-57-012 C
www.quantel.com
support–downloads–login–manuals
2-1
Record and Play-out
Record Material
Device Set-up and Selection
Source material is recorded and saved into the local Clips Bin where it then becomes
available to other applications for editing and processing.
First Clip
<<
<
play
stop
>
>>
eject
Preroll Standby Off
sdi in A
sdi in B
30fps
new
10:08:18:07 RLI
sdi in A
SDI audio
create
rename
3
delete
Record
Play
Conform
AAF Out
Archive In
Archive Out
Import
Export
desk
00:00:10:00
[<
tape play preroll:
tape edit preroll:
play tc offset:
edit tc offset:
Clip - 001
owner
cat
tape
dur
in
out
tail
Andy
Rushes
FLOR
interlaced
16x9
00:43:47:21
10:34:06:24
11:17:54:20
00:00:00:00
14:20:50:21
V1 First Clip
A1 First Clip
A2 First Clip
Video
ch 1
A1
ch 2
A2
none
pen start
3
5
0
0
Second Clip
Second Clip
Second Clip
seq out
00:00:20:00
in00:00:30:00
<
>
|<
|>
>]
Third Clip
Third Clip
Third Clip
00:00:40:00
reverse
00:00:50:00
play
No Control RS422 Auto SDI VITC
refresh
Port A No Connection
Port B DVWA500
remove item
Port C
duration stop
Edit Setups
bank
sdi in A
preview
00:00:20:00
go
add to batch
clear batch
0
use Edit clip
Ddr
Edit
Effects
Utility
I/O
Scribe
clips Graphics
P2
QShare XDCAM render
lut
576 25i 16:9
vid
aud
Before recording material into local workspace, configure a device set-up in order to set
the appropriate video, audio and control connections.
Select the appropriate device set-up from the Record menu or
select the Edit Set-ups box to create a new set-up or modify an
existing one.
Edit Set-ups
Device Settings
The comms ports and video inputs can be configured and saved as device settings and
used within the Record, Play and Conform menus. Up to eight device set-ups can be
stored and easily selected by using the scroll box in the menu. Device set-ups can be
used to store VTR and system configurations for each different studio installation or
working set‑up.
2-2
copyright © Quantel Ltd 2001-2014
July 2014
ref 2140-57-012 C
stop
>
>>
eject
30fps
new
10:08:18:07 RLI
sdi in A
SDI audio
create
rename
3
delete
Conform
AAF Out
Archive In
Archive Out
Import
Export
desk
[<
tape play preroll:
tape edit preroll:
play tc offset:
Clip - 001
dur
in
out
tail
Andy
owner
cat
tape
Rushes
FLOR
interlaced
16x9
00:43:47:21
10:34:06:24
11:17:54:20
00:00:00:00
Video
ch 1
A1
ch 2
A2
none
pen start
3
5
0
0
Second Clip
Second Clip
Second Clip
seq out
00:00:20:00
in00:00:30:00
<
>
|<
|>
>]
Third Clip
Third Clip
Third Clip
00:00:40:00
reverse
00:00:50:00
play
No Control RS422 Auto SDI VITC
refresh
Port A No Connection
Port B DVWA500
remove item
Port C
Edit Setups
duration stop
bank
sdi in A
preview
00:00:20:00
go
add to batch
clear batch
0
use Edit clip
Ddr
Edit
Effects
Utility
I/O
Scribe
clips Graphics
P2
QShare XDCAM render
lut
576 25i 16:9
vid
aud
To configure the device set-ups, press
Edit
First
ClipSet-ups on the right of the menu area. Extra
functions display for configuration. The create box on the left places a New Set-up box
on the left side of the desktop and resets the current settings to default. If the settings
are changed, they are automatically saved in this new set-up. The rename box turns on
the soft keyboard from where the New Set-up can be given a new title. To remove a
Second Clip
Third Clip
V1 First Clip
>
> > eject
selected set-up, press delete and confirm.
A1 First Clip
Second Clip
Third Clip
14:20:50
stop
18:07 RLI
A2 First Clip
Second Clip
Third Clip
30fpsset-up name
seq outin the
00:00:10:00
00:00:40:00
in00:00:30:00
Always select a device
that is00:00:20:00
easy to recognise
new
Record, Play and Conform menus.
[<
|<
|>
> ] reverse play
<
>
Video Input Selection
sdi in A
SDI audio
3
Select
the
correct 3videoNoinput
from the scroll list before refresh
tape play
preroll:
Control RS422 Audio SDI VITC
starting
to
record
material.
tape edit preroll:
5
Port A
tc offset:of the input
0
Port B
This automatically detects play
the format
video
from the corresponding digital
remove
item
0
Port
C connections on the rear
offset:
video inputs. The names in edit
the tcscroll
list correspond
to the
panel
of the platform.
00:00:50:0
Edit Setups
duration stop
pen start
00:43:47:21
Video
dur
in For
10:34:06:24
ch 1 media
A1requires both A and B outputs from the VTR to be connected
sdi in A
8U iQs Stereo3D
out to
11:17:54:20
ch 2 pairA2
the same SDI input
on the workstation, eg A+B 1-IN respectively (or alternatively
stop
Second Clip
Third Clip
V1 First Clip
>
> > eject
none either sdi 1 in stereo or sdi 3 in stereo, depending on the
00:00:00:00
tail use
A+B 3-IN). Select
A1 First Clip
Second Clip
Third Clip
workstation IN connection.
A2 First Clip
Second Clip
Third Clip
add to batch
30fps
seq out 00:00:40:00
00:00:10:00
00:00:20:00
00:00:50:0
in00:00:30:00
For Pablo Rio and Qube, Stereo3D new
media has the A and B inputs as 0 + 1. Pablo Rio
clear batch
0
[<
|a
< 5800
| > VTR
> ] deck,
reverse play
<HD using
>
supports dual RGB and dual P (1080P). If recording Stereo
14:20:50
go
l Standby Off
6x9
00:00:10:00
edit tc offset:
Record
Play
14:20:50:21
V1 First Clip
A1 First Clip
A2 First Clip
Preroll Standby Off
sdi in A
sdi in B
l Standby Off
lay
play
<
Record and Play-out
lay
<<
18:07 RLI
Dual x2(YUV HD x2 realtime) is supported.
SDI or AES/EBU Audio Selection
I/O
Utility
dur
in
out
tail
6x9
sdi inScribe
A 3
SDI audio
The platform can record audio from the following sources:
duration stop
pen start
00:43:47:21
Video
The
audio
recorded
is
extracted from the SDI input video
SDI
Audio
10:34:06:24
ch 1
A1
data.
11:17:54:20
ch 2
A2
none
00:00:00:00
The audio recorded is obtained from the AES/EBU audio
AES/EBU Audio
www.quantel.com
I/O
lut
576 2
Edit Setups
sdi in A
input connection. The platform’s audio is also routed to the
go
AES/EBU audio output connection.
add to batch
clear batch
0
Utility
clips
Graphics
XDCAM
P2 QShare
render
tape
play scroll
preroll:
3 display
No
Control
RS422 Audio
SDIand
VITC
The
two
boxes
the available
video
audiorefresh
tape edit preroll:
5
Port Aare to be used with device
inputs.
Select the inputs
that
play tc offset:
Port B
0
set-up.
remove item
0
Port C
edit tc offset:
support–downloads–login–manuals
Scribe
clips Graphics
P2
QShare XDCAM render
2-3
Quantel
lut
576 2
Record and Play-out
V1 First Clip
A1 First Clip
A2 First Clip
30fps
new
The VTR used to record video into the Quantel platform must have identical and
synchronised LTC and VITC at all times in order for the Quantel platform to perform
correctly. The boxes on the right of the menu allow the appropriate VITC source to be
selected.
14:20:50:21
Second Clip
Third Clip
Clip
Third Clip
The blue scrollSecond
box (displaying
RS422 VITC,
RS422 LTC or RS422 Auto) configures the
Third
Clip
system to useSecond
verticalClip
interval timecode
or longitudinal
timecode from the VTR via the
seq out 00:00:40:00
00:00:10:00
00:00:20:00
00:00:50:00
in00:00:30:00
preroll:
preroll:
fset:
fset:
First Clip
VITC and LTC
Selection
3
5
0
0
[<
<
|<
>
|>
eject
>]
reverse
play
When the SDI VITC is enabled, VITC is obtained from the SDI output. With this box
disabled, VITC is obtained from the serial cable.
Select the VTR Comm Port
No Control RS422 Auto SDI VITC
refresh
When
a
VTR is connected to the Quantel platform, its
Port A No Connection
description
displays in the blue box corresponding to the
Port B DVWA500
port remove
it is connected
to (‘A’, ‘B’ or ‘C’ on the serial break out
item
Port C
cable). Select the port to assign control of the VTR to the
Edit Setups
bank
device set-up.
duration stop
pen start
preview
ff
control port.
sdi in A
Second Clip
V1 First Clip
14:20:50:21
Third Clip
The No Control
option
VTR Clip
transport controls
andClip
is intended for crash
A1 First
Clip does not provide
Second
Third
recording
material
from
the
selected
video/audio
inputs.
A2 First Clip
Second Clip
Third Clip
00:00:20:00
go
30fps
00:00:10:00
00:00:20:00
seq out
in00:00:30:00
00:00:40:00
00:00:50:00
new
When all set-ups
are complete, select the Edit Set-ups menu again to return to the main
[<
|<
|>
> ] reverse play
<
>
menu and select the required set-up from the scroll box next to the audio monitor.
VTR Characteristics
tape play preroll:
sdi in A 3
tape edit preroll:
SDI audio
cs P2 QShare XDCAM
play tcrender
offset:
edit tc offset:
7:21
6:24
4:20
0:00
Video
tape
ch 1 TheA1
ch 2
TheA2tape
none
pen start
TheControl
greenRS422
boxes
allowSDI
the
Quantel
platform to compensate
No
Audio
VITC
refresh
forPort
specific
VTR characteristics and delays in the video
A
vid aud and the
lut set576
path.
Prerolls
can be
for 25i
up 16:9
to six seconds,
Port B
offsets
remove item
Port C between +/- 10 frames.
3
5
0
0
Edit Setups
duration stop
bank
play preroll specifies the length of time the VTR prerolls before
sdi inplaying.
A
edit preroll specifies the length of time the VTR prerolls before a record to
tape starts.
go
The play tc start offset compensates for a specific fixed delay video between the VTR
and the Quantel platform when material is stored by the platform.
ch
0
The edit tc start offset compensates for a specific fixed video delay between the
Quantel platform and the VTR when playing material out to tape.
Scribe
2-4
clips Graphics
P2
QShare XDCAM render
copyright © Quantel Ltd 2001-2014
lut
July 2014
576 25i 16:9
vid
ref 2140-57-012 C
aud
Select the correct input video standard before starting to record material by using the
device settings previously configured.
The platform detects the actual aspect ratio, line rate, frame rate, bit depth and colour
space from the embedded header information in the data stream. It is then automatically
configured to allow the video to be recorded and stored in its native format.
The platform automatically detects and matches the format of the video connected to
the input, and determines whether the video needs to be interlaced or progressive. To
change this, select either interlaced or progressive from the blue scroll box. This can be
useful if the original source material is progressive but is transferred using an interlaced
tape format.
First Clip
The scroll box displaying interlaced or progressive allows material
to be marked as 4:3 or 16:9 as it is recorded.
Record Menu
14:20:50:21
When the required video and audio inputs are selected from the device settings, use the
Preroll Standby Off
Record menu to record10:08:18:07
materialRLI
into Quantel workspace.
<<
<
play
stop
>
>>
eject
V1 First Clip
A1 First Clip
A2 First Clip
sdi in A
sdi in B
30fps
new
sdi in A
SDI audio
create
rename
3
delete
Record
Play
Conform
AAF Out
Archive In
Archive Out
Import
Export
desk
00:00:10:00
[<
tape play preroll:
tape edit preroll:
play tc offset:
edit tc offset:
Clip - 001
owner
cat
tape
dur
in
out
tail
Andy
Rushes
FLOR
interlaced
16x9
00:43:47:21
10:34:06:24
11:17:54:20
00:00:00:00
Video
ch 1
A1
ch 2
A2
none
pen start
3
5
0
0
Second Clip
Second Clip
Second Clip
seq out
00:00:20:00
in00:00:30:00
<
>
|<
|>
>]
Third Clip
Third Clip
Third Clip
00:00:40:00
reverse
00:00:50:00
play
No Control RS422 Auto SDI VITC
refresh
Port A No Connection
Port B DVWA500
remove item
Port C
duration stop
Edit Setups
Record and Play-out
Video Standard Selection
bank
sdi in A
preview
00:00:20:00
go
add to batch
clear batch
0
use Edit clip
Ddr
Edit
Effects
Utility
I/O
Scribe
clips Graphics
P2
QShare XDCAM render
lut
576 25i 16:9
vid
aud
Automatic Name, Owner and Category
Before recording any material, name the subsequent clip via the name box, ensuring that
naming conventions are adopted. The first clip recorded is automatically given this name
with the numeric suffix 1, and subsequent clips increment from 1.
The owner and cat (category) boxes can also be set before recording; this automatically
sorts the material in the Clips Bin.
www.quantel.com
support–downloads–login–manuals
2-5
Quantel
Record and Play-out
Input Audio Channel to Track Assignments
Up to 16 channels of audio can be recorded and assigned to internal working tracks.
An sQ server seat has a maximum of 8 audio channels and a
workstation has a maximum of 16 audio channels.
The audio channels assigned to these tracks can be edited on the platform (for example,
using Edit) and the final output then played-out.
See “Audio Track Output Mapping” on page 2-13.
The platform accepts audio from the embedded audio stream of the SD SDI input or from
the embedded audio stream of the HD SDI input. Within each SDI data stream there are
4 groups of 4 audio channels. The platform decodes group 1: audio channels 1, 2, 3 and
4, and group 2: audio channels 5, 6, 7 and 8. Likewise the two groups can be embedded
again at output.
AES/EBU digital audio inputs and outputs are provided on some Quantel platforms.
When recording material using the Record menu, assign the required audio tracks such
as ch 1 and ch 2, from the VTR to the platform’s internal working audio tracks such as A1
and A2.
When any clip is edited in the Edit application, the audio assignments that have been
set‑up are used.
The internal audio track A1 must be assigned before A2, and
likewise audio track A2 must be assigned before A3 etc.
Input Audio Level Indication
The VU meter in the Record menu monitors the level of the incoming audio.
Control a VTR
When a VTR is connected and configured correctly, tape transport controls display in
the menu (fast rewind, step backwards, play, stop, step forward and fast forward). The
controls can be used to find the required segment of video to be recorded.
To shuttle through a clip:
1 Place the cursor in the centre of the Shuttle Active Area: a yellow diamond displays.
2 Press on the diamond and slide the cursor to the right to shuttle forward through the
VTR tape. Slide to the left to shuttle backwards through the tape.
The further the cursor is moved from the centre of the diamond, the faster the
shuttle speed is.
2-6
copyright © Quantel Ltd 2001-2014
July 2014
ref 2140-57-012 C
• Place the cursor in the Shuttle Active Area, apply pressure and move the pen in a
circular motion clockwise or anti-clockwise.
A timecode box in the menu indicates the current tape timecode. Enter a timecode in
this box and the VTR moves to that point on the tape.
When the required in and out timecodes have been established, enter them in the
corresponding timecode boxes. The current VTR timecode displays on the menu and can
be automatically placed in the in and out timecode boxes.
The Eject box next to the transport controls ejects the tape from the VTR.
Set In and Out Timecode
The in, out and dur (duration) timecode boxes are interactive. When entering the
in timecode value followed by the out timecode value, the duration value changes
accordingly. Likewise, when entering the in timecode value followed by the required
duration value, the out timecode value changes accordingly.
There are two modes of timecode entry which are toggled by pressing the <Insert> key
on the keyboard:
Overwrite mode
Insert mode
The digits entered overwrite the timecode at the cursor
position and the cursor moves right.
On entry of the first digit, the digits to the left are set to zero
and subsequent entries shift all digits to the left.
Record and Play-out
To jog through a clip:
When the in and out timecode values have been set-up, the clip can be recorded. To start
recording, press Start. To stop the recording process at any point, press Abort.
The value in the green Start Offset box is used to introduce a fixed advance or delay to
the material being recorded. This allows for delays in the video path.
Control Record Start and Stop
Material can be recorded automatically using timecode in and out values or manually
using a pen start and pen stop.
The scroll box in the menu displays tc start or pen start controls when material is
recorded:
tc start
pen start
scene select
picture
aterial is recorded when the in timecode value is met.
M
The recording process starts start is pressed.
The material is recorded when the pen is pressed in the
image area.
Clips can be captured from a playing VTR by marking in
and out points at the required points. The captured clips
can then be saved in the Clips Bin.
Still images can be grabbed from the input and recorded
into the Clips Bin or bank.
See “Record Using Scene Select” on page 2-8.
www.quantel.com
support–downloads–login–manuals
2-7
Quantel
Record and Play-out
The scroll box in the menu displaying duration stop or pen stop controls when the
recording stops.
duration stop
pen stop
The recording process stops when the timecode duration is
reached.
The recording process stops when the pen is pressed in
the image area. Without selecting pen stop, the recording
process stops automatically when the available space is filled.
When the recording process has started the clip immediately
becomes available in the library Clips Bin ready for editing or
processing.
Record Using Scene Select
To capture clips from a playing VTR:
1 Choose scene select from the scroll box (displaying tc start, pen start or scene
select).
2 Press Start. Video is only captured from the VTR if it is playing.
3 Press waiting for in to mark the current frame being captured as a valid in point.
4 Press waiting for out to mark the current frame being captured as a valid out point.
This process can be repeated as required until all clips have been marked, or when
Stop is pressed. The process also stops if the record buffer is full (approximately
80% of the total available Clips Bin space).
5 Press Stop to stop the capture. The captured clips are processed and menu boxes
determine how the marked material is saved:
take all
take edit
2-8
Saves the whole record buffer. If linked is turned off then the
separate clips are saved. If linked is turned on then a single
clip with markers is saved (including any material between out
and in point markers).
Saves only the material between the marked in and out points
(plus tails of length set by the tails box). If linked is turned
off then the separate clips (determined by the marked in and
out points) are saved. If linked is turned on then a single clip
with spliced segments (determined by the marked in and out
points) are saved.
copyright © Quantel Ltd 2001-2014
July 2014
ref 2140-57-012 C
The use Edit Clip function (available when a VTR is connected) in the Record menu
allows material to be recorded directly on to the Edit timeline. Two windows display; the
left window shows the current source video and the right window is a view of the Edit
timeline.
First Clip
<<
<
play
stop
>
>>
eject
Preroll Standby Off
sdi in A
sdi in B
14:20:50:21
V1 First Clip
A1 First Clip
A2 First Clip
30fps
new
10:08:18:07 RLI
00:00:10:00
[<
Second Clip
Second Clip
Second Clip
seq out
00:00:20:00
in00:00:30:00
<
>
|<
|>
>]
Third Clip
Third Clip
Third Clip
00:00:40:00
reverse
00:00:50:00
play
The VTR can be controlled by using the transport controls underneath the source
window.
sdi in A
SDI audio
create
rename
3
delete
tape play preroll:
tape edit preroll:
play tc offset:
edit tc offset:
Clip - 001
Record
Play
Conform
AAF Out
Archive In
Archive Out
Import
Export
dur
in
out
tail
Andy
owner
cat
tape
Rushes
FLOR
00:43:47:21
10:34:06:24
11:17:54:20
00:00:00:00
Video
ch 1
A1
ch 2
A2
none
pen start
3
5
0
0
No Control RS422 Auto SDI VITC
refresh
Port A No Connection
Port B DVWA500
remove item
Port C
duration stop
Edit Setups
bank
sdi in A
See “Control a VTR” on page 2-6. go
interlaced
16x9
preview
00:00:20:00
add to batch
clear batch
0
use Edit clip
The window on the right shows an actual view of the timeline in the Edit application. A
clip must be present on the timeline before the use Edit Clip function can be used.
desk
Ddr
Edit
Effects
Utility
I/O
Scribe
clips Graphics
P2
QShare XDCAM render
lut
576 25i 16:9
vid
aud
Record and Play-out
Record Directly to the Timeline
Recorded material from the VTR is inserted either at the current timeline cursor position,
or into a segment defined by the in and out points. Material is recorded on to the
selected timeline tracks (determined by the filter boxes V1, A1, A2 etc).
See the Timeline Editing User Guide for more details on how to use
and navigate the timeline.
Press Go to preroll the VTR to the start point, play the clip on the timeline and place the
newly recorded material on the timeline. The value next to preview determines how
much of the timeline clip can be viewed before the recording starts.
Batch Record
Use a ‘batch record’ to review and select segments from tape and record those sections
at a later time. When a VTR connection is selected, the add to batch and clear batch
boxes are visible in the Record menu.
To add an entry to the batch list:
1 Determine the required range by setting in and out points in the Record menu.
2 Enter a clip and tape name, and select the audio tracks required.
3 Press add to batch.
4 Repeat to add more entries.
www.quantel.com
support–downloads–login–manuals
2-9
Quantel
Record and Play-out
To load the selected material:
1 Navigate to the Conform menu; the batch list displays in the Conform load list view.
2 Press conform and a prompt to load the first tape displays.
The recorded clips display in the Clips Bin. The conform menu reverts to its normal
behaviour when an AAF file is dropped into it.
Record Directly into the Bank
The bank box allows clips to be recorded directly into the bank alone.
Grab Stills
The picture function under the pen start / tc start / scene select scroll box allows
still images to be grabbed from the input (using Grab), and saved in the Clips Bin or
bank.
Record 3-2 Pull-down Material
Film material shot at 24 frames per second (FPS) can be recorded using different media
and techniques. Where film material has been transferred onto 30 FPS video, two out
of each five frames in the resultant video contain information from two different film
frames. This transfer method is called 3-2 pull-down and can be recognised by the
repeating sequence of still and flickering frames.
24 FPS 30 FPS
1
1
2
2
A
3
3
3
4
4
5
5
6
A
7
6
7
7
8
8
9
9
10
11
12
A
10
11
11
12
24 FPS 30 FPS
13
1
2
Still
3
Still
4
Flicker
5
Flicker
5
Still
14
A
14
15
15
15
16
16
17
17
6
18
7
19
8
13
A
18
19
19
20
20
9
21
21
10
22
11
23
9
12
13
24
A
22
23
23
24
13
14
3-2 pull-down material needs to be converted
back to its original 24 FPS format during the
record.
15
16
17
17
18
19
20
21
21
22
23
24
To convert 3-2 pull-down material back into
24 FPS material, the correct start point (or
‘A-frame’) in the frame sequence must be
found. The A-frame is locked to the timecode
value and an offset can be applied to move the
timecode A-frame position to the correct
position in the actual 3-2 pull-down sequence.
25
The 3-2 pull-down boxes are provided to assist in locating A-frames when recording 3-2
pull-down material. These boxes display (below the tape timecode box) whenever 3-2 is
enabled and represent the still, still, flicker, flicker, still sequence. One of the boxes turns
pink to show where in the five frame sequence the current timecode is allowing for the
A-frame offset setting in the <F1> Configuration Window.
2-10
copyright © Quantel Ltd 2001-2014
July 2014
ref 2140-57-012 C
To set-up the A-frame offset for a section of tape to be recorded:
1 Turn on the 3-2 menu, jog to a timecode which is an A-frame and press the in box to
set the in point.
2 Turn off the 3-2 menu and record a short section of material at 30 FPS.
3 Review the resulting clip and scroll through it to find the A-frame.
4 Increase the offset by the number of frames the A-frame is away from 1.
The value of the A-frame offset is also applied to material played-out. If a segment of
video is taken from VTR it is placed back in exactly the same 3-2 pull-down sequence (or
cadence).
When editing to a VTR tape, it is essential that the in and out timecode values are at
A-frame boundaries. This ensures that the fields of the 3-2 pull-down sequence are
placed in their correct positions.
Play-out Material
Play Menu
Any locally saved clip can be dragged from a Clips Bin and then dropped on to the
desktop area of the Play menu. From here, the clip can be played-out and recorded onto
VTR. The Play menu is only available when using Quantel platforms.
Record and Play-out
Set up the A-frame Offset
Output Video Standard
Before playing material, select the correct output video standard. The HD or SD video
output, audio output and VTR comm port to be used are selected using a device setting
(previously configured) from the scroll boxes on the right of the menu area.
See “Device Set-up and Selection” on page 2-2.
Player Settings
The blue output format box on the right of the Application
Bar shows the specific output/play preview format
currently being used.
To change the output format regardless of the current
locking reference standard, press the box.
A pop-up menu displays the platform’s output types.
The current video output format is highlighted pink. To change a format, use the blue
scroll box to the right of an sdi out box.
www.quantel.com
support–downloads–login–manuals
2-11
Quantel
Record and Play-out
To play-out the clip as a different standard, the Quantel platform automatically changes
the resolution of the image and re-shapes any aspect ratio irregularities between the
source and target formats (as determined by the <F1> Configuration Window’s Cut or
Box selection in the System – Aspect Conv menu).
For Stereo3D media, the same resolution and frame rate are used on both active outputs;
they are locked together by using the single sdi stereo out control.
The left eye plays on the GUI and on the second stereo output both eyes play together.
The split VL/VR box on a stereo Floating Clip can be used to play-out each eye
separately.
Output Crop Settings
The Safe Area menu includes static cropping of the main video output. To access the
menu, press <Ctrl>+<F3>.
preset safe: 1 custom safe
1
HD 1080 16:9
14:9
NTSC 4:3 16:9 14:9
PAL 4:3
16:9 14:9
1.66
1.85
2.35
Academy offset
Academy offset
Academy offset
The pre-defined
output
settings
inCaption
the safe
blue boxes
and
Action
safe
Projection
aperture
Clean
aperture crop
Show centre
1920green
1080user-definable
1888 1062
90 % 90crop
%
80 % 80
%
the
output
ratio
values
(to the left
80 % 80 %
708 480
90 % 90 %
720
486
of the menu under the blue boxes) control how much
box
cut the
output image is cropped.
set defaults
By default the user-definable values are set to three commonly used values which are
effectively film camera aperture aspect ratios that define the active area of the film:
35 mm Academy Offset Standard 1.66
35 mm Full Screen Super 1.85
35 mm Academy Offset CinemaScope 2.35
Selecting the small ‘enable’ box to the right of the crop value box displays blue crop
cursors on the image (and output video if show main is enabled). Selecting the enable
box again turns it red and applies this crop value to the output video if crop main is
enabled.
An Academy offset crop can also be applied by selecting the Academy offset box to the
right of the red enable box.
The show main box displays the Safe Area box and Crop cursors on the main HD and SD
video outputs. The green numeric box to the right of the show main box sets the opacity
of the image outside of the crop area.
The crop main box crops the HD and SD video outputs to match the value of the
selected crop (the small box turns red).
Load Material
To select a clip to be played-out, choose a clip from the Clips Bin and drag and drop it
onto the VTR window on the desktop. The title of the clip to be played-out displays in the
menu area of the I/O application.
See ‘Media Bins User Guide’ for more details on using bins.
2-12
copyright © Quantel Ltd 2001-2014
July 2014
ref 2140-57-012 C
To display the following functions, tick the Audio Channel Selection
box in the <F1> Configuration Window’s Clips menu.
When clips are edited in the Edit application, the audio assignments set for recording are
used. To affect how audio plays-out, audio channels from the source video can be set-up
on each track and assigned to specific output channels (ie speakers). This is done via
‘hidden’ audio input/output boxes. Drag one of the timeline track filters (eg V1 or A1) to
the right to display these boxes, which display like this:
The scroll box on the left displays the source grouping of the clip dropped onto the
timeline, eg mono, stereo, quad etc. This can be changed (where available) by scrolling
to a new grouping, eg to split a stereo track out to separate mono tracks select mono.
Record and Play-out
Audio Track Output Mapping
This box may turn orange where the clip has mixed source grouping,
so mono set in an orange box may indicate for example, a mixed
mono/stereo source.
Grouping options are as follows:
mono
stereo
quad
8 channel
16 channel
an individual audio channel (eg 1, 2, 3, 4 etc)
a pair of audio channels (eg 1 & 2 or 3 & 4 etc)
a group of 4 audio channels (eg 1, 2, 3 & 4 or 5, 6, 7 & 8 etc)
a group of 8 audio channels (eg 1, 2, 3, 4, 5, 6, 7 & 8 or
9, 10, 11, 12, 13, 14, 15 &16)
one group of 16 audio channels (1, 2, 3, 4, 5, 6, 7, 8, 9, 10, 11,
12, 13, 14, 15 &16)
The two scroll boxes to the right control the following:
from ch...
this box displays the available source channels. With no audio
segments selected, this setting affects the whole audio track.
www.quantel.com
support–downloads–login–manuals
2-13
Quantel
Record and Play-out
2-14
Change the ‘from ch’ setting on an individual segment by
double-clicking/lassoing the segment then scrolling to a
new setting.
If the timeline audio segments are originally from mixed
channel sources, or a segment’s source has subsequently
been changed, this box turns orange (see screen shot on
the left) to indicate that the setting is not global for the
whole track.
out to ch...
t his box displays the available output (ie speaker) channels. The
output channel settings made via this box always affect the whole
track (ie an individual segment cannot be changed).
A stereo clip can be split by placing it on the timeline then rightclicking the track box (eg A2) and selecting split audio.
The following examples indicate how channels can be output:
copyright © Quantel Ltd 2001-2014
July 2014
ref 2140-57-012 C
Record and Play-out
Standalone workstations with AVIO3 or eVidIO cards support 16
channels. sQ seats support a maximum of 8 channels (ie the
maximum that the sQ Server supports).
The example shows a typical set-up
in a broadcast environment.
In this example, a mono clip of a
voice-over is placed on track A1 and
an interview placed on A2 (these
are both input from channel 1 where
the main camera microphones are
centrally placed).
The voice-over and interview are
then both output to channels 1 and 2
together.
The mono background audio (usually from an offset camera microphone via channel 2)
is placed on A3 and output to channel 1. Music input as stereo from channels 1 and 2 is
placed on A4 and output to channels1 and 2.
www.quantel.com
support–downloads–login–manuals
2-15
Quantel
Record and Play-out
Too Few/Too Many Channels
Where there are too few track channels for the selected output channels, the most
appropriate track channel is automatically duplicated. For example, a mono track output
to channels 1 & 2 places the mono channel on both channel 1 and channel 2. If a stereo
track is output as a quad (eg channels 1, 2, 3 & 4) then the stereo pair 1 & 2 also display
on channels 3 & 4.
Where there are too many track channels for the selected output channels, unused
channels are ignored, eg a stereo track output to channel 1 discards the second channel.
Enable/Disable Audio Tracks
Use the track filter boxes (A1, A2 etc) to enable audio tracks before processing (ie
copying, slipping, moving, replacing, etc). When a box is on (ie pink) the corresponding
track is affected during processing. If it is off (ie grey) the track remains unaffected. This
is useful when performing video-only or audio-only editing.
Play-out to VTR
When a VTR is connected to the system and configured correctly, tape transport
controls display in the menu (fast rewind, step backwards, play, stop, step forward and
fast forward). These controls can be used to find the required segment of video to be
recorded.
Both ‘Insert’ and ‘Assemble’ editing can be performed by selecting the appropriate option
from the scroll box. ‘Insert Edit’ mode requires that the VTR tape being recording to is
fully striped with contiguous timecode. ‘Assemble Edit’ mode enables the recording of
video onto the end of any existing material already recorded. This removes the need to
fully stripe a tape with contiguous timecode before recording onto it.
After the required in and out timecodes have been established, they can be entered in
the corresponding timecode boxes. The current VTR timecode displays on the menu and
can be automatically placed in the in and out timecode boxes.
The in, out and dur (duration) timecode boxes are interactive. The duration value is
automatically determined by the length of clip to be played-out. When entering the in
timecode value, the out timecode value changes accordingly.
The use clip timecode box sets the in and out timecode values to match those of the
clip to be played-out.
After the in and out timecode values have been set-up, press Start to play-out onto VTR
tape. The VTR window on the desktop shows the clip as it is played-out.
To stop playing-out at any time, press Stop.
The use resume offset box allows the clip to be played-out from the defined timecode
after the clip’s in point. This can be used to continue an aborted play-out without the
need to restart the whole process.
When resume offset is pressed the timecode box that displays, defines an actual tape
timecode allowing playing to resume just before the point at which it failed. Press the set
box to enter the current VTR timecode.
2-16
copyright © Quantel Ltd 2001-2014
July 2014
ref 2140-57-012 C
To preview a play-out to an existing tape:
1 Check that the monitoring is set-up to show VTR output.
2 Select preview in the Play menu. At the edit in point, the monitor switches between
playback from tape to the new material to be inserted.
Recreate 3-2 Pull-Down Material
When 24 FPS material is played-out at 30 FPS a 3-2 pull-down sequence is applied to the
video output (rather than speeding up the frame rate). The A Frm Offset value (<F1>
Configuration Window - System menu) is automatically applied to the sequence.
When inserting a clip segment back onto VTR tape it is essential that the in and out
timecode values are at A frame boundaries to ensure that the fields of the 3-2 pull-down
sequence are placed in their correct positions.
www.quantel.com
support–downloads–login–manuals
Record and Play-out
Preview of Play-Out to Tape
2-17
Quantel
Record and Play-out
2-18
copyright © Quantel Ltd 2001-2014
July 2014
ref 2140-57-012 C
Conform and AAF Out
ref 2140-57-012 C
www.quantel.com
support–downloads–login–manuals
3-1
Conform and A AF Out
Conform Offline Material
Conform Menu
The Conform menu allows all or any part of the AAF clip list and edit instructions to
be used to record material from named tapes or import files from storage devices or
network folders directly into the Clips Bin.
Material is automatically assembled into a timeline that can then be used in the Edit
application.
When file based media is imported or conformed, the original network location has its
own Clips Bin entry that is separate from originator and source timecode.
Advanced Authoring Format (AAF)
Material assembled offline can be conformed via an AAF file, which loads and assembles
all required clips and effects information into an edit for final processing.
When multilayer AAF files are conformed (eg Avid and Final Cut Pro), they are interpreted
as follows:
• The clips include cuts, dissolves, wipes, stretches and audio fades. Stretches are
assumed to be linear.
• AAF Edit Protocol effects including position scale, rotate, corner pins, opacity and
text effects can be transferred from Final Cut Pro.
Other effects’ descriptions are displayed in the Conform menu, but the effects’
parameters are not applied to the clip. For effects within layers that have multiple
inputs, for example separate rather than embedded alpha channels, all of the media
is loaded but only the first input is used to build the clip.
3-2
copyright © Quantel Ltd 2001-2014
July 2014
ref 2140-57-012 C
• Multilayer timelines nested within multilayer timelines are not supported.
Video tracks are all enabled by default; this is indicated by the numbered pink boxes in
the video tracks menu. If individual video tracks are not required to be a part of the
conform process, press on the required numbered boxes to disable them (they turn
grey).
Select an AAF File
To view and select an AAF file:
1 Select the Conform menu, then open the AAF Bin by pressing the aaf tab on the
Application Bar (this bin supports AAF, EDL and NCL files).
2 Find the AAF file from the bin or Windows browser, then drag and drop it into the
Conform window. If an EDL or NCL file is dragged, a conversion to AAF is required as
indicated by the pop-up that displays. Press confirm to convert it to an AAF.
Conform and A AF Out
• External file media referenced by filename can be loaded automatically for system
supported formats. Take care to avoid requesting tails that are not available in the
referenced files.
3 Check that ‘open aaf succeeded’ displays under the conform box.
The content of the AAF file displays in the desktop area as a clip list, with source details
such as file, tape, reel name, effect type, start frame, end frame and duration etc. The
display can be changed by selecting the options in the list display menu.
Place the cursor on the list and drag up or down to scroll through the list, and drag left or
right on column borders to increase the display width. To select a ‘group’ of entries
together in the list, press on the first item, hold the <Shift> key and then press on the last
item; all clips in between are also selected. Alternatively, hold the <Ctrl> key to select
multiple individual items.
Before pressing the conform box, set the following options:
www.quantel.com
support–downloads–login–manuals
3-3
Quantel
Conform and A AF Out
Name, Owner, Category and Seg Name
The clip details menu allows additional metadata to be entered. The name box defines
the name to be assigned to the conformed clip. Use the keyboard to type in the title or
edit an existing one.
The owner and cat (category) boxes can also be set prior to recording material into
Quantel workspace and then automatically sort the material in the Clips Bin.
The seg name scroll box is used to specify how segments in the conformed clip are
named. Select either from edit name (to use the segment number/name from the AAF
file); from rush name (to use the name of the rush clip used to make that segment); or
edit + rush name (to use the edit name followed by the rush name).
Interlaced or Progressive Material
As in the record/import menu, the scan scroll box displaying interlaced or
progressive allows material to be recorded in the required format. This is important if
progressive material has been recorded using an interlaced tape medium.
Tail Length
As in the record/import menu, the tails box determines the number of frames of
additional tails that are recorded with every clip. For example, a value of 25 adds 25
frames to the start and end of each clip.
M2 Command Stretch Method
The M2 command stretch method can be selected. The type of stretch is determined by
the following scroll boxes in the effects – stretch mode menu:
The scroll box displaying native, field or frame controls whether the stretch is
field-based or frame-based. If native is selected, the format is the same as the
material being conformed.
When stretching a clip, the interpolation process is controlled by selecting the
scroll box displaying interp (interpolate), nearest or replicate. With interp
selected, any new fields/frames are created by interpolating the nearest
adjacent fields/frames. With nearest selected, instead of creating new fields
or frame where they are needed, the nearest existing field or frame is repeated.
With replicate selected, if a new field or frame is required the last one is
repeated.
Blank Format (Text Effects)
The blank format box is used when conforming an AAF file containing text effects (as
there is no actual video input). A ‘picture’ shape needs to be specified in which the text
needs to be rendered so that it displays correctly positioned and sized. The custom
option enables the size and pixel aspect boxes.
3-4
copyright © Quantel Ltd 2001-2014
July 2014
ref 2140-57-012 C
The video tracks menu indicates the number of video
tracks in the AAF, displayed in boxes as 1, 2, 3, 4 etc.
By default all video tracks are enabled (coloured pink). To exclude a video track from
the conform press on a number box to disable it (it turns grey). If all video tracks are
disabled, only audio is conformed.
Assign Audio Channels to Tracks
The audio tracks menu allows the audio channels defined
by the AAF File to be manually patched to specific audio
tracks within the system.
Tape Name and Limit
The mapping menu’s tape name scroll box determines the content of the tape
column in the conform window, therefore affecting which rushes are used to make the
conformed clip. Select either from tape (AAF tape name); from edit name (segment
number/name from AAF file); or from cam roll (AAF camera roll required for some Avid
conforms).
A limit value can be entered for any of the tape name options described above. This
value limits the comparison of the AAF information to a specific number of characters.
For example, with a RED (r3d) file conform, select from edit name to use the file name
information stored in the AAF edit name (as the AAF file’s tape name information is
useless). However, any suffix and file extension should be ignored so that the AAF edit
name matches the originator of the RED file. Do this by specifying a limit value (usually 9
or 16 for RED files) to limit comparison of the AAF edit name and file originator.
www.quantel.com
support–downloads–login–manuals
Conform and A AF Out
Video Track Control
3-5
Quantel
Conform and A AF Out
Offset Timecode
tape
all tapes +
reel
all reels
clear
0.00
0
The mapping menu’s tape/reel offsets box displays a
pop-up menu which allows the AAF timecode of tapes and
reels to be offset to match the actual timecode of dubbed
tapes.
To apply an offset timecode:
1 To the right of tape on the pop-up, select which tape to apply the offset to from the
scroll box. Enter any frame offset values in the green numeric box. Use the + / - box
to add or subtract the offset value to the timecode.
2 To the right of reel on the pop-up, select which reel to apply the offset to. Enter any
positive or negative frame values in the green numeric box.
To clear any offset, press clear.
To close the pop-up menu, select the tape/reel offsets box again. If an offset value has
been entered, this box turns orange.
Conform Date and Time Filter
Clips Bin rushes can be selected for conforming
using their clip modified date as well as their
owner, originator and source timecode.
Select the rushes tab followed by the from
and to boxes to enable filtering from/to a
specific date. Select the date boxes on the right
to display a calendar pop-up, then select a date
and time of day. With date filtering, the owner,
originator, source timecode and modified date
must match in order for a rush clip to be
selected.
This only applies to Clips Bin rushes, not the reference clip or reference project. If the
date range does not include ‘today’ any media that is loaded by the conform process is
not found and it may repeatedly reload it.
See “Conform Using a Reference Clip” on page 3-14.
3-6
copyright © Quantel Ltd 2001-2014
July 2014
ref 2140-57-012 C
In the list display menu, the blue scroll box displaying track list, load list or edit list
changes the display of the AAF content. The column headers at the top of the main
window change depending on the selections made:
track list
load list
edit list
Use the + and - boxes at the left side of the list display to expand and
collapse video and audio track details.
Displays the clips to be loaded in tape/reel/file chronological order;
this is the order in which the clips are recorded.
Sort this list by selecting src order (ordered by source tape name and
timecode) or dst order (ordered by destination position in the final
edit). Usually, it is advisable to use src order when loading media from
tape so that the tapes are accessed linearly. However, when loading
media from files, it is useful to load the media in the order that it
displays in the clip, so that work can start on the beginning of the edit
as soon as possible.
When load list - merge is enabled, the system conforms video and
audio from a single source and merges neighbouring ranges. When it is
disabled, the platform conforms video and audio from separate video/
audio sources and without merging neighbouring ranges.
Displays the clips to be loaded in the form of an edit decision list (EDL).
In this mode various aspects of the list can be changed.
Modify AAF Metadata
The following options are available in the menu area, depending on whether track list,
load list or edit list is selected. These options do not affect the original AAF file:
grey
delete
copy
new tape
new reel
www.quantel.com
Conform and A AF Out
AAF List Display Modes
The grey box on the right of the menu area gives access to the
selected or all files/all tapes boxes. The selected box allows the
currently highlighted section of the AAF to be replaced with grey; and
the all files/all tapes boxes allow all missing media required by the
AAF to be replaced with grey. This can be used if a specific file/tape
referred to in the AAF file is not available.
The delete box on the right of the menu area removes the currently
highlighted part of the clip list so that it is not used as part of the
conform process.
The copy box on the right of the menu area copies the currently
highlighted part of the clip list to the desktop and discards the original
full clip list.
With edit list - new tape selected, a new tape is inserted in the AAF
list. This can then be used to replace an existing one. The new tape can
be given a name and frame rate which is entered into the list when end
is pressed.
With edit list - new reel selected, a new reel is inserted in the AAF
list. This can then be used to replace an existing one. The new reel can
be given a name, frame rate, film format and film stock details which
are entered into the list when end is pressed.
support–downloads–login–manuals
3-7
Quantel
Conform and A AF Out
Set Tape, File or Network Conform
In the list display menu, the scroll box displaying file info/tape info/film info and the
box to the right displaying tape media/file media should be set depending on the type
of conform to be undertaken. These options affect the menu options that display when
Conform is pressed.
With a tape conform, material is loaded directly from named tapes. Select tape info and
tape media from the scroll boxes.
With a file conform, material is loaded directly from the local drive or any physically
attached storage drives/devices. Select file info from the first scroll box. This option
uses the file path information in the AAF file to locate each file. The file name must match
the AAF but the location may be different. Identify where the first file is, then I/O can
locate other files in this directory automatically.
With a network conform, material is loaded from network folders directly into the Clips
Bin. Select tape info and file media. This option uses the tape information in the AAF
file to locate the files regardless of file name. All the files in a directory are searched in
order to find files with the appropriate originator and timecode.
To undertake a network conform using NCL or AAF files that contain keycode information,
select film info from the first scroll box. Media is now selected based on keycode rather
than tape name/timecode or file name/offset.
See “Start the Conform (network media)” on page 3-11.
Before starting the conform, set a target folder for conformed media
by pressing on the clips tab to open the Clips Bin. Now create/
select a destination folder for the conformed media then press set
project on the right. The folder now turns orange to indicate that it
is the target.
Start the Conform (tape media)
With a tape conform, material is loaded directly from named tapes. Select tape info and
tape media from the scroll boxes in the menu. When Conform is pressed, the following
menu displays and a prompt to choose the first tape containing material detailed in the
AAF file displays.
3-8
copyright © Quantel Ltd 2001-2014
July 2014
ref 2140-57-012 C
The blue ‘tape’ scroll box on the left allows the source tape to be selected from the list.
Variable Frame Rate
The variable frame rate box must be ticked for Panasonic VariCam media so that only
the flagged frames from the tape are recorded. For this to function, Variable Frame
Rate Mode must be ticked in the <F1> Configuration Window’s System menu.
Eject Tape
The eject tape scroll box is for selecting whether the system ejects the tape
automatically, or whether it is to be done manually.
Rush Prefix
The rush prefix box allows a prefix to be specified for naming the rush clips that are
recorded during the conform process. The rush prefix defaults to rush but can be blank.
Rush Name
The rush name scroll box allows rushes to be named using timecode or seg name (the
name used in the edit list).
Load Material
To begin loading material from tape, insert the specific tape into the VTR and press ok.
Conform and A AF Out
Select Tape
This confirms the current menu settings and continues with the conform process. During
this process, the clips available in the system are displayed and prompts display for the
different tapes listed in the AAF list. When all clips have been loaded, the edit displays in
the Clips Bin.
The cancel box aborts the conform process.
The ignore tapes box continues with the conform process without loading material tape.
The platform loads material from the timecode position defined in
the AAF clip list.
www.quantel.com
support–downloads–login–manuals
3-9
Quantel
Conform and A AF Out
Start the Conform (file media)
With a file conform, material is loaded directly from the local drive or any physically
attached storage drives/devices. Select file info from the scroll box in the menu.
When Conform is pressed, the following menu displays. This option uses the file path
information in the AAF file to locate each file. The file name must match the AAF but the
location may be different. Identify where the first file is, then I/O can locate other files in
this directory automatically.
Below the ‘Please locate file:’ prompt, select the required media by either pressing the
folder icon then selecting a path (press <Ctrl> + the folder icon to access the Windows
directory browser); or by typing a path in the text field; or by pressing the arrow box on
the right to select a previously used path.
Most functions in this menu are described in ‘network media’ conform.
See “Start the Conform (network media)” on page 3-11.
However, this menu also provides the following options:
If ticked, the ignore missing files tick box ensures that if a missing file is encountered,
user intervention is not required to restart the conform (so the conform process can be
left to run unattended).
The ok box confims the current menu settings and continues with the conform process
by searching for the required material. Check that ‘conform succeeded’ displays. Clips
are placed in the Clips Bin and display under the clip column in the Conform window.
The cancel box aborts the conform process.
With a file conform, a list of files that need to be loaded are identified, but one or more of
these files may not be available. Pressing ignore this skips over the file that is currently
displayed. Pressing ignore files ignores all remaining files that need to be loaded. Then,
either choose to load media by selecting tape info or film info; or can conform the clip
as it is (inserting blank for ignored sections).
3-10
copyright © Quantel Ltd 2001-2014
July 2014
ref 2140-57-012 C
With a network conform, material is loaded from network folders directly into the Clips
Bin. Select tape info and file media from the scroll boxes in the menu. Alternatively, to
undertake a conform using NCL or AAF files that contain keycode information, select film
info from the first scroll box to select media based on keycode.
See “Keycode Conform (NCL)” on page 3-14.
When Conform is pressed, the following menu displays and prompts to choose the
parent folder/directory that contains all the material detailed in the AAF file display.
Select Media
Below the ‘Please choose source folder...’ prompt, select the required media by either
pressing the folder icon then selecting a path (press <Ctrl> + the folder icon to access the
Windows directory browser); or by typing a path in the text field; or by pressing the arrow
box on the right to select a previously used path.
Conform and A AF Out
Start the Conform (network media)
The media must be held in network folders that represent the tape or film reels referred
to in the AAF file. The tape information in the AAF file is used to locate the files regardless
of file name. All the files in a directory are searched in order to find files with the
appropriate originator and timecode. The system assumes that all media folders are held
in a single main folder. Media can also be ‘soft-mounted’.
See “Soft Mount Option” on page 3-24.
Specific file types, including RED, CIN, DPX, AVI, MOV etc, can be searched for during
the conform process by making a selection from the all files scroll box. If all files is
selected, the filter is disabled and all file types are found.
Merge Sequences
The merge sequences box that displays to the right of all files, merges sequences that
have contiguous timecode/keycode but non-contiguous names, or are from separate
folders before they are loaded.
www.quantel.com
support–downloads–login–manuals
3-11
Quantel
Conform and A AF Out
Select Image Size
Files containing a specific image size can be searched for during the conform process by
making a selection from the all sizes scroll box. With all sizes selected, all image sizes
are found.
The scroll box below all sizes allows the keycode format of the keycode in the file header
to be specified, so that the keycode is interpreted correctly.
Timecode From
The ‘timecode from’ box below the keycode format box specifies where the source
timecode information is found:
timecode from file reads the timecode from the file header (if present).
timecode from name converts the frame number in the filename into a
timecode.
timecode 00:00:00:00 assumes that all rushes start at a zero timecode.
Originator From
The ‘originator from’ scroll box specifies the location of the material where the originator
information is found:
originator from file reads the originator from the file header (if present).
originator from name takes the originator from the file name either with or
without its extension (controlled from the originator with extension tick
box). With Arri Alexa ProRes QuickTime files that have names in the form
of A060C001_101006_L1QF.mov that have an offline edl created using this
filename, then originator from file cannot be used as the originator in the
file header is read as A060L1QF (formed by the start and end of the filename).
Consequently these cannot be conformed and so the originator from name (ie
the file name) needs to be used.
originator from folder uses the folder name as the originator.
If originator from folder is selected, the originator depth value determines
how many levels of sub-folders below the selected folder are used to set the
originator.
The system assumes that all media folders are held in a single main
folder.
Rush Prefix
The rush prefix box allows a prefix to be specified for naming the rush clips that are
recorded during the conform process. The rush prefix defaults to rush but can be blank.
3-12
copyright © Quantel Ltd 2001-2014
July 2014
ref 2140-57-012 C
The rush name box allows the rushes to be named using timecode, seg name (the
name used in the edit list), file root, or folder which includes the rush name depth
value determining how many levels of sub-folders below the selected folder is used to set
the rush name. The file root selection was previously used for removing number suffixes
from file sequences (eg DPX etc), so that the resulting rush name was the same as the
file root. However, with frequent conforms from RED and Cineform (MOV and AVI) files
and as these are no longer ‘sequences’, the full file name is required to be the rush name.
The trailing number and ‘ ‘/’.’/’-’/’_’ are only removed from the file name if the file is from
a sequence (eg DPX not RED). So A002_C006_901226_001.R3D are named
A002_C006_901226_001 (not A002_C006_901226).
Exclude Folders
The exclude folders box allows folders that contain the specified text in the folder name
to be specified and ignored from the search. This is useful if film has been re-scanned
into a duplicate folder that can then be ignored during the search.
Display Options
Select the ‘options’ box, and a format, to display a pop-up to enter decode options for this
format; these vary depending on the format. When conforming using QuickTime files, an
ignore matte tick box displays when mov options is selected.
The resize options function allows any file type to be resized to either a list of presets
or a custom size (4K is the largest ‘canvas’ size that is supported for processing on a
Quantel workstation). The resize function is also available in the pop-up import menu
when a clip is dropped from a bin onto the desktop.
Conform and A AF Out
Rush Name
The fps scroll box (to the right of resize options) determines how file sequences are
interpreted, eg a sequence of dpx files may either be interpreted at 25/30 or 50/60 FPS.
This selector is ignored for files that ‘know’ their own frame rate.
Tick the soft mount box to keep media on third party storage without importing it into
Quantel workspace.
See “Soft Mount Option” on page 3-24.
The ok box confirms the current menu settings and continues with the conform process.
The system searches the parent folder and its sub-directories for the required material.
Check that ‘conform succeeded’ displays. Clips are placed in the Clips Bin and are
displayed under the clip column in the Conform window. Soft-mounted clips have yellow
timecodes (whereas locally held clips’ timecodes are grey). If files are missing, the clip
column field remains blank; missing files need to be imported from their location.
The cancel box aborts the conform process.
The ignore network box continues with the conform process without loading material
from the current folder.
www.quantel.com
support–downloads–login–manuals
3-13
Quantel
Conform and A AF Out
Keycode Conform (NCL)
Imported media can be conformed into an edit using an NCL file (negative cutting list;
created by various products such as Avid FilmScribe) or from AAF files that contain
keycode information.
Film material may be scanned and stored on a SAN (storage
area network) as a series of Cineon or DPX files with
embedded keycode data. An NCL is produced that makes
reference to the same keycode as the scanned files. This
list may be used to import the necessary files into the
system as clips.
1 Navigate to the NCL (or AAF) in the AAF Bin. NCL files have a TXT extension.
2 Drag the NCL from the bin into the main window and on the convert ncl to aaf
pop‑up enter the film format information including frames per second (typically
24.00), film type and perforation spacing. This information is used to determine
the correct keycode/film frame relationship of the material. Set either tabbed or
columnar from the list box (to match the format used to create the NCL) and if
required tick the list has tape/tc box (if the NCL contains tape name and timecode
columns).
3 Press confirm when finished.
4 In the Conform — list display menu, select film info from the first scroll box to
select media based on keycode. Set any other required options.
See “Start the Conform (network media)” on page 3-11.
5 Press Conform to build the edit and create a new entry in the Clips Bin.
The keycode conform is only designed to conform data from telecine (with 2-3 pull down
turned off) and not for material that has been transferred via tape.
Transitions and segments marked in the NCL as ‘optical’ are replaced with black in the
conformed edit. These can then be replaced as required.
Stretched Clips
If a conform has been performed once and several clips are stretched, then any
subsequent conforms requiring the same stretches use the originally stretched rush
instead of repeatedly stretching clips.
Conform Using a Reference Clip
The Conform menu allows settings from a reference clip to be transferred to a new
version of the clip. Additionally, the media from an existing edit can be replaced by newer
(eg dustbusted or colour-corrected) media held in a reference project folder in the Clips
Bin.
3-14
copyright © Quantel Ltd 2001-2014
July 2014
ref 2140-57-012 C
Use a Reference Clip/Project for Versioning
1 Drag and drop the AAF file into the Conform window. This can be the original AAF
used to conform the edit, or a newly created AAF (made from the edit, if any edit
points have been moved or if any additional shots have been added since the initial
conform).
2 If required, drag and drop the reference project folder from the Clips Bin into the
Conform window. The reference project is the folder that contains the newly loaded
media (its path displays under the ref project tab and the ‘ref project’ text now turns
orange). To clear the reference project, press clear. Only single segment clips within
the reference project with the correct originator and source timecode are used.
The source timecode modified flag and owner are ignored for clips in the reference
project. Clips within the reference project are used in preference to all other media
in the system.
3 If required, drag and drop the reference clip from the Clips Bin into the Conform
window (its name displays under the ref clip tab and the ‘ref clip’ text now turns
orange). To clear the reference clip, press clear. The reference clip is the existing
version of the edit being conformed. This can be used to provide media and settings
for the new version of the edit.
If rush is selected from the scroll box, the rushes in the reference clip (including the
tails) are available for providing media and/or settings during the conform process.
If seg is selected then only the media and/or settings that display within the
reference clip segments (not the tails) are available during the conform process.
Conform and A AF Out
The transfer of settings currently only applies to single layer effects, for example, colour
corrections and DVEs.
If the new AAF file has extended any of the segments in the edit, select rush so that
the tails of the reference clip are available for use. However, if multiple segments in
the reference clip use different parts of the same rush then select seg to avoid the
problems caused by duplicate rushes. If media is selected, the media and settings
for clip segments that are the same length or shorter are supplied by the reference
clip. If settings is selected, the settings for all clip segments (whether longer or
shorter) are supplied by the reference clip if present.
If the dst box is selected, a reference clip (previously graded sequence with source
timecode), with a single destination tape name and timecode is used. When the
reference clip is dragged into the window, input the tape name and first frame of
destination timecode in the boxes underneath.
See “Use Destination Timecode” on page 3-16.
www.quantel.com
support–downloads–login–manuals
3-15
Quantel
Conform and A AF Out
4 Press Conform to start the process.
If media is not available from the reference clip or project, media from the Clips Bin is
used (ie single segment clips with correct originator, source timecode and owner). If
there are multiple clips with the same originator and source timecode, the ‘owner’ should
be used first to select which clips are to be used. If the required media has not been
found, it is requested as part of the conform process.
Only clips with the correct owner and unmodified source timecode
are used at this stage (timecodes with a ‘:’ separator rather than a ‘.’
separator, eg ‘00:00:00.00’ not ‘00.00.00.00’).
Use Destination Timecode
When an edit is output from the system to tape, the resultant tape has the destination
timecode instead of the source timecode (or keycode) of the original media. If the tape is
used for offline work, an EDL or AAF made by the offline system relates to the destination
timecode.
When using the EDL or AAF within the system, the destination timecode is used to pick
up the original material from the original edit that was output to tape.
To use this method of conforming, the edit used to make the offline tape must be used as
the reference clip. To use the destination timecode as the reference, select dst from the
scroll box displaying rush, seg or dst.
EDL to AAF Conversion
EDL files (.edl extension) can be converted directly to AAF format (.aaf extension) in the
Conform menu. Select EDL files for conversion to AAF either from the AAF Bin on the
Application Bar or from the Windows directory browser.
Drag an EDL file from the bin or browser out onto the main conform window and the
convert edl to aaf pop-up displays. Conversion parameters can be set up to match
those of the EDL (the EDL file does not contain the specific video format information
required to make the appropriate conversion to an AAF). When the set-up is complete,
press confirm to start the conversion process (or the ‘X’ in the top right of the pop-up to
cancel the process). When complete, the AAF file displays in the AAF Bin with the same
name as the original EDL file:
The type — edit list box converts the EDL to AAF as normal.
3-16
copyright © Quantel Ltd 2001-2014
July 2014
ref 2140-57-012 C
The type — dest edit box converts the EDL to AAF using just the destination timecodes
and keeping transitions but disregarding stretches. This is useful for cutting-up a clip that
has been laid out to tape to grade across the transitions.
Selecting fps allows the frame rate of the EDL to be selected and allows EDLs that have
been made at one frame rate, eg where 3-2 has been added or Varicam material used for
offline, to be converted to the correct frame rate for online.
The ignore B-rolls box if ticked, ignores any material that is held on a B-roll and refers
back to the original source.
When use file comments is ticked, file (not tape) information is used in the clip name
field of an EDL. This is often required when conforming subtitle EDLs. The ‘FROM CLIP
IS A STILL’ comment is read; so only one file is loaded for each event (not the whole
sequence of files).
With type — dest cut or dest edit selected, all the tape name entries in the EDL file are
changed to ‘SOURCE’. The Source TC and Originator ware then used by the system to
make references to these clips. To use this option:
1 Record the Clip from tape (usually from 01:00:00:00 or 10:00:00:00) to match the
timecode in the EDL/AAF file.
2 In the Clips Bin, select the recorded clip and use the set originator function to set
the originator to ‘SOURCE’. The system now references the recorded clip as both the
timecode and the originator match.
Conform and A AF Out
The type — dest cut box converts the EDL to AAF using just the destination timecodes
but disregarding stretches and transitions. This should be selected if the EDL references
pre-edited material assembled as a single clip on a single source tape.
3 Press confirm to start the conversion process. When complete, the AAF file displays
in the AAF Bin with the same name as the original EDL file. When the EDL has been
converted to AAF and has been conformed, the recorded clip is cut into segments
according to the cutting list.
CDL Information
CDL (Colour Decision List) comments from an EDL can be read and the information
converted to AAF (as defined in the AAF Effects Protocol AS-02). The following is an
example of the format currently supported:
001 001 V C 00:00:01:04 00:00:01:05 01:00:00:00 01:00:00:01
*ASC_SOP (1.282822 1.279681 1.214705)(0.018875 -0.045064 -0.053974)
(1.057500 0.934143 0.957396)
*ASC_SAT 1.000000
These EDLs can be produced by third party grading systems or the information produced
manually. The XML, ALE and FLEX CDL formats are not currently supported.
The Conform menu reads the CDL information from the AAF file and creates an
unrendered MLT FX colour effect (this is not applicable in the Effects application).
www.quantel.com
support–downloads–login–manuals
3-17
Quantel
Conform and A AF Out
The Quantel colour effect that most closely matches the CDL formula is the ‘classic’
contrast/gamma/brightness effect:
CDL Quantel
slope contrast
offset brightness
power gamma
sat saturation
Contrast/gamma/brightness menu are normally enabled from the <F1> Configuration
Window’s Lift/Gain colour setting. However, when conforming the EDL, the Lift/Gain
colour setting is ignored (although if a cascade is added to the conformed clip, the new
cascade reverts to the current <F1> setting).
The colour effect is tagged as a Quantel contrast/gamma/brightness effect and also a
CDL colour effect because there are the following differences between them:
• CDL effects are applied to the raw data values (ie without linearising log data).
• CDL values are clamped to be within the range 0-1.
• CDL saturation is applied after slope/offset/power, not before.
The resultant colour effect has live parameters that can be adjusted in the MLT FX colour
menu; it is not stored as a cube.
Drag the EDL containing the CDL comments
onto the Conform desktop and convert it to
AAF via the pop-up. The effects column should
now display Colour Effect as in the screen shot
on the left.
Set the owner and name etc, then press Conform. When the conform has finished, drag
and drop the unrendered clip from the Clips Bin onto the timeline in the Edit application.
Open MLT FX then select the colour menu. The contrast/gamma/brightness menu
should display automatically (regardless of <F1> setting). Any values for contrast,
gamma, brightness or saturation have now changed accordingly for each clip segment.
These values can be changed, if required, and/or saved in the Settings Bin to transfer to
other media.
3-18
copyright © Quantel Ltd 2001-2014
July 2014
ref 2140-57-012 C
Using the Conform menu, STL files can be converted to AAF files with subtitles. This
means the metadata from the STL file is conformed into a text-only timeline that is ready
for layering above the video.
To convert an STL file to an AAF:
1
ocate the .stl file from the media bin and drag it into
L
the Conform menu. A pop-up box displays.
2
et the font type, height, face colour, edge size and
S
colour. (The font height is a percentage based on the
effects size in the bottom-left corner of the Conform
menu (see previous diagram).
Conform and A AF Out
STL to AAF Conversion with Subtitles
For non-western subtitles, select the appropriate font type in order
for the subtitles to display correctly in the conformed clip.
3
Press confirm.
The STL file is then conformed with the metadata and displays in the Conform window.
The two main file types that are supported are Spruce and EBU. These are automatically
detected. If some of the information is missing from the STL file, the file type may have to
be manually specified using the blue scroll box to the right of stl type.
For Spruce STL files which are in Unicode (UTF-8 or UTF-16) a code page does not need
to be selected and can be left as System default.
www.quantel.com
support–downloads–login–manuals
3-19
Quantel
Conform and A AF Out
or EBU and 8-bit ANSI STL files that are not in
F
Unicode, select a code page from the blue scroll
box. Supported code pages include Western
European, Japanese (Shift-JIS), Chinese
(Simplified), Chinese (Traditional), Korean (Hangul
Code), Korean (Johab), Vietnamese, Central
European, Cyrillic, Greek, Turkish, Hebrew, Arabic
and Baltic.
When using non-western version of Windows, there is no need to
select a code page.
RED Conform
Set <F1> Options
RED Timecode
The RED camera records two different timecodes: ‘Absolute’ code (time of day) and ‘Edge’
code (which starts from a fixed point for each magazine eg 10:00:00:00).
The Red timecode box is set to preferred by default. This uses whatever was flagged
at the time of shooting. To override this, set to absolute or edge, if the incorrect code is
found in the files.
For Red preview option see ”RED Soft Mount Preview” on page
3-25.
Conform Inserts Underscore
Various camera types name their files using the format AxxxCxxx or Axxx_Cxxx. RED
file names contain 16 characters whereas EDLs are typically limited to 8-character tape
names. Some systems force the RED file name into the EDL tape name by removing
the last 7 characters and remaining underscore (eg the RED file A001_C001_1234XY
becomes A001C001). To conform an EDL like this, the underscore in the middle of
A001C001 needs to be re-inserted.
• Tick the Conform inserts underscore tick box to insert an underscore into the RED
file name automatically.
3-20
copyright © Quantel Ltd 2001-2014
July 2014
ref 2140-57-012 C
This function inserts underscores; it does not replace spaces with
underscores (as for Import and Export).
Select the AAF file
• In the Conform menu drop the AAF file onto the desktop.
Set the Conform Type
EDLs and AAFs usually reference the RED media using tape name and timecode, so it is
possible to do a ‘network conform’ using this tape name and timecode information. Only
referenced parts of the r3d files are loaded.
• In the list display menu, select load list, tape info, file media.
The load list selection is not essential, but it is the easiest way to
see what is found and imported.
Set Tape/File Name Extraction
1 If the tape/file names need to be extracted from the EDL clip name comment
because the EDL tape/file name is not valid, the tape name — from edit name box
should be selected from the mapping menu.
Conform and A AF Out
This can then be matched to the RED file names
by setting the Conform menu’s tape name –
limit box to 9.
2 Select the limit box and enter the appropriate value in the green numeric box next
to it – usually 9 or 16, but it can depend on the length of name in the EDL. This allows
support for a variety of different offline EDLs and AAFs. Set the Conform inserts
underscore tick box from the <F1> Configuration Window.
See “Set <F1> Options” on page 3-20.
Set up the Conform
1 Press the large Conform box.
2 At the ‘Please choose source folder...’ prompt, select the folder icon and select
the directory that contains all the r3d files. This can be as high up the folder level
hierarchy as required, but a ‘higher’ level selection results in a wider and therefore
longer search.
3 In the all files blue box, select r3d as the filter. If this is not selected, the search
process searches for all valid types, and takes longer.
4 Select timecode from file and originator from file using the blue scroll boxes. Set
the rush name and the rush prefix if required (eg ‘Red’).
www.quantel.com
support–downloads–login–manuals
3-21
Quantel
Conform and A AF Out
Set General and Colour Options
1 Select r3d options. A pop-up displays with General, Colour and FLUT tabs. The
settings under the tabs modify the actual image data (ie essence) as it is imported
into the system during the conform process which affects the speed. On any tab,
with override file settings set to none, actual file metadata is used so that this
information can be transferred as part of the conform for each shot. With override
file settings set to all, the same user-defined settings are applied to all shots that
are conformed.
2 If required, select the General tab for decoding set-up:
override file settings
General Colour
force to 10 bit
include audio
Decode mode
Colour version
Gamma curve
Colour space
Image detail
OLPF
Denoise
HDR
Full res. High
Original colour science
REDspace
REDspace
High
Off
Off
reset from file
force to 10 bit
include audio
Decode mode
Colour version
Gamma curve
Colour space
Image detail
3-22
all
FLUT
with this tick box ticked, the image data is truncated to 10-bit as
it is imported.
with this tick box ticked, any associated audio with the conform
also imported.
sets the resolution of the image data (essence) that is decoded
as part of the conform. The default setting is Full res. High
which decodes the full resolution image data. The other settings
reduce the size of the image by discarding data: Full res High
(4096 × 2048); Half res High (2048 × 1024); Half res Medium
(2048 × 1024); Quarter res Medium (1024 × 512); Eighth res
Medium (512 × 256).
FLUT colour science is associated with RED ONE camera
firmware build 30. All clips are decoded with this new colour
science by default. To use the older colour science for older clips,
select original colour science.
a gamma curve can be applied to the image. It is set to the
setting used at the time of shooting (eg REDspace, linear,
REDlog, REC.709). This setting can be changed before import, if
required.
this is the colour space to output the image in. It is set to the
setting that was used at the time of shooting (eg REDspace,
Camera RGB, REC.709). This setting can be changed before
import, if required.
sets the sharpness of the image. The options are low, medium or
high (where the image data is not processed).
copyright © Quantel Ltd 2001-2014
July 2014
ref 2140-57-012 C
Denoise
( optical low pass filter) sets the focus of the image. The options
are low, medium, high and off (the default where the image
data is not processed).
applies a noise filter to the image. The options are minimal, mild,
medium, strong, maximum and off (the default where the
image data is not processed).
3 If required, set the parameters in the Colour tab which allows a primary grade to be
applied to the image data during import as part of the conform.
4 If required, set the Shadow and FLUT parameters from the FLUT tab.
5 If required, set the HDR Blend and HDR Bias in the HDR tab.
Set Resize Options
• Select resize options if required.
Choosing an option from the resize to scroll box sets the resultant size for the imported
image data. The default setting is same as source file and with this selected, decoded
size images are imported.
Conform and A AF Out
OLPF
There are a range of other formats that can be selected including a custom sizing pop-up
(see screen shot), 4K, 2K, HD and SD with different aspect ratios and pixel shapes. With
these selected, the resolution of the image is downsized (ie interpolated then resized)
using Quantel hardware.
Start the Conform
• Either enable or disable the soft mount box, then start the search for files and the
conform by selecting the large ok box. Check that ‘conform succeeded’ displays.
Clips are placed in the Clips Bin and are displayed under the clip column in the
Conform window. Soft-mounted clips are displayed with yellow timecodes (whereas
locally held clips’ timecodes are displayed in grey). If files are missing, the clip
column field remains blank; missing files need to be imported from their location.
www.quantel.com
support–downloads–login–manuals
3-23
Quantel
Conform and A AF Out
Soft Mount Option
R3D, DPX, P2 and XDCAM media can be soft-mounted. With RED
media the timeline and preview functions can also be used.
If required, before starting the conform, the soft mount function can be used to enable
media to be viewed, edited, conformed and have effects applied to it on third party
storage, without having to import media into Quantel workspace. ‘Soft-mounting’ is an
immediate process allowing clip changes to be made and viewed instantly.
The Import and Conform menus both display a soft
mount tick box in the left of the menu area.
When the soft mount box is ticked, the media is ‘soft-mounted’ where it is (SAN, NAS,
USB drive etc), instead of importing or conforming the media into the Quantel workspace.
Any soft-mounted media is indicated in the Clips Bin with
yellow icons and in the Conform menu’s clip column in
yellow.
A yellow bar on the Edit or MLT FX timeline indicates where a segment uses remote
media. This includes soft-mounted R3D, DPX, P2 and XDCAM media.
In the <F1> Clips menu, this yellow bar can be disabled by
deselecting Remote Media Indicator.
Soft-mounted media can be edited, graded etc in MLT FX in the same way as any other
media, but it is at preview resolution and not the full render/localise resolution. If
soft‑mounted media is rendered, only the rendered frames are written to the local
workspace. If media needs to be re-edited and its history accessed, the original media
needs to be available online or the original rushes localised first.
Media can be localised from the Clips Bin, Floating Clip or timeline. Localised clips
display in the Clips Bin with white icons.
The DPX soft mount function does not currently have the lower resolution preview mode
that RED has and 2K DPX sequences may not playback in real-time regardless of network
bandwidth.
DPX files that have a horizontal resolution not divisible by eight,
contain an alpha channel or are not part of a numbered sequence
cannot be soft-mounted.
All soft-mounted media can be exported as QuickTime, WMV, or
other file sequences without having to localise it first. However if
the media has any unrendered history, this must be rendered first
before exporting.
3-24
copyright © Quantel Ltd 2001-2014
July 2014
ref 2140-57-012 C
When RED media is soft-mounted, all the tails are available and the decode settings are
available live on the Edit application’s timeline by right clicking or pressing <Alt> and
tapping with the cursor. Select r3d settings from the pop-up. This menu reflects the r3d
options in the Import and Conform menus.
By default, only the currently selected timeline segment is adjusted. To adjust multiple
segments simultaneously, first draw a lasso over them from top-left to bottom‑right (they
highlight yellow) or press <Shift> and press on each segment.
The output updates whenever the values are adjusted. However, the Decode mode only
affects the media resolution and quality when it is either rendered or localised into the
Quantel workspace.
A single soft-mounted clip or edit can exist in the library with several different colour
settings. The r3d decode mode can be adjusted live on the timeline when effects are
applied both in MLT FX and Edit.
This allows for optimal balance between the r3d decode mode and the effects or colour
settings applied in MLT FX.
Sizing changes can also be made from the Edit timeline before localisation. Right click or
press <Alt> and tap with the cursor, and select r3d size from the pop-up.
This menu reflects the resize options in the Import and Conform menus. If no RED
Rocket card is installed, these changes are reflected live on the timeline first, whereas if
a RED Rocket card is installed, the sizing changes only affect the media after it has been
localised.
Conform and A AF Out
RED Timeline Functions
RED Soft Mount Preview
The <F1> Configuration Window has a Red preview scroll box (for playback preview
only) which controls playback performance by determining quality versus playability. This
menu does not affect how the media is decoded when localised.
WITH RED Rocket Card
With a RED Rocket card installed, this menu
references the sizes based on the current
output settings (set from the blue output format
box on the bottom-right of the Application Bar)
on the workstation.
For example, with the output set to 1920 ×1080 and Rocket full selected in the <F1>
Configuration Window, the preview images are full HD images. If Rocket 1/2 is selected,
the preview image size is 960 × 540.
These are the image sizes that the RED Rocket card sends to the Quantel platform
and are for preview playback only. They do not affect and are not affected by the I/O
application’s Decode mode resolution/sizing settings.
www.quantel.com
support–downloads–login–manuals
3-25
Quantel
Conform and A AF Out
WITHOUT RED Rocket Card
With no RED Rocket card installed, RED media
can still be soft mounted and played back in
real-time, but at a lower preview resolution.
The Red preview setting sets the maximum
decode resolution of the RED media that is
used for preview.
For example, for 4096 × 2048 media with the decode mode set to half res (2048 × 1024),
the Red preview set to 1/4 res and the output size (from the blue box on the
bottom‑right of the Application Bar) set to HD (1920 × 1080), the media is previewed at
quarter res (1024 × 512). If the Red preview is then set to full high, the media is actually
previewed at half res (2048 × 1024), as the preview res is scaled down to match the
output size.
SI-2K and Phantom Conform
Silicon Imaging or Phantom camera files can be confirmed in a similar way to the steps
described in the ‘RED Conform’ section. Select cineform options or phantom options
from the scroll box, navigate to the directory that contains all the AVI or MOV files
(containing CineForm data) or CINE files (Phantom) and ensure that the relevant format is
selected as the filter. Only the part of the file required is decoded.
The enable 3D file settings tick box
determines whether the 3D settings
within a CineForm file are applied
when the file is imported (eg
horizontal flip of one eye).
The phantom (CINE) options menu displays the same controls as those in the Import
menu.
Stereo 3D Conform
It is possible to conform from single HDCAM SR tapes containing stereo rushes to create
stereo conformed clips and have modified archive to allow these clips to be archived with
‘minimum media’ (ie the archive refers to the source tapes).
Stereo segments are created automatically if the corresponding
sources are stereo ie Cineform or stereo tape deck.
The edit may be modified before it is archived (eg VL and VR may be swapped on a stereo
clip). To allow the minimum archive to work, stereo rushes are now always recorded with
a -VL or -VR suffix appended to the originator of the VL and VR tracks. This is visible on
the timeline but hidden in the Clips Bin.
3-26
copyright © Quantel Ltd 2001-2014
July 2014
ref 2140-57-012 C
Stereo clips can be used as references during
the conform process.
To do this, drag a clip from a bin onto the Conform main window and it is added as a
reference into the same area as a mono reference. Then choose whether to use the
settings from both eyes or either eye from the VL/VR scroll box.
Save Decode Parameters
Settings Bin Functions
From the Conform menu, RED, Phantom (CINE)
and Cineform (AVI or MOV) file decode settings
can be saved in the Settings Bin. They can then
be transported by archiving them with a
project. To recall parameters, drag the setting
from the bin into the file/network box in the
Conform menu area.
www.quantel.com
support–downloads–login–manuals
Conform and A AF Out
Stereo Reference Clip Options
3-27
Quantel
Conform and A AF Out
Output AAF Files
Project Transfer Using AAF
Projects assembled on the system can be transferred to another platform or workspace
using an AAF (Advanced Authoring Format) file that references the original source clips.
The AAF file references the original source clips using the originator name and source
timecode entered when the material was ingested. This allows any other platform to use
the AAF file (or converted EDL) to recreate the edited clip.
When an edit is dragged from the Clips Bin and dropped on the desktop in the AAF Out
menu, an AAF file can be created for future use or for use by another platform that
supports the AAF format.
Create AAF for Existing Clip
To create an AAF file for an existing clip:
1 Select the AAF Out menu.
2 Open the Clips Bin then drag and drop the required clip onto the main window area.
3 Select the required destination directory/folder by either pressing the folder icon
to open the AAF Bin then select a path (press <Ctrl> + the folder icon to access the
Windows directory browser); or by typing a path in the text field; or by pressing the
arrow box on the right to select a previously used path.
4 Enter the required name for the AAF file in the name field.
5 Press make aaf. The AAF file is created in the AAF Bin.
The boxes to the right of the blue video box determine which video tracks of the selected
edit are used to create the resultant AAF file.
3-28
copyright © Quantel Ltd 2001-2014
July 2014
ref 2140-57-012 C
AAF to EDL Conversion
The current AAF file can be converted to an EDL file by pressing the convert to edl box.
Alternatively drag and drop an AAF file from the bin onto the convert to edl box.
The pop-up menu displays.
When an AAF file is converted to an EDL, parts of the AAF
can be selected or filtered using segment details or tape
details.
The seg name comments tick box allows the segment names from the AAF file to be
included in the EDL as comments. These comments are used to set the segment names if
the EDL is converted back to AAF.
When the source file comments tick box is ticked, it includes the source file path (if
any) of a segment in the EDL. If a segment has an effect on it, the source file path is
taken from the base layer of the effect.
The box next to the blue seg filter box allows any text (such as a segment name) to
be used as a filter. Highlighted names are included in AAF Out segment names if show
highlights is enabled in the <F1> Configuration Window. An EDL of only those segments
highlighted can be created by entering ‘highlight’ in the filter field.
Conform and A AF Out
The boxes to the right of the blue audio box determine which audio tracks of the
selected edit are used to create the resultant AAF file.
The box next to the blue tape filter box allows any text (such as a specific tape name) to
be used as a filter.
Use the tape limit box to specify the maximum number of characters allowed in the EDL
tape name. This was previously fixed at eight, but must be greater when creating EDLs
from RED material.
Only AAF lines with corresponding seg filter and tape filter matches are used in the
resultant EDL when confirm is pressed.
Press confirm to action the conversion and create an EDL file using the settings held in
the AAF.
www.quantel.com
support–downloads–login–manuals
3-29
Quantel
Conform and A AF Out
Audio Post
The audio post tick box displays additional functionality allowing audio segments to be
exported as WAV files and an AVI or MOV video guide to be output.
The video guide tick box allows the video and audio channels of the clip to be included
with the AAF file in the form of an AVI or MOV file.
The value in the green tails box defines the extra frames of tails that are included in the
exported WAV files in addition to any tails required for fades, dissolves or wipes within an
edited clip.
The green X and Y boxes to the right of the size box determine the video size of the video
guide file.
From the scroll box to the right of format, select whether the clip is mov or avi.
To add the video channel to the video guide, tick the include video tick box in the
options menu.
To add the audio channel to the video guide, tick the include audio tick box in the
options menu.
The scroll boxes to the right of the video codec and audio codec boxes allow the
video/audio to be compressed using any of the codecs installed within the Windows
environment.
3-30
copyright © Quantel Ltd 2001-2014
July 2014
ref 2140-57-012 C
Archive
ref 2140-57-012 C
www.quantel.com
support–downloads–login–manuals
4-1
Archive
Overview
The I/O application has two archive functions; ‘Archive In’ and ‘Archive Out’.
Archive Out is used to store Quantel files and projects including all essence and
metadata into a data infrastructure. When archiving a file, the original format is retained
including resolution, bit-depth, color space and frame rate. Files can be archived out to a
specified destination using a network, or a local tape.
Archive In is used to retrieve the Quantel project or files that were stored using Archive
Out, and load them in their original format with all the original metadata.
To archive out P2 and XDCAM media it must be localised first.
4-2
copyright © Quantel Ltd 2001-2014
July 2014
ref 2140-57-012 C
Use ‘Archive Out’ to store files and project into a data infrastructure. All the essence and
metadata is stored with the files and this can later be retrieved in the original format by
using Archive In.
See “Archive In” on page 4-6.
Archive
Archive Out
When a new archive is made into an existing archive folder the contents of the latest
metadata folder is taken into account (any essence already archived is not re-transferred
unless it has been modified), and a new metadata folder is created that contains both the
original archive and the new archive.
The clips to be archived display in a list on the desktop with clip information displayed in
several columns.
Prepare an Archive Out
Before archiving out a clip, consider the following settings:
Archive Destination
Files can be stored in different types of destinations by changing the settings in the
destination menu. Select use network or use local tape from the type scroll box.
Selecting use network allows files to be stored on a data server that uses Hierarchical
Storage Management (HSM) in any visible folder on the network. This provides quick and
easy access.
destination
type
path
use network
\\drive\folder\example\archives
destination
type
name
tape
use local tape
A destination path can
be entered
generationQ
archive by any of the following methods:
initialise
60GB tape
• Press on the drop-down arrow to select a path that’s been used before.
• content
Press
on thelocal
path field and type the path.
media
tails
0
• Press
on theinclude
folder
include audio
history icon to open the ‘Desktop’ Bin and navigate through the folders
to find the required destination.
all
Ensure
that the correct access rights are available for the folder
local
new
chosen
0 to receive the archive. These include the right to create new
include
minimum
folders, history
create files, read files and change their attributes.
content
media
tails
include audio
destination
type
name
tape
www.quantel.com
use local tape
generationQ archive
initialise
60GB tape
7GB
(183GB free)
support–downloads–login–manuals
Archive succeeded
start archive
Grade
Utility
4-3
Quantel
Archive
destination
Select type
use local tape to
usestore
network the files onto a data tape drive connected directly to the
path
\\drive\folder\example\archives
Quantel platform. Further tape settings display in the destination menu.
destination
type
destination
name
type
tape
nter a tape name by pressing on the
E
name field and using the hard or soft
keyboard to type the name.
use local tape
generationQ archive
use
network
initialise
60GB tape
destination
path
\\drive\folder\example\archives
type
network
Define
the
size
tape
by
using theuse
tape
scroll box. To delete any existing data on the tape,
content
path
\\drive\folder\example\archives
media
local
press
initialise.
destination
tails
0
include
audio
include history
type
use local tape
archive
nameBefore pressinggenerationQ
initialise,
make sure data on the tape is no longer
destination
60GB
tape
tapeneeded or
type
use
local
tape
that it is duplicatedinitialise
elsewhere.
all
contentname
generationQ archive
local
media
initialise
60GB tape
tape
new
tails
0
include audio
content
include
history
minimum
Archive
Content
media
contenttails
include
media audio
tails
includedestination
audio
type
name
local
0
include
local history
0
include history
use local tape
Use the content menu to select settings to
apply to the files for archiving.
generationQ archive
60GB
tape
all tape
content
local
media
new
tails
0all
7GB (183GB free)
content
include audioArchive succeeded
include
minimum
localhistory
media
start
archive
new
tails
0
include
audio
include
history
minimum
Utility
Grade
Specify
the media to archive using the media
initialise
scroll box.
all
local
includes AAF information, metadata and all material.
includes only local media in the archive and maintains links to
destination external soft-mounted media. This is useful for archiving softtype
use local tape
destination
platforms that have the same drive
generationQbetween
archive
name mounted media
use
local
tape to original sources are retained
initialise
60GB
tape
tape type
mapping configurations (so
links
generationQ archive
name
when archiving back in). If nothing has been rendered, only the
destination
initialise
60GB tape
tape
7GBtype
(183GB free) (history) is archived
metadata
use local out
tape (ie no essence). When the archive
4% (33/670)
generationQ
archive soft-mounted media is
is restored, it is assumed
that external
name
cancel tape
pause
initialise
tape drive mapping
accessible
via60GB
the same
configurations. If not, tick
7GB (183GB
free)
Utility
Grade
the
search for remote media box in the Archive In menu). The
Archive succeeded
Conform menu is then used to locate the media using the same
start
archive
7GB
(183GB
mechanism
asfree)
a ‘minimum media’ archive.
Archive
succeeded
metadata and only newly created material.
new
Utility
Grade includes AAF information,
The archive
links to the original source material.
start archive
includes only AAF information, metadata and unique frames that
minimum
Utilitythe original source media. The archive
Grade cannot be reproduced from
destination
retains links to the original source material.
type
use local tape
generationQ archive
initialise
60GB tape
name
tape
destination
The tails box defines
tails
type the length of the clipuse
localthat
tape are archived in addition to any tails
required for fades,name
dissolves or wipes within
a
composite
generationQ archive clip.
initialise
60GB tape
tape
7GBdetermines
(183GB free)whether the archive contains audio material.
The include audio box
4% (33/670)
4-4
cancel
pause
7GB (183GB free)
Grade
4% (33/670)
copyright © Quantel Ltd 2001-2014
cancel
Grade
pause
Utility
July 2014
Utility
ref 2140-57-012 C
type
name
tape
use local tape
generationQ archive
initialise
60GB tape
An archive
localcan be created with history or without history. Selecting the include history
0
box allows
locally
held clips to be archived with their effects settings so that they can be
include
history
restored at a later date for modification. When a file is archived without history (with the
include history box unselected) it allows clips to be archived as rendered and finished
all
content
clips.
local
media
new
0
include
history
minimum
tails
include audio
Perform an Archive Out
To perform an Archive Out:
1 destination
If necessary, clear the list on the desktop by pressing reset list on the right of the
type
use local tape
screen.
generationQ archive
name
tape
Archive
content
media
tails
include audio
initialise
60GB tape
2 Drag the required clips or project folders from the Clips Bin and drop them on the
destination desktop.
7GB (183GB free)
type
path
use network
Archive
succeeded
\\drive\folder\example\archives
start the
archivesettings in the destination and content menus.
3 Specify
destination
typeGrade
name
tape
Utility
use local tape
4 Press start
archive.
generationQ
archive
initialise
60GB tape
The platform now starts archiving the clips listed on the desktop to the selected
destination. Two folders are created in the destination: one for metadata and the other for
essence.
destination
type
use local tape
content
generationQ archive
name
media
local
initialise
60GB tape
tape 0
tails
include audio
include history
During the archive, the progress displays in % complete, and
cancel and pause boxes become available on the menu.
7GB (183GB free)
4% (33/670)
all
content
cancellocal
pause
media
new
tails
0
includeGrade
audio
include
history
minimum
Utility
The time taken to complete the archive process depends on:
• The amount of video, audio and metadata to be archived (the platform checks the
amount of free video space at the start of the process).
destination
• How
video
type much of the use
local tapeand audio has been archived previously.
generationQ archive
name
initialise
tape
tape
• The
speed 60GB
of the
network storage
device or local data tape drive.
7GB (183GB free)
Archive succeeded
start archive
Utility
Grade
After the archive is complete, Archive succeeded displays
above the start archive box. The total size of the archive
displays, with the remaining free space indicated in
brackets.
If the archive fails for any reason, the essence data folders contain the data that has
destination
been
transferred
up tousethe
time the archive failed. If the archive is attempted again, the
type
local tape
generationQ archive
name
data intape
these folders
is used therefore
removing the need to transfer the data again. If
initialise
60GB tape
the archive is aborted the essence data folders are left unused.
7GB (183GB free)
4% (33/670)
cancel
Grade
www.quantel.com
pause
Utility
support–downloads–login–manuals
4-5
Quantel
Archive
Archive In
The ‘Archive In’ function is used to retrieve and restore files that have been previously
archived. The files are retrieved in their original format. Open the Archive Bin to view
archived material.
The clips to be restored display in a list on the desktop with clip information displayed in
several columns.
Prepare for an Archive In
Before performing an Archive In, consider the following settings:
Location of Archive
Use the source menu to select a location to retrieve the archived files from.
Select use network to access files that have been archived through a network.
A source path can be entered in any of the following ways:
• press on the drop-down arrow to select a path that’s been used before.
• press on the path field and type the path.
• press on the folder icon to open the ‘Desktop’ Bin and navigate through the folders to
find the required destination.
Select use local tape to access files from a video tape drive connected directly to the
Quantel platform.
Open the Archive Bin (by pressing the archive tab on the Application Bar) to select clips
previously archived. Press the refresh archive or open archive boxes on the bin to
refresh/display the available clips.
4-6
copyright © Quantel Ltd 2001-2014
July 2014
ref 2140-57-012 C
type
name
tape
use local
localtape
tape
use
generationQarchive
archive
generationQ
initialise
60GB tape
tape
initialise
60GB
source
type
path
source
type
name
tape
content
fresh
media
fresh
00
tails
include
include audio
include history
history
search for remote media
media
The content menu provides settings that can
be applied to files on an Archive In.
content
fresh
fresh
media
intelligent
intelligent
tails
00
tails
include
audio
include
include audio
include history
history
search
for
remote
media
search for remote media
Specify the type of media to restore by using
the media scroll box.
fresh
Archive
Content to Restore
t he restore process reloads all archived material into the system
regardless of whether it is already present.
the restore process only loads archived material that is not already
intelligent
source
use
local
tapethe system.
source on
use network
\\drive\folder\example\archives
generationQ
typearchive
use
uselocal
localtape
tape
type
The tails60GB
boxtapedefines
theinitialise
length of additional
clip tails that are restored (if additional tails
generationQ
name
generationQarchive
archive
name
were saved with the
archive). 60GB
initialise
tape
initialise
60GB tape
tape
tape
content
media
fresh
tails
0
include audio
include history
search for remote media
The include audio box determines whether the restored archive contains audio material.
An archive can be
restored with
or without history. Restoring an archived file with history
video
video space:
space: 1%
1% (76%
(76% free)
free)
(by selecting the include
history
box) allows archived clips and effects settings to be
Restore
succeeded
Restore succeeded
restored into
the local library for reworking. Archiving a clip in without history restores
content
fresh
start
restore
media
start
the clip into
the Clips Bin
asrestore
a rendered and finished clip.
intelligent
tails
0
include audio
include
history
Utilitytick the search for remote media box to
Grade
If the
media
is not located on the same drive,
search
for remote
media Grade
Utility
locate the media from other drives.
Perform
an
Archive In
source
source
source
type
use local tape
use localarchive
tape
generationQ
generationQ archive
name
initialise
60GB
tape
tape
initialise
60GB
tape the list on
1 If necessary, clear
thetape
desktop by pressing
reset list on the right of the
initialise
60GB
tape
tape
type
use local tape
type
To perform
an Archive
In:
generationQ archive
name
name
screen.
video space: 1% (76% free)
Restore succeeded
2 Drag start
archived
files
from1%
the(76%
Archive
video
space:
free) Bin and drop them onto the desktop area. Press
restorevideo space: 1% (76% free)
the refresh archive
open archive boxes on the bin to view the latest clips.
5% or
(34/670)
Utility
5% (34/670)
Grade
cancel
pause
3 Specify the settings
and content.
cancel in source
pause
source
Grade
4 Press
type start
use local tape
Graderestore.
name
tape
generationQ archive
initialise
60GB tape
Utility
Utility
The system starts restoring the selected clips listed on the desktop.
During the restoration, the progress displays in % and
cancel and pause boxes are available on the menu.
video space: 1% (76% free)
5% (34/670)
cancel
Grade
www.quantel.com
pause
Utility
support–downloads–login–manuals
4-7
Quantel
Archive
content
fresh
media
intelligent
tails
0
include audio
include history
search for remote media
The time taken to complete the restoration process depends on:
• the amount of video, audio and metadata to be restored (the system checks the
amount of free video space at the start of the process).
source
type much of the video
use local tape
• how
and audio is already held in the Clips Bin.
generationQ archive
name
tape
initialise
60GB tape
• the speed of the network storage device or local data tape drive.
After the restoration is complete, Restore succeeded
displays above the start restore box.
video space: 1% (76% free)
Restore succeeded
start restore
Utility
Grade
The total size of the restored file displays, with the remaining free space indicated in
brackets.
source
type
name
tape
use local tape
generationQ archive
initialise
60GB tape
Soft Mounted Archives
Drag archived clips from the Archive Bin and drop them directly onto the desktop,
space:
1% (76%
or intovideo
the
Clips
Binfree)
which soft mounts the archives (indicated by yellow bin icons).
5% (34/670)
The soft‑mounted clips can then be loaded onto the Edit timeline (indicated by yellow
cancel
pause
highlights on each segment) where the clips can be edited and have processes applied to
Grade
them
using MLT FX. Utility
Play-back performance is varied as it depends on network
bandwidth and the source disk performance.
Archives can be localised via the desktop, Clips Bin or Edit timeline.
• Mark in and out points on a timeline clip, to localise the selected section only.
Soft-mounted clips with tails cannot be localised.
To modify and resave an archive back to the Archive Bin, the clip must have been
originally archived out as local media. To resave the modified version back to the Archive
Bin, it again needs to be archived out as local media on to the same drive letter as the
original.
4-8
copyright © Quantel Ltd 2001-2014
July 2014
ref 2140-57-012 C
DCP
ref 2140-57-012 C
www.quantel.com
support–downloads–login–manuals
5-1
DCP
Description
Digital Cinema Package (DCP) masters can be imported into the Quantel environment,
and can also be created directly without the need for third party hardware or software.
Quantel have implemented Fraunhofer’s API providing the same functionality as their
“easyDCP” standalone software.
DCP In
Import/Soft-mount a DCP File
A license is required, otherwise media displays at a low resolution
after the first few seconds. Automatic licensing is available from
within the UI. See “Automatic Licensing” on page 5-6.
• Select the DCP In menu.
The menu displays:
1. Select DCP
folder
3. Open
DCP bin
2. Select
DCP tab
1 Navigate to the DCP folder containing the source material.
2 Select the DCP tab at the bottom of the screen.
3 Press Open DCP bin, to open the DCP bin containing the composition.
4 Either drag the composition into the workspace, or press start DCP in.
To soft-mount media tick the soft mount box before importing. The media is ‘softmounted’ from where it is (SAN, NAS, USB drive etc), instead of importing the media into
the Quantel workspace.
See “Soft Mount Option” on page 3-24.
5-2
copyright © Quantel Ltd 2001-2014
July 2014
ref 2140-57-012 C
A single composition can be made from one or multiple reels. Encryption can be added
to the reels and, if required, there are many encryption types to choose from, each of
which create a Key Delivery Message (KDM).
DCP
DCP Out
All exports are 12-bit RGB. However, if the standard XYZ transform is not required, lookup
tables (LUTs) can be added to the reels on export, via the PreProcess settings. DCPs are
created at a maximum bit-rate of 250 Mbit/s. Audio is output at a sample rate of 48 kHz.
A license is required to produce un-watermarked compositions.
Automatic licensing is available from within the UI. See “Automatic
Licensing” on page 5-6.
Create a DCP Package
• Select the DCP Out menu.
The menu displays:
Define the Format
1 Ensure the project settings tab is selected.
2 Define the target path for the resulting DCP package.
3 Add an annotation, creator and issuer, as required. If none are added, the issuer
defaults to the owner from the first clip.
4 Set the format, size and fps according to the output required.
When making changes to the clip size, ensure that the width and
height are both divisible by four.
www.quantel.com
support–downloads–login–manuals
5-3
Quantel
DCP
Set the Composition
1 Press on the composition settings tab.
2 Add a suitable title for the composition. If none is added, the composition takes the
title from the first clip.
3 From the content kind scroll box, determine the kind of composition that is
produced. For example, a feature or a trailer.
4 Add further annotation, if required.
Set Encryption
1 Press on the kdm settings tab.
2 To add an encryption, tick the encrypt DCP (create KDM) tick box. Leave this box
unticked if no encryption is required.
3 Set the directory containing the server certificates for this DCP.
4 Define the target directory for where the KDM certificates are to be created. By
default this is set to a sub-folder under the DCP package path.
The encryption keys are generated and transmitted via a KDM to the projection site.
These keys can only be used by the destination device.
Add Clips
• From the Clips Bin, drag the set of clips that make up the DCP composition, to
the desktop. Clips must match the formatting, as defined, otherwise they are not
dropped onto the DCP Out menu.
Each DCP package can have a single composition only.
Video-only or audio-only reels are not supported.
Subtitles or closed captions are not supported.
5-4
copyright © Quantel Ltd 2001-2014
July 2014
ref 2140-57-012 C
DCP
Define the PreProcess Settings
The PreProcess settings give various options for the output files:
1 Select a lookup table from the scroll box, if required.
2 The source region is set to all by default. If a custom region is required, select
custom from the scroll box, and define the appropriate size and centre values for the
region.
3 aspect conversion can be set to box, cut or none. This is of particular use when
resolution is not full 2K or 4K. Selecting box outputs with black bars either side of
the content to fill the screen top to bottom, and cut outputs with the top and bottom
edges cropped to fill the width of the screen.
The output crop box is used to crop each frame to the value set in the green
numeric box. This can be set to picture, ratio, or none.
When set to picture, define an origin position, and a size (x × y).
When set to ratio, choose from the list of commonly used ratio values. Some of
these are effectively film camera aperture aspect ratios that define the active area
of the film are, and others are television standards:
1.33 (4:3) - SD video
1.66 - 35 mm Academy Offset Standard
1.78 (16:9)- HD video
1.85 - 35 mm Full Screen Super
2.35
- 35 mm Academy Offset CinemaScope
2.37 (21:9)- True ratio 64:27 - often used as a best fit between Cinemascope
(2.35) and 35 mm Anamorphic (2.40)
4 Set a number of frames to trim from the start and end using the numeric boxes.
5 If sRGB colour space (default) is not to be used, tick the enable XYZ transform tick
box.
www.quantel.com
support–downloads–login–manuals
5-5
Quantel
DCP
Generate DCP
• Once the setup is complete, press generate dcp to start the creation of the DCP
package.
Progress is indicated by progress bars. At any time during the process, the DCP creation
can be aborted by pressing cancel.
The resulting DCP package contains MXF files for each DCP reel, an XML file for the DCP
composition, and ASSETMAP and VOLUMEMAP files. If encryption was enabled, the KDM
directory contains KDM.XML file containing a Key Delivery Message.
Automatic Licensing
If a license has not been previously obtained, the following displays in the menu area.
To license and register:
1 Enter a valid domain name (usually that of your company). This is required for the
signing of any DCPs created, and to identify where DCPs are created.
2 Supply a password. This is used to create a decryption key.
3 Press on Start EasyDCP registration.
The easyDCP website opens in a browser window.
Easy DCP
1 A login is required. If a company account already exists enter the username and
password, otherwise click on Create account.
2 Enter the details, and click on save changes.
3 Enter the username and password as set up on the previous screen, and click on
Submit.
5-6
copyright © Quantel Ltd 2001-2014
July 2014
ref 2140-57-012 C
DCP
The plug-in options page displays:
4 Click on Purchase license.
5 Tick the box(es) to select the module(s) for which a license is required, and click on
Purchase.
6 Complete the purchase as required.
The licence is downloaded to the PC. An example of a licence filename is:
“Quantel_Ltd_easyDCP_Pablo_Rio.easyDCP”
7 Copy the licence to C:\Data\User\DCP.
8 Reboot the software, and go to the DCP Out menu. The signing and encryption
certificates are written to the C:\Data\User\DCP\My certificates folder. Once
complete, the License & Register box is removed from the display, and any further
DCP Outs are no longer watermarked.
www.quantel.com
support–downloads–login–manuals
5-7
Quantel
DCP
5-8
If required, the license can be downloaded at any time by logging into EasyDCP from a
browser window, and clicking on the License & Certificate tab.
copyright © Quantel Ltd 2001-2014
July 2014
ref 2140-57-012 C
Import and Export
ref 2140-57-012 C
www.quantel.com
support–downloads–login–manuals
6-1
Import and Export
Import Material
Import Clips from Files
The Import menu is used to import files as stills or sequentially numbered images to
form a video clip in the Clips Bin. All files within a sequence must be the same file type,
the same size, the same aspect ratio, the same colour depth and the same resolution.
When file-based media is imported or conformed into Quantel workspace, the original
network location has its own Clips Bin entry that is separate from originator and source
timecode. When clips or images are selected for import, they display on the desktop area
with a preview thumbnail.
The horizontal resolution of all files imported into Quantel hardware
must be divisible by 8. In previous versions of software, files were
‘padded’ on the right hand side when their horizontal resolution was
not divisible by 8. Now these types of files are centred having black
equally padded to both left and right sides. If the import file is
larger than 2K, the horizontal resolution is divisible by 16.
To import a sequentially numbered set of images (for example, clip 001-007) or single clip
sequence:
1 Select the Import menu.
2 Select a file format as a filter from the accept box on the right of the menu area; for
example to separate RED and MOV files. Only material of the selected file format is
then added to the list.
6-2
copyright © Quantel Ltd 2001-2014
July 2014
ref 2140-57-012 C
4 Open the ‘Desktop’ Bin and select the local or network directory containing the
required images (or press the Windows <Start> key to access the Windows browser).
5 Hold down the <Shift> key on the keyboard and highlight the required files.
6 Drag the selected files (or an entire directory) from the bin and drop them in either of
the following places:
•
The main window where they are listed.
•
The menu area, where a pop-up displays. Set any resize options etc, then press
import to create a Floating Clip or tick copy to bin to place the file into the
Clips Bin. In the menu area, enter the name for the clip in the name field; the
default name is that of the first image selected.
7 Set up any decode and resize options in the menu area. The decode settings for RED,
Phantom or Cineform files can be reset to the file import defaults by pressing reset
from file on the pop-up. The decode settings for soft-mounted RED clips can also be
reset from the Edit timeline.
Import and Export
3 If required, tick group stills into sequences, so that all selected files are placed on
the desktop as a single entry and saved in the Clips Bin as a clip.
8 To soft-mount media tick the soft mount box. The media is ‘soft-mounted’ from
where it is (SAN, NAS, USB drive etc), instead of importing the media into the
Quantel workspace.
See “Soft Mount Option” on page 3-24.
9 If required, adjust the fps and scan settings for the resultant clip and press start
import. After each file is imported, ‘success’ displays in the result column. When the
stop on error box is ticked, all import files are stopped if an error occurs in one and
the options restart, continue and abort become available. If the box is not ticked,
the options restart, retry and abort become available during import when an error
occurs in a file but the import continues with any remaining files.
The media is saved into the Clips Bin with the new clip name and settings from the menu.
Any soft-mounted media is indicated with a yellow icon.
Ignore Matte Option
When dropping a QuickTime file that contains an alpha channel in the Import menu, an
ignore matte tick box displays in the menu area (this is also in the Conform menu).
This is useful because many QuickTime files appear to have an alpha channel even if they
were not created with one, eg ProRes files.
www.quantel.com
support–downloads–login–manuals
6-3
Quantel
Import and Export
Batch Import
Group Stills into Sequences
Single files or file sequences can be dragged from the ‘Desktop’ Bin and placed on the
desktop in the Import menu. Tick group stills into sequences, and all selected files
are placed on the desktop as a single entry and saved in the Clips Bin as a clip. Any
subsequent files dragged out are appended to the first entry if they are dropped over it;
if not, a new entry is created. With group stills into sequences unticked, the selected
files are dropped onto the desktop as individual entries and saved into the Clips Bin as
stills.
In both the Import and Export menus, multiple clips can be selected as a group by using
the <Shift> and <Ctrl> keys so that their attributes such as frame rate, export path or file
format can be changed at the same time. Only the attributes changed on the active item
are rippled through the selection.
Video Attributes Menu
The video attributes menu displays information
available from the file. Change the information,
if required, to customize the file on import.
The video and audio attribute menus are
on different tabs. The video attribute menu
displays by default.
The video attributes menu displays the following:
Format, Size and Pixel Aspect
The format box lists a number of preset frequently used formats, eg SD 486 4:3 or
HD 1080. To use a non-standard format, select custom from the format drop-down
which allows customization of the size and pixel aspect. The size box indicates the frame
size of the image. The pixel aspect box indicates the pixel aspect ratio within the image.
Convert to
The convert to box allows all file types to be resized to either a list of presets or a
custom size on import. Select same as source if the file does not need resizing. When
custom is selected, the size and pixel aspect boxes become available. There are also
options to compress specific file types (eg MpegIMX40 625 4:3).
Images up to 16K can be imported providing they are resized to 4K or less (4K is the
largest ‘canvas’ size that is supported for processing on a Quantel workstation).
6-4
copyright © Quantel Ltd 2001-2014
July 2014
ref 2140-57-012 C
When a file needs resizing, but the picture aspect ratio doesn’t match the new size
selected, the aspect conv field allows selection of the conversion method (ie box or
cut).
Flip
The image can be flipped either vertically or horizontally on import by selection of the
boxes to the right of the flip box.
Colour
The box to the right of the colour box indicates the video data format colour space and
allows change of the indicated content type to linear, log or print density.
If the colour format of the image is YUV, the colour options are not
available.
Black Level and White Level
The black level and white level values in the boxes allow the black and white values of
the resultant clip to be changed from the specific levels in the source image.
Import and Export
Aspect Ratio Conversion
Look-up Table
The lookup table box allows selection of a previously configured look-up table to be
applied to a file on import.
The previously configured look-up tables must be stored in a specified place – as
determined by each organisation – for them to be accessible from in Quantel workspace.
Look-up tables can be stored in one of the following places:
• locally in the ‘C:\Data\User\Cubes’ folder or sub-folder. The ‘C:\Data\User\Cubes’
folder is selected by default.
• in a shared folder on a network drive, eg ‘\\shared\media\user’.
• in a shared folder on a mapped network drive, eg ‘h:\’.
The Active Cube Folder location on the Quantel
kernel can be changed in the UI menu, in the
<F1> Configuration Window.
www.quantel.com
support–downloads–login–manuals
6-5
Quantel
003
Import and Export
0018
sers\hazel\Desktop\Stereo 3D clips\{0x281285\file000003.dpx
x486
Audio Attributes Menu
video attributes
audio attributes
audio length
283.55
seconds
SD
486 4:3
samples per second
x48000
bits per sample
: 24
audio channels
8
mono
track format
23.98
progressive
6\file000018.dpx
r
rt import
7\file000058.dpx
all files
accept
group stills into sequences
To view the audio attributes menu select the
timecode
originator
from attributes
file
unknown
audio
tab to the right of the video
sourceTC
from file
attributes
keycode
tab. 00:00:00:03
result
files
The first 1four attributes in the audio attributes menu (audio length, samples per
second, bits per sample and audio channels) display the information from the source
file. These cannot be changed.
Use the box
to the right of track format to select a track type of mono, stereo, or quad.
1
See SAM
“Audio Track
Output Mapping”
on page 2-13.
XDCAM QShare ftp
P2
Utility
1
5\file000003.dpx
s
1
Timecode Menu
audio attributes
283.55
seconds
SD
486 4:3
nd
x48000
: 24
8
mono
timecode
originator from file
sourceTC from file
keycode
accept
unknown
all files
group stills into sequences
remove item
reset list
se the timecode menu to select where the
U
originator and timecode are taken from.
00:00:00:03
Originator
The originator scroll box is used to determine the source for the originator timecode.
Select originator from file, originator from name or originator from path.
The originator from file is the default and displays the file in the field on the
right.
SAM
P2
ftp
QShare from
XDCAM
For
originator
name, tick with file extension and set character limit in
limit numeric box if required.
For originator from path, set directory level in the level numeric box and the
character limit in the limit numeric box if required.
Source TC
With the sourceTC scroll box select between sourceTC from file or sourceTC from
name.
Source TC from file is the default and allows a start timecode to be entered in
the resultant clip.
Source TC from name interprets the trailing number as frame count.
Keycode
When the keycode box is ticked, select the film and perforation type. The keycode value
can be adjusted by using the prefix, feet and frame boxes.
6-6
copyright © Quantel Ltd 2001-2014
July 2014
ref 2140-57-012 C
bank
Underscores
The Underscores box controls how file names are controlled during import and export.
If remove/add is selected:
• any underscores in the file names are replaced with spaces on import.
• any spaces in the file names are replaced with underscores on export.
If ignore is selected:
Import and Export
<F1> Options
• underscores are not replaced on import or export.
Import Format
The Import Format box controls the format in which imported (or localised) video
is stored. This is available only on systems unable to play RGB video. When native is
selected, imported files are saved in their native format. When yuv is selected, imported
files are converted to YUV colour space (this box also displays on Compass for importing
video either using the native compression format, if any, or transcoding it to the output
format).
Import Max Bits
The Import max bits box controls the maximum number of bits to be used to store
imported video clips. This is available only on systems with Quantel hardware. The
options are 10 bit or 16 bit (if the hardware supports it).
Import Keycode
The Import keycode box controls whether keycode within imported files is interpreted
to represent frames or perfs. It is always stored and displayed in frames within the
system.
www.quantel.com
support–downloads–login–manuals
6-7
Quantel
Import and Export
Import Clip Name Level
If the Import clip name level box is set to 0 and a file is dropped into the Import menu
or onto the desktop, the clip name is set to the file name without the file extension (if the
file header does not contain its own name). If set to n (where n > 0), the clip name is set
to the name of the directory n levels above the file.
Import Clip Name Without Number
When the Import clip name without number tick box is ticked, the number at the
end of the file name is removed, together with spaces, hyphens and underscores that
precede it.
Allow Non-server Sized Import (Qube and sQ Edit Plus HD)
When the Allow non-server sized import box is ticked, the same as source option
is available in the Convert to menu in Import. This allows files that are larger than sQ
server supported formats and/or are a non‑standard format, ie neither HD or SD to be
imported at their native format and colour space.
If the Allow non-server sized import box is not ticked, a file that is larger or different
from an sQ server supported format has to be converted to a supported format selected
from the Convert to menu or it cannot be imported.
When applying any effects to an imported file that is larger than sQ
server supported formats, clear the history and add it to the
timeline in order to publish it to the sQ Server. In this case, it’s
advisable to create two copies in the Clips Bin – with one retaining
the history for future access.
Red Timecode
The RED camera records two different timecodes: absolute (time of day) and edge
(starts from a fixed point for each magazine, eg 10:00:00:00). The Red timecode box
should normally be set to preferred. This uses whatever was flagged at the time of
shooting, but can be overridden by selecting absolute or edge if the incorrect code is
being found in the files.
6-8
copyright © Quantel Ltd 2001-2014
July 2014
ref 2140-57-012 C
Settings Bin Functions
From the Import menu, save RED, Phantom (CINE) and Cineform (AVI or MOV) file
decode settings in the Settings Bin. They can then be transported by archiving them with
a project.
To recall parameters, drag the setting from the bin into the file list area in the main
window. Multiple items can be grouped together to have an import setting applied to
them.
www.quantel.com
support–downloads–login–manuals
Import and Export
Save Decode Parameters
6-9
Quantel
Import and Export
Supported Import Formats
Video clips (up to a maximum size of 4K) and audio clips can be imported in the formats
listed below.
Not all formats may be available on the platform or workspace in
use.
AIFF
The platform imports AIFF (Audio Interchange File Format) 24-bit, PCM (uncompressed)
files.
ARRIRAW
The system imports ARRIRAW uncompressed12-bit raw Bayer sensor data output from
Arri Alexa cameras.
When one of these files is dropped into the import menu, a new menu with three tabs
displays providing further options.
source details
General
Downscale
Sharpness
reset from file
Metadata
Colour
2880
100
source details
Metadata
Colour
General
Lock CCT, TINT & White Factors
800
ISO
CCT
4300
0
TINT
White Balance Factor R 1.43 G 1.00 B 1.65
1.0
Colour Blending
Colour Encoding
100
Colour Space
100
source details
General
Metadata
Colour
Camera Type - ALEXA
Company - WSG
Production Name - CODEX
reset from file
reset from file
General tab
Colour tab
Metadata tab
set the downscale using the scroll box, and the sharpness using
the soft or hard keyboard.
set several colour settings including colour blending, encoding
and space.
for viewing the metadata of the file being imported.
All settings can be reset when the file is imported by pressing reset from file at the
bottom-left of the source details menu.
AVI
Uncompressed: the platform imports uncompressed video and uncompressed 16-bit
48 kHz audio.
Compressed: if a suitable codec is installed on the platform (within the Windows
operating environment) the system imports compressed video and decompresses it
before storing it in the library. The system supports the import of AVI files larger than
4 GB.
6-10
copyright © Quantel Ltd 2001-2014
July 2014
ref 2140-57-012 C
The platform imports Microsoft Windows bitmap images as 8-bit RGB clips.
CDA
The platform imports CD audio files. An audio file can be previewed and a segment of the
file selected for import.
CIN
Logarithmic Cineon files are supported and can be imported, saved in their native
logarithmic form.
The Cineon Utility within the Utility application can be used to convert Log format clips
into linear data clips.
CINE (Phantom Camera)
Import of the native RAW file format produced by Vision Research’s high speed Phantom
camera is supported. The import of CINE format material provides the user with a clip
preview on the desktop.
DPX
Import and Export
BMP
The platform imports a series of DPX files conforming to SMPTE 268M-1994 and imports
them as video-only clips.
DV
Digital Video DV file formats can be imported using QuickTime, if it is available.
EXR
The platform supports the import of EXR files. When importing EXR files, the source
details menu allows selection of a colour space: raw, Rec709 and P3.
source detailsACES
Linear
Raw
Log
log range in stops
lin range in stops
16
1.0
Choose a profile of Linear, Log or ACES using the scroll
box in the source details box. Linear has an adjustable
exposure scale. Selecting ACES allows the result to be
viewed through one of the ACES viewing LUTs.
Select the Log profile to convert the data to a filmic log format. This allows the result to
be viewed through one of the FilmLook log profiles or a custom LUT.
Both the ACES and Log profiles should be imported as 16-bit
logarithmic data. Ensure I/O – Import max bits is set to 16-bit in
the <F1> Configuration Window.
The Linear profile shows the raw data in the file.
www.quantel.com
support–downloads–login–manuals
6-11
Quantel
Import and Export
GIF
The platform imports GIF (CompuServe Incorporated - Graphics Interchange Format)
files that conform to the GIF87a and GIF89a standards. The animated GIF format is not
supported.
Go-Pro
The platform supports Go-Pro H.264/MPEG 4 formats. This can also be soft-mounted.
JPEG
The platform imports a series of JPG files and records them as un-compressed video-only
clips.
M2V (Blu-ray)
The platform imports MPEG video only files for Blu-ray.
MCF
The platform imports high speed video media from ARRI Tornado cameras from the
native MCF format.
MOV (QuickTime)
QuickTime MOV files can be imported if QuickTime 7 is installed on the platform.
QuickTime 7 supports the Apple ProRes codec. When a MOV file is imported, it is
decompressed and saved in the library.
The file import process supports the import of QuickTime files with alpha channels. Clips
or stills imported with alpha channels are shown in the Clips Bin with a red fill to indicate
that they have a key channel.
When a file is detected as having been encoded with a codec which can support an Alpha
channel, this is automatically made with an alpha channel unless the ignore matte box
in the menu area is ticked.
QuickTime users should be aware of license requirements for
various codecs.
6-12
copyright © Quantel Ltd 2001-2014
July 2014
ref 2140-57-012 C
The I/O Application supports the import of specific MPEG-1, MPEG-2 and VOB (DVD video
object) files.
MPEG-1 files with the MPG extension (video with embedded audio channels) and with the
following characteristics can be imported:
Video:MPEG-1 constant bit rate Video CD - 352 × 288 or 352 × 240,
Super VCD - 480 × 576 or 480 × 480
Audio:
MPEG Layer-2 16-bit mono or stereo
MPEG-2 files with the MPG extension (video with embedded audio channels) and with the
following characteristics can be imported:
Video:MPEG-2 variable or constant bit rate 500 bkit/s,1000 kbit/s,
2000 kbit/s, 3000 kbit/s, 4000 kbit/s, 5000 kbit/s,
6000 kbit/s, 7000 kbit/s, 8000 kbit/s, 9000 kbit/s or
10000 kbit/s.
DVD Video (720 × 576 @ 25 FPS, 4:3 or 16:9)
DVD Video (720 × 480 @ 29.98 FPS, 4:3 or 16:9)
DVB (transport stream)
MicroMV (transport stream)
DVHS (transport stream)
HDV (transport stream)
ATSC (transport stream)
Aspect ratios: 4:3, 16:9 or 1:1
Audio:MPEG Layer-2 16-bit mono or stereo, 48 kHz sample rate, audio
at 96 kbit/s, 112 kbit/s, 128 bkit/s, 160 kbit/s, 192 kbit/s,
224 kbit/s, 256 kbit/s, 320 kbit/s or 384 kbit/s.
Import and Export
MPEG-1, MPEG-2, VOB (option)
Multiplexed MPEG-2 and audio streams in VOB format with DVD type 5 compatible
formats such as 720 × 567 @ 25 FPS, 4:3, 16:9 or 720 × 480 @ 29.98 FPS, 4:3, 16:9.
MP3
The platform imports MP3 files and stores them as audio-only clips.
MP4, M4V, MP4V, M4A, M4P
The above MPEG-4 part 14 file formats can be imported using the QuickTime SDK.
MXF
P2, XDCAM, DNxHD, SonyF65, Sony SStP and Quantel
All Panasonic P2 formats and Avid DNxHD formats are supported. The platform imports
MXF files conforming to SMPTE 377M-2004 that use Operational Patterns Op1A and
OpAtom, and have a supported media format. These file types can also be soft-mounted.
www.quantel.com
support–downloads–login–manuals
6-13
Quantel
Import and Export
Sony F65 MXF
The platform supports the import of Sony F65 MXF files.
source details
Debayer Quality:
Resolution:
Kelvin:
Colour Space:
Profile:
Scale:
Standard Quality
1024x540
3200
S-Gamut
Linear
T his data can be stored in log format and to assist
with the precision, it should be at 16 bits. When
one of these files is dropped into the import menu,
a pop-up displays providing more options.
1.0
The Kelvin quality resolution has three available values including 5500 (classed as
source details
daylight
setting), 4300
and 3200 (both classed as tungsten settings).
Debayer Quality:
Standard Quality
Resolution:
1024x540
The boxKelvin:
to the right of3200
Colour Space allows selection of S-Gamut, sRGB/rec‑709, P3,
S-Gamut
Space:
S-Gamut
XYZ orColour
ACES.
Select
a
choice of profile curve – Linear or S-Log2 – to be applied using
sRGB/rec-709
Linear
Profile:
P3 of 1.0
Scale:
the scroll
box to the right
Profile. If ACES is selected for the Colour Space, the Profile
XYZ
must also be ACES forACES
correct operation.
The scroll box to the right of Profile allows selection of: Linear, S-Log2 or ACES. Linear
source details
present
intensity data
to the clip. This generally appears darker as the normal intensity
Debayer Quality:
Standard Quality
Resolution:
1024x540
range sets
black to 512
and scene white to 5472 counts from a potential range of 65536
Kelvin:
3200
counts.
ToSpace:
assist withS-Gamut
this the scale tool is enabled to adjust the brightness of the
Colour
Linear
Linear converts the input data into a film like density response. When
Profile:
S-Log2
image imported.
S-Log2
1.0
Scale:
colour correcting this ACES
material, the settings need to be adjusted so that DMin is 90 and
DMax is 582. These settings can also be changed to new default settings in the <F1>
Configuration Window. ACES converts the data to conform to Quantel ACES processing
standard. This must be paired with ACES in Colour Space for correct operation. When
colour correcting this material the settings need to be adjusted so that DMin is 143 and
DMax is 494.
Sony SStP
Sony SStP files can also be imported. These use a MPEG4 codec. Supports resolutions:
720P, 1080i, 1080P and 2K. Three quality levels are supported: lite (225 MB),
SQ (450 MB) and HQ (900 MB). Colour space can be RGB 444 or YUV 422.
PIC
The platform imports Softimage pic files as 8-bit RGB clips.
PNG
The platform imports PNG (Portable Network Graphics) format files of the following
types:
1-bit, 2-bit, 4-bit, 8-bit or 16-bit greyscale;
3 × 8-bit RGB colour or 3 × 16-bit RGB colour;
1-bit, 2-bit, 4-bit or 8-bit palette colour;
8-bit (or 16-bit) greyscale + 8-bit (or 16-bit) alpha-channel;
3 × 8-bit (or 16-bit) RGB colour + 8-bit (or 16-bit) alpha-channel.
6-14
copyright © Quantel Ltd 2001-2014
July 2014
ref 2140-57-012 C
The platform imports RED (r3d) raw image files. The check box in the Import menu (also
available in the Conform menu) allows audio to be imported with the r3d file. The import
of r3d material provides a clip preview on the desktop.
SGI
The platform imports a series of 8-bit or 16-bit Silicon Graphics SGI files and records
them as video-only clips.
Silicon Imaging (SI-2K) Camera
Import of the CineForm RAW format is supported. The raw data is wrapped as either MOV
or AVI files and can be decoded in the Import menu by using the various menu functions.
The import of CineForm RAW material provides a clip preview on the desktop.
TARGA
The platform imports a series of 8-bit RGB Targa files and records them as video-only
clips.
TIFF
Import and Export
RED (r3d)
The platform imports a series of 8-bit or 16-bit, RGB TIFF files and records them as
video‑only clips.
VPB
The platform imports a series of VPB files (Video Paintbox format) and records them as
video-only clips.
WAV
The platform imports 48 kHz, 16-bit, 24-bit, or 32-bit, 1, 2 or 4 channel WAV files and
stores them as audio-only clips.
If the file is not 48 kHz, it has to be 16-bit and have a maximum of
two channels.
Windows Media (ASF, WMA, WMV)
The platform imports Windows Media 9 ASF files as well as Windows Media video (WMV)
and audio (WMA) files if Windows Media 9 is installed on the system. When importing a
file, it is decompressed and saved in the library.
www.quantel.com
support–downloads–login–manuals
6-15
Quantel
Import and Export
6-16
Important Notice: Quantel provides the mechanism for creating
Windows Media 9 files but Quantel does not give the installer or
user the right to create and distribute these file types. The
installer/end user must agree to the terms of use of Windows
Media 9 license (displayed during installation) and ensure that they
have the appropriate license to create and distribute files using the
codecs provided.
Royalties may also be payable to different licensing authorities for
the use of the codecs provided and payment of these royalties is
the responsibility of the installer/end user and not Quantel. Please
refer to Microsoft for licensing and royalty information.
copyright © Quantel Ltd 2001-2014
July 2014
ref 2140-57-012 C
Export Clips as Files
The Export menu is used to export any clip from the Clips Bin.
format
result
1
file00018
C:\Users\hazel\Desktop\Stereo 3D clips\{0x110386\file000018.dpx
720x486
mov
left
2048x1556
RGB 0..255 > YUV 16..235
2
file00018
C:\Users\hazel\Desktop\Stereo 3D clips\{0x280887\file000058.dpx
720x486
mov
right
2048x1556
RGB 0..1023
3
file0003
C:\Users\hazel\Desktop\Stereo 3D clips\{0x281285\file000003.dpx
720x486
mov
1920x1080
YUV 16..231
output file
path
name
sizing
output format
size
pixel aspect
c:\
2k_VR
format
fps
timecode
name with
options
deinterlace
re-render
mov
29.97
dest
colour
key
same as clip
x
1556
2048
1 : 1
Import and Export
Export Material
To export an existing clip as a sequentially numbered set of images or a single interleaved
file:
Grade
1 Select the Export menu.
Utility
SAM
P2
XDCAM QShare ftp
2 Open the Clips Bin by selecting clips on the Application Bar, and highlight the
required clip(s) to be exported.
include video
video codec
H.264
video quality
normal
F1 Dominant
dominance
Alpha export unsupported
all channels (mono)
one mono channel
include audio
audio codec
two mono channels
four mono channels
audio quality
single stereo track
mix down
3 Drag and drop the clip(s) from the Clips Bin onto the desktop.
4 Select the required destination directory/folder by either pressing the folder icon
then selecting a path (press <Ctrl> + the folder icon to access the Windows directory
browser); or by typing a path
the text
topor by pressing the arrow box on the
default field;
showin
timecode
kb/sec (nominal)
0
right to select a previously used path.
5 Enter the required name for the images using the name field.
6 Select the required output format for the exported files from the format scroll box
then press options. A pop-up now displays with options relevant to this format. If
required, set parameters here and in the output file and sizing/colour/key menus
(described in the following sections).
7 Press start export and the clip is exported as a set of images or a single interleaved
file (this depends on the selected export file format). When the stop on error box is
ticked, all export files are stopped if an error occurs in one. If the box is not ticked,
Stop, restart and abort options become available during import when an error
occurs in a file but the import continues with any remaining files.
www.quantel.com
support–downloads–login–manuals
6-17
Quantel
Import and Export
Render On Export
When dropping an unrendered clip onto the desktop in Export, a render box displays in
the menu.
It is selected by default if the clip is unrendered.
When the box is ticked, the clip is rendered
during export. If the clip is unrendered and the
box is not ticked, the clip cannot be exported.
In this instance, the following error message displays: ‘error: Clip title needs rendering
before export’.
When dropping a rendered clip onto the desktop in Export, a re-render box displays in
the menu. It is unchecked by default.
If the box is ticked, the clip is re-rendered
during export. If the box is not ticked, the clip is
exported as it is.
Batch Export
Multiple clips can be dragged out of the Clips Bin onto the desktop in the Export menu
where they form a list. The file type and network destination can then be set, and a batch
export can be started.
Multiple clips can be selected as a group by using the <Shift> and <Ctrl> keys so that
their attributes such as frame rate, export path or file format can be changed at the same
time. Only the attributes changed on the active item ripple through the selection.
Name with Timecode, Frame or Original Suffix
The timecode – source/dest scroll box allows
the clip’s source or destination timecode to be
selected for export. This affects the timecode
embedded within the file and also how the file
is named.
Tick the name with box to append the selected timecode to the file name. If name with
– timecode is selected, the timecode is appended in the format ‘hhmmssff.’ If name
with – tc frame num is selected, the timecode is appended as a frame count from
midnight (where midnight is a zero start point).
When file sequences are imported without their suffix, it can be added if required on
export. Tick name with – original suffix to do this. This is useful if a clip has been
shortened, as the correct frame numbers can then be added on export.
Deinterlace
The Deinterlace tick box allows field 1, 2 or average deinterlace to be applied.
6-18
copyright © Quantel Ltd 2001-2014
July 2014
ref 2140-57-012 C
When images are to be exported they can be resized, offset, and have their aspect ratio
changed to suit the hardware or process that is being used to import them.
Select the sizing tab in the Export menu to
reveal the following functions:
The output format box allows the target
format of the clip or files to be selected from a
list of default formats.
The values next to the size box set the size of the output image in pixels.
The values next to the pixel aspect box set the aspect ratio of the resultant pixels.
The source region scroll box allows selection of all, custom (use selected source
region) or pan & scan (use pan and scan data from the clip, if present).
The size and centre boxes trim and reposition each frame to the value set in the
green numeric boxes. The clip image in the main window updates as these settings are
changed.
The aspect conversion box controls how the aspect ratio of frames is managed when
the clip has mixed aspect ratio segments. When a 16:9 clip is output at 4:3 aspect ratio
with the cut function enabled, the system resizes the 16:9 clip and crops the left and
right edges of the image. With box enabled, the 16:9 clip is output in letter box form.
When a 4:3 clip is output at 16:9 aspect ratio with the cut function enabled, the system
crops the top and bottom edges of the image. With box enabled, the 4:3 clip is output as
pillar box. With none selected, mixed aspect ratio segments are stretched to fit.
Import and Export
Sizing
The output crop box is used to crop each frame on output. The options for this are to
crop by ratio, picture area, or none (no crop). Select the required option from the blue
scroll box.
Some of the commonly used ratio values are effectively film camera aperture aspect
ratios that define the active area of the film are, and others are television standards:
1.33 (4:3) - SD video
1.66 - 35 mm Academy Offset Standard
1.78 (16:9)- HD video
1.85 - 35 mm Full Screen Super
2.35
- 35 mm Academy Offset CinemaScope
2.37 (21:9)- True ratio 64:27 - often used as a best fit between Cinemascope
(2.35) and 35 mm Anamorphic (2.40)
To crop by picture area, determine a point of origin from the top left of the picture, and
then define the required (x × y) pixel length of the picture.
www.quantel.com
support–downloads–login–manuals
6-19
Quantel
Import and Export
Export Files with Pan & Scan
The pan & scan zoom and offset values set-up on a clip in the Edit Application can be
applied when a clip is exported using the I/O Application. The pan & scan settings can be
previewed in the I/O Application but cannot be seen during the export process.
To see which part of the image is to be exported, refer to the
browse image in the list at the top of the screen.
Colour
From the colour tab’s output levels scroll box,
select format defaults, same as clip or
custom to affect the black/white level values
below. Choose custom to amend these values
manually.
The box to the right of the look-up table box allows the selected look-up table to be
applied to the clip or frame as it is exported.
Key
The key tab allows a key to be included by ticking the include key box.
<F1> Options
Underscores
The Underscores box controls how file names are controlled during import and export.
If remove/add is selected:
• any underscores in the file names are replaced with spaces on import.
• any spaces in the file names are replaced with underscores on export.
If ignore is selected:
• underscores are not replaced on import or export.
6-20
copyright © Quantel Ltd 2001-2014
July 2014
ref 2140-57-012 C
When Export always overwrite is ticked, exporting a file of any type overwrites an
existing file of the same name. This affects CIN, DPX, TIF and VPB files. Other file types
always overwrite anyway. An archive process never overwrites.
Export Project Folders
Use the Export project folders numeric box to specify the number of Clips Bin project
folders to include in the export path.
If set to 0, it behaves as before. If set to 1, it includes the folder containing the clip in the
export path. If set to 2, it also includes the folder above that, etc.
If the setting is changed, drop the clips into the menu again to use the new value.
Export Make Clip Folder
If Export make clip folder is ticked and a clip is then dropped on the desktop, the
export directory is set to the path of the previously selected item but with the clip name
as the lowest level directory.
Therefore the export path can consist
of export directory\selected
folders\clip name\file name.
Import and Export
Export Always Overwrite
Export Naming
The Export naming field allows a name and incremental number sequence to be added
to the filename of files being exported. The number entered here defines the starting
value for the exported frame sequence.
Save Export Parameters
Settings Bin Functions
File export settings can be saved in the Settings Bin. These include file path name,
format, timecode, options, sizing, colour and key settings.
To recall settings, drag and drop the setting from the bin onto the selected clip(s) in the
main window. Any existing export presets from previous software versions are converted
to ‘settings’ on initial start-up of the new software.
www.quantel.com
support–downloads–login–manuals
6-21
Quantel
Import and Export
Stereo3D Export
split VL/VR
tereo3D clips can be exported as separate file
S
sequences with VL and VR tags by ticking the split VL/
VR box on the right of the menu (this is the default
state).
remove item reset list
bank
format
result
1
file00018
C:\Users\hazel\Desktop\Stereo 3D clips\{0x110386\file000018.dpx
720x486
mov
left
2048x1556
RGB 0..255 > YUV 16..235
2
file00018
C:\Users\hazel\Desktop\Stereo 3D clips\{0x280887\file000058.dpx
720x486
mov
right
2048x1556
RGB 0..1023
3
file0003
C:\Users\hazel\Desktop\Stereo 3D clips\{0x281285\file000003.dpx
720x486
mov
1920x1080
YUV 16..231
output file
path
name
format
fps
timecode
name with
sizing
output format
size
pixel aspect
c:\
2k_VR
options
deinterlace
re-render
mov
29.97
dest
colour
key
same as clip
2048 x 1556
1 : 1
If split VL/VR is selected, the stereo clip is split into left/right eye clips; one with a VL
tag and the other with a VR tag. By selecting the clip folder and proj folder tick boxes in
the <F1> Configuration Window, the separate left and right eye clips are placed into their
corresponding folders.
Grade
Utility
SAM
P2
XDCAM QShare ftp
include video
video codec
H.264
video quality
normal
F1 Dominant
dominance
Alpha export unsupported
all channels (mono)
one mono channel
include audio
audio codec
two mono channels
four mono channels
audio quality
single stereo track
mix down
show timecode
kb/sec (nominal)
6-22
copyright © Quantel Ltd 2001-2014
top
default
0
July 2014
ref 2140-57-012 C
The following export formats are available within Export. To access the relevant options
for each format, select the required format from the scroll list and press options.
Not all formats may be available on the platform or workspace in
use.
AVI
Uncompressed: if none is selected in the codecs box, the platform produces
uncompressed video and uncompressed audio (48 kHz; 16-bit; 2 channels).
Compressed: if a codec other than none is selected, the video is compressed using that
codec. Additional codecs can be installed on the platform via the operating system.
CIN
Logarithmic Cineon files are supported and can be imported, saved in their native
logarithmic form.
The Cineon Utility within the Utility application allows linear data to be converted into
Cineon Log data that can be exported using the CIN function.
Import and Export
Supported Export Formats
DPX
The platform exports video-only clips as a series of DPX files conforming to
SMPTE 268M‑1994.
JPEG
The platform exports video-only clips as a series of JPEG files. The quality of JPEG exports
can be adjusted between 1 and 100 in the options box; the default is 75.
MOV
Windows QuickTime MOV files can be exported if QuickTime 7 is installed on the
platform.
Important Notice: Quantel provides the mechanism for creating
QuickTime MOV files but Quantel does not give the installer or user
the right to create and distribute these file types.
MOV Menu
Select mov from the scroll list and press options.
www.quantel.com
support–downloads–login–manuals
6-23
Quantel
Import and Export
2
file00018
C:\Users\hazel\Desktop\Stereo 3D clips\{0x280887\file000058.dpx
720x486
dpx1
right
2048x1556
RGB 0..1023
3
file00018
C:\Users\hazel\Desktop\Stereo 3D clips\{0x281285\file000003.dpx
720x486
mov
1920x1080
YUV 16..231
output file
path
name
include video
video codec
H.264
key
sizing
video quality
normalcolour
same as clip
output F1
format
Dominant
dominance
size
2048 x 1556
Alpha export unsupported
c:\
2k_VR
options
deinterlace
re-render
mov
29.97
dest
format
fps
timecode
name with
include audio
audio codec
audio quality
mix down
show timecode
kb/sec (nominal)
pixel aspect
1 : 1
Linear PCM
maximum
single stereo track
top
default
0
The include audio and include video boxes allow video + audio, video only or audio
only to be selected for export.
Utility
Grade
XDCAM QShare ftp
P2
The video codec box
allows an appropriate
codecSAM
to be selected
from
those installed
within the Windows operating environment. If Alpha channel (key channel) is supported
by the codec, the message ‘Alpha export supported’ displays. This indicates Alpha
channel capability regardless of whether the clip being exported has a key channel or
not.
The video quality box affects the quality of the resultant video. This value affects the
result
format
sharpness of the resultant video.
file00018
C:\Users\hazel\Desktop\Stereo 3D clips\{0x110386\file000018.dpx
720x486
2048x1556
mov
RGB 0..255
> YUV
16..235
left
Select either the first field or the second
field
to be
dominant
in each frame of the export
file by selecting F1 or F2 in the scroll box to the right of dominance.
1
2048x1556
The box to the right of audio codecdpx
allows
selection of an audio codec for export such as
right
RGB 0..1023
Linear PCM, AAC and Apple Lossless.
file00018
C:\Users\hazel\Desktop\Stereo 3D clips\{0x280887\file000058.dpx
720x486
The box to the right of audio quality mov
allows1920x1080
quality selection: minimum, low, medium,
YUV
16..231
high or maximum.
file00018
C:\Users\hazel\Desktop\Stereo 3D clips\{0x281285\file000003.dpx
720x486
ut file
path
name
ormat
fps
mecode
ame with
c:\
2k_VR
options
deinterlace
re-render
mov
29.97
dest
include video
video codec
H.264
key
sizing
video quality
normalcolour
same as clip
output F1
format
Dominant
dominance
size
2048 x 1556
Alpha export unsupported
all channels (mono)
pixel aspect
1 : 1
one mono channel
include audio
audio codec
two mono channels
four mono channels
audio quality
single stereo track
mix down
show timecode
top
default
kb/sec (nominal)
Tick the mix down box to export the
file with selected audio output
patching. The box to the right of mix
down allows selection of how many
channels should be included in the
export file (as separate mono tracks
or a single stereo track).
0
If mix down is not selected, any audio output patching made on the
timeline is ignored on export.
Utility
SAM
P2
XDCAM QShare ftp
The show timecode tick box allows a QuickTime movie to be created with embedded
timecode. To the right of this box, the style (in the first scroll box), and position (in the
second scroll box) of the timecode display in the QuickTime player can be changed.
Set the style to default, white on black, or black on white; and the position to top,
bottom or below.
To allow the QuickTime files to be imported correctly into other applications, the aspect
ratio of the exported clip needs to manually defined. To do this, close options and press
the sizing tab on the Export desktop.
See “Export Material” on page 6-17.
6-24
copyright © Quantel Ltd 2001-2014
July 2014
ref 2140-57-012 C
Windows QuickTime MOV files can be exported if QuickTime 7 is installed on the
platform.
Important Notice: Quantel provides the mechanism for creating
QuickTime MOV files but Quantel does not give the installer or user
the right to create and distribute these file types. The installer/end
user must agree to the terms of use of QuickTime license
(displayed during installation) and ensure that they have the
appropriate license to create and distribute files using the codecs
provided.
Royalties may also be payable to different licencing authorities for
the use of the codecs provided and payment of these royalties is
the responsibility of the installer/end user and not Quantel. Please
refer to Apple for licensing and royalty information.
MPEG-2 (option)
Import and Export
There are three deinterlace options on MPG, MOV and WMV files;
tick the deinterlace box then select either field 1, field 2 or field
average from the box on the right.
With an appropriate password/license installed, the application supports the export of
specific MPEG-2 format files (MPG). This function is aimed primarily at the creation of
material for approval purposes but can also be used in the pre-production of DVDs using
DVD authoring packages.
MPEG-2 Option Notice: As a condition of the MPEG-2 Intermediate
Product license granted to Quantel the following notice must be
given to the end-user of this product:
USE OF THIS PRODUCT IN ANY MANNER THAT COMPLIES WITH THE
MPEG-2 STANDARD IS EXPRESSLY PROHIBITED WITHOUT A LICENSE
UNDER APPLICABLE PATENTS IN THE MPEG-2 PATENT PORTFOLIO,
WHICH LICENSE IS AVAILABLE FROM MPEG LA, L.L.C., 250 STEELE
STREET, SUITE 300, DENVER, COLORADO 80206.
The MPEG-2 files are created with the MPG extension (video with embedded stereo audio
channels) with the following characteristics:
Video:Constant bit rate: 1 Mbit/s, 2 Mbit/s, 3 Mbit/s, 4 Mbit/s, 5 Mbit/s, 6 Mbit/s,
7 Mbit/s, 8 Mbit/s, 9 Mbit/s, 10 Mbit/s, 15 Mbit/s or 20 Mbit/s. GOP (group of
pictures) 15.
Format: the size, frame rate and interlaced/ progressive settings used are those
of the clip itself.
Aspect ratio: as defined by the currently selected video output format (4:3, 16:9
or 1:1).
www.quantel.com
support–downloads–login–manuals
6-25
Quantel
Import and Export
Audio:MPEG Layer-2 16-bit mono or stereo, 48 kHz sample rate, audio at
96 kbit/s, 112 kbit/s,
128 kbit/s, 160 kbit/s, 192 kbit/s, 224 kbit/s,
result
format
256 kbit/s, 320 kbit/s or 384 kbit/s.
e00018
2048x1556
mov
RGB 0..255
> YUV 16..235
left Tracks
Internal Audio
mixed
down to stereo channels 1 and 2 in the
\Users\hazel\Desktop\Stereo 3D clips\{0x110386\file000018.dpx
20x486
embedded audio.
e00018
\Users\hazel\Desktop\Stereo 3D clips\{0x280887\file000058.dpx
20x486
dpx1
2048x1556
The export process can create
MPEG-2
right
RGB
0..1023 files of a number of video formats. Some of these
may not be actual transmittable standards or be directly compatible with other systems
(such as those used in themovproduction
1920x1080 of DVD) that require specific video formats.
e00018
\Users\hazel\Desktop\Stereo 3D clips\{0x281285\file000003.dpx
20x486
MPEG-2 Menu
c:\
2k_VR
options
deinterlace
re-render
mpg
29.97
dest
YUV 16..231
key
colour
sizing
output format
same as clip
general
MPEG2 codec
sizeDVB compatible
2048 x 1556
DVD
compatible
video bitrate pixel aspect
1 : 1
6 Mbit/S
DVB
compatible
128 Kbits/sec
Blu-rayF1
compatible
audio bitrate
Dominance
Encode Format
4:2:0
m2v+mpa
T he scroll list to the right of the MPEG2
Codec box allows general, DVD
compatible, DVB compatible or Blu-ray
compatible data streams to be selected.
General Program Stream
With general selected, video clips of any format can be encoded as an MPEG-2 Program
stream with any video and audio bit rate settings.
Utility
SAM
P2
XDCAM QShare ftp
DVD Compatible Program Stream
With DVD compatible selected, video clips of the following types can be encoded as
MPEG-2 Program streams for use with DVD type 5:
MPEG2 codec
video bitrate
audio bitrate
Dominance
Encode Format
sizeDVB compatible
2048 x
pixel aspect 6 Mbit/S
1 : 1
PAL - 720 × 567 @ 25 FPS, 4:3 or 16:9
128 Kbits/sec
PAL
- 704 × 576 @ 25 FPS, 4:3 or 16:9
F1
4:2:0
m2v+mpa
NTSC - 720 × 480 @ 29.98 FPS, 4:3 or 16:9
NTSC - 704 × 480 @ 29.98 FPS, 4:3 or 16:9
If any other video format clip is exported with DVD compliant selected the process fails.
When exporting MPEG-2 files for DVD production the maximum video bit rate used should
be 8000 kbit/s and the minimum audio bit rate should be 192 kbit/s.
If the appropriate MPEG-2 settings are used for exporting (ie the
same settings as the final DVD) the DVD authoring process does
not need to re-compress the MPEG stream. This reduces the time
taken to author the DVD and maintain the highest video quality.
DVB Compatible Transport Stream
With DVB compatible selected, video clips of any format can be encoded as an MPEG-2
Transport stream, with any video and audio bit rate settings.
6-26
copyright © Quantel Ltd 2001-2014
July 2014
ref 2140-57-012 C
With Blu-ray compatible selected, video clips of any format can be encoded as an
MPEG‑2 Transport stream with any forced field dominance and video/audio bit rate
settings applied.
The first Encode Format scroll box can be set
to either 4:2:0 or 4:2:2.
The second Encode Format scroll box can be
set to generate either m2v+mpa (required for
DVD Studio Pro) or mpg files.
MXF
The platform exports MXF files conforming to SMPTE 377M-2004 that use Operational
Pattern Op1A.
MXF wrapped DNxHD files
Import and Export
Blu-ray Compatible Transport Stream (M2V+MPA, MPG)
When exporting a clip of this format, a folder is created containing the mxf wrapped
DNxHD essence, an aaf and xml descriptor files.
If a folder has been previously created and an attempt is made to
re-export the clip, a file export error message displays and the
export is not completed. An existing folder must be deleted before
re-exporting as it cannot be overwritten.
The mxf file can then be placed in the Avid media folder and the aaf file dragged into the
Avid clips bin to make the clip available.
PNG
The platform exports video frames as PNG (Portable Network Graphics) format.
SGI
The platform exports video-only clips as a series of 8-bit or 16-bit Silicon Graphics SGI
files.
TARGA
The platform exports video-only clips as a series of 8-bit RGB Targa (TGA) files.
TIFF
The platform exports video-only clips as a series of 8-bit or 16-bit RGB TIFF files.
www.quantel.com
support–downloads–login–manuals
6-27
Quantel
Import and Export
VPB
The platform exports video-only clips as a series of Quantel proprietary VPB files (Video
Paintbox format). This format can be opened directly by Quantel standard definition video
products.
VPB/WAV/INFO
The platform exports clips as a series of VPB video files, WAV audio files and a file
containing clip metadata. This can be used to export clips to other Quantel equipment
that supports this kind of media exchange.
WAV
The platform exports audio-only clips as a single 48 kHz, 24-bit or16-bit, 1, 2 or 4 channel
WAV file.
When exporting a clip with audio as a WAV file, choose the audio tracks to be exported.
Press mix down and choose from mono, stereo or quad to mix down the audio.
Windows Media (WMA, WMV)
The platform exports Windows Media 9 compressed video (WMV) and audio (WMA) files
if Windows Media 9 is installed on the system.
Important Notice: Quantel provides the mechanism for creating
Windows Media 9 files but Quantel does not give the installer or
user the right to create and distribute these file types.
The installer/end user must agree to the terms of use of Windows
Media 9 license (displayed during installation) and ensure that they
have the appropriate license to create and distribute files using the
codecs provided. Royalties may also be payable to different
licensing authorities for the use of the codecs provided and
payment of these royalties is the responsibility of the installer/end
user and not Quantel. Please refer to Microsoft for licensing and
royalty information.
6-28
copyright © Quantel Ltd 2001-2014
July 2014
ref 2140-57-012 C
• Select wmv from the scroll list and press options:
The video codec box allows an appropriate video codec to be selected from those
installed within the Windows operating environment. The green box below allows the
video bit rate to be set in kilobits per second. The recommend box automatically
calculates the appropriate bit rate to be used.
The audio codec box allows an appropriate audio codec to be selected from those
installed within the Windows operating environment.
The audio format box allows an appropriate audio sample rate to be selected for the
exported audio.
The quality box affects the quality of the resultant video. This value affects the
sharpness of the resultant video.
Import and Export
WMV/WMA Menu
The KF box sets the video keyframe rate (this is equivalent to an I-frame and determines
how often the whole video frame is sent in the data). This value affects the size of the
resultant video component of the wmv file and the quality of playback in Windows Media
Player. If a low value is selected with a low video bit rate then frames may be lost.
The overall quality and the size of the resultant .asf file is
determined by the type of material being exported, the video and
audio codecs selected and their settings.
There are three deinterlace options on MPG, MOV and WMV files;
tick the deinterlace box then select either field 1, field 2 or field
average from the box on the right.
www.quantel.com
support–downloads–login–manuals
6-29
Quantel
Import and Export
6-30
copyright © Quantel Ltd 2001-2014
July 2014
ref 2140-57-012 C
Appendix
ref 2140-57-012 C
www.quantel.com
support–downloads–login–manuals
A–1
Appendix
About This Manual
This guide covers software available on some Quantel stand-alone and server-connected
systems. It may cover functions or options not available on the system you are using.
This guide was written and published by Quantel. The bottom of each page displays the
guide’s reference number, eg 2140-57-xxx plus a revision letter, eg B (B being more
recent than A which is the original). The publish date is also indicated in the format mm/
yy. If you require hard copies of this guide, always quote the reference number, revision
letter and title.
2140-57-012
revision
ECO (Quantel use only)
software version
A
03/11E44203 5.0
B
11/12E44770 5.2
C
09/13E45394 5.3
A–2
publish date
copyright © Quantel Ltd 2001-2014
July 2014
ref 2140-57-012 C
Maintenance
warning (wm2) service personnel – maintenance and calibration within
THE equipment enclosure is only to be carried out by service personnel
(12/97)
Conventions Used
Appendix
Notices
Symbols
See: Reference to other items in this document or in other
documents.
Notes: System, software and workflow points to consider and
remember.
Tips: Useful hints and advice when undertaking tasks.
Information: Additional hardware or software information which
may be useful.
Cautions: Indicate possible damage to (or misalignment of) the equipment if
the indicated statements are ignored or the indicated procedures are not
followed correctly.
warnings: indicate danger to life and limb if the indicated statements are
ignored, or the indicated procedures are not followed correctly.
Text
<Text>
indicates a specific key press on the QWERTY keyboard.
NN/nn
indicates a value entered on a numeric keypad.
Text/textindicates either a Quantel application menu function or a Windows/Quantel
installation/system setting.
www.quantel.com
support–downloads–login–manuals
A–3
Quantel
Appendix
Trademarks
Most of the product names mentioned in this manual are manufacturer trademarks and are used within this manual
only for the purpose of identification:
Quantel sQ Edit, sQ Cut, sQ View, Quantel sQ Edit Plus Platform, Quantel ISA, Quantel Pablo, Quantel PabloNeo,
Quantel NeoNano, Quantel iQ, Quantel eQ, iQ Platform, eQ Platform, Resolution Co-existence and Clipnet are
trademarks of Quantel Limited.
XDCAM is a registered trademark of Sony Japan.
Final Cut, Final Cut Pro, QuickTime and Macintosh are registered trademarks of Apple Computer, Incorporated.
Windows and Windows Media Player are registered trademarks of the Microsoft Corporation.
Mocha Tracker is a registered trademark of Imagineer Systems Limited.
All other brand names, product names, or trademarks belong to their respective holders.
GNU GPL/LGPL Applied Software: The software contains elements
that are licensed under GNU General Public License (GPL) or GNU
Lesser General Public License (LGPL).
This informs you that you have a right to have access to, modify and redistribute source
code for these software programs under the conditions of the supplied GPL/LGPL.
Source code is available on request; you can contact Quantel Support regarding the
source code contents.
MPEG-2 Option Notice: As a condition of the MPEG-2 Intermediate
Product license granted to Quantel the following notice must be
given to the end-user of this product:
USE OF THIS PRODUCT IN ANY MANNER THAT COMPLIES WITH THE MPEG-2 STANDARD IS EXPRESSLY PROHIBITED
WITHOUT A LICENSE UNDER APPLICABLE PATENTS IN THE MPEG-2 PATENT PORTFOLIO, WHICH LICENSE IS AVAILABLE
FROM MPEG LA, L.L.C., 250 STEELE STREET, SUITE 300, DENVER, COLORADO 80206.
XDCAM Software License Notice: As a condition of the License
Agreement that Quantel has with Sony, the following notice must
be given to the end-user of this product.
i
The END USERS may not modify, change, alter, reverse-engineer, disassemble, decompile or otherwise analyse
all or any portion of the LICENSED SOFTWARE except as permitted by applicable law;
ii Any or all warranties associated with the LICENSED SOFTWARE shall be no greater than those contained in the
Agreement; and
iii The limited liability of SONY shall be no less than the limited liability under this Agreement.
XDCAM MPEG 4 Option Notice: The Software includes MPEG 4 visual
decoding technology. For this technology, MPEG LA, L.L.C. requires
this notice:
THIS PRODUCT IS LICENSED UNDER THE MPEG-4 VISUAL PATENT PORTFOLIO LICENSE FOR THE PERSONAL AND NONCOMMERCIAL USE OF A CONSUMER FOR (I) ENCODING VIDEO IN COMPLIANCE WITH THE MPEG-4 VISUAL STANDARD
(‘MPEG-4 VIDEO’) AND/OR (II) DECODING MPEG-4 VIDEO THAT WAS ENCODED BY A CONSUMER ENGAGED IN A
PERSONAL AND NON-COMMERCIAL ACTIVITY AND/OR WAS OBTAINED FROM A VIDEO PROVIDER LICENSED BY MPEG
LA TO PROVIDE MPEG-4 VIDEO. NO LICENSE IS GRANTED OR SHALL BE IMPLIED FOR ANY OTHER USE. ADDITIONAL
INFORMATION INCLUDING THAT RELATING TO PROMOTIONAL, INTERNAL AND COMMERCIAL USES AND LICENSING
MAY BE OBTAINED FROM MPEG LA, LLC. SEE HTTP: //WWW.MPEGLA.COM.
A–4
copyright © Quantel Ltd 2001-2014
July 2014
ref 2140-57-012 C
Quantel Limited accepts no responsibility for the accuracy of the information contained
herein and reserves the right to change the contents without prior notice. This document
does not form part of the product’s Technical or Functional Specification and does not
form part of any contractual agreement.
This manual is not product specific and may detail features that are not available on all
systems.
Helpdesk and Web Support
Appendix
Disclaimer
24 Hour Helpdesk
tel +44 (0)1635 38508* fax +44 (0)1635 815892
email [email protected]
Website and Downloads (manuals, drivers, plugins and software)
http://www.quantel.com go to support–downloads (login required)
* calls may be recorded for training & quality control purposes.
www.quantel.com
support–downloads–login–manuals
A–5
Quantel
Appendix
A–6
copyright © Quantel Ltd 2001-2014
July 2014
ref 2140-57-012 C

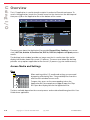
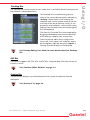
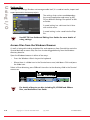

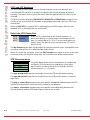
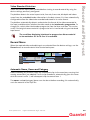
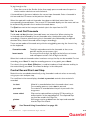
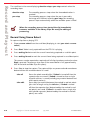
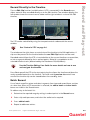
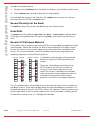
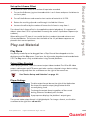
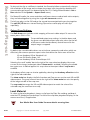
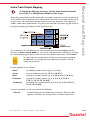
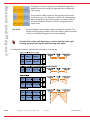
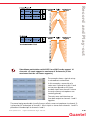

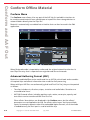
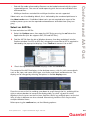
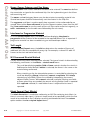
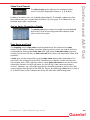
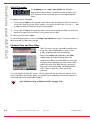
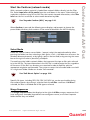
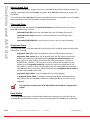
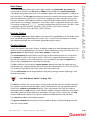
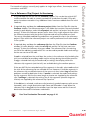
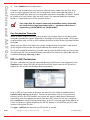
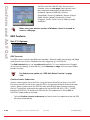
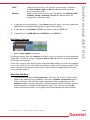

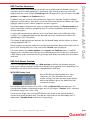
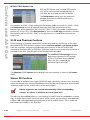
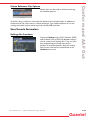
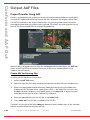
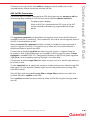
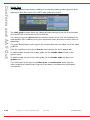

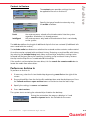

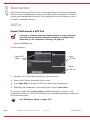
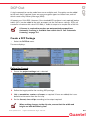

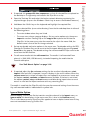
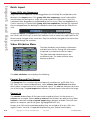
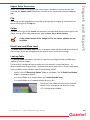
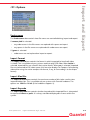
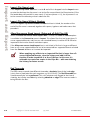
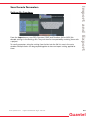
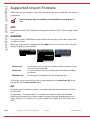
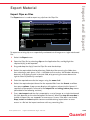
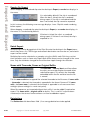
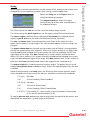
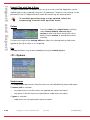
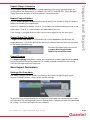
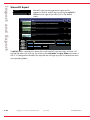
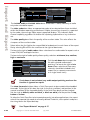
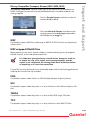


![CINE Y VÍDEO DIGITAL [473]. PROGRAMA DE LA ASIGNATURA](http://vs1.manualzilla.com/store/data/006212138_1-01e514309393024b8a96495a37b20457-150x150.png)