1
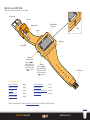
Rebel
user guide
www.s-w-a-p.co.uk
Contents
Welcome to your sWaP™ Rebel
2
Your Phonebook (Contacts)
8
Settings19
Adding a new entry
8
Pen Calibration
Copying entries
8
Organizer19
19
Getting started
3
Inserting your SIM card
3
Finding an entry
8
File manager
Charging the battery
3
Other Phonebook options
8
Stopwatch23
Wearing your sWaP Rebel
3
Removing/inserting the memory card
4
Messages9
Using the wired earphones
4
SMS messages
9
Switching on and off
5
MMS messages
11
Using the stylus
5
Voice mail server
12
Pen Calibration
5
Broadcast message
12
The clock face
5
Menu map
6
Media13
Dialling a call
6
Camera13
Answering a call
6
Photo album
Rejecting a call
6
Ending a call
23
User Profiles
24
Phone Setup
24
Call Setup
25
Network Setup
25
Security Setup
26
Restore Factory Settings
26
USB link to your computer
27
14
Important safety information 28
Video recorder
14
Exposure to radio frequency (RF) signals
28
6
Video player
14
Operational precautions 28
Voice activation
6
Audio player
15
Medical devices
28
Using speed dial
6
FM radio
17
Batteries29
In-call options
7
Auto keypad lock 7
Call history
7
WAP18
Vehicles29
Specific Absorption Rate (SAR)
29
EU directives
30
FCC warning
30
contents
sWaP Rebel user guide
www.s-w-a-p.co.uk
1
Welcome to your sWaP Rebel
™
All the functions you need, right there on your wrist.
USB port socket
Strap loop
1.46” high resolution
touch screen
Earphones socket
Camera
Speaker
Microphone
Telescopic stylus
End button
(plus power on/off)
When you see
in this
guide, it means for you to
press this button, not to press
the part of the fascia where
the
logo is located.
Call button
When you see
in this
guide, it means for you to press
this button, not to press the
part of the fascia where the
logo is located.
USB connection
Things that you can do:
•Insert your SIM card
•Charge the battery
•Switch on
•Dial/answer a call
•Use the earphones
page 3
page 3
page 4
page 5
page 6
•Use the Phonebook
•Use messaging •Use multimedia applications
•Access websites
page 7
page 8
page 12
page 15
Please also take a moment to read the important safety information located at the rear of this guide.
Contents
sWaP Rebel user guide
www.s-w-a-p.co.uk
2
Getting started
Inserting your SIM card
Charging the battery
Note: Avoid touching the gold contacts of your SIM card.
1On the underside of your sWaP Rebel, carefully lever off
the back cover to reveal the SIM card holder.
Wearing your sWaP Rebel
Charge your sWaP Rebel using the USB port on your
computer. Your sWaP Rebel can be switched on or off
when it is charging.
0%
100%
While charging, the battery indicator
on the display will show the progress:
1Carefully insert the USB connection on the strap into a
vacant USB port on your computer.
PC
2Slide back the SIM card holder to release it. Lift it up
and then place your SIM card fully into the holder so
that its gold contacts are facing down and the notched
corner is facing outwards.
Wear your sWaP Rebel in the same way as any watch.
Note: You will find that if you
wear it on your left wrist then the
camera will face away from you,
making it easier to photograph
and film other people.
Camera
1Place your sWaP Rebel on your wrist and buckle the
clasp as you would with any normal watch.
2Insert the USB connection at the end of the strap into
the corresponding socket on the strap loop.
A
USB connection
B
3Carefully push down the holder and SIM card until they
lie flat, then slide the holder forward so that it locks
into place with a click.
4Replace the back cover of your sWaP Rebel, making
sure that it clicks shut.
2If your computer is not already switched on, switch it
on to start charging your sWaP Rebel.
Strap loop
This will help to keep the contacts of the USB
connection free from damage and is also essential if
you wish to use the headphones.
Contents
sWaP Rebel user guide
www.s-w-a-p.co.uk
3
Removing/inserting the memory card
Your sWaP Rebel comes with a 2 GigaByte memory
card to store all of your messages, pictures, videos and
other information. You do not normally need to remove
the memory card, however, there may the occasional
need to transfer memory content to, or from, another
similarly equipped device.
The memory card conforms to the Micro SD standard
and is located below the SIM card holder.
1On the underside of your sWaP Rebel, carefully lever off
the back cover to reveal the SIM card holder.
2Slide back the SIM card holder to release it. Lift it and
the SIM card (if fitted) up to reveal the memory card.
Using the wired earphones
3Carefully lift the paper pull tag attached to the memory
card holder to disengage and raise the holder. You can
now slide out the memory card.
Pull tag
Micro SD memory card
4To reinsert the card, ensure that it is oriented as above
and then carefully slide it into the holder. Close the
memory card holder until it clicks into place, taking care
to leave the pull tag accessible
5Carefully push down the holder and SIM card until they
lie flat, then slide the holder forward so that it locks
into place with a click.
6Replace the back cover of your sWaP Rebel, making
sure that it clicks shut.
The supplied earphones and microphone can be used
to listen to music/videos/FM radio as well as making
and taking calls.
1Carefully insert the right-angle plug of the earphones
into the connector located on the strap loop.
Note: The USB strap connection must be inserted
into the other side of the loop in order to provide the
earphone signals.
The small button on the microphone pod can be used
to answer* and terminate calls.
* Within the Headset profile, if the Answer Mode
option is set to Auto, then calls will be answered
immediately - you can alter this. See the Settings
section for details.
Contents
sWaP Rebel user guide
www.s-w-a-p.co.uk
4
Switching on and off
Using the stylus
The clock face
Press and hold the upper side button until the screen
responds, then release.
The stylus is a telescopic pointer with which you can
select items more accurately on the touch screen. It is
stored in the strap loop of your sWaP Rebel.
When your sWaP Rebel is not engaged in other
activities, it will display a clock face (analog or digital):
Analog clock face
Digital clock face
sWaP
14
Telescopic
stylus
Long press
Pen Calibration
For best results, we recommend that you calibrate the
screen of your new sWaP Rebel. This will ensure the
best accuracy between your stylus movements and the
reaction of the screen.
1From the clock face, tap the Menu link in the lower left
corner of the screen.
2Tap
(twice, if necessary).
3Tap Pen Calibration and then follow the on screen
instructions, using the stylus to tap where instructed.
TIPS:
•When tapping on the displayed touch points, view the
screen exactly as you would in normal operation.
•For best results, go through the procedure twice.
•
Repeat the procedure once a month to keep
accuracy at the opimum level.
Tap here to
access the
main menu
Tap here to
access your
Phonebook
Name of the
current network
The chosen clock face will overlaid with the current
network name plus selectable options (in the two lower
corners). The top edge of the clock face will also show
one or more of the following status icons:
?
Signal level (0 to 4 bars)
Battery charge status
Missed call
SMS message(s) received
MMS message(s) received
GPRS data connection available
Earphones attached
Auto keypad lock is off
Auto keypad lock is on
Bluetooth function enabled
Alarm set
User profile set to use ring alert only
User profile set to use vibrate first and then ring
User profile set to use vibrate and ring alerts
User profile set to use vibration alert only
Stopwatch running
From the clock face, you can access the Menu, view
your Contacts or make a call (tap and hold anywhere).
See also Phone Setup > Swipe Function.
Contents
sWaP Rebel user guide
www.s-w-a-p.co.uk
5
Menu map
Dialling a call
From the clock face, tap the Menu option (or press the lower button) and then choose one
of six icons:
CONTACTS
Search Entry
Add Entry
Copy All
Delete
Caller Group
Settings
MESSAGES
SMS
MMS
Voice Mail Server
Broadcast Message
CALL LOG
Missed Calls
Dialed Calls
Received Calls
Delete Call Log
Call Time
SMS Counter
GPRS Counter
MEDIA
Camera
Photo Album
Video Recorder
Video Player
Audio Player
Sound Recorder
FM Radio
Tap the Back option or press
SETTINGS
Pen Calibration
Organizer
Calendar
To Do List
Alarm
World Clock
Calculator
Bluetooth
File Manager
Stopwatch
User Profiles
Phone Setup
Call Setup
Network Setup
Security Setup
Restore Factory Settings
1From clock face, tap and hold the screen for
2 seconds to show the dial page:
2Tap the phone number and then press the
button. Alternatively, tap
to access
your Phonebook.
1 2 3 4 5
6 7 8 9 0 #
Answering a call
When the call alert sounds (or vibrates):
•Press the
button twice to answer, or
•Tap Option and then tap Answer, or
•Tap Option and then tap Deflect to dial a number (or choose
from your Phonebook) to which you wish to send the incoming
call.
•Tap Option and then tap Call background sound to choose a
sound effect (such as Pub, Motorcycle, Sidewalk, etc.) to play in
the background and answer the call once chosen.
Rejecting a call
•Press the
button or tap Reject in the lower right corner.
Ending a call
•Press the
button or tap Option in the lower left corner and
then tap End single call.
Voice activation
WAP
WAP
Data Account
to exit from the menu and return to the clock face.
•From the clock face, press and hold the
button and then
say either “CALL xyz” or “FIND xyz”, where xyz is a Phonebook
contact name.
Using speed dial
•Tap and hold a number between 1 and 8 to dial one of your most
commonly used contacts*.
•Tap the
button to view your list of speed dial contacts. Here
you can edit an entry, delete an entry, or call an entry (highlight
the required entry and press
to place the call).
*To use speed dial, you need to first store your special contact
numbers - use the
button or see Speed Dial within the Phone
Setup section.
Contents
sWaP Rebel user guide
www.s-w-a-p.co.uk
6
In-call options
Auto keypad lock
During a call you can access a number of features by
tapping Option:
To help you avoid accidentally activating features on
your sWaP Rebel or making unwanted call, you can
invoke the auto keypad lock feature. When enabled,
this feature will lock the screen after a certain period of
inactivity (from 5 seconds to 5 minutes).
Once locked, you simply need to press the
button
and then tap your stylus on a displayed target on the
display to unlock your sWaP Rebel.
•Hold single call - Place the call on hold*.
•End single call - End the current call.
•New Call - Dial a new number*.
•Phonebook - Access your Phonebook.
•Messages - Access your messages.
•Sound recorder - Record the call.
•Call background sound - Select from a range of
sound effects to play in the background of your call.
•Mute - Switch off the microphone for privacy.
•DTMF - Enable audible DTMF (Dual Tone Multi
Frequency) tones when dialling numbers.
In the call screen, you can also:
•Tap to re-display the numeric keypad.
•Tap H-Free to activate the loudspeaker.
Tap H-Held to return to quiet mode.
To enable/disable the auto keypad lock feature
1From the clock face, tap Menu.
2Tap
(twice, if necessary).
3Tap Security Setup.
4Tap Auto Keypad Lock. Enable the feature and choose
the required period of inactivity: 5 secs, 30 secs, 1 min
or 5 mins.
Call history
Your sWaP Rebel maintains records of all incoming,
outgoing and missed calls as well as text message
quantities and data usage. You can use these records to
make calls, populate your Phonebook and/or keep track
of your call charges.
1From the clock face, tap Menu.
2Tap (twice, if necessary) to view the Call history
options:
•Missed Calls
•Dialed Calls
•Received Calls
•Delete Call Log
•Call Time
•SMS Counter
•GPRS Counter
Select the required item to view a list of related options
or details.
* Network support required.
Contents
sWaP Rebel user guide
www.s-w-a-p.co.uk
7
Your Phonebook (Contacts)
Your Phonebook is where you store all of your contact
details for quick access and rapid dialling.
There are two main ways to enter your Phonebook
(Contacts):
•From the clock face, tap Contacts.
The list of Phonebook contact entries will be shown.
or
•From the clock face, tap Menu. Then tap
(twice, if
necessary).
The main Phonebook menu will be shown.
Adding a new entry
To add a new entry you need to enter the Phonebook
via the Menu:
1From the clock face, tap Menu.
2Tap
(twice, if necessary).
3Tap Add Entry.
4Choose where to store the entry: Tap either To SIM or
To Phone. The latter uses the sWaP Rebel memory and
allows more details to be stored.
5Use the labelled information fields to enter the relevant
details about your contact.
For contacts stored within the sWaP Rebel memory,
you can associate an image and/or a particular ring
tone to each person. You can also collect your contacts
into groups, such as Friends, Family, Business, etc.
These options are located lower down in the list of
information fields.
Copying entries
You can copy all of the contacts from your SIM card to
the sWaP Rebel memory and vice versa.
1From the clock face, tap Menu.
2Tap
(twice, if necessary).
3Tap Copy All.
4Tap either From SIM or From Phone as appropriate.
Importing contacts from another phone
The simplest way to import contacts is to use your SIM
card as a carrier.
1Fit your SIM card into the other phone.
2Copy the contacts from the phone memory to the SIM
card.
3Fit your SIM card into your sWaP Rebel.
4Use the Copying entries procedure (above) to transfer
the contacts across to your sWaP Rebel memory.
Finding an entry
You can find entries in two main ways: By scrolling
through the list of contacts; or by entering one or more
characters of the name to make a search.
Finding an entry by scrolling:
1From the clock face, tap Contacts.
2Tap the up or down arrows (or use the up/down
button) to scroll through the list.
3When the required entry is highlighted, tap to dial or
tap Option to send a message or edit the entry.
Finding an entry by searching:
1From the clock face, tap Menu.
2Tap
(twice, if necessary).
3Tap Search Entry.
4Enter one or more characters of the name and then tap
Option and then tap Search.
5When the required entry is highlighted, tap to dial or
tap Option to send a message or edit the entry.
Other Phonebook options
There are numerous other things that you can do
within your Phonebook. Here are just a few:
•Send SMS or MMS messages to a contact by starting
from the Phonebook. Enter the Phonebook via
Contacts (Option: Send SMS or Send MMS).
•Edit characteristics for your caller groups or create new
caller groups in which to collect your contacts. These
groups are particular useful when you need to regularly
send messages to more than one person. Enter
Phonebook via the menu (Option: Caller Group).
•Prevent calls from certain people by adding them to
a black list within your Phonebook. (Option: Add to
BlackList)
•Delete entries individually or clear the entire SIM card
or sWaP Rebel memory. Enter Phonebook via the menu
(Option: Delete).
•Check how much memory space you have remaining.
Enter Phonebook via the menu (Option: Settings >
Memory Status).
•Choose which memory you prefer to use to store
contacts: SIM or Phone. Enter Phonebook via the menu
(Option: Settings > Preferred Storage).
•Create a vCard containing your contact details which
you can easily send to other people, rather like an
electronic business card. You can send your vCard
either via SMS or MMS messaging, Bluetooth link or as
a file that can be downloaded to a computer via the
USB cable. Enter Phonebook via the menu (Option:
Settings > My vCard).
Contents
sWaP Rebel user guide
www.s-w-a-p.co.uk
8
Messages
Your sWaP Rebel enables you to stay in contact using
two different kinds of messages. SMS is the method
supported by all mobile phones which allows text
plus certain small media attachments to be sent and
received. MMS is the newer format that allows you to
send and receive larger photos, video clips and sound
recordings, in addition to text.
When an incoming message is received, your sWaP
Rebel will alert you and display the sender’s number*
or their name if they are listed in your Phonebook. The
clock face will also show the
icon until you have
read the message.
•Tap Read to go straight to the message immediately.
or
•From the clock face, tap Menu. Tap
(twice, if
necessary). Then tap either SMS or MMS and then
tap Inbox.
* Subject to availability.
Writing an SMS message
1From the clock face, tap Menu.
2Tap
(twice, if necessary).
3Tap SMS, then Compose Message.
4Tap out or handwrite your message within the editor
page:
Message display area - you can
also use the stylus to hand write
characters into this area.
Show/hide
punctuation
characters
Show other
characters
Change between upper and
lower case plus numeric
characters
Space bar
5You can optionally add other elements to your
message. Tap Option:
•Insert Number from your Phonebook.
•Insert Name from your Phonebook.
•Insert Object to add small images, animations or
melodies.
•Format Text to change the size, style and alignment
of the characters.
•Use Template to quickly add a standard phrase to
your message.
•Insert Bookmark to add internet addresses stored in
the WAP browser.
Note: Not all mobile phones are able to display or play
media attachments or show text formatting.
6When your message is complete, tap Option and then
tap Send.
You can now choose how to send and/or save the
message: Send to one person, send to a list of people,
send to one of the your groups, or just save the
message for later.
7Tap the required send/save option and then either enter
the phone number (or tap Search to find a Phonebook
entry) or choose the group of recipients.
8Tap OK to send/save your message.
If you chose to save your message, it will be stored in
the Outbox, which you can choose from the main
Messages menu.
SMS messages
Contents
sWaP Rebel user guide
www.s-w-a-p.co.uk
9
Reading an SMS message
1From the clock face, tap Menu.
2Tap
(twice, if necessary).
3Tap SMS, then tap Inbox. The list of received messages
will be shown, each listed with either the phone
number or the name (if in the Phonebook) of its sender.
The prefixed envelope icon will be shown closed for
unread messages or open for previously viewed ones.
4Tap the required message to open it. (Note: Tap Re.. to
send a reply to the sender).
5Tap Option to view the range of actions available to
you:
•Reply allows you to compose and send a response to
the original message.
•Delete removes the currently opened message.
•Edit allows you to alter the message and then send it
to one or more new recipients.
•Forward allows you to send the message to one or
more new recipients without editing.
•Multi operation allows you to choose a selection of
messages and then collectively delete them or delete
all messages from a particular sender.
•Copy to ..., Move to ..., Copy All and Move All
allow you to copy or transfer messages from one
memory area to the other.
•Delete All allows you to keep your Inbox clear
of clutter.
•Use Number and Use URL are particularly useful
when there are phone numbers or website addresses
within the original message. These options allow you
to use them to make calls, save to your Phonebook or
access the website, as appropriate.
SMS message settings
1From the clock face, tap Menu.
2Tap
(twice, if necessary).
3Tap SMS, then tap Message Settings.
•Profile Setting determines important message
delivery criteria for one or more networks.
•Report Settings allows you to request a Delivery
Report when your messages are received by the
recipients. Reply Path is a network option that is not
normally needed.
•Memory Status shows the remaining space for
messages in memory.
•Preferred Storage allows you to choose which
memory to use.
•Message Signature allows you to enter text to use as
a standard signature and append it to every message
that you send.
Contents
sWaP Rebel user guide
www.s-w-a-p.co.uk
10
MMS messages
MMS messages are structured in a similar way to slide
show presentations. Each message consists of one or
more slides, with each slide able to contain text, an
image, an audio file, a video clip, a file attachment or
any combination of these. When the message is played,
each slide and it’s contents are shown in order. You can
optionally adjust the timing of the slides, for instance,
to keep showing an image until a clip of music has
finished playing.
Note: MMS messages require a GPRS connection as
part of your service provider agreement. Also, not all
mobile phones can accept or display MMS messages.
You must also choose the correct initial settings to
match your network. Please see MMS connection
configuration at the end of this MMS section.
Writing an MMS message
1From the clock face, tap Menu.
2Tap
(twice, if necessary).
3Tap MMS, then tap Compose Message. A series of
blank fields will be shown. Each has a different
function:
1-To; 2-Cc (copy); 3-Bcc (blind copy); 4-Subject;
5-Edit content
Tap on a field that you want to use, and then tap Edit.
For fields 1, 2 and 3 you can enter any number of
phone numbers and/or email addresses.
Field 4 is the message Subject and will invoke the
standard text editor.
Field 5 is where you create and determine the content.
When you tap Edit Content for field 5 for the first
time, you will see the text editor for the first slide.
4Enter/edit your text and then tap Option.
To add an item to the current slide, tap Add Picture,
Add Audio, Add Video or Add Attachment.
In each case, tap Phone or Memory Card to choose
the location of the item. Your sWaP Rebel applications
use Phone storage as standard, however, this can be
changed within each application (the memory card has
a much larger capacity).
You will then see the folders located within the chosen
storage area, e.g. Images, Audio, Photos, Video, etc.
Tap the appropriate folder name to view the contents.
Tap the required item to add it to your slide.
5For each item type, repeat step 4. Remember that you
can only have one of each item type per slide. If you
add a second image to a slide, it will overwrite the first
one.
6If necessary, add one or more new slides to
accommodate multiple items of the same type. From
the text editor, tap Option and then tap either Add
Slide Before or Add Slide After. You will now see the
blank text editor for the new slide. It is not necessary
to have text on every slide. Repeat steps 4 and 5 to
populate the new slide.
7To change between slides, tap Option and then tap
either Previous Slide or Next Slide, as appropriate.
8When you have completed the slides you can see how
they will play. Tap Option and then tap Preview. If
necessary, you can change the timing. Tap Option and
then tap Slide Timing. Use the editor to change the
time (in seconds) that each slide is displayed.
9Once the message is complete, tap Option and then
tap Done. You will now see the initial group of fields
where the addressing is performed.
If not already done, enter the recipient
phone numbers and/or email addresses and then tap
Done.
10You can now choose to Send Only, Save and Send
or Save to Drafts.
If you did not enter any recipients, the only option will
be Save to Drafts.
Contents
sWaP Rebel user guide
www.s-w-a-p.co.uk
11
Reading an MMS message
1From the clock face, tap Menu.
2Tap
(twice, if necessary).
3Tap MMS, then tap Inbox. The list of received MMS
messages will be shown, each listed with either the
phone number or the name (if in the Phonebook) of its
sender.
The prefixed envelope icon will be shown closed for
unread messages and open for previously viewed ones.
4Tap the required message to open it.
5Tap Option to view the range of actions available to
you:
•Reply allows you to compose and send a response to
the original message.
•Reply by SMS allows you to contact the sender via
SMS.
•Reply All allows you to send a response to the sender
and all of the original recipients.
•Forward allows you to send the message to one or
more new recipients without editing.
•Delete and Delete All allow you to keep your Inbox
clear of clutter.
•Properties allows you to view the addressing details,
the subject name and file size of the message.
•Use Details allows you to use the addressing details
of the message.
MMS connection configuration
Before you can use MMS for the first time, you must
ensure that the MMS settings are correct for your
network connection.
1From the clock face, tap Menu.
2Tap
(twice, if necessary).
3Tap MMS.
4Tap Message Settings.
5Tap Server profile.
6Tap the appropriate network provider name and tap
Activate profile.
This process is required only once, you are now ready to
use the MMS application.
Voice mail server
This option allows you to configure the phone number
of your network service provider’s voice mail system.
These details are often set automatically by your SIM
card.
1From the clock face, tap Menu.
2Tap
(twice, if necessary).
3Tap Voice Mail Server.
4Tap one of the entries and tap Edit.
5Tap the upper entry, tap Edit and enter a name for the
network/server.
6Tap Option and tap Done.
7Tap the lower entry and enter a valid number for the
voice mail server, as advised by your service provider.
Tap OK and then confirm to save.
Broadcast message
These are text messages that contain information
relevant to your location, which you can choose to
receive. The messages could contain local weather
forecasts, traffic reports or special offers in local
establishments.
1From the clock face, tap Menu.
2Tap
(twice, if necessary).
3Tap Broadcast Message. The menu provides a number
of options:
•Receive Mode enables or disables the broadcast
messages feature.
•Read Message allows you to view any received
broadcast messages.
•Languages allow you to choose to receive all
messages or only those in English.
•Channel Settings allows you to optionally refine
which channels (0 to 999) you wish to receive. As
standard, you will receive messages from all channels.
Listening to voice mail messages
1Tap Voice Mail Server.
2Tap appropriate server name.
3Tap Call Voice Mail.
Contents
sWaP Rebel user guide
www.s-w-a-p.co.uk
12
Media
Camera
Your sWaP Rebel is a fully formed multimedia device
that can handle video and music just as smoothly as it
deals with your phone calls.
Your sWaP makes great use of its
in-built high resolution camera, which can operate as a
video camera as well as capturing still images.
Media features include:
•Camera
•Photo Album
•Video Recorder
•Video Player
•Audio Player
•Sound Recorder
•FM Radio
Allows you to capture high quality still images
which you can retain on your sWaP Rebel or transfer
elsewhere.
1From the clock face, tap Menu or press the lower
button.
2Tap
(twice, if necessary).
3Tap Camera. The camera viewfinder will be shown:
Adjust
brightness
Memory
remaining
Change
picture
resolution
Change white
balance mode
Change delay
timer
Zoom
Change
number of
shots
Take picture
To change camera settings, you can either tap the
screen icons or tap Option to view the following
settings:
•Camera Settings includes: Shutter sound, EV
(brightness), banding, delay timer, etc.
•Image Settings includes: Picture size and quality.
•White Balance includes: Daylight, Tungsten,
Fluorescent, etc.
•Scene Mode includes: Night mode or Auto.
•Effect Settings allows you to apply a special effect
to the captured video, such as greyscale, various sepia
tints or colour inversion.
•Add Frame allows you to choose a frame for your
pictures, which will be superimposed on the final
image.
Change image
quality
The camera lens is located on the right side of your
sWaP Rebel. Ensure that it has a clear view to your
subject.
•To capture a picture, tap
on the screen.
The screen will show your captured image and provide
two options:
Tap Continue to save the picture to memory, or
Tap Delete to remove it.
When you select Continue, the image will be stored in
the currently chosen memory location, either Phone or
Memory Card.
•Use the accompanying Photo album application to
view your video recording.
Contents
sWaP Rebel user guide
www.s-w-a-p.co.uk
13
Photo album
Video recorder
Allows you to view, organise and do things with
your photos, such as send to friends or use them as
wallpaper on your sWaP Rebel.
1From the clock face, tap Menu.
2Tap
(twice, if necessary).
3Tap Photo Album. Your photos will be shown, either
as a list (showing thumbnail views, filenames, dates
and sizes for each entry) or as a matrix of thumbnail
views.
4To see options for a photo, tap on a photo entry. The
menu shows a number of options:
•View displays the selected photo. You can then tap
the left and right arrows to move through your photos.
•Browse Style allows you to change between the list
and matrix views of your photos.
•Forward allows you to assign the selected photo for
use in your sWaP Rebel (as wallpaper, screensaver or
power on/off image); as the picture for a contact in
your Phonebook; or send the photo to someone either
via MMS message or by Bluetooth link. The latter
option will guide you through the process of searching
for and bonding with a Bluetooth device in your
vicinity.
•Rename allows you to change the standard filename.
•Delete and Delete All Files allow you to clear away
unwanted photos.
•Sort By allows you to list your photos in order by
name, type, time or size.
sWaP Rebel user guide
Uses the integral camera to capture moving images and
sound as video clips (.AVI format) which can be sent to
friends or transferred to a computer.
1From the clock face, tap Menu or press the lower
button.
2Tap
(twice, if necessary).
3Tap Video Recorder. The video viewfinder will be
shown:
Record
/ pause
button
Change
brightness
Change
zoom
Timer
The camera lens is located on the right side of your
sWaP Rebel. Ensure that it has a clear view to your
subject.
To start recording: Tap
The screen will show the video image as it is captured.
To pause recording: Tap
or Stop.
Your captured video is automatically stored in the
currently chosen memory location, either Phone or
Memory Card.
•Use the accompanying Video player application to
view your video recording.
Video recorder options
To change settings, within the video recorder viewfinder
screen, tap Option to view the menu:
•Camcorder Setting allows you to change settings such
as white balance, brightness (EV) and night mode.
•Video Setting allows you to select the video quality:
Low, Normal or High. The latter uses the most memory.
•Effect Setting allows you to apply a special effect to
the captured video, such as greyscale, various sepia
tints or colour inversion.
•Restore Default will return all video recorder settings
back to their defaults. Video player
1From the clock face, tap Menu.
2Tap
(twice, if necessary).
3Tap Video Player. A list of your videos will be shown.
4To see options for a video, tap on an entry. The menu
shows a number of options:
•Play displays the player screen:
Play/pause
Take a snapshot
Speaker volume
Show full screen
Playback speed
Fast forward/fast rewind
•Forward allows you to use the video as a screensaver,
a power on or power off display or send it to someone
via Bluetooth link. The latter option will guide you
through the process of searching for and bonding with
a Bluetooth device in your vicinity.
•Rename allows you to change the standard filename.
•Delete and Delete All Files allow you to clear away
unwanted videos.
•Sort By allows you to determine the order in which
the video clips are listed.
•Bluetooth Settings allows you to choose a Bluetooth
headset and redirect the audio signal to that headset.
Contents
www.s-w-a-p.co.uk
14
Audio player
The audio player allows you to listen to your MP3 music
tracks or podcasts wherever you may be. The audio
player can also play .WAV and .M4A files.
Note: You can connect the wired earphones to hear
your music in stereo.
1From the clock face, tap Menu.
2Tap
(twice, if necessary).
3Tap Audio Player. The playback screen will be
displayed:
Current track timing,
track number and name
View settings
and access the
equalizer
Volume
increase
and decrease
Show
playlist
Playback
controls
Selecting and playing a track
1Tap List and then tap the required track name.
2Tap Play to commence playback.
You can now use the playback controls at the foot of
the screen.
During playback, tap
to gain quick access to the
playback settings menu.
If a call is received (or initiated) while listening to a
track, playback will be automatically stopped. If the
Background Play option is enabled, then playback will
automatically resume after the call is completed.
Plug in the supplied wired earphones to hear playback
in stereo.
Adding or transferring audio files
There are three main ways to add or transfer audio
files:
•Use a USB link with your computer. See the USB link
section later in this guide for details.
•Use Bluetooth to link with another device. See the
Bluetooth section later in this guide for details.
•Using MMS to send/receive audio file attachments. See
the MMS messaging section earlier in this guide for
details.
Audio player options
Within the audio playback screen, tap List and then tap
Option to view the menu:
•Details shows information about the selected track.
•Add to Ringtones copies the track to your ringtones
list. See the Settings section for detail about using it.
•Add allows you to find audio tracks stored on the
memorty card and add them to the playlist.
•Remove and Remove All allow you to clear away
unwanted audio tracks.
•Settings contains the following items:
Refresh List set to On to automatically update the
tracklist when changes occur.
Shuffle when enabled, plays tracks in a random order.
Repeat allows you to play either a single track or your
whole collection continuously.
Background play when enabled, continues playing
tracks even when you leave the audio player. Playback
stops automatically when making or receiving a
call. When this option is enabled, the track will
automatically resume playing.
BT Stereo Output determines whether audio should
be redirected to a Bluetooth stereo headphone device.
This option can be enabled once you have chosen a
suitable device using the option detailed below.
BT Stereo Headset allows you to locate/choose a
suitable Bluetooth stereo headphone device to use with
the audio player.
Contents
sWaP Rebel user guide
www.s-w-a-p.co.uk
15
Sound recorder
Allows you to record face-to-face or telephone
conversations (warn the caller first) or other
soundscapes around you.
1From the clock face, tap Menu.
2Tap
(twice, if necessary).
3Tap Sound Recorder. A list of any existing recordings
will be shown.
To start recording: Tap Option and then tap Record.
To pause or stop recording: Tap either Pause or Stop.
As soon as you choose Stop, the screen will display an
assigned numeric name for the recording in the editor
screen.
Optionally use the editor to alter the assigned name.
Once done, tap Option and then tap Save.
The new file will be added to the list in the sound
recorder main screen.
Sound recorder options
From the list screen, tap Option:
•Record to begin a new recording.
•Play the currently selected entry.
•Append to add further sound to the existing recording.
•Rename to edit the name of the currently selected
entry.
•Delete and Delete all files allow you to keep the list
free of clutter.
•Settings
File Format allows you to choose between AMR, AWB
and WAV formats. AMR is suited to voice recording;
AWB is an updated version of AMR with a wider
frequency band; whereas the WAV format is supported
widely on personal computers and would be the one to
choose if you intend to transfer your recordings.
Audio quality allows you to choose between High
and Low quality, which will affect the memory space
required to store your recordings - high quality uses
more memory.
•Forward allows you to copy the entry for use as an
alert tone, a background sound that you can play
during calls or send it to someone either via MMS
message or by Bluetooth link. The latter option will
guide you through the process of searching for and
bonding with a Bluetooth device in your vicinity.
Contents
sWaP Rebel user guide
www.s-w-a-p.co.uk
16
FM radio
This application allows you to listen to any FM radio
stations available within your vicinity. The stereo
earphones must be used uncoiled as the cable cleverly
forms the radio aerial.
1From the clock face, tap Menu.
2Tap
(twice, if necessary).
3Tap FM Radio. You will be asked to plug in the
earphones. Do so and then tap the screen to continue.
4The FM Radio screen will be displayed:
Current
frequency
setting
Settings
Volume
increase
and decrease
Mute
General settings
Use the + and - buttons to adjust the volume or tap
to mute / unmute.
Tap
to gain quick access to the settings menu.
If the Settings > Background Play option is enabled,
then the radio output will continue while you are
using other applications. Also, output will be muted
during calls and will automatically resume once a call is
completed.
Auto
Search
Change frequency or
station search (when Auto
Search option is selected)
Finding a station
To search manually: Tap
or
to change the
frequency.
To choose a frequency: Tap Option and then Manual
Input. Enter the frequency and tap OK.
To auto search: Tap
and then tap either
or
to
locate the next radio station.
To create/use a channel list entry: Tap Option and then
Channel List. Tap an existing entry to select its frequency
or tap an empty entry to add a new frequency.
Contents
sWaP Rebel user guide
www.s-w-a-p.co.uk
17
WAP
The WAP application brings the power of the world
wide web right to your wrist. Many websites are now
optimised for compact screens and this application
allows you to access and use them.
Note: To use WAP you must have either GSM data and/
or a GPRS connection as part of your service provider
agreement. You must also choose the correct settings
to match your network. Please see WAP connection
configuration at the end of this WAP section.
1From the clock face, tap Menu.
2Tap
(twice, if necessary).
3Tap WAP. The screen will show the main options:
•Homepage takes you to the web location that acts as
your starting point.
•Bookmarks provides a list of regularly used sites.
•Recent Pages gives you quick access to previously
visited locations.
•Offline Pages allows you to view previously viewed
pages that are stored within memory.
•Input Address allows you to enter a new web address.
•Service Inbox is the place where incoming WAP Push
messages are stored.
•Settings contains the following items:
Edit Profile selects the network configuration to use
Browser Options sets the page timeout period and
also whether pictures should be shown.
Service Message Settings decides whether WAP Push
messages should be received.
Clear Cache removes all stored web page data from
memory.
Clear Cookies removes all stored cookies (identification
information deposited by certain websites) from
memory.
Accessing WAP sites
Access the main WAP options list and then use any of
the first four options:
•Homepage - your portal to the web (usually a search
engine such as Yahoo, Google, etc.).
•Bookmarks - websites saved from previous visits.
•Recent Pages - a history of recently accessed websites.
•Enter Address - where you enter a new website
address.
When you have chosen a website, your sWaP Rebel will
attempt to connect using either a GPRS connection or,
failing that, a GSM data connection.
If the former cannot be used, then you will be asked for
permission to use the latter (GSM connection speeds
are lower than GPRS).
If your sWaP Rebel continually fails to use GPRS, then
there may be a configuration problem - see WAP
connection configuration for details.
Once a data connection is made, the website will be
located and displayed.
Note: While it is possible to access normal websites,
some will not display correctly because they are
designed only for large screens. Many organisations
offer WAP alternatives which are optimised for compact
screens.
Within each webpage you will be able to tap on
hyperlinks (usually shown in blue with or without an
underline). You can also tap within text boxes in order
to display the on-screen editor and enter alphanumeric
characters.
While browsing online, there are a couple more options
that appear within the list:
•Refresh reloads the current page.
•Set as Homepage uses the page you are viewing as
your new portal.
•Save Picture allows you to select any displayed picture
and save it to a memory location.
As mentioned above, the easiest way to create a new
homepage is to visit it, then tap Option and then tap
Set as Homepage.
You can also make a change offline from the main WAP
options list by tapping Settings, then Edit Profile, tap
your service provider’s entry, tap Edit Profile and then
edit the Homepage entry.
WAP connection configuration
In order to operate, the WAP browser requires a data
connection with your network. This can be either
using GPRS or a GSM data connection. Your contract
agreement may not include such services - check with
your network provider.
You also need to ensure that the correct network
connection details are selected:
1From the main WAP options list, tap Settings and then
tap Edit Profile.
2Locate your service provider’s name from the list of
operators and tap it.
3Tap Activate Profile and then tap Yes.
If your service provider is not within the list, use a
personal computer to access the sWaP website (http://
www.s-w-a-p.co.uk). Go to the FAQs page. Download
the procedure for adding new networks to your sWaP
Rebel. You will also need the following information
from your service provider:
•GSM data dial-up number
•GSM data username and password
•GSM data DNS IP address
•GPRS Access Point Name (APN)
•GPRS username and password
•Authentication type (i.e. Normal)
Once you have these details, use the downloaded
instructions to enter them into the appropriate
locations within your sWaP Rebel.
Contents
sWaP Rebel user guide
www.s-w-a-p.co.uk
18
Settings
Pen Calibration
To ensure that your sWaP Rebel works the way that
suits you, the main Settings section contains plenty of
options to modify its appearance and operation. The
Settings section also includes more applications for
everyday use.
1From the clock face, tap Menu.
2Tap
(twice, if necessary).
•Pen Calibration allows you to ensure that the touch
screen reacts accurately to stylus taps.
•Organizer contains a number of useful applications for
everyday use.
•User Profiles allow you to change all of the call and
message alert characteristics in one go, to suit your
location.
•Phone Setup is where you apply basic phone settings,
such as time and date, language, display characteristics,
etc.
•Call Setup lets you invoke call diverts, set call time
reminders, etc.
•Network Setup contains numerous network
connection options.
•Security Setup contains options such as SIM lock,
Auto keypad lock, change password, etc.
•Restore Factory Settings allows you to return all
settings back to their default configurations.
From time to time (once a month recommended), or
after a complete restore factory settings operation, you
may need to calibrate the screen to restore its accuracy.
1From the clock face, tap Menu.
2Tap
(twice, if necessary).
3Tap Pen Calibration.
The calibration wizard will be displayed and will take
you through the procedure. Be sure to use the supplied
stylus and view the screen exactly as you would in
normal operation as you confirm the touch points.
TIPS:
•When tapping on the displayed touch points, view the
screen exactly as you would in normal operation.
•For best results, go through the procedure twice.
•Repeat the procedure once a month to keep accuracy
at the opimum level.
Organizer
The organizer contains a number of useful applications
for everyday use.
1From the clock face, tap Menu.
2Tap
(twice, if necessary).
3Tap Organizer. The list of applications will be
displayed:
•Calendar
•To Do List
•Alarm
•World Clock
•Calculator
•Bluetooth
•File Manager
•Stopwatch
Contents
sWaP Rebel user guide
www.s-w-a-p.co.uk
19
Calendar
This application will ensure that you never forget your
important dates again.
•Access the Organizer and then tap Calendar.
When the calendar opens you will see the current
month to view and today’s date will be highlighted.
Use the left and right buttons on the top row to
change the year and month.
To set a calendar reminder
1Double tap on a day.
2Tap Add Task.
3Choose the task type, then use the scroll bar to change
between the various fields:
•Start date and time,
•End date and times,
•Note - add an explanation of the task (tap Option >
Use Templates for some pre-prepared notes),
•Alarm - choose how far in advance of your task that
you’d like the alarm to be given.
•Repeat - determine whether this will be a one off or
a regular reminder. Options include: Once, Everyday,
occur on particular Days, Weekly or Monthly.
The Days option allows you to include/exclude
particular days of the week. When a day is enclosed
within a border, it is included.
•Location - add a note reminding yourself where the
task will take place.
•Priority - determine whether it is a low, medium or high
priority.
4Tap Done and then tap Yes to confirm. The new entry
will be added to the Task List and a red border will be
placed around each date for which the reminder is
valid.
To jump to a specific date
1Double tap on a day.
2Tap Jump to Date and enter the required date.
3Tap OK and the chosen date will be shown highlighted
in a month to view page.
To Do List
•Access the Organizer and then tap To Do List.
When the list opens you will see any existing reminders,
including all programmed reminders from the Calendar
application.
•Tap Add (or Option and then Add, if shown) to create
a new entry, or tap an existing entry to view its details.
Follow the procedure outlined for the Calendar (from
step 3).
•Use Delete Task or Delete All to keep the list free
from clutter.
•Tap Send vCalendar to send the currently selected
entry to someone else or save it as a file. You have the
following choices:
•Send By SMS
•Send By MMS
•Send By Bluetooth
•Save as File
In each case, the relevant application will be invoked.
Contents
sWaP Rebel user guide
www.s-w-a-p.co.uk
20
Alarm
•Access the Organizer and then tap Alarm.
Allows you to quickly set one or more alarms.
To set an alarm
1In the opening page, tap a vacant alarm entry and then
use the scroll bar to change between the various fields:
•On/off - Set to On,
•Time - Enter the alarm time.
•Repeat - determine whether this will be a one off or
a regular reminder. Options include: Once, Everyday,
occur on particular Days, Weekly or Monthly.
The Days option allows you to include/exclude
particular days of the week. When a day is enclosed
within a border, it is included.
•Snooze - Optionally set a Snooze time (after which the
alarm will repeat).
•Alert type - If necessary, change the alert type using the
combinations of ring and vibration alerts.
2Tap Done and then tap Yes to confirm.
Your new alarm will be ticked to show that it’s active.
World clock
•Access the Organizer and then tap World Clock.
The opening page shows a world map with cross hairs
within the timezone that is configured as your location
in the Time and Date settings.
The current time and date for the highlighted location
is shown along with either a moon or sun symbol to
indicate night and day.
•You can either use the left and right buttons to change
to the next city or tap on the map to highlight the
nearest featured city within each timezone.
•Tap Option to choose whether the Daylight Saving
Time should be switched on or off.
Calculator
•Access the Organizer and then tap Calculator.
The calculator keypad and readout will be shown.
•Tap your figures and operand(s) and then either tap the
= key to reveal the answer.
Contents
sWaP Rebel user guide
www.s-w-a-p.co.uk
21
Bluetooth
•Access the Organizer and then tap Bluetooth.
This section contains all tools required to locate, pair
and manage Bluetooth devices for use with your sWaP
Rebel.
The opening page lists the main menu of options:
•Power determines whether the Bluetooth circuitry is
switched on.
•Search Bluetooth Device initiates a search for other
Bluetooth devices in the vicinity.
•My Devices shows details for all paired Bluetooth
devices, plus your sWaP Rebel.
•Active Device lists all paired Bluetooth devices that are
currently active.
•Settings contains various options:
Visibility determines whether your sWaP Rebel can be
seen by other Bluetooth devices that are not yet paired
with it.
Change Device Name allows you to change the
Bluetooth name by which your sWaP Rebel is known.
Authentication when set to On,
allows a Bluetooth device to reconnect to your sWaP
Rebel (once it has been initially authorized) without
confirmation.
Audio Path allows you to transfer all audio through
the microphone and speaker of a suitable Bluetooth
device.
FTP Settings determines where data to send and be
received should be stored in memory. It also allows
you to control whether the other device can write to
memory as well as read.
•About shows details for your sWaP Rebel including
Bluetooth device name, address and supported services.
Pairing with another device
In order to work together, Bluetooth devices must be
paired to produce a trusted bond between them. During
the pairing process, one device must search while the
other is made to be ‘visible’ and wait to be discovered.
To search for and pair with other devices
1From the main Bluetooth menu, tap Search Bluetooth
Device. If the Bluetooth circuitry was previously Off, it
will be switched On and a search for other devices will
be carried out for up to one minute. Ensure that the
other devices have been set to be visible.
Any found Bluetooth devices will be listed in the
Discovered Device page.
2Tap the name of the device to bond with, enter a valid
passcode and then tap OK. For most devices, there is
no fixed passcode number and a common four digit
number must be decided on between the users. Tap
Yes to confirm pairing.
To make your sWaP Rebel discoverable
1From the main Bluetooth menu, tap Settings and
check the current setting for the Visibility option.
2If Visibility is currently Off, tap it to change its state to
On.
3When your sWaP Rebel is discovered, the other device
will initiate pairing and you will be asked to enter a
four digit passcode that matches the one entered into
the other device. Enter the code and confirm pairing.
Your sWaP Rebel and the other device will now share
a common bond and can reconnect and transfer
information at any time.
To break the pairing bond
When you no longer want to use the devices together,
you can break the bond.
1Tap My device and then tap the name of the other
device.
2Tap Delete and then tap Yes to remove the pairing bond.
Contents
sWaP Rebel user guide
www.s-w-a-p.co.uk
22
File manager
Stopwatch
•Access the Organizer and then tap File Manager.
Allows you to organise the memory storage area within
your sWaP Rebel. The screen will show the memory
card locations along with total size and free space
information.
To view folders/files: Tap Option and then tap Open.
If necessary, use the scroll buttons on the right side to
bring a particular folder into view.
Tap on a folder to view its files.
Tap on a file to view a menu of options including: View,
Play, Forward, Detail, Rename, Copy, Move, Delete,
Delete all files and Sort by.
To create a new folder: Tap Option and then tap New
folder. Enter a name for the new folder.
To format the memory card: CAUTION: The Format
option will wipe all files and folders from the storage
area. Tap Option and then tap Format.
•Access the Organizer and then tap Stopwatch.
This application actually provides multiple stopwatches
in one.
The screen will show two options:
Typical Stopwatch and nWay Stopwatch.
The Typical Stopwatch option gives you two
variations:
•Split Timing, where each tap of Split saves the current
elapsed time while the main counter continues. Each
subsequent tap of Split saves another elapsed time
from the very beginning up to the point at which Split
was tapped.
•Lap Timing, where each tap of Lap saves the current
elapsed time since the last moment that Lap was
tapped, i.e. the counter is reset to zero each time.
The nWay Stopwatch provides a main counter and
four sub-counters of time. The main counter runs
continuously but a sub-counter is only incremented
when it is highlighted. When you tap a different subcounter, it begins to increment, while the previous
one is frozen. In this way the four sub-counters can
accumulate separate lots of time.
Note: If a stopwatch is left running while you use other
features, the
icon will be shown on the clock face.
Leaving a stopwatch running for long periods can
shorten battery life.
Contents
sWaP Rebel user guide
www.s-w-a-p.co.uk
23
User Profiles
Phone Setup
These allow you to change the whole nature of your
call-, key-, message- and alarm- alerts in one easy
action.
Note: Flight Mode switches off all communication
aspects of your sWaP Rebel to let you use other
features without infringing ‘no mobile’ rules in certain
areas. You can also choose whether to see a Flight
Mode option whenever you first switch on.
1From the clock face, tap Menu.
2Tap
(twice, if necessary).
3Tap User Profiles.
A list of all profiles will be shown:
General
Headset
Meeting
Bluetooth
Outdoor
Flight Mode
Indoor
To use a profile
•Tap a profile and then tap Activate or OK. Your choice
will be confirmed.
To adjust a profile
1Tap a profile name and then tap Customize. You can
now adjust the following:
•Tone Setup for all instances:
Incoming calls, alarms, power on and off, incoming
messages and keypad tones.
•Ringtone to adjust the volume for ring tones.
•Key Tone to adjust the volume for key tones.
•Alert Type to choose ring, vibrate or a mixture of the
two to announce incoming calls.
•Voice Recognize to switch the voice recognition
fetaure on and off.
•Ring type to choose single, repeat or ascending alerts.
•Extra Tone to allow extra tones for warnings, errors, etc.
•Answer Mode allows you to enable or disable anykey answering of incoming calls.
Contains many configuration options to customise the
operation of your sWaP Rebel.
1From the clock face, tap Menu.
2Tap
(twice, if necessary).
3Tap Phone Setup.
The menu options will be shown:
•Swipe Function allows you to link any of six sWaP
Rebel functions to a handwriting gesture on the clock
face. Thus, you could make an upward stroke of the
stylus on the clock face to immediately cause your
Phonebook to be shown. There are four swipe gestures
that can be defined.
•Time and Date allows you to set the current time
and date. You can also determine the time and date
formats and define your nearest major city within your
timezone.
•Schedule Power On/Off allows you to maximise your
power efficiency while you’re asleep by choosing times
to automatically switch your sWaP Rebel off and on.
•Language lets you choose the appropriate language
for all menus and messages within your sWaP Rebel.
•Preferred Input Method determines which on screen
keypad is displayed first when you need to enter
details.
•Display Characteristics contains numerous settings
related to the visual aspects of operation:
Wallpaper allows you to choose the image that is
displayed behind all menus. You can choose a standard
image from the System option or choose one of your
own that is stored within memory using the User
defined option.
Screen Saver allows you to choose an image that
will be displayed during periods of inactivity. You can
choose a standard image from the System option or
choose one of your own that is stored within memory
using the User defined option. You can also disable
the screen saver mode.
Power On Display and Power Off Display allow
you to choose a picture or animation to be shown
when your sWaP Rebel is powered on and off. You can
choose a standard image from the System option or
choose one of your own that is stored within memory
using the User defined option.
Show Date and Time determines whether the current
data and time are shown on the clock face page.
Show Operator Name determines whether the name
of the current network provider is displayed on the
clock face page.
Clock type allows you to choose the clock face design
for the standby screen.
•Speed Dial allows you to define up to eight of your
most regularly used phone numbers and associate them
with dial numbers 1 to 8. Once enabled, when you are
viewing the clock face, tap and hold as you normally
would to enter the dial page, but then tap and hold a
number between 1 and 8 to call the associated phone
number.
•Dialing Vibrator determines whether your sWaP Rebel
should provide vibration feedback each time you dial a
digit.
•Disable Sleep Mode determines whether or not your
sWaP Rebel should enter sleep mode when idle. Setting
this option to On will affect the standby battery timing.
•Auto Update of Date and Time determines whether
the network date and time signal should be used to
update your sWaP Rebel settings.
•Handwriting Setting allows you to choose a Pen
Speed and Pen Color for use in handwriting recognition
applications.
•LCD Backlight allows you to adjust the brightness of
the touch screen backlight.
Contents
sWaP Rebel user guide
www.s-w-a-p.co.uk
24
Call Setup
Network Setup
Contains configuration options related to call handling
by your network and by your sWaP Rebel.
1From the clock face, tap Menu.
2Tap
(twice, if necessary).
3Tap Call Setup.
The menu options will be shown:
•Caller ID determines whether your phone number will
be declared to people that you call. You can choose to
Hide ID, Send ID or leave the decision to be Set By
Network
•Call Waiting allows you to control whether you should
receive an earpiece alert when a new incoming call is
waiting during an existing call.*
You can Activate, Deactivate or Query Status to
discover the current setting.
•Call Divert determines whether incoming calls should
be diverted* to another number, often to a voicemail
box. You can set call divert actions for any or all of the
following scenarios:
Divert All Voice Calls
Divert If Unreachable
Divert If No Answer
Divert If Busy
Divert All Data Calls
Cancel All Divert
In each case, apart from the last, you can Activate,
Deactivate or Query Status to discover the current
setting. When setting a divert, you will be asked to
enter the number to which calls should be diverted.
This can be a voicemail box or another phone.
•Call Barring allows you to prevent calls being made or
received, depending on a range of circumstances*.
Outgoing Calls: All Calls; International Calls or
International Calls Except to Home Country.
Incoming Calls: All Calls or When Roaming (on a
network other than your own).
Cancel All
Change Barring PW (password).
In each case, apart from the last two, you can
Activate, Deactivate or Query Status to discover the
current setting.
•Restrictive Call allows you to prevent your sWaP Rebel
from making any outgoing calls.
Within this option, you can choose Call / Receive
(for normal operation) or Receive Only (to restrict
operation to receiving incoming calls only).
•Call Time Reminder allows you to invoke an earpiece
reminder beep during outgoing calls in order to remind
yourself about the length of the call. You can choose
a Single beep once a particular call time period has
elapsed or a Periodic beep which repeats each time
an allotted time period elapses. In both cases, after
choosing the reminder type you will be asked to enter
the time period.
•Call Time Display when enabled, will show the length
of the current call on the display.
•Auto Redial when enabled, will automatically try to
redial a called number if connection is lost during the
call.
Contains configuration options related to network
selection and operation.
1From the clock face, tap Menu.
2Tap
(twice, if necessary).
3Tap Network Setup.
The menu options will be shown:
•Network Selection gives you tools to find and choose
networks (subject to roaming agreements with your
home network). You can initiate a New Search for
networks, choose the Selection Mode as Automatic
or Manual and, if set to Manual, Select Network to
use.
•Preferred Networks allows you to maintain a list
of networks that you prefer to use and assign each a
weighting, so that your sWaP Rebel can make decisions
on your behalf to match network availability at any
time.
•GPRS Connection determines how data calls should
be routed using GPRS. You can choose to Always use
GPRS or use it only When Needed.
* These are network features and are subject to support
from your service provider.
Contents
sWaP Rebel user guide
www.s-w-a-p.co.uk
25
Security Setup
Restore Factory Settings
Contains options related to the secure use of your
sWaP Rebel.
1From the clock face, tap Menu.
2Tap
(twice, if necessary).
3Tap Security Setup.
The menu options will be shown:
•SIM Lock when enabled, causes your SIM card to
request a valid PIN code whenever your sWaP Rebel, or
any other phone in which it is installed, is switched on.
You are given only three attempts to unlock the SIM
card and then it permanently locks itself until a PUK
code is entered (available on request from your network
provider).
•Phone Lock when enabled, locks your sWaP Rebel
and requests its own PIN code (different to the SIM PIN
code - 1122 as standard) before use. Use the Change
Password option to alter the phone PIN code.
•Auto Keypad Lock allows you to choose a period of
inactivity, after which your sWaP Rebel screen will lock.
You can choose from 5 secs,
30 secs, 1 min or 5 mins of inactivity.
Once locked, you need to press the
button and
then tap your stylus on a displayed target to unlock
your sWaP Rebel.
•Fixed Dial allows you to define one or more phone
numbers which may be dialled from your sWaP Rebel.
When the Fixed Dial Mode is then enabled, only those
numbers can be dialled. This feature is subject to
support from your service provider.
•Barred Dial allows you to define one or more phone
numbers which you wish to prevent being dialled from
your sWaP Rebel. When the Barred Dial Mode is then
enabled, those numbers are barred from being dialled.
This feature is subject to support from your SIM and
service provider.
•Change Password allows you to change three types of
PIN code or password: Your SIM’s main PIN code, your
SIM’s secondary PIN2 code or your sWaP Rebel’s own
password code (1122 as standard).
Choose the code that you wish to change, enter
the old code and then enter the new code twice, as
confirmation.
Allows you to return all options to their factory
conditions and reboot your sWaP Rebel.
1From the clock face, tap Menu.
2Tap
(twice, if necessary).
3Tap Restore Factory Settings.
4Enter the sWaP Rebel password (1122 as standard) and
tap OK.
5Tap Yes to confirm.
Contents
sWaP Rebel user guide
www.s-w-a-p.co.uk
26
USB link to your computer
Your sWaP Rebel uses an industry- standard USB
connection to allow it to be linked to any similarly
equipped personal computer. Using the USB link, you
can do three main things:
•Transfer files of all types: Photos, video clips, sound
recordings, music tracks, etc. between the two devices.
•Use your sWaP Rebel camera as a webcam and view it
live on your computer.
•Charge your sWaP Rebel battery at the same time.
Note: Your sWaP Rebel can be switched on or off when
linking or unlinking with the computer.
To link your sWaP Rebel and computer
1Carefully insert the USB connection on the strap into a
vacant socket on your computer.
PC
2Your computer should respond to the new link and,
once it has configured its drivers will respond in the
same way as if any other USB storage device had been
attached.
If your sWaP Rebel is switched off when connected
then it will appear to the computer as a simple storage
device.
3Use your computer’s file manager application to access
the folders within your sWaP Rebel and transfer files
across.
If your sWaP Rebel is switched on, you should see a
menu on its screen offering the following choices:
•Mass Storage - Choose this option to allow the
computer access to the storage devices contained
within your sWaP Rebel.
•Webcam - Choose this option to turn your sWaP Rebel
into a webcam.
On the computer, access the option that allows you
to view the contents of external storage devices (USB
sticks, etc.). When the window opens, it should show
the live image from your sWaP Rebel camera.
At any time you can press the upper button to return
to normal sWaP Rebel operation.
Contents
sWaP Rebel user guide
www.s-w-a-p.co.uk
27
Important safety information
Medical devices
Exposure to radio frequency (RF) signals
Your sWaP Rebel contains a radio transceiver. When it
is on, it sends and receives radio frequency (RF) signals.
When you communicate using your sWaP Rebel, the
system handling your call controls the power level at
which it transmits.
Your sWaP Rebel is designed to comply with local
regulatory requirements in your country concerning
exposure of human beings to RF energy.
Operational precautions
To ensure that your sWaP Rebel continues to serve you
reliably, look after it as you would any other valuable
item and also follow these guidelines:
Apart from the battery cover, do not open your sWaP
Rebel or tamper with the internal circuitry as this could
cause damage and will void your warranty.
Your sWaP Rebel is NOT waterproof. Avoid contact with
water. If your sWaP Rebel becomes wet, switch it off
and remove the battery. Carefully and completely dry
out your sWaP Rebel and the battery before attempting
to switch it back on.
Do not press hard on your sWaP Rebel as this may
cause damage to the touch screen.
Do not expose your sWaP Rebel to direct sunlight,
extremely high or low temperature, dusty/sandy
conditions or very humid environments for extended
periods of time as this may cause damage to the screen
and/or internal circuitry.
Do not throw, beat or vibrate your sWaP Rebel in a
manner that might damage the external casing, the
sensitive touch screen or internal circuitry.
Do not use any corrosive chemical products or scouring
pads to clean your sWaP Rebel. Use only soft wipe to
clean it.
If your sWaP Rebel is lost or stolen, notify your network
provider to initiate the cancellation of the SIM Card.
You may be asked for the IMEI number which is printed
inside the battery compartment and also on your sWaP
presentation box. Write this number down in advance
and store it in a safe place.
RF energy interference/compatibilities
Note: Nearly every electronic device is susceptible
to RF energy interference from external sources
if inadequately shielded, designed, or otherwise
configured for RF energy compatibility. In some
circumstances your sWaP Rebel may cause interference.
Facilities and hazardous areas
Turn off your sWaP Rebel in any facility where posted
notices instruct you to do so. In certain cases it may be
sufficient to place your sWaP Rebel into Flight Mode
to disable the radio transceiver circuitry. However, in
certain instances, switching off power altogether may
be the only solution.
Hospitals and aircraft
Hospitals, health care facilities and aircraft regularly
use equipment that is sensitive to external RF energy.
Switch off your sWaP Rebel when instructed to do so or
place it into Flight Mode.
Pacemakers
Pacemaker manufacturers recommend that a minimum
separation of 6 inches (15 centimetres) be maintained
between any mobile phone and a pacemaker.
People with pacemakers should:
•When it is switched on, always keep your sWaP
Rebel more than 6 inches (15 centimetres) from the
pacemaker.
•Never carry your sWaP Rebel in a breast pocket.
•Use the ear opposite the pacemaker to minimise the
potential for interference.
•Stop using and turn off your sWaP Rebel immediately if
there is any reason to suspect that interference is taking
place.
Hearing Aids
Some digital wireless phones may interfere with some
hearing aids. In the event of such interference, you
may want to consult your hearing aid manufacturer to
discuss alternatives.
Other Medical Devices
If you use any other personal medical device, consult
the manufacturer of your device to determine if it is
adequately shielded from RF energy. Your physician
may be able to assist you in obtaining this information.
Flammable liquids
Adhere to all warning signs in areas where flammable
liquids are present, such as petrol/gas filling stations.
Switch off your sWaP Rebel before entering such an
area.
Contents
sWaP Rebel user guide
www.s-w-a-p.co.uk
28
Important safety information (continued)
Batteries
Specific Absorption Rate (SAR)
To ensure optimal battery performance, charge your
sWaP Rebel fully before using it.
When you charge the battery it will feel warm. This is
usual and the battery contains temperature protection
circuitry. However, we still strongly recommend that
you do not wear your sWaP Rebel when charging the
battery.
Never dispose of your sWaP Rebel in a fire.
Do not dispose of your sWaP Rebel in the household
waste stream.
Recycle your sWaP Rebel either through a mobile phone
recycling scheme or at a local waste recycling centre.
Contact your local authorities for more information.
Your sWaP Rebel is a radio transceiver and meets R&TTE
requirements for exposure to radio waves. It is designed
and manufactured not to exceed limits for exposure
to radio frequency (RF) energy. These limits are part of
comprehensive guidelines and establish permitted levels
of RF energy for the general population. The guidelines
are based on standards that were developed by
independent scientific organisations through periodic
and thorough evaluation of scientific studies. The
standards include a substantial safety margin designed
to assure the safety of all persons, regardless of age or
health.
The exposure standard for wireless phone devices
employs a unit of measurement known as the Specific
Absorption Rate, or SAR. The SAR limit recommended
by the International Commission on Non-Ionizing
Radiation Protection (ICNIRP), is 2W/kg averaged
over ten (10) grams of tissue. Although the SAR is
determined at the highest certified power level, the
actual SAR level of your sWaP Rebel while operating
can be well below the maximum value. This is because
your sWaP Rebel is designed to operate at multiple
power levels so as to use only the power required to
reach the network. In general, the closer you are to a
network transmitter, the lower the power output.
Before any mobile phone is available for sale to
the public, it is tested to confirm compliance with
the guidelines (e.g., at the ear) that conform to a
uniform testing methodology determined by an expert
standards body.
Vehicles
Do not use your sWaP Rebel when you are driving. It is
illegal in many countries to make or receive calls while
driving.
RF signals may affect improperly or inadequately
shielded electronic systems in motor vehicles. Check
with the manufacturer or its representative regarding
your vehicle. You should also consult the manufacturer
of any equipment that has been added to your vehicle.
The maximum results for your sWaP Rebel when tested
using the EGSM 900 and EGSM 1800 frequencies were
as follows (all values are stated as Watts per Kg of head
or body tissue averaged over 10 grams of tissue):
SAR values
•Please visit the sWaP website at:
www.s-w-a-p.co.uk for accurate, up to date SAR values
for your sWaP Rebel.
While there may be differences between the SAR levels
of various phones and at various positions, they all met
the R&TTE requirements for safe exposure. Please note
that improvements to your sWaP Rebel model could
cause differences in the SAR value for later products;
in all cases, products are designed to be within the
guidelines.
Contents
sWaP Rebel user guide
www.s-w-a-p.co.uk
29
EU directive 2002/95/EC on the Restriction of the
use of certain hazardous substances in electrical
and electronic equipment (RoHS).
All sWaP products put on the market into the EU and
EFTA Member States are in compliance with the EU
RoHS requirements. The European Union’s Restriction
of Hazardous Substances (RoHS) Directive (2002/95/
EC) restricts the use of lead (Pb), mercury, cadmium,
hexavalent chromium and two bromine-containing
flame retardants: PBB (polybrominated biphenyls) and
PBDE (polybrominated diphenyl ethers) in electrical and
electronic products.
EU directive 2002/96/EC on Waste Electrical and
Electronic Equipment (WEEE)
It is your responsibility to dispose of your waste
equipment by handing it over to a designated collection
point for the recycling of waste electrical and electronic
equipment. The separate collection and recycling of
your waste equipment at the time of disposal will
help to conserve natural resources and ensure that it
is recycled in a manner that protects human health
and the environment. For more information about
where you can drop off your waste equipment for
recycling, please contact your local city office, your
household waste disposal service or the shop where
you purchased the product.
FCC warning
Any Changes or modifications not expressly approved
by the party responsible for compliance could void the
user’s authority to operate the equipment.
This device complies with part 15 of the FCC Rules.
Operation is subject to the following two conditions:
(1) This device may not cause harmful interference, and
(2) this device must accept any interference received,
including interference that may cause undesired
operation.
Note: This equipment has been tested and found to
comply with the limits for a Class B digital device,
pursuant to part 15 of the FCC Rules. These limits are
designed to provide reasonable protection against
harmful interference in a residential installation. This
equipment generates uses and can radiate radio
frequency energy and, if not installed and used in
accordance with the instructions, may cause harmful
interference to radio communications. However, there
is no guarantee that interference will not occur in a
particular installation. If this equipment does cause
harmful interference to radio or television reception,
which can be determined by turning the equipment
off and on, the user is encouraged to try to correct the
interference by one or more of the following measures:
•Reorient or relocate the receiving antenna. •Increase the separation between the equipment and
receiver.
•Connect the equipment into an outlet on a circuit
different from that to which the receiver is connected.
•Consult the dealer or an experienced radio/TV
technician for help.
Specific Absorption Rate (SAR) information
This wireless phone meets the government’s
requirements for exposure to radio waves.
The guidelines are based on standards that were
developed by independent scientific organizations
through periodic and thorough evaluation of scientific
studies. The standards include a substantial safety
margin designed to assure the safety of all persons
regardless of age or health.
The exposure standard for wireless mobile phones
employs a unit of measurement known as the Specific
Absorption Rate, or SAR, The SAR limit set by the FCC
is 1.6 W/Kg.
Data Transmission Cable
Position: The data transmission cable is wrapped inside
the longer watch strap.
Length: 12.7cm
Function: Data transmission, charging and connecting
to the headphone connector.
Documentation by Corporate Text & Design (www.ctxd.com)
sWaP Rebel user guide
Release 1.1c
Contents
www.s-w-a-p.co.uk
30